AUDI S4 1995 B5 / 1.G 01E Transmission Clutch Mechanism Service User Guide
Manufacturer: AUDI, Model Year: 1995,
Model line: S4,
Model: AUDI S4 1995 B5 / 1.G
Pages: 27, PDF Size: 0.6 MB
AUDI S4 1995 B5 / 1.G 01E Transmission Clutch Mechanism Service User Guide
S4 1995 B5 / 1.G
AUDI
AUDI
https://www.carmanualsonline.info/img/6/1287/w960_1287-0.png
AUDI S4 1995 B5 / 1.G 01E Transmission Clutch Mechanism Service User Guide
Trending: battery, wiring, manual transmission, steering, light, tow, air bleeding
Page 11 of 27
30-11
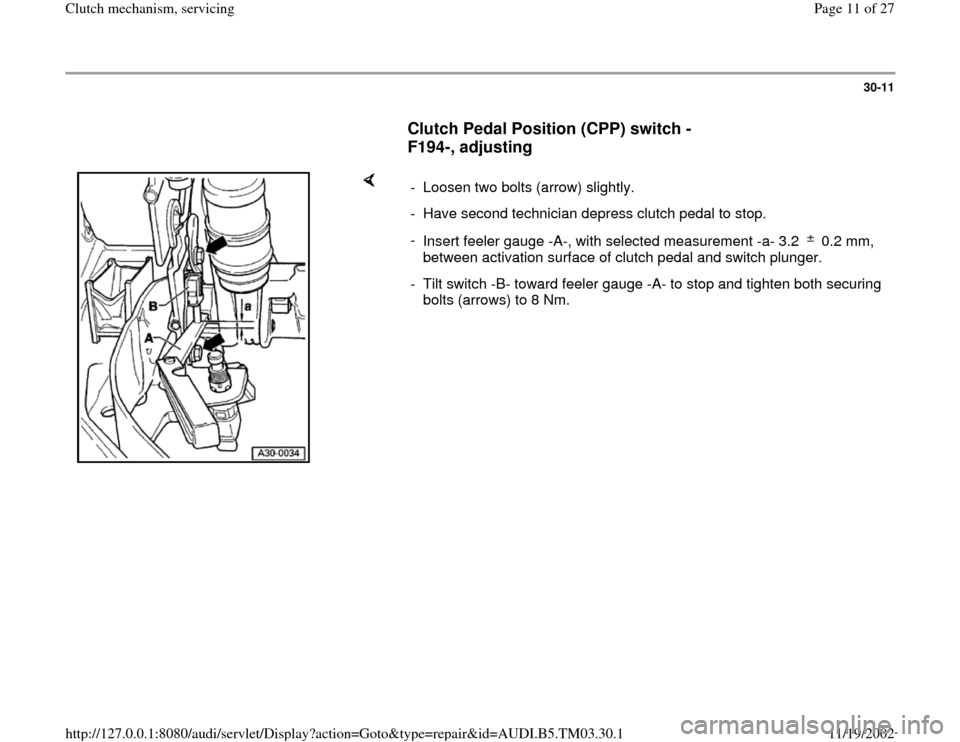
Clutch Pedal Position (CPP) switch -
F194-, adjusting
- Loosen two bolts (arrow) slightly.
- Have second technician depress clutch pedal to stop.
-
Insert feeler gauge -A-, with selected measurement -a- 3.2 0.2 mm,
between activation surface of clutch pedal and switch plunger. - Tilt switch -B- toward feeler gauge -A- to stop and tighten both securing
bolts (arrows) to 8 Nm.
Pa
ge 11 of 27 Clutch mechanism, servicin
g
11/19/2002 htt
p://127.0.0.1:8080/audi/servlet/Dis
play?action=Goto&t
yp
e=re
pair&id=AUDI.B5.TM03.30.1
Page 12 of 27
30-12
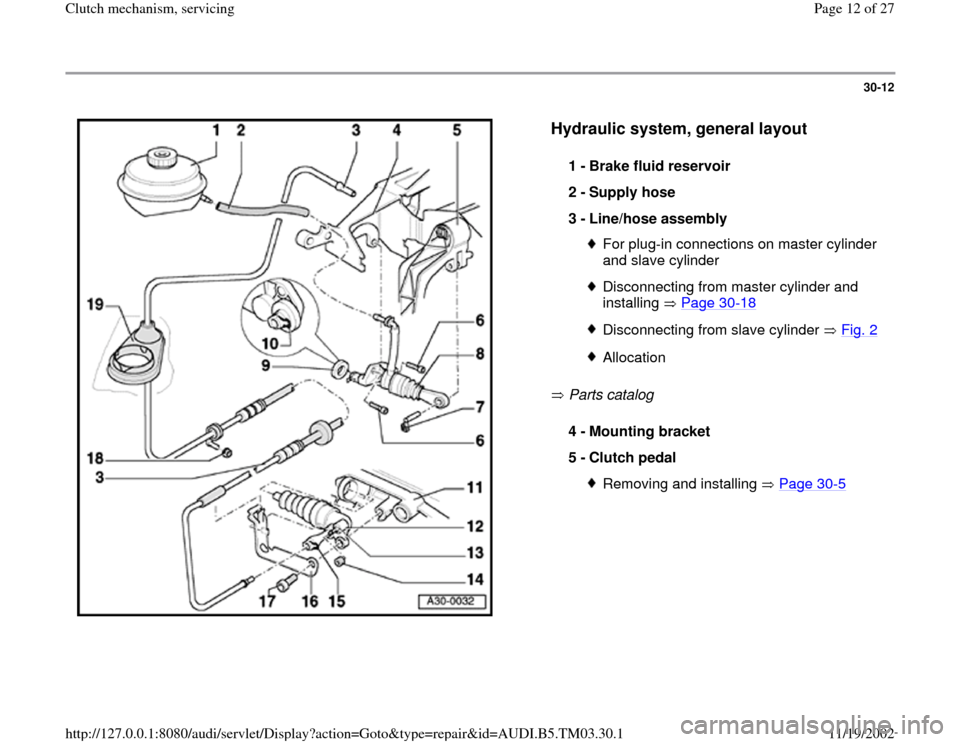
Hydraulic system, general layout
Parts catalog 1 -
Brake fluid reservoir
2 -
Supply hose
3 -
Line/hose assembly
For plug-in connections on master cylinder
and slave cylinder Disconnecting from master cylinder and
installing Page 30
-18
Disconnecting from slave cylinder Fig. 2Allocation
4 -
Mounting bracket
5 -
Clutch pedal
Removing and installing Page 30
-5
Pa
ge 12 of 27 Clutch mechanism, servicin
g
11/19/2002 htt
p://127.0.0.1:8080/audi/servlet/Dis
play?action=Goto&t
yp
e=re
pair&id=AUDI.B5.TM03.30.1
Page 13 of 27
30-13
6 -
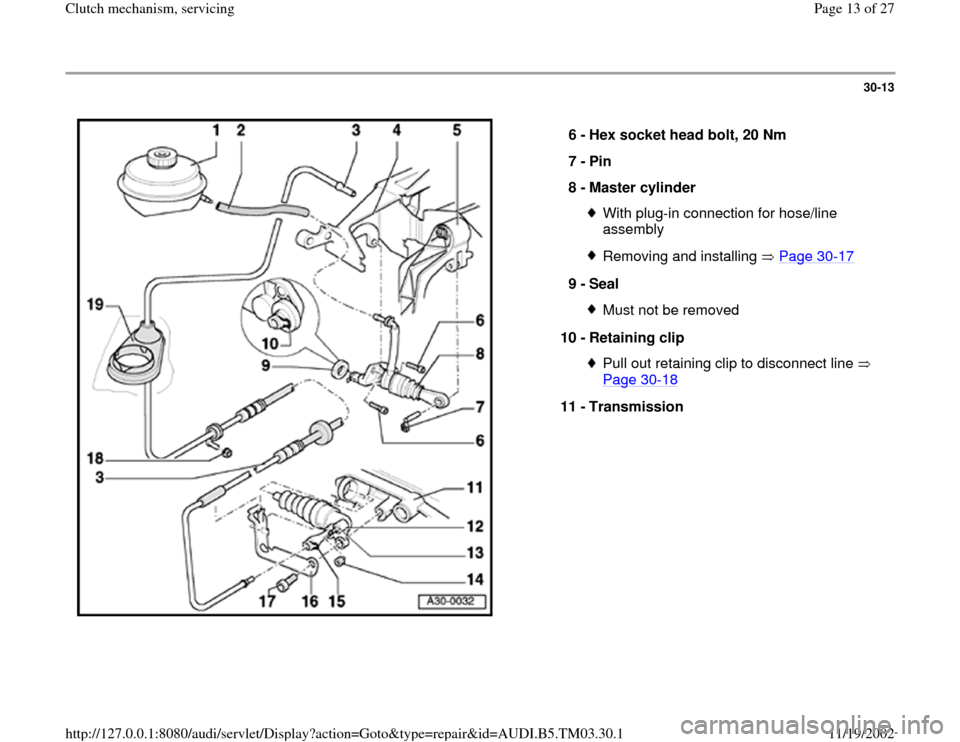
Hex socket head bolt, 20 Nm
7 -
Pin
8 -
Master cylinder
With plug-in connection for hose/line
assembly Removing and installing Page 30
-17
9 -
Seal
Must not be removed
10 -
Retaining clip Pull out retaining clip to disconnect line
Page 30
-18
11 -
Transmission
Pa
ge 13 of 27 Clutch mechanism, servicin
g
11/19/2002 htt
p://127.0.0.1:8080/audi/servlet/Dis
play?action=Goto&t
yp
e=re
pair&id=AUDI.B5.TM03.30.1
Page 14 of 27
30-14
12 -
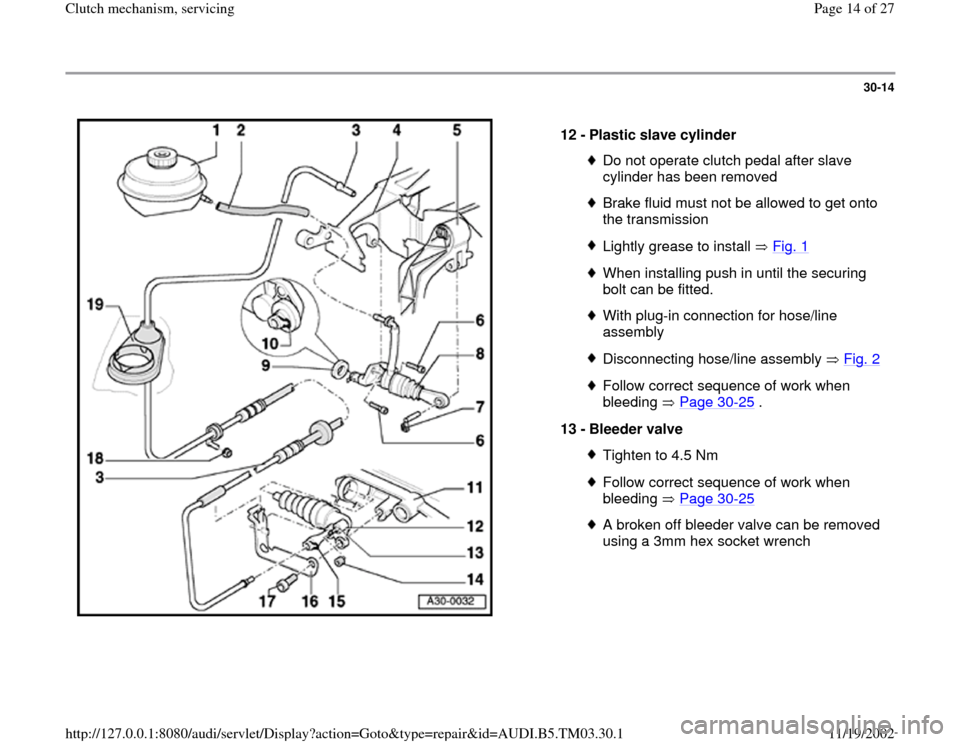
Plastic slave cylinder
Do not operate clutch pedal after slave
cylinder has been removed Brake fluid must not be allowed to get onto
the transmission Lightly grease to install Fig. 1When installing push in until the securing
bolt can be fitted. With plug-in connection for hose/line
assembly Disconnecting hose/line assembly Fig. 2Follow correct sequence of work when
bleeding Page 30
-25
.
13 -
Bleeder valve
Tighten to 4.5 NmFollow correct sequence of work when
bleeding Page 30
-25
A broken off bleeder valve can be removed
using a 3mm hex socket wrench
Pa
ge 14 of 27 Clutch mechanism, servicin
g
11/19/2002 htt
p://127.0.0.1:8080/audi/servlet/Dis
play?action=Goto&t
yp
e=re
pair&id=AUDI.B5.TM03.30.1
Page 15 of 27
30-15
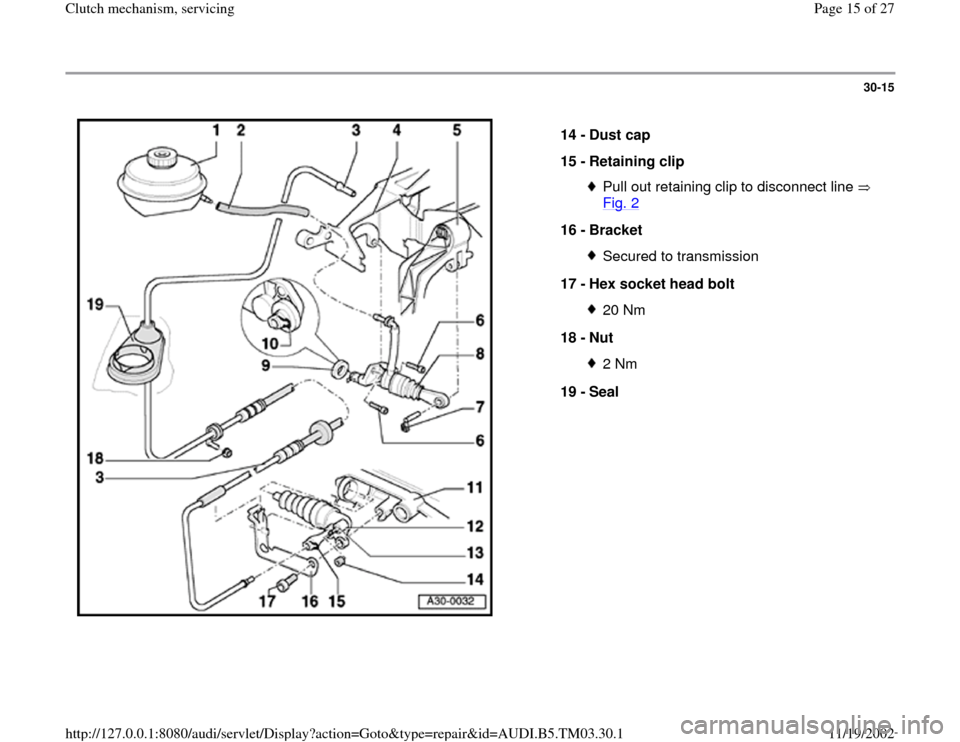
14 -
Dust cap
15 -
Retaining clip
Pull out retaining clip to disconnect line
Fig. 2
16 -
Bracket
Secured to transmission
17 -
Hex socket head bolt 20 Nm
18 -
Nut 2 Nm
19 -
Seal
Pa
ge 15 of 27 Clutch mechanism, servicin
g
11/19/2002 htt
p://127.0.0.1:8080/audi/servlet/Dis
play?action=Goto&t
yp
e=re
pair&id=AUDI.B5.TM03.30.1
Page 16 of 27
30-16
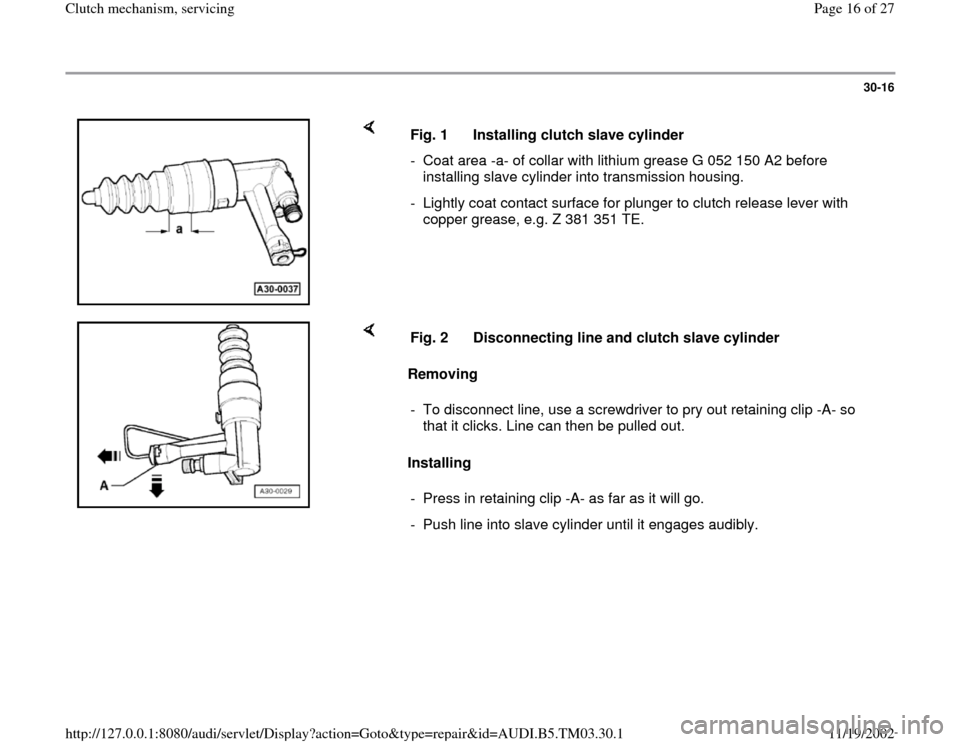
Fig. 1 Installing clutch slave cylinder
- Coat area -a- of collar with lithium grease G 052 150 A2 before
installing slave cylinder into transmission housing.
- Lightly coat contact surface for plunger to clutch release lever with
copper grease, e.g. Z 381 351 TE.
Removing
Installing Fig. 2 Disconnecting line and clutch slave cylinder
- To disconnect line, use a screwdriver to pry out retaining clip -A- so
that it clicks. Line can then be pulled out.
- Press in retaining clip -A- as far as it will go.
- Push line into slave cylinder until it engages audibly.
Pa
ge 16 of 27 Clutch mechanism, servicin
g
11/19/2002 htt
p://127.0.0.1:8080/audi/servlet/Dis
play?action=Goto&t
yp
e=re
pair&id=AUDI.B5.TM03.30.1
Page 17 of 27
30-17
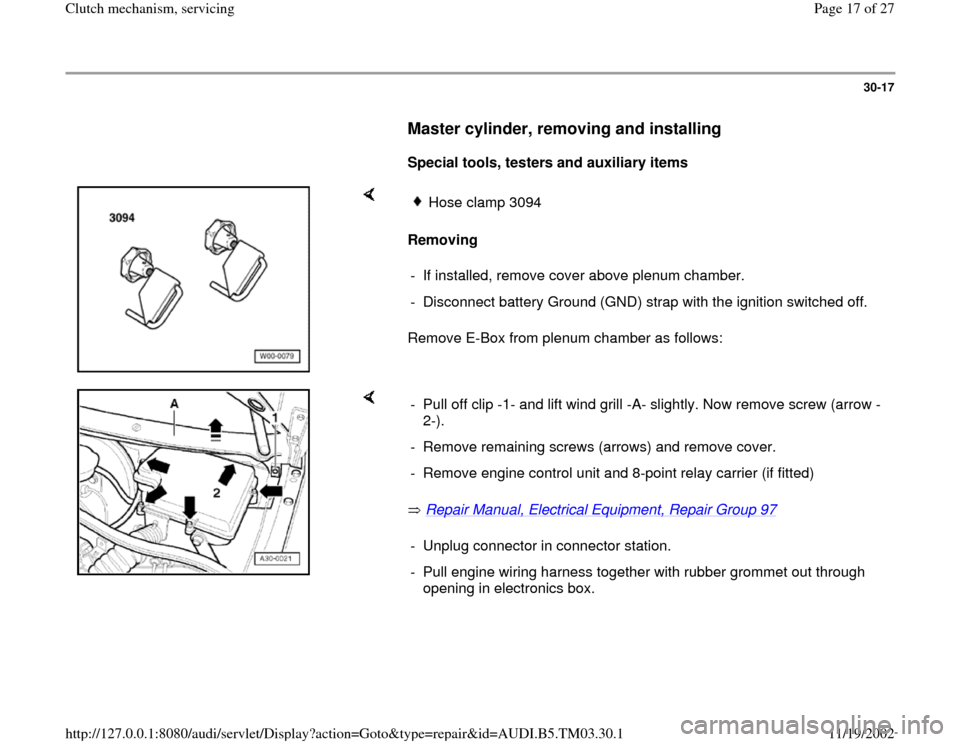
Master cylinder, removing and installing
Special tools, testers and auxiliary items
Removing
Remove E-Box from plenum chamber as follows:
Hose clamp 3094
- If installed, remove cover above plenum chamber.
- Disconnect battery Ground (GND) strap with the ignition switched off.
Repair Manual, Electrical Equipment, Repair Group 97
- Pull off clip -1- and lift wind grill -A- slightly. Now remove screw (arrow -
2-).
- Remove remaining screws (arrows) and remove cover.
- Remove engine control unit and 8-point relay carrier (if fitted)
- Unplug connector in connector station.
- Pull engine wiring harness together with rubber grommet out through
opening in electronics box.
Pa
ge 17 of 27 Clutch mechanism, servicin
g
11/19/2002 htt
p://127.0.0.1:8080/audi/servlet/Dis
play?action=Goto&t
yp
e=re
pair&id=AUDI.B5.TM03.30.1
Page 18 of 27
30-18
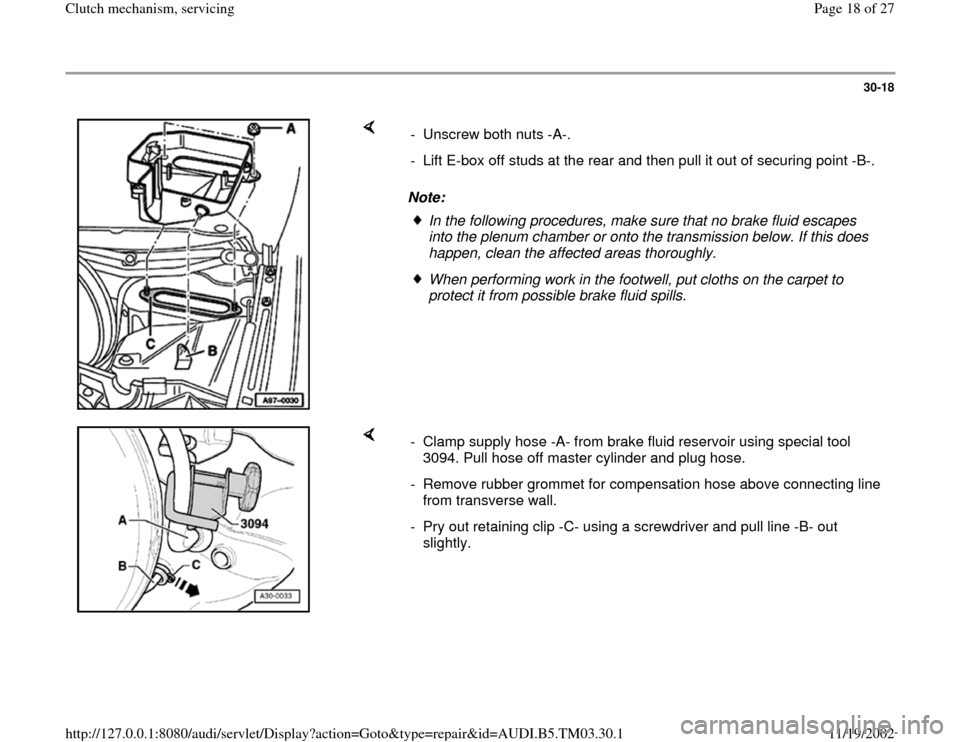
Note: - Unscrew both nuts -A-.
- Lift E-box off studs at the rear and then pull it out of securing point -B-.
In the following procedures, make sure that no brake fluid escapes
into the plenum chamber or onto the transmission below. If this does
happen, clean the affected areas thoroughly. When performing work in the footwell, put cloths on the carpet to
protect it from possible brake fluid spills.
- Clamp supply hose -A- from brake fluid reservoir using special tool
3094. Pull hose off master cylinder and plug hose.
- Remove rubber grommet for compensation hose above connecting line
from transverse wall.
- Pry out retaining clip -C- using a screwdriver and pull line -B- out
slightly.
Pa
ge 18 of 27 Clutch mechanism, servicin
g
11/19/2002 htt
p://127.0.0.1:8080/audi/servlet/Dis
play?action=Goto&t
yp
e=re
pair&id=AUDI.B5.TM03.30.1
Page 19 of 27
30-19
Repair Manual, Body Interior, Repair Group 68
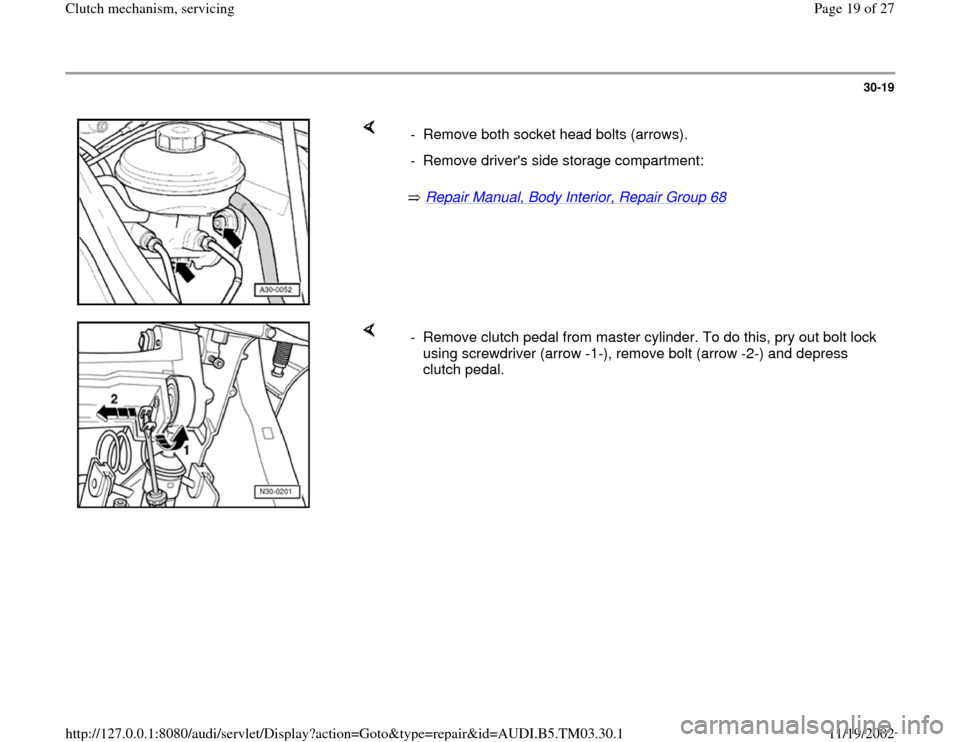
- Remove both socket head bolts (arrows).
- Remove driver's side storage compartment:
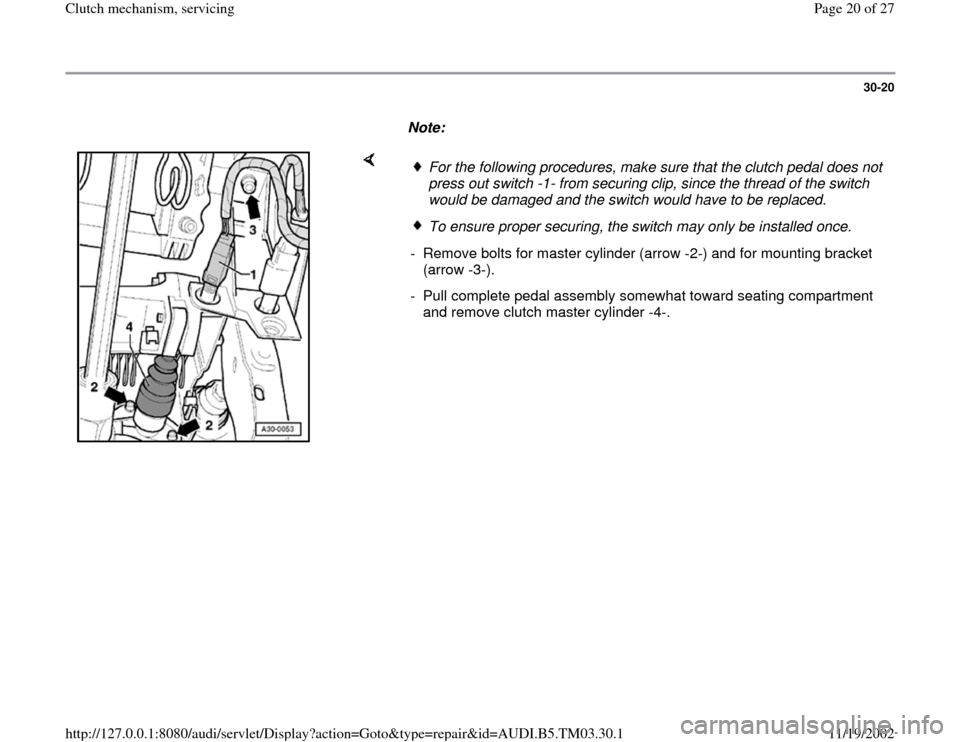
- Remove clutch pedal from master cylinder. To do this, pry out bolt lock
using screwdriver (arrow -1-), remove bolt (arrow -2-) and depress
clutch pedal.
Pa
ge 19 of 27 Clutch mechanism, servicin
g
11/19/2002 htt
p://127.0.0.1:8080/audi/servlet/Dis
play?action=Goto&t
yp
e=re
pair&id=AUDI.B5.TM03.30.1
Page 20 of 27
30-20
Note:
For the following procedures, make sure that the clutch pedal does not
press out switch -1- from securing clip, since the thread of the switch
would be damaged and the switch would have to be replaced. To ensure proper securing, the switch may only be installed once.
- Remove bolts for master cylinder (arrow -2-) and for mounting bracket
(arrow -3-).
- Pull complete pedal assembly somewhat toward seating compartment
and remove clutch master cylinder -4-.
Pa
ge 20 of 27 Clutch mechanism, servicin
g
11/19/2002 htt
p://127.0.0.1:8080/audi/servlet/Dis
play?action=Goto&t
yp
e=re
pair&id=AUDI.B5.TM03.30.1
Trending: manual transmission, radio, light, fuse, lock, auxiliary battery, tow
