ron AUDI S4 2008 Owners Manual
[x] Cancel search | Manufacturer: AUDI, Model Year: 2008, Model line: S4, Model: AUDI S4 2008Pages: 342, PDF Size: 15.01 MB
Page 171 of 342
Parking aid169
Controls
Safety
Driving tips
General maintenance
Self-help
Technical data
Parking aidApplies to vehicles: with Audi parking system/plus/advancedGeneral notesVarious systems are available to help you when parking or manoeu-
vring in tight spaces, depending on the equipment fitted on your
vehicle.
The Audi parking system gives an acoustic warning if there are any
obstacles behind the car ⇒page 169 .
When you are parking, the Audi parking system plus warns you
acoustically and optically about obstacles in front of and behind the
vehicle ⇒page 170 .
In conjunction with a reversing camera, the Audi parking system
advanced shows a picture of the area behind the vehicle. This
picture helps you to manoevre the vehicle backwards and sideways.
In addition, you are assisted by the acoustic signals and graphic
display of the parking aid ⇒page 171 .
Note
To ensure that the acoustic parking aid works properly, the sensors
must be kept clean and free of snow and ice.Audi parking systemApplies to vehicles: with Audi parking systemDescription
The Audi parking system is an acoustic parking aid.Sensors are located in the rear bumper. When the sensors detect an
obstacle, you are alerted by acoust ic signals (beeps). The measuring
range of the sensors starts at about: The acoustic signals sound with increasing frequency as you
approach the obstacle. A warning tone will sound continuously
when the vehicle is less than appr
ox. 0.30 m away from the obstacle.
Stop reversing immediately!
The volume of the warning beeps will be gradually reduced after
about 4 seconds if the vehicle remains at a constant distance from
a detected obstacle (it will not be reduced if the obstacle is closer
than 0.30 m).
The parking aid is switched on automatically when reverse gear is
engaged. You will hear a brief acknowledgement tone.
WARNING
•
The parking aid cannot replace the full concentration of the
driver. The driver is always resp onsible for safety during parking
and other manoeuvres.
•
The sensors have blind spots in which obstacles are not regis-
tered. It is particular ly important to ensure that there are no small
children or animals near the vehicle, as the sensors may not
always be able to detect them.
•
Always keep a close watch on the area around the vehicle and
make full use of the rear-view mirrors.Caution
Please note that low obstacles detected by the system may no
longer be registered by the sensors as the car moves closer, so the
system will not give any further warning. Certain kinds of obstacles
(such as wire fences, chains, thin painted posts or trailer draw bars, Rear
Side
0.60 m
Centre
1.60 m
document_0900452a81b1b9de.book Seite 169 Donnerstag, 26. Juli 2007 9:16 09
--4 -
-T
-+ +-
II]
•
CD
Page 172 of 342
Parking aid
170etc.) may not always be detected by the system, so take care not to
damage the vehicle in such cases.
Note
•
Please refer to the notes on towing ⇒ page 177.
•
You can adjust the volume and pitch of the beeps ⇒page 177 .
Audi parking system plusApplies to vehicles: with Audi parking system plusDescription
The Audi parking system plus is a parking aid with
acoustic signals and graphic display.Sensors are located in the front and rear bumpers. When the
sensors detect an obstacle, you are alerted by acoustic signals
(beeps) and a graphic display. The measuring range of the sensors
starts at about:
The acoustic signals sound with increasing frequency as you
approach the obstacle. A warning tone will sound continuously
when the vehicle is less than appr ox. 0.30 m away from the obstacle.
Stop moving immediately!
The volume of the warning beeps will be gradually reduced after
about 4 seconds if the vehicle remains at a constant distance from
a detected obstacle (it will not be reduced if the obstacle is closer
than 0.30 m).
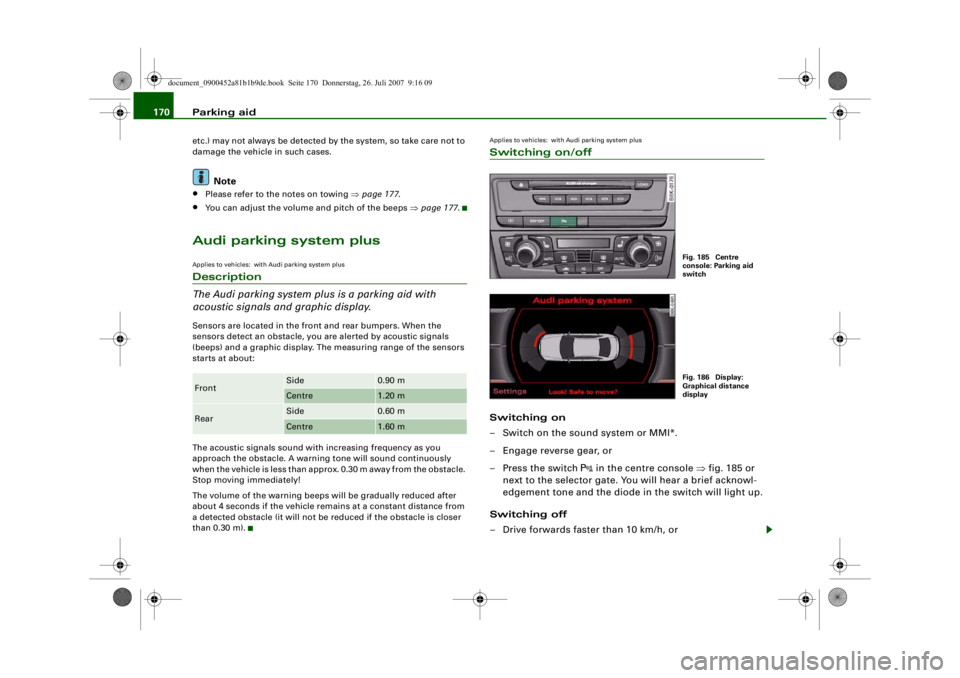
Applies to vehicles: with Audi parking system plusSwitching on/offSwitching on
– Switch on the sound system or MMI*.
– Engage reverse gear, or
– Press the switch
in the centre console ⇒fig. 185 or
next to the selector gate. You will hear a brief acknowl-
edgement tone and the diode in the switch will light up.
Switching off
– Drive forwards faster than 10 km/h, or
Front
Side
0.90 m
Centre
1.20 m
Rear
Side
0.60 m
Centre
1.60 m
Fig. 185 Centre
console: Parking aid
switchFig. 186 Display:
Graphical distance
display
document_0900452a81b1b9de.book Seite 170 Donnerstag, 26. Juli 2007 9:16 09
--4 -
-T
[I)
-+ +-
•
Page 173 of 342
Parking aid171
Controls
Safety
Driving tips
General maintenance
Self-help
Technical data
– Press the switch
, or
– Switch off the ignition.
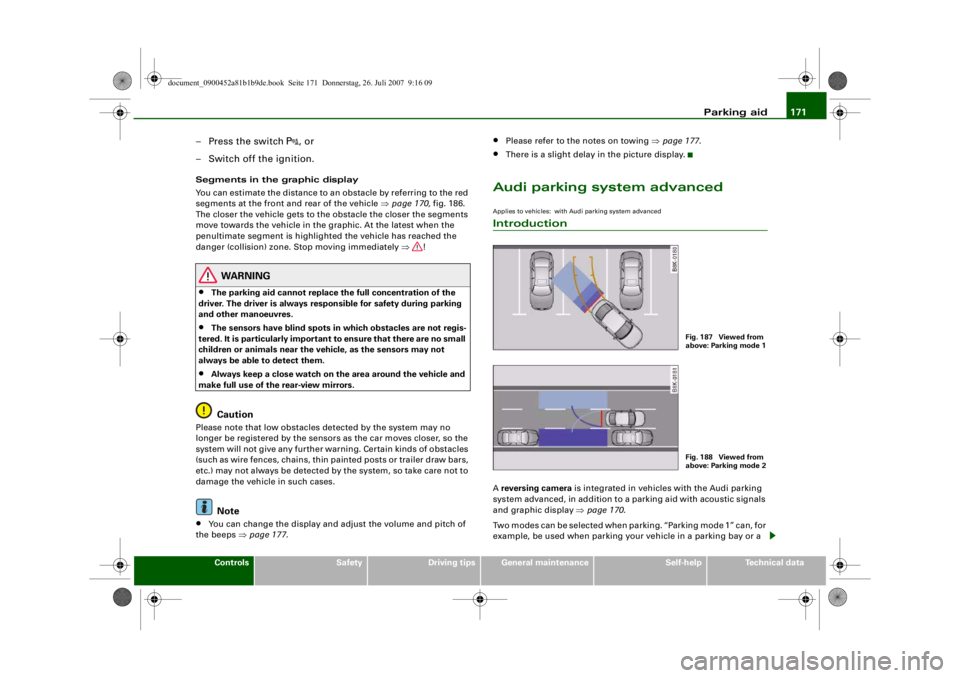
Segments in the graphic display
You can estimate the distance to an obstacle by referring to the red
segments at the front and rear of the vehicle ⇒page 170, fig. 186.
The closer the vehicle gets to the obstacle the closer the segments
move towards the vehicle in the graphic. At the latest when the
penultimate segment is highlighted the vehicle has reached the
danger (collision) zone. Stop moving immediately ⇒!
WARNING
•
The parking aid cannot replace the full concentration of the
driver. The driver is always resp onsible for safety during parking
and other manoeuvres.
•
The sensors have blind spots in which obstacles are not regis-
tered. It is particularly important to ensure that there are no small
children or animals near the vehicle, as the sensors may not
always be able to detect them.
•
Always keep a close wa tch on the area around the vehicle and
make full use of the rear-view mirrors.Caution
Please note that low obstacles detected by the system may no
longer be registered by the sensors as the car moves closer, so the
system will not give any further warning. Certain kinds of obstacles
(such as wire fences, chains, thin painted posts or trailer draw bars,
etc.) may not always be detected by the system, so take care not to
damage the vehicle in such cases.
Note
•
You can change the display and adjust the volume and pitch of
the beeps ⇒page 177 .
•
Please refer to the notes on towing ⇒page 177 .
•
There is a slight delay in the picture display.
Audi parking system advancedApplies to vehicles: with Audi parking system advancedIntroductionA reversing camera is integrated in vehicles with the Audi parking
system advanced, in addition to a parking aid with acoustic signals
and graphic display ⇒page 170 .
Two modes can be selected when parking. “Parking mode 1” can, for
example, be used when parking your vehicle in a parking bay or a
Fig. 187 Viewed from
above: Parking mode 1Fig. 188 Viewed from
above: Parking mode 2
document_0900452a81b1b9de.book Seite 171 Donnerstag, 26. Juli 2007 9:16 09
--4 -
-T
•
-+ +-
CD
Page 177 of 342
Parking aid175
Controls
Safety
Driving tips
General maintenance
Self-help
Technical data
– Reverse into the space and adapt the steering angle to
the parking space, using the orange lines to assist you
⇒ . indicates the rear bumper. You should stop
reversing, at the latest, when the red orientation line
is bordering on an object ⇒!
– Align your vehicle according to the blue area marking ⇒fig. 193. The blue marking is an extension of the
vehicle outline and reaches about five metres to the rear
of the vehicle. The shade of blue changes at a distance of
approx. 1m, 2m and 5m to the vehicle.
WARNING
•
The reversing camera does not show the complete area behind
the vehicle. It is part icularly important to ensure that there are no
small children or animals near the vehicle, as the reversing camera
may not always be able to detect them (accident risk).
•
Please note that objects whi ch are not touching the ground
may appear to be further away th an they actually are (e.g. the
bumper of a parked ve hicle, a towing bracket or the rear end of a
truck). In this case you should not use the orientation lines as a
guide when parking the car - accident risk!Caution
The MMI display shows the path of th e rear end of the vehicle if you
were to reverse using the current steering angle. NB: The front end
of the vehicle swings out further th an the rear. Please make sure you
keep a sufficient distance between the vehicle and any obstacles to
make sure that the exterior mirror or edge of the vehicle do not
collide with the obstacle (accident risk).
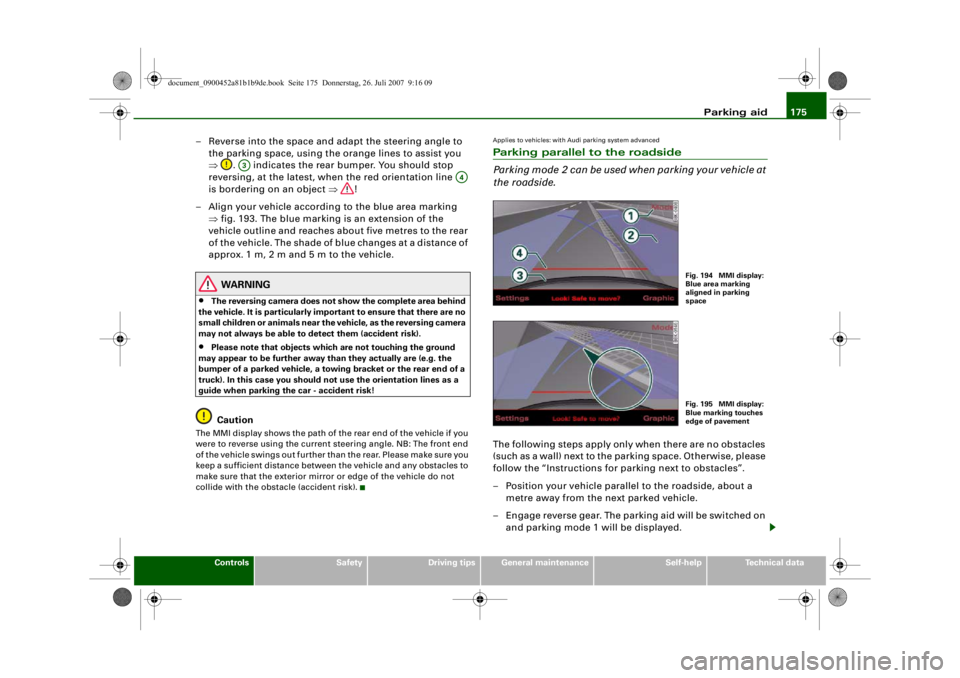
Applies to vehicles: with Audi parking system advancedParking parallel to the roadside
Parking mode 2 can be used when parking your vehicle at
the roadside.The following steps apply only when there are no obstacles
(such as a wall) next to the parking space. Otherwise, please
follow the “Instructions for parking next to obstacles”.
– Position your vehicle parallel to the roadside, about a metre away from the next parked vehicle.
– Engage reverse gear. The parking aid will be switched on and parking mode 1 will be displayed.
A3
A4
Fig. 194 MMI display:
Blue area marking
aligned in parking
spaceFig. 195 MMI display:
Blue marking touches
edge of pavement
document_0900452a81b1b9de.book Seite 175 Donnerstag, 26. Juli 2007 9:16 09
--4 -
-T
CD
-+ +-
0
•
Page 178 of 342
Parking aid
176
– Press the control button for Mode ⇒ fig. 194 on the
MMI control console. Park ing mode 2 is displayed.
– Reverse and align your vehicle in such a way that the blue
area marking borders onto the vehicle behind or onto
the parking space line marking. The blue marking is an
extension of the vehicle outline and reaches about five
metres to the rear of the vehicle. The long side of the blue
marking should border onto the kerb. The complete blue
area marking must fit into the parking space.
– When the vehicle is stationary turn the steering wheel to the left as far as it will go.
– Reverse into the parking space.
– Stop the vehicle as soon as the blue curve touches the kerb ⇒page 175, fig. 195.
– When the vehicle is stationary turn the steering wheel to the right as far as it will go.
– Continue to reverse into the parking space until the vehicle is standing parallel to the kerb. indicates the
rear bumper. You should stop reversing, at the latest,
when the red orientation line is bordering on an
object ⇒! Keep a close watch on the front of your
vehicle ⇒.Parking next to obstacles
If an obstacle (such as a wall) is located next to the parking space,
the clearance at the side of the vehicle must be larger. Position the
long side of the blue marking so that there is sufficient clearance
from the kerb. The marking must not touch the kerb. You must also
start turning the steering wheel much earlier. The blue curve
⇒page 175, fig. 195 must not touch the kerb - make sure there is
sufficient clearance from the kerb.
WARNING
•
The reversing camera does not show the complete area behind
the vehicle. It is part icularly important to ensure that there are no
small children or animals near the vehicle, as the reversing camera
may not always be able to detect them (accident risk).
•
Please note that objects which are not touching the ground
may appear to be further away th an they actually are (e.g. the
bumper of a parked vehicle, a towi ng bracket or the rear end of a
truck). In this case you should not use the orientation lines as a
guide when parking th e car - accident risk!Caution
The MMI display shows the path of the rear end of the vehicle if you
were to reverse using the current steering angle. NB: The front end
of the vehicle swings out further th an the rear. Please make sure you
keep a sufficient distance between the vehicle and any obstacles to
make sure that the exterior mirror or edge of the vehicle do not
collide with the obstacle (accident risk).
Note
The orientation lines and markings ap pear on the left or right side,
depending on which turn signals are on.
A1
A2
A3
A4
document_0900452a81b1b9de.book Seite 176 Donnerstag, 26. Juli 2007 9:16 09
--4 -
-T
CD
-+ +-
[I]
&
•
CD
Page 179 of 342
Parking aid177
Controls
Safety
Driving tips
General maintenance
Self-help
Technical data
Applies to vehicles: with Audi parking system/plus/advancedSwitching display and acoustic signals on and offThe settings for the graphic display* and acoustic signals
are controlled via the sound system or MMI*.– Select: Function selector button > Audi parking
system .Display*•
off - The parking aid gives only acoustic warning signals when it
is activated.
•
Graphic - The graphic display ap pears when reversing and
driving forwards.
•
Rear View * - The picture from the reversing camera is shown
when reversing and driving forwards.
•
Automatic * - The picture from the reversing camera is shown
when reversing and the graphic display is shown when driving
forwards.
Warning beeps
•
Rear volume - Volume of the rear sensors
•
Rear frequency - Pitch of the rear sensors
•
Front volume* - Volume of the front sensors
•
Front frequency * - Pitch of the front sensors
You will hear a short test tone each time you make a new setting.Note
•
You can also change the warning beep settings directly from the
graphic display* or reversing camera* picture. Simply press the
control button for *.
•
New settings are not activated until you switch on the parking
aid again.
•
The settings will be automatically stored and assigned to the
remote control key.
Applies to vehicles: with Audi parking system/plus/advanced and towing bracketTo w i n g b r a c k e tIn towing mode, the rear parking sensors are NOT activated when
you select reverse gear or press the switch
. This may not apply if
the power socket was NOT factory-fitted. This results in the
following restrictions:
Audi parking system*
There is no distance warning.
Audi parking system plus*
There is no rear distance warning. However, the system will still give
a warning when obstacles are detected while driving forwards. The
proximity graphic will switch over to towing mode.
Audi parking system advanced*
There is no rear distance warning. However, the system will still give
a warning when obstacles are detected while driving forwards. The
proximity graphic will switch over to towing mode. The image of the
Fig. 196 Display:
Settings for parking
aid
CAR
Settings
document_0900452a81b1b9de.book Seite 177 Donnerstag, 26. Juli 2007 9:16 09
--4 -
-T
[1J
I I •
-+ +-
Page 182 of 342
HomeLink
180
At the operating unit
1. Switch on the ignition (do not start the engine).
2. Press and hold down the two outer HomeLink buttons ⇒page 179, fig. 197 until the indicator diode
⇒ page 179, fig. 197 begins to flash after about
20 seconds. This procedure will delete the standard
factory settings and does not need to be repeated when
programming the other buttons.
3. Press the particular HomeLink button which you would like to program.
4. Wait until the diode begins to flash. The HomeLink module now remains in trai ning mode for 5 minutes.
5. Now step in front of your vehicle with the original hand-
held transmitter for the garage door opener or any other
device you wish to assign to the HomeLink control
button.
At the radiator grille
6. Hold the original hand-held transmitter at or near the
centre of your car's radiator grille ⇒ page 179, fig. 198.
7. Press the activator button on the original hand-held
transmitter .
8. As you do so, watch the tu rn signals on your vehicle.
HomeLink confirms successful programming by flashing
all four turn signals three times.
9. If the turn signals fail to flash three times, repeat the procedure with the transmitter held at a different
distance from the radiator grille.
The proper distance between the hand-held transmitter and the
HomeLink module at the radiator grille depends on the system you
want to train. It may require several attempts.
The turn signals will flash once if the time limit for the programming
mode has been exceeded. In this case the programming procedure
needs to be performed again. Repe at the sequence at the operating
unit starting with step 3.
The programming instructions above also apply to the other control
buttons. Start with step 3 if you wish to proceed and program the
other two buttons.
If the garage door or other devices st ill fail to be activated with the
HomeLink control buttons after programming is completed, it is
possible that these systems might be working with a rolling code
instead of the normal fixed security code. If this is the case, a rolling
code programming is required in addition to the steps described
above. ⇒page 180Applies to vehicles: with HomeLinkRolling code programming
Some devices require rolling code programming of the
HomeLink universal transmitter.Identifying a rolling code
– Press the already programmed HomeLink button again
and hold it down.
–Watch HomeLink diode ⇒ page 179, fig. 197. If the
diode starts flashing rapidly and turns into a constant
light after about 2 seconds, this indicates that the device
you wish to operate (e.g. a garage door opener) is
equipped with a rolling code.
– Program the rolling code as follows:
AA
AA
AA
document_0900452a81b1b9de.book Seite 180 Donnerstag, 26. Juli 2007 9:16 09
--4 -
-T
-+
•
+-
Page 184 of 342
HomeLink
182Applies to vehicles: with HomeLinkRe-programming a button
A HomeLink button can be re-programmed individually
without affecting the other button allocations.At the operating unit in the headliner
– Press and hold down the selected button until the indi-
cator diode ⇒ page 179, fig. 197 starts flashing slowly.
At the radiator grille
–Hold the original hand-held transmitter for the garage
door opener or other device directly in front of the radi-
ator grille of your vehicle (at or near the centre)
⇒ page 179, fig. 198. The exact distance depends on the
system that you want to program.
– Press the button on the original hand-held transmitter
for the garage door opener or other device.
– As you do so, watch the turn signals on your vehicle. HomeLink confirms successful programming by flashing
all four turn signals three times.
– If the turn signals fail to flash three times, repeat the procedure with the transmitter held at a different
distance from the radiator grille.When the turn signals have flashed three times, this means the
device previously stored in HomeLink has been erased and the new
system programmed in its place. To activate the new system, press
the HomeLink button that has just been re-programmed.
Note
It may require several attempts before programming is successful.
When programming a new device, keep the button pressed for at least 15 seconds before trying
again with the transmitter in a
different position. Keep watching the turn signals during that
time.
Applies to vehicles: with HomeLinkConformity certificationThe HomeLink universal transmitter is registered in the following
countries under the following certification numbers:Country
Certification number
Andorra
16SEP2003
Belgium
RTT/D/X2064
Denmark
98.3142-266
Germany
D800038K
Finland
FI98080106
France
97619 RD
Gibraltar
RTTE 20754/0087847
Greece
JCI 05JUL2000 RTTE
Great Britain
RTTE 20754/0087847
Republic of Ireland
TRA 24/5/109/5
Iceland
IS-3418-00
Italy
DGPGF/4/341032/TB 0002573
Croatia
SRD-156/03
Luxembourg
L2433/10510-03J
Malta
WT/122/98
Monaco
PC/cp-CI.T55-03/04672
Netherlands
NL99030970
Norway
NO20000026
document_0900452a81b1b9de.book Seite 182 Donnerstag, 26. Juli 2007 9:16 09
--4 -
-T
•
-+ +-
[I]
Page 188 of 342
Safe driving
186Safe drivingGeneral notesSafety is the first priority
Your safety is our first priority.This chapter contains important information, tips, sugges-
tions and warnings that you should read and observe for
your own safety and the safety of your passengers.
WARNING
•
The information in this chapter is important for the driver of
the vehicle and all passengers. Th e other chapters in this manual
(and, where applicable, in the ot her literature supplied with the
vehicle) contain further importan t notes which you should read
and observe for your own safety and that of your passengers.
•
Ensure that the complete vehicle wa llet is always in the vehicle.
This is especially imp ortant when you lend or sell the vehicle to
others.
Safety features
The safety features listed he re are part of the vehicle's
occupant restraint system. They work together to help
reduce the risk of injury in a wide variety of accident situ-
ations.Your safety and the safety of your passengers should not be left to
chance. In the event of an accident, the safety features incorporated
in your vehicle are capable of reducing the risk of injury. These are
just a few of the safety features in your Audi:•
Optimised three-point seat belts for all seats,
•
Belt force limiters for the front seats,
•
Belt pre-tensioners for the front seats,
•
Head restraints for all seats,
•
Optimised protection against injuries of the cervical vertebrae,
•
Front airbags,
•
Side airbags in the front seat backrests and on the outer rear
seats*,
•
Head-protection airbags (sideguard system),
•
“ISOFIX” mountings* for “ISOFIX” child safety seats on the rear
seats,
•
Height-adjustable head restraints on the seats,
•
Adjustable steering column.
These individual safety features are harmonised to provide you and
your passengers with the best possible protection in accident situ-
ations. However, they can only be effective if you and your passen-
gers sit in the correct position and adjust and use the safety equip-
ment properly.
For these reasons, this chapter explains why these safety features
are so important, how they can protect you, what you need to
remember when using them, and how you and your passengers can
gain the most benefit from them. There are also a number of impor-
tant safety warnings which you and your passengers should always
observe in order to minimise the risk of injury.
Safety is everyone's responsibility!
document_0900452a81b1b9de.book Seite 186 Donnerstag, 26. Juli 2007 9:16 09
--4 -
-T
-+ +-
•
•
Page 189 of 342
Safe driving187
Controls
Safety
Driving tips
General maintenance
Self-help
Technical data
Before every trip
The driver is responsible for the safety of the passengers
and the safe operation of the vehicle at all times.For your own safety and the safety of your passengers,
always note the following points before every trip:
– Make sure that all lights and turn signals are working
properly.
– Check the tyre pressures.
– Make sure that all windows are clean and give good visi- bility to the outside.
– Secure all luggage and other items carefully ⇒page 79 .
– Make sure that no objects can interfere with the pedals.
– Adjust the front seat, head restraint and mirrors correctly.
– Make sure that the head restraints for all passengers are adjusted to the correct position.
– Make sure that children are protected with suitable safety seats and properly worn seat belts ⇒ page 210.
– Sit in the correct position in your seat and make sure that
your passengers do the same. ⇒page 73 .
– Fasten your seat belt correctly. Make sure that your passengers do the same ⇒page 194.
What affects driving safety?
Safety on the road is directly related to how you drive, and
can also be affected by the passengers in the vehicle.The driver is responsible for the safety of the vehicle and all
its occupants. If your ability to drive is impaired in any way,
you endanger yourself and other road users ⇒. There-
fore:
– Do not let yourself be distracted by passengers or by using a mobile phone, etc.
– Never drive when your driving ability is impaired (by medication, alcohol, drugs, etc.).
– Obey all traffic regulations and speed limits and always maintain a safe distance to the vehicle in front.
– Always adjust your speed to suit the road, traffic and weather conditions.
– Take frequent breaks on long trips. Do not drive for more than two hours without a stop.
– If possible, avoid driving when you are tired or stressed.
WARNING
•
Distractions while driving or any kind of impairment to your
driving ability increase the risk of accident and injury.
•
Do not store loose objects on the dashboard. These objects
could fly around the interior when the vehicle is moving (under
acceleration or whilst cornering) and distract the driver – this
could lead to an accident.
document_0900452a81b1b9de.book Seite 187 Donnerstag, 26. Juli 2007 9:16 09
--4 -
-T
-+ +-
•
•