ESP AUDI S4 2014 User Guide
[x] Cancel search | Manufacturer: AUDI, Model Year: 2014, Model line: S4, Model: AUDI S4 2014Pages: 296, PDF Size: 73.56 MB
Page 50 of 296
48 Clear vis ion
@ Tips
- The light sensor* for headlight control is
located in the rear view m irror mount.
You should therefore not apply any st ick
ers to the windsh ield in this area in order
to prevent malfunctions or failures.
- Some exterior lighting functions can be
adjusted
c> page 48.
- When you remove your key from the igni
tion while the vehicle's lights are turned
on, a buzzer sounds as long as the driv
er's door is open .
- In cool or damp weather, the ins ide of
the headlights, turn signals and tail lights can fog over due to the tempera
ture difference between the inside and
outside. They will clea r shor tly after
switching them on. This does not affect
the service life of the lighting.
- In the even t of a light sensor malfunc
tion, the driver is no tified in the instru
ment cluster disp lay¢
page 22.
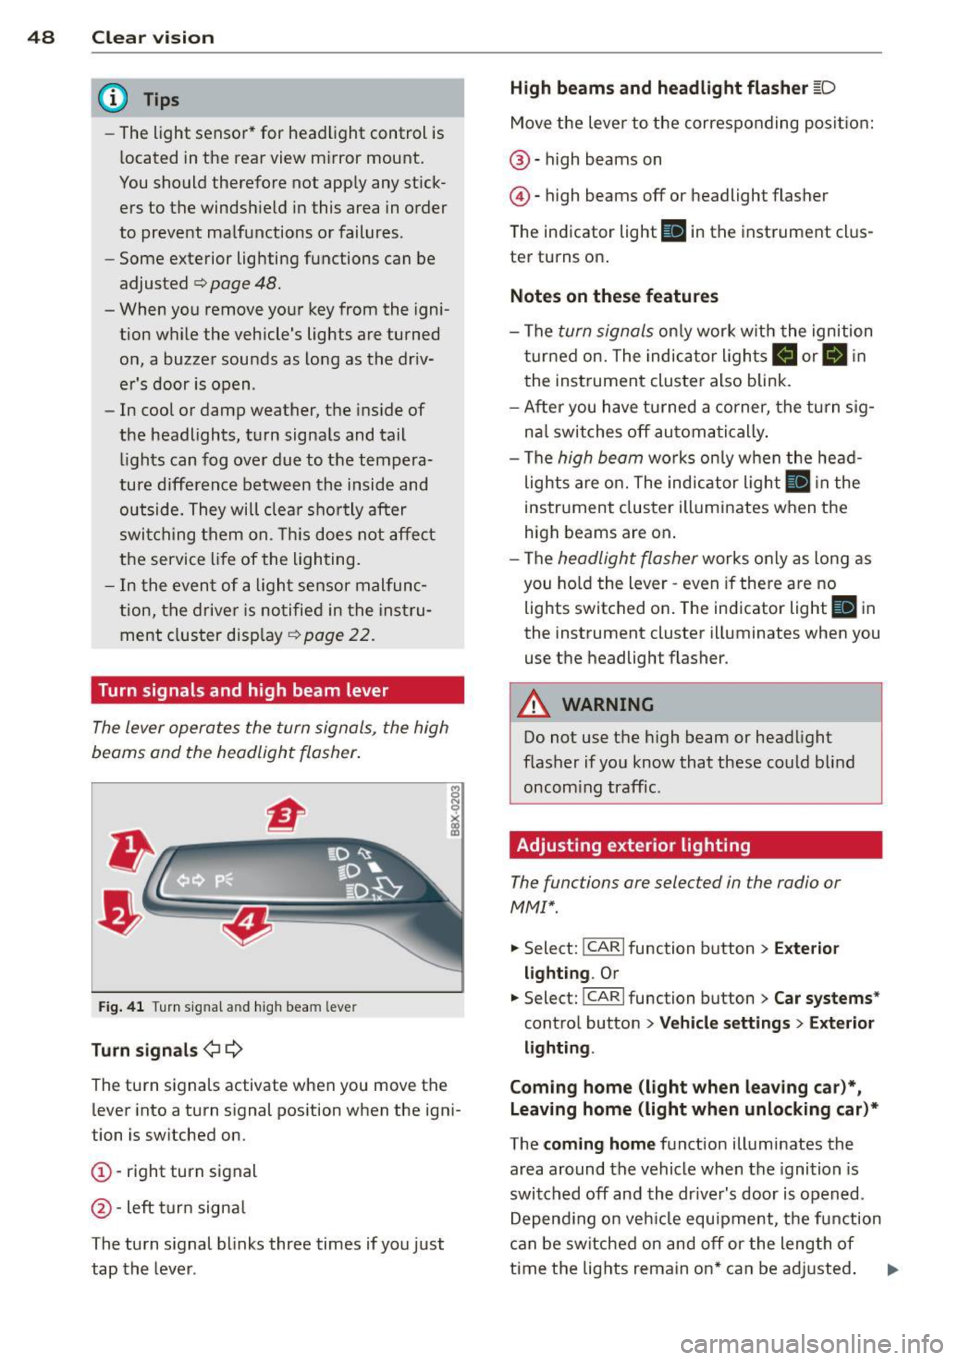
Turn signals and high beam lever
The lever operates the turn signals, the high
beams and the headlight flasher .
Fig. 4 1 Tu rn s ig na l and hig h beam lever
Turn sign als ¢i ¢
The turn signals activate when you move the
l ever into a turn s ignal pos ition when the ign i
tion is switched on.
(D -right turn signal
@-left tur n signa l
The turn s ignal blinks three times if you just
tap the lever .
High be ams and headlight flasher [D
Move the lever to the correspon ding posit io n:
@ -high beams on
@ -high beams off or headlight flasher
The indicator light
ii in the instrument cl us
ter turns on .
Notes on thes e features
-The turn signals on ly wor k w ith the ignition
t urned on. The indicator ligh ts
Ct or a in
the instrument cluster also blink.
- After you have turned a co rner, the turn s ig
na l switches off au toma tically .
- The
high beam works on ly w hen the head
lights a re on. The indicator ligh t
II in the
instrument cluster illuminates when the
high beams are on .
- The
headlight flasher works o nly as long as
you ho ld the lever -even if there a re no
lights switched on . The indicator light
II in
the instrument cluster illuminates when you
use the headlight flasher.
A WARNING
--
Do not use the h igh beam or headlight
flasher if you know that these could blind
oncom ing traffic.
Adjusting exterior lighting
The functions ore selected in the radio or
MMI" .
.,. Select: !CARI function button> Exte rior
light ing .
Or
.,. Select: !CARI function button > Car systems *
control button > Vehicle s etting s> Exterior
lighting .
Coming home (light when leav ing car }*,
Leav ing home (light when unlocking car )*
The coming home function illuminates the
area around the vehicle when the ignition is
switched off and th e dr ive r's door is opened.
Depend ing on vehi cle equ ipment, the function
can be switched on and off or the length of
time the lig hts remain on* can be ad justed . ..,.
Page 52 of 296
50 Clear vis ion
Interior lights
Front /rear interior lights
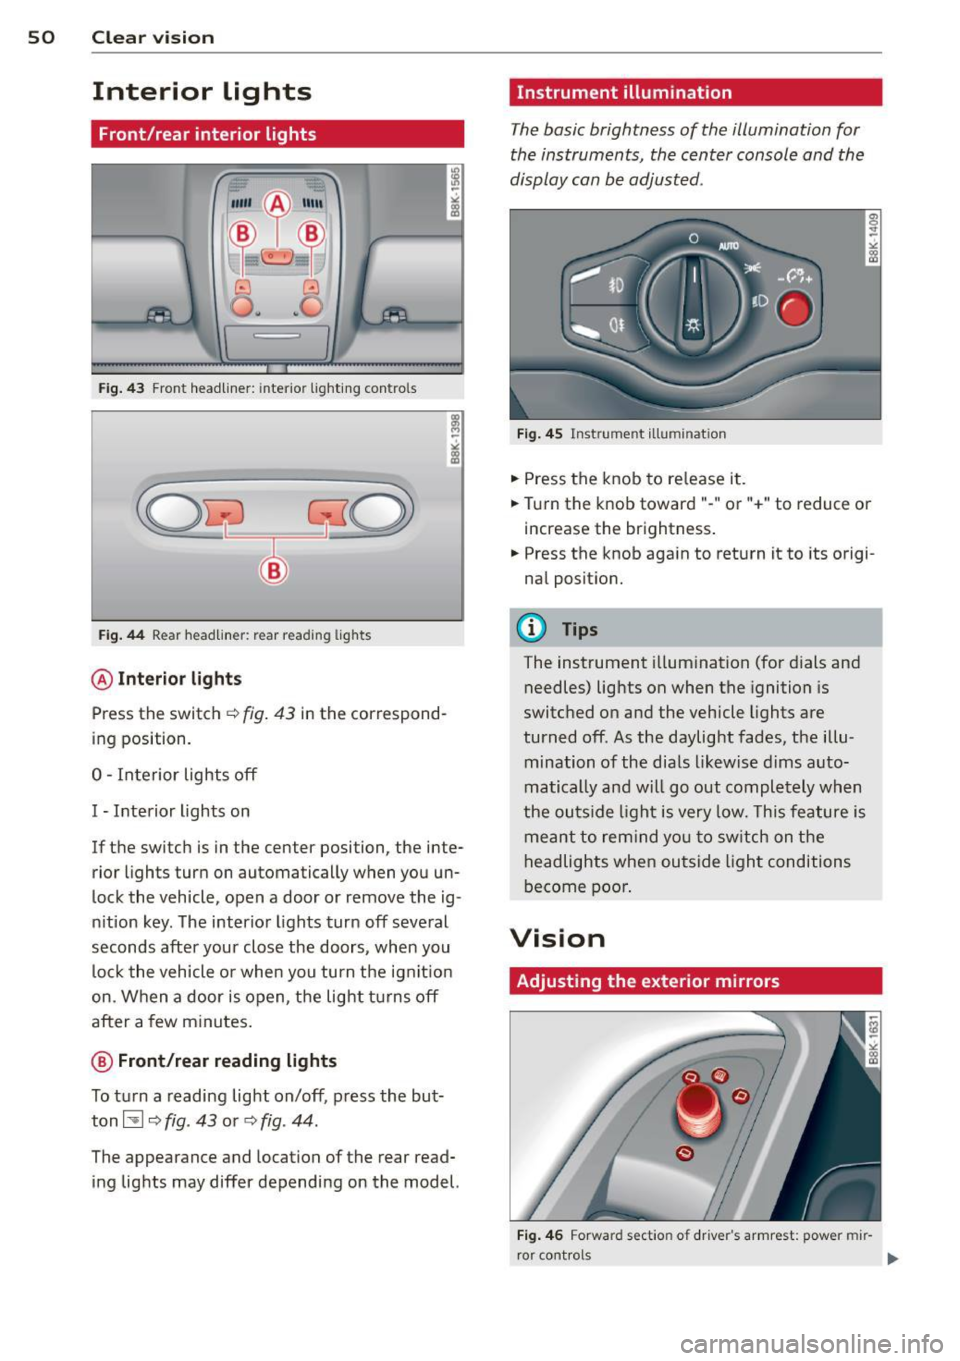
Fig . 43 Front headliner: inte rior lighting controls
Fig. 44 Rear headliner: rear reading lights
@Interio r ligh ts
Press the switch ~ fig. 43 in the correspond
ing position.
0 -Interior lights off
I -Interior lights on
If the switch is in the center position, the inte
rior l ights turn on automatically when you un
lock the vehicle, open a door or remove the ig
n ition key. The interior lights turn off several
seconds after your close the doors , when you
lock the vehicle or when you turn the ign it ion
on. When a door is open, the light tu rns off
after a few minutes.
@ Fr ont /rear r eading lights
To turn a reading light on/off, press the but
ton~
c::> fig. 43 or c::> fig. 44.
The appearance and location of the rear read
ing lights may differ depending on the model.
Instrument illumination
The basic brightness of the illumination for
the instruments, the center console and the
display can be adjusted .
Fig . 45 Inst rume nt illu mination
.,. Press the knob to release it .
.,. Turn the knob toward"-" or"+" to reduce or
increase the brightness .
.,. Press the knob again to return it to its origi
nal posit ion.
(!') Tips
The instrument i llumination (for dials and
needles) lights on when the ignition is
switched on and the vehicle lights are
turned off . As the daylight fades, the illu
mination of the dia ls likewise dims auto
matically and wi ll go out completely when
the ou tside light is very low. This feature is
meant to rem ind you to sw itch on the
headlights when ou tside light conditions
become poor .
Vision
Adjusting the exterior mirrors
Fig . 4 6 Forward section of driver's a rmrest: power mir
r or controls
Page 53 of 296
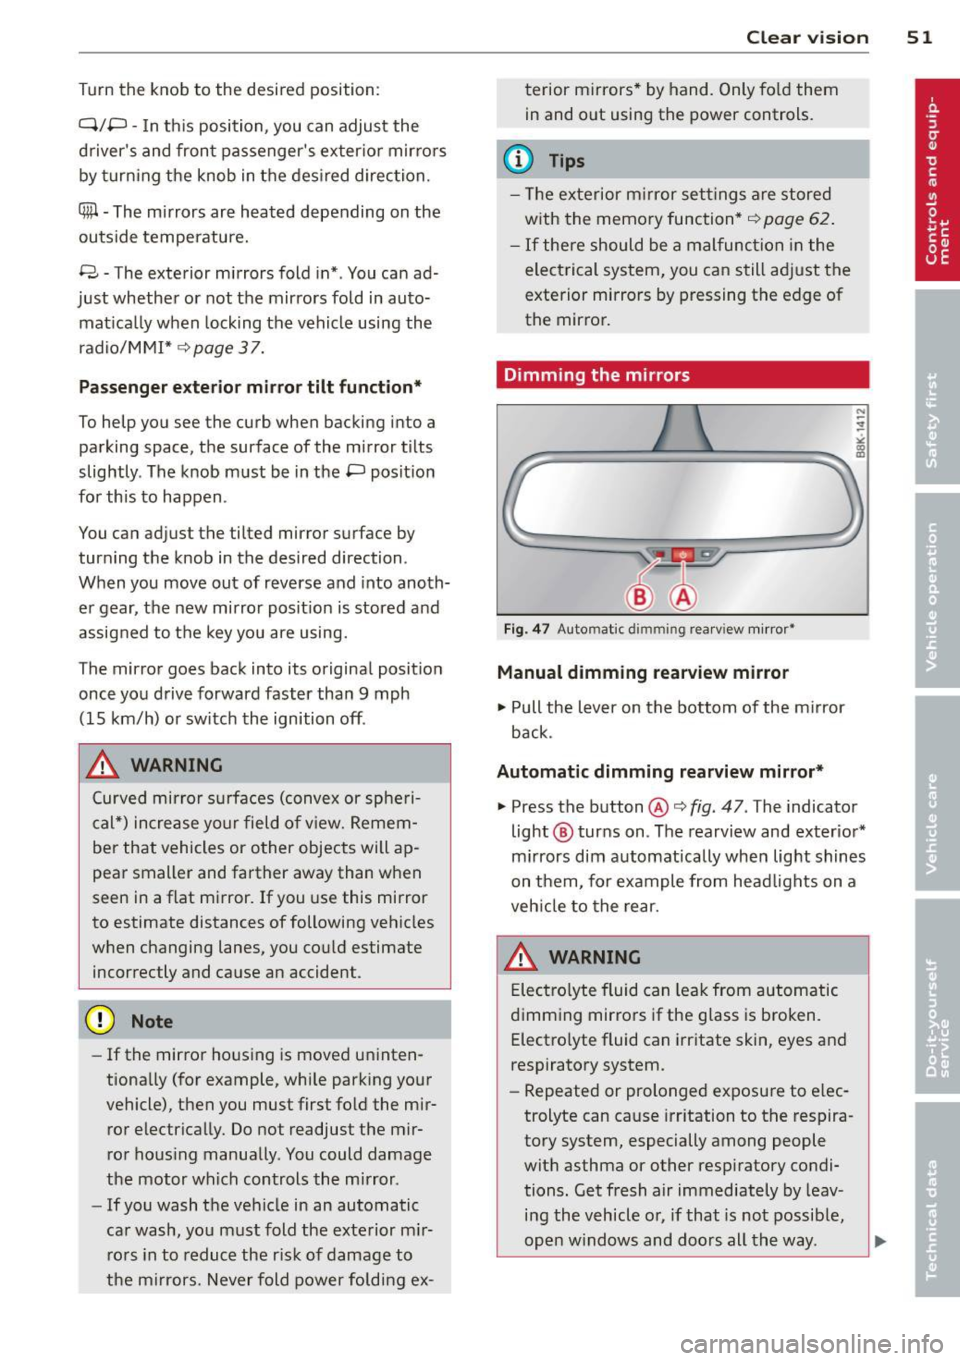
Turn the knob to the desired position:
Q/ P -In this position , you can adjust the
driver's and front passenger's exterior mirrors by turning the knob in the desired direction.
(ijjl -The mirrors are heated depending on the
outside temperature.
8 -The exterior mirrors fold in*. You can ad
just whether or not the mirrors fold in auto
matically when locking the vehicle using the
radio/MM I*¢
page 3 7.
Passenger exterior mirror tilt function*
To help you see the curb when backing into a
parking space, the surface of the mirror tilts
slightly . The knob must be in the P position
for this to happen .
You can adjust the tilted mirror surface by
turning the knob in the desired direction .
When you move out of reverse and into anoth
er gear, the new mirror position is stored and
assigned to the key you are using.
T he mirror goes back into its original position
once you drive forward faster than 9 mph (15 km/h) or switch the ignition off .
_& WARNING
Curved mirror surfaces (convex or spheri
cal*) increase your field of view. Remem
ber that vehicles or other objects will ap
pear smaller and farther away than when
seen in a flat mirror. If you use this mirror
to estimate distances of following vehicles
when changing lanes, you could estimate
incorrectly and cause an accident .
(D Note
-If the mirror housing is moved uninten
tionally (for example, while parking your
vehicle), then you must first fold the mir ror electrically. Do not readjust the mir
ror housing manually . You could damage
the motor which controls the mirror .
- If you wash the vehicle in an automatic
car wash, you must fold the exterior m ir
rors in to reduce the risk of damage to
the mirrors. Never fold power folding ex-
.
Clear vision 51
terior mirrors* by hand. Only fold them
in and out using the power controls.
a) Tips
- The exterior mirror sett ings are stored
with the memory function*
~ page 62.
-If there should be a malfunction in the
electrical system, you can still adjust the
exterior mirrors by pressing the edge of
the mirror.
Dimming the mirrors
Fig. 47 Auto mat ic dimmin g rearv iew mirror •
Manual dimming rearview mirror
11>-Pull the lever on the bottom of the mirror
back.
Automatic dimming rearview mirror*
.,. Press the button@¢ fig. 47 . The indicator
light @ turns on . The rearview and exterior*
mirrors dim automatically when light shines
on them, for example from headlights on a
vehicle to the rear.
A WARNING
Electrolyte fluid can leak from automatic
dimming mirrors if the glass is broken .
Electrolyte fluid can irritate skin, eyes and
respiratory system .
- Repeated or prolonged exposure to elec
trolyte can cause irritation to the respira
tory system, especially among people
with asthma or other respiratory condi
tions. Get fresh air immediately by leav
ing the vehicle or, if that is not possible,
open windows and doors all the way. .,..
Page 56 of 296
54 Clear vis ion
rain sensor mode off and switch intermittent
mode on in the MMI*. Se lect:
I CAR ! function
button
> C ar sys tem s* contro l button > Dri ver
assi st> Rain s enso r.
In interm ittent mode,
you can adjust the interval time using the ®
switch .
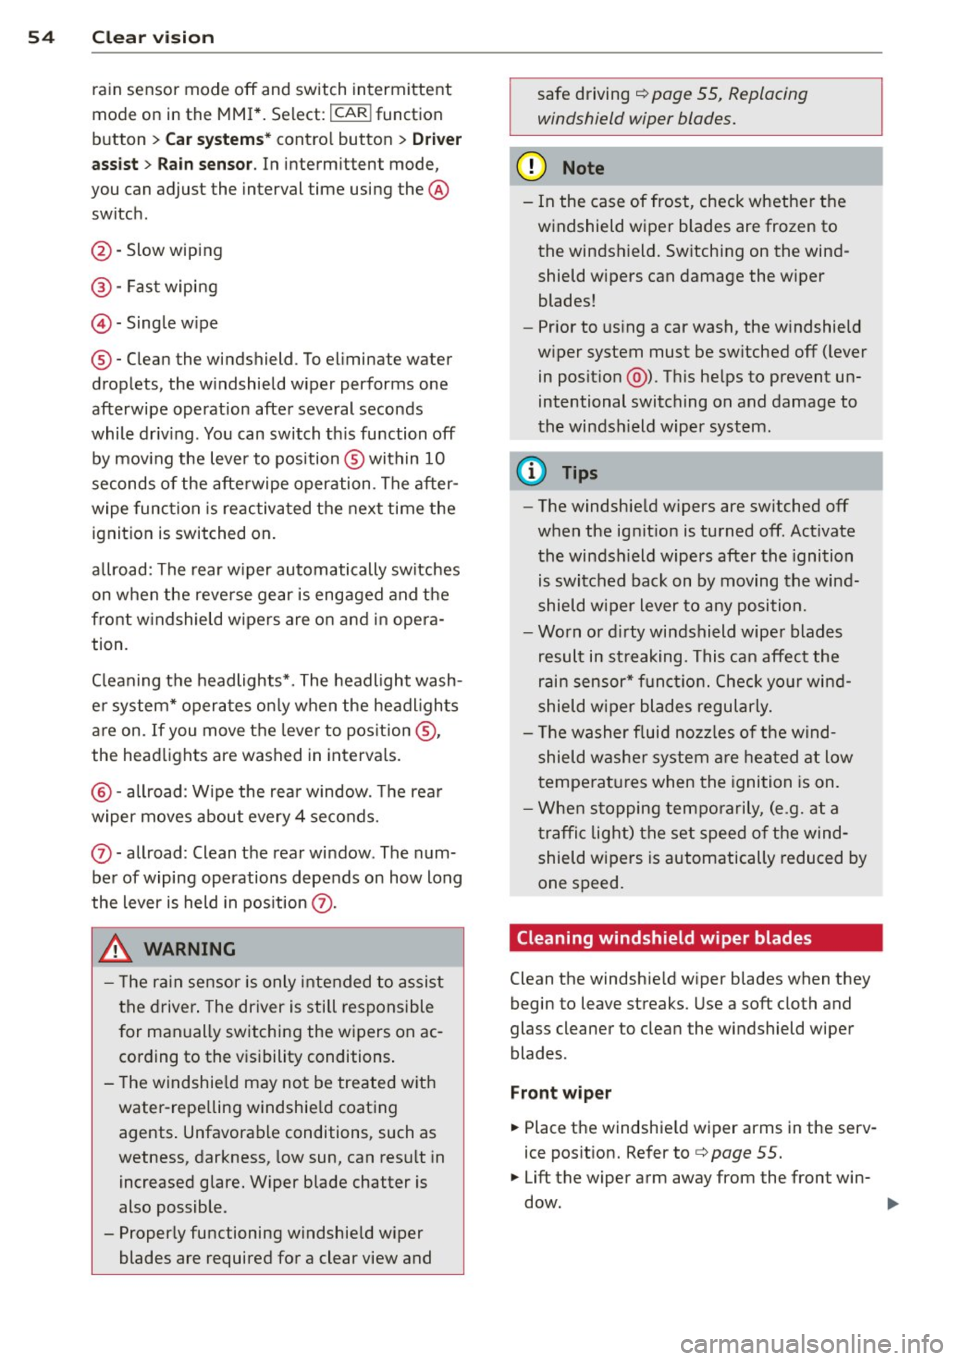
@-Slow wiping
@-Fas t wiping
© -Sing le w ipe
® -Clean the windshield . To eliminate water
drop lets, the w indshield wiper performs one
afterwipe operation after several seconds
while driv ing . You can switch th is fu nction off
by mov ing the lever to position ® within 10
seconds of the afte rwipe operation . The after
wipe func tion is reactiva ted the next time the
ignition is switched on.
a llroad: The rear w iper automatically switches
on when the reve rse gear is engaged and the
front w indshield w ipers are on and in opera
tion .
C lean ing the headlights*. The headlight wash
e r system* opera tes on ly when the headl ights
a re on. If you move the leve r to pos ition @,
the head lights are washed in intervals.
@ -allroad : Wipe the rear window. The rear
wiper moves about every 4 seconds.
(J) -allroad : Clean the rear window . The num
ber of wiping operations depends on how long
the lever is held in pos ition
(J) .
_& WARNING
- T he ra in sensor is only inte nded to assist
the drive r. The driver is still responsible
for man ually switching the wipers on ac
cording to the v isibility conditions .
- T he windshie ld may not be treated w ith
water-repe lling windshie ld coating
agents . Unfavorable conditions, such as
wetness, darkness, low sun, can res ult in
increased glare. Wiper blade chatter is
also possible .
- Proper ly functioning windshie ld w iper
blades are required for a clear view and safe driving
~ page 55, Replacing
windshield wiper blades.
@ Note
- In the case of frost, check whethe r the
windshield wiper blades are frozen to
the windshield. Sw itching on the wind
shield wipers can damage the wiper
blades!
- Pr ior to us ing a car wash, the w indshield
w iper system must be sw itched off ( lever
in posit ion @). Th is he lps to prevent un
intentional switching on and damage to
the windsh ield wiper system .
@ Tips
-The windshie ld wipers are switched off
when the ignit ion is turned off. Act ivate
the winds hield wipers after the ignition
is switched back on by moving the wind
shield w iper lever to any position.
- Worn or d irty windshield wiper blades
result in st reaking. This can affect the
rain sensor* function. Check your wind
shield w ipe r blades regularly.
- The washer fluid nozz les of t he wind
shield w asher system a re heated at low
temperat ures when the igni tion is on.
- When stopping tempo rarily, (e .g. at a
t raffic light) the set speed o f the wind
shield wipers is automatically reduced by
one speed.
· Cleaning windshield wiper blades
Clean the windshie ld w iper b lades when they
begin to leave streaks. Use a soft cloth and
glass cle aner to clea n the windshield wiper
blades .
Front wip er
.. Place the windshie ld wiper arms in the serv
ice pos it ion. Refer to
c> page 55.
.. Lift the wiper arm away from the fron t win-
d~.
~
Page 60 of 296
58 Seat s a nd s tor ag e
Seats and storage
General recommen
dations
Why is your seat adjustment so
important?
The safety belts and the airbag system can
only provide maximum protection if the front
seats are correctly adjusted.
There are various ways of adjust ing the front
seats to provide safe and comfortable support
for the driver and the front passenger . Adjust
your seat properly so that :
- you can easily and quick ly reach all the
switches and controls in the instrument
panel
-your body is prope rly supported thus reduc
ing physical stress and fatigue
- the safety be lts and a irbag system can offer
maximum protection ¢
page 146.
In the following sec tions, you will see exactly
how you can best adjust you r seats .
There are special regulations and instructions
for insta lling a child safety seat on the front
passenger's seat. Always follow the informa
tion rega rd ing child safety provided in
G page 167, Child Safety.
WARNING
Refer to G page 128, Driving Safely for
important information, tips, suggestions
and warnings that you should read and fol
low for your own safety and the safety of
your passengers.
A WARNING
, -
Incorrect seating position of the dr iver and
all other passengers can result in serious
personal inj ury .
- Always keep your feet on the f loor when
the vehicle is in mo tion -never put your
feet on top of the instrument panel, out of the w indow or on top of the seat cush
ion. This app lies especially to the passen- gers
. If your seating position is incorrect,
you increase the risk of injury in the case of sudden braking or an accident. If the
airbag inflates and the seating position is incorrect, this could result in pe rsonal
in ju ry or even death.
- It is important for both the driver and front passenge r to keep a distance of at
least 10 inches (25 cm) between them
selves and the steering wheel and/or in
s trumen t panel.
If you're s itting any
closer than th is, the a irbag system can
not protect you properly. In addition, the
front seats and head restraints m ust be
adj usted to your body height so that they
can give you max imum protect ion.
- Always try to keep as much distance as
possible between yourself and the steer
ing wheel or instrument panel.
- Do not adjust the driver's or front pas senger's seat while the vehicle is moving.
Your seat may move unexpected ly , caus
ing sudden loss of veh icle control and
pe rsonal injury. If you ad just you r seat
while the veh icle is moving, yo u are out
of posit ion.
Driver's seat
The correct seat position is important for safe
and relaxed driving .
We recommend that you adjust the dr iver's
seat in the follow ing manner:
.. Adjust the seat in fore and aft direction so
that you can easily push the pedals to the
floor wh ile keeping your knees slightly bent
G &. in Why is your seat adjustment so im
portant? on page 58 .
.,. Adj ust the seatback so that when you s it
w ith your back against t he seatback, you can
s till grasp the top of the steering whee l.
.. App lies to ve hicles w ith ad justable head re
straints: Adjust the head restraint so the up
pe r edge is as even as possible with the top
of yo ur head. If that is not possib le, try to
adjust the head restraint so that it is as .,.
Page 61 of 296
close to this position as possible
c:>page 61.
A WARNING
Never place any objects in the driver's foot
well. An object could get into the pedal
area and interfere with pedal function. In
case of sudden braking or an accident, you
would not be able to brake or accelerate .
Front passenger's seat
Always move the front passenger seat into
the rearmost position .
To avoid contact with the airbag while it is de
ploying, do not sit any closer to the instru
ment panel than necessary and always wear
the three-point safety belt provided adjusted
correctly . We recommend that you adjust the
passenger's seat in the following manner:
.,. Bring the backrest up to an (almost) upright
position.
Do not ride with the seat reclined .
"" Applies to vehicles with adjustable head re
stra ints: Adjust the head restraint so the up
per edge is as even as possible with the top
of your head. If that is not possible, try to
adjust the head restraint so that it is as
close to this position as possible
c:> page 61.
.,. Place your feet on the floor in front of the
passenger's seat .
Front seats
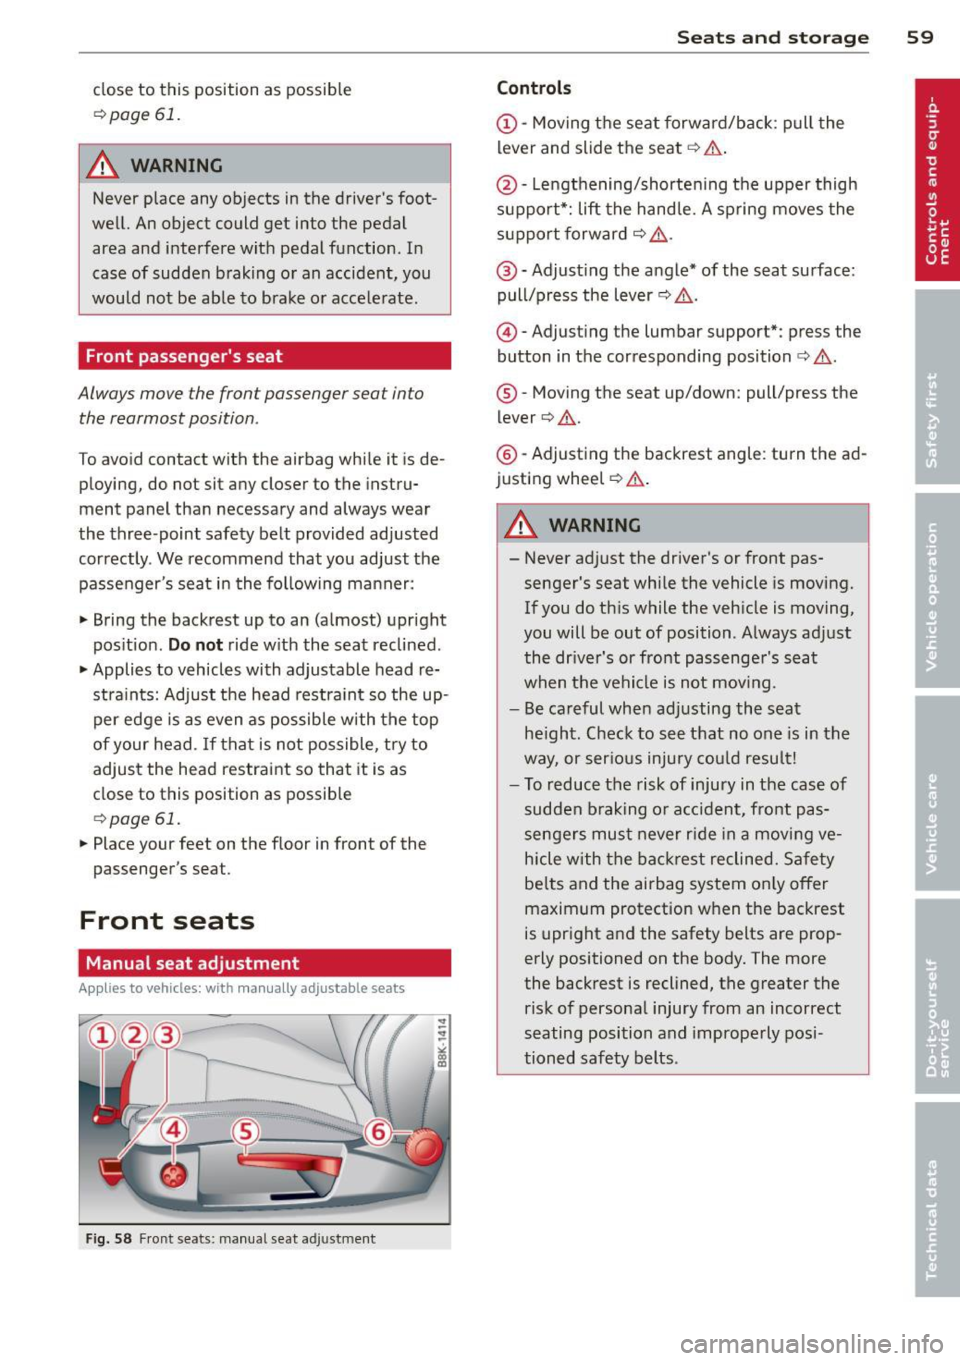
Manual seat adjustment
Appl ies to vehicles: with manu ally a djustable seats
Fig. 58 Fr ont seats: manual seat adjustment
Seats and storage 59
Controls
@-Moving the seat forward/back: pull the
lever and slide the seat
c:> A.
@ -Lengthening/shortening the upper thigh
support*: lift the handle. A spring moves the
support forward
c:> ,& .
@ -Adjust ing the angle* of the seat surface:
pull/press the lever
c:> ,& .
@) -Adjusting the lumbar support*: press the
button in the corresponding position
c:> ,& .
®-Moving the seat up/down: pull/press the
lever
c:> .&. .
@ -Adjusting the backrest angle : turn the ad
justing wheel
c:> .&..
A WARNING ,--
-Never adjust the driver's or front pas
senger's seat while the vehicle is moving.
If you do this while the veh icle is moving,
you will be out of position. Always adjust
the dr iver's or front passenger's seat
when the vehicle is not mov ing.
- Be careful when adjusting the seat
he ight. Check to see that no one is in the
way, or ser ious injury could result!
- To reduce the risk of injury in the case of
sudden braking or accident, front pas
sengers must never rid e in a moving ve
hicle with the backrest reclined. Safety
be lts and the airbag system on ly offer
maximum protection when the backrest
is upright and the safety belts are prop
erly positioned on the body. The more
the backrest is reclined, the greater the
risk of personal injury from an incorrect
seating position and improperly posi
tioned safety belts.
Page 62 of 296
60 Seats and st o rage
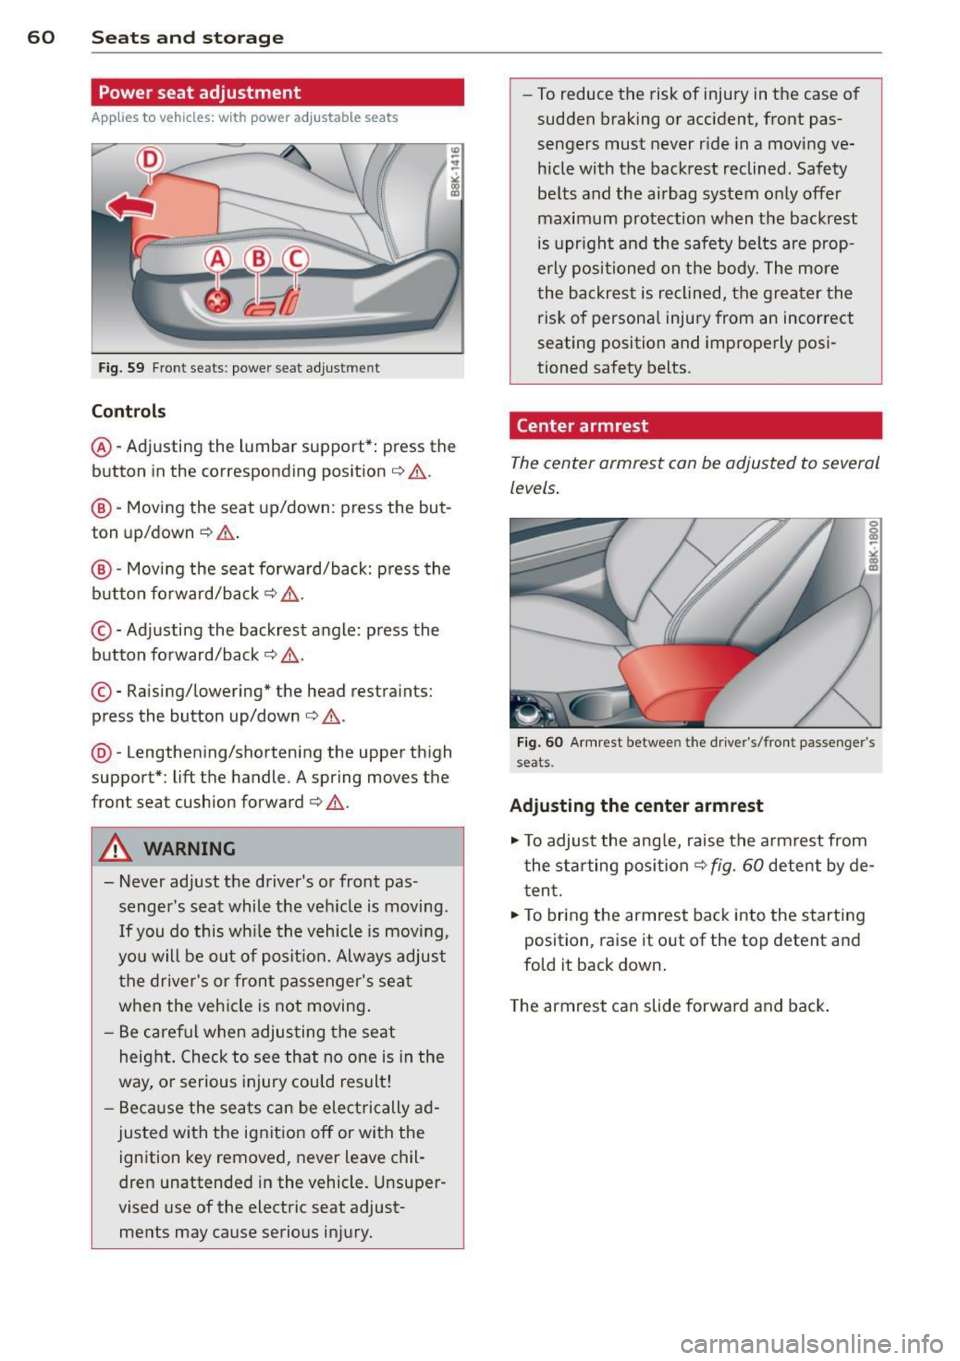
Power seat adjustment
App lies to vehicles: with power adjustable seats
Fig. 59 Front seats: powe r seat adjust men t
Contr ols
@ -Adj usting the lumbar support*: press the
button in the corresponding position¢.&. .
@-Moving the seat up/down: press the but
ton up/down ¢.&. .
@-Moving the seat forward/back: p ress the
button fo rward/back
¢ .&, .
©-Adjusting the backrest angle: press the
button fo rward/back
¢ .&. .
©-Raising/lowering* the head restraints:
press the button up/down ¢ .&. .
@ -Lengthening/shortening the upper thigh
support*: lift the handle. A spring moves the
front seat cushion forward¢.&. .
A WARNING
- Never adjust the d river's or front pas
senger 's seat while the veh icle is moving .
If you do this wh ile the vehicle is moving,
yo u will be out of posit ion. Always adjus t
the drive r's or front passenger's seat
when the vehicle is not moving .
- Be care ful when adjus ting the seat
heig ht. Check to see that no one is in the
way, o r serious injury could result!
- B eca use the sea ts can be elec trically ad
justed with the ignit ion off or with the
ignition key removed, never leave chil
dren unattended in the vehicle. Unsuper
vised use of the electric seat adjust ments may cause serious injury. -
To reduce the risk of injury in the case of
sudden braking or accident, front pas
sengers must never r ide in a moving ve
hicle with the backrest reclined . Safety
be lts and the airbag system only offer
maximum protection when the backrest is upr ight and the safety belts are prop
e rly po sitioned on the body. The more
the backres t is reclined, the grea ter the
risk of persona l injury from an incorrect
seating position and imprope rly posi
tioned safety belts.
Center armrest
The center armrest can be adjusted to several
levels .
Fig. 60 A rm rest betwee n the d rive r's/front passenger's
seats.
Ad ju sting the center armrest
"" To adjus t the ang le, raise the armrest from
the starting position
¢ fig. 60 detent by de
t en t.
.,. To bring the armrest back into the starting
position, raise it out of the top detent and
fold it back down.
T he armrest can slide forwar d and back .
Page 66 of 296
64 Seats and storage
12-volt socket
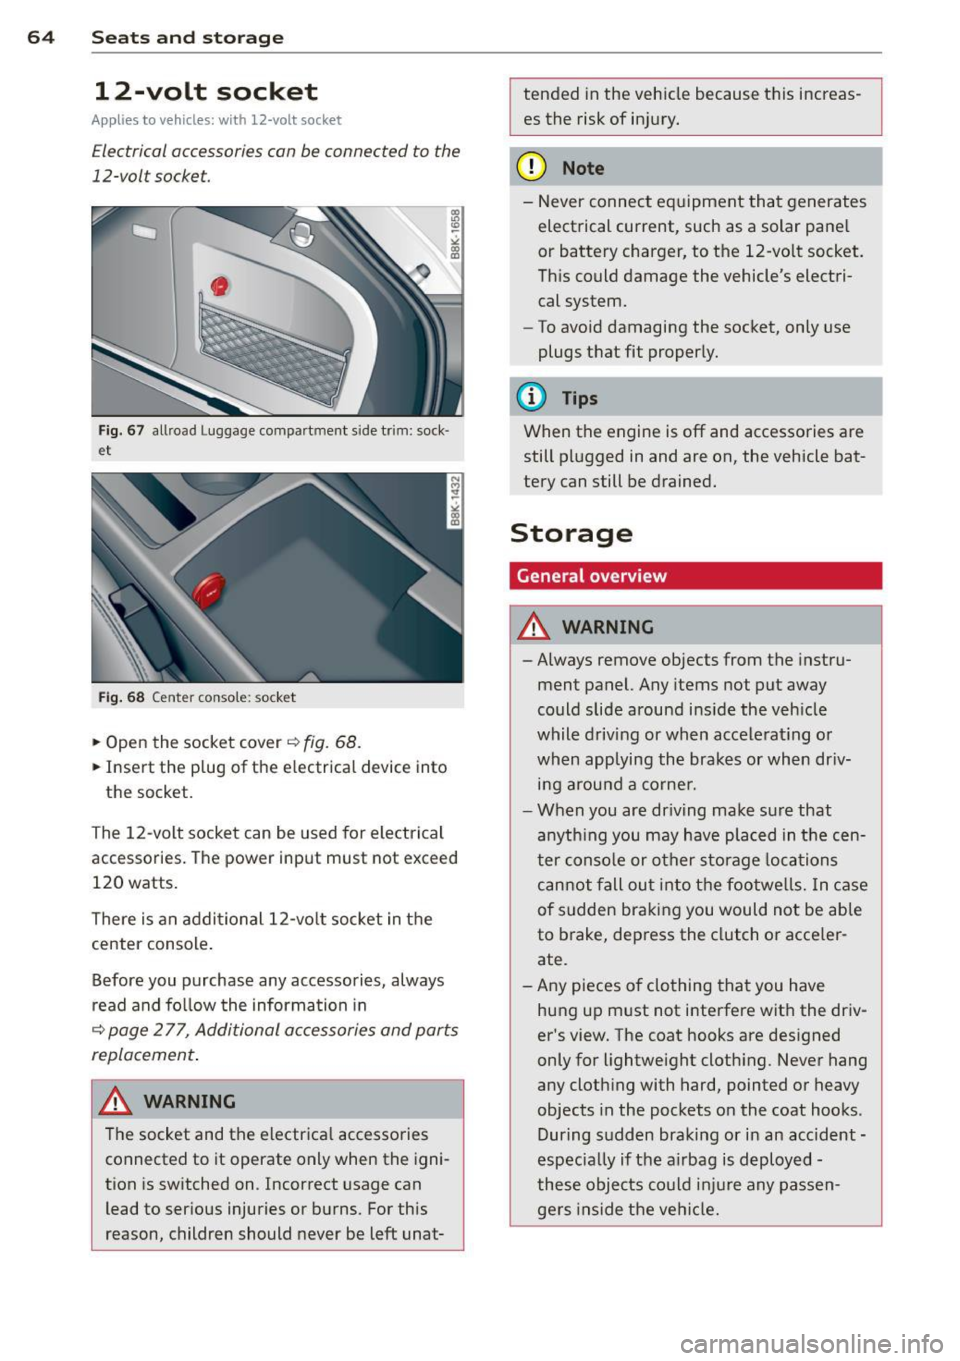
Applies to vehicles: wit h 12-volt socket
Electrical accessories can be connected to the
12-volt socket.
F ig . 6 7 allroad Luggage compartment s ide trim: sock·
et
Fig . 68 Center conso le: socket
.,. Open the socket cover~ fig. 68.
.,. Insert the p lug of the e lectrical device into
the socket.
The 12-volt socket can be used for elec trical
accessories. The power input must not exceed
120 watts.
There is an addi tional 12-vo lt socket in the
center console .
Before you purchase any accessories, always
r ead and fo llow the information in
~ page 277, Additional accessories and parts
replacement .
.&_ WARNING
The socket and the electrica l accessories
connected to it operate only when the igni
tion is sw itched on. Incorrect usage can
lead to serious injuries or burns. For this
reason, children should never be left unat-
-
tended in the veh icle because this increas
es the risk of in jury.
(D Note
-Never connect eq uipment that generates
electrical current, such as a solar pane l
or battery charger, to the 12-vo lt socket.
Th is could damage the vehicle's electri
cal system.
- To avoid damaging the socket, only use
plugs t hat fit properly.
(D Tips
When the engine is off and accessories are
still plugged in and are on, the vehicle bat
tery can still be drained.
Storage
General overview
.&_ WARNING
-
- Always remove objects from the instru-
ment panel. Any items not put away
could slide around ins ide the veh icle
while driving or when accele rat ing or
when applying the brakes or when dr iv
i n g arou nd a corne r.
- When you are dr iving make su re that
anyth ing you may have pla ced in the cen
ter conso le or other sto rage locations
can not fall ou t in to t he footwe lls. In c ase
of sudden braking you would not be able
to brake, dep ress the clutch o r acce ler
ate.
- Any pieces o f clothing that you have
hung up m ust not interfere with the driv
er 's view. The coat hooks are des igned
only for lightweight cloth ing. Never hang
any clothing with hard, pointed or heavy
objects in the pockets on the coat hooks .
During s udden braking or in an accident -
especia lly if the a irbag is d eployed -
these objec ts co uld inj ure any passen
gers inside the ve hicl e.
-
Page 68 of 296
66 Seat s a nd s tor ag e
Addit ional storage
There are a variety of storage compa rtments
and fasteners in var ious places in the vehicle.
- In the roof headliner above the rearview
mirror .
- On the back of the front seat . The com pa rt
ment can hold a maximum weight of 1 kg.
- On the left and right of the luggage com
partment, behind the s ide trim.
- Garment hooks on the pillars in the rear of
the vehicle .
A WARNING
-When driving, do not leave any hard ob
jects on the rear wi ndow shelf or allow
your pet to s it on the shelf. They could
become a hazard for ve hicle occ upan ts in
the event of sudden braking or a crash.
- Always remove objects from the instru
ment pane l. Any items no t stored could
slide around inside the vehicle while driv
ing or when accelerating or when apply
ing the brakes or when driving around a
corner.
- When you are driving make sure that
anything you may have placed in the cen
ter console or other storage locations cannot fall out into the footwells. In case
of sudden braking you would not be able
to brake or accelerate .
- Any articles of cloth ing that you have
hung up must not interfere with the driv
er's v iew. The coat hooks are designed
only for lightweight clothing. Never hang
any clothing wit h hard, po inted or heavy
objects in the pockets on the coat hooks .
During sudden braking or in an accident -
especially if the airbag is deployed -
these objects could injure any passen
gers inside the vehicle .
- To reduce the risk of persona l injury in an
acc ident or sudden stop, always keep the
glove compartment closed while dr iving.
- Read and fo llow all WARNINGS
i=> page 163, Important safety instruc
tions on the side airbag system.
- Hang clothes in such a way that they do
not impa ir the driver's vision.
- The coat hooks must on ly be used for
lightweight clothing. Do not leave any
heavy or sharp edged objects in the pock
ets which may interfere with the s ide cur
tain airbag deployment and can cause pe rsonal injury in a crash.
- Do not use coat hangers for hanging
cloth ing o n the coat hooks as t his can in
terfere with proper deployment of the
side curta in a irbags in an a ccident.
- Do not hang heavy objects on the coat
hooks , as they could cause personal in
jury in a sudden stop.
- Always keep the compa rtment above the
rea rv iew mirror closed while d riving to
re duc e the risk of i nju ry in the event of
sudden b raking m aneuvers or a collision.
(£} Note
Objects located on the rear shelf that rub
against the rea r window could damage the
hea ting wi res for the rear window defog"
ger.
(D Tips
-A vent slot is located between the shelf
and the rear w indow. Do not bloc k the
vent wi th any items you may place o n the
rear window she lf.
- Do not place b ulky items on the rear win
dow shelf as they co uld restrict or block
the drive r's vision in the rear view mirror.
Page 78 of 296
76 Warm and cold
Warm and cold Climate controls
Description
The climate control system warms, cools and
adds humidity to the air in the vehicle interior.
It is the most effect ive when the windows and
sunroof are closed . If there is a build-up of
heat inside the vehicle, ventilation can help to
speed up the cooling process.
I n all heating mode functions except
defrost,
the blower on ly switches to a higher speed
once the engine coolant has reached a certain
temperature.
Condensat ion from the cooling system can
drip and form a puddle of water under the ve
hicle. This is normal and does not mean there
is a leak.
Pollutant filter
The pollutant filter removes pollutants s uch
as dust and pollen from the air.
The air pollutants filter must be changed at
the intervals spec ified in you r Warranty
&
Maintenance booklet, so that the air condi
tioner can properly work.
If you drive your vehicle in an area with h igh
a ir po llution, the fi lter may need to be
changed more frequent ly than specified in
your Aud i Wa rranty
& Ma intenance booklet. If
in doubt, ask your authorized Audi Service Ad
visor for advice .
Key coded settings
The climate control settings are automat ically
stored and assigned to the remote control key
that is in use.
A WARNING
Reduced visibility is dangerous and can
cause accidents.
-
- For safe driving it is very important that
all windows be free of ice, snow and con
densation.
- Comp letely familiarize yourself with the
proper use and function of the heating
and ventilation system and especially how to defog and defrost the windows.
- Never use the windshield wiper/washer
system in freez ing weather unt il you
have warmed the windshield first, using
the heating and ventilation system. The
washer solution may freeze on the wind shie ld and reduce visib ility.
(D Note
- If you suspect that the air conditioner
has been damaged, switch the system
off to avoid further damage and have it
inspected by a qualified dealership.
- Repairs to the Audi air conditioner re
quire special technical know ledge and
special tools. Contact an authorized Aud i
dea ler fo r assistance.
@ For the sake of the environment
By reducing the amount of fuel you use,
you also reduce the amount of pollutants
emitted into the air.
(D Tips
-Keep the air intake s lots (in fro nt of the
w indshield) free from ice, snow and de
bris in order to maintain the proper func
tion of the climate control system.
- T he energy management system may
switch the seat heating* or rear window
defroster off temporarily . These systems
are available again as soon as the energy
balance has been restored.
- Air escapes through vents under the rear
window. When placing items of clothing
on the luggage compartment cover, en
sure that the openings are not covered.