coolant AUDI S4 2014 User Guide
[x] Cancel search | Manufacturer: AUDI, Model Year: 2014, Model line: S4, Model: AUDI S4 2014Pages: 296, PDF Size: 73.56 MB
Page 223 of 296
Engine cooling system
Coolant
The engine coolant performs two functions: it
keeps the engine from overheating and it pro
tects the engine from freezing in the winter .
The cooling system is sealed and generally re
qu ires little attention .
The cooling system has been filled at the fac
tory with a permanent coolant which does not need to be changed. The coolant consists of a
mixture of specially conditioned water and the
manufacturer's glycol-based coolant addi-
tive G13 antifreeze with anticorros ion addi
tives (50% for USA models; 60% for Canadian
models) . This mixture both assures the neces
sary frost protection and protects metal com
ponents in the engine's cooling system from
corrosion and scaling.
It also raises the boil
ing point of the coolant.
Do not reduce the concentration of the coo l
ant in the summer by adding plain water .
The
proportion of coolant additive must be at
least 50% but not more than 60%
to main
tain antifree ze protection and cooling efficien
cy. If the coolant frost protection is too low,
the coolant could freeze and damage the vehi
cle heating and eng ine cooling system .
For year-round driving, antifree ze is added at
the factory for temperatures down to:
- -31°F(-35°C)USA
- -40 ° F ( - 40 °C) Canada.
I f you must add coo lant, use a mixture of wa
ter and coolant addit ive. Mixing the coolant
additive with distilled water is recommended.
& WARNING
Before you check anything in the engine
compartment, always read and heed all
WARNINGS
c::;, .&. in Working in the engine
compartment on page 214.
(D Note
- Before winter sets in, have the coolant
checked to see if the coolant additive in
Checkin g and fillin g 221
your vehicle is sufficient to meet the cli
mate conditions. This is especia lly impor
tant if you live in a region where the win
ter is extremely co ld. If necessary, in
crease the proportion of coolant additive
to 60% .
- When adding coolant additive to your
cooling system, remember :
- We recommend using only coolant ad
ditive G12++ or G13 for your vehicle .
This coolant additive is available at au
thorized Audi dealers. Other types of
antifreeze can significantly reduce cor
rosion protection. The resulting corro
sion can cause a loss of coolant and se rious engine damage.
- Do not add any type of radiator leak seal
ant to your vehicle's engine coolant.
Adding radiator repair fluid may adverse
ly affect the function and performance of
your cooling system and could result in
damage not covered by your New Veh icle
Limited Warranty.
Checking the engine coolant level
The engine coolant level can be checked with
a quick glance.
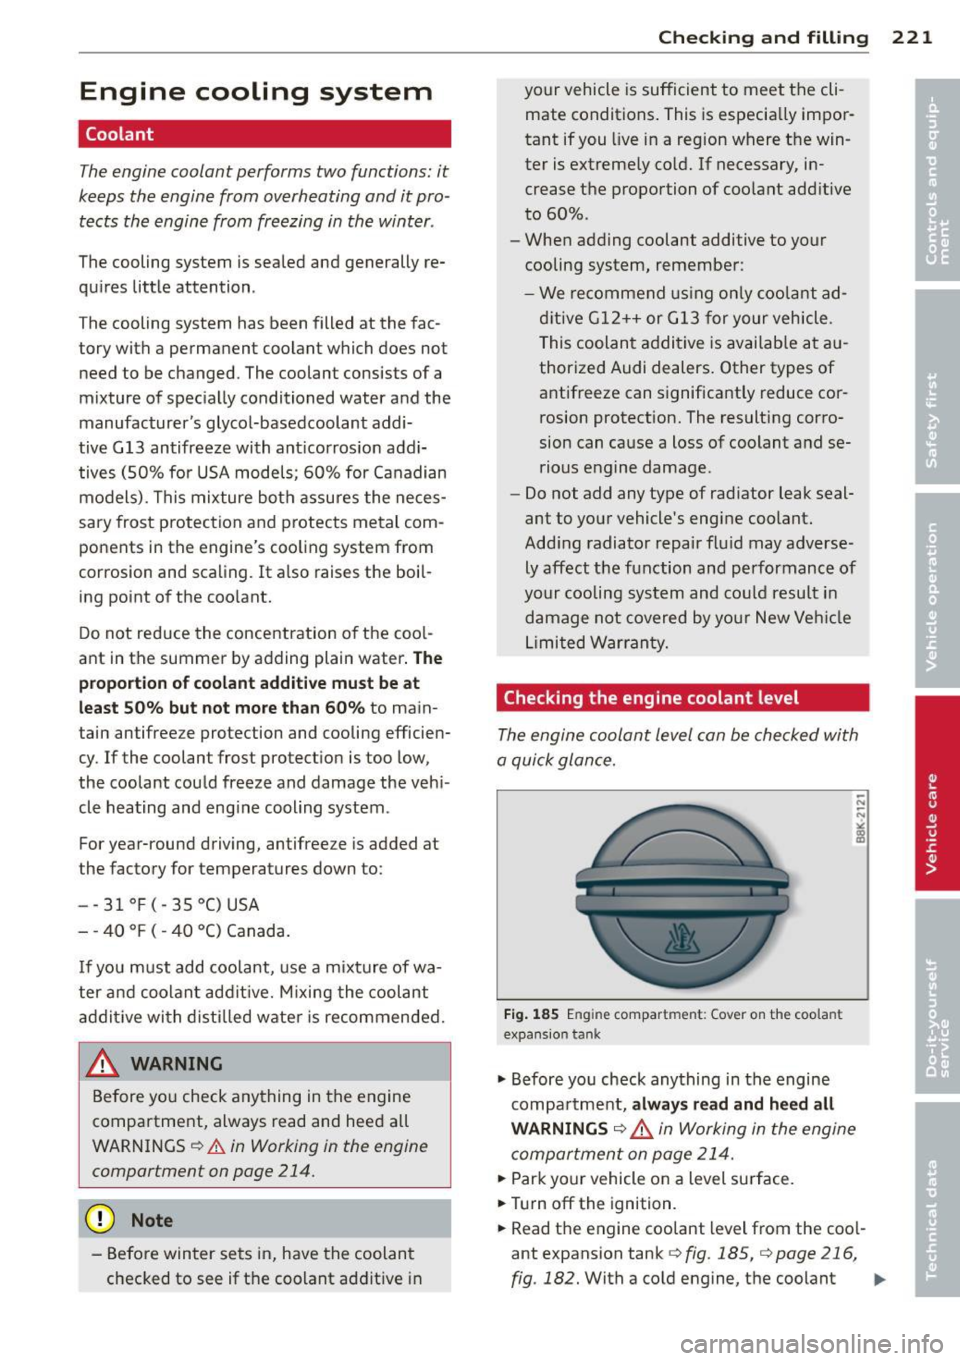
Fig. 185 En gin e compar tment: Cover on the coo la n t
expansio n tan k
"' Before you check anything in the engine
compa rtme nt,
always read and heed all
WARNINGS c::;, .&, in Working in the engine
compartment on page 214.
"'Park your vehicle on a level su rface .
.,. Turn off the ignition .
.,. Read the engine coolant level from the cool
ant expansion tank
i=> fig . 185, c::;, page 216,
fig . 182. With a cold engine, the coolant Iii>
Page 224 of 296
222 Check ing and filling
level should be between the "MIN" and
"MAX" markings. When the engine is warm,
the leve l may be slightly above the "MAX"
marking .
The location of the coolant expansion tank
can be seen in the engine compartment illus
tration
c:> page 216.
To obtain an accurate reading, the engine must be switched
off.
The expansion tank in you r vehicle is equipped
with an e lectric coolant level sensor.
When the coolant level is too low, the warning light in the Auto-Check System
c:> page 17will
b link until you add coo lant and the level has
been restored to no rma l. Even though there is
an electric coolant level sensor, we still rec
ommend you check the coolant leve l from
time to time.
Coolant loss
Coolant loss may indicate a leak in the cool ing
system. In the event of coolant loss, the cool
ing system should be inspected immediately
by your authorized A udi dealer.
It is not
enough merely to add coolant.
I n a sealed system, losses can occur only if
the boiling point of the coolant is exceeded as
a result of overheat ing.
A WARNING
The cooling system is unde r pressure and
can get very hot. Reduce the risk of scald
ing from hot coolant by following these
steps .
- Turn
off the engine and allow it to cool
dow n.
- Protect yo ur face, hands and arms from
escaping fluid and steam by covering the
cap with a large, thick rag .
- Turn the cap slowly and very carefully in
a counter-clockwise direction wh ile ap
plying light, downward pressure on the
top of the cap .
- To avoid be ing burned, do not spill ant i
freeze or coolant on the exhaust system
'
or hot engine parts. Under certa in cond i
tions, the ethylene glycol in engine coo l
ant can catch fire.
(D Note
Do not a dd any type of radiator leak sea l
ant to your veh icle's engine coolant. Add
i ng radiator repa ir fl uid may adverse ly af
fect the funct ion and performance of your
cooling system and could result in damage
not covered by your New Veh icle L imited
War ranty .
Adding coolant
Be very careful when adding engine coolant.
Before you check anyth ing in the eng ine com
partment, always read and heed all WARN
INGS
c:> A in Working in the engine compart
ment on page 214 .
Requirement: There m ust be a res idual
amount of coo lant in the expans ion tank
c:> (]) .
.,.. Turn off the eng ine .
.,.. Let the engin e cool down.
.,.. Place a thick rag over the coo lant expansion
tank
c:> page 221 , fig. 185 and carefully turn
the cap counter-clockwise
c:> .&_ .
.,.. Add coo lant m ixed in the correct rat io
c:> page 221, Coolant up to the MAX ma rk
ing.
.,.. Mak e s ure t hat the fl uid leve l remains sta-
b le. Add more coo lant if necessary.
.,.. Twist the cap on again
tightly .
Replacement engine coo lant must confo rm to
ex act spec ific at ions
c:> page 221, Coolant.
We recommend using only coolant add it ive
G12 ++, G13 or i n an emergency G 12+. Do
not
use a different add it ive. In an emergen cy use
plain wa ter until yo u can ge t the correct addi
tive and can restore t he correct ratio. This
sho uld be done as soon as possib le .
If you have los t a cons iderab le amount o f
coolant, the n you sho uld add cold ant ifree ze
and co ld wate r on ly when the engine is cold.
Always use
n ew engine coo la nt w hen refilling . .,.
Page 225 of 296
Do not fill coolant above the "MAX" mark. Ex
cess coolant will be forced out through the pressure relief valve in the cap when the en
gine becomes hot .
_& WARNING
-The cooling system is under pressure and
can get very hot. Reduce the risk of
scalding from hot coolant by following
these steps .
- Turn
off the engine and allow itto cool
down.
- Protect your face, hands and arms from escaping fluid and steam by covering
the cap with a large, thick rag.
- Turn the cap slowly and very carefully in a counter-clockwise direction while
applying light, downward pressure on
the top of the cap .
- To avoid being burned, do not spill an
tifreeze or coolant on the exhaust sys
tem or hot engine parts . Under certain
conditions, the ethylene glycol in en
gine coolant can catch fire.
- Antifreeze is poisonous. Always store an
tifreeze in its original container and well
out of the reach of children.
- If you drain the coolant, it must be
caught and safely stored in a proper con
tainer clearly marked "poison".
(D Note
- Do not add coolant if the expansion tank
is empty. Air could enter the cooling sys
tem and damage the engine. If this is
the case, do not continue driving . Seek
professional assistance.
- Coolant pollutes the environment and
could cause an engine fire . Excess cool
ant will be forced out through the pres
sure relief valve in the cap when the en
gine becomes hot.
- If, in an emergency, only water can be
added, the correct ratio between water
and antifreeze ¢
page 221 must be re
stored as soon as possible.
Checking and filling 223
'
@) For the sake of the environment
Drained coolant should not be reused. Al
ways dispose of used coolant while observ
ing all environmental regulations.
Radiator fan
The radiator fan switches on automatically by
itself .
The radiator fan is driven by the engine via the
V-belt. The viscous clutch regulates the speed
of the fan according to the temperature of the coolant.
An auxiliary electric radiator fan* switches on
and
off depending on coolant temperature
and other vehicle operating conditions.
After you switch the engine
off, the auxiliary
fan can continue running for up to 10 minutes
- even with the ignition
off. It can even switch
on again later by itself ¢.&. , if
- the temperature of the engine coolant rises
du e to the h eat build-up from th e engin e in
the engine compartment, or
- the engine compartment heats up because
the vehicle is parked in intense sunlight.
_& WARNING ~
-To reduce the risk of personal injury nev-
er touch the radiator fan .
- The auxiliary electric fan is temperature
controlled and can switch on suddenly
even when the engine is not running.
- The auxiliary radiator fan switches on au
tomatically when the engine coolant reaches a certain temperature and will
continue to run until the coolant temper
ature drops. •
•
Page 233 of 296
-Never mount used tires on yo ur vehicle if
yo u are not sure of their "previous histo
ry." Old used tires may have been dam
aged even though the damage cannot be
seen that can lead to sudden tire failure
and loss of vehicle control.
- If you notice unusual vibration or if the
vehicle pulls to one side when d riving, al
ways stop as soon as it is safe to do so
and check the wheels and tires for dam
age .
(D Note
-Please note that summer and winter
tires are designed for the cond itions that
are typ ic al in those seasons. Aud i recom
mends using w inter t ires du ring the win-
Glossary of tire and loading terminology
Accessory weight
means the comb ined weight (in excess of
those standard items which may be replaced)
of automatic tra nsmission, power steering,
power brakes, power windows, power seats,
radio, and heater, to the extent that these
items are availab le as factory-installed equip
ment (whether installed or not) .
Aspect ratio
means the ratio of the height to the width of
the tire in percent . Numbers of 55 or lower in
d icate a low sidewall for improved steering re
sponse and better overall handling on dry
pavement .
Bead
means the pa rt of the ti re that is made of
steel wires, wrapped or reinforced by ply cords
and that is shaped to fit the rim.
Bead s eparation
means a b reakdown of the bond between
components in the bead.
Cord
means the strands forming the plies in the
tire.
Tire s an d wheel s 231
ter months . Low temperatu res signifi
cantly decrease the elastic ity of summer
t ires, which affects traction and braking
ability. If summer tires are used in very
co ld temperatures, cracks can form on
the tread bars, res ulting in permanent
ti re damage that can cause loud drivi ng
noise and unbalanced tires. Aud i is not
responsib le for this type of damage.
- Burn ished, polished or chromed rims
must not be used in winter weather. Th e
surfa ce of the rims does not have suffi
c ien t cor rosion pro te cti on for this and
c o ul d be pe rmanen tly damaged by road
salt or similar substances. This damage
is not covered by warranty.
Cold tir e inflation pressure
me ans the t ire press ure re commended by the
vehicle manufacturer fo r a tire o f a des igna ted
size that has not bee n driven for more than a
couple of miles (k ilomete rs) at low speeds in
the three hour pe riod before the tire press ure
is measured or adjusted.
Curb weight
means the weight o f a motor vehicle with
standard equipment including the maximum
capacity of fuel, o il, and coolant, air cond i
tion ing and additional weight of optiona l
equipment.
E xtra load tire
means a tire design to operate at higher loads
and at higher inflation pressures than the cor
responding standard tire. Extra load tires may
be identified as "XL", "xl", "EXTRA LOAD", or
"RF" on the sidewall.
Gross Axle Weight Rating ("GAWR")
means the load-carrying capacity of a single
axle system, measured at the tire-ground in-
ter~ces .
~
•
•
Page 241 of 296
not exceeded . Vehicle load includes everybody
and everything in and on the vehicle. These
l oad limits are techn ica lly referred to as the
ve hicle's
Gross Veh icle We ight Rat ing
("GVWR").
The "GVWR" includes the weight of the basic
veh icle, all factory insta lled accessories, a full
tank of fu el, oil, coolant and other fluids plus
maximum load. The maximum load includes
the number of passengers that the vehicle is
i n tended to carry ("seating capacity") with a n
assumed weight of 150 lbs . (68 kg) for each
passenger at a des igna ted sea ting pos ition
and the tota l we ight of any l uggage in the ve
h icle. If you tow a trailer, the weight o f the
trailer hitch and the tong ue weight of the
l oaded trailer must be included as part of the
veh icle load.
The
Gro ss A xle Weight Rating ("GAWR") is
the maximum load that can be applied at each
of the vehicle's two ax les.
The G ross Vehicle We ight Rating and the
Gross Axle Weight Rating are listed on the
safety compliance sticker labe l located on the
driver's side B -pi llar . Your Audi has 5 seating
positions, 2 in the front and 3 in the rear for
tota l seating capacity of 5. Each seating posi
tion has a seat belt¢
page 138, Safety belts.
The fact that there is an upper limit to your
veh icle's Gross Vehicle Weight Rating means
that the tota l weight of whatever is being car
ried in the vehicle (including the weight of a
trailer hitch and the tongue weight of the
loaded trailer) is limited. The more passen
ge rs in the veh icle or passengers who are
h eav ier than the standa rd weights assumed
mean that less weight can be ca rr ied as l ug
gage.
The tire pressure labe l on you r Audi also lists
the maximum combined we ight of all of the
oc cu pants and luggage o r othe r ca rgo that
the vehicle can carry . For the location o f the
l abe l
¢page 234, fig. 189.
Tires an d wheel s 239
A WARNING
Overloading a vehicle can cause loss of ve
h icle contro l, a crash or other accident, se
rious pe rsonal injury, and even death.
- Carrying more we ight than your veh icle
was des igned to carry will prevent the
veh icle from handling properly and in
crease the risk of the loss of vehicle con
trol.
- The brakes on a vehicle that has been
overloaded may not be able to stop the
veh icle w ith in a safe distance.
- Tires on a vehicle that has been overload
ed can fail suddenly, incl uding a blowout
and sudden defla tion, causing loss of
contro l and a crash.
- Always ma ke sure that the total load be
ing transpor ted - incl uding the weight of
a trailer hitch and the tongue weight of a loaded trailer -does not ma ke the vehi
cle heavier than the vehicle's Gross Vehi
cle We ight Rating.
Determining correct load limit
U se th e example below to ca l
culate the total weight of the
pa ssengers and lu ggage or oth
e r thing s that you pl an t o tran s
po rt so that you can make sur e
that your vehicle will not be
o verloaded.
Steps for Determining
Correct Load Limit
1 . Lo cate th e statement "THE
COMBINED WEIGHT OF O C
CUPANTS AND CARGO
SHOULD NE VER E XCE ED XXX
KG OR XXX LBS"on your vehi-
c le 's pla card (tire inflation ..,
•
•
Page 274 of 296
272 Technical Data
Technical Data
Vehicle identification
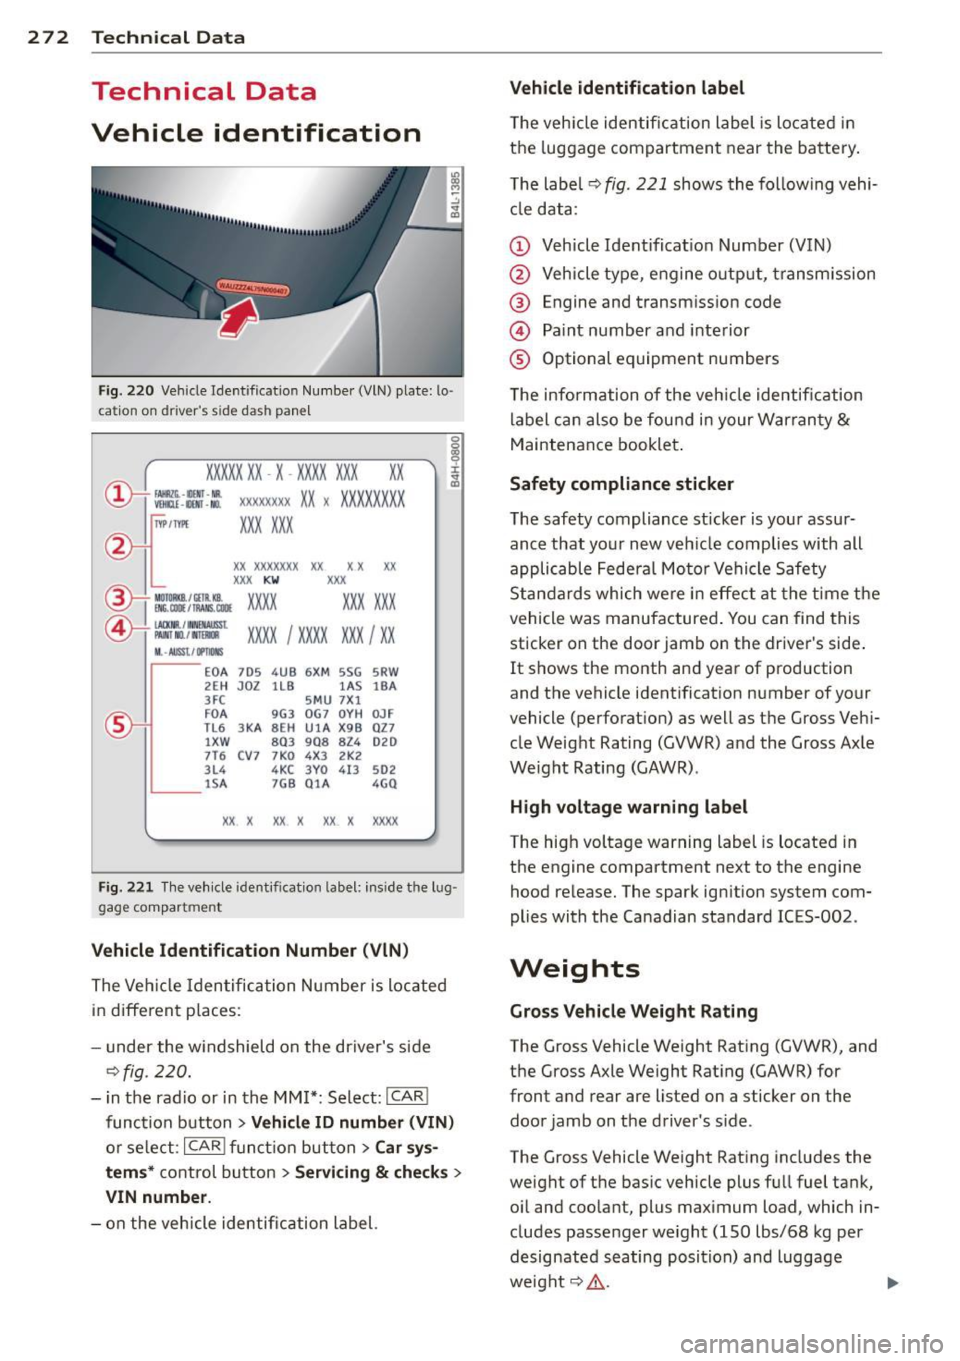
Fig . 220 Vehicle Ident ification Number (VlN) plate: lo ·
cation on driver 's s ide dash panel
XXXXX XX · X -XXXX XXX
r,"\__l f~ -11!111 · NII. ~ V!Hlll -llllll . NO.
xx
XXXXXXXX XX X XXXXXXXX
XXX XXX IYP IT'fl'E
XX XXXXXXX XX X X XX
XXX
KW XXX
®i ~~:f :l~~ XXXX XXX XXX
@+ ~~r= XXXX I XXXX XXX I XX M ,. AIIISl./ lflllllS
EOA 7D5 4 UB 6XM SSG 5RW
2E H JDZ llB l AS lBA
3FC 5MU 7Xl
FO A
9G3 OG7 O
YH OJF
TL6 3
KA BEH
UlA X9B QZ 7
l XW
8Q3 9Q8 82 4 020
7T6 CV 7 7KO 4X3 2K2
3L4 4 KC 3YO 4I3 502
lS A 7GB Q1A 4GQ
XX X
XX X XX X XXXX
Fig. 221 The vehicle identi fication label: ins ide the l ug
gage compart men t
Vehicle Identification Number (VlN)
The Vehicle Identification Number is located
in different pla ces :
- under the windshield on the driver's side
~fig. 220.
-in the radio or in the MM!": Select: I CAR!
function button >
Vehicle ID number (VIN)
or select: ICAR!function button> Car sys
tems* control button > Servicing & checks >
VIN number.
-on the vehicle identification label.
Vehicle identification label
The veh icle identification label is located in
the luggage compartment near the battery.
T he labe l~
fig. 221 shows the following vehi
cle data :
(D Vehicle Identificat ion Number (VIN)
@ Vehicle type, engine o utput, transmission
@ Engine and transm ission code
@ Paint number and interior
® Optional equipment numbers
T he information of the vehicle identification
label can also be found in your Warranty
&
Maintenance booklet.
Safety compliance sticker
The safety compliance sticker is your assur
ance that your new vehicle complies with all applicable Federal Motor Vehicle Safety
Standards which were in effect at the time the
vehicle was manufactured . You can find this
sticker on the door jamb on the driver's side .
It shows the month and year of production
and the vehicle ident ification number of your
vehicle (perforation) as well as the Gross Veh i
cle Weight Rating (GVWR) and the Gross Ax le
Weight Rating (GAWR) .
High voltage warning label
The high voltage warning label is located in
the engine compartment next to the engine
hood release. The spark ignition system com
plies with the Canadian standard ICES-002 .
Weights
Gross Vehicle Weight Rating
The Gross Vehicle Weight Rating (GVWR), and
the Gross Axle Weight Rating (GAWR) for
front and rear are listed on a sticker on the
door jamb on the driver 's s ide .
The Gross Vehicle Weight Rating includes the
weight of the basic vehicle plus full fuel tank,
o il and coolant, plus maximum load , which in
cludes passenger we ight (150 lbs/68 kg per
designated seating position) and luggage
we ight~ _&.
Page 279 of 296
-Always make sure the transm ission se
lector lever (automatic transmiss ion) is
in "P" (Park position) or Neutral (manual
transmission) and the park brake is firm
ly appl ied .
® For the sake of the environment
-Changing the eng ine settings w ill ad
versely affect em ission levels. This is det
rimental to the environment and increas
es fuel consumption .
- Always observe env ironmental regula
tions when d ispos ing of old engine oil,
used brake fluid, dirty engine coolant,
spent batter ies or worn out t ires.
- Undeployed airbag modules and p reten
s ioners might be classified as Perchlo
rate Material -special handling may ap
ply, see www.dtsc.ca .gov/hazardous
waste/perch lorate . When the veh icle or
parts of the restraint system including
airbag modules safety belts with preten
s ioners are scrapped, all applicable laws
and regulations must be observed. Your
authorized Audi dealer is familiar w ith
these requirements and we recommend
that you have your dealer perform this
serv ice for you .
Additional accessories,
modifications and
parts replacement
Additional accessories and parts
replacement
Always consult on authorized Audi dealer be
fore purchasing accessories.
Your veh icle incorporates the latest safety de
sign featu res ensu ring a high standard of ac
tive and passive safety.
This safety could be compromised by non-ap
proved changes to the veh icle. For this reason ,
if parts have to be replaced, p lease observe
the following points when installing addition
al accessories:
Con sumer In formation 2 77
Approved Audi accessories and genuine Audi
parts are available from authorized Audi deal
er.
T hese dea lers a lso have the necessary facili
ties, tools and trained specialists to install the
parts and accessories proper ly.
A WARNING
Using the wrong spare parts or using non
approved accessories can cause damage to
the vehicle and serious persona l injury.
- Use on ly accessories express ly approved
by Audi and genuine Audi spare parts
- These parts and accessories have been
specially designed to be used on your ve
hicle.
- Never install accessories such as tele
phone cradles or beverage holders on air
bag covers or within the airbag deploy
ment zones . Do ing so will increase the
risk of injury if a irbags are triggered in an
accident!
- Before you check anything in the engine
compartment, always read and heed all
WARNINGS ~
page 214.
(D Note
-If items other than genuine Audi spare
parts, add-on equipment and accessory
items are used or if repair work is not
performed accord ing to specified meth
ods, this can result in severe damage to
your vehicle's engine and body (such as
corrosion) and adversely affect your vehi
cle's warranty .
- If emergency repairs must be performed
elsewhere, have the vehicle examined by
an authorized Audi dealer as soon as
possible.
- The manufacturer cannot be held liable
for damage wh ich occurs due to failure
to comply with these stipulations.
•
•
Page 282 of 296
28 0 Index .:..:..:..::....::.. ...:..._ ___________________________ _
A
Accessories . . . . . . . . . . . . . . . . . . . . 64, 277
AC (automatic cl imate control) ... .. .. . . 77
adaptive cruise control Vehicles with manual transmission .. . 101
Adapt ive cruise control . . . . . . . . . . . . . . . . 99
C leaning the sensor .. ... .. .. .. .... . 205
Messages . . . . . . . . . . . . . . . . . . . . . . . . 107
Request for dr iver intervention . ..... . 105
Setting the driving program .. .. .. ... 104
Adapt ive dampers .......... .... .... . 113
Adapt ive light ................ ... .... 47
Adaptive Lig ht (defective) ... .. .. .... .. 22
Adding Eng ine coolan t .................... 222
E ng ine oil . .... .. ..... ... .. .. .... . 219
Windshield washer fluid ... .. .. .... . 228
Addit ional accessories
Addit ives 277
Eng ine oil .. ............. .. .. .. .. . 219
Ad justab le steering column . ... .. .... .. 80
Adjust ing
A ir dist ribution (automatic climate con -
trol) . . . . . . . . . . . . . . . . . . . . . . . . . . . . . . 78
I ns trumen t illum inat ion . .. .. .. .. .. . . 50
Steer ing column .. ..... ... .. .. .... .. 80
Temperature (automatic climate control) 78
A irbag
War ning/ indicato r ligh ts ... .... .... .. 20
A irbag system . . . . . . . . . . . . . . . . . 146, 162
Advanced Airbag System ........ .... 150
Advanced Airbag System components . 153
Care . .. .. .. ........ ........ ..... . 159
C hil dren . ............... .. .. .. .. . 168
Ch ild restr aints ........... .. .. .. .. . 169
Components (front airbags) .. .... .. . 153
Danger of fitting a child safety seat on
the front passenger seat . . . . . . . . . . . . 147
Disposal . .... ........... .. .. .... . 159
Front airbags . . . . . . . . . . . . . . . . 150, 151
H ow do the front airbags work? . .. .. . 155
H ow many airbags does my vehicle
have? .... ................... ... . 153
H ow the Advanced Airbag System com-
po nents work together ............. 154
I mpor tan t things to know .. .. .. .. .. . 14 6 Indicator light
... ... .. ..... .... . .. 156
Monitoring . ..... .. ... ..... ... .. .. 156
PASSENGER AIR BAG OFF light ... .. .. 157
Repairs ... .... .. ............. .... 159
Safety instructions ................. 158
S ide a irbags ..... ................ . 161
S ide cu rtain airbags ........... ... .. 164
Weight-sensing mat ............... 168
When must the sys tem be inspected? 156
Alcantara Cleaning ...... ................... 207
all-wheel drive
All wheel d rive 192
Winter tires . .. .. .. ........... .. .. 246
Alternator
refer to Generator . . . . . . . . . . . . . . . . . . 17
Anti-freeze
refer to Engine coolant system ....... 221
An ti-lock brak ing system ............. 186
W arning/ind icator lights . . . . . . . . . 18 , 19
An ti-slip regulation ................ . 186
Warning/ind icator lights ........... .. 18
Anti-theft alarm warning system ... .... . 32
An ti- theft systems
El ectronic immob ilizer .. ..... .... . .. . 38
Armrest ...... .. .. .. ... ....... ... .. . 60
Ashtray .. .. .. .. .. ............. .. .. . 63
As te ris k
Wha t does i t mean when something is
marked w it h an asterisk? . . . . . . . . . . . . . . 6
Audi braking guard
refer to b ra ki ng guard .......... .. .. . 99
Audi drive select ... ............. .... 113
Adaptive dampers ................. 113
Description ...... ................ . 113
Dynam ic steer ing ................. . 113
Setting the dr iv ing mode ........ .... 114
Spo rt differential . ............. .... 113
Audi Serv ice Repair Manuals and Litera-
ture 275
AUTO Automat ic climate control . . . . . . . . . . . . 78
Automat ic headlights .......... .. .. . 47
A ut o Lock . ..... .. .. .... .... ... .. .. . 32
Automat ic be lt retractor ............. 141
Page 283 of 296
Automatic climate control Air vents ... .... .. .... ... .. .. .. .... 78
Operation . . . . . . . . . . . . . . . . . . . . . . . . . 77
Setup ... .. ................. .. .... 79
Automatic S hift Lock (ASL) . . . . . . . . . . . . 93
Automatic transmission ......... ... ... 91
Automatic S hift Lock (ASL) . . . . . . . . . . . 93
D riving .. .. ............. .... .. .. .. 9 3
E mergency mode . . . . . . . . . . . . . . . . . . . 97
E me rgency release . . . . . . . . . . . . . . . . . . 98
Kick -down . . . . . . . . . . . . . . . . . . . . . . . . . 96
M anual shift program .. ... .. .. .. .. .. 96
Remova l lock (ignition key) ... .. .. .. .. 80
Selector lever . . . . . . . . . . . . . . . . . . . . . . 92
Automatic wipe rs . . . . . . . . . . . . . . . . . . . . 53
Auto Safety Hotline ............. .... 136
Average speed . . . . . . . . . . . . . . . . . . . . . . . 25
Avoid damag ing the vehi cle .. .. .. .. .. . 195
B
Bag hooks . . . . . . . . . . . . . . . . . . . . . . . . . . 72
Battery . . . . . . . . . . . . . . . . . . . . . . . 17,225
Battery location inside the luggage com -
partment .. .. ........... .. .. .. ... 225
Charging . ................ ... ... .. 227
Important war nings when wo rking on
the battery . ................ ... ... 225
J ump starti ng ............ .... .. .. . 266
L ow . .. .. .. .. .. ........... .. .. ... 193
Replacing the ba ttery .. ... .. .. .. .. . 228
State of charge . ....... ... .. .. .. ... 193
Winter operation . ..... ... .. .. .. .. . 225
Working on the battery .... .. .. .. .. . 225
B efore dr iving ............. .... .. .. . 128
Bio-ethanol (Fuel) ..... ..... .. .. .. .. . 210
Blended gasoline ... .... ... .. .. .. .. . 209
B lower (automatic climate cont rol) . . . . . . 78
Booster seats ............. .... .. .. . 175
B rake fl uid
C hanging the brake fl uid ... .. .. .. .. . 224
Chec king the brake fluid level ... .. .. . 224
Reservoir .. ............. .... .. ... 224
What is the correct brake flu id leve l? . . 224
What should I do if the brake fluid warn-
i ng light comes o n? .. ..... .. .. .. .. . 224
Inde x 281
Brake system . ..... ... .. .. ..... ... .. 224
Anti- lock b raking system ..... ... .. .. . 19
B rake assist system .. .. ..... ... .. .. 186
Brake fluid .. .. .. ................. 224
Brake fluid specifications for refill and re-
placement ...... .. ............... 224
B rake light defective ... .. .. ... ... .. . 21
B ra ke powe r ass ist unit ............ . 189
Br akes .. .. .. .. .. .. . .............. 189
Ce ram ic bra kes . .. .... ........... .. 189
El ec tromechanica l parking brake ... .. . 85
Warning/indicator lights ..... ... .. .. . 15
Wor n brake pads symbo l . . . . . . . . . . . . . 20
B ra kin g
E mergency b ra ki ng f unction ..... .. .. . 87
braking guard . . . . . . . . . . . . . . . . . . . . . . . 99
Messages . . . . . . . . . . . . . . . . . . . . . . . . 107
Settings ........ .. ............... 106
Break -in per iod .. .. .... ............. 195
Tires ... .. .. .. .. .. ............... 195
Bul bs . ... .. .. .... .. . .. .. ..... ... .. 2 64
C
Califor nia Proposition 65 War ning . .. .. 215
B attery spec ifi c .. ............. .. .. 226
Capacities ........ .. ............... 273
Carbon pa rts
Cleaning . . . . . . . . . . . . . . . . . . . . 206, 207
Care ..... .. .. .. .... ... .......... .. 20 4
Cargo a rea
refer to L uggage compartment . . . 68, 134
Catalytic converter ... .. ...... ... .. .. 196
Cen te r armrest . . . . . . . . . . . . . . . . . . . . . . 60
Central lock ing .. .. ................. . 32
Cen tral lock ing switch ............. .. 36
Co nvenience key . . . . . . . . . . . . . . . . . . . . 36
Remote cont ro l key . ........... .... . 35
Ceram ic brake rotors
New brake pads .. ............. .... 189
Ce rtification . ... .... . ... ...... ... .. 278
Chang ing a flat t ire . .. ... ....... .... . 255
Chang ing a wheel .. ............. .... 255
Chang ing engine oil ............. .... 220
Checking Engine coolant level .... ....... .... . 221
Checking t ire pressure ............... 237
•
•
Page 284 of 296
282 Index
Child restraints
Dang er of using child restraints in th e
front seat . .... .... ......... ..... . 147
Where can I get addit ional information
about child restra ints and their use? . . 185
Child restraint system anchors ..... .. . 181
Ch ild safety .. ................ ... ... 167
Conve rtible locking retracto r .. .. .....
177
Important safety instructions fo r using
ch ild safety seats . . . . . . . . . . . . . . . . . . 17 0
I mportant things to know when driving
with chi ldren ........... ... .. .... .
167
Installing a child restraint using the
LATCH system . . . . . . . . . . . . . . . . . . . . . 182
Lower anchorages .......... .. .... . 182
Mounting and releasing the anchorage
hook .. .... .......... ...... ... .. . 182
Tether anchors . . . . . . . . . . . . . . . . . . . . 183
Tether straps .......... .. .. .. .. .. . 183
Child safety locks Power windows . ..... .... .. .. .. .. .. 43
Rear doors . .............. ... .. .. .. 42
Child safety seats .................. .
173
Booster seats . . . . . . . . . . . . . . . . . . . . . 17 5
Convertible child seats .... .. .. .... .
17 4
Convertible locking retracto r .. .. .....
177
Danger of using child restraints in the
front seat .. .......... ...... ... .. . 147
H ow do I properly install a child safety
seat in my vehicle? ...... .. .. .. .. .. .
170
Infant seats ............. .. .. .. .. . 173
I nstalling . .. .... ........ .. .. .... .
177
LATCH system .. .. ...... .. .. .. .... . 182
Safety instructions ................ . 170
Unused safety belts on the rear seat . .
172
C ig are tte lighte r . . . . . . . . . . . . . . . . . . . . . 63
Cleaning .. .. ................ ... .. .
204
Climate controls . . . . . . . . . . . . . . . . . . . . . 76
C limate control system
Automatic recirculation . . . . . . . . . . . . . .
79
Supp lementary heater . . . . . . . . . . . . . . . 79
synchronizing .. ........ .. .. .. .... .. 79
C lock ....... .......... ...... ... .. .. 12
C losing
Power windows .......... .. .. .... .. 43
Sliding/tilting sunroof ...... ..... .. .. 44
Sunshade .. ................ ... ... . 44 Closing/opening
at the lock cylinder . . . . . . . . . . . . . . . . . . 38
by remote control . . . . . . . . . . . . . . . . . . 35
with the centra l locking switch ... .... . 36
wi th the conven ience key . . . . . . . . . . . . . 36
Cold tire inflation pressure ........ .. .. 234
Coming home ..... ................ .. 48
Compact spare ti re .............. .... 252
also refer to Spare tire .......... .. .. 252
Compartments . . . . . . . . . . . . . . . . . . . . . . 66
Compass in the mirror ..... ... ..... .. . 56
Compliance ..... .. .. ... ........ .. .. 278
Consumer Information . . . . . . . . . . 136, 275
Contac ting NHTSA . ... .......... .. .. 136
Controls Cleaning . ..... .. .. ... ........ .. .. 206
Convenience key Indi cator lights .. ... .......... .. .. . 84
Starting engine (S TART ENGINE STOP
button) ... .... .. ... .. ........ .. .. . 83
Stopping the engine (START ENGINE
STOP button) . . . . . . . . . . . . . . . . . . . . . . 84
Switching on ignition ........... .... . 83
unlocking/locking ............. .... . 36
Convenience opening/closing ..... .. .. . 43
Convertib le child safety seats ......... 17 4
Convertib le locking retractor
Activating ... .. .. ............. .. ..
179
Deact ivat ing ... .. ... .... ....... ... 180
Using to secure a child safety seat
1.77, 179
Coolant system .... .. ........... .. .. 221
Cooling mode (automatic climate control) 77
Cooling System Expansion tank . .. .......... ...... . 221
Cornering light .... .. ........... .. .. . 47
Cruise control Changing speed .. ............. .. .. . 89
Presetting your speed .......... .... .
90
Switching off .... ... .......... .. .. . 90
Switching on ... .. ... .......... .. .. . 89
Cruising range ... .. ............. .... . 25
(upholder .. .... .. ............. .... . 65
D
Data recorder . . . . . . . . . . . . . . . . . . . . . . 186
Date display .... .. ............. .... . 12