engine sound AUDI S4 2017 Owners Manual
[x] Cancel search | Manufacturer: AUDI, Model Year: 2017, Model line: S4, Model: AUDI S4 2017Pages: 386, PDF Size: 96.32 MB
Page 28 of 386
Cockpit overview
If the light does not turn off after starting the
engine
or turns on while driving, this may indi·
cate that there is a malfunction in the eng ine. If
the indicator turns on , the catalytic converter
may be damaged.
Drive
with reduced engine performance (avoid
h ig h speeds for extended periods of time and/ or
fast acce leration) and have the malfunction cor
rected. See an authorized Aud i dealer or author
ized Audi Service Fac ility .
The electronic speed limiter may be faulty if the
indicator light turns on. For additional informa
tion, refer to
¢ page 93, Electronic speed limit
er .
The MIL indicator light may also turn on if the
fuel filler cap is not closed correctly
¢page 298.
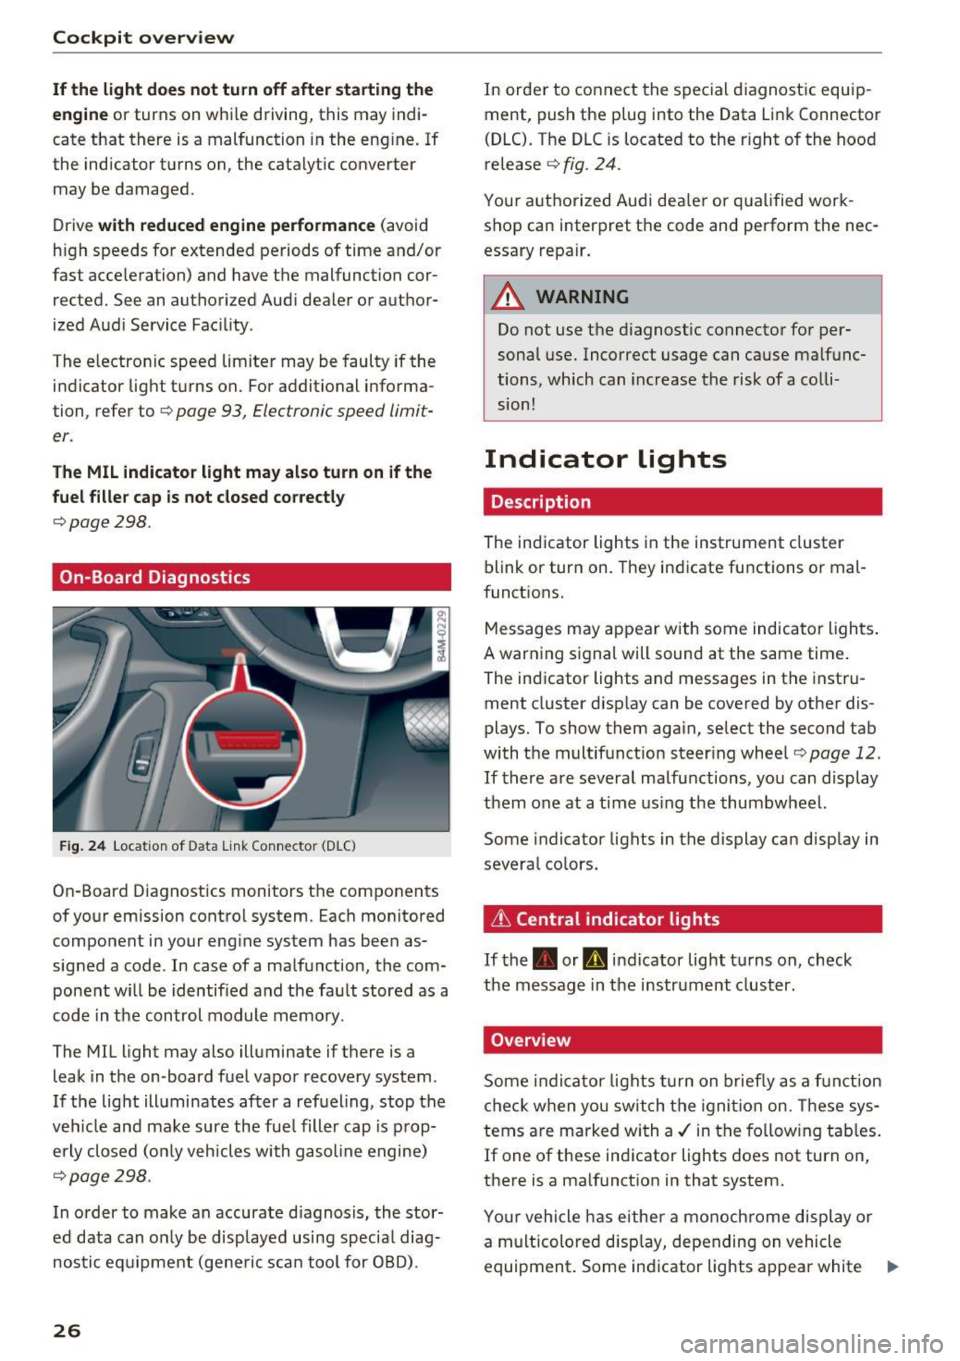
On-Board Diagnostics
Fig . 24 Locat ion of Data Link Connector (D LC)
On-Board Diagnostics monitors the components
of your emission control system. Each monitored
component in your engine system has been as
signed a code . In case of a malfunction, the com
ponent w ill be identified and the fault stored as a
code in the control module memory.
The MIL light may also illuminate if there is a
leak in the on-board fuel vapor recovery system .
If the light illuminates after a refuel ing, stop the
veh icle and make sure the fue l filler cap is prop
erly closed (on ly vehicles with gasol ine engine)
¢page 298.
In order to make an accurate d iagnosis, the stor
ed data can only be disp layed using specia l diag
nostic equipm ent (ge ne ric scan tool for OBD) .
26
In order to connect the special diagnostic equip
ment, push the plug into the Data Link Connector
(DLC). The DLC is located to the r ight of the hood
release
¢ fig. 24.
Your authorized Audi dea le r or qualified work
shop can interpret the code and perform the nec
essary repair.
_& WARNING
Do not use the diagnostic connector for per
sonal use. Incorrect usage can cause malfunc
tions, which can increase the risk of a colli
sion!
Indicator lights
Description
The indicator lights in the instrument cluster
blink or tur n on. They indicate functions or mal
funct ions.
-
Messages may appear with some indicator lights .
A warning signal will sound at the same time.
The ind icator lights and messages in the instru
ment cluster disp lay can be covered by other dis
plays. To show them again, select the second tab
with the multifunction steering wheel ¢page 12.
If there are several ma lfunctions, you can display
them one at a time using the thumbwheel.
Some indicator lights in the display can display in
several colors.
& Central indicator lights
If
the . or Q indicator lig ht turns on, check
the message in the instrument cluster.
Overview
Some indicator lights turn on briefly as a function
check when you switch the ignition on. These sys
tems are marked with a ./ in the fo llow ing tables.
If one of these ind icator lights does not turn on,
there is a malfunction in that system.
Your vehicle has e ither a monoch rome display or
a multicolored display, depending on vehicle
equipment . Some indicator lights appear white
1111-
Page 79 of 386

<( a, .... N ,....
N .... 0 0
3 a,
briefly or press and hold for longer than two sec
onds.
A WARNING
- Never t urn off the engine before the veh icle
has come to a comp lete stop.
- Please note that the brake booster and pow
er steering on ly work when the engine is
running. When the engine off, you must use
more force to steer or b rake the ve hicle. Be
cause the usual steering and brak ing capa
b ili ty is not ava ila ble, the risk of accid ents o r
injuries i ncre ases .
- For safety reasons, always park the vehicle
with the se lector lever in the P position .
Ot herwise, the re is the r is k t hat the vehicle
c o ul d roll uninten tion ally.
- After the engine h as bee n sw itched off, the
r adi ator fan c an con tinue to run for up to
1 0
m inu tes -even wi th the ig nition switche d
o ff . I t can a lso switch on again after some
t ime if the coolant temperature rises as the
result of heat buildup or if t he engine is a l
ready warm and the engine compartment is
also heated by the sun's rays.
(D Note
I f the en gine has been under heavy load for
an e xtended per io d of t ime, heat builds up in
the engine compartment after the engine is
sw itched off and there is a risk of damagi ng
the engine . For this reason, let the eng ine run
at idle fo r approximately two minu tes before
shut ting it off .
Messages
Engine running. Warning! Turn off ignition be
fore leaving car
This message appea rs and a warn ing tone sounds
i f you open t he d river's doo r when the engi ne is
ru nning.
Please press brake pedal
This message appea rs if you do not press the
brake pedal when starting the eng ine.
D riving
Ill Remote control key: key not recognized. Is
the key still in the vehicle?
T h is ind icator l igh t tu rns on and this message ap
pears if the ignition key was remove d from the
vehicle when the engi ne was running . If the ig ni
tion key is no lo nger in the vehicle, you cannot
switch on the ignition or start the engine once
you stop it . You also cannot lock the ve hicle from
the outside .
Shift to P, otherwise vehicle can roll away.
Doors can be locked in P only
T h is mess age appears for safety re asons if the
selector lever is in the N pos it ion when yo u
switch the ignition off. Move the se lector lever to
t h e P position . Othe rw ise the vehicle is not pro
tected from roll ing and it cannot be locked.
II Remote control key: hold back of key
against the de signated area. See owner' s man
ual
If t he indica to r ligh t turns on and this message
appea rs, there is a malfunction ~
page 78.
Shift to P before leaving car, otherwise vehicle
can roll away
Th is message appears if the drive r's door is
opened wh ile the ign ition is switched on an d the
t ran sm issio n has not been s hifte d to t he
P posi
t ion. Shift t he tr ansmission in to the
P p o sition
and t urn o ff the igni tion if you are leaving the ve
hicle . Otherwise the vehicle could roll. A lso refe r
to
~ page 80.
77
Page 84 of 386

Driving
A WARNING
-Always switch th e ignit ion off and take the
vehicle key with you when leav ing the veh i
cle, eve n for a short per iod of t ime . This ap
plies particularly when chi ld ren remain in
the ve hicle. Othe rwi se, children coul d sta rt
the engine, re le ase the p arki ng bra ke o r op
er ate ele ctrica l equipmen t such as power
windows, which increases the risk of an acci
dent.
- When the vehicle is loc ke d , no one -particu
larly not children -sho uld rema in in the ve
hicle . Locked doors make it more difficult
f or eme rgency workers to get into the vehi
cle, which p uts lives at risk.
Starting from a stop
The hold assist function ensures that the parking
brake releases automatically when the vehicle
starts moving .
Stopping and setting the parking brake
" Pull th@(®) switch to s@t th @ parking bra k@ .
Starting and automat ically releasing the
parking brake
" When you pr ess t he accelerator pedal, the
par king b rake is autom atically released and
yo ur vehicle begins to move.
T he parki ng b rake c an be set if you must s top the
ve hicl e at a stop lig ht or in t raff ic. Th e ve hicle
does not have to be he ld with the brake pedal.
The parking brake e liminates the tendency to
creep when a selector lever position is engaged .
The par king b rake releases automatica lly and the
ve hicle beg ins to move as soon as you press the
accelerator pedal as usual.
Starting on hills
When starting on hills, hill start assist prevents
the vehicle from un intent iona lly rolling back. The
braking force of the parking brake does not re
lease until the wheels bu ild up enoug h driving
force.
82
(D Tips
Fo r safety reasons, the par king brake only re
l eases automatically when the drive r's door is
closed.
Starting to drive with a trailer
To prevent rolling back unintentionally on a hill,
do the following:
.. Keep the(®} switch pulled and press the acce l
erator pedal. The parking brake remains set
and prevents the ve hicle from roll ing backwar d.
.. You can release the<®> switch once you a re sure
that you are giv ing enough driv ing force to the
wheels by pressing the accelerator pedal.
Depend ing on the weight of t he rig (vehicle and
trailer) and the steepness of the incline, you may
r oll backward as you start.
Emergency braking function
In the event that the standard brake system fails
or locks up.
.. To brake your veh icle in an eme rgency, pull the
<® > switch and ho ld it pulled.
.. As soon as you re lease the <®> switch or acceler-
ate, the braking stops.
P ulli ng and ho ld ing the C®l switch wh ile driving
the ve hicle activates the eme rgency brak ing func
tion. The ve hicle brakes at all four wheels by acti
vat ing the braking hydraulics . T he braking effect
i s sim ila r to mak ing a n emergency stop .
Q &
To reduce the risk of act ivat ing the emergency
braking by m istake, an audib le warning tone
(buzzer) sounds w hen the C®l switch is pulled.
Emergency b raking s tops as soon as th e<®>
switch is re leas ed or the ac celerator p eda l is
presse d.
A WARNING
Eme rgen cy braking sho uld only be used i n an
emergency, when the normal brake pedal has
failed or the brake peda l is obst ructed. Using
the park ing bra ke for emergency b raking w ill
~
Page 86 of 386
Driving
Sel ector l ev e r lo ck
The se lector lever lock prevents you from se lect
ing a position unintentionally, causing the vehicle
to ro ll. When engaging some selector lever posi
tions, you must press the locking button
CD on
the selector lever and/or press the brake pedal
¢fig. 83.
You must press the brake pedal to engage a se
lector lever position when the engine is running
and the vehicle is stationary.
You do not have to press the brake peda l if you
shift from D to R within one second. This allows
you to "rock" the vehicle to free it when it is stuck.
P -Pa rk
The whee ls are loc ked in this pos it ion. On ly shift
into park when the veh icle is stationary ¢&. . T o
select the P selector lever position, press the P
button @on the selector lever ¢
fig. 83. Pap
pears next to the se lector lever.
You can only shift out of park when the engine is running and you are press ing the b rake pedal. To
release the parking lock, press the brake peda l,
press the locking button
CD on the selector lever
and select the desired pos it ion ¢
fig. 83.
P engages automat ically if you switch the engine
off while the selector lever is in D, E, Sor R.
If yo u sw itch the engine off when the N position
is selected, the transmission remains in N for ap
proximate ly 30 minutes and then Pis engaged .
You must use the par king loc k emergency release
before towing the vehicle¢
page 89.
R -Reverse
The reverse gear is engaged in this pos ition. Only
select reverse when the vehicle is stationa ry and
the engine is ru nning at id le speed ¢.&. . T o en
gage the R selector lever position, press the b rake pedal, press the lock ing button
CD on the
selecto r lever and select the R position ¢
fig. 83.
A confirmation tone wi ll sound when the reve rse
gear is engaged.
84
N -Neutral (idle )
The t ransmission is in idle in th is position. To en
gage the N selector lever position, press the lock
i ng button
CD on the se lector lever and shift into
the N position ¢
fig. 83.
If you switch the engine off when the N posit io n
i s selected, the transmission remains in N for ap
prox imately 30 minutes and then P is engaged.
You cannot se lect t he N pos ition when the ig ni
tion is swi tched off. When dr iv ing th rough an au
tomat ic car wash, fi rst select the N position and
then turn the eng ine off.
Fo r safety reasons, the veh icle canno t be loc ked
whe n the t ransmiss io n is in the N pos it ion.
D IS -Driving forward
When the transm iss ion is in the D/S posit ion, it
can be operated either in the norma l D mode or
i n the S sport mode. Move the selector lever bac k
to engage the S sport mode. You ca n only se lect
the S se lector lever position when the Dor E pos i
tion is se lected . To select the Dor E position
again when S is engaged, move the selector lever back ¢&. . To sh ift from N to D when traveling at
speeds below 1 mph (2 km/h), press the brake pedal and shift into the D position¢&. .
In the
normal mode D, the transmission auto
matically selects the suitable gear ratio. It de
pends on engine load, vehicle speed and driving
style.
Se lect the
sport mode S fo r sporty driving . The
vehicle makes f ull use of the engine 's power.
Sh ift ing may become noticeable when accelerat
i ng .
The S selector lever posit ion engages automati
ca lly when you select
dynamic mode in drive se
l ect*.
A WARNING
Read and follow all WARNINGS.
-The vehicle can roll even if the ignit ion is
sw itched off.
Page 92 of 386

Trailer towing
Trailer towing
Driving with a trailer
General information
Your Audi was designed primarily for passenger
transportation.
If you plan to tow a trailer, please remember that
the additional load will affect durability, economy and performance.
Trailer towing not on ly places more stress on the
ve hicle, it also ca lls for more concentration from
the dr iver.
F or this reason, always follow the operating and
driving instructions provided and use common
sense.
Technical requirements
Trailer hitch
Use a weight-carrying hitch conforming to the
gross tra iler weight. The hitch must be suitab le
for your veh icle and tra iler and must be mounted
securely on the vehicle's chassis at a technically
sound
locat ion . Use on ly a trailer hitch with a re
movable ba ll mount . Always che ck with the t rail
er hitch man ufac tur er to make s ure t hat you are
using the co rrect hi tc h.
Do not use a bumper hitch.
The hitch must be installed in such a way that it
does not interfere with the impact -absorbing
bumper system. No mod ificat ions should be
made to the vehicle exhaust and b rake systems .
Fr om t ime to t ime, che ck that all hitch mo unti ng
bol ts rem ain securely f aste ned.
W hen you are not tow ing a tra iler, remove the
tra ile r hitc h ba ll mount . This prevents the hit ch
from caus ing damage s hou ld your veh icle be
s truck from be hind ¢
,&..
Trailer brakes
If you r trailer is equipped with a brak ing system,
check to be su re that it conforms to all regula
tions .
90
The t rai ler hydraulic bra ke system must not be
directly connected to the vehicle's hydraulic
bra ke system ¢&. .
Safety chains
Always use s afety chains be tween you r vehi cle
and t he tra ile r.
Trailer lights
Traile r lights must meet all regula tions . B e s ure
to check w ith your author ized Audi dealer for cor
r ec t wir ing, swi tches and relays.
Mirrors
If you are unable to see t he traffic behind you us
i ng t he regular outs ide mirrors, then yo u
must in
stall ex tended mirrors . It is impo rtant that you
al ways have clear vision to the rear.
.&_ WARNING
Afte r remov ing the tra ile r hi tc h, do not s tore
it i n y our vehicle. In case o f su dden brak ing,
the hitch could fly fo rward and injure you or
your passengers.
Operating instructions
Maximum trailer weight
A tra iler f or yo ur vehicle is lim ite d to a typical
class 1 or class 2 trailer.
Trailer load distribution
Be sure the load in the t rai le r i s he ld se curely in
pla ce to p reve nt i t from shi fting forwar d, bac k
ward or si deways.
Never allow a passenger to ride in a trailer ¢ &.
in Driver messages on page 91.
Engine cooling system
Towi ng a tra iler makes the engine work harder. It
is important that the cooling system's perform
ance is up to the additional load . Make sure tha t
the coo ling system has enoug h fluid.
Tire pressure
When towing a trailer, inflate the tires of your
vehicle to the cold tire p ressure listed under "Full
load" on the t ire press ure label. The t ire pressure
1111-
Page 123 of 386
<( a, .... N ,....
N .... 0 0
3 a,
The rear cross-traffi c assist is not ava ila ble . E i
ther the ESC is switched off, or the radar sensors may be covered by a b ike rack, stickers, leaves,
snow or other objects. Switch the ESC on, or
clean the area in front of the sensors if necessary
c> page 116, fig. 112 . If this message cont inues
to be d isplayed, d rive immed iate ly to an au thor
iz ed A udi dealer o r autho rized Audi Servi ce Fac ili
ty to have t he malfunc tion repa ired.
Audi drive select
Introduction
Applies to: vehicles with Audi drive select
Drive se lect makes it possible to experience dif
fe rent types of vehicle settings in one vehicle.
The dr ive r can se lect
Comfort , Auto a nd Dynamic
modes in the I nfota inme nt system to switch be
tween , fo r exa mple, a sporty and a co mfo rtable
d riving mo de. Settings ca n be ad justed to your
p e rs o nal pr efe ren ces in
Individual m ode. This
makes it poss ible to comb ine settings su ch as a
sporty eng ine setting w ith smooth stee ring.
Descript ion
Applies to: vehicles with Audi drive select
The fo llow ing systems, among other things, are
i nfluenced by drive select:
Engine and automatic transmission
D epending on the mode, the en gine and auto
mat ic transmission respond more quickly o r in a
mo re balanced ma nner to accelerator pe dal
movements . In the spo rty
Dynamic mode, the
transmission shifts at higher speed ranges.
Steering
The power s teering adapts. Ind irect s teer ing t hat
moves easi ly as in
comfort mode is espec ia lly
suited to long drives on highways . The
dynamic
mode p rovides sporty, d irect steering.
The fo llow ing applies to vehicles wi th dynam ic
steer ing* : the stee ring rat io chan ges base d on
ve hicle speed in or der to ma inta in optim um
steer ing effort for the drive r at all times. This
sets the steer ing to be less sensitive at higher
speeds i n order to prov ide improved vehicle con-
Assist
t ro l. At r educed spee ds, steeri ng is more direct in
o rder to kee p the steering effort as minima l as
poss ib le when the drive r is maneuvering t he vehi
cle. Dynam ic steer ing* also p rovides more re
spons ive steering performance at low and aver
age speeds .
Suspension control*
The ada ptive dampers * use sensors to reco rd in
f ormat ion regard ing steering movements, b rak
ing and accele ration operations by the dr iver,
road s urface, driving speed, and load. This makes
it possible to adapt damping to the d riv in g situa
t io n virtu ally in rea l ti me . Wi th drive select, you
can ad just th e adap tiv e dam pers to sporty
(Dy
nami c),
comfo rtable (Comfort ) or balan ced (Au
to ).
Cornering light*
T he co rne ring light adapts the high beams to the
direction of the curve de pending on the speed .
T he pivo ting ac tion and the lighting also a dapt to
t h e mode.
Adaptive cruise cont rol (ACC)*
The behavio r whe n accelerati ng ca n be adjusted
from comfortable to s porty, depending on the
dr ive selec t mode . Adap tive cruise control also
r espon ds to the dr iv ing behav ior of t he vehicle
ahea d in a m ore conse rv a tive or sporty m an ner.
Engine sound*
The eng ine sound adapts to the c urrent mode
and can be subtle to sporty .
(D Tips
The S selector leve r posit ion automatically en
gages whe n the
Dynamic mode is select ed.
121
Page 124 of 386
Assist
Selecting the driving mode
Applies to: vehicles with Audi drive select
:... ~ -'!. .:· ~ .:
LI , Ill .. tJ
------
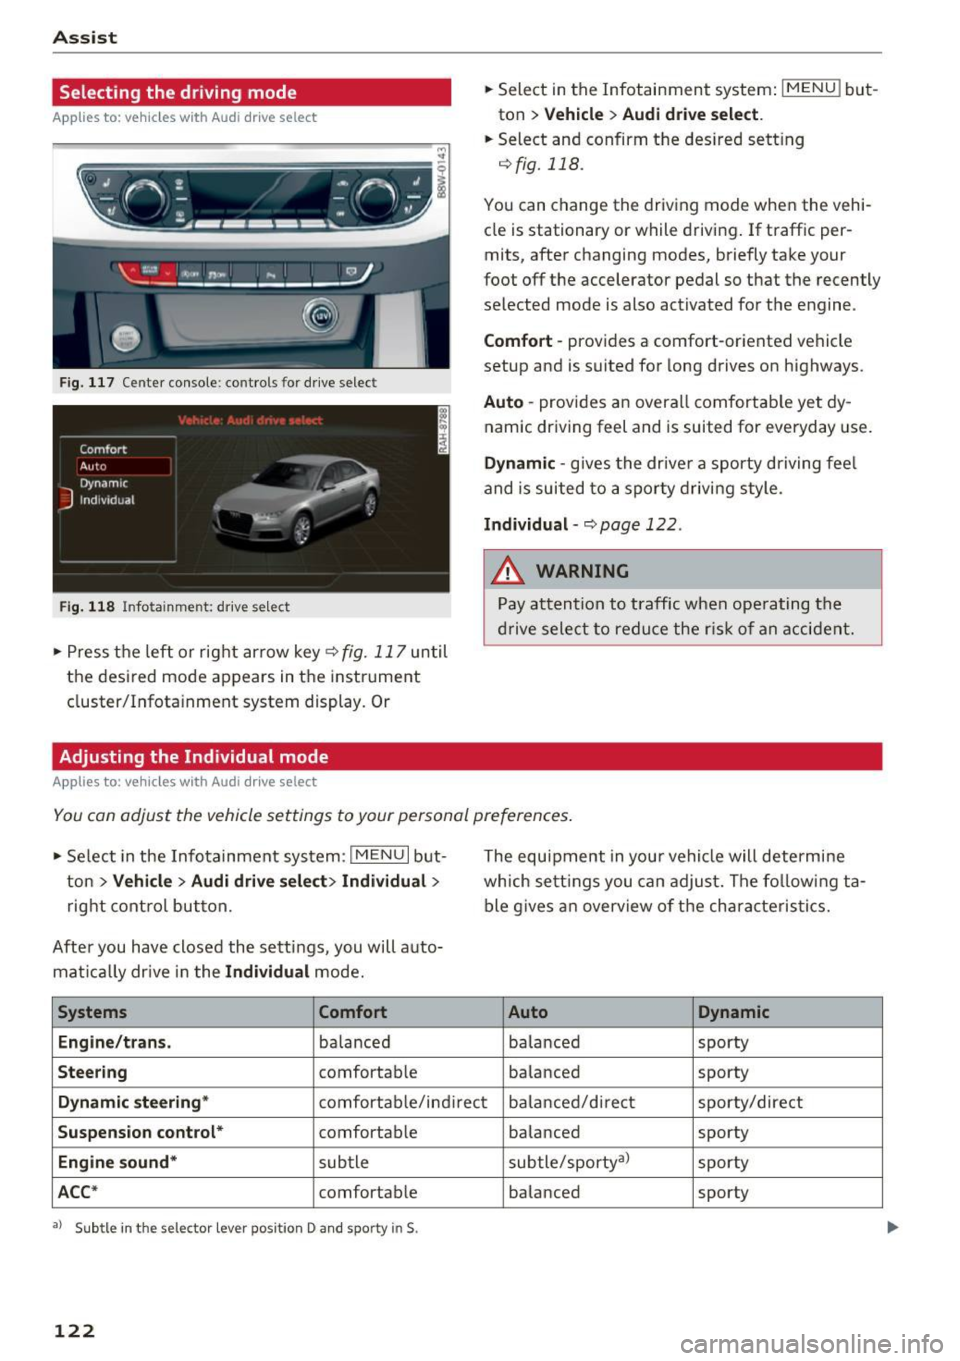
Fig. 117 Center console: controls for drive select
Fig. 118 Infotainment: drive select
• Press the left or rig ht arrow key<=> fig. 117 until
the desired mode appears in the instrument
cluster/Infotainment system display. Or
Adjusting the Individual mode
Applies to: vehicles with Audi drive select
• Select in the Infotainment system: IMENU ! but
ton
> Vehicle > Audi drive select.
• Select and confirm the des ired sett ing
qfig. 118.
You can change the driv ing mode when the vehi
cle is stationary or while driving . If traffic per
mits, after changing modes, briefly take your
foot off the accelerator pedal so that the recently
selected mode is also activated for the engine.
Comfort -provides a comfort-oriented vehicle
setup and is suited for long drives on highways.
Auto -provides an overall comfortab le yet dy
namic driving feel and is suited for everyday use.
Dynamic -gives the dr ive r a sporty driving fee l
and is suited to a sporty driving style.
Individual-q page 122.
&_ WARNING
Pay attention to traffic when ope rating the
drive select to reduce the risk of an accident.
-
You can adjust the vehicle settings to your personal preferences .
• Se lect in the Infotainment system: I MENU I but
ton
>V ehicle > Audi drive select> Individual >
right control button.
After you have closed the sett ings, you will a uto
mat ically drive in the
Individual mode.
Systems Comfort
Engine/trans .
balanced
Steering comfortable The equipment in you
r vehicle will determine
which sett ings you can adjust. The fo llowing ta
ble gives an overview of the characteristics.
Auto Dynamic
balanced sporty
balanced sporty
Dynamic
steering* comfortable/indirect balanced/direct sporty/direct
Suspension control* comfortab le
balanced sporty
Engine
sound* subtle subtle/sporty
a)
sporty
ACC* comfortab le balanced sporty
•> Subtle in the selector lever position D and sporty in$.
122
Page 355 of 386
<( a, .... N ,....
N .... 0 0
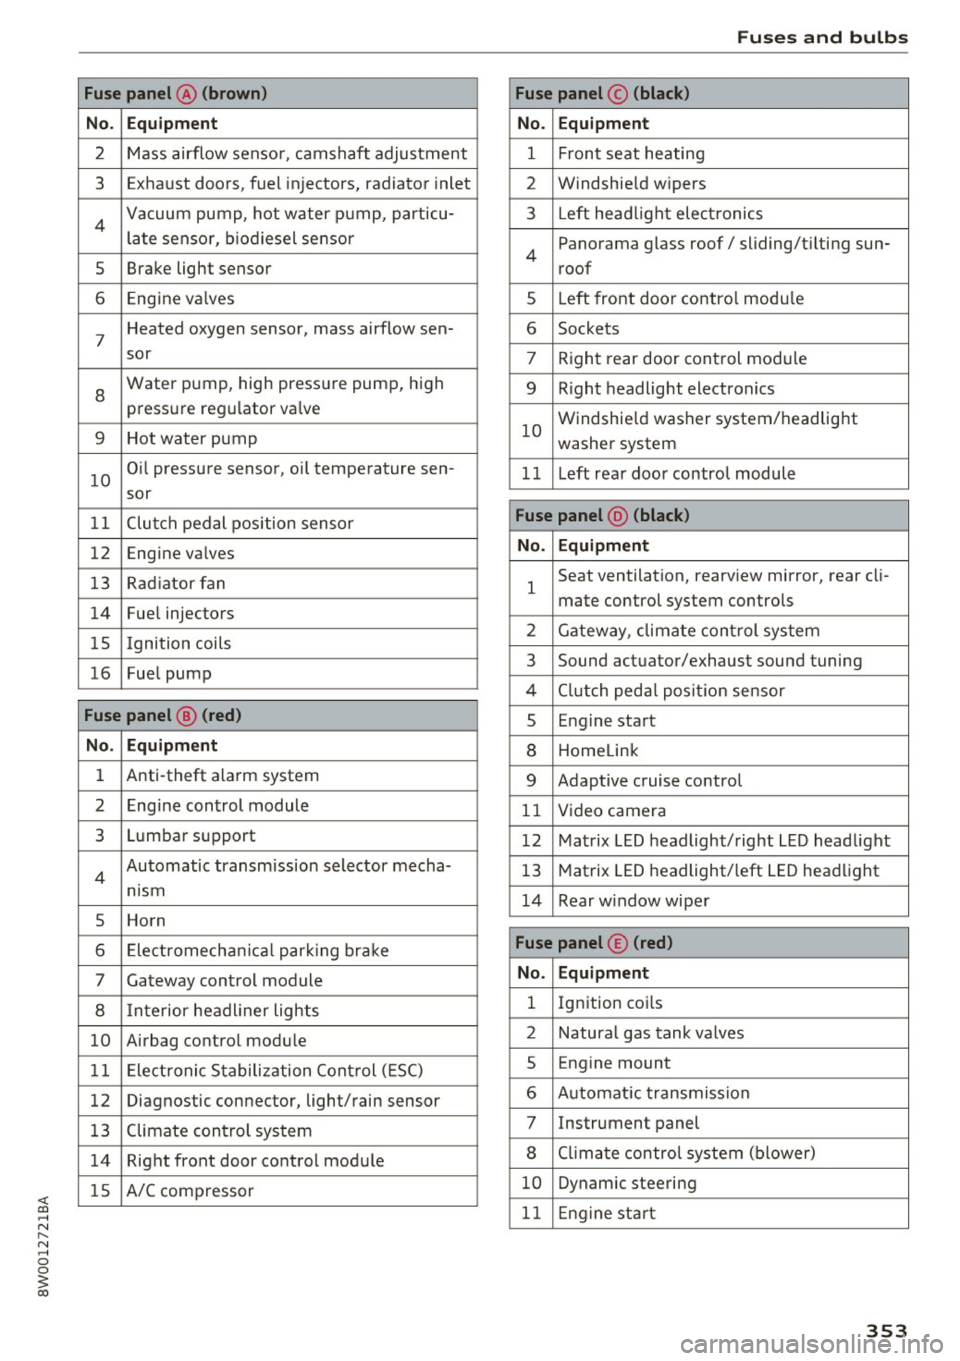
3 a,
Fuse panel @ (brown)
No . Equipment
2 Mass airflow sensor, camshaft adjustment
3 Exhaust doors, fuel in jectors, radiator inlet
4 Vacuum pump, hot water pump, particu -
late senso r, biodiesel sensor
5 Brake light sensor
6 Engine va lves
7
Heated oxygen sensor, mass airflow sen-
sor
8
Water pump, high pressure pump, high
pressure regulator va lve
9 Hot water pump
10
Oil pressure sensor, oi l temperature sen-
sor
11 Clutch pedal position sensor
12 Engine valves
13 Radiator fan
14 Fuel injectors
15 I gnition coils
16 Fuel pump
Fuse panel @ (red)
No . Equipment
1 Anti-theft alarm system
2 Engine control module
3 Lumbar support
4
Automatic transmission selector mecha-
nism
5 Horn
6 Electromechan ical park ing brake
7 Gateway control module
8 I nterior headl iner lights
10 Airbag control module
11 Electronic Stabilization Control (ESC)
12 Diagnostic connector, light/rain sensor
13 Climate control system
14 Right front door control module
15 A/C compressor
Fuses and bulbs
Fuse panel © (black)
No . Equipment
1 Front seat heating
2 Windshield w ipers
3 L eft head light electronics
4
Panorama glass roof/ sliding/t ilting sun-
roof
5 L eft front door control module
6 Sockets
7 Right rear door control module
9 Right headlight electronics
10
Windshield washer system/headlight
washer system
1 1 Left rear door control module
Fuse panel @ (black)
No . Equipment
1
Seat ventilation, rearv iew mirror, rear cl i-
mate control system controls
2 Gateway , climate control system
3 Sound actuator/exhaust sound tuning
4 Clutch pedal pos ition sensor
s Engine start
8 Homelink
9 Adaptive cruise control
11 Video camera
12 Matrix LED headlight/right LED headlight
13 Matrix LED headlight/left LED headlight
14 Rear window wiper
Fuse panel © (red)
No . Equipment
l Ignition coi ls
2 Natural gas tank valves
5 Engine mount
6 Automat ic transmission
7 Instrument panel
8 Cli mate control system (blower)
10 Dynamic steering
11 Engine start
353
Page 357 of 386
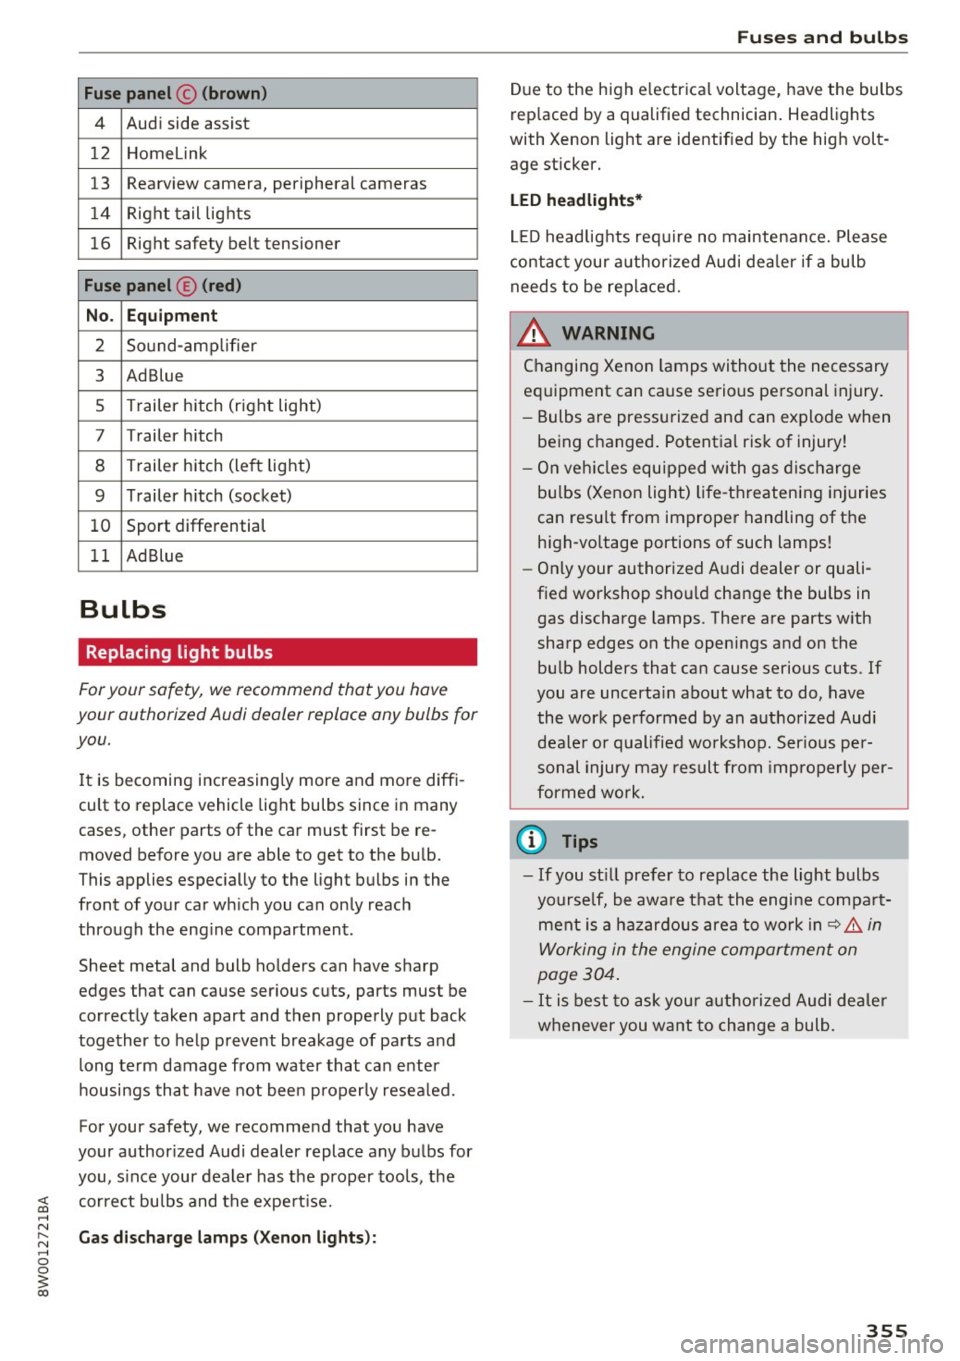
Fuse panel © (brown)
4 Audi side assist
12 Homelink
13 Rearview camera, peripheral cameras
14 Right tail lights
16 Right safety belt tensioner
Fuse panel © (red)
No. Equipment
2 Sound-amp lifier
3 Ad Blue
5 Trailer hitch (right light)
7 Trailer hitch
8 Trailer hitch (left light)
9 Trailer h itch (socket)
10 Sport differential
11 Ad Blue
Bulbs
Replacing light bulbs
For your safety, we recommend that you have
your authorized Audi dealer replace any bulbs for
you.
I t is becoming increasing ly more and more diffi
cult to replace vehicle light bulbs since in many
cases, other parts of the car must first be re
moved before you are able to get to the bulb.
This applies especially to the light bulbs in the
front of your car wh ich you can only reach
through the eng ine compartment.
Sheet metal and bulb ho lders can have sharp
edges that can cause serious cuts, parts must be
correctly taken apart and then properly put back
together to help prevent breakage of parts and
long term damage from water that can enter
housings that have not been properly resealed.
For your safety, we recommend that you have
your author ized Audi dealer replace any bulbs for
you, s ince your dealer has the proper tools, the
;;§ correct bu lbs and the expert ise .
.... N
~ Gas discharge lamps (Xenon lights): .... 0 0
3
Due to the high e lectrica l voltage, have the bulbs
replaced by a qualified technician. Headlights
with Xenon light are identified by the high volt
age sticker.
LED headlights*
LED headlights require no maintenance. Please
contact your authorized Audi dealer if a bulb
needs to be replaced.
& WARNING ~ -
Changing Xenon lamps without the necessary
equipment can cause serious personal injury.
- Bulbs are pressurized and can explode when
being changed . Potential risk of injury!
- On vehicles equipped with gas discharge
bu lbs (Xenon light) life-threatening injuries
can resu lt from improper handling of the
h ig h-vo ltage portions of such lamps!
- Only your authorized Audi dealer or quali
fied workshop shou ld change the bulbs in
gas discharge lamps. There are parts with
sharp edges on the openings and on the bulb holders that can cause serious cuts. If
you are uncerta in about what to do, have
the work performed by an authorized Audi deale r or qualified workshop. Ser ious per
sonal injury may result from improperly per
formed work.
(D Tips
-If you st ill prefer to replace the light bulbs
yourself, be awa re that the engine compa rt
ment is a hazardous area to work in~.&..
in
Working in the engine compartment on
page 304.
-It is best to ask your authorized Audi dealer
whenever you want to change a bulb.
355
Page 370 of 386
Index
Audi connect ( Infotainment) .. ... .. . 172, 178
Data protection
Pe rsonal hotspot 179
172
Services overv iew . . . . . . . . . . . . . . . . . . . . 173
Starting . . . . . . . . . . . . . . . . . . . . . . . . . . . 173
Aud i d rive select
refer to Drive select . . . . . . . . . . . . . . . . . . 121
Aud i Enterta inment mobi le ...... .... .. . 217
Aud i mus ic interface ............ .... .. . 215
Aud i m usic s tream
refer to Wi -Fi . . . . . . . . . . . . . . . . . . . . . . . 213
Aud iofi les ..... .. ................ ... . 217
Aud io player
Bluetooth audio pl ayer . . . . . . . . . . . . . . . 212
W i-F i aud io player . . . . . . . . . . . . . . . . . . . 213
Audio track 220
Aud i Serv ice Repair Man uals and Lite rature 363
Aud i smar tphone interface ...... ... 227,231
Aud i virtual cockp it
refer to Instr ument cluster . . . . . . . . . . . . . 10
AUTO Automatic headlights . . . . . . . . . . . . . . . . . SO
Climate con trol system . . . . . . . . . . . . . . . . 70
Auto Lock (central locking system) . . . . . . . . 3 7
Automatic belt ret ractor . . . . . . . . . . . . . . . 248
Automatic transm ission . . . . . . . . . . . . . . . . . 83
E me rgency mode . . . . . . . . . . . . . . . . . . . . . 87
H ill descent contro l . . . . . . . . . . . . . . . . . . . 85
Kick -down . . . . . . . . . . . . . . . . . . . . . . . . . . . 87
Launch contro l program . . . . . . . . . . . . . . . 87
Manual sh ifting . . . . . . . . . . . . . . . . . . . . . . 86
Parking lock emergency re lease . . . . . . . . . 89
Selector lever pos itions . . . . . . . . . . . . . . . . 83
Automatic wipe/wash system . . . . . . . . . . . . 56
Auto Safety Hotline . . . . . . . . . . . . . . . . . . . 243
Auxiliary heater (climate control system) . . . 71
AUX inp ut . .. .. .. ............. .... .. . 215
Average consumption . . . . . . . . . . . . . . . . . . . 16
Average speed . . . . . . . . . . . . . . . . . . . . . . . . 1 6
Avoid damaging the vehicle . . . . . . . . . . . . . . 73
B
BACK button
Balance (sound)
Basic
Bass (sound)
368
141
233 108
233 Battery .
... .. .. .. .. .. ... . .. .... ... .. 312
Battery location inside the luggage compart-
ment . . . . . . . . . . . . . . . . . . . . . . . . . . . . . . 313
Charge leve l . . . . . . . . . . . . . . . . . . . . . . . . 138
Charging . . . . . . . . . . . . . . . . . . . . . . . . 31, 314
E nergy management . . . . . . . . . . . . . . . . . 138
Impo rtant warnings when working on the
batte ry . . . . . . . . . . . . . . . . . . . . . . . . . . . . 313
Ind icator lig ht . . . . . . . . . . . . . . . . . . . . . . . 31
Jump start ing . . . . . . . . . . . . . . . . . . . . . . . 356
Replacing . . . . . . . . . . . . . . . . . . . . . . . . . . 315
Winter operation ... .. ... . .. .... ... . .
Working on the battery . ... .. .... ... . .
Befo re dr iv ing
Be lt tens ioner
. .. .. .. .. ............. ..
B lended gasoline . ... .. .. .. .. .... ... . .
Blind
......... ... ... ............. ....
3 12
313
236
251
296
56
B lower (climate control system) . . . . . . . . . . 70
B luetoot h
Audio p layer . . . . . . . . . . . . . . . . . . . . . . . . 2 12
Connecting a cell phone . . . . . . . . . . . . . . 160
Settings . . . . . . . . . . . . . . . . . . . . . . . . . . . 231
Booster seats
Brake flu id 28
7
Changi ng the brake flu id .. ... .... ... .. 311
Check ing the brake fluid level ......... . 311
Brakes Ind icator light . . . . . . . . . . . . . . . . . . . . . . . 35
B rake system
B rake flu id
311
Brake fl uid spec ifications for refill and re
placement . . . . . . . . . . . . . . . . . . . . . . . . . 311
Fluid reservo ir . .. .. .. ............. .. 311
B raking . . . . . . . . . . . . . . . . . . . . . . . . . . . . . 136
A utomat ic post-collision braking system . 134
Brake assist system . . . . . . . . . . . . . . . . . . 134
Brake booster . . . . . . . . . . . . . . . . . . . . . . . 136
E me rgency braking function . . . . . . . . . . . . 82
Ind icator light . . . . . . . . . . . . . . . . . . . . 29, 33
New brake pads . . . . . . . . . . . . . . . . . . . . . 136
Parking brake . . . . . . . . . . . . . . . . . . . . . . . . 81
Wo rn brake pads . . . . . . . . . . . . . . . . . . . . . 33
Braking in New brake pads 136
B re aking in
New engine . . . . . . . . . . . . . . . . . . . . . . . . . 73
New ti res . . . . . . . . . . . . . . . . . . . . . . . . . . 324