tow bar AUDI S4 2017 Owners Manual
[x] Cancel search | Manufacturer: AUDI, Model Year: 2017, Model line: S4, Model: AUDI S4 2017Pages: 386, PDF Size: 96.32 MB
Page 19 of 386

Fuel consumption
The current fuel consumption can be shown us
ing a bar graph¢
fig. 13. The average consump
tion stored in the short-term memory is also dis
played. If the bars are green or the gray tone on
the bars changes (depending on the equipment),
your vehicle is saving fuel by the following func
tion :
-Recuperation : electrical energy can be stored in
the battery when the vehicle is coasting or driv
ing downhill. The bar will move toward 0/0.
(D Tips
-The date, time of day and time and date for
mat can be set in the Infotainment system
¢page 229.
- If the vehicle battery is disconnected, all
memory values are erased.
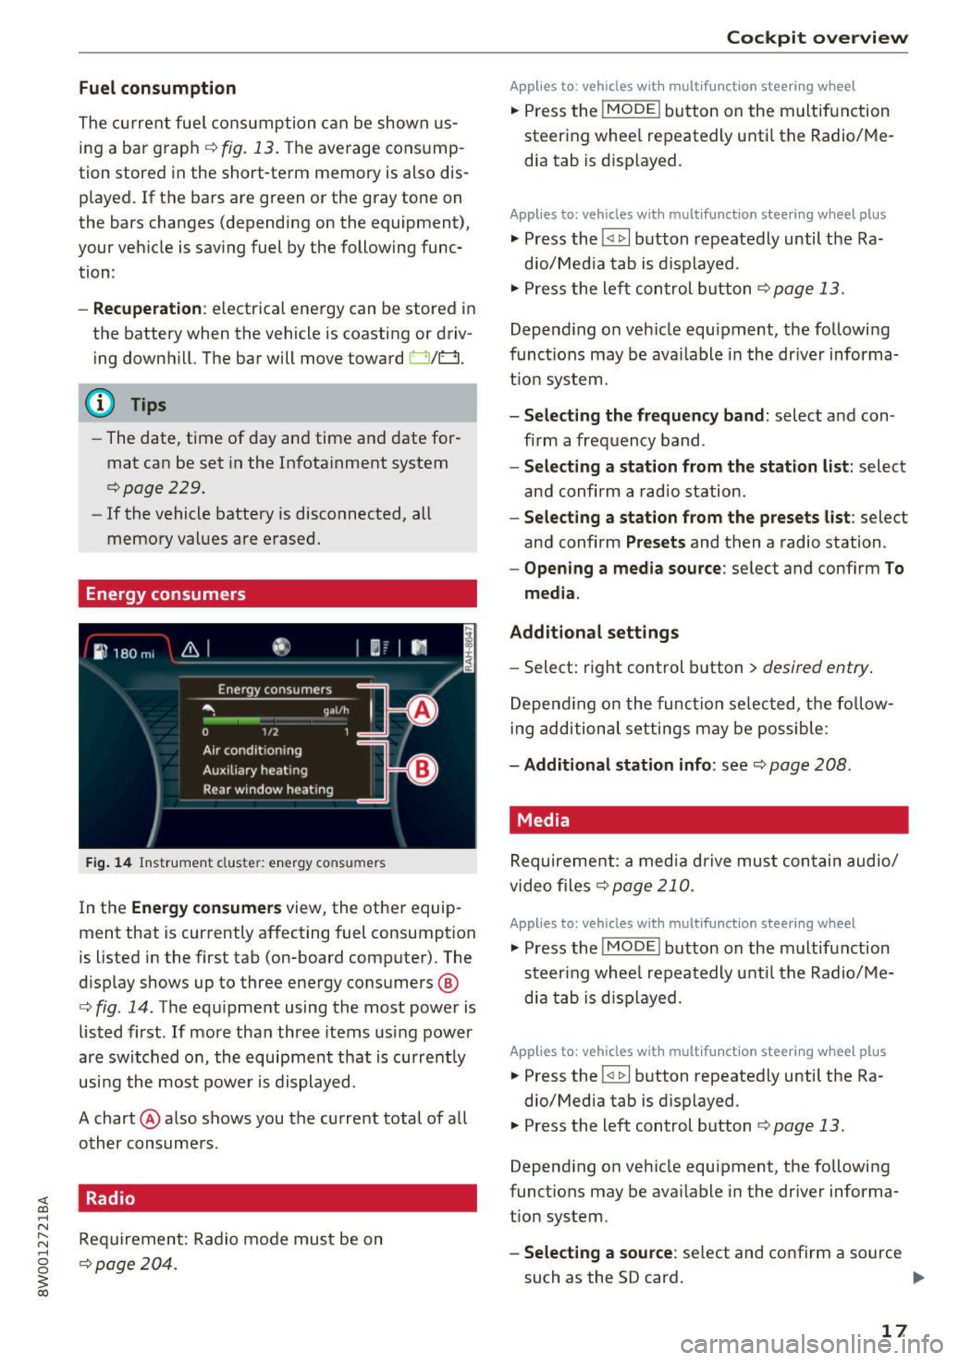
Energy consumers
Fig. 14 Instrument cluste r: energy consu mers
In the Energy consumers view, the other equip
ment that is currently affecting fuel consumption
is listed in the first tab (on-board computer) . The
display shows up to three energy consumers @
¢ fig. 14. The equipment using the most power is
listed first . If more than three items using power
are switched on, the equipment that is currently
using the most power is displayed.
A chart @ also shows you the current total of all
other consumers .
Radio
Requirement: Radio mode must be on
¢page 204.
Cockpit overview
Applies to : vehicles with mult ifunction steering wheel
.,. Press the !MODE ! button on the multifunction
steering wheel repeatedly until the Radio/Me
dia tab is displayed.
Applies to: vehicles with mult ifunction steering wheel plus
.,. Press the !<11>1 button repeatedly until the Ra-
dio/Media tab is displayed .
.,. Press the left control button ¢
page 13.
Depending on vehicle equipment, the following
functions may be available in the driver informa
tion system.
- Selecting the frequency band: select and con
firm a frequency band.
-Selecting a station from the station list: select
and confirm a radio station.
-Selecting a station from the presets list: select
and confirm
Presets and then a radio station.
-Opening a media source: select and confirm To
media.
Additional settings
- Select: right control button > desired entry.
Depending on the function selected, the follow
ing additional settings may be possible:
-Additional station info: see¢ page 208 .
Media
Requirement: a media drive must contain audio/
video files¢
page 210.
Applies to: vehicles with multifunct ion steering wheel
.,. Press the !MODE ! button on the multifunction
steering wheel repeatedly until the Radio/Me
dia tab is displayed.
Applies to: vehicles with multifunction steering wheel plus
.,. Press the !<1 1>I button repeatedly until the Ra-
dio/Media tab is displayed .
.,. Press the left control button ¢
page 13.
Depending on vehicle equipment, the following
functions may be available in the driver informa
tion system.
- Selecting a source : select and confirm a source
such as the SD card.
lli>-
17
Page 101 of 386

Switching adaptive cruise control off
• Push the lever away from you into position @
unti l it clicks into place. The message
ACC: off
appears.
@ Indicato r lights
I'll -adaptive cru ise control is switched on. No
vehicles are detected ahead. The stored speed is
maintained.
• -A vehicle driving ahead was detected. The
adapt ive cr uise control system regulates the
speed and distance to the vehicle dr iv ing ahead
and accelerates/brakes automatically.
• -adaptive cru ise cont rol is switched on . Ave
h icle was detected ahead. Yo ur vehicle is stat ion
ary and will not star t driving automatically.
(-j -adaptive cru ise control is switched on . No
vehicles we re detected ahead . Your vehicle is sta
tionary and will not start dr iving automati cally.
• -T he automatic brak ing is not enough to
maintain a sufficient distance to a veh icle dr iving
ahead . You must intervene
¢ page 102, Request
for driver intervention.
© In strum ent cluster display
If Dr ive r assis t is not shown in the instrument
cluster display, you can open it using the multi
function steering wheel buttons
¢ page 12.
Based on the graphic display, you can determine
if the system is maintaining a distance to the ve
h icle dr iving ahead and what that distance is .
No vehicle -no vehicle was detected driving
ahead .
Silver vehicle -a vehicle was detected driv ing
ahead.
Red vehicle -request for the dr iver to take action
¢page 102.
The five distance bar s on the gauge© rep resent
the set d istance (refer to
~ page 101 for infor
mat io n on how to change the dis tance) . If you
fa ll below the se lected distance, the distance
bars become red from the bottom upward.
A ss ist
A WARNING
If you press the !SET ! button when driv ing at
speeds below 20 mph (30 km/h), the veh icle
accelerates automatically up to 20 mph (30
km/h), wh ich is the minim um speed that can
be set.
@ Tips
- If you switch the ignition or the adaptive
cruise cont rol sys tem off, the set speed is
erased for safety reasons.
- The e lectronic stabilization control (ESC)
and the an ti-slip-regula tion (ASR) are auto
matically switched on when the adap tive
cruise cont rol is swit ched on.
Changing the speed
Appl ies to: vehicles wit h Aud i ada ptive cru ise control
0
f
'
0
Fi g. 95 Operat ing lever: changing the speed
"'To increase/decrease the speed in 1 mph (1
km/h) increments, b riefly
t a p the lever toward
0 10 ¢ fig. 95 to the firs t level.
• To increase/dec rease the speed in 5 mph
(5 km/h or 10 km/h) increments, brief ly
tap
the lever toward 0 10 to the second level.
• To increase or decrease the speed quick ly,
hold
the lever toward 0 10 up to the first or second
level unt il the red LED@ reaches the desired
speed¢
page 98, fig . 94 .
You can also preselect the speed when adaptive
cruise contro l is not act ive by moving the lever in
the des ired direction
0 10 . Activate the previ
ously selected speed by pulling the lever into po
sition
(D ¢ page 98, fig . 93 .
After every adjustment, the new stored speed ap
pears briefly in the status line ¢
page 98, fig. 94 ..,.
99
Page 113 of 386

<( a, .... N ,....
N .... 0 0
3 a,
-Inflating the side bolsters* in the seat backrest
and s eat surfac e.
Aud i drive select*: the function is not active de
pending on the mode selected.
A WARNING -,..___
-Pre sense city cannot overcome the laws of
physics. It is a system designed to assist and
it cannot prevent a collision in every circum
stance. The driver must always intervene.
The driver is always responsible for braking at the correct time . Do not let the increased
safety provided tempt you into taking risks.
This could increase your risk of a collision .
- The system can deploy incorrectly due to
system-specific limits.
- To reduce the risk of an accident, please
note that the camera does not always detect
every object .
- Pre sense city does not react to animals,
crossing or oncoming vehicles, objects such
as bars, railings or railcars, and objects that
are difficult to detect~&.
in General infor
mation on page 97.
A WARNING
Pre sense city may be restricted or not availa
ble in the following example situations:
- in heavy fog, rain, spray or snow.
- when there are visual obstructions, such as
glare, reflections or var iations in light.
- when it is dark .
- if the camera window or the windshield is
dirty, iced over, damaged or covered .
- when driving on snow, ice or loose ground .
- on sharp curves.
- if the ESC was restricted or switched off .
- when towing a trailer.
- when the driver's seat belt is unfastened.
- up to ten seconds after sw itching on the ig-
nition.
1 ) Thi s is no t avail able in some c oun tries.
Assist
(D Note
Impacts or damage to the camera mount on
the windshield can displace the sensor . Pre
sense city can be impaired by this. Have an au
thorized Audi dealer or authorized Audi Serv
ice Facility check their function .
(i) Tips
-You can cancel the system braking interven
tion if you accelerate considerably or swerve
away .
- Keep in mind that pre sense city can brake
unexpectedly. Always secure any cargo or
objects that you are transporting to reduce
the risk of damage or injury.
- When there is a malfunction in the camera,
the pre sense city functions also switch off.
Settings in the
Infotainment system
Applies to: vehicles with Aud i pre sense
.,. Select in the Infotainment system: I MEN U! but
ton
> Vehicle > left control button > Driver as
s ist > Audi pre sense.
Audi pre sense-
switch On/Off. You can switch
the pre sense functions on and off with th is.
If the system is switched off, it switches on again
automatically once the ignition is switched on
again
l ).
Early warning1
) -the early warning can be
switched off or the pre sense city/front warning
point
( Early /Mediu m/La te) can be set .
Driver messages
Applies to: vehicles with Aud i pre sense
fll Audi pre sense currently restricted. Restrict
ed sensor vision due to surroundings. See own
er's manual
This message appears if the radar sensor and
camera view is obstructed, for example by leaves,
snow, heavy spray or dirt . If necessary , clean the .,..
111
Page 126 of 386

Parking systems
Parking systems
General information
A ppl ies to: ve hicles w ith a rea r parking sys te m /pa rking sys
tem p lus/rearv iew camera/peripheral ca meras
Depending on your vehicle's equipment , various
parking aids will help you when parking and ma
neuvering.
The
rear parking system is an audible parking aid
that warns you of obstacles
behind the vehicle
¢ page 125.
Parking system plus assists you when parking by
using audio and visual signals to indicate objects
detected in
front of and behind the vehicle
¢ page 125.
The rearview camera shows the area behind the
vehicle in the Infotainment display . The lines in
the rearview camera image help you to park or
maneuver ¢
page 126. The parking system plus
functions are also available
¢page 125.
The peripheral cameras give various views to
help you when parking or maneuvering
¢ page 128 . fhe parking system plus functions
are also available
¢ page 125.
A WARNING
- Always look for traffic and check the area
around your vehicle by looking at it directly
as well. The parking system cannot replace
the driver 's attention. The driver is always
responsible when entering or leaving a park
ing space and during similar maneuvers.
- Please note that some surfaces, such as
clothing, are not detected by the system.
-
- Sensors and cameras have blind spots in
which people and objects cannot be detect ed . Be especially cautious of small children
and animals .
- Always keep your eyes on the vehicle's sur
roundings, using the rearview mirror as
well .
- The sensors can be displaced by impacts or
damage to the radiator grille, bumper,
wheel housing and the underbody . The park
ing system may be impaired as a result.
Have an authorized Audi dealer or author-
124
ized Audi Service Facility check their func
tion .
(D Note
-Some objects are not detected or displayed
by the system under certain circumstances:
- Objects such as barrier chains, trailer draw
bars, vertical poles or fences
- Objects above the sensors such as wall ex
tensions
- Objects with certain surfaces or structures
such as chain link fences or powder snow
- If you continue driving closer to a low ob
ject, it may disappear from the sensor range. Note that you will no longer be
warned about th is obstacle .
- Keep enough distance from the curb to
avoid damage to the rims.
(D Tips
-The system may provide a warning even
though there are no obstacles in the cover
age area in some situations, such as :
- certain road surfaces or when there is tall
grass.
- external ultrasonic sources such as from
cleaning vehicles .
- in heavy rain, snow, or thick vehicle ex
haust.
- We recommend that you practice parking in
a traffic-free location or parking lot to be
come familiar with the system . When doing
this, there should be good light and weath
er conditions.
- You can change the volume of the signals
and the display ¢
page 131.
-Please refer to the instructions for trailer
towing in
¢page 132.
- What appears in the infotainment display is
somewhat time-delayed.
- Th e sensors must be kept clean and free of
snow and ice for park assist to operate.
Page 293 of 386

<( a, .... N ,....
N .... 0 0
3 a,
-Always make sure the seat backrest to which
the child restraint is installed is in an up
right position and securely latched into
place and cannot fold forward. Otherwise,
the seatback with the child safety seat at
tached to it could f ly forward in the event of
an accident or other emergency situation.
- Always read and heed all WARNINGS when
ever using a child restrained in a veh icle is
being used¢
page 277. Specia l precaut ions
apply when installing a child safety seat on
the front passenger seat
¢ page 2 54, Child
restraints on the front seat -some impor
tant things to know.
Deactivating the convertible locking
retractor
The convertible locking retractor for child re
straints will be deactivated automatically when
the belt is wound all the way back into the re
tractor .
~ Press the red button on the safety belt buckle.
The belt tongue will pop out of the buckle.
~ Guide the safety belt all the way back into its
stowed position .
Always let the safety belt retract completely into
its stowed position. The safety belt can now be
used as an ordinary safety belt without the con
vertible locking retractor for child restraints.
If the convertible locking retractor should be ac
tivated inadvertently, the safety belt must be un
fastened and guided completely back into its
stowed position to deact ivate this feature. If the
convert ible locking retractor is not deactivated,
the safety belt w ill gradually become tighter and
uncomfortable to wear.
_& WARNING
-
Improperly installed chi ld safety seats in
crease the risk of serious personal injury and
death in a collision.
- Never unfasten the safety belt to deactivate
the convertible locking retractor for child re
straints while the vehicle is moving . You
Child safety
would not be restrained and could be seri
ously injured in an accident.
- Always read and heed all WARNINGS when
ever using a child restrained in a vehicle is
be ing used
¢ page 2 77. Special precautions
apply when install ing a child safety seat on
the front passenger seat¢
page 254, Child
restraints on the front seat -some impor
tant things to know.
LATCH system (Lower
anchorages and tethers
for children)
Child Restraint System anchors and how
are they related to child safety
To provide a simpler and more practicab le way to
attach the child restraint on the vehicle seat,
Federal regulations require special lower ancho
rages in vehicles and devices on new child re
straints to attach to the vehicle anchorages .
In the United States, the combination of the
tether anchorages and the lower anchorages is
now generally called the LATCH system for
"Lower Anchorages and Tethers for Children". In
Canada, the terms "top tether" with "lower uni
versa l anchorages" (or "lower universal anchor
age bars") are used to descr ibe the system .
In other countries the term "ISOFIX" is used to
describe the lower anchorages .
Forward-facing child restraints manufactured af
ter September 1, 1999, are required by U.S. fed
eral regulations to comply with new child head
movement performance req uirements. These
new performance requirements make a tether
necessary on most new ch ild seats.
Installing a child restraint that requires a top
tethe r without one can seriously impair the per
formance of the child restraint and its ab ility to
pro tect the child in a collision. Installing a child
restra int that requi res a top tether without the
top tether may be a violation of state law.
Child restraint manufacturers offer LATCH lower
anchorages on their child seats w ith hook-on or ..,.
291