air AUDI S4 2018 User Guide
[x] Cancel search | Manufacturer: AUDI, Model Year: 2018, Model line: S4, Model: AUDI S4 2018Pages: 403, PDF Size: 66.81 MB
Page 61 of 403

a co .... N ,....
N .... 0 0
3 co
make objects in the mirror appear smaller
and farther away. Your may estimate incor
rectly when you use these mirrors to gauge
your distance from the vehicles behind you
when changing lanes, which increases the risk of an accident .
Q) Note
- Applies to vehicles with power folding exte
rior mirrors: if the mirror housing was
moved by outside forces (such as an impact
when maneuvering), you must use the pow
er folding function to fold the mirror all the
way out. The mirrors will make a loud noise
when they latch into place. The mirror hous
ing must not be moved back into place by
hand because this would impair the func
tion of the mirror mechanism.
-Applies to vehicles without power folding
exterior mirrors: if the mirror housing was
moved by outside forces (such as an impact
when maneuvering), you must move it back
in place by hand.
- If you wash
th@ vehicle in an automatic car
wash, you must fold the exterior mirrors in
to reduce the risk of damage to the mirrors.
Never fold power folding exterior mirrors*
by hand . Only fold them in and out using
the power controls.
{!) Tips
-If the power adjusting function malfunc
tions, the glass in both mirrors can be ad
justed by pressing on the edge of it by hand.
- The exterior mirror settings are stored with
the memory function*
9 page 67.
Dimming the mirrors
Your vehicle is equipped with a manual or auto
matic* dimming rearview mirror .
Manual dimming rearview mirror
.,. Pull the lever on the bottom of the mi rror back .
Lights and Vision
Automatic dimming rearview mirror*
.,. The interior and exterior mirrors dim automati
cally when light shines on them, for example
from headlights on a vehicle behind you.
A WARNING ,-
If the glass on an automatic dimming mirror
breaks, electrolyte can leak out. This liquid
can irritate the skin, eyes and respiratory sys
tem. If there is contact with the fluid, flush
immediately with plenty of water. Consult a
physician if necessary .
- Repeated or long -term exposure to electro
lyte fluid can lead to irritation of the air
ways, especially in people with asthma or
other respiratory conditions. Take deep
breaths immediately after leaving the vehi
cle or, if this is not possible, open all of the
doors and windows as wide as possible.
- If electrolyte fluid enters the eyes, flush
them thoroughly with a large amount of
clean water for at least 15 minutes and then
seek medical attention.
- If electrolyte fluid comes into contact w ith
the skin, flush the affected area with clean
water for at least 15 minutes and then clean
with soap and water and seek medical at
tention . Clean affected clothing and shoes
thoroughly before wearing again.
- If the fluid was swallowed and the person is
conscious, flush the mouth with water for at least 15 minutes . Do not induce vomiting
unless this is recommended by medical pro
fessionals . Seek medical attention immedi
ately .
0 Note
If the glass on an automatic dimming mirror
breaks, electrolyte can leak out. This liquid
damages plastic surfaces and paint . Clean
this liquid as quickly as possible, for example
with a wet sponge .
(D Tips
-If the light reaching the rearview mirror is
obstructed, the automatic dimming mirror
will not function correctly,
59
Page 67 of 403
Seats and storage
General information
A WARNING
See¢ page 254, Driving safety for important
information, tips, suggestions and warnings
that you sho uld read and follow for your own
safety and the safety of yo ur passengers.
Front seats
Power seat adjustment
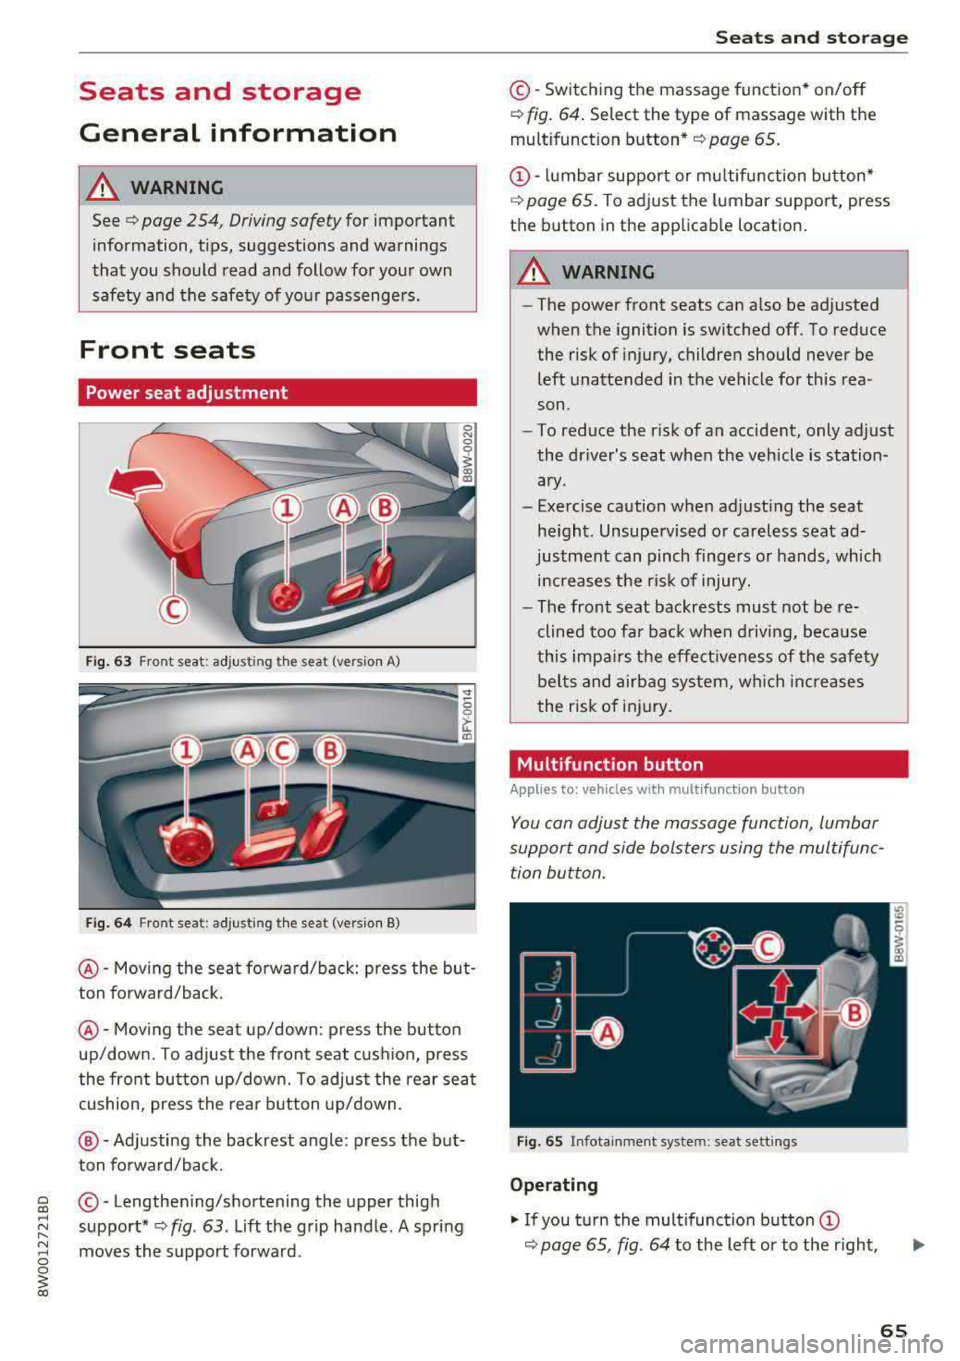
Fig. 63 Front seat: adjusting the seat (ve rsion A)
F ig . 6 4 Front seat: adjusting the seat (ve rs ion B)
@-Moving the seat fo rward/back: press the but
ton forward/back.
@ -Moving the seat up/down: press the button
up/down. To adjust the front seat cus hion, press
the front bu tton up/down. To adjust the rear sea t
cushion, press the rear b utton up/down.
@ -Adjusting the backrest angle: press the but
ton forward/back.
~ © -Lengthen ing/shortening the upper thigh
~ ~ support* ¢ fig. 63. Lift the g rip hand le . A spring
~ moves the support forward. 0 0
~ co
Seats and storag e
©-Switching the massage function* on/off
¢ fig. 64. Select the type of massage with the
multifunction
button*¢ page 65.
@ -lumbar support or mu ltifunction button*
¢
page 65. To adjust the lumbar support, press
the button in the applicab le location.
A WARNING
-
-The power front seats can a lso be adjusted
when the ignition is switched off. To reduce the risk of injury, children should never be
left unattended in the vehicle for this rea
son .
-To reduce the r isk of an accident, only adjust
the dr iver's seat when the vehicle is station
ary.
-Exercise caution when adjust ing the seat
he ight. Unsupervised or careless seat ad
justment can pinch finge rs or hands, which
increases the risk of injury.
-The front seat backrests must not be re
clined too far back when driving, because
this impa irs t he effect iveness of the safety
be lts and airbag system, which increases
the risk of injury.
Multifunction button
Applies to: vehicles wit h mult ifunct ion butto n
You can adjust the massage function, lumbar
support and side bolsters using the multifunc tion button.
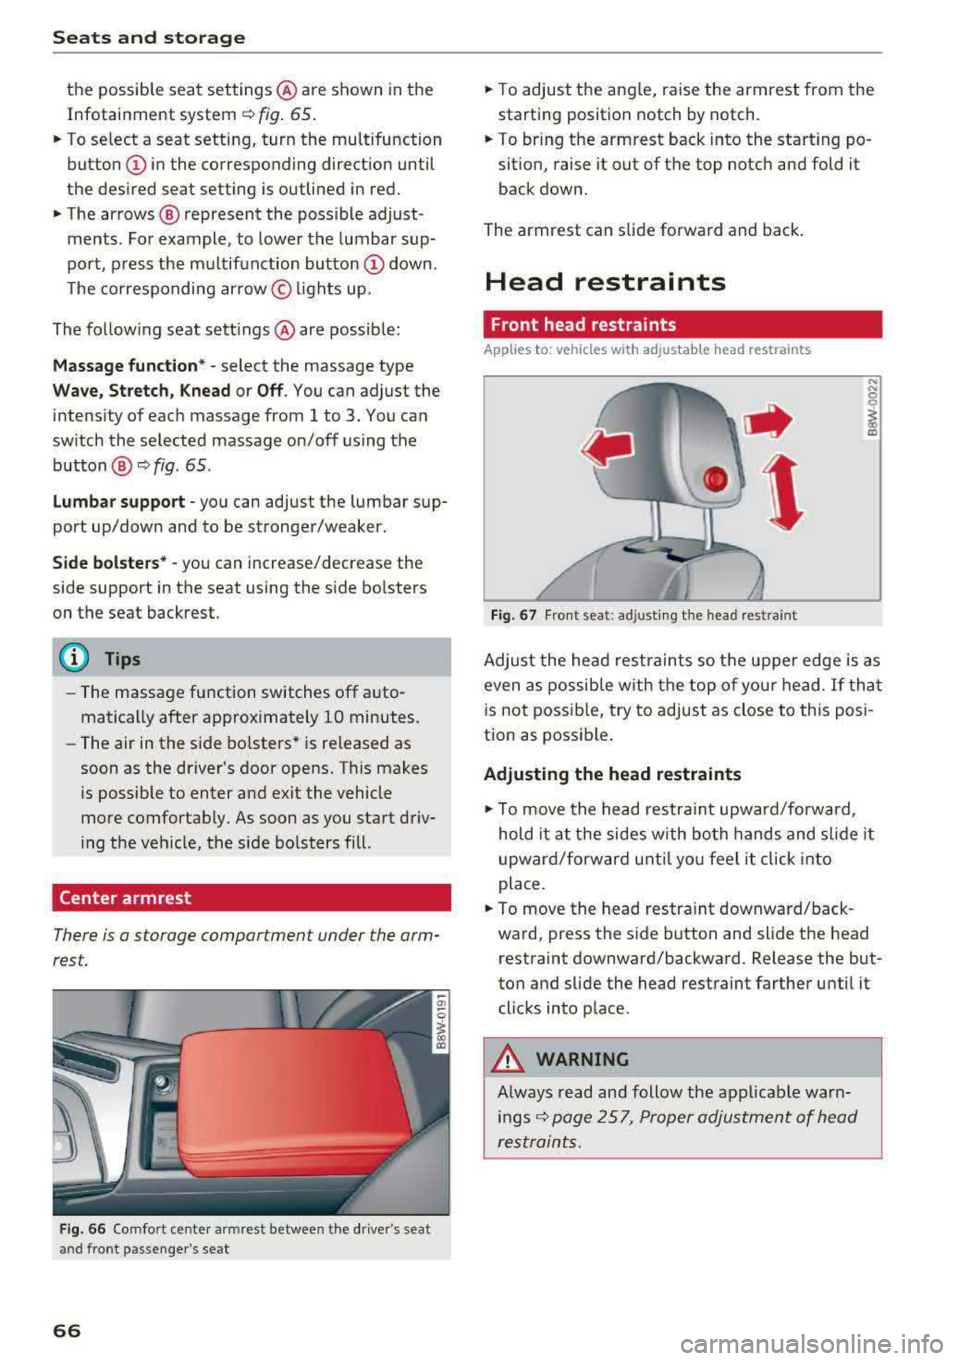
F ig. 65 Infotain ment system: seat sett ings
Operating
"' If you turn the multifunction button (D
¢ page 65, fig. 64 to the left or to the r ight,
65
Page 68 of 403
Sea ts and stor age
the possible seat settings @ are shown in the
Infotainment system
r::!;> fig . 65.
• To select a seat setting, turn the multifunction
button
(I) in the corresponding direction until
the desired seat setting is outlined in red.
• The arrows @ represent the possible adjust
ments. Fo r example, to lower the lumbar sup
port, press the multifunction button
(I) down.
The co rresponding ar row © lights up.
The follow ing seat sett ings @ are possible:
Massage function * -select the massage type
Wave, St ret ch , Knead or Off . You can adjust the
intens ity of each massage from 1 to 3. You ca n
sw itch the selected massage on/off using the
button @
r::!;> fig. 65.
Lumbar support -you can adjust the lumbar sup
port up/down and to be stronger/weaker.
Side bolsters* -you can increase/decrease the
side support in the seat using the side bolsters
on the seat backrest.
@ Tips
- The massage function switches off a uto
matically after approx imately 10 minutes.
- The air in the side bo lsters* is released as
soon as the driver's door opens. T his makes
i s possible to enter and exit the vehicle
more comfortably. As soon as you start driv
i ng the veh icle, the side bo lsters fill.
Center armrest
There is a storage comportment under the arm
rest.
F ig . 66 Comfort center armrest between the driver's seat
and front passenger's seat
66
• To adjust the ang le, raise the armrest from the
starting position notch by notch.
• To bring the armrest back into the sta rt ing po
sition, raise it out of the top notch and fold it
back down.
The armrest can slide forward and back .
Head restraints
Front head restraints
Applies to: vehicles with adjustable head restraints
Fig. 67 Fro nt seat: adjust ing the head restraint
Adjust the head restraints so the upper edge is as
even as possible w ith the top of your head . If that
i s not possib le, try to adjust as close to this pos i
tion as possib le .
Adjusting the head restraints
• To move the head restra int upward/forward,
hold it at the sides w ith both hands and sl ide it
upward/forward until yo u feel it click into
place.
• To move the head restra int downward/back
ward, press the s ide button and slide t he head
restraint downward/backward . Release the but
ton and slide the head restraint farther unti l it
clicks into place.
&_ WARNING
Always read and follow the applicable warn i n gs
r::!;> page 257, Proper adjustment of head
restraints.
-
Page 72 of 403
Sea ts and stor age
-Nets* on the left/right luggage compartment
trim pane l
-Tie-downs * on the left/right luggage compart
ment trim panel
-Bag hooks* in the luggage compartmen t
A WARNING
-
-Always keep the g love compartment lid
closed w hile d riving to reduce the risk of in
jury .
-Only use the storage compartments in the
door trim pane ls to store small objects that
will not st ick o ut of the compartment and
impa ir the range of the side a irbags.
-Due to strength reasons, on ly secure objects
up to 11 lbs (S kg) with the tie-downs*.
Heav ier objects are not adequately secured.
The re
i.s risk of perso nal injury.
- Make sure that the view to the rear is not
obstructed by hanging garments.
- Hang only lightweight cloth ing and be sure
that there are no heavy or sharp-edged ob
jects in the pockets.
- Do not use coat hangers to hang the cloth
ing because this could impair the effective
ness of the side curta in airbags.
Luggage compartment
General information
A WARNING
Read and follow the important safety precau
tions in
q page 259, Storing cargo correctly .
Luggage compartment cover
Applies to: vehicles with luggage compartment cover
F ig . 75 Luggage compa rtment: cove r attached
70
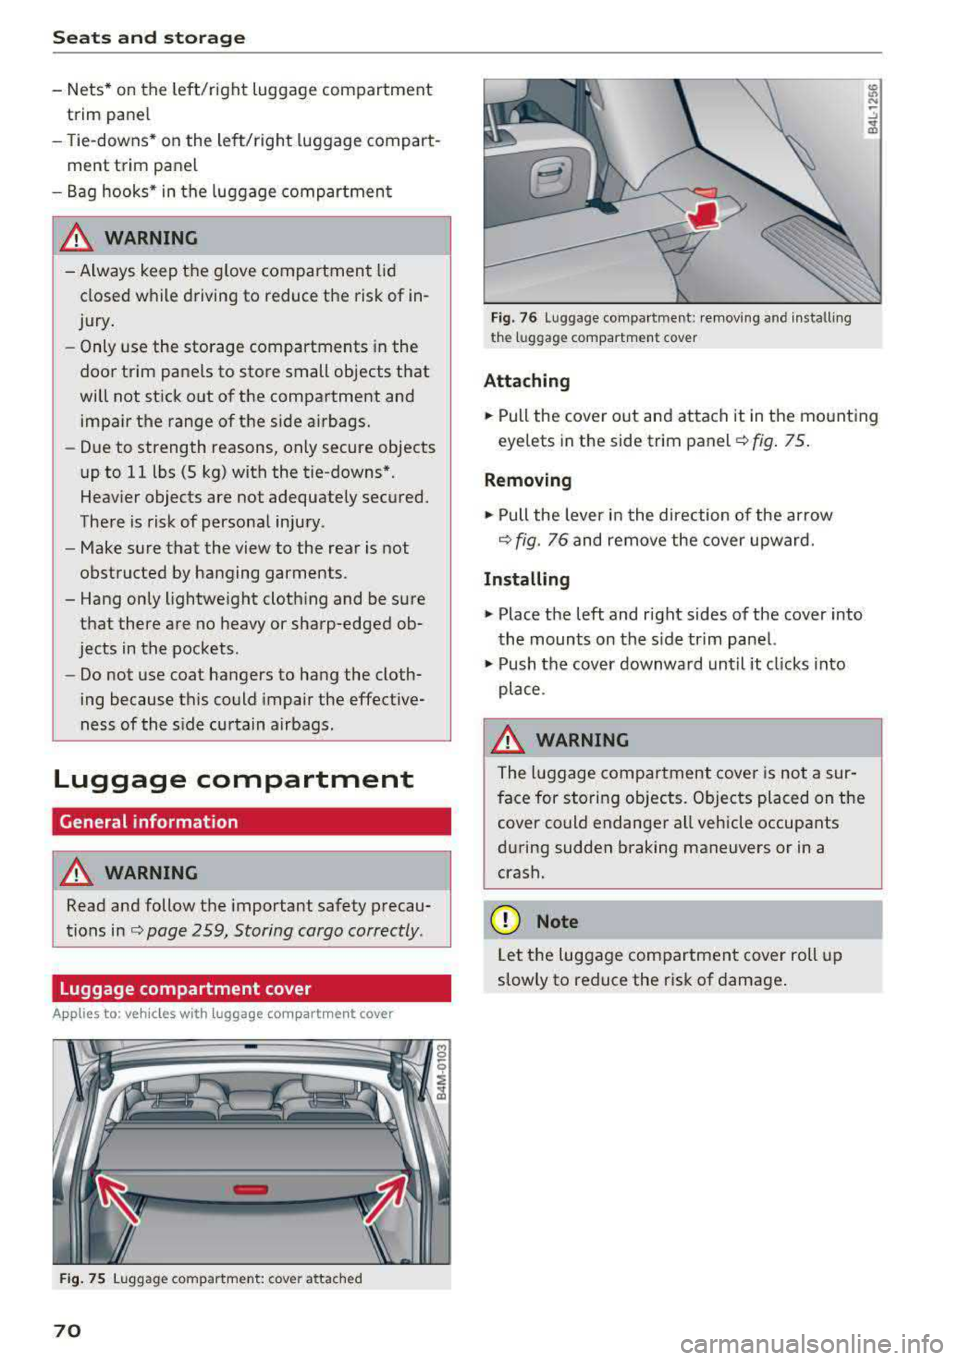
Fig. 76 Luggage compa rtment: remov ing and install ing
the lu ggage compartment cover
Attaching
.,. Pull the cover out and attach it in the mounting
eyelets in the side trim
panel ¢ fig. 75.
Removing
.,. Pull the lever in the direction of the arrow
q fig. 76 and remove the cover upward.
Installing
.,. Place the left and rig ht sides of the cover into
the mounts on the s ide trim panel.
.,. Push the cover downward unt il it clicks into
place .
A WARNING
The luggage compartment cover is not a sur
face for storing objects. Objects placed on the
cover could endange r all vehicle occupants
d uring sudden b raking maneuvers or in a
crash.
(D Note
Let the luggage compartment cover roll up
slow ly to reduce the risk of damage .
Page 78 of 403
Warm and cold
Warm and cold
Climate control system
Description
The climate control system warms, cools and re moves humidity from the air in the vehicle interi
or. It is the most effective when the windows and
sunroof * are closed. If there is a bui ld-up of heat
inside the vehicle, ventilation can he lp to speed
up the cooling process.
I n all heating mode f unctions except for
defrost,
the blower only switches to a higher speed once
the engine coolant has reached a sufficient tem
perature .
Pollutant filt er
The po llutant filter removes poll utants such as
dust and pollen from the a ir .
Ke y recognit ion
The climate control settings are automatically
stored and assigned to the remote contro l key
that is in use .
76
® For the sake of the environment
-If you would like to reduce fuel consump
t ion, sw itch the air conditioning
off. This
will also reduce emissions.
- In veh icles with a diesel engine, you can
switch the auxiliary heater
off in the Info
tainment system.
(D Tips
- To prevent interference with the heating
and cooling output and to prevent the win
dows from fogging over, the air intake in
front of the windshie ld must be free of ice,
snow or leaves.
- Condensation from the cooling system can
dr ip and form a pudd le of water under the
vehicle . This is norma l and does not mean
there is a leak.
- The energy management system may tem porarily switch
off certain functions, such as
the seat heating* o r rear window defogger.
T hese systems are ava ilable again as soon
as the ene rgy supply has been restored.
Page 79 of 403

Warm and cold
3 zone deluxe automatic climate control
Operation
.... M
~ a,
Fig. 90 3-zone de lu xe a uto mat ic cl imate contro l; cockpit controls
Fig. 9 1 3-zone de luxe automatic cl imate control system: rear controls
Press the knobs, buttons or rocker switches to
turn the functions on or off . When the funct ion is
sw itched on, the LED in the respect ive button or
knob t urns
on ¢ fig. 90. The rocker switc hes are
se nsitive to to uch. The drive r and front passenger
sett ings can be ad justed sepa rately.
You can adjust the settings for the rea r of the ve
hi cle using the controls in the rear
~ fig. 91 .
On right-hand dr ive vehicles*, the functions of
the rocker sw itched ® and ® are switched .
OFF
clima te control sy stem
You can switc h the cl imate control system on and
off using the OFF button.
It also sw itches on when you press another button or a knob. A
irflow
from outside is b locked when the clima te control
system is sw itched off.
A/C Cooling mode
You can switch the coo ling mode on or off using
the rocker switch ®· The air is not coo led and hu
mid ity is not removed when cooling mode is
switched off. This can cause fog on the w indows .
Cooling mode switches off automatically when
t h e outs ide tempe ra ture is below zero .
A/Ceco cooling mode*
You can switch the eco cooling mode on or off us-
ing the rocker switch ®· The climate control
..,.
77
Page 80 of 403

Warm and cold
system operates most efficiently in eco cooling
mode.
A/C MAX cooling mode*
You can switch the maximum cool ing mode on or
off using the rocker switch@. Th e air is not
coo led and humidity is not removed when cooling
mode is switched off. This can cause fog on the
windows. Cooling mode switches off automati
cally when the outside temperature is below
zero. When the cooling mode is switched on, the
vehicle interior is cooled as quickly as possible
and dehumidified .
c:E) Recirculation mode
In recirculation mode, the air inside the vehicle is
circu lated and filtered. This prevents the unfil
tered air outside the vehicle from entering the
vehicle interior. Switching recirculation mode on
when dr iv ing through a tunnel or when s itting in
traffic is recommended
Q &, .
Using the button, recirculation mode is~ using
the button. You can also switch the recirculation
mode off by pressing the knob (D or the ~ but
ton.
AUTO
Automatic mode
Automatic mode maintains a constant tempera
ture inside the vehicle. Air temperature, airflow
and air distribution are controlled automatically .
You can switch automatic mode on or off by
pressing the
knob@.
Temperature
You can adjust the temperature between 60°F
( + 16°()
and 84°F ( +28°() by turn ing the knob
(D . Outs ide of this range, LO or HI will appear in
the climate control system display . In both set
tings, the climate control runs constantly at the
maximum cooling or heating level. The tempera
ture is not regulated.
The temperature can be adjusted in the rear us
ing the rear contro ls
Q fig. 91.
86'~ Blower
You can adjust the vo lume of air generated by the
blower to your preference using the rocker switch
@ . The blower should always run at a low setting
78
to prevent the windows from fogging and to en
sure a continuous exchange of air inside the vehi
cle. To have the blower regulated automatically,
press one of the knobs
(D .
Air distribution
You can use the rocker sw itches @to adjust the
vents where the air will flow out of. Press the
rocker switches @repeatedly unti l the desired
air distribution setting is displayed in the climate
control system controls. To have the air distribu
tion regulated automatically, press one of the
knobs
(D .
""lll"' OPEN/CLOSE the wide vent
You can open and close the wide vent in the cock
pit using the rocker switch ®·
JI~ Seat heating and ventilation*
If you press the button J ,J, the seat heating/
ventilat ion is switched on at the highest leve l (3) .
The LEDs indicate the temperature level. To re
duce the temperature, press the button again. To
switch the seat heating/ventilation off, press the
button repeatedly until the LED turns
off.
3% Defrosting
The windshield and side windows are defrosted
or cleared of condensation as quick ly as possible .
The maximum amount of air flows mainly from
the vents below the windsh ield. Recirculation
mode switches off. The temperature should be
set at
+72°F (+22°() or higher . The temperature
i s controlled automat ically .
Defrost is switched on and off
3% using the but
ton. You can switch the function off by pressing a knob
(D .
Applies to vehicles with windshield defogger: the
windshield defogger switches on automatically
when outside temperatures are low. If you would like to sw itch the windshield defroster on man
ually, press the
3%. The LED in the button blinks.
ClWREAR Rear window defogger
Press the button [email protected] switch the rear window de
fogger on. It on ly operates when the engine is
running. It switches off automatically after
10 to .,,.
Page 81 of 403

a co .... N ,....
N .... 0 0
3 co
20 minutes, depending on the outside
temperature.
To keep the rear window defogger on contin uous
l y, press and hold the
QWREAR button longer
than
3 seconds. This is stored unti l the ignition is
switched off .
SYNC Synchronization
Use the rocker switc h® to sele ct the funct ion.
When synch ronization is switched on, the set
tings for the driver's side are applied to the front
passenger's side and the rear (except for seat
heating/venti lation*) . When the settings on the
front passenger's side or in the rear are changed,
the synchron iz at ion is automatically sw itched off
and
3 -z one appears in the display .
SET REAR function
Use t he rocker switch ® to select the function .
When the function is switched on, you can adjust
all settings for the rear us ing the climate control
system controls in the cockpit. The rear climate
control system controls cannot be operated at
the same time . This function switches off auto
mat ically after a certain period of time or after
leaving the menu.
Vent s
You can open or close the center and rear vents in
the cockpit and the vents in the rear center con
sole us ing the r idged thumbwheels . The levers
adjust the d irection of the airflow from the vents.
The wide vent is opened and closed using the
r ocker switch
® ·
Residu al heat
You can activate the residual heat funct ion when
the ignition is switched off by pressing the knob
(D . The res idual heat from the coolant is used to
h eat the vehicle inte rior. The residual heat func
tion swi tches off automatically afte r abou t 15
minu tes .
A WARNING
- You should not use the recirculation mode for an exten ded period of time, because no
fresh a ir is drawn in and the w indows can
Warm and c old
fog when cooling mode is switched off. This
increases the r isk of an accident.
- Individuals with reduced sensitivity to pain
or temperature could develop burns when
using the seat heat ing* function. To reduce
the risk of injury, these individua ls should
not use seat heating*.
(D Note
To avoid damaging the seat heat ing* ele
ments, do not knee l on the seats or place
heavy pressure on one area of the seat.
Setup
The climate control system basic settings ore ac
cessed in the Infotainment system .
.,. Select in the Infotainment system : I MENU! but
ton
> Vehicle > l eft control button > Ai r co ndi
tioning
Auto recircu lation
When switched on, a utomat ic rec irculat ion con
trols the recircu lation mode automatically . You
must press the
®MAX button if fog forms on
the windows.
Automatic auxiliary heater*
T he aux iliary hea ter he lps to wa rm the vehicle in
terior more q uickly.
Steering wheel heating
Applies to: vehicles with steering wheel heating
The steering wheel rim con be heated.
.,. Press the bu tton on the m ultif unct ion steeri ng
wheel to switch the steering whee l heating on
and
off~ r=:> poge 15, fig . 11 . The message
Steering wheel heating : on /Steering wheel
heating: off
appears in the instrument cluster
disp lay.
The temperature is maintained at a constant lev el when steering wheel heating is switched on .
T he s teer ing whee l heating se tt ings a re stored
automat ica lly and assigned to the remo te control
key that is in use.
79
Page 83 of 403
a co .... N ,....
N .... 0 0
3 co
engaged, for example when you notice that the next traffic light is red . This produces an engine
braking effect, which helps to protect the brakes
and tires and reduces the emissions and fuel con
sumpt ion to zero (fuel shut-off dur ing decelera
tion) .
Shift efficiently
Upshifting earlier is an effective way to save fuel.
Staying in a gear too long uses fuel unnecessari
ly.
Applies to: vehicles with manual transmission
Shift as soon as possible from first to second
gear. S hifting to the next highest gear at approxi
mately 2,000 RPMs if poss ible is recommended.
Applies to: vehicles with automatic transmissions
Press down on the acce le rator peda l slowly and
avoid "kick -down".
Avoid full acceleration
You should rarely travel at the maximum vehicle
speed. High speeds cause a disproportionately
high increase in fuel consumption, emissions and
traffic noise. Driving more slowly saves fuel.
Reduce idling time
The Start/Stop system* he lps to reduce the idling
time automatically. In vehicles without the Start/
Stop system*, it is efficient to switch the engine
off when stopped at railroad cross ings and long
r ed lights. Stopping the engine for 30-40 sec
onds already saves more fuel than the amount of
extra fuel needed to restart the eng ine.
It takes a very long time in idle to warm the en
g ine up to operating temperature. Wear and
emissions are especially h igh in the wa rm-up
phase . Therefore, you should begi n driving im
mediately a fter starting the engine . Avoid high
RPMs while do ing this .
Have maintenance performed regularly
By having maintenance performed regu larly on
your veh icle, yo u ca n he lp to reduce f uel con
sumption before yo u even start to drive. The
maintenance condition of your vehicle not only
affects traffic safety and long-term value but a l-
Driving
so impacts fuel consumption . A poorly main
tained engine can lead to fuel consumption that is 10% higher than norma l.
Avoid short trips
The eng ine and exhaust cleaning system must
reach their optimal operat ing temperatu re to ef
f ectively reduce consumption and emissions.
A cold engine uses a disproportionately high
amount of fue l. The engine reaches operating
temperat ure and consumption normalizes on ly
after approximate ly 2.5 miles (4 km).
Check the tire pressure
To save fuel, make sure the tires are always in
flated to the correct press ure
~ page 344. The
fuel consumption can increase by 5% if the pres
s u re is only 0.5 bar too low. Due to the increased
rolling resistance, low tire pressures wi ll also
l ead to greater tire wear and will affect driving
behavior.
Do not drive on winter tires year-round, as this
will consume up to 10% more fuel.
Eliminate unnecessary weight
S in ce eve ry po und of ext ra weight increases f uel
consumption , a quick inspection of the luggage
compartment may be worth it to avoid unneces
sary weight .
When not be ing used , a roof rack should be re
moved to decrease the wind resistance of the ve
hicle. This will save you approximately 12% fuel
at speeds from 62 -75 mph (100 - 120 km/h) .
Save energy
The eng ine drives the generator, which generates
electric ity; the fuel consumpt io n also incr eases
with the demand for electr icity. The refore, switch
electrical eq uipment off when you no longer
need it . Examples of equipment that uses a lo t of
energy are air blowers at a high setting, the rear
window defogger and seat heating* .
@ Note
Do not leave engine idling unattended after
starting. If warning lights shou ld come on to
indicate improper operation, they would go
81
Page 84 of 403
Driving
unheeded. Extended idling also produces
heat, which could result in overheating or
other damage to the vehicle or other proper
ty.
(D Note
- Have your vehicle maintained properly and
in accordance with the service recommenda
tions in your Warranty
& Maintenance book
let . Lack of proper maintenance as well as
improper use of the vehicle will impair the
function of the emission control system and
could lead to damage.
- Do not alter or remove any component of the Emission Control System unless approved by the manufacturer .
- Do not alter or remove any device, such as
heat shields, switches, ignition wires,
valves, which are designed to protect your
vehicle's Emission Control System and other
important vehicle components.
(D Tips
The consumption estimates as published by
ENVIRONMENTAL PROTECTION AGENCY (EPA) and Transport Canada may not corre
spond to your actual consumption on the
road, which will vary depending upon vehicle
load and speed, road and weather conditions,
trip length, etc.
Steering
Adjusting the steering wheel position
The steering wheel position is adjustable up and
down and forward and back.
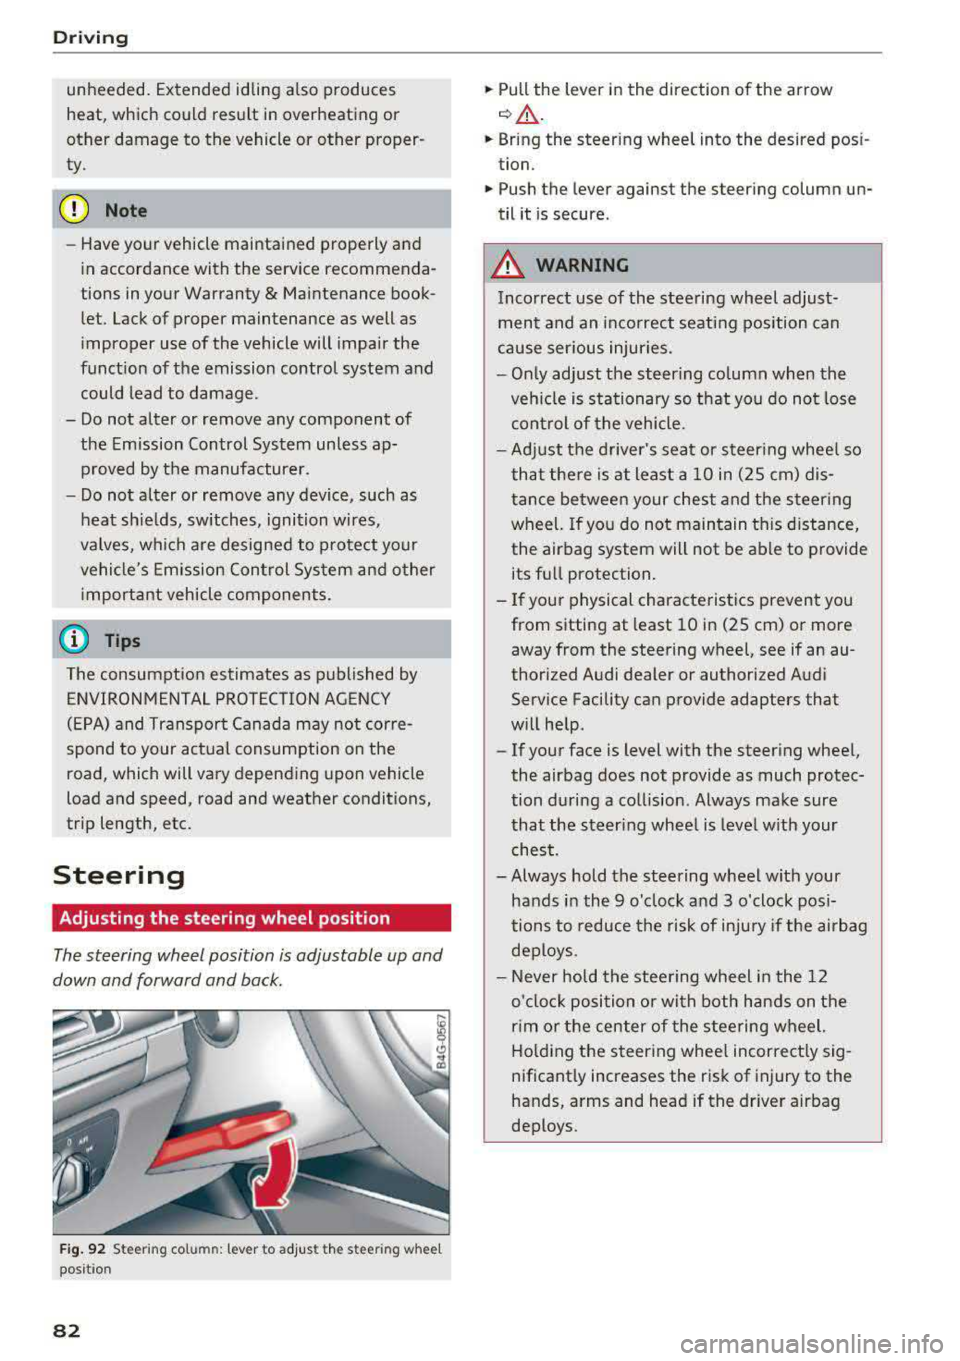
Fig. 92 S tee rin g col umn : le ver to adjus t the stee ring w heel
posit ion
82
.,. Pull the lever in the direction of the arrow
c::, A -
... Bring the steering wheel into the desired posi
tion .
.,. Push the lever against the steering column un
til it is secure .
_&. WARNING
Incorrect use of the steering wheel adjust
ment and an incorrect seating position can
cause serious injuries.
- Only adjust the steering column when the
vehicle is stationary so that you do not lose
control of the vehicle.
-
-Adjust the driver's seat or steering wheel so
that there is at least a 10 in (2S cm) dis
tance between your chest and the steering
wheel. If you do not maintain this distance,
the airbag system will not be able to provide
its full protection.
-If your physical characteristics prevent you
from sitting at least 10 in (2S cm) or more
away from the steering
wheel, see if an au
thorized Audi dealer or authorized Audi
Service Facility can provide adapters that
will help .
- If your face is level with the steering wheel,
the airbag does not provide as much protec
tion during a collision . Always make sure
that the steering wheel is level with your
chest.
- Always hold the steering wheel with your
hands in the 9 o'clock and 3 o'clock posi
tions to reduce the risk of injury if the airbag
deploys.
- Never hold the steering wheel in the 12
o'clock position or with both hands on the
rim or the center of the steering wheel.
Holding the steering wheel incorrectly sig
nificantly increases the risk of injury to the
hands, arms and head if the driver airbag
deploys .