air AUDI S4 2018 Service Manual
[x] Cancel search | Manufacturer: AUDI, Model Year: 2018, Model line: S4, Model: AUDI S4 2018Pages: 403, PDF Size: 66.81 MB
Page 188 of 403
Telephone
using the Ringtone fu nction . Select and confirm
an entry from the list. Fo r the
Ringtone volume /
Message volume
sett ings, refer to ¢ pag e 253 .
The Microphone input level can be ad justed d ur
ing a phone call using the contro l knob .
(D Tips
-Seve ra l cell ph ones can be paire d to the
MM I, but only two* cell phones ca n be ac
tive ly connected.
- To delete all paired Bluetooth devices, the
Bluetooth funct ion can be reset to the fac
tory default sett ings
c:> page 249.
Additional options
... Se lect : I MENU I button> Telephone > right co n-
t ro l butto n.
Connection manage r
See c:> page 249.
Bluetooth settings*
See c:> page 25 0.
Online settings*
See c:> page 251 .
Wi-Fi settings*
See c:> page 194, Wi-Fi hotspot .
Directory settings
A ppl ies to: ve hicles w ith tele phone
... Select : I MENU I button> Telephone > left con
trol button
> Directory > right control button>
Directory settings .
186
Memory capacity
Sho ws the Memory capacity fo r t he direct ory.
You can ma nage up to 17 ,00 0 co nta cts wi th the
d irectory. Yo u can load up to 4, 000 contacts
from your cell phon e into each directory. Yo u ca n
a ls o im por t up to 1,00 0 c ontacts fr om a storage
d evice.
Sort order
You can so rt the contacts in your directo ry alpha
b eti call y acco rdi ng to
Last name or First name .
Import contacts/Export contacts
See c:> page 185.
Download directory
To update the contacts in the MMI, yo u ca n man
u ally down loa d your cell phon e contacts . De
pending on the ce ll phone, the Bluetooth connec
tion may need to be disconnected and reconnect
ed to upda te t he contacts.
Hide contacts without phone number
W hen t his fu ncti on i s s witch ed o n~ , conta cts
that do not have any num bers assig ned to them
will be g rayed ou t in the directory.
Page 189 of 403
a co .... N ,....
N .... 0 0
3 co
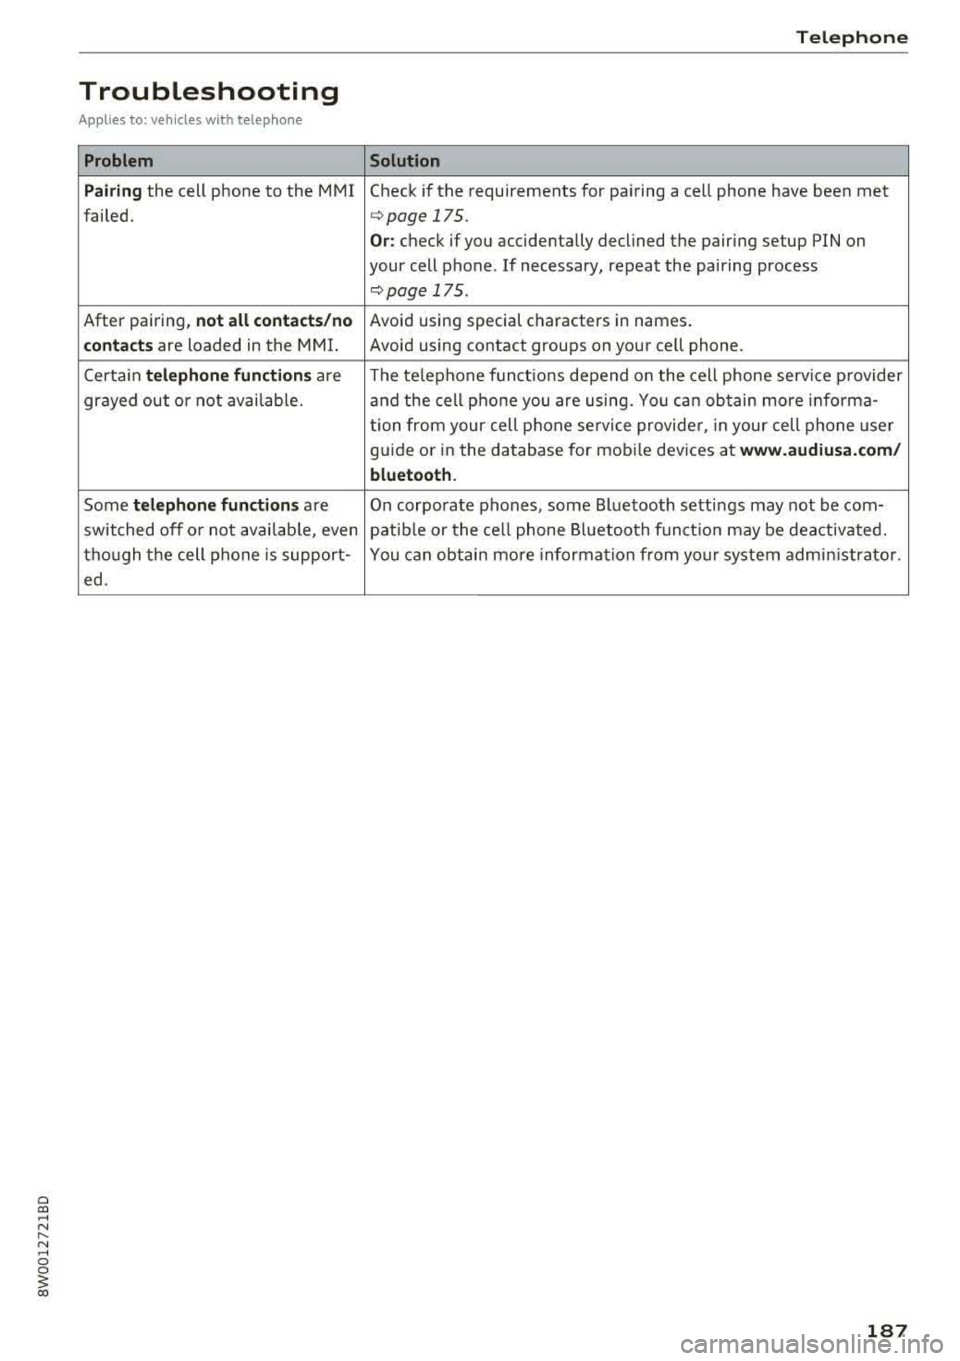
Troubleshooting
Applies to: vehicles with telephone
Problem
Pairing
the cell phone to the MMI
failed.
After pai ring,
not all contact s/no
contacts
are loaded in the MMI.
Certa in
telephone functions are
gr ayed out o r not avai lab le.
Some
telephone function s are
switched off o r not avai lab le, even
tho ugh t he cell phone is support -
ed .
Telephone
Solution
Check if the requirements for pai ring a ce ll phone have been met
c::;,page 175.
Or: check if you accidentally declined the pairing setup PIN on
your cell phone . If necessary, repeat the pairing process
c::;, page 17 5.
Avoid using special c haracters in names .
Avoid using contact groups on your cell phone.
The te lephone funct ions depend o n the cell phone service p rovider
and the cell p hone you are using. Yo u ca n ob tain more info rma-
tion from your cell phone se rvice provide r, in your cell phone user
g ui de or in the database for mob ile dev ices at
www.audiusa.com /
bluetooth .
On corporate phones, some Bluetooth setti ngs may not be com-
patib le or the ce ll phone Bluetooth f unct ion may be deactivated.
You c an obtai n more informa tion from yo ur system adm inistrator.
187
Page 194 of 403
Audi connect (Infotainment)
You must have connected your vehicle with
myAudi
¢ page 188.
.,. Se lect: I MENU I button> Audi connect> Twitter
> left contro l button > desired function (for ex
amp le,
Trends ).
The following categories can be selected in the
Twitter menu:
- My tweets : News Feed and the Tweets you have
posted are listed.
- Home: the Tweets for everyone you follow are
displayed .
-Trends: topics on Twitter that are currently
popular within a country .
Different functions are available depending on
the Twitter category you have selected:
- New tweet : you can post a new tweet using
pre-made templates or using myAudi tem
plates that you have created yourself.
- Refresh : the selected Twitter function is re
freshed.
- Favorite: set a Tweet as favorite to show you
liked it.
-Retweet : you can quote a Tweet to share it with
others.
(D Tips
- Other settings such as account, language,
Tweet security and location settings
cannot
be changed in the MMI. These changes must
be made on the Twitter website.
- You can only connect
one Twitter account
with your myAudi account.
- Audi connect (Infotainment) makes it possi
ble to access Tw itter . Permanent avai lability
cannot be guaranteed, because that de
pends on Twitter.
Travel (travel guide)
Ap plies to veh icles with Audi co nnect (Infotainment)
You can use the Audi MMI connect opp to store
points of interest on your mobile device (such as
a smartphone) and then use them for route
guidance in the
MMI.
Requirement:
192
The Audi MMI connect app must be installed and
open on your mobi le device .
You must be logged into your myAudi account in
the
Audi MMI connect app and you must have se
l ected your vehicle.
The Wi-Fi function on your mobile device and on
the
MMI must be switched on.
The
MMI must be connected to the network .
"'Press: !MENU ! button> Audi connect> left con-
trol button >
Information category > Travel.
After opening the travel guide, trave l tips in your
area wi ll be displayed including current ratings as
well as the corresponding category .
"' Press the left control button to change the cat
egory (such as bars nearby).
A WARNING
-
-It is o nly safe to use tablets, laptops, mo
bi le devices and other similar devices when
the vehicle is stationary because, like all
loose objects, they could be thrown around
the inside of the vehicle in a crash and cause
serious injuries. Store these types of devices
secure ly while driving.
- Do not use any wire less devices on the front
seats within range of the airbags while driv
ing. Also read the warnings in the chapter
¢ page 275, Front airbags .
Q) Note
Always fo llow the information found in ¢@ in
Wi-Fi hotspot on page 194.
(D Tips
Units of measurement, language settings and
time are shown in the Infotainment system
display based on how they were set in the
MMI system settings ¢ page 248.
Audi connect (Infotainment) in navigation
App lies to : vehicles wit h a navigation system and Audi co n·
nec t (In fo ta inm ent)
... Select: !MENUI button> Audi connect > left
control button >
Navigation .
Page 196 of 403
a co .... N ,....
N .... 0 0
3 co
Configuring the data
connection
Applies to vehicles with Aud i connect (Infotainment)
The data connection for Audi connect Infotain·
ment services is pre-configured at the factory .
However , if a configuration should be necessary,
you can adjust the following settings .
.,. Select: I MENU I button > right control button>
Connection manager .
.,. Select: right control button > Online settings>
Data connection settings .
Using the Data connection settings menu, you
can set when an Internet connection should be
made . T he Internet connect ion disconnects auto
matica lly on ce the requested Audi connect Info
tainment service no longer requires any data.
The fol low ing settings can be selected:
Audi connect (MMI)
With the Audi connect (MMI) f unction, you can
Allow or Deny the use of Audi connect Infotain ·
ment services if the connection is set to No re·
quest or With request .
Wi-Fi devices*
Using the Wi-Fi devices function, you can Allow
or Deny a connection to the In ternet.
A WARNING
-As the driver, do not allow usage of the Wi
Fi hotspot to distract you from driving, as
this could increase the risk of an accident.
-It is only safe to use tablets, laptops, mo·
bile devices and other s imilar dev ices when
the vehicle is stationary because, like all
loose objects, they could be thrown around
the inside of the vehicle in a crash and cause
serious injuries . Store these types of devices
securely whi le driving.
-Do not use any wireless devices on the front
seats within range of the airbags while driv·
ing. Also read the warnings in the chapter
t::> page 275, Front airbags.
Audi connect (Infotainment)
(D Note
Always fo llow the information found in ~0 in
Wi-Fi hotspot on page 194.
Audi connect (Infotainment) general
information
Audi connect Infotainment services
Applies to vehicles wit h Aud i connect (Infota inment)
@ Tips
-You can only use services supported by Aud i
connect (Infotainment) if you have the
op·
tional MMI Navigation plus equipment w ith
MMI touch* and Audi connect (Infotain
ment).
-Use of the L TE* mobile network standard is
not available in every country. Contact an
authorized Audi dealer or authorized Audi
Service Facility or your cell phone service
provider for additional information.
-Usage of Audi connect Infotainment serv
ices depends on the ava ilability of services
through third party providers.
-Audi connect Infotainment services are only
availab le within the cell phone network cov
erage from your cell phone service provider.
-Audi connect Infotainment services are
available in the USA. Audi connect Infotain·
ment services are currently not availab le in
Canada or in Mexico.
- Also read the information in the chapter
t::> page 175, Telephone.
- Availability, scope, providers, screen display
and costs of services may vary depending on
the country, model, model year, end device
and rates. For add itional information, v is it
www.audiusa.com .
-An initial registration/activation on the
myAudi platform at
www.audiusa.com/
myaudi
is requ ired to use individual serv
ices . You can contact an authorized Audi
dealer or Aud i connect (Infotainment) cus
tomer service at (87 7) SOS-AUDI (2834) to
195
Page 203 of 403
Emergency call
Emergency call
Introduction
The following functions may be available depend
ing on the vehicle and the market.
- Emergency call
¢page 202.
- Online roadside assistance Q page 203 .
(D Tips
-The services are provided through a SIM
card installed in the vehicle. The cost of the
call and data connections is included in the
price for the services. Services are provided
assuming that the cell phone network re
quired for the installed SIM card is function
ing and ready to operate. The available serv
ices set by Audi AG are only available within
the cell phone network coverage area for
the cell phone service provider selected by
Audi AG.
- You can find what data will be transferred
at www.aud iusa.com.
- These services cannot be deactivated using
the settings in the Infotainment system .
Emergency call
Description
Applies to: vehicles with emergency call function
You can request help when in an emergency or
dangerous situation using the emergency call
function
l) _ An emergency call is a combination
of data transmission and a phone call. The data
transmission from your vehicle forwards impor
tant information, such as the vehicle and position
data, to the emergency call center.
1l The avai lability of the serv ices o ffere d de pen ds on t he
c oun try a nd may chang e ove r tim e.
202
Making an emergency call
Applies to: vehicles with emergency call function
The emergency call can be made two different
ways .
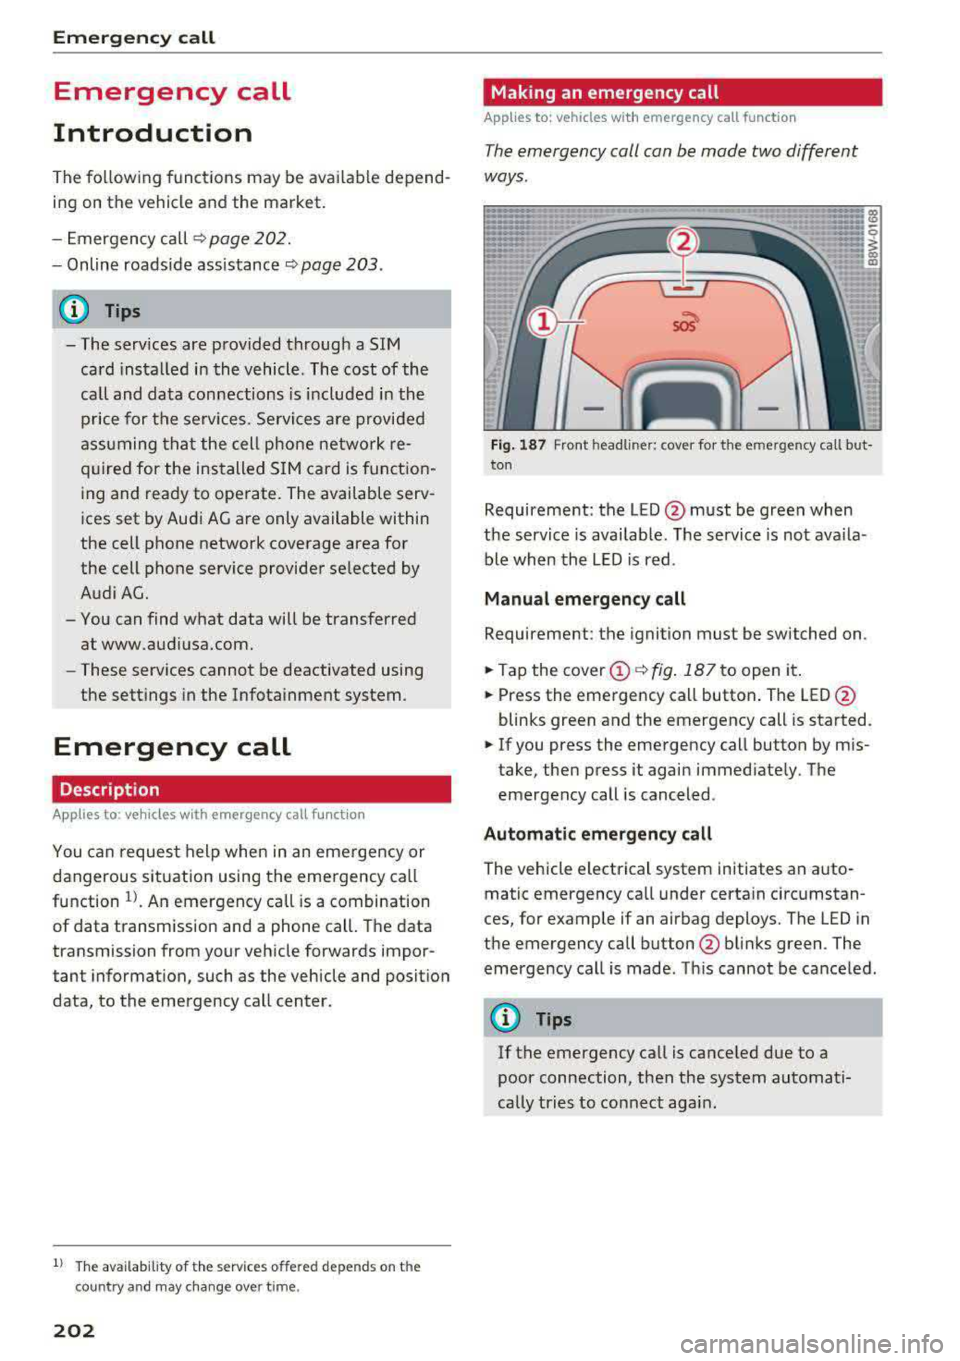
Fig. 187 Front headli ner: cover for the e mergency cal l but
ton
Requirement: the LED @must be green when
the service is available. The service is not ava ila
ble when the LED is red .
Manual emergency call
Requirement: the ignition must be switched on.
.. Tap the cover@¢ fig. 187 to open it .
.. Press the emergency call button. The LED@
blinks green and the emergency call is started.
.. If you press the emergency call button by mis
take, then press it again immediate ly. The
emergency call is canceled .
Automatic emergency call
The vehicle electrical system initiates an auto
matic emergency call under certain circumstan
ces, for example if an airbag deploys. The LED in
the emergency call button @blinks green . The
emergency call is made . Th is cannot be canceled.
(D Tips
If the emergency call is canceled due to a
poor connection, then the system automati
cally tries to connect again .
Page 205 of 403
Nav igatio n
Navigation
Opening navigation
Applies to: vehicles with navigation system
The navigation system directs you to your desti
nation , around traffic incidents and on alterna
tive routes, if desired .
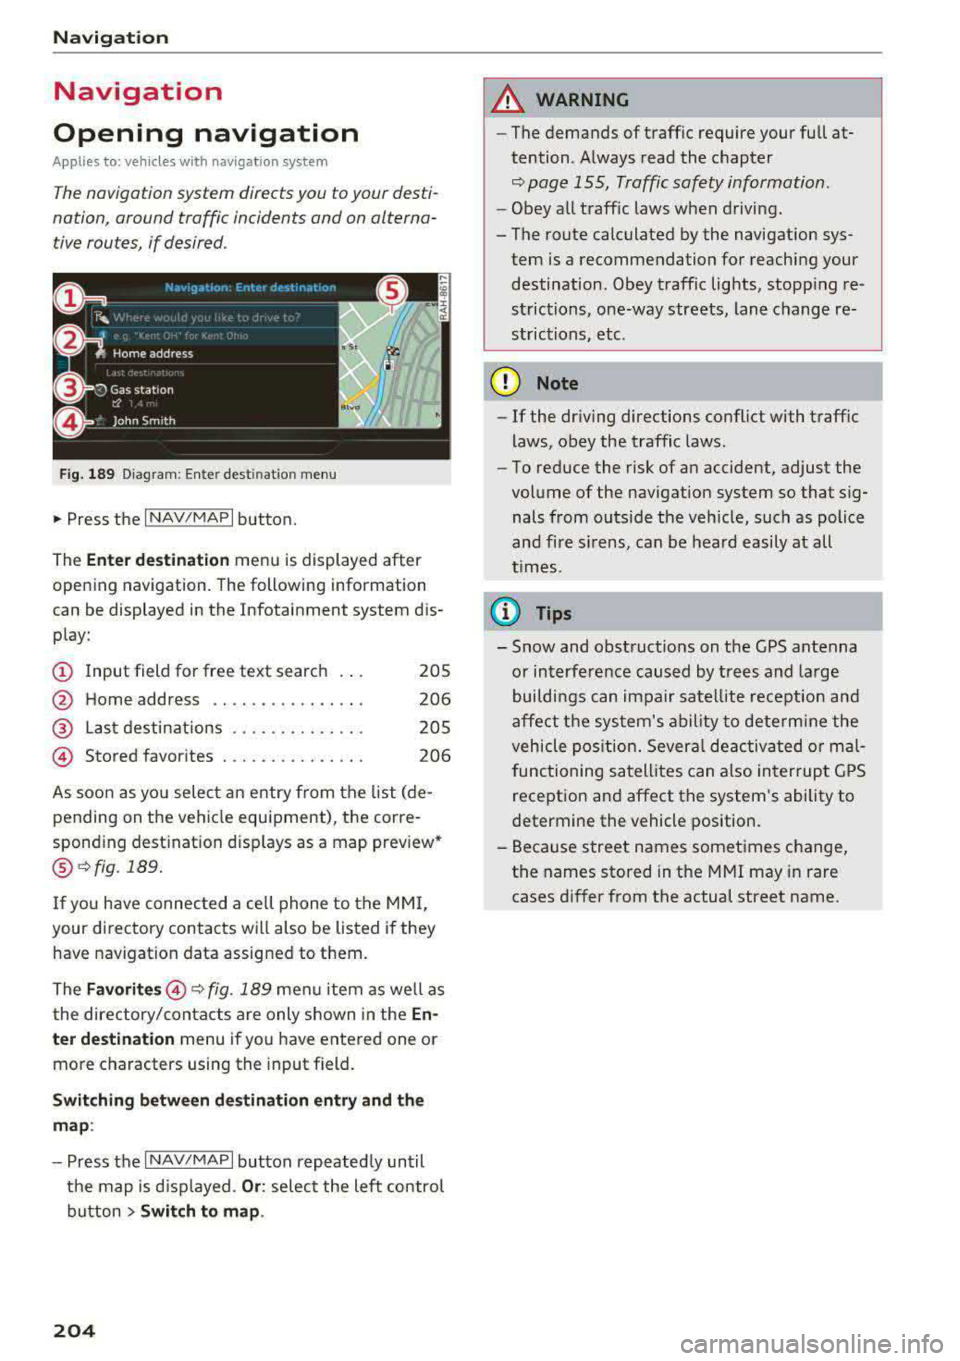
Fig. 189 Diagram: Ente r dest inatio n menu
• Press the I NAV/MAPI button.
The
Enter d estina tion menu is displayed after
opening navigation . The following information
can be displayed in the Infotainment system dis
play:
(D Input field for free text search 205
@ Home address . . . . . . . . . . . . . . . . 206
@ Last destinations . . . . . . . . . . . . . . 205
@ Stored favorites . . . . . . . . . . . . . . . 206
As soon as you select an entry from the list (de
pending on the vehicle equipment), the corre
spond ing dest ination d isp lays as a map prev iew*
@ ~ fig . 189.
If you have connected a cell phone to the MMI,
your directory contacts will also be listed if they
have navigation data assigned to them.
The
F avo rites @ ~fig. 189 menu item as we ll as
the directory/contacts are only shown in the
En ·
t e r d estination
menu if you have entered one or
more characters using the input field.
S w itc hin g betwe en dest inati on entry and th e
m ap :
- Press the I NAV/MAPI button repeated ly until
the map is displayed .
Or: select the left control
button
> Swi tch to map .
204
A WARNING
-The demands of traffic require your fu ll at
tention. Always read the chapter
~ page 155, Traffic safety information.
- Obey all traff ic laws when driving.
- The route calculated by the navigation sys- tem is a recommendation for reaching your destination. Obey traffic lights, stopping re
strictions, one-way streets, lane change re
strictions, etc.
{Q) Note
- If the dr iving directions conflict with traff ic
laws, obey the traffic laws.
- To reduce the risk of an accident, adjust the
volume of the navigation system so that sig nals from outs ide the veh icle, such as police
and fire s irens, can be heard easily at all
t imes.
@ Tips
- Snow and obstruct ions on the GPS antenna
or interference caused by trees and large
buildi ngs can impair satellite reception and
affect the sys tem's ability to dete rmine the
vehicle pos ition. Several deactivated or ma l
functioning satellites can also inter rupt GPS
reception and affect the system's ability to
determine the vehicle position.
- Because street names sometimes change, the names stored in the MMI may in rare cases differ from the actual street name .
Page 207 of 403
Navig ation
-En te rin g a d estinati on using the Ci ty/ZIP
code :
select and confirm Cit y/ZIP . Enter a city
or a ZIP code.
Or : select and confirm a city from
the list.
-Se lect and confirm additional details about the
destination such as
S tre et , House numbe r or
Downto wn.
-Destination ent ry using a street inter section* :
Requirement: you must enter a street . Se lect
and confirm
Inte rsection . Select and confirm a
street d irectly from the list .
Or: search for a
street usi ng the input field.
-Select and confirm Start route guidance .
Selecting a destination from the map
Ap plies to: ve hicles w ith navigation system and MMI touch
A point on the mop con be used as the destina
tion.
- Adju st ing the scale : turn the control knob to
the left or right.
- Acti vating c ro sshairs : press the cont rol knob.
The crosshairs are shown on the map .
-Moving the crosshair s: move the crosshairs to
the destinat ion using the MMI touch control
pad*
c:> page 159.
-Setting as destinat ion : press the control knob
when the crosshairs are shown. If necessary,
select and confirm
Add as stopo ve r and then
Start route guidance .
-Hiding the cro sshai rs : press the I BACK I button.
Addition al inform atio n ab out th e loc ation of
the cro sshairs :
when you select map content us
ing the crosshairs, a display of available informa
tion appears (such as street name, address or points of
interest) @c:>poge 214, fig . 197.
206
Setting a home address/favorite as the
destination
App lies to: vehicles wi th navigat ion sys te m
You con quickly and easily start route guidance
to your home address using the home address
function. Favorites allow easier access to fre
quently used destinations.
.,. Press the I NAV /MAPI button repeatedly until
the
En ter dest inati on me nu i s displayed
c:>poge 204, fig . 189.
Setting a home address as the destination
Requirement: a home address m ust be stored
c:> page 212.
Your Home addr ess is shown directly in the Enter
d es tination
menu @ c:> page 204, fig. 189 .
-Select: Home address > Start route g uidance .
Setting a fa vor it e as the destination
Requirement: a favorite mus t be sto red as a des
tination
c:> poge212 .
-Enter at least the f irst three letters of t he de
sired favo rite in the free text sea rch input field.
T he favo rit es fo und a re shown in the Infotain
ment system
display @c:> page 204, fig . 189.
-Select and confirm t he des ired entry.
-Sele ct and confirm Start r oute guidanc e.
(D Tips
-Additional settings for the home address
can be found under
c:> page 212 .
-Additional settings for the favor ites can be
found under
c:> page 212 .
Page 215 of 403
Navigation
Voice guidance volume : you can adjust the vo l
ume d uring voice guidance using the On/Off knob
¢ page 155 Yo u can also f ind additional informa
tion
u nder¢ page 253.
Map
Operating the map
A pp lies to : ve hicles w ith navigat ion system
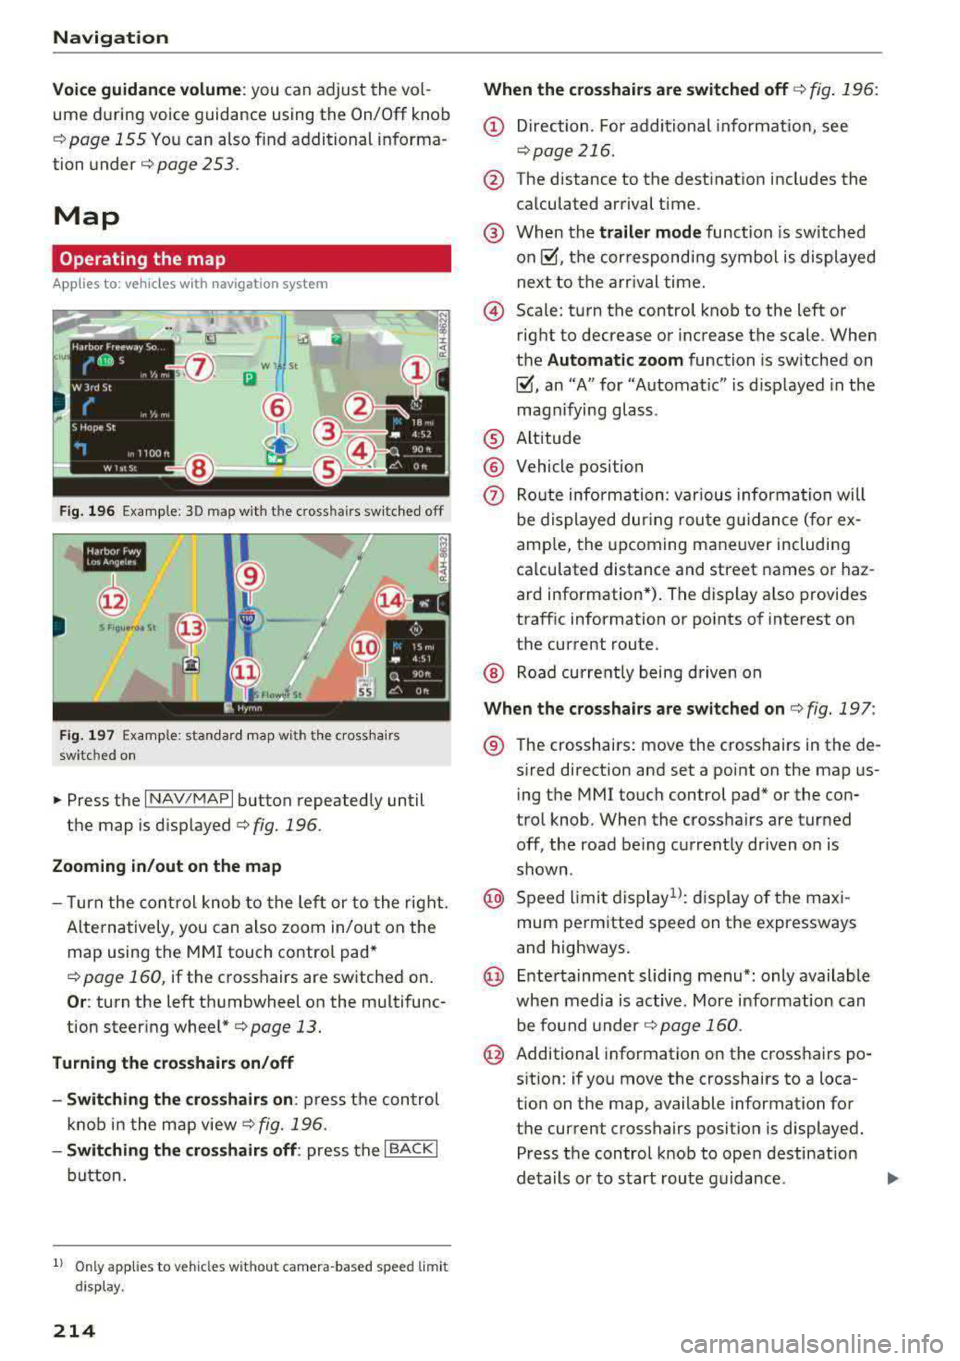
F ig . 196 Exa mple: 30 map with the cross hair s sw itche d off
•IN
r@
S Flo 1Jtro 11 St
F ig . 197 Exa mple: stan dard map w it h the c ross ha ir s
sw itc hed on
• Press the I N AV /MAPI button repeated ly until
the map is
d isp layed ¢ fig. 196.
Zooming in /out on the map
- T urn the co ntr ol knob to the left or to the right.
A lte rnatively, you can also zoom in/out on the
map using the MM I touch contro l pad*
¢ page 160, if the crosshairs are sw itched on.
O r: turn the left t humbwheel on the mu ltifunc
tion steer ing
whee l*¢ page 13 .
Turning the crosshairs on/off
- Switching th e crosshairs on :
press t he con trol
kno b in t he map
view ¢ fig. 196.
-Switching the crosshairs off : press the I BACKI
button.
1l Only app lies to vehi cles w it ho ut camer a-based speed limit
dis play .
214
When the cro sshairs are swit ched off ¢ fig . 196:
(D Direction . Fo r additional info rmat io n, see
¢page 216.
@ The distance to the dest inat ion includes the
ca lculated arrival time .
@ When th e trailer mode funct ion is sw itch ed
on~, th e cor responding symbol is displayed
next to the arr ival time.
© Sca le: turn the control knob to the left or
right to decrease or increase the scale . When
t h e
Automatic zoom function is sw itched on
~, an "A" for "Automat ic" is d isplayed in the
magnifying glass.
® Alt itude
@ Vehicle position
(?) Ro ute info rma tion: various informa tion will
be displayed dur ing rou te g uidance ( fo r ex
amp le, the upcoming m aneuver includi ng
ca lculated distance and street names o r haz
ard information *). The display a lso provides
traff ic information or po ints of interest on
t h e cur rent route.
@ Road curre ntly being d riven on
When the crossha irs are switched on ¢ fig. 197 :
® The crosshairs : move the crosshairs in the de -
s ired direct ion and set a point on the map us
ing t he MMI touch control pad* or the con
trol knob . When the crosshairs are turned
off, the road be ing current ly dr iven on is
shown .
@ Speed limi t display 1l: dis p lay of the ma xi
mum pe rm itted speed on the expressways
and highways.
@ E nte rtainmen t sliding menu*: only available
whe n media is active. More info rmation can
be fo und under
¢ page 160 .
@ Additional information on the cross hairs po
s it ion: if you move the crosshairs to a loca
t ion on the map, available information for
t h e cur rent crosshairs position is displayed .
P ress t he control knob to ope n destinat ion
de tails or to s tart rou te g uidance .
Page 218 of 403
The map display is based on data received from
the Internet in the form of satellite images,
which are then combined with the roadways from
the
S tand ard map view . There are two gigabytes
of memory space in the MMI memory that can be
used to temporar ily store the map or navigation
data that was received. This is roughly the
amo unt required fo r the map/navigation data for
a 2,485 mile (4,000 km) route. As long as t he
satellite images lo aded fo r rou te g uidance are
stored, you can use them w ithout having an a c
tive data connection.
Street View
W ith St reet V iew, yo u can explore many places in
t he world through the eyes of a pedestrian.
S treet View is available whe n the
symbo l@
¢ fig . 198 is d isp layed in the crosshairs mode.
Activating str eet view : turn the cont rol knob to a
scale less than
32 yards (30 m).
T he follow ing funct ions are then ava ilable:
- Ex plo ring an area step-by -step : press the con
trol knob when the
symbol @¢ fig. 199 is d is
played .
-Zoom ing in or out on the current view in four
stages :
turn the control knob to the left or to
the
right @¢ fig. 199 .
-Navigat ing in street view : move your finger in
t h e des ired direct ion on the MMI touch control
pad *.
Additional information
Showing additional informat ion in the Infotain
ment system disp lay can be switched on in the
Map content menu ¢ page 216. To disp lay any
applicable additional information, move the
crossha irs onto an item on the map and press the
control knob .
(D Tips
-The stored onli ne map view data can be de
l eted in
Factory sett ings > Navigation and
online
memory ¢ page 249.
~ -The online map view is an Audi connect In-
.... ~ fota inment service and is regu larly updated
:::l when the func tion is opened . The process 0
3 m ay ta ke several seconds.
- When the online map view is switched on
using the 3D map or ientat ion, the MMI dis
play automatically switches to the
2D map
orientation when driving through tunnels.
- For safety reasons, t he Street View func
tions can only be used when the vehicle is
stat iona ry.
- Always read the
chapter ¢ page 195, Audi
connect (Infotainment) general informa
tion.
- For add itiona l information, v is it
www .audiusa .com .
Map update
Introduction
Applies to: veh icles w ith navigat ion syste m
The re are m ultip le opt io n s av ailabl e for up dat ing
you r map mate rial:
- Map updates through the
online map updat e*
¢page 218.
- I mport map updates from the SD card * to your
M MI. Yo u can fi nd addi tion al i nfo rmation on
line at
www.audiu sa .c om /myaud i.
-Map update at an autho rized Aud i dea le r o r au
t hori zed A udi Servi ce Facili ty. Thi s can resul t in
a ddi tio na l c osts .
217
Page 229 of 403
Media
(CO) 6/VDE 0837. The optical readers that are in
stalled conform to safety class
1. Lasers in this
class are very weak and well shielded, so there is no danger if used correctly.
Media drives
SO card reader
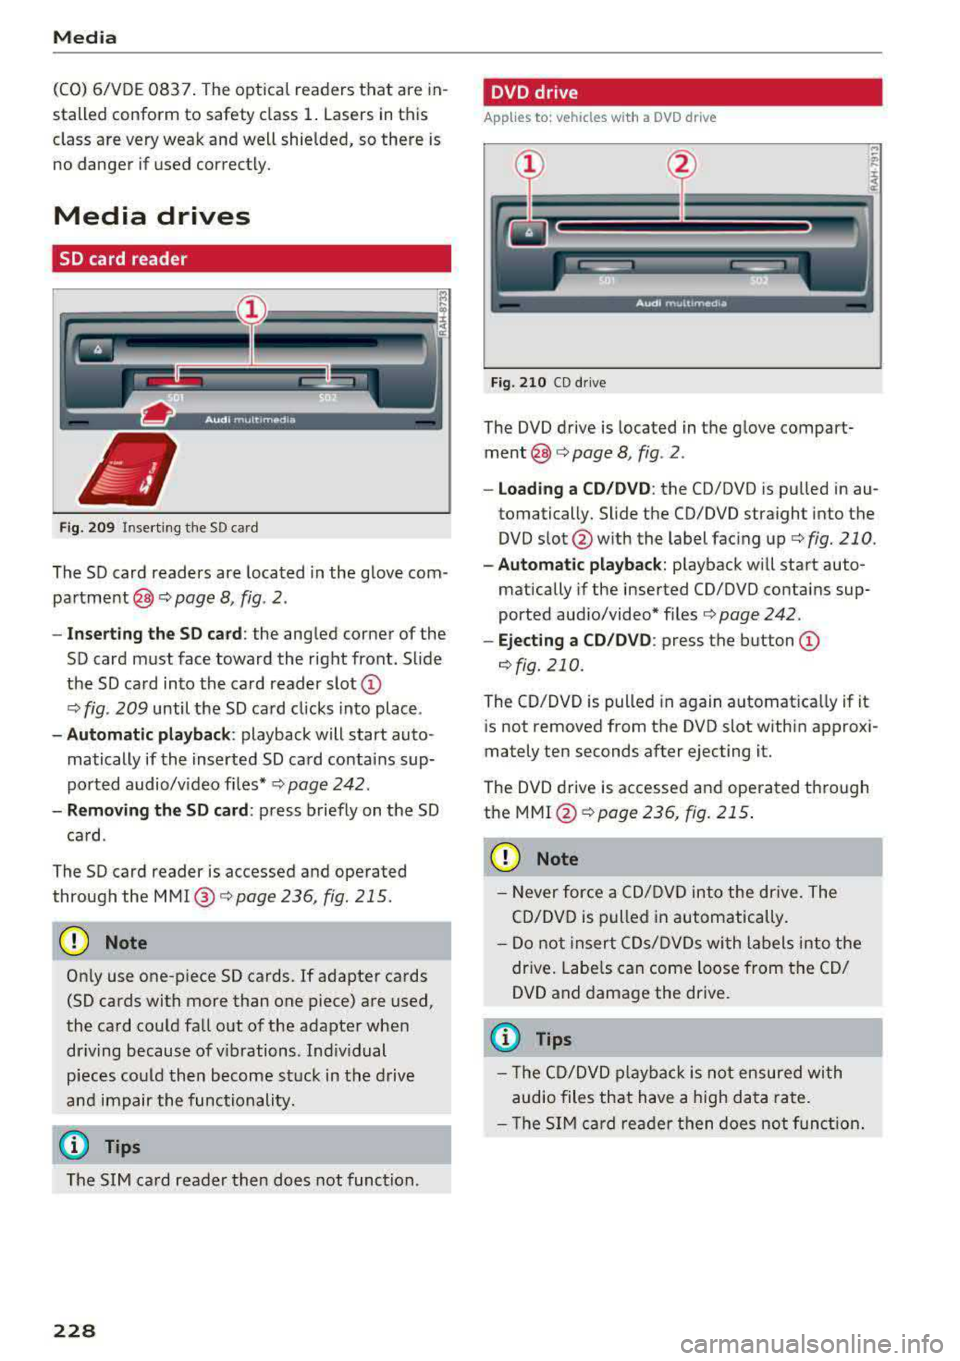
Fig. 209 In serting the SD card
The SD card readers are located in the glove com
partment @c::>
page 8, fig. 2.
- Inserting the SD card: the angled corner of the
SD card must face toward the right front. Slide
the SD card into the card reader slot
CD
c::> fig . 209 until the SD card clicks into place .
-Automatic playback : playback will start auto
matically if the inserted SD card contains sup
ported audio/v ideo f iles* c::>
page 242.
-Removing the SD card : press briefly on the SD
card .
The SD card reader is accessed and operated
through the
MMI @c::>page236, fig. 215.
CD Note
Only use one-piece SD cards. If adapter cards
(SD cards with more than one piece) are used,
the card could fall out of the adapter when
driving because of vibrations . Ind iv idual
pieces could then become stuck in the drive
and impair the functionality.
(0 Tips
The SIM card reader then does not function.
228
DVD drive
Applies to : vehicles wit h a DVD drive
Fig. 210 CD drive
The DVD drive is located in the glove compart
ment@c::> page 8, fig . 2 .
- loading a CD/DVD: the CD/DVD is pulled in au
tomatically. Slide the CD/DVD straight into the
DVD slot @with the label facing up c::>
fig. 210.
-Aut omatic playback : playback will start auto-
matically if the inserted CO/DVD contains sup
ported aud io/video* files c::>
page 242.
-Ejecting a CD/DVD : press the button CD
¢fig. 210.
The CD/DVD is pulled in again automat ica lly if it
is not removed from the DVD slot within approxi
mately ten seconds after ejecting it.
The DVD drive is accessed and operated through
the
MMI @¢poge 236, fig. 215 .
CD Note
-Never force a CD/DVD into the drive. The
CD/DVD is pulled in automatically.
- Do not insert CDs/DVDs with labels into the
drive. Labels can come loose from the CD/
DVD and damage the drive.
(D Tips
- The CD/DVD playback is not ensured with
audio files that have a high data rate.
- Th e SIM card reader then does not function.