AUDI S4 2018 Owners Manual
Manufacturer: AUDI, Model Year: 2018, Model line: S4, Model: AUDI S4 2018Pages: 403, PDF Size: 66.81 MB
Page 311 of 403
Child safety
push-on connectors attached to adjustable
straps.
I n addition to the LATCH lower anchorages, these
chi ld restraint systems usually require the use of
tether straps to he lp keep the child restraint
firm ly in place.
A WARNING
Improper installation of child restraints will
increase the risk of injury and death in a
crash.
- Always follow the instructions provided by
the manufacturer of the child restraint you intend to install in your veh icle.
- Never install a child restraint without a properly attached top tether strap if the
child restraint manufacturer's instruct ions
requ ire the top tether strap to be used.
- Improper use of child restra int LATCH lower
anchorage points can lead to injury in a colli
s ion . The LATCH lower anchorage points are
designed to withstand on ly those loads im
posed by cor rect ly fitted child restraints .
- Never mount two child restraint systems on
one LATCH lower anchorage point.
- Never secure or attach any luggage or other
item to the LATCH lower anchorages.
Location
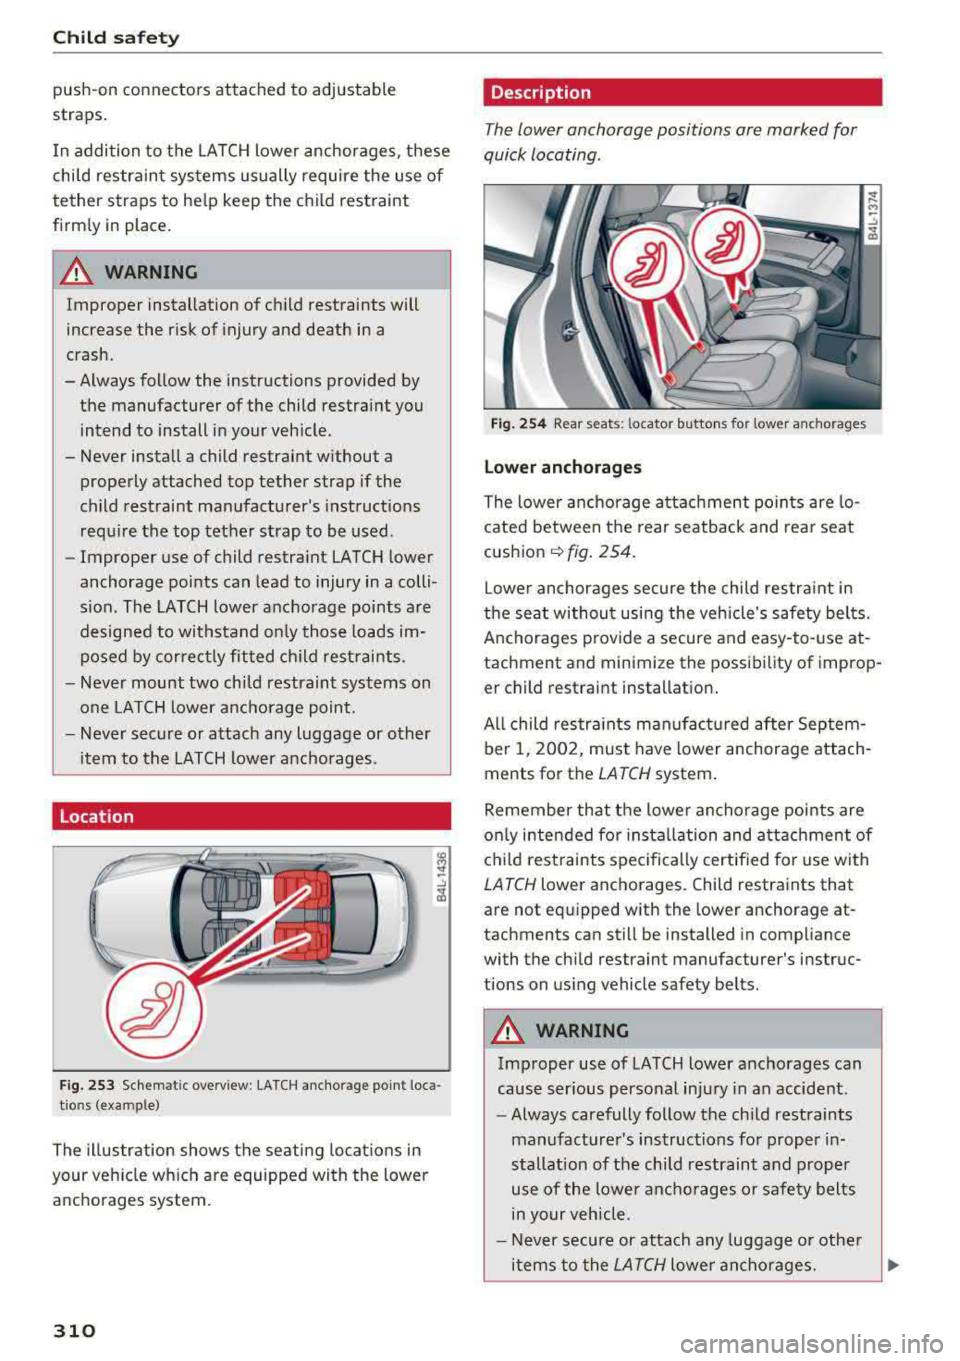
F ig. 253 Schematic overview : LA TCH anchorage point loca
t ions (example)
The illustration shows the seating locations in
your veh icle which are equipped with the lower
anchorages system.
310
Description
The lower anchorage positions are marked for
quick locating .
Fig. 254 Rear seats: locator buttons for lower anchorages
L o wer anchorage s
The lower anchorage a ttac hment points are lo
cated between the rear seatback and rear seat
cushion
c:::> fig . 254 .
Lower anchorages secure the child restra int in
the seat without using the vehicle's safety belts.
Anchorages p rovide a secure and easy-to-use at
tachment and minimize the possibility of improp er child restraint installation.
All child restra ints manufact ured after Septem
ber 1, 2002, must have lower anchorage attach
ments for the
LATCH system.
Remember that the lowe r ancho rage points are
on ly intended fo r insta llation and attachment of
child restraints spec ifically cert ified for use with
LATCH lower anchorages. Child restraints that
are not equipped with the lower anchorage at
tachments can still be installed in compliance
with the child restraint manufacturer's instruc
tions on using vehicle safety belts.
A WARNING
Improper use of LATCH lower anchorages can
cause ser ious personal injury in an accident.
- Always carefully follow the ch ild restraints
manufacturer's instructions for proper in
stallation of the child restraint and proper
use of the lower ancho rages or safety belts
in your vehicle.
- Never secure or attach any luggage o r other
items to the
LATCH lower an chorages. ..,
Page 312 of 403
-Always read and heed the important infor
mation about child restraints in this chapter
and WARNINGS
c> page 295 , Child safety.
Installing a child restraint with LATCH
lower anchorages
Whenever you ins tall a child restraint always fol
low the child restraint manufacturer's instruc
tions .
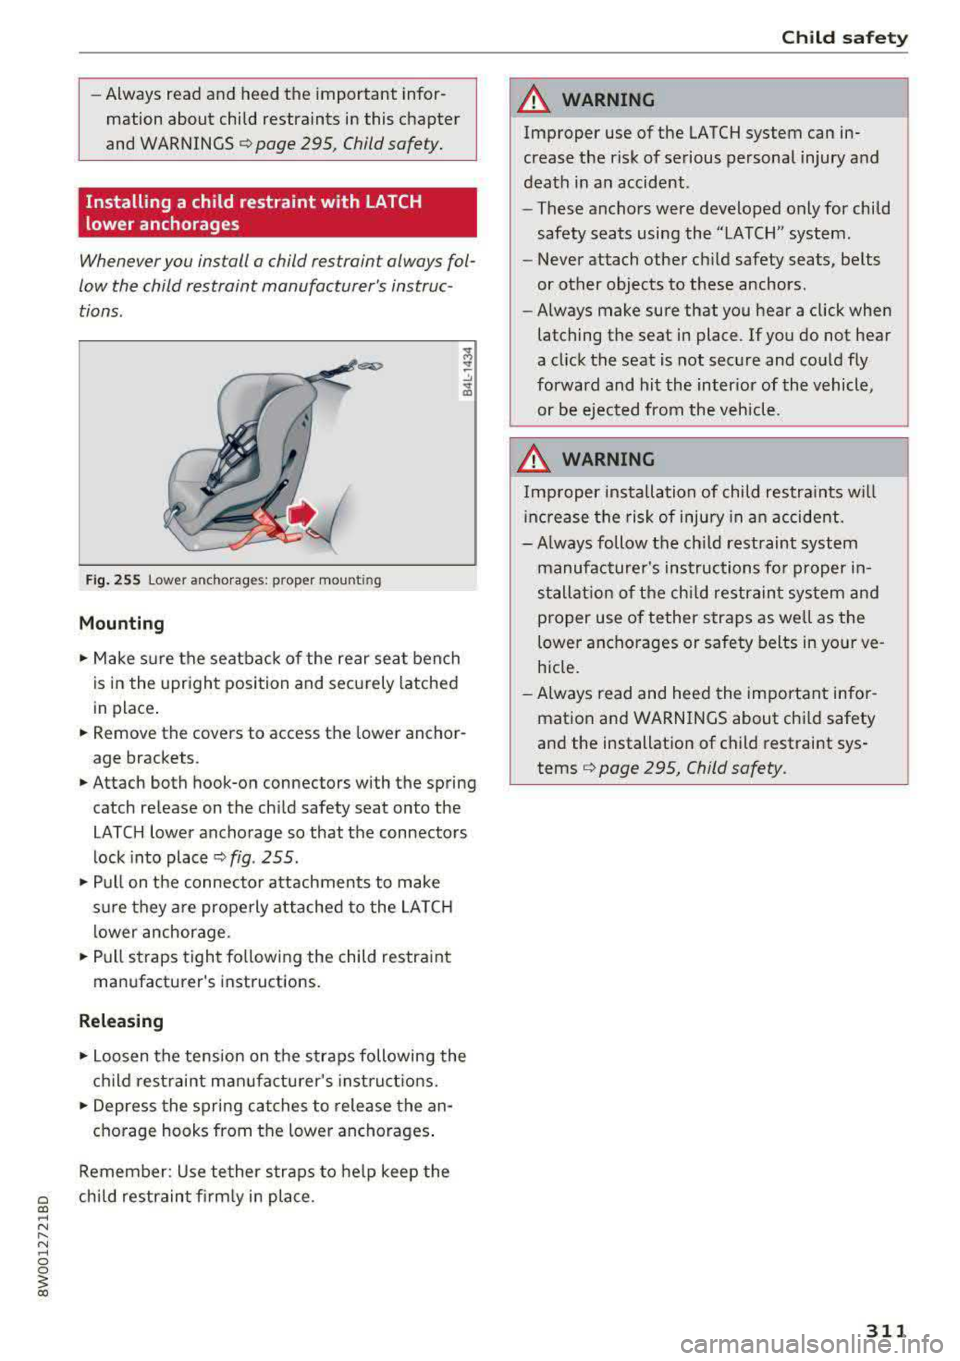
Fig. 255 Lo we r anch orag es: proper mou nting
Mounting
.,. Make sure the seatback of the rear seat bench
is in the upright position and securely latched
in place .
.,. Remove th e covers to access the lower anchor
age brackets .
.,. Attach both hook-on connectors with the spring
catch release on the child safety seat onto the
LATCH lower anchorage so that the connectors
lock into place
c> fig . 255 .
.,. Pull on the connector attachments to make
s u re they a re properly attached to the LA TCH
l ower anchorage .
.,. Pull straps tight fo llowing the child restraint
manufacturer's instructions.
Releasing
.,. Loosen the te nsion on the straps following the
c hild rest rai nt man ufacturer's inst ruct io ns .
.,. Depress the spring catches to release the an
chorage hooks from the lower anchorages .
Remember : Use tether straps to he lp keep the
a ch ild restraint firm ly in place . al ~ N ...... N ~ 0 0
~ al
Child sa fety
A WARNING
-Improper use of the LATCH system can in-
crease the risk of serious personal injury and
death in an accident .
- These anchors were developed only for child
safety seats using the
"LATCH " system.
- Never attach other ch ild safety seats, be lts
or other objects to these anchors .
- Always make sure that you hear a click when
latching the seat in place . If you do not hear
a click the seat is not secure and co uld f ly
forward and hit the inter ior of the vehicle,
or be ejected from the vehicle .
A WARNING
-Imp roper insta llation of child restra ints w ill
i nc rease the risk of injury in a n accident.
- Always follow the ch ild restraint system
manufacture r's instruc tions fo r proper in
stallat ion of the chi ld restrain t system and
p roper use of tether straps as well as the
lower ancho rages or safety belts in your ve
h icle.
- Always read and heed the important infor
mation and WARNINGS about ch ild safety
and the installation of child restrai nt sys
tems
c>page 295, Child safety .
311
Page 313 of 403
Child safety
Tether anchors and tether straps
Applies to: Sedan
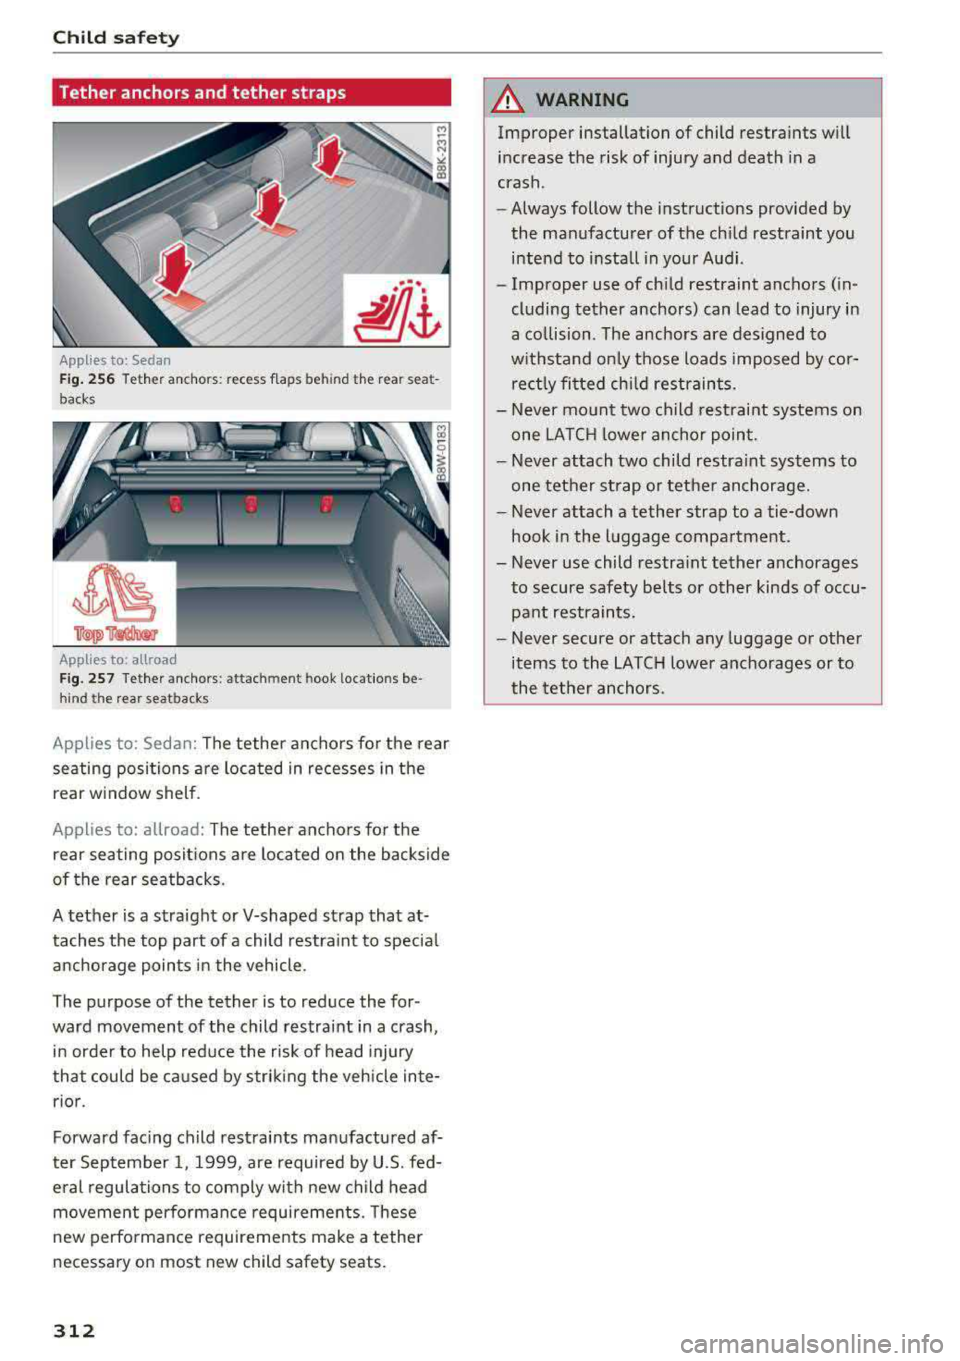
Fig . 256 Te th er ancho rs : re ce ss f la ps beh ind the rear se at
bac ks
Applies to: a llroa d
Fig. 257 Te ther ancho rs : atta chm ent hoo k loc atio ns be
hind the rea r se atb ack s
Appl ies to: Seda n: The tether ancho rs fo r the rear
seating positions a re located in recesses in the
rear w indow shelf .
Applies to: allroad: The tether anchors fo r the
rear seating posit ions are located on the backside
of the rear seatbacks .
A tether is a straight or V-shaped strap that at
taches the top part of a ch ild restra int to specia l
anchorage points in the vehicle .
T he purpose of the tether is to reduce the for
ward movement of the child restraint in a crash,
i n order to help reduce the risk of head in jury
that could be caused by striking the veh icle inte
rio r.
Forward facing child restraints ma nufactured af
ter September 1, 1999, are required by U .S. fed
eral regulations to comply with new child head
movement performance requirements . T hese
new perfo rmance requirements make a tethe r
necessary on most n ew ch ild safety seats .
312
A WARNING
Improper installation of child restraints will
increase the risk of injury and death in a
crash .
- Always follow the instructions provided by
the manufacturer of the ch ild restraint you
intend to install in your Audi .
- Improper use of chi ld restraint anchors (in
cluding tether anchors) can lead to injury in
a co llision . The anchors are designed to
w ithstand only those loads imposed by cor
rectly fitted ch ild restraints.
- Never mo unt two ch ild rest raint systems on
one LATC H lower anchor poin t.
- Never attach two child restraint systems to
one tether st rap or tethe r anchorage.
- Never attach a tether strap to a tie-down
hook in the luggage compa rtment .
- Never use child restra int tether anchorages
to secure safety belts or other kinds of occu
pant restraints.
- Never secure or attach any luggage o r other
items to the LATCH lowe r anchorages or to
the tether anchors .
Page 314 of 403
Installing the upper tether strap on the
anchorage
Appliesto:Sedan
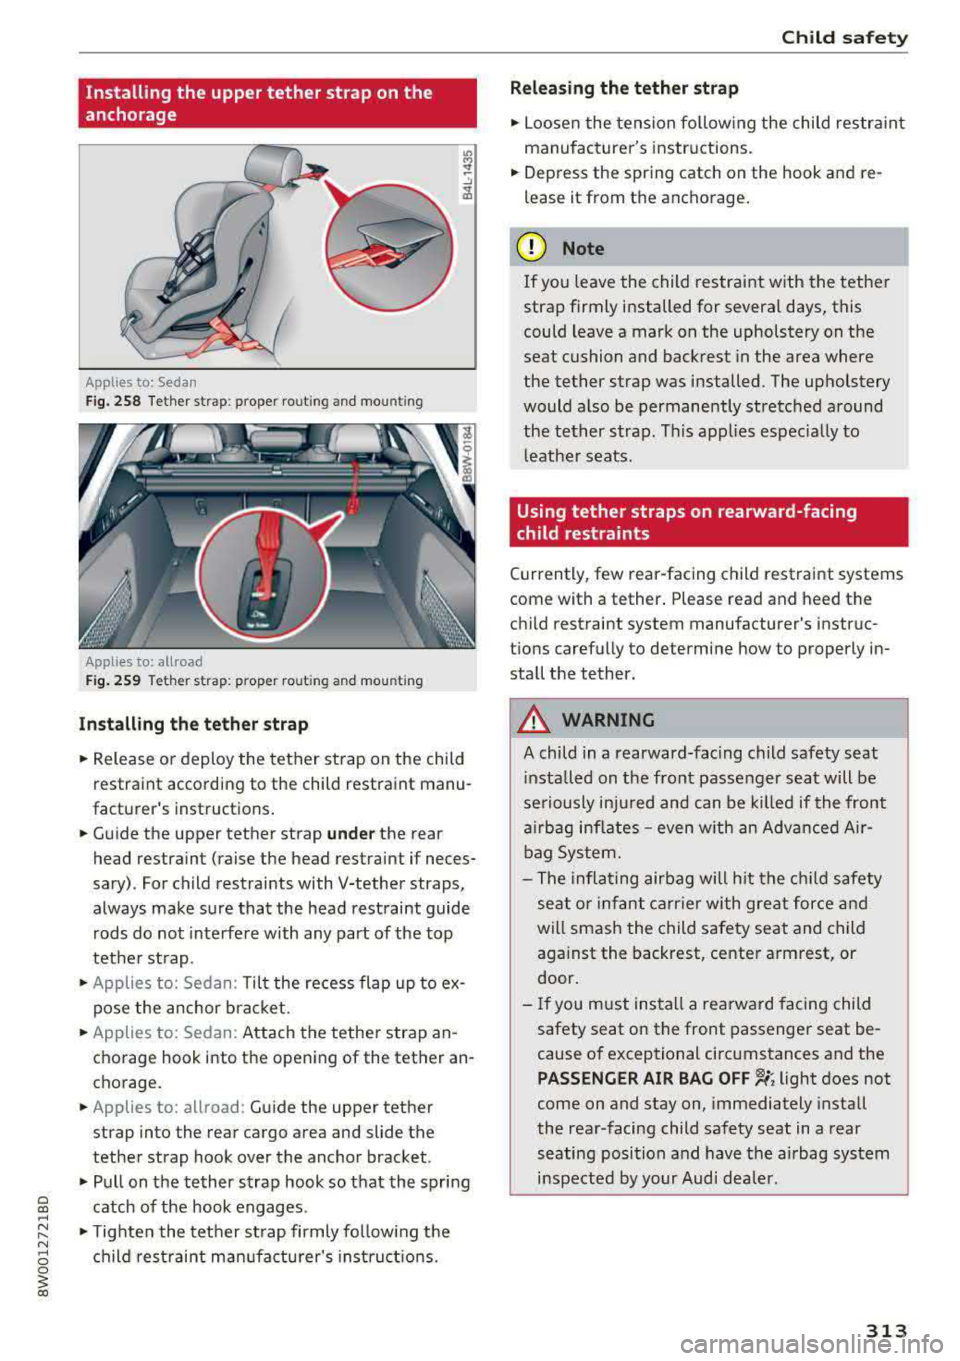
Fig. 258 Tether strap: proper routing and mo unting
Applies to: allroad
Fig. 259 Tether strap: pro per rout ing and mount ing
Installing the tether strap
• Release or deploy the tether strap on the child
restraint according to the child restraint manu
facturer's instructions .
• Guide the upper tether strap under the rear
head restraint (raise the head restraint if neces
sa ry) . For child restraints with V-tether straps,
always make sure that the head restraint guide
rods do not interfere with any part of the top
tether strap.
• Applies to: Sedan: Tilt the recess flap up to ex
pose the anchor bracket.
• Applies to: Sedan : Attach the tether strap an
chorage hook into the opening of the tether an
chorage.
• Applies to: allroad: Guide the upper tether
strap into the rear cargo area and slide the
tether strap hook over the anchor bracket .
•Pullon the tether strap hook so that the spring
catch of the hook engages .
• Tighten the tether strap firmly fo llow ing the
child restraint manufacturer's inst ruct ions.
Child safety
Releasing the tether strap
• Loosen the tension following the child restra int
manufacturer's instructions.
• Depress the spring catch on the hook and re
lease it from the anchorage.
(D Note
If you leave the child restraint with the tether
strap firmly installed for several days, this
could leave a mark on the upholstery on the
seat cushion and backrest in the area where
the tether strap was installed . The upholstery
would also be permanently stretched around
the tether strap . T hi s applies espec ially to
le ather seats.
Using tether straps on rearward-facing
child restraints
Currently, few rear-facing child restraint systems
come with a tether. Please read and heed the
child restraint system manufacturer's instruc
tions carefully to determine how to properly in
stall the tether.
_&. WARNING ~
A child in a rearward-facing child safety seat in sta lled on the front passenger seat will be
se riously inju red and can be killed if the front
airbag inflates -even w ith an Advanced Air
bag System.
- The inflating airbag will h it the child safety
seat or infa nt carrier with great force and
will smash the child safety seat and child against the backrest, cente r armrest, or
door.
- If you must install a rearward facing child
safety seat on the front passenger seat be
cause of exceptional circumstances and the
PASSENGER AIR BAG OFF "1; light does not
come on and stay on, immediately install
the rear-facing child safety seat in a rear
seating position and have the a irbag system
i n spected by your Audi dealer.
313
Page 315 of 403
Child safet y
Additional information
Sources of information about child
restraints and their use
There are a number of sources of additiona l in
formation about child restraint selection, instal
lation and use:
NHTSA advises that the best child safety seat is
the one that fits your chi ld and fits in your vehi
cle, and that you will use correctly and consis
tently.
Try before you buy!
U .S Nation al Highw ay Tra ffic Safet y Admini stra
tion
Tel.: 1-888-327-4236 (T TY : 1-800-424-9 153)
http :/ /www.nhtsa.gov
http ://www . safercar . gov
National S AFE KID S Campa ign
Tel.: (202) 662 -0600
http :/ /www.safek ids.org
Safety B elt S afe U .S .A
Tel.: (800) 7 45-SAFE ( English)
Tel.: (800) 747-SANO (Span ish)
http ://www.carseat.org
Tran sport Canada Inform ation C entre
Tel.: 1-800-333-0371 or call 1-613-998-8616 if
you are in the Ottawa a rea
http ://www.tc.gc.ca/ eng/ro adsafety/menu .htm
Aud i Cu stom er Relation s
Tel.: (800) 822-2834
314
Page 316 of 403
a co .... N ,....
N .... 0 0
3 co
Checking and Filling
Gasoline
Fuel supply
Applies to: veh icles with gaso line engine
Using the right fuel helps keep the environment
clean and prevents engine damage .
Fuel recommendation
The fuel recommended for your vehicle is unlead
ed premium
grade gasoline. Audi recommends
using TOP TIER Detergent Gasoline with a mini
mum octane rating of 91 AKI (95 RON). For more
information on TOP TIER Detergent Gasoline,
p lease go to the official website
(www.toptiergas .com) .
The recommended gasoline octane rating for
your engine can also be found on a label located
on the inside of the fuel filler flap . This rating
may be specified as AKI or RON.
Your vehicle may also be operated using unlead
ed regular gasoline with a min imum octane rat
ing of 87 AKl/91 RON. However, using 87 AKl/91
RON octane fuel will slightly reduce engine pe r
formance.
Use unleaded gasoline only. Unleaded gasoline
is available throughout the USA , Canada, and in
most European countries . We recommend that
you do not take your vehicle to areas or countries
where un leaded gasol ine may not be available.
For more information on refueling your vehicle,
see
c::> page 317 .
Octane rating
Octane rating indicates a gasoline's ability to re
sist engine damaging "knock" caused by prema
ture ignit ion and detonation . Therefore , buy ing
the correct grade of gasoline is very important to
h e lp prevent possible engine damage and a loss
of eng ine performance.
Gasoline most commonly used in the United
States and Canada has the following octane rat
ings that can usually be found on the filler pump:
- Premium Grade: 91
-96 AKI
Checking and Filling
-Regu lar Grade: 87 -90 AKI
E xplanation of the abb reviations:
AKI =
Anti Knock Index = (R +M)/2 = (RON +MON)/
2
RON = R esearch Octane Number
MON = Motor Octane Number.
(D Note
- Do not use any fuel w ith octane ratings low
er than 87 AKI or 91 RON otherwise expen
sive engine damage w ill occur .
- Do
not us e leaded gasoline. The use of lead
ed gasoline will severe ly damage your vehi
cle's catalytic converter and its ability to
control exhaust emissions .
Blended gasoline
Applies to: vehicles with gasoline engine
Use of gasoline containing alcohol or MTBE
(methyl tertiary butyl ether)
You may use unleaded gasoline blended with al
cohol or MTB E (commonly referred to as oxygen
ates) if the blended mixture meets the following
criteria:
Blend of gasoline methanol (wood alcohol or
methyl alcohol)
-Anti -knock index must be 87 AKI or higher.
- Blend must contain no more than 3% metha-
nol.
- Blend must contain more than 2% co-solvents.
Blend of gasoline and ethanol (grain alcohol or
ethyl alcohol)
- Anti-knock index must be 87 AKI or higher.
- Blend must not conta in more than 15% etha-
nol.
Blend of gasoline and MTBE
- Anti-knock index must be 87 AK I or higher.
- Blend must contain not more than 15% MTBE.
Seasonally adjusted gasoline
Many gasoline grades are blended to perform es
pecially well for winter or summer dr iving . Dur-
ing seasonal change-over, we suggest that you
..,.
315
Page 317 of 403
Checking and Filling
fill up at busy gas stations where the seasonal
adjustm ent is more likely to be mad e in time.
0 Note
- Methanol fuels which do not meet these re
quirements may cause corrosion and dam
age to plastic and rubber components in the
fuel system.
- Do not use fuels that fail to meet the speci
fied criteria in this chapter .
- If you are unable to determine whether or
not a particular fuel blend meets the speci
fications, ask your service station or its fuel
supplier.
- Do not use fuel for which the contents can
not be identified.
- Fuel system damage and performance prob
lems resulting from the use of fuels differ
ent from those specified are not the respon
sibility of Audi and are not covered under
the New Vehicle or the Emission Control
System Warranties.
- If you experience a loss of fuel economy or
driveability and performance problems due
to the use of one of these fuel blends, we
recommend that you switch to unblended
fuel.
Gasoline additives
Applies to: vehicles with gasoline engine
A major concern among many auto manufactur
ers is carbon deposit build-up caused by the type
of gasoline you use .
Although gasoline grades differ from one manu
facturer to another, they have certain things in
common. All gasoline grades contain substances
that can cause deposits to collect on vital engine parts, such as fuel injectors and intake valves.
Al
though most gasoline brands include additives to keep engine and fuel systems clean, they are not
equally effective .
Audi recommends using TOP TIER Detergent Gas
oline. For more information on TOP TIER Deter
gent Gasoline, please go to the official website (www.toptiergas .com) .
316
After an extended period of using inadequate
fuels, built-up carbon deposits can rob your
en
gine of peak performance.
([) Note
- Damage or malfunction due to poor fuel
quality is not covered by the Audi New Vehi
cle Limited Warranty.
- Do not add aftermarket fuel additive prod
ucts to your fuel tank.
Diesel fuel
Applies to: vehicles with diesel engine
Always use ULSD (Ultra Low Sulfur Diesel) No. 2.
The ULSD No. 2 meets the ASTM 0975.
Diesel fuel with concentrations of biodiesel high
er than 5
% such as 811,820 or 8100 are strictly
prohibited.
Service station fuel pumps are labeled with the
correct fuel information for easy recognition by
the user. If the diesel fuel pump is not labeled
ask the station operator what fuel is being dis
pensed before filling up your vehicle.
ULSD No. 2 may not be available outside the USA
and Canada. Be sure to check before traveling to
other countries.
ULSD No. 2 can become thicker in very cold tem
peratures, and this can impair the engine's start
ing and running . Depending on the season , gas
stations provide ULSD No. 2 that flows better in
cold temperatures so that you can continue oper
ating your vehicle as usual.
(D Note
- Your vehicle's diesel engine was designed
soley for use with ULSD No. 2. Therefore,
never use gasoline, heating oil, other fuels
or flow improvers. These contain substances
that will severely damage the fuel system
and the engine. Such damage will not be
covered by your New Vehicle Limited War
ranty.
- If you put any amount of incorrect fuel in
the fuel tank, do not start the engine under
.,..
Page 318 of 403
any circumstances. Immediately contact the
nearest authorized Audi dealer or author
ized Audi Service Facility for assistance.
These fuels contain substances that can se
verely damage the fuel system and the en
gine if the engine is started.
Refueling
Fuel filler neck
The fuel filler neck is located on the right rear
side panel behind the fuel filler flap.
If the power locking system should fail, you can
still open the flap manually
-for detailed instruc
tions see
¢page 319.
You can find the fuel tank capacity of your vehicle
in
¢page 381.
The label on the inside of the fuel filler flap tells
you the correct fuel for your vehicle. For more in
formation about fuel specifications, see
<=?page 315.
Your veh icle fuel tank has an onboard refuelling
vapor recovery system. This feature he lps to pre
vent fuel vapors from escap ing from the tank and
polluting the environment while you refuel your
vehicle . In order to fill the tank properly while
protecting the environment, please follow this
refueling procedure carefully.
A WARNING
Under normal operating conditions, never car
ry additional fuel containers in your car. Gas
canisters and other containers used to trans
port fuel can be dangerous. Such containers,
full or empty, may leak and could cause a fire
in a collision. If you must transport fuel to
use for your lawn mower, snow blower, etc.,
be very careful and always observe local and
state laws regarding the use, transportation
and storage of such fuel containers. Make cer
tain the container meets industry standards
(ANSI/ASTM F8S2
-86).
(D Note
Never dr ive your vehicle until the fuel tank is
completely empty. The irregu lar supply of
Checking and Filling
fuel can cause misfiring. Gasoline could enter
the exhaust system and damage the catalytic
converter.
Fueling procedure
Fig. 260 Right rear side of the vehicle: opening the fuel
f ilte r door
Fig. 261 Fuel filler door with attached fuel cap
The fuel filler door is unlocked or locked by the
central locking system.
Opening the fuel cap
.,. Press the left side of the fuel filler door to open
it¢
fig. 260 -arrow-.
.,. Unscrew the tank cap counterclockwise.
.,. Place the cap from above on the open fuel filler
door¢
fig. 261.
Closing the fuel cap
.,. Turn the fuel cap to the right until it stops.
.,. Close the fuel filler door until it latches.
Once the pump nozzle switches off, the fuel tank
is "full". Do not fill the tank more. Otherwise the
expansion space in the tank will be filled.
The correct fuel type for your vehicle can be
found on a label located on the inside of the fuel
.,.
317
Page 319 of 403
Checking and Filling
filler door. For additional information on fuel,
see
<=> page 315.
The fuel tank capacity of your vehicle is listed in
the
Technical Data section <=> page 381.
To avoid fuel spilling or evaporating from the fuel
tank always close fuel cap properly and com
pletely . An improperly closed fuel filler cap may
also cause the MIL lamp
<=>page 24 to come on.
A WARNING
Not paying attention when fueling or han
dling fuel incorrectly can lead to fires, explo
sions or serious injuries.
- Fuel ignites easily and can cause serious
burns and other injuries .
- If you do not switch the engine off when fu
eling and/or do not insert the fuel nozzle
completely into the tank opening, fuel can
leak out or run over. Leaked fuel can ignite
and start a fire .
- Do not use the telephone while fueling. The
electromagnetic rays can cause sparks,
which can ignite fuel vapors and start a fire.
- Do not sit in your vehicle while fueling. If
you must make an exception and enter your
vehicle again while fueling, close the door and touch metal to discharge static electric
ity before touching the fuel nozzle . Static
electricity can create sparks, which can ig
nite vapors when fueling.
- Do not smoke or have an open flame in the
area when fueling your vehicle or filling a
fuel container because this increases the
risk of an explosion .
-For your safety , carrying fuel containers in
your vehicle is not recommended. Whether
full or empty, the container can leak and
cause a fire in the event of an accident.
-If you must make an exception and trans
port a fuel container, note the following:
- Never fill the fuel container with fuel
while it is in or on the vehicle . Stat ic elec
tricity is discharged when filling which can
cause the fuel vapors to ignite and in
creases the risk of an explosion.
- Always place a fuel container on the
ground before filling.
318
-Always hold the fuel nozzle completely in
the fuel container when filling.
-If the fuel container is made of metal, the
fuel nozzle must always be in contact with
the container when filling it with fuel. This
prevents static electricity from discharg
ing .
-Never spill fuel in the vehicle or the lug
gage compartment . Evaporated fuel is ex
plosive and increases the risk of serious in
jury or death .
- Follow legal requirements when using, storing and transporting fuel containers .
-Make sure the fuel container conforms to
industry standards (ANSI/ASTM F8S2 -86).
{(D Note
- Remove spilled fuel from vehicle paint im
mediately, because it can damage paint.
- Never drive until the fuel tank is completely
empty. The irregular supply of fuel that re
sults from that can cause engine misfires.
Uncombusted fuel will enter the exhaust
system and increase the risk of damage to
the catalytic converter.
- If the fuel tank runs completely empty in a
vehicle with a
diesel engine, the ignition
must remain switched on for at least 30
seconds after refueling before starting the
engine.
It may take longer than usual for
the engine to start, even up to a minute.
This is because the air must first bleed out
of the fuel system when starting the engine.
@ For the sake of the environment
Do not overfill the fuel tank, otherwise fuel
can leak out when the vehicle is warming up.
@ Tips
Diesel vehicles are equipped with a diesel mis
fueling guard.
It allows the vehicle to be fu
eled only with a diesel fuel pump nozzle. A
worn or damaged nozzle or a nozzle that is
too small may not be able to open the diesel
misfueling guard. If this is the case, try turn
ing the nozzle before inserting it in the fuel
filler neck, use a different fuel pump, or see
..,_
Page 320 of 403
an authorized Audi dealer or authorized Audi
Service Facility for assistance.
Fuel filler door emergency release
If the central locking system is faulty, the fuel
filler door can be unlocked manually.
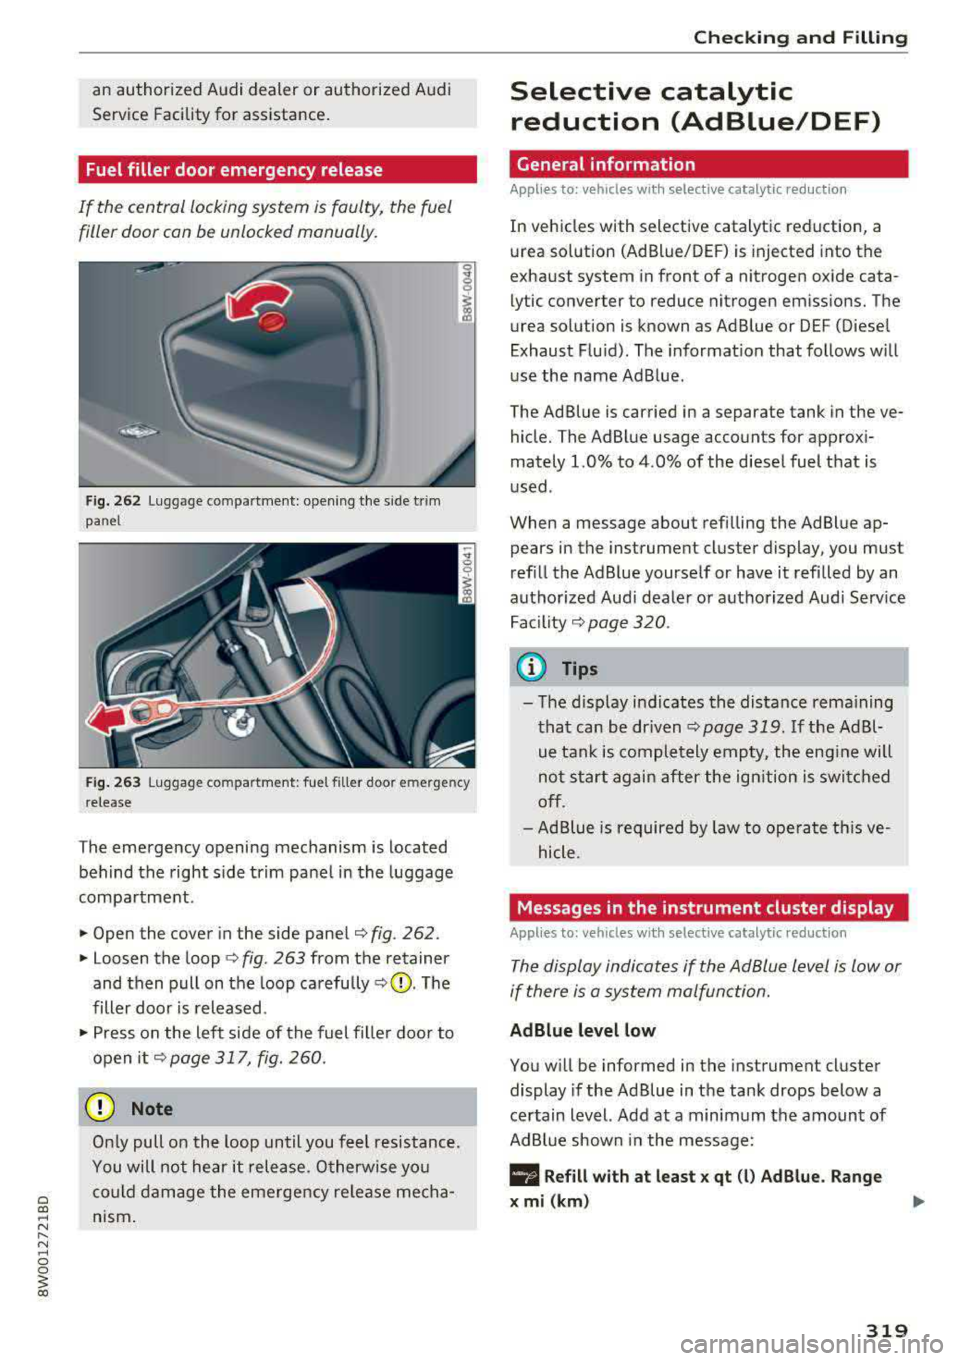
Fig. 262 Luggage co mpartment: opening the side trim
panel
Fig . 263 Luggage compartment: fuel filler door e merge ncy
r elease
The emergency opening mechanism is located
behind the right side trim panel in the luggage
compartment.
... Open the cover in the side panel ¢fig. 262.
... Loosen the loop c;, fig. 263 from the retainer
and then pull on the loop carefully
¢(D . The
filler door is released .
... Press on the left side of the fuel filler door to
open it
¢ page 317, fig. 260.
(D Note
Only pull on the loop until you feel resistance.
You will not hear it release . Otherwise you
could damage the emergency release mecha
nism.
Checking and Filling
Selective catalytic
reduction (AdBlue/DEF)
General information
Applies to: vehicles with selec tive catalytic reduction
In vehicles with selective catalytic reduction, a
urea solution (AdBlue/DEF) is injected into the
exhaust system in front of a nitrogen oxide cata
lytic converter to reduce nitrogen emissions. The
urea solution is known as Ad Blue or DEF (Diesel
Exhaust Fluid). The information that follows w ill
use the name AdBlue.
The Ad Blue is carried in a separate tank in the ve
hicle. The AdBlue usage accounts for approxi
mately 1.0% to 4 .0% of the diesel fuel that is
used .
When a message about refilling the AdBlue ap
pears in the instrument cluster display, you must
refill the AdBlue yourself or have it refilled by an
authorized Audi dealer or authorized Audi Service
Facility
c;, page 320 .
{D Tips
-The display indicates the distance remaining
that can be dr iven
c;, page 319. If the Ad Bl
ue tank is completely empty, the engine will
not start again after the ignition is switched
off.
-Ad Blue is required by law to operate this ve
hicle.
Messages in the instrument cluster display
Appl ies to: vehicles wi th selective catalytic reduction
The display indicates if the Ad Blue level is low or
if there is a system malfunction.
AdBlue level low
You will be informed in the instrument cluster
display if the AdBlue in the tank drops below a
certain level. Add at a minimum the amount of
AdBlue shown in the message:
II Refill with at least x qt (l) Ad Blue. Range
x mi (km )
319