key AUDI S4 CABRIOLET 2009 User Guide
[x] Cancel search | Manufacturer: AUDI, Model Year: 2009, Model line: S4 CABRIOLET, Model: AUDI S4 CABRIOLET 2009Pages: 340, PDF Size: 77.32 MB
Page 57 of 340
turn over the valet key you should therefore lock the rear lid
mechanically with the master key. •
Emergency locking
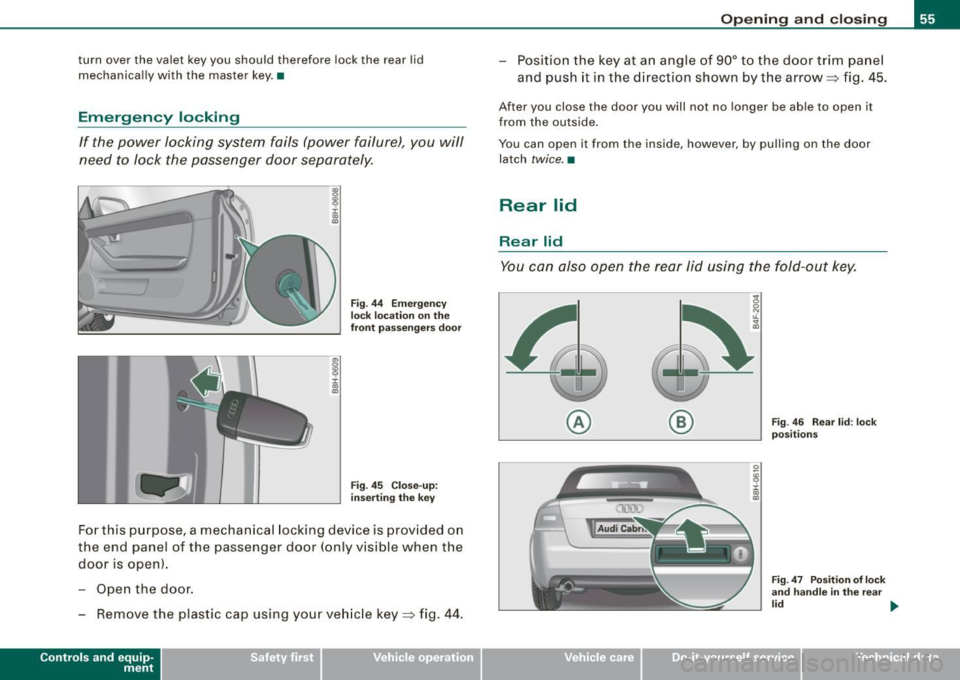
If the power locking system fails (power failure), you will
need to lock the passenger door separately.
i I
"' "'
0,
~ I
"' "'
Fig . 44 Emergency
lock location on the
front passengers door
Fig . 45 Close-up:
inserting the key
For this purpose, a mechanical locking device is provided on
the end panel of the passenger door (only visible when the door is open).
- Open the door.
- Remove the plastic cap using your vehicle key=> fig. 44.
Contro ls and eq uip
ment
Opening and closing
-Pos ition the key at an angle of 90° to the door trim panel
and push it in the direction shown by the arrow ~ fig. 45.
After you close the door you will not no longer be able to open it
from th e outside .
You can open it from the inside, however, by pulling on the door latch
twice. •
Rear lid
Rear lid
You can also open the rear lid using the fold-out key .
@ ®
~ehicle care
0
ij I
"' "'
Fig. 46 Rear lid : lock
positions
Fig . 47 Position of lock
and handle in the rear
lid ...
irechnical data
Page 58 of 340
Opening and closing
As a general rule, you should use the remote control key to
lock and unlock the rear lid
c:5 =:> page 51. With the key slot
in the vertical position the rear lid can be
locked and
unlocked
by the power locking system using either the
remote-control- or the fold-out key:::::>
page 50.
Opening the rear lid
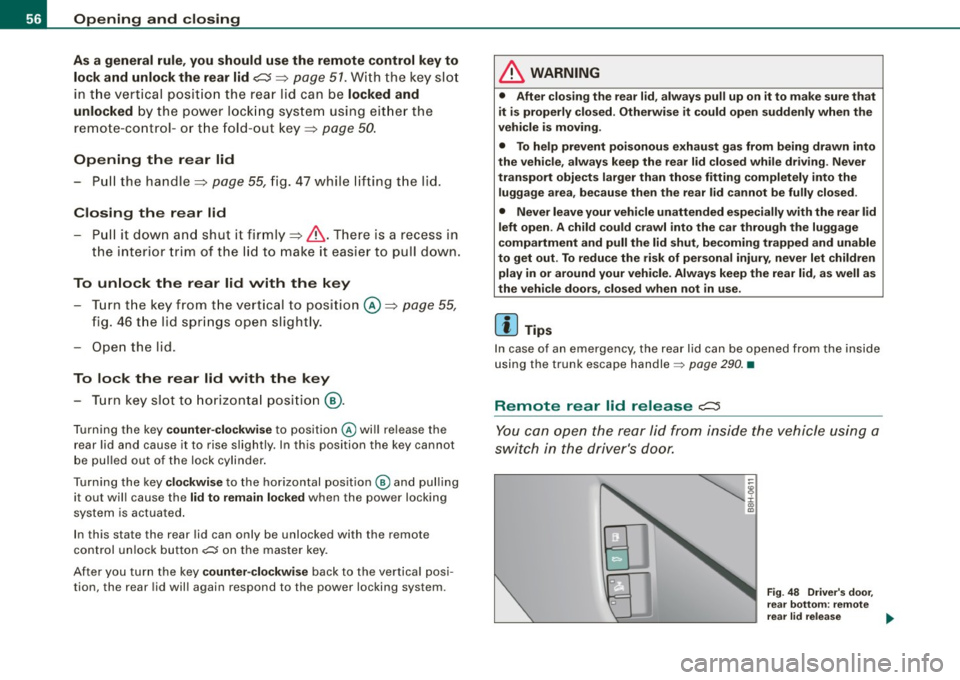
-Pull the handle :::::> page 55, fig. 47 while lifting the lid.
Closing the rear lid
-Pull it down and shut it firmly:::::>& . There is a recess in
the interior trim of the lid to make it easier to pull down.
To unlock the rear lid with the key
- Turn the key from the vertical to position @ :::::> page 55,
fig. 46 the lid springs open slightly.
- Open the lid.
To lock the rear lid with the key
-Turn key slot to horizontal position @.
Turning the key counter-clockwise to position @will release the
rear lid and cause it to rise slightly. In this position the key cannot
be pulled out of the lock cylinder.
Turning the key
clockwise to the horizontal position@ and pulling
it out will cause the
lid to remain locked when the power locking
system is actuated.
In this state the rear lid can only be unlocked with the remote
control unlock button
c:::5 on the master key.
After you turn the key
counter -clockwise back to the vertical posi
tion, the rear lid will again respond to the power locking system.
& WARNING
• After closing the rear lid, always pull up on it to make sure that
it is properly closed. Otherwise it could open suddenly when the
vehicle is moving .
• To help prevent poisonous exhaust gas from being drawn into
the vehicle, always keep the rear lid closed while driving . Never
transport objects larger than those fitting completely into the luggage area, because then the rear lid cannot be fully closed .
• Never leave your vehicle unattended especially with the rear lid
left open. A child could crawl into the car through the luggage
compartment and pull the lid shut, becoming trapped and unable
to get out. To reduce the risk of personal injury, never let children play in or around your vehicle. Always keep the rear lid, as well as
the vehicle doors, closed when not in use.
[ i] Tips
In case of an emergency , the rear lid can be opened from the inside
using the trunk escape handle~
page 290. •
Remote rear lid release c::::5
You can open the rear lid from inside the vehicle using a
switch in the driver's door.
Fig. 48 Driver's door,
rear bottom: remote
rear lid release ...
Page 59 of 340
To unlock r ear lid
- Pu ll the switch c:::::5 ~ page 56, fig. 48 in the driver's door.
To open re ar lid
- Raise the rear lid.
The remote rear lid re lease is deactivated automatically if you lock
the rear lid using the key . This enables the driver to lock the luggage
compartment permanently with the key and prevent unwanted
access to the trunk .•
Anti-theft alarm system
Description
The anti-theft alarm triggers an alarm if anyone attempts
to break into the vehicle.
The anti -theft a larm system triggers an audible alarm and turns on
the emergency flasher if an unauthorized interference with the
veh ic le is sensed by the system.
How i s the anti -theft alarm syste m switched on ?
The anti-theft alarm system is switched on when you lock the
driver's door manually using your key, o r when you use the remote
control. The system is activated approx imately 30 seconds after the
vehic le is locked. The indicator light on top of the door trim start
fl ashing rapid ly for 30 seconds and then b link slowly.
How i s the anti -theft al arm syst em switch ed off ?
The anti-theft alarm system is switched off only when you use the
remote contro l to unlock your vehicle . If you do not open a door
with in 60 seconds after you have unlocked with the remote control,
the vehic le will lock itself again automatica lly.
Controls and equip
ment
Op ening and clo sing
If you lock just the driver's door using your key, the front
passenger's door, the rear and the fuel f iller flap remain locked.
If you use the vehicle key to unlock the driver's door, the other
doors, the rear lid and the fuel tank flap will remain locked . The
a larm system will not be deactivated unless you insert the key in the
ignition switch within 15 seconds and turn on the ignition. If you fai l
to do this, the a lar m wi ll sound.
When will the anti theft alarm system be triggered?
When the vehic le is locked, the a larm system monitors and protects
the following parts of the vehic le:
• engine compar tment
• luggage compartment
• doors
• vehic le incline
• ignition
• factory installed radio.
When the system is activated, the alarm will be triggered if one of
the doors, the engine hood or the rear lid are opened, or if the igni
tion is turned on or the radio removed or if the vehicle incline has
been changed.
The ant i-theft alarm system will also go off when you unlock the rear
lid with your key and open it. The alarm is switched off again when
you close the rear lid.
The anti-theft alarm system will also go off when the battery is d isconnected.
You can also trigge r the alarm by pressing the PANIC button on your
remote control. This will alert other people in case of emergency.
Press the
PANI C button again to turn off the a larm. .,_
Page 60 of 340
Openin g and clo sin g
How is th e a nti-th eft ala rm switch ed off whe n
t riggered ?
The alarm system is switched off when you unlock the vehicle using
the remote control or when the ignition is switched on. The a larm
will a lso switch itse lf off when it comes to the end of its cycle.
Em erg en cy flashe r
The emergen cy flashe r will blink briefly when the doors, engine
hood and rear lid are properly closed .
If the emergency flashers do not blink, check the doors, engine hood
and r ear lid to make sure they are properly closed . If you close a
door, the hood or the rear lid w ith the anti-theft a larm switched on,
the emerg ency flashers will blink only aft er you have clos ed the
door or lid.
[ i ] Tips
• For the anti -theft alarm system to function properly, make sure
all vehicle doo rs and windows are closed before leaving the vehicle .
• When you open the vehicle from the driver's door using the key,
the c entral locking switch will work only af ter you hav e swi tched on
the ignition. •
Tilt sensors ~
The tilt sensors trigger an alarm if they detect vehicle
movement.
N
ij
:c .,
"'
Fig . 49 D river's do or,
rear botto m: ti lt se nso r
sw itch
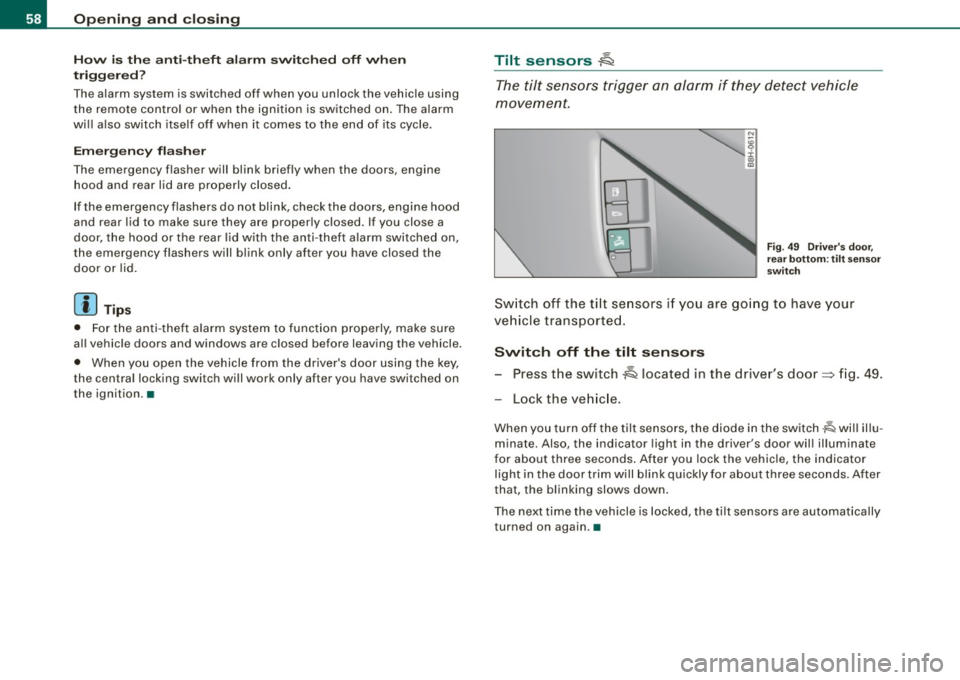
Sw itch off the tilt se nsors i f you are go ing to have your
ve hicle tr ansported .
Switch off the tilt s ensors
- Press the switch A located in the driver's door=> fig. 49 .
Lock the ve hicle.
When you turn off the tilt sensors, the diode in the switch -lQ wi ll illu
minate. Also , the indicator light in the driver's door wil l illuminate
for about three seconds . After you lock the vehicle, the indicator
light in the door trim will b link quickly for about three seconds . After
that, the blinking slows down.
The next time the vehicle is locked, the tilt sensors are automatically
turned on again .•
Page 61 of 340
Power windows
Controls
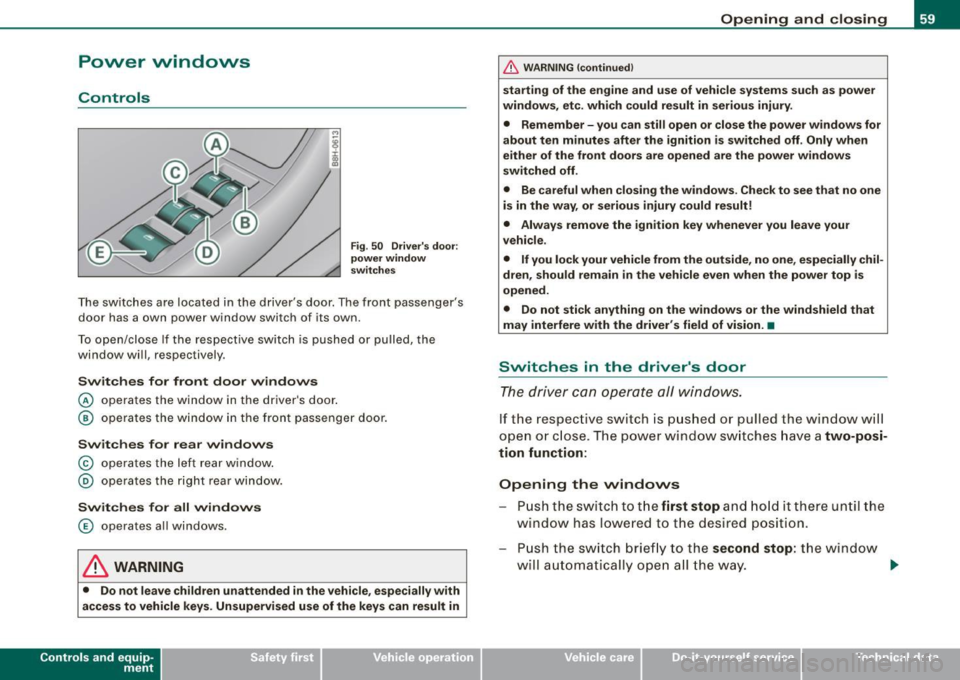
Fig. 50 Driver's door:
power window
switches
The switches are located in the driver's door. The front passenger's
door has a own power window switch of its own.
To open/close If the respective switch is pushed or pulled, the
window will, respectively .
Switches for front door windows
© operates the window in the driver's door.
@ operates the window in the front passenger door.
Switches for rear windows
© operates the left rear window.
@ operates the right rear window.
Switches for all windows
© operates all windows .
& WARNING
• Do not leave children unattended in the vehicle, especially with
access to vehicle keys. Unsupervised use of the keys can result in
Contro ls and eq uip
ment
Opening and closing
& WARNING (continued)
starting of the engine and use of vehicle systems such as power
windows, etc. which could result in serious injury.
• Remember -you can still open or close the power windows for
about ten minutes after the ignition is switched off. Only when
either of the front doors are opened are the power windows
switched off.
• Be careful when closing the windows . Check to see that no one
is in the way, or serious injury could result!
• Always remove the ignition key whenever you leave your
vehicle.
• If you lock your vehicle from the outside, no one, especially
chil
dren, should remain in the vehicle even when the power top is
opened.
• Do not stick anything on the windows or the windshield that
may interfere with the driver's field of vision. •
Switches in the driver's door
The driver can operate all windows.
If the respect ive switch is pushed or pulled the windo w will
open or close . The power w indow switches have a
two-posi
tion function:
Opening the windows
Push the switch to the first stop and hold it there until the
window has lowered to the desired position.
Push the switch briefly to the
second stop: the window
will automatically open all the way. ..
~ehicle care Technical data
Page 65 of 340
& WARNING (continued)
• During operation of the power top the head clearance in the
rear of the vehicle is reduced . Always make sure that rear seat
passengers keep clear of the power top as it is being opened or
closed. Risk of injury! •
Convenience opening and closing of power
top
The power top can alternatively be opened and closed by
turning the key in the driver's door lock.
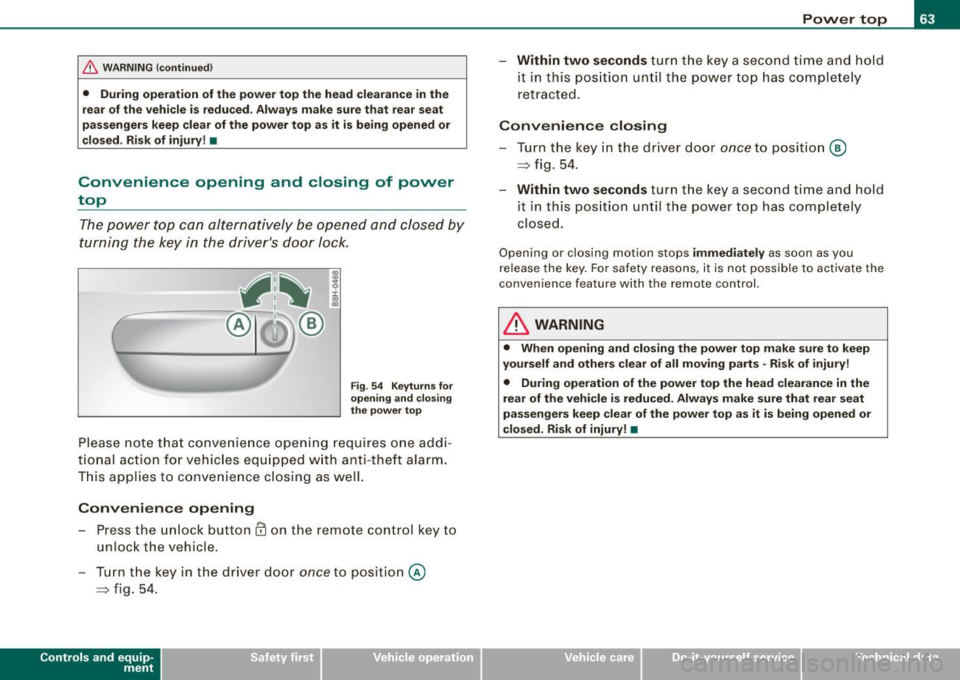
Fig . 54 Keyturns for
opening and closing
the power top
Please note that convenience opening requi res one addi
tional action for vehicles e quipped with anti-theft alarm.
This applies to convenience closing as well.
Convenience opening
- Press the unlock button @ on the remote control key to
unlock the vehicle.
- Turn the key in the driver door
once to position @
~ fig. 54.
Controls and eq uip
ment
Power top
- Within two seconds turn the key a second time and hold
it in this position until the power top has completely
retracted.
Convenience closing
-Turn the key in the driver door once to position @
~ fig. 54.
- Within two seconds turn the key a second time and hold
i t in this position until the power top has completely
closed.
Opening o r closing motion stops immediately as soon as you
release the key. For safety reasons , it is not possible to activate the
c onven ience feature wi th th e re mote control.
& WARNING
• When opening and closing the power top make sure to keep
yourself and others clear of all moving parts -Risk of injury!
• During operation of the power top the head clearance in the
rear of the vehicle is reduced. Always make sure that rear seat
passengers keep clear of the power top as it is being opened or
closed. Risk of injury! •
~ehicle care irechnical data
Page 70 of 340
Pow er to p
R emovin g
- Make sure the single piece section is folded up and
engaged in the vertical position as illustrated=> page
67,
fig. 62.
- Push the arresting pin on each side inward until the arresting button (darker green in => page
67, fig. 62) pops
up.
- Slightly slide the horizontal deflector sect ion forwa rd to
clea r the upholstery and then lift t he deflector out of the
veh icle.
- Turn the deflector so t hat its split sect ion points up verti
cally as shown
G) => page 67, fig. 63
Folding
- Fo ld the reta iner pegs fl ush ag ainst the frame, small
arrows
(D => page 67, fig . 63 .
- Grab the split section at the top on both sides of the joint
and pull it apart in the direct io n of the bold arrows @.
- Fo ld the split halves down until they meet at the bottom.
- Fold the split halv es fo rward in the directi on of bol d
arrows @.•
Operate the power top manually
General notes
The po wer top can be closed manually in the event of a
malfunction.
- App ly the handbrake. - Lower the wi
ndows.
Remove the igni tion key.
You should operate the power top manually only if automatic oper
ation does not wo rk. It is best to contact an Aud i dealer to identify
the cause of the ma lfunction .
Follow this procedure step by step to close the power top manua lly:
• Relea se a nd open the storage bay cover: you must use the
manual release key to unlock the storage bay cover . Unlock the
cover and swing i t ope n.
• Lift th e power top out and unfold it : lift the top out of the storage
bay by hand and extend it forward to the windshield.
• Lock the power top in pla ce: you must use the manual release
key to proper ly engage and lock the power top to the windshie ld.
& WARNING
• Ta ke care not to r ea ch in side the link age me ch an is m or a ny
moving p arts when you lift out and unfold the power top . Carel ess
h andling ri sk s injurie s to your hand s and finger s!
• Nev er driv e the car w it h a power top that is not securely locked
i n pl ace.
If it is not firmly engaged , th e top c an be blo wn ope n by
the air stream and c ause injurie s and damag e to the veh icle . - R isk
of cr ash!
0 Not e
The trunk lid must be closed be fore opening the storage bay cover
as otherwise the two panels can collide . T his can cause consider
able damage to the surfaces on both parts.
[ i ] Tips
It is advisable to have a second person assist you wi th closing the
power top. Particularly the part of folding up and extending the top
~
Page 71 of 340
forward goes much easier when done by two people. However, if no
assistance is available, you may find it easier to position yourself on
the rear seatbench and lift the power top up by grabbing it at the
center. •
Where is the manual release key stored?
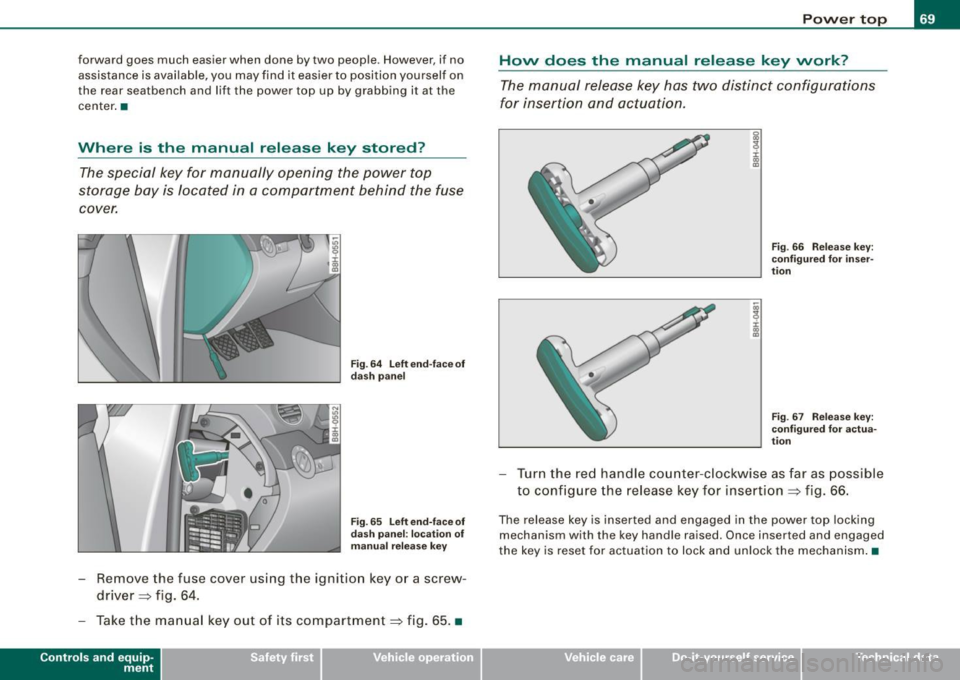
The special key for manually opening the power top
storage bay is located in a compartment behind the fuse
cover.
Fig. 64 Left end-face of
dash panel
Fig. 65 Left end-face of
dash panel: location of
manual release key
-Remove the fuse cover using the ignition key or a screw
driver=:> fig. 64.
- Take the manual key out of its compartment=:> fig. 65. •
Controls and eq uip
ment
Power top
How does the manual release key work?
The manual release key has two distinct configurations
for insertion and actuation.
g
9 :c: ., a,
j ., m
Fig . 66 Release key:
configured for inser
tion
Fig. 67 Release key:
configured for actua
tion
Turn the red handle counter-clockwise as far as poss ible
to configure the release key for insertion =:> fig. 66.
The release key is inserted and engaged in the power top locking
mechanism with the key handle raised. Once inserted and engaged
the key is reset for actuation to lock and unlock the mechanism. •
~ehicle care Technical data
Page 72 of 340
Power top
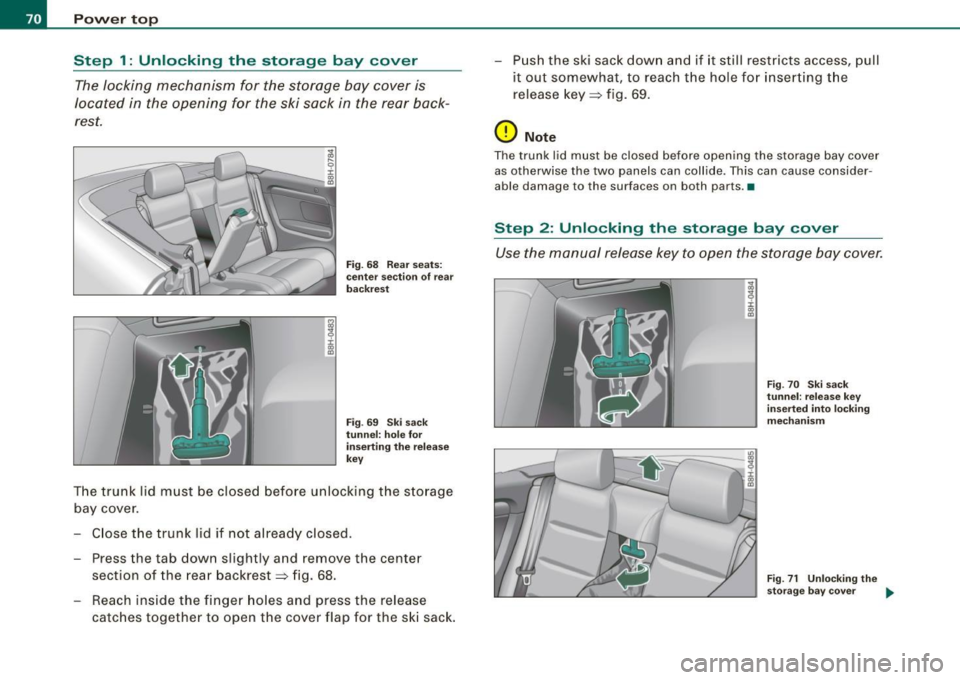
Step 1: Unlocking the storage bay cover
The locking mechanism for the storage bay cover is
located in the opening for the ski sack in the rear back
rest.
i :r a:> a,
Fig. 68 Rear seats:
center section of rear
backrest
Fig.
69 Ski sack
tunnel: hole for
inserting the release
key
The trunk lid must be closed before unlocking the storage
bay cover.
Close the trunk lid if not already closed.
- Press the tab down slightly and remove the center
section of the rear backrest~ fig. 68.
- Reach inside the finger holes and press the release
catches together to open the cover flap for the ski sack. -
Push the ski sack down and if it still restricts access, pull
it out somewhat, to reach the hole for inserting the
release key~ fig. 69.
0 Note
The trunk lid must be closed before opening the storage bay cover
as otherwise the two panels can collide . This can cause consider
able damage to the surfaces on both parts. •
Step 2: Unlocking the storage bay cover
Use the manual release key to open the storage bay cover.
Fig. 70 Ski sack
tunnel: release key
inserted into locking
mechanism
Fig. 71 Unlocking the
storage bay cover
~
Page 73 of 340
Inserting the release key into the locking
mechanism
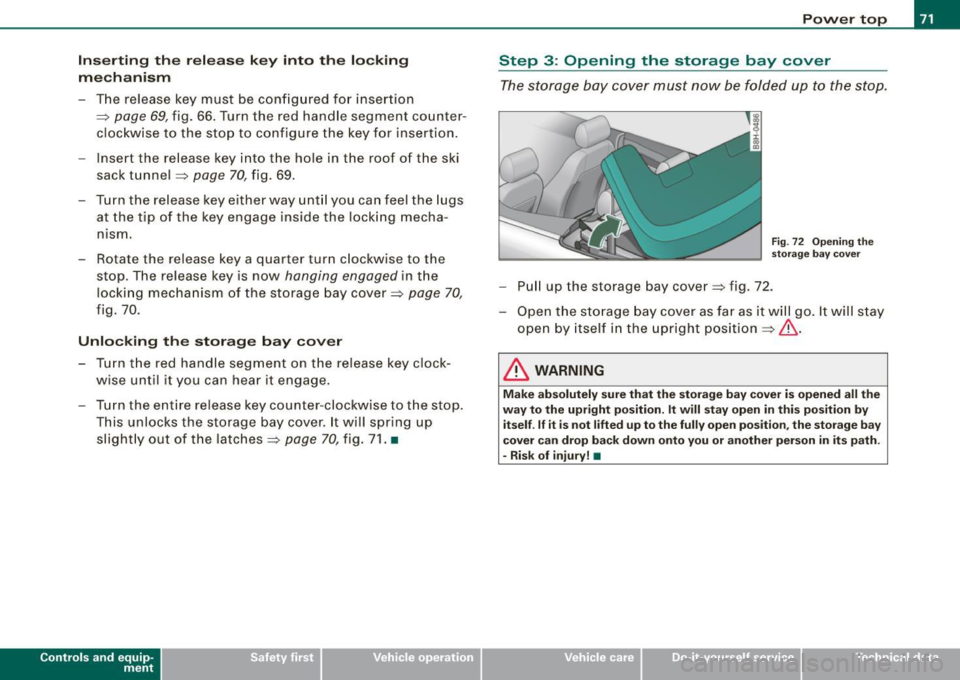
-The re lease key must be configured for insert ion
=>
page 69, f ig. 66. Turn the red handle segment counter
clockwise to the stop to configure the key for insertion.
- Insert the release key in to the hole in the roof of the ski
sack tunnel :::>
page 70, fig. 69.
- Turn the release key either way until you can feel the lugs
at the tip of the key engage inside the locking mecha
n ism.
- Rotate the release key a quarter turn clockwise to the stop . The release key is now
hanging engaged in the
locking mechanism of the storage bay cover :::>
page 70,
fig. 70.
Unlocking the storage bay cover
- Turn the red handle segment on the release key clock
wise until it you can hear it engage.
- Turn the entire release key counter -clockw ise to the stop.
This unlocks the storage bay cover. It will spring up
slightly out of the latches :::>
page 70, fig. 71. •
Controls and eq uip
ment
Power top
Step 3 : Opening the storage bay cover
The storage bay cover must now be folded up to the stop.
Fig . 72 Opening the
storage bay cover
-Pull up the storage bay cover :::> fig . 72.
- Open the storage bay cove r as far as it will go. It will stay
open by itself in th e upright position =>& .
& WARNING
Make absolutely sure that the storage bay cover is opened all the
way to the upright position. It will stay open in this position by
itself .
If it is not lifted up to the fully open position, the storage bay
cover can drop back down onto you or another person in its path.
- Risk of injury! •
~ehicle care irechnical data