engine AUDI S6 2009 Owner's Manual
[x] Cancel search | Manufacturer: AUDI, Model Year: 2009, Model line: S6, Model: AUDI S6 2009Pages: 398, PDF Size: 43 MB
Page 37 of 398
Battery voltage ~
If the battery's state of charge is not in the optimal range, the
symbo l is shown in the display and the driver message
Low battery
c harge : battery will be charged wh ile dr iving
appears .
Whi le th is d river notification is displayed, you have to be p repa red
for limited starting capabi lity.
Driver message appears and goes out again
If this driver message appears after the ignition is turned on or
w hile driving and it g oes out agai n after a w hile , th e ba tte ry has
been adequately recharged.
Driver message appears and does not go out again
I f this dr iver notification appears after the ignition is turned on or
while driv ing and does n ot go out aga in, the bat tery's state of
charge is not in the optimal range. Starting capability is restricted.
H ave the ba ttery checke d by an au tho rize d Audi deale r as soon a s
poss ible .•
Worn brake pads
Brake pads!
If the wa rning light i lluminates, immediate ly contact your autho
rized Aud i d eal er or qualified wor kshop to have a ll brake pads
inspected. On USA models the warning light comes on together
wit h the warning light
BRAKE . Both sets of brak e pads o n an a xle must
a lways be replaced at the same time.
& WARNING
Driving with bad brakes can cause a collision and serious personal
injury.
• If the warning light • and the warning light
BRAKE11 with the
message Brake pads ! comes on in the instrument cluster display ,
Controls and equip
ment
Driv er information display
& W ARNING (continued )
immediately contact your author ized Audi dealer or qualified
workshop to have all brake pads checked or replaced if necessary .•
Headlight range control defective ">
l ) Headlight range control defective
If th e sy mbol ill uminates , the dyna mic headlig ht ra nge c ont rol is n o
longer working properly . Have the system checked and repa ired at
yo ur Au di d eale r.•
Engine oil level "'·
Please check oil level
When the symbol il luminates, check the engine o il leve l as soon as
possible =>
page 305. Top off the oi l at your earliest opportu nity
=>
page 306. •
Engine oil sensor defective ~,m,
Oil level! sensor defective
If the symbo l il luminates, contact your authorized Audi dealer and
h ave th e oil sensor insp ecte d. Unt il y ou hav e thi s do ne, c heck the oil
leve l each time you refue l just to be on the safe side=>
page 305. •
11 BRAKE : USA models only
I • •
Page 38 of 398
Driver inf ormati on displ ay
Ap plies to vehicles : wit h en gine sp eed limitat ion
Engine speed limitation ,-;,,
l.r1 Engine speed maximum XXXX RPM
The )t symbo l illuminates when there is an engine control malfunc
tion. The indicator light
C in the instrument cluster also illumi
nates . The engine speed is limited to the speed displayed in the
driver information system. Keep in mind that the engine speed will
not exceed the va lue displayed in the driver information system, for
example when downshifting.
P lease go to an authorized Audi dealer or other qua lified workshop
to have the ma lfunction repaired .•
Ap plies to vehicles: wit h A dapt ive Li ght
Adaptive Light defective t;: :
Adapti ve Li ght defect ive
When this symbol '" illuminates, it means that Adaptive Light is
defective. Go to an authorized dealership to have the head lights or
the control unit for the Adaptive Light repaired. •
Ignition lock malfunction ..,e
If the symbol in the d isplay c omes on, there is a malfunc -
tion in the e lectronic ignition lock. An additional driver
message can be displayed by press ing the [ CHECK ] button:
D efe ctiv e ignition swi tch
- Drive to an authorized service facility at your earliest
convenie nce to have the malfunction corrected .•
Windshield wipers faulty ->
. W in ds hield wi per m alfun ction
When this symbol il luminates, i t means tha t the electronics for
the windshield wipers are defective . Please go to an authorized
dea lership to have the windshield wiper system repaired .•
Speed warning system
Overview
The speed warning system helps you to keep your driving
speed below a set speed limit.
The speed warning system warns the driver if he exceeds a previ
ous ly stored maximum speed. A warning tone will sound as soon as
the vehicle speed exceeds th e set speed by about 3 mph (3 km/h). At
the same t ime, a warning symbol appears in the display .
The speed warning system has
t w o wa rnin g thr eshol ds that func
tion independent ly of each other and that have somewhat different
purposes:
S peed warnin g 1
You can use speed warning 1 to set the maximum speed while you
are driving. This setting will remain in effect until you turn off the
ignition , assuming that you have not changed or reset the se tting .
The speed warning symbol
0 (USA models) /0 (Canada models) in
the warning 1 display appears when you exceed the maximum speed . It goes out when the speed falls below the stored maximum
speed .
The speed warning symbol wi ll also go out if the speed
e xce eds the
stored maximum speed by more than about 25 mph
(40 km/h) for at
leas t 1 O seconds. The stored maximum speed is deleted .
Setting speed warning 1 :::::,
page 37.
Page 43 of 398
Opening and closing
Keys
Key set
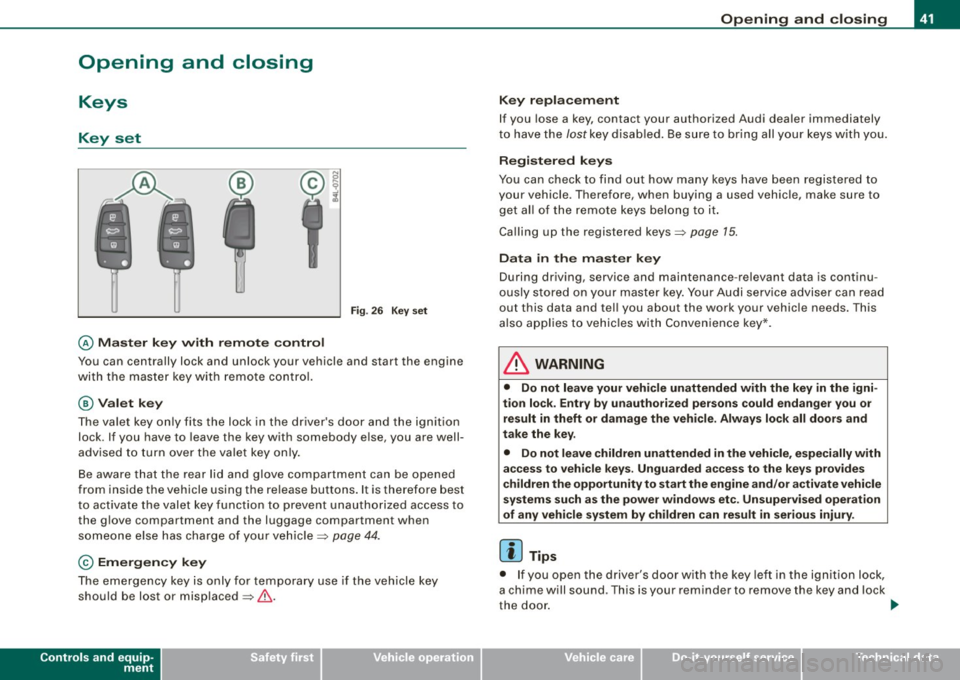
© Master key w ith remo te con trol
Fig . 26 Key s et
You can centrally lock and unlock your vehicle and start the engine
with the mas ter key with remote control.
@ Valet k ey
The va let key o nly fits the lock in the driver 's door and the ignition
lock . If you have to leave the key with somebody else, you are well
advised to turn over the va le t key only .
Be aware t hat the rear lid and glove co mpartment can be opened
from inside the vehicle using the re lease buttons . It is therefore best
to activate the valet key function to prevent unauthorized access to
the g love compartment and the luggage compartment when
someone e lse has charge of your vehic le=>
page 44.
© Emergency key
The emergency key is only for temporary use if the vehicle key
should be lost or misplaced=>& .
Controls and equip
ment
Opening and clo sing
Ke y repla cemen t
If you lose a key, contact your authorized Audi dealer immediately
t o have the
lost key disab led . Be sure to bring all your keys with you.
R egister ed keys
You can check to find out how many keys have been registered to
your vehicle. Therefore, when buying a used vehicle, make sure to
get al l of the remote keys belong to it .
Ca lling up the registered keys=>
page 15.
Data in the master key
During driving, service and maintenance -relevant data is continu
ously stored on your master key . Your Audi service adviser can read
out this data and tel l you about the work your vehicle needs. This
a lso applies to vehic les wi th C onvenience key*.
& WARNING
• Do not leave your vehi cle unattended with the key in the igni
tion lock . Entry b y un authorized persons could endanger you or
result in theft or damage the vehi cle . Alway s lock all doo rs and
t ak e the key .
• Do not le ave children unattended
in th e vehicl e, especially with
a ccess to vehicle key s. Ungu arded a ccess to the ke ys pr ovides
c hildren the opportunity to st art the eng ine and /or a ctivate vehicle
systems su ch as the po wer wi ndo ws etc . Unsupervi sed operat ion
of any vehi cle system b y ch ildren c an re sult in serious injury .
[ i ] Tips
• I f you open the driver's door with the key left i n the ign ition lock,
a chime will sound . T his is your reminder to remove the key and lock
the door .
I,,,
I • •
Page 46 of 398
Openin g a nd clo sin g
- Place the cover w ith the new battery on the key base and
press both parts together.
c£> For the sake of the environment
Dispose of dead batteries properly so as not to pollute the environ
men t.
[ i J Tip s
The replacement battery mus t be the same specification as the
original. •
Electronic immobilizer
The immobilizer helps to prevent unauthorized use of
your vehicle.
A computer chip inside your key automatically deactivates the e lec
tronic immobilizer when you inser t the key in the igni tion lock, or on
vehic les with Convenience key *, when the key is inside th e vehicle.
When you remove the key from the ignition lock , or on vehic les with
Conv enience key, when you r emove the key from the vehicl e, the
e lectronic immobil izer is automatically activated once again .
If an unau thorized key was used, SAFE is displayed continuous ly in
the odometer disp lay field .
& WARNING
Always take the key with you when you leave the vehicle . The key
ca n dis arm the el ectronic eng ine immobili zer and pe rm it an u nau
thori zed per son to start the engine and enable op era tion of the
v ehi cle sys tem s such as po wer w ind ow or p ower s unroof* lead ing
to seriou s per son al injur y.
[ i J T ip s
• Your engine can only be started using the factory -equipped key .
• You may not be able to start your vehicle if an ignition key of a
differen t vehicle make is also located on your set of keys.
• For Declaration of Compliance to United States FCC and Industry
Canada regulations~
page 375. •
Valet key function
The valet key function prevents unauthorized persons
from opening the glove compartment or rear lid.
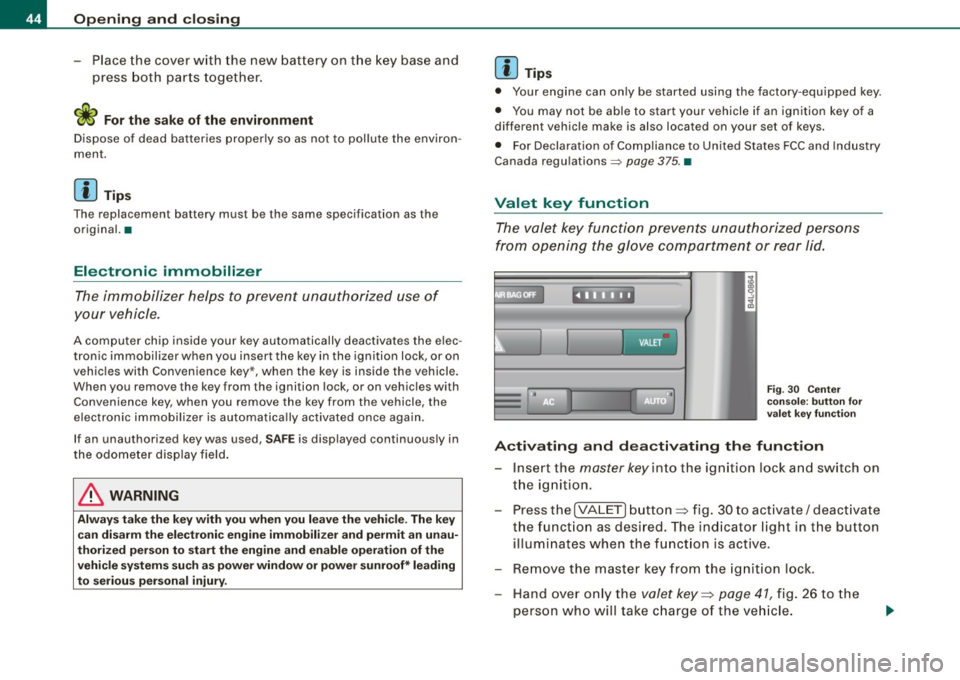
Fig . 3 0 Center
cons ole: butto n fo r
val et key fu nct ion
A ctiv ating and de activating the fun ction
- Insert the master key in to the ignition loc k and switch on
the ignition .
- Press the
[VALE T) button => fig. 30 to activate/ deact ivate
the funct ion as desired. The ind icator light in the button
illuminates when the funct ion is active.
- Remove the master key from the ignition lock.
- Hand over on ly the
valet key=> page 41 , fig. 26 to the
person who will take c harge of the ve hicle.
Page 49 of 398
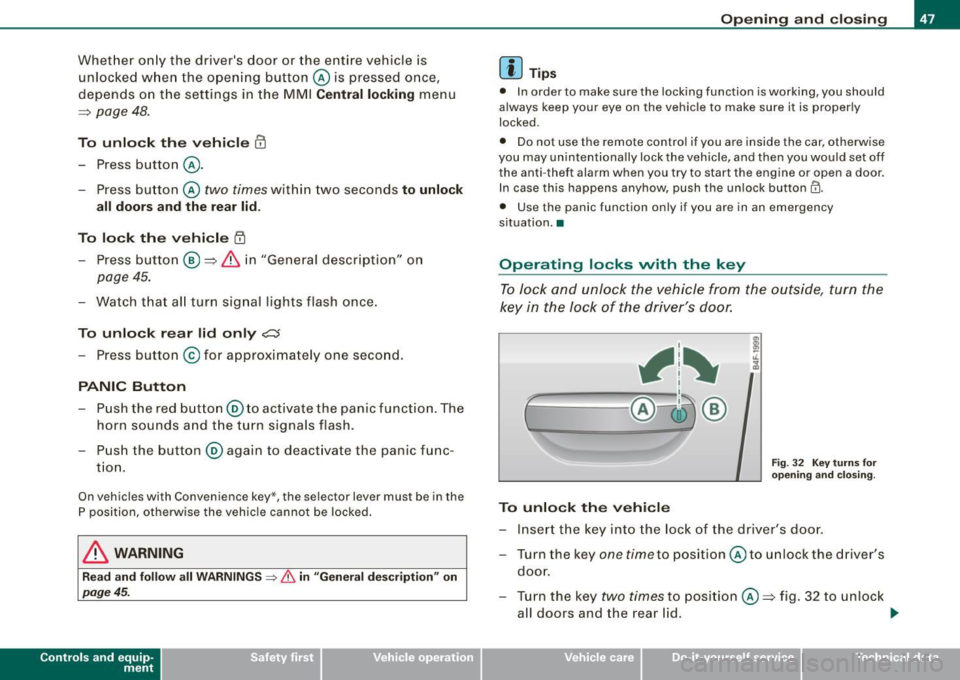
Whether on ly the driver's door or the entire vehicle is
unlocked w hen the o pen ing button © is pressed once,
depends on the settings in the MMI Central l ocking menu
=> page 48.
To unlock th e vehi cle CD
- Press button @.
- Press button @
two times within two seconds to unlock
all doors and the rear lid .
To lo ck th e vehicle
t'.D
- Press button ® => & in "General description" on
page 45.
- Watch that all turn signal lights flas h once .
To unlo ck r ear lid only
~
- Press button @ for app roximately one second .
PANIC Button
- Push the red button @to activate the panic function . The
horn sounds a nd t he turn signals flash.
- Push the button@ again to deact ivate the pa nic func
t io n.
On vehicles wi th Convenience key *, the sele ctor lever must be in the
P position, otherwise the vehic le cannot be locked.
& WARNING
Read and fo llow all WARNINGS ::::> & in "General de scription " on
page 45.
Con tro ls and eq uip
ment
Op ening and clo sing
[ i ] Tip s
• In order to make sure the locking function is working, you should
always keep your eye on the vehicle to make sure it is proper ly
locked .
• Do no t use the remote control if you are inside the car, otherwise
you may un intent ionally lock the vehicle , and then you would set off
the anti -theft alarm when you try to start the engine or open a door .
In case this happens anyhow, push the un lock button
II).
• Use the panic function only if you are in an emergency
s ituation. •
Operating locks vvith the key
To lock and unl ock the vehicle from the outside, turn the
key in the lock of the driver 's door.
, 1~
ff-= ~;:__, @-i3 ®
To unlock th e veh icle
F ig. 32 Key turn s for
o penin g and clos in g.
- Insert the key into the lock of the driver 's doo r.
- Turn the key
one time to posit ion @ to unlock the driver 's
doo r.
- Turn the key
two times to position @=> fig . 32 to unlock
all doors and the rear l id. .,_
Vehicle care I I irechnical data
Page 54 of 398
Openin g a nd clo sin g
When the chi ld safety lock is activated, the interior door opening
lever is inoperative; the door can only be opened from the outside .
In addition, the window regulator for that door is a lso inoperative
when the child safety lock is activated.
[ i ] Tips
• In order to activate the child safety lock on the left and the right
side, you have to press the two safety buttons in succession .
• Make certain that the chec k light comes on in the corresponding
safety switch when the child safe ty lock is activated .•
Convenience key
A pplies to vehicles : wi th Con venien ce key
Description
Access and vehicle operation based on: Master key
remains in driver's pocket.
The Convenience key vehicle au thorization system allows k e yless
unlocking, locking and starting of the vehicle. You on ly have to carry
the master key on your p erson .
It makes no difference whether the master key is in your jacket
pocket or in your brief case. As soon as you approach your vehicle,
the Convenience key recognizes the request fo r access, checks fo r
authori zation and enab les the fo llowing functions:
• Unlocking the vehicle:::::,
page 53.
• Locking the vehicle:::::, page 53.
• Switching on ignition and starting the engine by pressing the
[ S TA RT] button; the master key does not have to be in the ignition
switch :::::,
page 118.
& WARNING
• When you lock your vehi cle fr om o uts ide , nobod y -espe ciall y
children -should remain in side the vehicle. Remember , when you
l o ck th e ve hicle from the out side the windo ws ca nnot be opened
from the in side .
• When you lea ve the vehi cle , al ways re m ov e the ign ition key and
take it with you. Thi s will prevent pa ss enger s (children , for
e xample ) from a ccidentally being l ocked in the vehi cle s hould the y
ac cidentall y pre ss the pow er lockin g switch in the front doors .
• Do not l eave childr en in side the vehi cle un sup erv is ed . In an
emerg ency it wo uld be impo ssible to open the door s from the
out side witho ut th e key.
[ i ] Tips
• In order for Convenience key to function, you must always carry
the master key with you.
• In order to be able to un lock or lock the vehicle, the authorized
master key must be within a range of about 1.5 meters from the
door or the rear lid.
• Of course, you can still un lock and lock your vehicle using the
buttons on the master key . The selector lever must be in the P posi
tion .
• For Declaration of Compliance to United States FCC and Industry
Canada regulations :::::,
page 375. •
Page 56 of 398
Opening and closing
& WARNING
• When you lock your vehicle from outside, nobody -especially
children - should remain inside the vehicle. Remember, when you
lock the vehicle from the outside the windows cannot be opened
from the inside.
• When you leave the vehicle, always remove the ignition key and
take it with you. This will prevent passengers (children, for example) from accidentally being locked in the vehicle should they
accidentally press the power locking switch in the front doors .
• Do not leave children inside the vehicle unsupervised. In an
emergency it would be impossible to open the doors from the
outside without the key.
[ i] Tips
It is not possible to re-open the door for a brief period directly after
closing it. This allows you to ensure that the doors are properly
locked .•
Anti -theft alarm system
Description
The anti-theft alarm triggers an alarm if anyone attempts
to break into the vehicle.
The anti-theft alarm system triggers an audible alarm and turns on
the emergency flasher if an unauthorized interference with the
vehicle is sensed by the system.
How is the anti-theft alarm system switched on?
The anti-theft alarm system is switched on when you lock the
vehicle. The system is activated approximately 30 seconds after the
vehicle is locked. The indicator light on top of the door trim start
flashing rapidly for 30 seconds and then blink slowly.
How is the anti-theft alarm system switched off?
The anti-theft alarm system is switched off only when you unlock
your vehicle. If you do not open a door within 60 seconds after you have unlocked with the remote control, the vehicle will lock itself
again automatically.
When will the anti-theft alarm system be triggered?
When the vehicle is locked, the alarm system monitors and protects
the following parts of the vehicle:
• engine compartment
• luggage compartment
• doors
• vehicle incline
• ignition
When the system is activated, the alarm will be triggered if one of
the doors, the engine hood or the rear lid are opened, or if the igni
tion is turned on or if the vehicle incline has been changed. The anti
theft alarm system will also go off when the battery is disconnected.
You can also trigger the alarm by pressing the PANIC button on your
remote control. This will alert other people in case of emergency .
Press the
PANIC button again to turn off the alarm .
How is the anti-theft alarm switched off when
triggered?
The alarm system is switched off when you unlock the vehicle or
when the ignition is switched on . The alarm will also switch itself off
when it comes to the end of its cycle.
Emergency flasher and horn
The emergency flasher will blink briefly and the horn sounds when
the doors, engine hood and rear lid are properly closed.
If the emergency flashers do not blink, or the horn does not sound,
check the doors, engine hood and rear lid to make sure they are
properly closed. If you close a door, the hood or the rear lid with the
~
Page 57 of 398
anti-theft alarm switched on, the emergency flashers will b link and
the horn will sound only after you have c losed the door or lid .
[ i J Tips
For the an ti-theft a larm system to function p rope rly, make sure a ll
vehicle doors and windows are c losed before leaving the vehicle .•
Tilt sensors -lQ
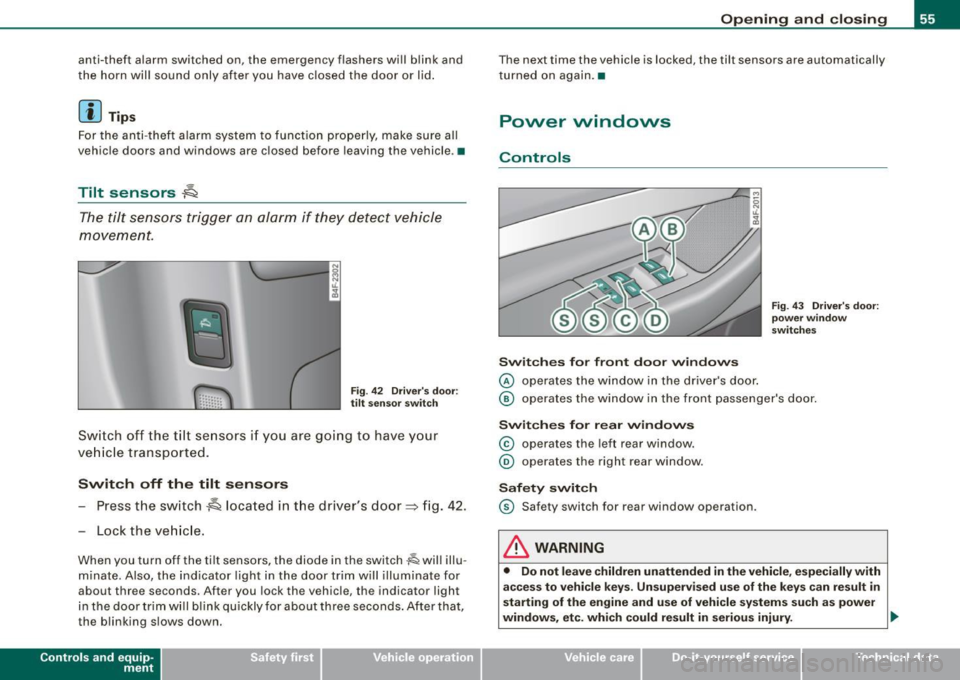
The tilt sensors t rigg er an alarm if they detect vehicle
movement.
Fi g. 4 2 Driver's door:
tilt senso r switch
Sw it c h off the tilt se nsors i f you ar e go ing to have y our
ve hicle transported .
Switch off the tilt sensors
- Press the switch~ located in t he driver's door~ fig . 42.
- Lock the veh ic le.
When you turn off the tilt sensors, the diode in the switch~ will illu
m inate . Also, the ind icator light in the door trim wil l illuminate for
about three seconds. After you lock the v ehicl e, the indicator light
in the door trim wi ll blink quickly for about three seconds . After tha t,
the blinking slows down.
Con tro ls and eq uip
ment
Op ening and clo sing
The next time the vehicle is locked, the tilt sensors are automatically
turned on again .•
Power windows
Controls
Sw it c hes for fr ont do or window s
@ operates the window in the driver's door .
Fig. 43 Driv er's d oor:
pow er wind ow
s w it ch es
@ operates the window in the front passenger's door.
Switch es for rear window s
© operates the left rear window .
® operates the right rear window .
Safety swit ch
© Safety switch for rear window op eration.
& WARNING
• Do not l eave children unattended in the vehicl e, especially with
a cce ss to vehi cle keys . Un super vised u se of the ke ys c an result in
starting of the engine and use of vehi cle s ystem s suc h as power
windows , etc . which could re sult in seriou s injury. .,
Vehicle care I I irechnical data
Page 62 of 398
Opening and closing
Tilting the roof shut
-Briefly pull the rotary switch to close the roof.
- To tilt the roof down to any intermediate position
pull and
hold
the switch until the roof reaches the desired posi
tion.
& WARNING
Improper use of the power sunroof can cause serious personal
injury.
• Be careful when closing the power sunroof. Not paying atten
tion could cause you or others to be trapped and injured as the
roof closes.
• Always take the key with you when you leave the vehicle to
prevent injuries caused by the roof closing.
• Never leave children or persons requiring assistance alone in
the vehicle, especially when they could access the vehicle keys.
Unsupervised use of the keys can result in the engine being
started or use of vehicle systems such as the power windows, etc.
which could result in serious injury. The doors could be locked
with the remote key, delaying help in an emergency.
• The power sunroof will continue to operate until the ignition
key has been removed and one of the front doors has been
opened. •
Applies to vehicl es: with slid ing/ tilt ing power sunroof
Convenience closing feature
The power sunroof can be closed from outside with the
key in the driver's door lock.
- Insert the key into the driver's door lock. - Turn and hold the key
in the lock position @=> page
47,
fig. 32 until the sunroof is completely closed=> & in
"Closing the power sunroof" on page
59.
& WARNING
Be careful when closing the power sunroof. Not paying attention
could cause you or others to be trapped and injured as the roof
closes. •
Applies to vehicles : with s lid ing/t ilting powe r sunroof
Power emergency closing
The sunroof can still be closed electrically if for some
reason the overload protection function becomes acti
vated.
The power sunroof is equipped with an overload protection
feature. If, under normal conditions, the power sunroof will
not close, you can close it using this feature.
- Turn the rotary switch to position @=>page
58, fig. 46 .
- Now pull the switch
and hold it in this position until the
power sunroof closes completely.
& WARNING
Improper use of the power sunroof can cause serious personal
injury.
• Be careful when closing the power sunroof . Not paying atten
tion could cause you or others to be trapped and injured as the
roof closes.
• Always take the key with you when you leave the vehicle to
prevent injuries caused by the roof closing .
Page 63 of 398
& WARNING !continued)
• Never leave children or persons requiring assistance alone in
the vehicle, especially when they could access the vehicle keys.
Unsupervised use of the keys can result in the engine being
started or use of vehicle systems such as the power windows, etc.
which could result in serious injury. The doors could be locked
with the remote key, delaying help in an emergency.
• The power sunroof will continue to operate until the ignition
key has been removed and one of the front doors has been
opened .•
Ap plies to veh icles: w it h sli ding/ tilt in g p ower su nroof
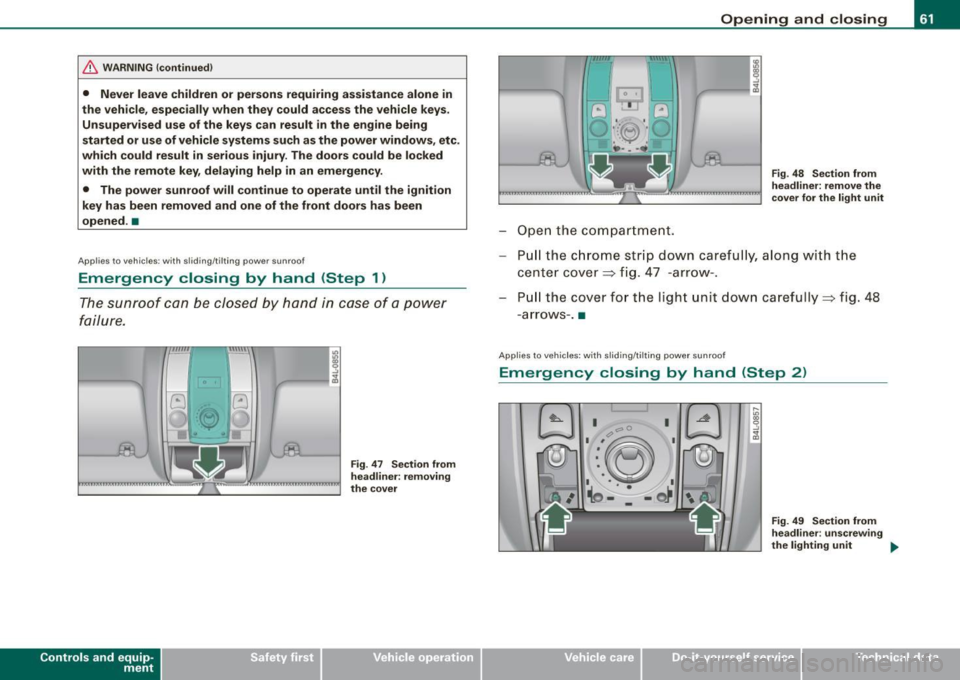
Emergency closing by hand (Step 1)
The sunroof can be closed by hand in case of a power
failure.
Con tro ls and eq uip
ment
Fig . 47 Section from
headliner: removing
the cover
Opening and closing
Open the compartment.
Fig. 48 Section from
headliner: remove the
cover for the light unit
Pull the chrome strip down carefully, along with the
center cover=> fig. 47 -arrow-.
Pu ll the cover for the light unit down carefully=> fig. 48
- arrows -. •
A pplie s to v ehicle s: with sli di ng/ti lt in g p owe r sunroo f
Emergency closing by hand (Step 2)
Vehicle care I I
Fig. 49 Section from
headliner : unscrewing
the light ing unit
~
irechnical data