technical data AUDI S6 2010 Manual Online
[x] Cancel search | Manufacturer: AUDI, Model Year: 2010, Model line: S6, Model: AUDI S6 2010Pages: 368, PDF Size: 86.82 MB
Page 165 of 368
___________________________________________________ P_ a _ r_k :...:.; a..::s ...:s...: i..::s ...:t _ ___,J_
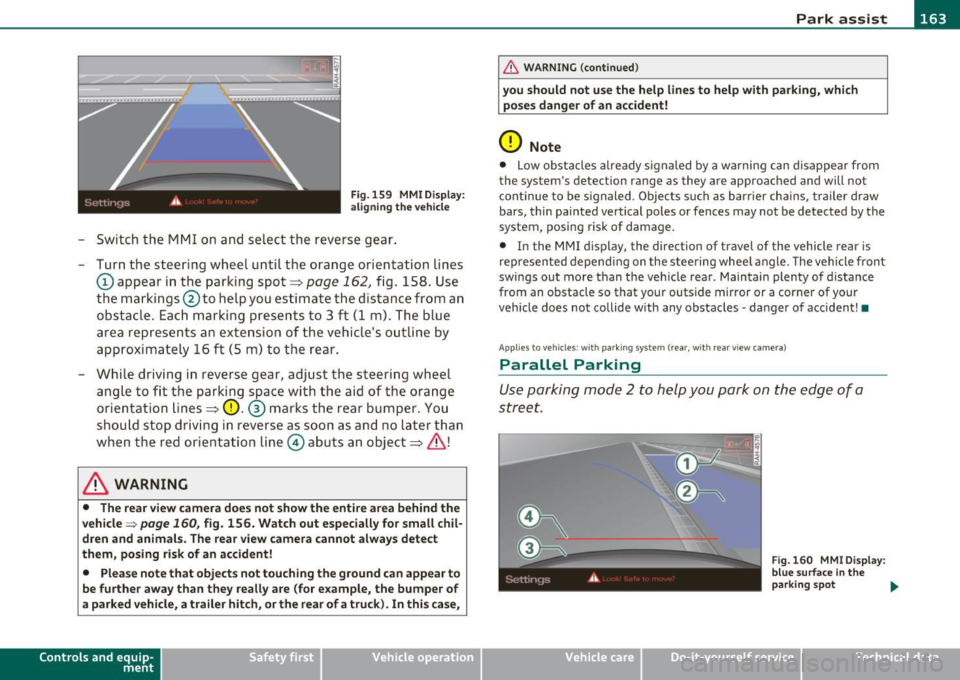
Fig. 159 MMI D isplay:
al igni ng the veh icle
- Switch the MMI on and se lect the reverse gear .
- Turn the steering wheel until the orange orientation lines
(D appear in the parking spot=> page 162, fig. 158 . Use
the markings @to help you estimate the distance from an
obstacle. Each marking presents to 3 f t (1 m) . The blue
area represen ts a n extension of the vehi cle's o utline by
approximately 16 ft (5 m) to the rear .
- While driving in reverse gear, adjust the steering wheel ang le to fit the parking space with the aid of the orange
orientation lines =>
0. ® marks the rear bumper . You
should stop driving in reverse as soon as and no la ter than
when the red orientation line© abuts an object=>& !
& WARNING
• The rear view came ra does not show the enti re area beh ind the
v ehicle =>
page 160, fig. 156. Watch out e spe cially fo r s mall chil ·
dren and animal s. The rear v iew cam era cannot alwa ys dete ct
them , posing ri sk of an accident!
• Plea se note that obje ct s not tou ching the groun d can appear to
be further awa y than th ey reall y are (for example , th e bumpe r of
a parked vehi cle, a trailer hit ch , or the r ear of a truck) . In thi s case ,
Con tro ls a nd e quip ·
m en t Vehicle
OP-eration
& WARNING (con tin ued)
you sh o uld not use the help lin es to help with p arking , whic h
po se s dang er of an accident!
0 Note
• Low obstacles a lready signaled by a wa rning c an disappear from
the sys tem's de te ct ion range as they are app roached and will no t
conti nue to be signaled . Objects such as barrier cha ins, trailer draw
bars, thin painted ve rtica l poles or fences may not be detected by the
system , posing risk of damage.
• In the MMI display , the direc tion o f travel o f the vehicle rear is
represen ted depend ing on the steering whee l angle. The vehicle front
swings out more than the veh icle rear . Maintain plenty of distance
from an obstacle so that your outside mirror or a corner of your
vehicle does not collide with any obstacles -danger of accident !•
Ap plie s to veh icle s: with pa rk ing syst e m (r ea r, wi th rear vie w cam era)
Parallel P arking
Use parking mode 2 to help you park on the edge of a
street.
Vehicle care
Fig. 160 MM I Displ ay :
blue surface In the
p arking s pot
~
Do-it-yourselt service iTechnical data
Page 167 of 368

Park assist IIJII _________________________________ _____;.....:;_;_.:..:,____;;_ ____ _
0 Note
In the MMI display, the d irect ion of t ravel of the vehicle rear is rep re
sented depend ing on the steering wheel angle. The vehicle front
swi ngs ou t mo re t han t he ve hicle re ar. M ain tain ple nty of dist ance
from an obstacle so t hat your outs ide mirror or a corner of your
vehicle d oes no t collide with any o bstacles - dange r of accide nt!
[ i ) Tips
Th e left or right or ientat ion lines and s urfaces will be displ aye d,
depending on the tu rn signal being used. •
App lies to veh icles : with park ing syst em (rear, wit h rea r view cam era)
Adjusting the display and warning tones
Th e display and warning tones can be adjusted in the
MM I.
-Select: Funct ion button !CA R]> Systems *> Parking
system .
Display
• Off -when the parking system is switche d off, only audible sig na ls
are given.
• On -when t he pa rking system is swi tched on, the pic ture from the
rear view camera is displayed.
Warning tones (Canada models)
• Rear volume -rear sensor vo lume
• Rear frequency -rear sensor frequency
• In-car entertainment fader -w hen the p ark in g sys tem is switche d
on, t he volume of the active audio source is lowered.
Th e newly adj uste d value is briefly hear d from the signal generator .
Th e set tings are automat ically stored and assigned to the master key
with remote control.
Controls and equip
ment Safety first
& WARNING
•
Canada models: always make sure that the volume and
frequency of the chimes is adjusted so that you can easily hear the
acoustic distance signal even if the radio is playing, the air-condi
tioner blower is on High or there is a high level of outside noise.
• Check the settings whenever someone else has driven the
vehicle before you.
[I] Tips
• Cana da mo dels: the warning tones can a lso be adjusted directly
from t he rear -view came ra image* . Simply press the
!Settings)
control button.
• Cha nged settings are activated w hen parking assist is switched on
again. •
Appli es to ve hicle s: wit h pa rk ing system (rea r, wi th r ear vie w c amer a)
Error messages
If a wa rni ng tone* is aud ible for abo ut five seconds w he n you t urn on
the ignition , the re is a ma lfunction in the system. Have the prob lem
co rrected by yo ur aut ho rized Audi dea ler.
Keep the sensors in the rear b umper clean and free from ice so that
t he a cousti c p ark assis t* sys tem c an fun ction pro perly .•
Vehicle care Technical data
Page 169 of 368
__________________________________________ A _d_ a __,_ p_t_ i_v _e _ A_i_ r _ S_ u_s __,_p _ e_ n_s _ i_ o _n _ __.fflll
A pplie s to veh icles : with Ad aptive Air Su spen sion
Chassis controls
Four different driving modes can be set by the driver.
The automatic control processes are speed- and time-dependent. For
example, it is not possible to raise the suspension to the lift mode
above certain speeds.
Level adjustment
Automatic
Comfort
Dynam ic
Lift
Automatic Ground clearance
about 4
. 7 -4.1 inches
(120 -105 mm)
about 4. 7 inches (120 mm)
about 4.1 inches (105 mm)
about 5.3 inches (135 mm)
Select the automatic mode if you prefer suspens ion and damping
sett ings emphasizing comfort .
• Lowering : When a speed of about 75 mph (120 km/h) is exceeded
for more than 30 seconds, the vehicle is automatically lowered by
about 0 .6 inch (15 mm) to the dynamic level which is more suitable
for highway speeds. Road holding is optimized as a result of the lower
center of gravity and fuel consumption is reduced as a result of
reduced wind resistance.
• Raising: The vehicle is automatically raised again if the speed falls
below about 44 mph (70 km/h) for a period of 2 minutes. The veh icle
is raised immediately when speed falls below about 22 mph (35
km/h).
Comfort
Select the comfort mode if you desire a suspension setting with a
special emphasis on comfort. In the standard mode there is
no
lowering of the suspension. Even at high speeds, the vehicle stays at
the same level. Damping characteristics with a decided emphasis on
comfort are se lected in this mode .
Contro ls a nd e quip
m en t Vehicle
OP-eration
Dynamic
Select the dynamic mode if you prefer a sporty suspension setting . In
this mode, the vehicle is lowered while it is st ill stationary and sporty
damping characteristics are se lected. The wa rning light
cw in the
instrument cluster will come on for a few seconds just to remind you
of the reduced ground clearance.
If you switch off the engine wh ile the vehicle is in the dynamic mode
and then switch on the ignition once again, the
cw warning light will
also come on again for a few seconds as a reminder.
Lift
Select the lift mode when you have to travel over poor sections of
road (e.g. trails) . In the lift mode, the vehicle is raised by 0.6 inch (15
mm) compared to normal level w hile it is still stationary and damping
characteristics are adjusted to emphasize comfort.
Th e lift mode can be activated only at speeds below 50 mph (80
km/h) . When a speed of about 62 mph (100 km/h) is exceeded, the
system automatically leaves lift mode and the mode set previously
(standard, automatic, dynamic) is activated again.•
App lies to veh icles: w ith Adaptive Air Suspens ion
Setting the driving modes
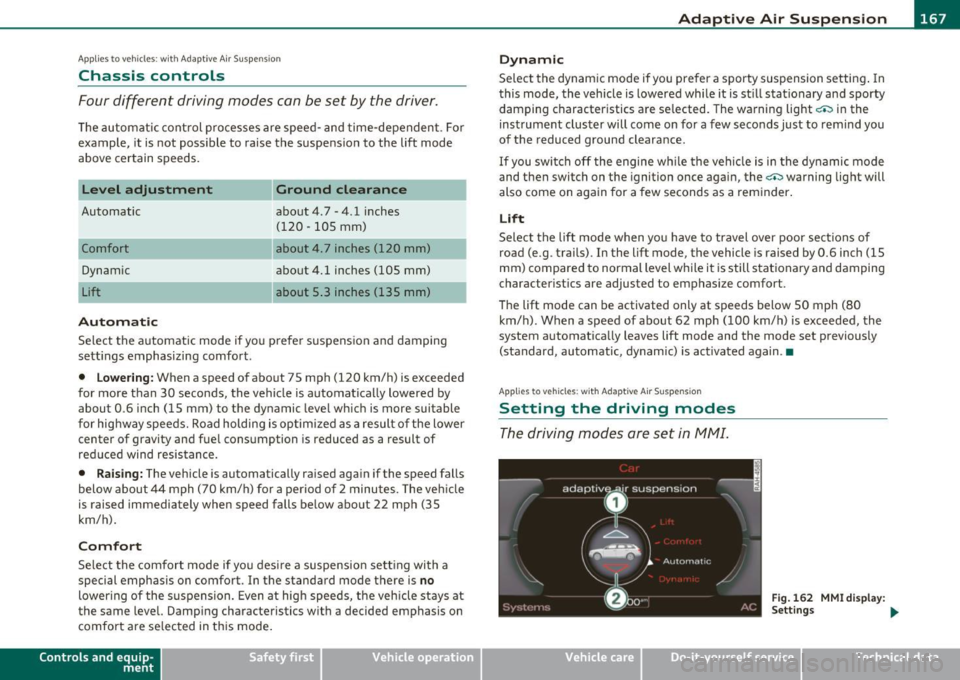
The driving modes are set in fv1fv1I.
Fig. 162 MMI display :
Settings ...
Vehicle care Do-it-yourselt service iTechnical data
Page 171 of 368
___________________________________________________ H_o_ m_ e_L_ i_ n _ k_ ® __ _
Homelink ®
Universal remote control
Applies to veh icles: w ith Hom eli nk ® universal remote control
General information
The Homelink ® feature can learn the up to three radio
frequency codes for most current transmitters used for
operating garage doors, estate gates, home or outdoor
lighting systems, and other devices.
You must first program the Homelink ® transm itter before you can
use the system=>
page 170, "Programming the Home link® trans
mitter".
I n order to program the Homelink ® transmitter for devices utilizing
rolling code, a second person on a ladder who can safe ly reach the
garage door opener motor is recommended. It is also necessary to
locate the "learn" button on your garage door opener motor. Refer to
the operating instructions for the opener, as the location and color of
this button may vary by manufacturer.
You can still use the original remote control for the device at any
time.
& WARNING
• Never use the Homelink'"' transmitter with any garage door
opener that does have not the safety stop and reverse feature as
required by federal safety standards. This includes any garage
door opener model manufactured before Aprill, 1982.
• A garage door opener which cannot detect an object, signaling
the door to stop and reverse does not meet current federal safety
standards. Using a garage door opener without these features
increases risk of serious injury or death.
Controls and equip
ment Safety first
& WARNING
(continued)
• For safety reasons never release the parking brake or start the
engine while anyone is standing in front of the vehicle.
• A garage door or an estate gate may sometimes be set in
motion when the Homelink ® remote control is being
programmed. If the device is repeatedly activated, this can over
strain motor and damage its electrical components -an over
heated motor is a fire hazard!
• To avoid possible injuries or property damage, please always
make absolutely certain that no persons or objects are located in
the range of motion of any equipment being operated.
rn Tips
• If you would like more informat ion on Homelink ®, where to
purchase the Homelink ® compatible products, or would like to
purchase the Homelink ® Home Lighting Package, please call toll
free: 1-800-355-3515.
• For Declaration of Compliance to United States FCC and Industry
Canada regulations=>
page 347 . •
Vehicle care Technical data
Page 173 of 368
HomeLink® -_______________ __.
9. The emergency flashers will flash three times (after about
15-60 seconds) when the programming is successful.
Release the button on the remote control.
-To program more devices, repeat steps 4 to 9.
10. Press and hold the trained Homelink ® button and
observe the indicator light©~
page 170, fig. 163.
- If the indicator light is solid/continuous, programming is
complete and your device should activate when you press
and release the trained Homelink ® button.
- If the indicator light blinks rapidly for 2 seconds and is then a solid/continuous light, proceed with phase 3 to program a rolling code device.
Phase 3: rolling code programming
- A second person on a ladder who can safely reach the
garage door opener motor is recommended.
11 . Locate the "learn" button on the garage door opener
motor (refer to the operating instructions for the opener,
as the location of this button may vary by manufacturer) .
12. Press and release the learn button on the garage door
opener motor.
-Note: once the button is pressed, there are 30 seconds in
which to initiate the next step.
13. On the Homelink® keypad inside the vehicle, firmly press
and hold the Homelink® button previously programmed
in phases 1 and 2 for two seconds and release. Repeat this
sequence
twice .
Contro ls a nd e quip
m en t Vehicle
OP-eration
-Some vehicles may require the press/hold/release
sequence up to three times to complete the training
process.
- Homelink ® should now activate your rolling code
equipped device.
If the 5 minute time limit is exceeded, the emergency flashers will
flash one time
to indicate that the process has been terminated. In
this case, repeat steps 4 through 9.
If the emergency flashers do not flash three times (after about 15 -
60 seconds), programming was not successful. In this case, repeat
steps 4 through 9.
Remote control units for garage door openers in Canada are set to
stop transmitt ing radio frequency signals after two seconds. This
time may not be sufficient for the Home link® system to learn the
radio frequency signal. Perform all other steps as described above.•
Applies to veh icles: with Hom elin k® un iversa l rem ote cont rol
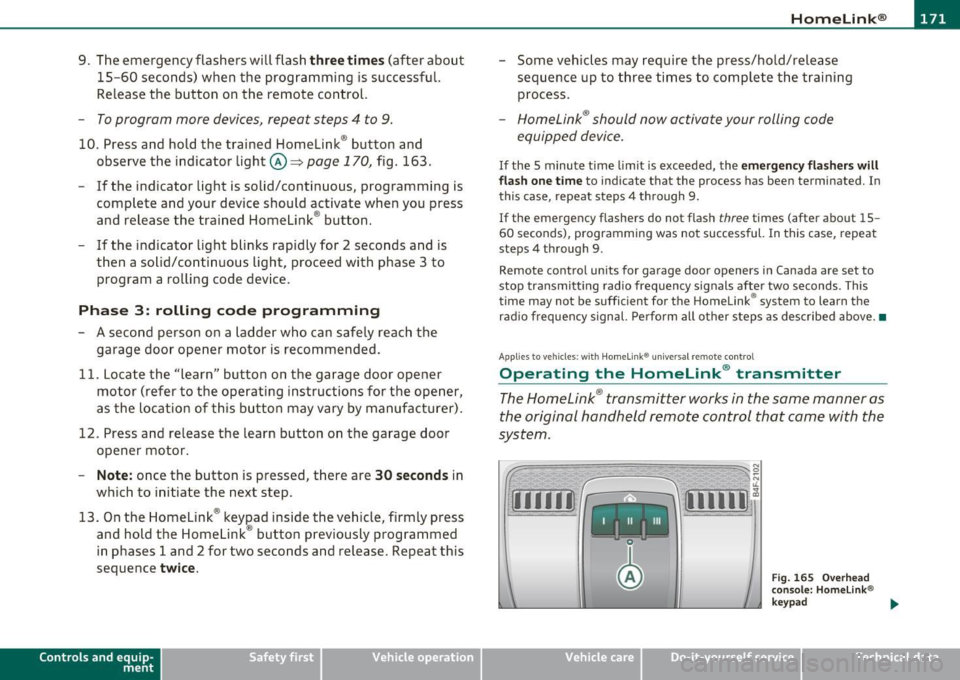
Operating the Homelink ® transmitter
The HomeLink ® transmitter works in the same manner as
the original hand held remote control that came with the
system.
~ ;;;;;~~~~ ~=;==~~~ ;;;;:;;;~,~!:
{I I I I I~ i 111111 1,A
Fig. 1 65 Overhead
conso le: Homelink®
keypad
Vehicle care Do-it-yourselt service iTechnical data
Page 175 of 368

HomeLink® -
----------------
Controls and equip
ment Safety first
Vehicle care Technical data
Page 177 of 368
Driving Safely ---------------------"~'---
Important things to do before driving
Safety is everybody's job! Vehicle and occupant safety
always depends on the informed and careful driver.
For your safety and the safety of your passengers, before
driving always:
- Make sure that all lights and signals are operating
correctly.
- Make sure that the tire pressure is correct.
- Make sure that all windows are clean and afford good visi-
bility to the outside.
- Secure all luggage and other items carefully::::>
page 93.
-Make sure that nothing can interfere with the pedals.
- Adjust front seat, head restraint and mirrors correctly for your height .
- Instruct passengers to adjust the head restraints according to their height.
- Make sure to use the right child restraint correctly to
protect children ::::,
page 217, "Child Safety".
- Sit properly in your seat and make sure that your passen gers do the same::::,
page 75, "General recommenda
tions".
- Fasten your safety belt and wear it properly. Also instruct
your passengers to fasten their safety belts properly
=:> page 185. •
Controls and equip
ment Safety first Vehicle operation
What impairs driving safety?
Safe driving is directly related to the condition of the
vehicle, the driver as well as the driver's ability to concen
trate on the road without being distracted .
The driver is responsible for the safety of the vehicle and all
of its occupants. If your ability to drive is impaired, safety
risks for everybody in the vehicle increase and you also
become a hazard to everyone else on the road::::,,& . There
fore:
Do not let yourself be distracted by passengers or by using
a cellular telephone.
NEVER drive when your driving ability is impaired (by
medications, alcohol, drugs, etc.).
- Observe all traffic laws, rules of the road and speed limits
and plain common sense .
- ALWAYS adjust your speed to road, traffic and weather
conditions.
- Take frequent breaks on long trips. Do not drive for more than two hours at a stretch.
- Do NOT drive when you are tired, under pressure or when
you are stressed .
& WARNING
Impaired driving safety increases the risk of serious personal
injury and death whenever a vehicle is being used.•
Vehicle care Do-it-yourself service Technical data
Page 179 of 368
Driving Safely ---------------------"~'----
& WARNING (continued)
to help reduce the risk of personal injury if the driver's airbag
inflates.
• Never hold the steering wheel at the 12 o 'clock position or with
your hands at other positions inside the steering wheel rim or on
the steering wheel hub. Holding the steering wheel the wrong way can cause serious injuries to the hands, arms and head if the
driver's airbag deploys.
• Pointing the steering wheel toward your face decreases the
ability of the supplemental driver's airbag to protect you in a colli·
sion .
• Always sit in an upright position and never lean against or
place any part of your body too close to the area where the airbags
are located.
• Before driving, always adjust the front seats and head
restraints properly and make sure that all passengers are properly
restrained.
• Never adjust the seats while the vehicle is moving. Your seat
may move unexpectedly and you could lose control of the vehicle .
• Never drive with the backrest reclined or tilted far back! The
farther the backrests are tilted back, the greater the risk of injury due to incorrect positioning of the safety belt and improper
seating position.
• Children must always ride in child safety seats =>
page 217.
Special precautions apply when installing a child safety seat on
the front passenger seat =>
page 195. •
Controls and equip
ment Safety first Vehicle operation
Proper seating position for the front
passenger
The
proper front passenger seating position is important
for safe, relaxed driving.
For your own safety and to reduce the risk of injury in the
event of an accident, we recommend that you adjust the seat
for the front passenger to the following position:
- Adjust the angle of the seatback so that it is in an upright
position and your back comes in full contact with it when
ever the vehicle is moving.
- Adjust the head restraint so that the upper edge is as even
with the top of your head as possible but not lower than
eye level and so that it is as close to the back of your head
as possible=>
page 179.
- Keep both feet flat on the floor in front of the front
passenger seat.
- Fasten and wear safety belts correctly=>
page 189.
For detailed information on how to adjust the front passenger's seat,
see=>
page 75 .
& WARNING
Front seat passengers who are unbelted, out of position or too
close to the airbag can be seriously injured or killed by the airbag
as it unfolds. To help reduce the risk of serious personal injury:
• Passengers must always sit in an upright position and never
lean against or place any part of their body too close to the area
where the airbags are located.
• Passengers who are unbelted, out of position or too close to
the airbag can be seriously injured by an airbag as it unfolds with
great force in the blink of an eye. .,_
Vehicle care Do-it-yourself service Technical data
Page 181 of 368
______________________________________________ D_ ri_v _ i_n _,,g ,c.._ S_a_ f_ e_ l..:: y __ _
Proper adjustment of head restraints
Correctly adjusted head restraints are an important part
of your vehicle's occupant restraint system and can help to reduce the risk of injuries in accident situations.
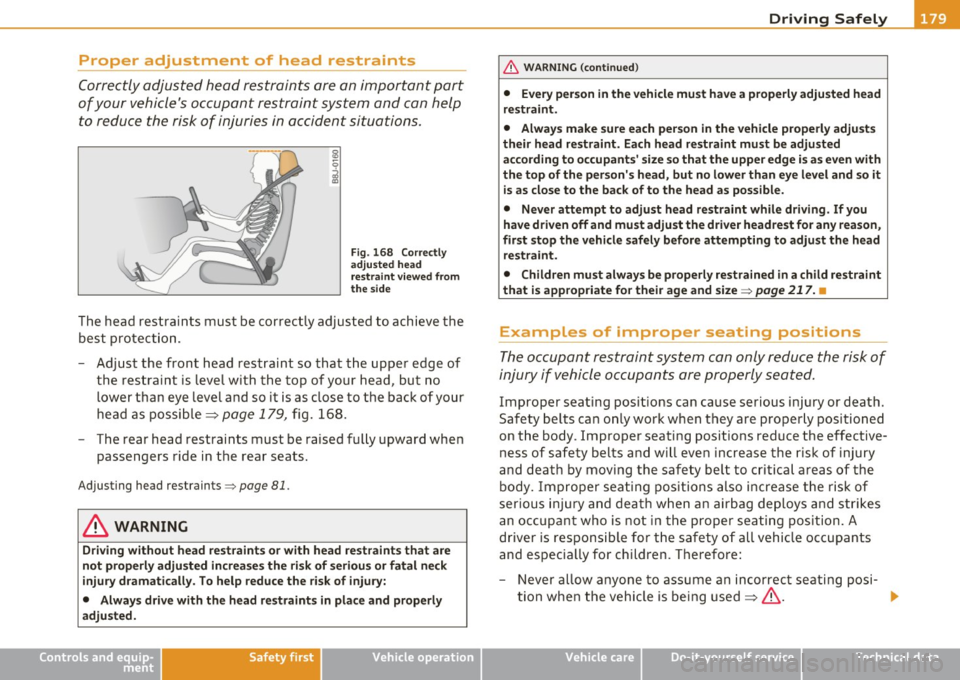
Fig . 168 Correctly
adjusted head
restraint viewed from
the side
The head restraints must be correctly adjusted to achieve the
best protection.
- Adjust the front head restraint so that the upper edge of
the restraint is level with the top of your head, but no
lower than eye level and so it is as close to the back of your
head as possible =>
page 179, fig. 168.
- The rear head restraints must be raised fully upward when
passengers ride in the rear seats.
Adjusting head restraints => page 81.
& WARNING
Driving without head restraints or with head restraints that are
not properly adjusted increases the risk of serious or fatal neck
injury dramatically. To help reduce the risk of injury:
• Always drive with the head restraints in place and properly
adjusted.
Controls and equip ment Safety first Vehicle operation
& WARNING (continued)
•
Every person in the vehicle must have a properly adjusted head
restraint.
• Always make sure each person in the vehicle properly adjusts
their head restraint. Each head restraint must be adjusted
according to occupants' size so that the upper edge is as even with
the top of the person's head, but no lower than eye level and so it
is as close to the back of to the head as possible.
• Never attempt to adjust head restraint while driving. If you
have driven off and must adjust the driver headrest for any reason,
first stop the vehicle safely before attempting to adjust the head
restraint.
• Children must always be properly restrained in a child restraint
that is appropriate for their age and size=>
page 217. •
Examples of improper seating positions
The occupant restraint system can only reduce the risk of
injury if vehicle occupants are properly seated.
Improper seating positions can cause serious injury or death.
Safety belts can only work when they are properly positioned
on the body . Improper seating positions reduce the effective
ness of safety belts and will even increase the risk of injury
and death by moving the safety belt to critical areas of the body. Improper seating positions also increase the risk of
serious injury and death when an airbag deploys and strikes
an occupant who is not in the proper seating position. A
driver is responsible for the safety of all vehicle occupants
and especially for children. Therefore:
- Never allow anyone to assume an incorrect seating posi-
tion when the vehicle is being used=>& . _,,,
Vehicle care Do-it-yourself service Technical data
Page 183 of 368
________________________________________________ D_ r_ i_ v _i_n ""'g "-- S_a_ f_ e_ l _,,y'-- __
Use only floor mats that leave the pedal area unobstructed and that
are firmly secured so that they cannot slip out of position . You can
obtain suitable floor mats from your authorized Audi Dealer.
Floor mat fasteners are installed in your Audi.
Floor mats used in your vehicle must be attached to these fasteners.
Properly securing the floor mats will prevent them from sliding into
positions that could interfere with the pedals or impair safe opera
tion of your vehicle in other ways .
& WARNING
Pedals that cannot move freely can result in a loss of vehicle
control and increase the risk of serious personal injury.
• Always make sure that floor mats are properly secured.
• Never place or install floor mats or other floor coverings in the
vehicle that cannot be properly secured in place to prevent them
from slipping and interfering with the pedals or the ability to
control the vehicle.
• Never place or install floor mats or other floor coverings on top
of already installed floor mats. Additional floor mats and other
coverings will reduce the size of the pedal area and interfere with
the pedals.
• Always properly reinstall and secure floor mats that have been
taken out for cleaning.
• Always make sure that objects cannot fall into the driver foot
well while the vehicle is moving. Objects can become trapped under the brake pedal and accelerator pedal causing a loss of
vehicle control. •
Controls and equip ment Safety first Vehicle operation
Stowing luggage
Loading the luggage compartment
All
luggage and other objects must be properly stowed
and secured in the luggage compartment.
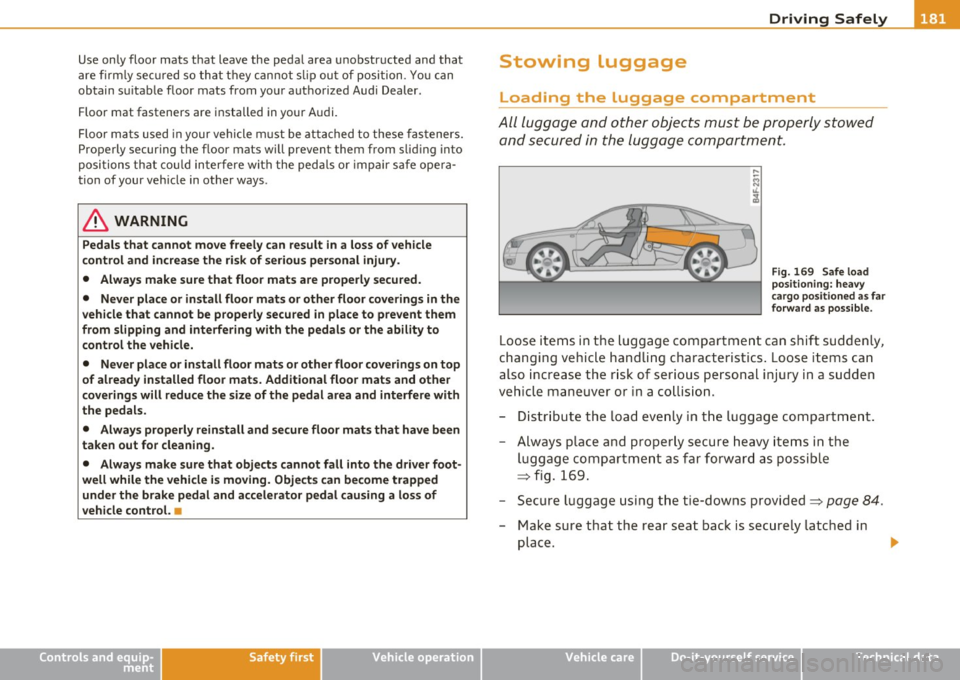
Fig. 169 Safe load
positioning : heavy
cargo positioned as far
forward as possible.
Loose items in the luggage compartment can shift suddenly,
changing vehicle handling characteristics. Loose items can
also increase the risk of serious personal injury in a sudden
vehicle maneuver or in a collision.
- Distribute the load evenly in the luggage compartment.
- Always place and properly secure heavy items in the
luggage compartment as far forward as possible
=> fig. 169.
- Secure luggage using the tie-downs provided=>
page 84.
-Make sure that the rear seat back is securely latched in
place .
Vehicle care Do-it-yourself service Technical data