AUDI S6 2014 Owner's Guide
Manufacturer: AUDI, Model Year: 2014, Model line: S6, Model: AUDI S6 2014Pages: 304, PDF Size: 76.32 MB
Page 31 of 304
Instrument s and warning /indicator lights 29
Resetting the service interval display
Your authorized A udi dealer w ill rese t the cor
respo nding service sche dule after per forming
the approp riate service on yo ur vehicle. Yo u
also have the possibility to reset the oil
change schedu le after having performed an
oil change according to Audi specifications.
Select the
I CAR ! function button > ( Car) * sy s
tems
control bu tton > Servicing & checks >
Service Int ervals > Re set oil change interval.
(D Note
If you disconnect the battery termina ls, no
calc ulations can be made for the serv ice
interval display d uring this time and no
s ervice re min der w ill appea r. Remembe r
t ha t obse rv in g the pr ope r se rv ice in tervals
is v itally impo rtant to ex ten ding the life o f
your vehicle, part icu larly the eng ine , and
maintaining its va lue . Even if t he mileage
driven is low, the maxim um period o f one
year from one se rvice to the next must not
be exceeded.
{!) Tips
- Do not reset the display between o il
c hanges, otherw ise the display will be i n
cor rect.
- The information in the Service Reminder
r ema ins stored even when the veh icle
battery is discon nected .
Head-up Display
Applies to vehicles: with Head -up Display
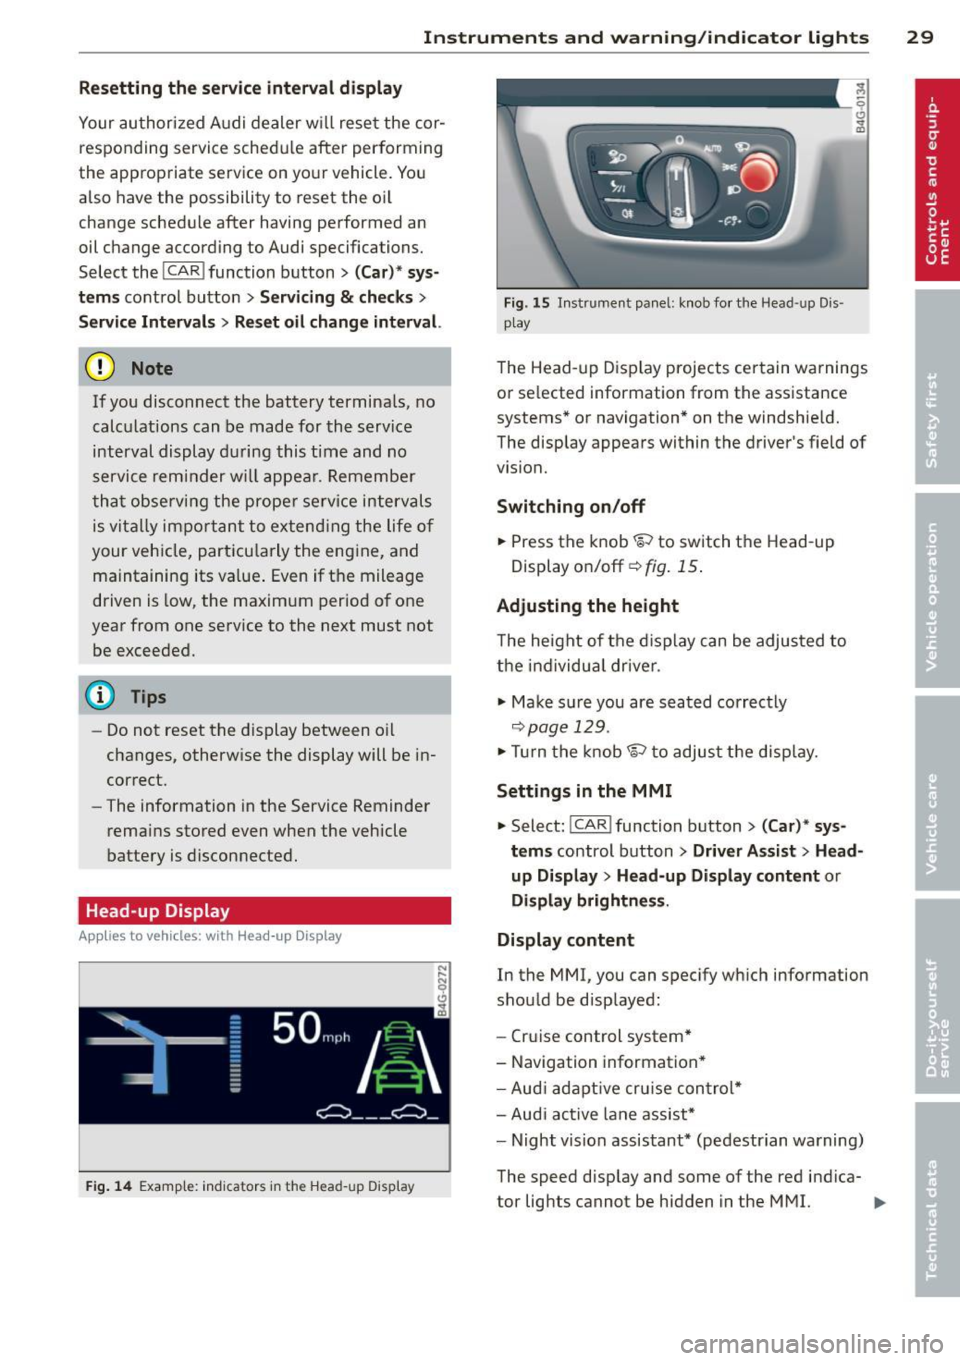
F ig. 14 Examp le: indicators in the Hea d-up Disp la y
Fig . 15 In strumen t pa nel: k nob fo r th e Head -up D is
p lay
The Head -up D is p lay projec ts cer tain warnings
or se lected information from the ass istance
systems* o r navigation * on the windshie ld.
The display appears within the driver 's fie ld of
vision.
Switching on/off
.,. Press the knob~ to switch t he Head -up
Display on/off ¢
fig. 15 .
Adjusting the height
The heig ht of t he di s p lay can be adju sted to
the individua l driver .
.,. Ma ke sur e you are seated correc tly
¢ page 129 .
.,. Tur n t he kn ob~ to adjus t th e disp lay.
Settings in the MMI
.,. Select: !CAR !function button> ( Car) * sys
tems
control button > Driver Assist > Head
up Display
> Head-up Display content or
Display brightness .
Display content
In the MMI, you can spec ify w hich information
sho uld be disp layed:
- Cr uise control system*
- Navigation information *
- Aud i adapt ive cr uise con trol *
- Aud i act ive lane ass ist*
- Night vision assistant* (pe destrian warning)
The speed d isp lay and some of the red indica-
tor lig hts cannot be hidden in the MMI. .,..
Page 32 of 304
30 Instruments and warning/indicator lights
Display brightness
You can adjust the display brightness in the
MMI. The display brightness decreases auto
matica lly as the amo unt of light decreases.
The basic leve l of brightness is adjusted with
the instrument illumination
c:> page 46.
(D Note
To prevent scratches on the glass covering
the Head-up Disp lay, do not place any ob
jects in the projection opening.
@ Tips
- Sunglasses with polarization fi lters and
unfavorable lighting conditions can af
fect the display.
- A specia l windshield is needed for the
Head-up Display function.
- For information on cleaning, refer to
c:> table on poge 212.
On-Board Diagnostic
system (OBD)
Malfunction Indicator Lamp (MIL)
The Malfunction Indicator Lamp (MIL) II! in
the instrument cluster is part of the On-Board
Diagnostic (OBD II) system.
The warning/indicator light illuminates when
the ignition is switched on and goes o ut after
the engine starts and the idle has stabilized.
This indicates that the MIL is working proper
ly .
If the light does not go out after the engine
is started, or illuminates while you are driv
ing, a ma lfunction may exist in the engine sys
tem. If the light illuminates, the catalytic con
verter could be damaged.
Continue driving
with reduced power (avoid
ing sustained high speeds and/or rapid accel
erations) and have the condition corrected.
Contact your authorized Audi dealer .
If the light illuminates, the electronic speed
limiter may also be malfunctioning. For more information
r=.> page 31,
Electronic speed
limiter .
An improperly closed fuel filler cap may also
cause the MIL light to illuminate
c:>page 218.
On-Board Diagnostics
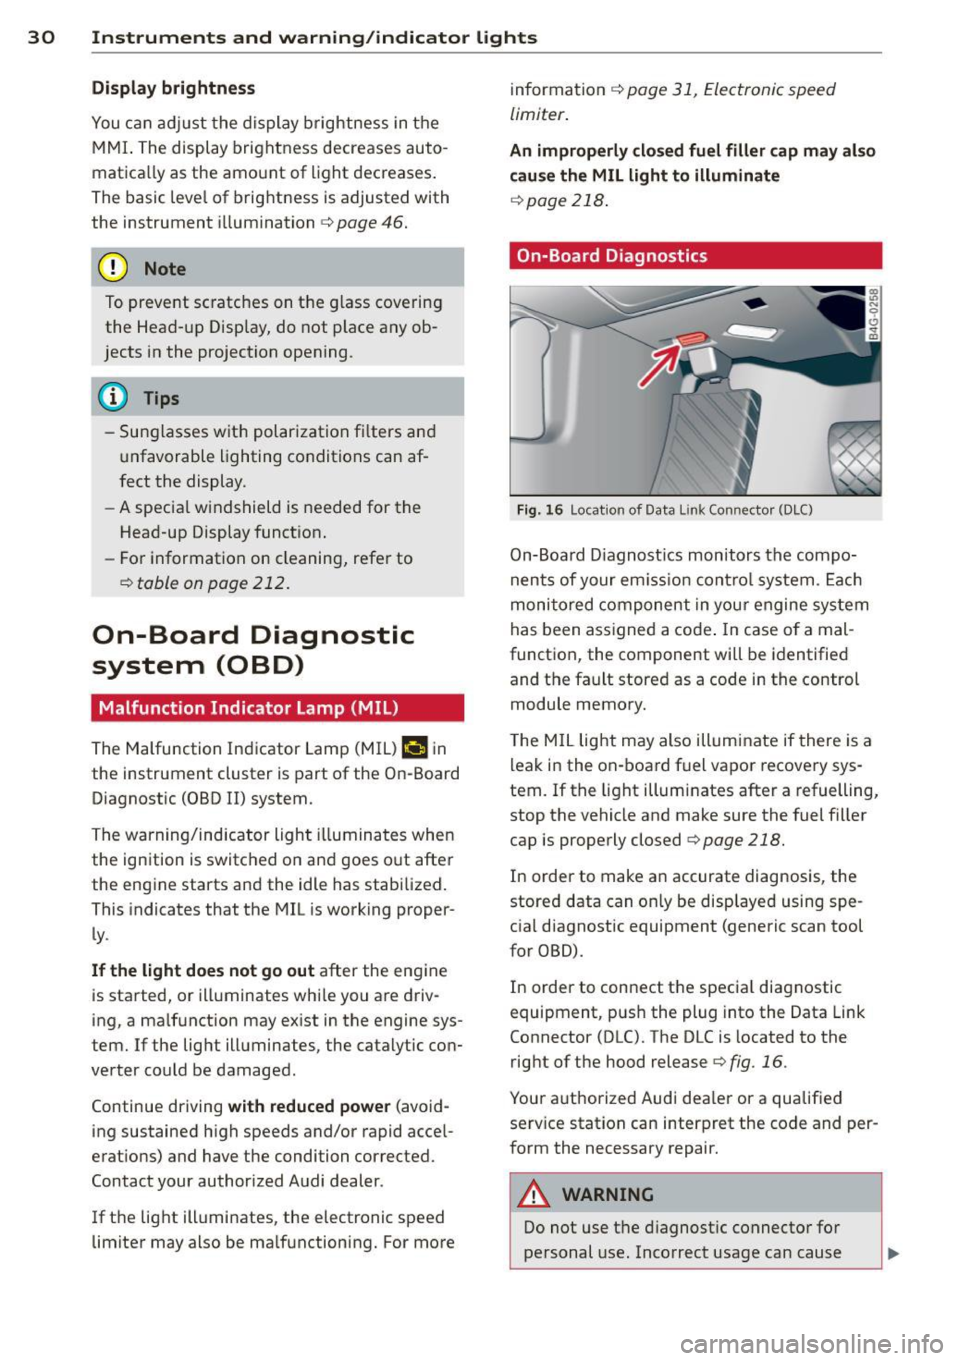
Fig. 16 Locat ion of Data L ink Con nector (DLC)
On-Board D iagnost ics monitors the compo
nents of your em iss ion control system . Each
monitored component in your engine system
has been assigned a code . In case of a mal
function, the component will be identified
and the fault stored as a code in the control
module memory.
T he MIL light may also illuminate if there is a
leak in the on-board fuel vapor recovery sys
tem.
If the light illum inates after a refuelling,
stop the vehicle and make sure the fuel filler
cap is properly closed
c:> page 218.
In order to make an accurate diagnosis, the
stored data can only be displayed using spe
cial diagnostic equipment (generic scan tool
for OBD).
In order to connect the special diagnostic
equipment, push the plug into the Data Link
Connector (DLC). The DLC is located to the
right of the hood release
r=.> fig . 16 .
Your authorized Audi dea ler or a qualified
serv ice station can interpret the code and per
form the necessary repair.
A WARNING
Do not use the diagnostic connector for
personal use. Incorrect usage can cause
Page 33 of 304
malfunctions, which can increase the risk
of a coll is ion!
Electronic speed limiter
Instruments and warning/indicator lights 31
Your vehicle may be factory equipped with
tires that are rated for a maximum speed of
130 mph (210 km/h) . This is less than the
maximum speed of your vehicle. To reduce the
risk of sudden tire failure and loss of control if
the veh icle is ope rated at excessive speeds,
your veh icle also has an elect ronic speed limit
er. The electronic speed limiter prevents your
vehicle from going faster than the tire speed
rating . For more information
c:::> page 251.
If the engine control unit receives faulty vehi
cle road speed s ignals, the Malfunction Indi
cator Lamp (MIL)
¢,llij will illuminate . If this
occurs, contact the nearest authorized Audi
dealer for assistance.
S models
Your veh icle's top speed is electronically limit
ed to 155 mph (250 km/h).
I f the engine control unit receives faulty vehi
cle roadspeed signals, the Malfunction Indica
tor Lamp (MIU
¢,llij will illum inate. If this oc
curs, contact the nea rest authorized Audi
dealer for assistance.
8_ WARNING
Always observe the posted speed limits
and adjust your speed to suit prevailing
road, traffic and weather conditions. Never
drive your vehicle faster than the maxi
mum speed rating of the tires insta lled.
Page 34 of 304
32 Opening and clo sing
Opening and closing
Keys
Key set
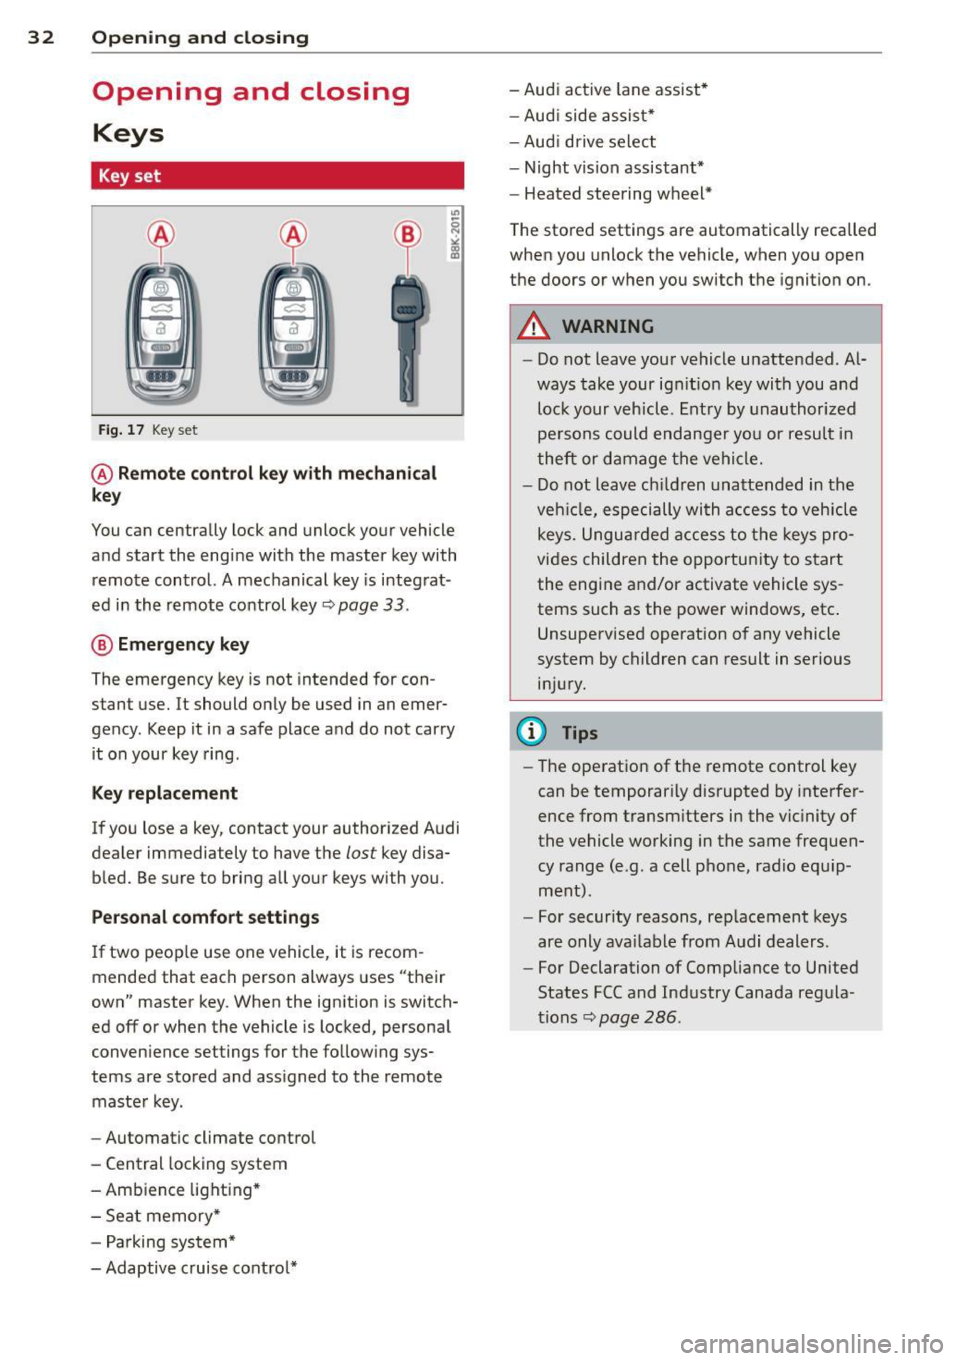
Fig . 17 Key set
@ Remot e control k ey w ith m echan ical
ke y
You can centrally lock and unlock your vehicle
and start the engine with the master key with
remote control. A mechanical key is integrat
ed in the remote control key
r:::;, page 33 .
@ Eme rgenc y ke y
The emergency key is not intended for con
stant use.
It should only be used in an emer
gency. Keep it in a safe place and do not carry it on your key ring .
Key replac em ent
If you lose a key, contact your authorized Audi
dealer immediately to have the
lost key disa
bled. Be sure to bring all your keys with you.
P er sonal c omfo rt se ttin gs
If two peop le use one vehicle, it is recom
mended that each person always uses "their
own" master key . When the ignition is switch
ed off or when the vehicle is locked, personal
convenience settings for the follow ing sys
tems are stored and assigned to the remote master key .
- Automatic climate control
- Central locking system
- Amb ience light ing*
- Seat memory*
- Parking system*
- Adaptive cruise control* - Audi active
lane assist *
- Aud i side assist*
- Aud i drive select
- Night vision assistant*
- Heated steering wheel*
The stored settings are automatically recalled
when you unlock the vehicle, when you open
the doors or when you switch the ignition on.
A WARNING
-- Do not leave your vehicle unattended . Al-
ways take your ignit ion key with you and
lock your vehicle . Entry by unauthorized
persons could endanger yo u or resu lt in
theft or damage the vehicle.
- Do not leave ch ildren unattended in the
veh icle, especially with access to vehicle
keys. Unguarded access to the keys pro
vides children the opportunity to start the engine and/or activate vehicle sys
tems such as the power windows, etc .
Unsupervised operation of any vehicle
system by children can result in serious
injury.
(1) Tips
- The operation of the remote control key
can be temporar ily disrupted by interfer
ence from transm itters in the vic inity of
the vehicle working in the same frequen
cy range (e.g. a cell phone, radio equip
ment).
- For security reasons, rep lacement keys
are only ava ilable from Audi dealers.
- For Declaration of Compliance to United
States FCC and Industry Canada regula
tions
r:::;, page 286.
Page 35 of 304
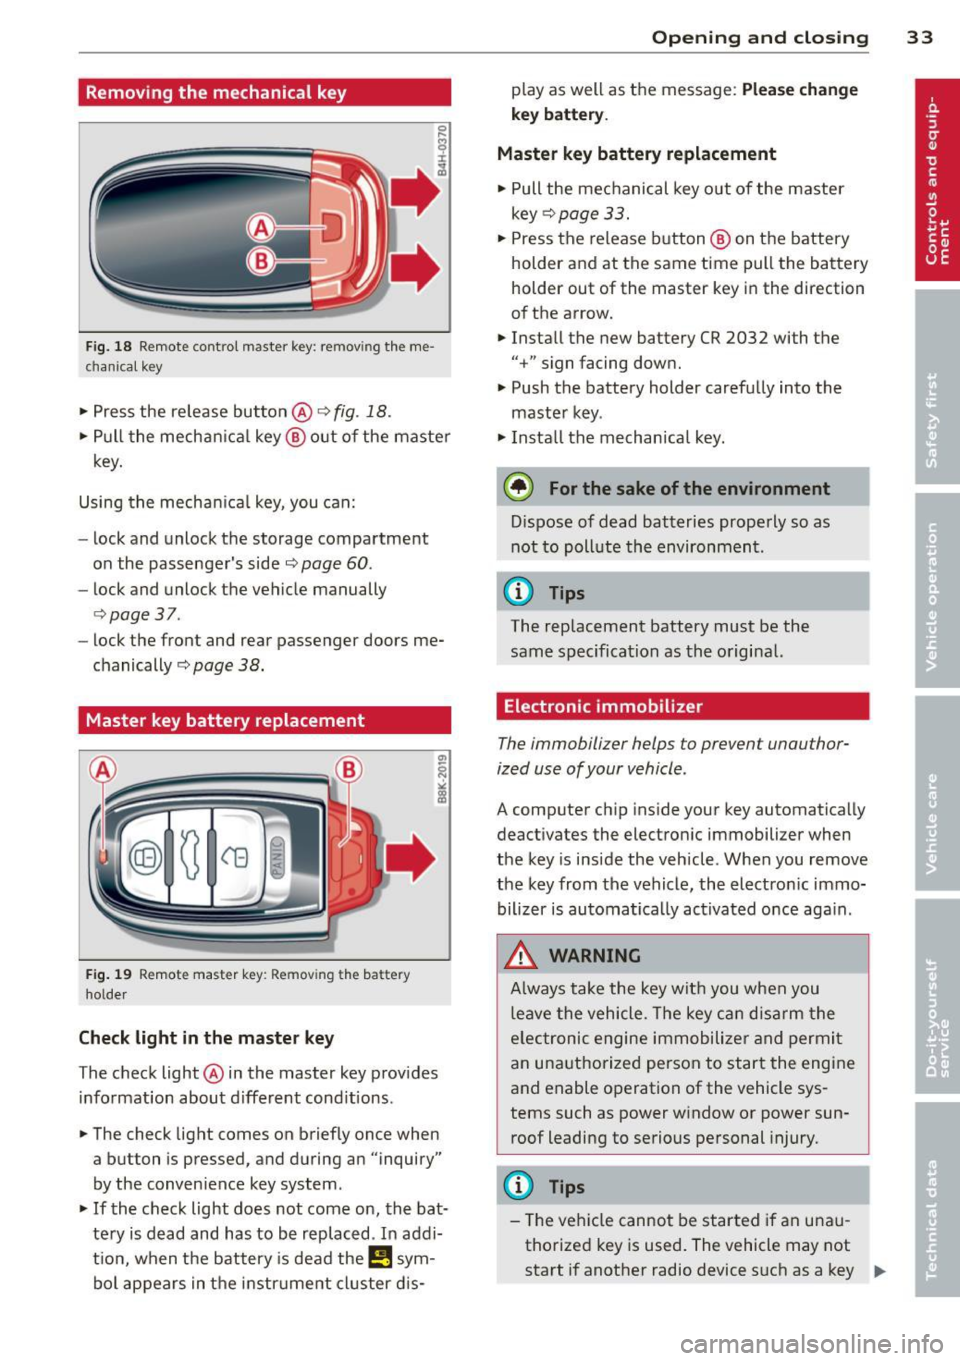
Removing the mechanical key
Fig. 18 R emo te contro l master key : remov ing the me
chanica l key
• Press the release button @ c:> fig. 18.
• Pull the mechanica l key @ out of the master
key.
Using the mechan ica l key, you can:
- lock and unlock the storage compartment
on the passenger's side
c::> page 60.
- lock and unlock the vehicle manually
c::>page 37 .
-lock the front and rear passenger doors me
chanically
c:> page 38.
Master key battery replacement
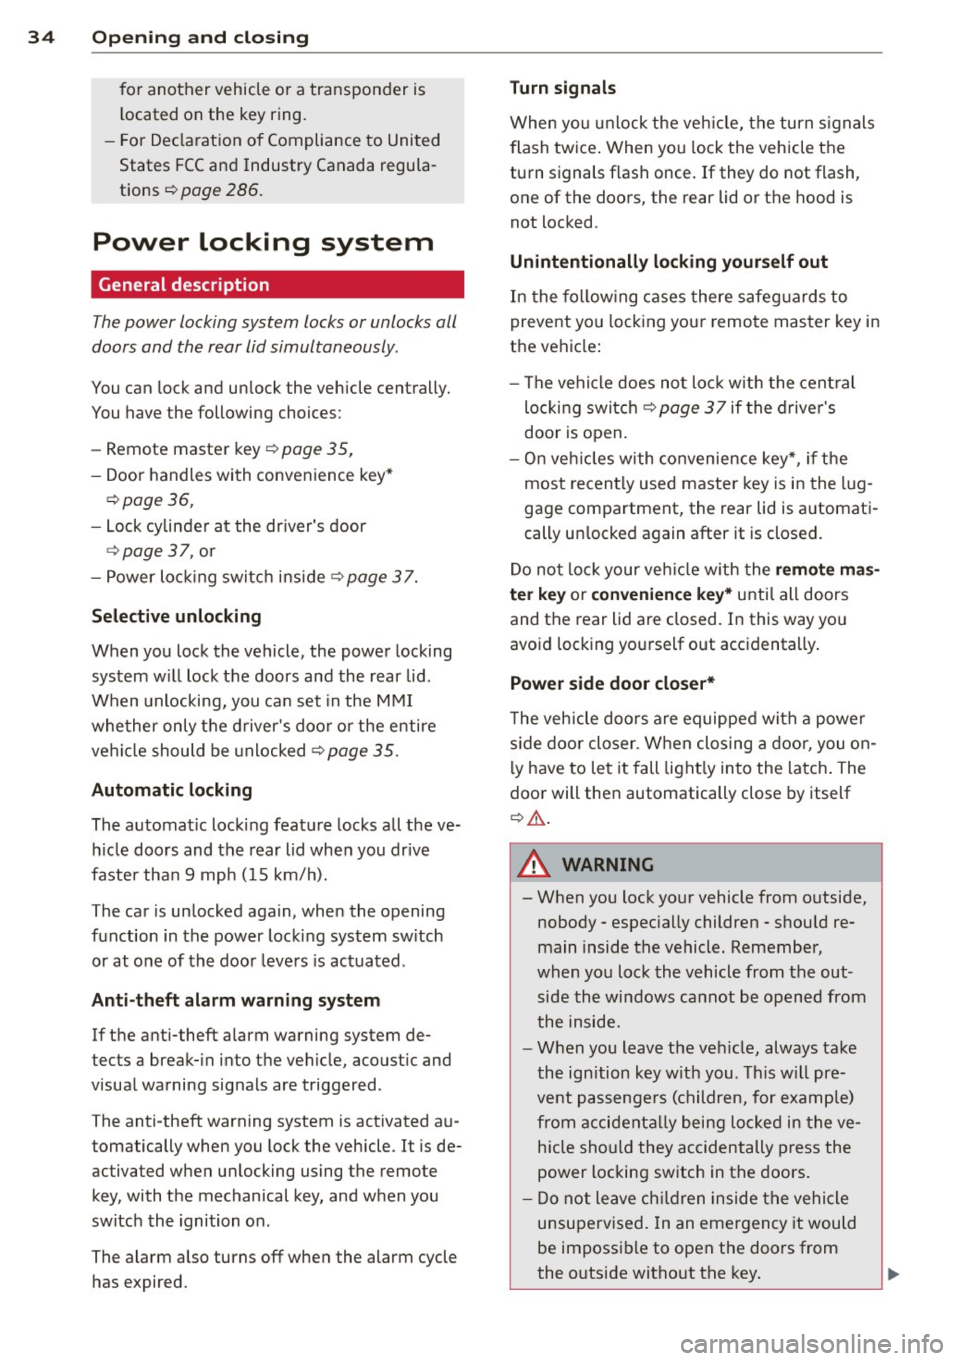
F ig . 19 Remote master key: Removing the battery
holde r
Check light in the master key
The check light @ in the master key provides
information about different cond itions .
• The check light comes on briefly once when
a button is pressed, and during an "inquiry"
by the conven ience key system .
• If the check light does not come on, the bat
tery is dead and has to be replaced. In addi
t ion, when the battery is dead the
I!! sym
bol appears in the instrument cluster dis-
Opening and closing 33
play as well as the message: Please change
key battery .
Master key battery replacement
• Pull the mechanical key out of the master
key
c::> page 33.
• Press the release button @ on the battery
holder and at the same time pull the battery
holder out of the master key in the direction
of the arrow.
• Install the new battery CR 2032 with the
"+" sign facing down.
• Push the battery holder carefully into the
master key .
• Install the mechanical key.
@ For the sake of the environment
Dispose of dead batteries properly so as
not to poll ute the environment.
(D Tips
The replacement battery must be the
same specification as the original.
, Electronic immobilizer
The immobilizer helps to prevent unauthor
ized use of your vehicle.
A comp uter chip inside your key automatica lly
deactivates the electronic immobilizer when
the key is inside the vehicle. When you remove
the key from the vehicle, the electronic immo
bilizer is automatically activated once again .
A WARNING
-
Always take the key with you when you
leave the vehicle. The key can disarm the
e lectronic engine immobilizer and permit
an unauthorized person to start the engine
and enable operation of the vehicle sys
tems such as power window or power sun
roof leading to serious personal injury.
(D Tips
- Th e vehicle cannot be started if an unau
thorized key is used. The vehicle may not
start if another radio device such as a key .,.
Page 36 of 304
34 Opening and closing
for another vehicle or a transponder is
located on the key ring.
- For Declaration of Compliance to United
States FCC and Industry Canada regula
tions ¢
page 286.
Power locking system
General description
The power locking system locks or unlocks all
doors and the rear lid simultaneously.
You can lock and unlock the vehicle centrally.
You have the following choices:
- Remote master key¢
page 35,
-Door handles with convenience key*
¢page 36,
-Lock cylinder at the driver's door
<=?page 37, or
- Power locking switch inside
<=? page 37.
Selective unlocking
When you lock the vehicle, the power locking
system w ill lock the doors and the rear lid .
When unlocking, you can set in the MMI
whether only the driver's door or the entire
vehicle should be unlocked <=?
page 35.
Automatic locking
The automat ic locking feature locks all the ve
h icle doors and the rear lid when you drive
faster tha n 9 mph (15 km/h).
The car is unlocked again, when the opening
function in the power locking system sw itch
or at one of the door levers is actuated .
Anti-theft alarm warning system
If the anti-theft alarm warning system de
tects a break- in into the vehicle, acoust ic and
visual warning signals are triggered .
The anti-theft warning system is activated au
tomatically when you lock the vehicle . It is de
activated when u nlocking using the remote
key, with the mechanical key, and when you
switch the ignition on.
The alarm also turns off when the alarm cycle has expired.
Turn signals
When you unlock the vehicle, the turn s ignals
flash twice. When you lock the vehicle the
turn signals flash once. If they do not flash ,
one of the doors, the rear lid or the hood is
not locked .
Unintentionally locking yourself out
In the follow ing cases there safeguards to
prevent you locking your remote master key in
the vehicle:
- The vehicle does not lock w ith the central
locking switch <=?
page 37 if the driver's
door is open.
- On veh icles with convenience key*, if the
most recently used master key is in the lug
gage compartment, the rear lid is automati
cally un locked again after it is closed.
Do not lock your veh icle w ith the
remote mas
ter key or convenience key*
unti l all doors
and the rear lid are closed. In this way you
avoid locking yourself out accidentally .
Power side door closer*
The veh icle doors are equipped with a power
s ide door closer . When closing a door, you on
ly have to let it fall light ly into the latch . The
door will then automatically close by itself
¢& .
A WARNING
-- When you lock your vehicle from outside,
nobody - especially children -should re
main inside the vehicle. Remember,
when you lock the vehicle from the out
side the windows cannot be opened from
the inside.
- When you leave the vehicle, always take
the ignition key with you . This will pre
vent passengers (children, for example)
from accidentally being locked in the ve
hicle should they accidentally press the
power locking switch in the doors.
- Do not leave children inside the vehicle
unsupervised. In an emergency it would
be impossible to open the doors from
the o utside without the key.
Page 37 of 304
-Applies to vehicles with power side door
closer*:
- When closing a door, make sure noth ing can interfere w ith the door. This
could cause ser ious personal inj ury.
- You can stop the door from clos ing at
any time by pulling on the inside or
outside doo r handle.
(D Tips
- In the event of a crash with airbag de
ployment a ll locked doors will be auto
ma tically unlocked to g ive access to the
vehicle occupants from the outside .
- If the power locking system should ma l
f unct ion, you can lo ck the dr iver's door
us ing the mechanical key¢
page 38.
-If the power lo cking system should fail,
you can still open the fuel tank flap in a n
emergency ¢
page 220.
- You are we ll advised not to keep valua
bles inside an unattended vehicle, visib le
or not. Even a properly locked vehicle
cannot provide the security of a safe.
- If the L ED in the upper edge o f the driv
er's door panel comes on for abo ut 30
seconds after the vehicle is locked, there
is a ma lfunction in the power locking or
the anti-theft warning system. Have the
malfunction corrected by an author ized
Audi dealersh ip or qua lified repair fac il i
ty.
Setting power locking
The driver can determine the functions for
power locking in the MMI.
• Select : I CARI function button > (C ar)* sy s
tems
control button > Vehicle se tti ngs >
Central lock ing .
Unlock door s -You can decide if All doors or
only the
Driv er should unlock . The rear lid al
so unlocks when
All is selected . If you select
Driv er in a vehicle with a convenience key*,
only the door whose handle you pull will un l ock.
Op enin g an d clos ing 35
If you select Driver , all the doors and rear lid
will unlock if you press the
ffi button on the re
mote control master key twice.
Loc k exterior trunk handl e -If yo u se lect On ,
the rear lid handle is locked . In this case the
rear lid can be opened with the b utton
cs on
the master key or with the
cs button in the
driver's door. In veh icles with a convenience
key*, you can still open the rear lid using the
handle if an authorized master key is near the
proxim ity sensor.
Fold m irrors * -If you select On, the exterior
rearview mirrors fold in automatically when
you press the
ff! button on the remote control
master key or touch the sensor* in the ha ndle.
To ne when lock ing -When you select On, a
confirmation tone sounds when you lock the
vehicle .
locking and unlocking the vehicle with
the remote control
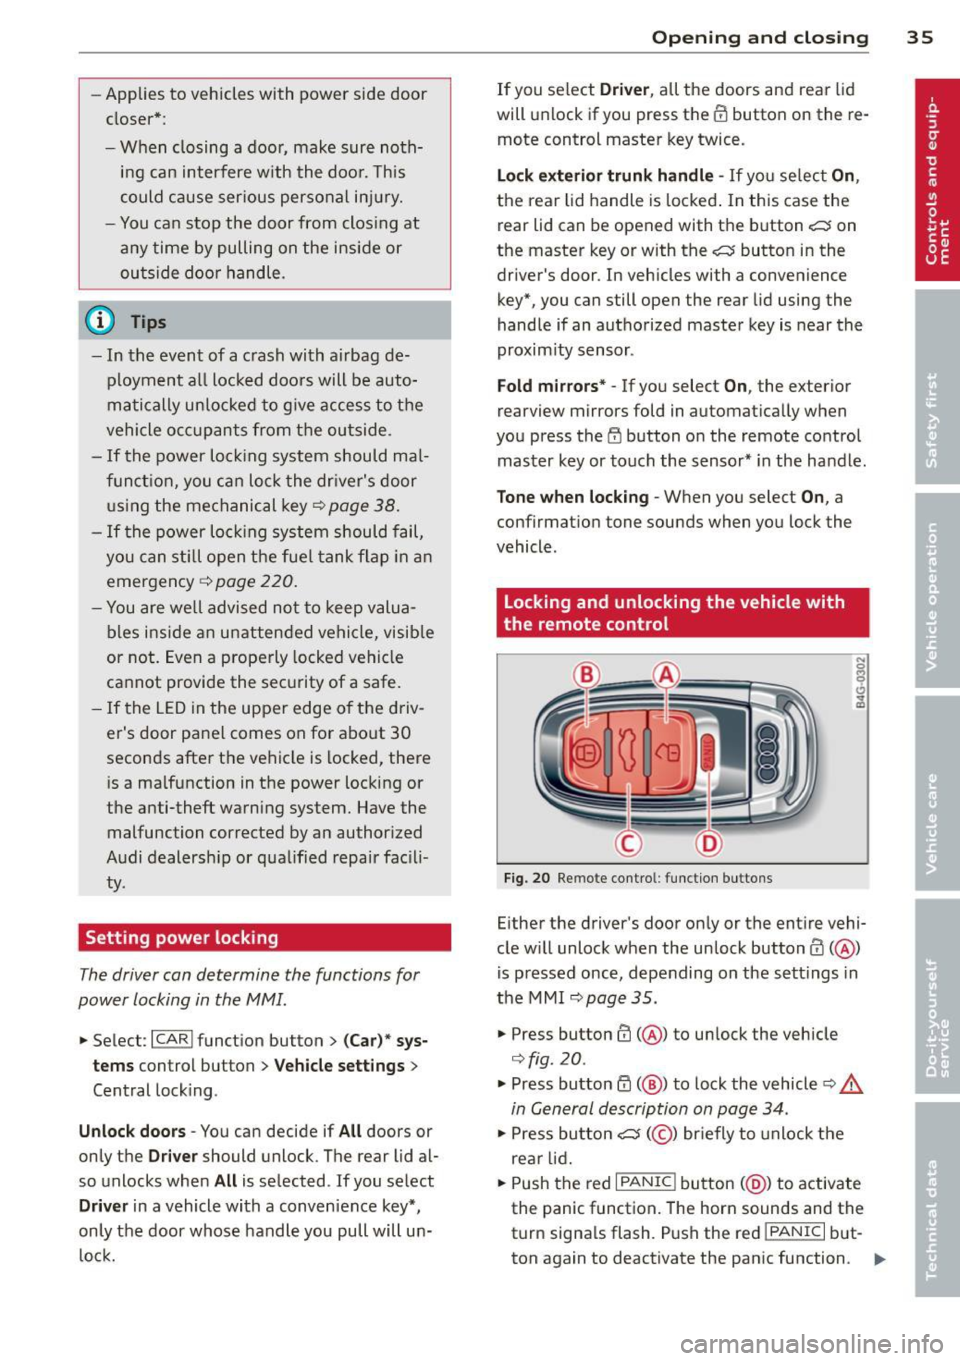
Fig. 20 Remote cont rol : function buttons
Either the driver's door only or the entire vehi
cle w ill unlock when the unlock button
ffi ( @ )
is pressed once, depending on the sett ings in
the MMI
¢page 35.
• Press button ffi (@ ) to unlock the vehicle
¢fig . 20 .
• Press button ff! (@ ) to lock the vehicle ¢ &.
in General description on page 34.
• Press button cs( @) briefly to unlock the
rear lid.
• Push the red
I PANIC ! button (@ ) to activate
the panic function. The horn sounds and the
turn signa ls flash . P ush the red
!PANIC I but
ton again to deactivate the panic function. ..,.
Page 38 of 304
36 Openin g and clo sing
If the vehicle is unlocked and no door, the rear
lid or the hood is opened within 60 seconds ,
the veh icle locks itse lf aga in automatically.
This feature prevents the veh icle from be ing
accidentally left unlocked over a long period
of time.
It depends on the sett ings in the MMI wheth
er the entire veh icle is unlocked or on ly cer
tain doors
<=) page 35.
A WARNING
Read and follow all WARNINGS Q .&. in
General description on page
34.
(D Tips
- In order to make sure the locking func
tion is working, you should always keep
your eye on the vehicle to make sure it is
proper ly locked.
-
- Do not use the remote control if you are
i nside the car, otherwise you may unin
tentionally lock the vehicle, and then you
would set off the anti-theft ala rm when
you try to start the engine or open a door. In c ase this happens anyhow, push
the un lock button@ .
- The vehicle can on ly be locked when the
se lector lever is in the P posit ion .
- Use the panic funct ion only if you are in
an emergen cy situa tion.
Locking and unlocking with convenience
key
App lies to vehicles: with co nve nience key
The doors and the rear lid can be unlocked
and locked without operating the master key.
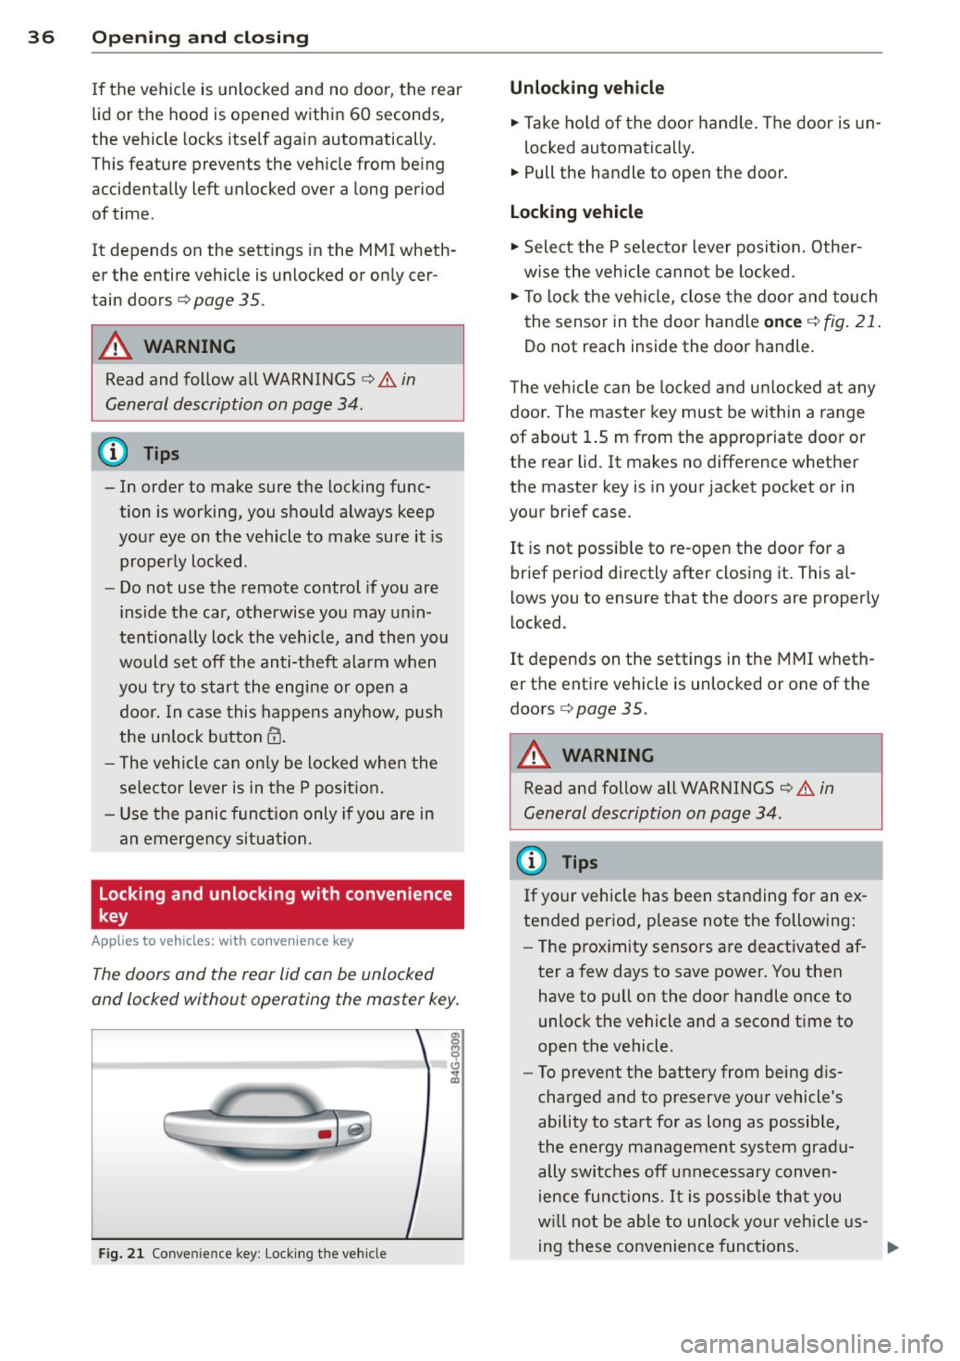
Fig. 2 1 Conve nience key : Lock ing the vehicle
Unlocking vehicle
.,. Take ho ld of the door handle . T he door is un-
loc ked automatically .
.,. Pull the handle to open the door .
Locking vehicle
.,. Select the P se lecto r lever posit ion. Othe r
w ise the veh icle cannot be locked.
.,. To lock the ve hicle, close the door and touch
the sensor in the door handle
on ce Q fig . 21 .
Do not reach inside the door handle.
T he veh icle can be locked a nd u nlocked at any
doo r. The master key must be within a range
of about 1.5 m from the appropriate door or
the rear lid. It makes no difference w hether
the master key is in your jacket pocket or in
your brief case.
It is not possib le to re -open the door for a
brief period directly after closing it. This a l
l ows you to ensure that the doors are proper ly
locked.
It depends on the settings in t he MMI wheth
er the entire vehicle is unlocked or one of the
doors
<=) page 35.
A WARNING
Read and follow all WARNINGS ¢.&. in
General description on page
34.
(D Tips
If your vehicle has been standing for an ex
tended per iod, please note the following:
- The p roximity sensors are deactivated af-
ter a few days to save power. You then have to pull on the door handle once to
unlock the vehicle and a second t ime to
open the vehicle.
- To prevent the battery from being d is
charged and to preserve your vehicle's
ability to start for as long as possib le,
the energy management system gradu
ally switc hes off unnecessary conven
ience func tion s. It is possib le tha t you
w ill not be able to unloc k your vehicle us
ing these convenience func tions.
Page 39 of 304
-For Declaration of Compliance to United
States FCC and Industry Canada regula
tions ¢
page 286.
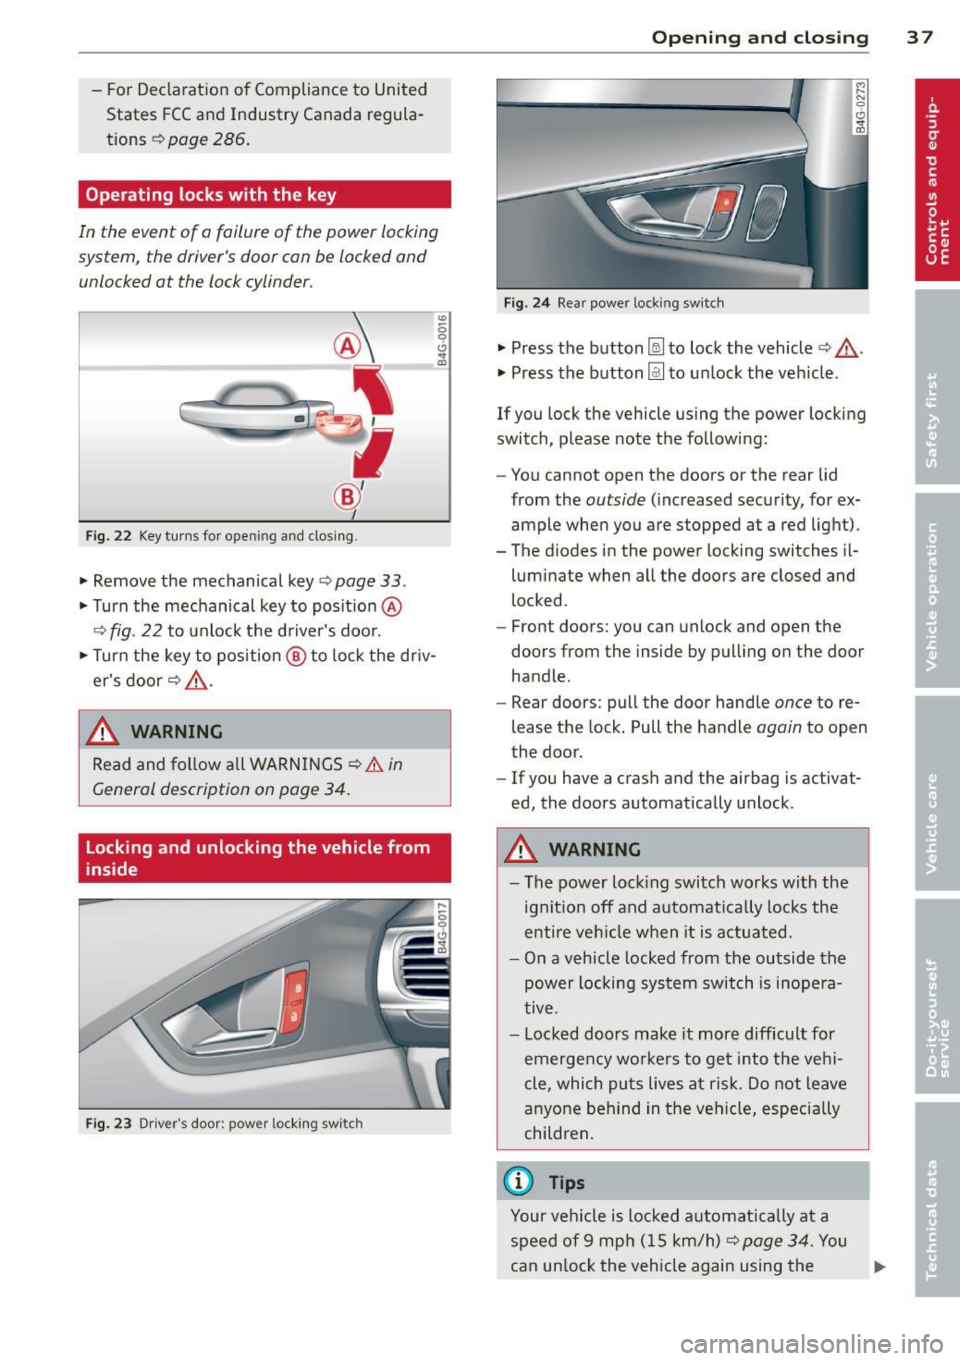
Operating locks with the key
In the event of a failure of the power locking
system, the driver's door can be locked and
unlocked at the lock cylinder.
Fig . 22 Key tur ns for open ing and dosing .
• Remove the mechanical key <::> page 33 .
• Turn the mechanical key to posit ion @
9fig . 22 to unlock the d river's door.
• Turn the key to position ® to lock the dr iv
er's door
r:::> .&_ .
A WARNING
"' :; 0 0 .., a,
-
Read and follow a ll WARNINGS ¢.& in
General description on poge 34.
Locking and unlocking the vehicle from
inside
Fig . 23 Driver' s door: power lockin g swi tc h
Op enin g an d clos ing 3 7
Fig . 24 Rea r powe r lock ing switch
• Press the button~ to lock the vehicle Q .&_ .
• Press the button Im to un lock the veh icle .
If you lock the vehicle using the power locking
switch, please note the following:
- You cannot open the doors or the rear lid
from the
outside (increased security, for ex
ample when you are stopped at a red light).
- The diodes in the power locking switches il- luminate when all the doors are closed and
locked .
- Front doors: you can unlock and open the
doors from the inside by pulling on the door
handle.
- Rear doors: pull the door handle
once to re
lease the lock. Pull the handle
again to open
the door .
- If you have a crash and the airbag is activat
ed, the doors automatically unlock .
A WARNING
-The power locking switch wo rks with the
ignition off and automat ica lly locks the
entire veh icle when it is actuated.
- On a vehicle locked from the outside the
power locking sys tem switch is inope ra
tive .
- Locked doors make it more difficult for
emergency wo rke rs to get into the veh i
cle, which puts lives at risk. Do not leave
anyone behind in the vehicle, especially
children .
(D Tips
Your vehicle is locked a utomat ica lly at a
speed of 9 mph ( 15 km/h)
r:::> page 34. You
can un lock the vehicle again using the .,..
Page 40 of 304
38 Openin g and clo sing
opening function in the power locking sys
tem switch.
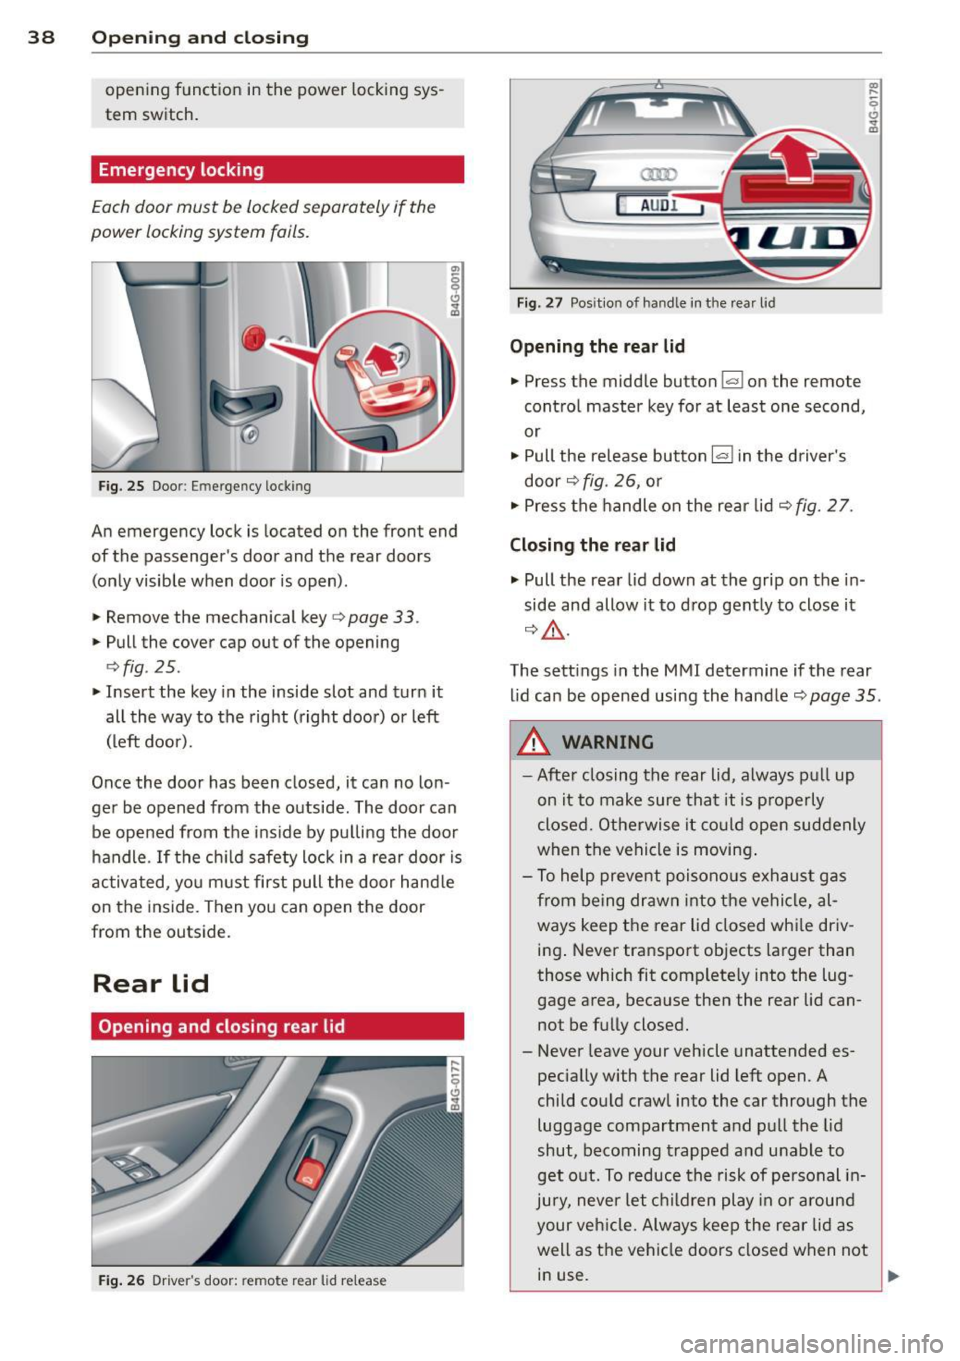
Emergency locking
Each door must be locked separately if the
power locking system fails.
Fig. 25 Doo r: Em erge ncy lock ing
An emergency lock is located on the front end
of the passenger's doo r and the rear doors
(only visible when door is open).
.. Remove the mechanical key ¢
page 33.
.. Pull the cover cap out of the opening
¢ fig . 25 .
.. Insert the key in the inside slot and turn it
all the way to the right (right doo r) or left
(left door).
Once the doo r has been closed, it can no lon
ger be opened from the outside. The door can be opened from the ins ide by pu lling the door
handle . If the ch ild safety lock in a rea r door is
activated, yo u m ust first pull the door hand le
on the inside. Then you can open the door
from the outside.
Rear lid
Opening and closing rear lid
F ig . 26 Drive r's door: re m ote rear lid release
a:ro
AU DI
Fig. 27 Pos it io n of ha ndle i n th e rear l id
Opening the re a r lid
.. Press the middle button~ on the remote
cont ro l master key for at least one second,
or
.. Pull the release button
l«=>I in the driver's
door ¢
fig. 26, o r
.. Press the handle on the rear lid ¢
fig. 2 7.
Closing the rear lid
.. Pull the rear lid down at the grip on the in
side and allow it to d rop gent ly to close it
¢ &, .
The sett ings in the M MI determine if the rear
l id can be opened using the handler=)
page 35 .
&, WARNING
-Afte r closing the rear lid, a lways p ull up
on it to make sure tha t it is p rope rly
closed. Otherwise it co uld ope n suddenly
when the vehicle is moving .
- T o help prevent p oisono us e xhaust gas
from being dr awn i nto t he ve hicl e, al
ways keep the rear lid closed whi le driv
ing . Never transpo rt objects larger than
those which fit complete ly into the lug
gage area, beca use then the rear lid can
not be fully closed.
- Never leave your vehicle unattended es
pecially with the rear lid left open. A
child cou ld craw l into the car through the
luggage compartment and pul l the lid
shut, becoming trapped and unable to
get o ut. To reduce the risk of pe rsonal i n
jury, neve r let ch ildren play in or a round
your ve hicle. Alw ays kee p the rear lid as
well as the vehi cle doors closed when not
in use.
L,__ _______________ _J ~