warning light AUDI S6 2016 Owner's Manual
[x] Cancel search | Manufacturer: AUDI, Model Year: 2016, Model line: S6, Model: AUDI S6 2016Pages: 294, PDF Size: 73.88 MB
Page 33 of 294
.... N
0 CJ '
.. Press the release button@ c::> fig. 18.
.. Pull the mechanical key @ out of the master
key.
Using the mechanical key , you can:
- lock and unlock the storage compartment on
the passenger's s ide
c::> page 61.
- lock and unlock the vehicle manually
Qpage 35.
-lock the front and rear passenger doors me
chanically
c::> page 36.
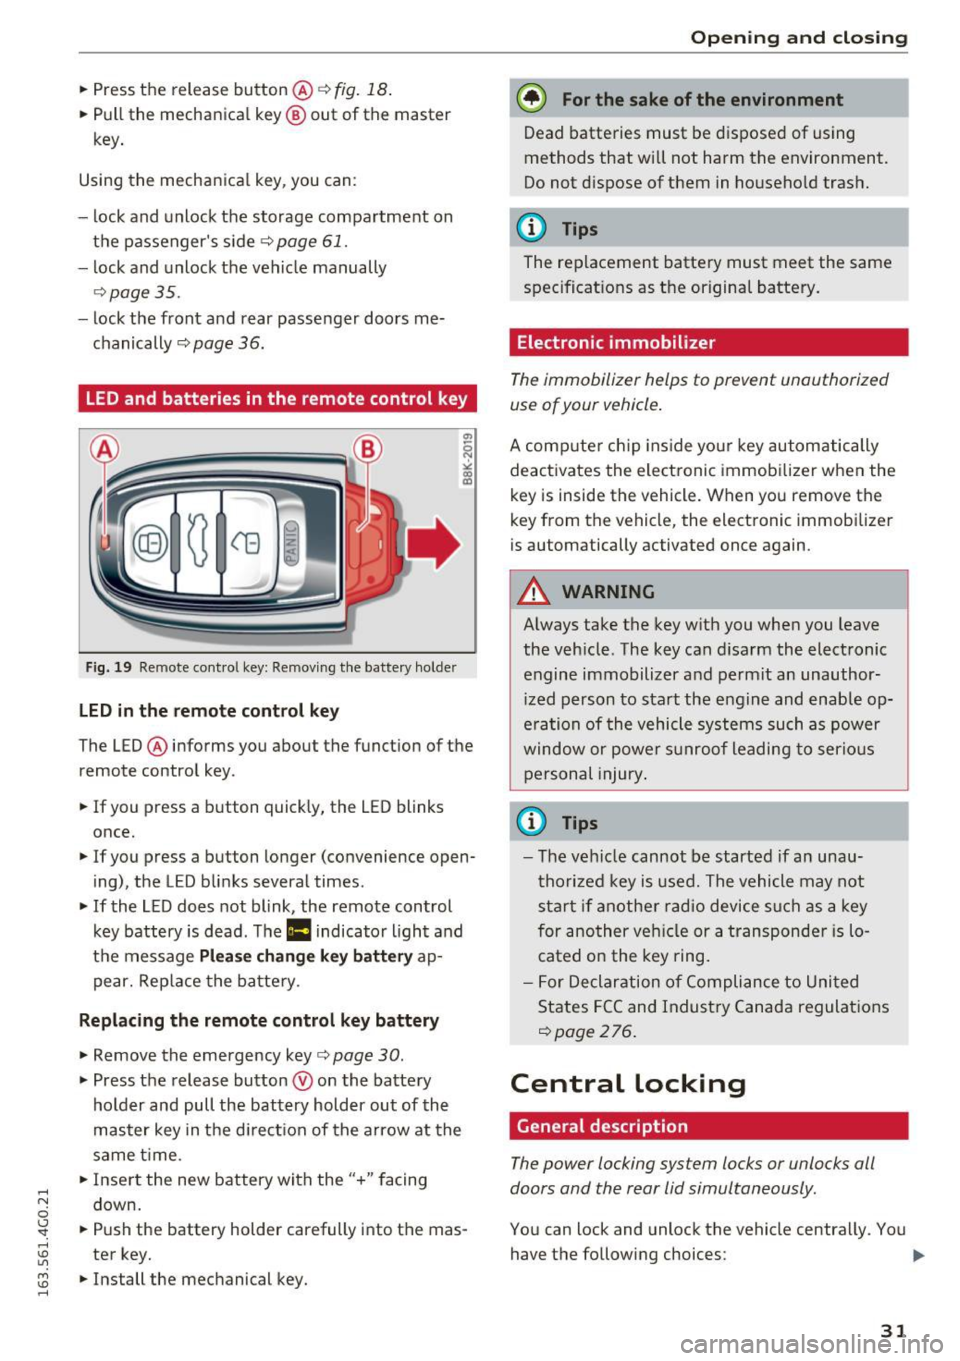
LED and batteries in the remote control key
Fig. 19 Re mote cont ro l key: Removing the battery holde r
LED in the remote control key
The LED ® informs you about the function of the
remote control key .
.. If you press a button quickly, the LED blinks
once.
.. If you press a button longer (convenience open
ing) , the LED blinks several times .
.. If the LED does not blink, the remote control
key battery is dead . The
Ill indicator light and
the message
Plea se change key battery ap
pear. Replace the battery .
Replacing the remote control key battery
.. Remove the emergency key c::> page 30 .
.,. Press the release button ® on the battery
holder and pull the battery holder out of the
master key in the direction of the arrow at the
same time.
.. Insert the new battery with the
"+ " facing
down.
.. Push the battery holder carefully into the mas
ter key.
.. Install the mechanical key.
Open ing and closing
@) For the sake of the environment
Dead batteries must be disposed of using
methods that will not harm the environment.
Do not d ispose of them in household trash.
@ Tips
The replacement battery must meet the same
specifications as the origina l battery.
Electronic immobilizer
The immobilizer helps to prevent unauthorized
use of your vehicle .
A computer chip ins ide your key automatically
deactivates the electronic immobilizer when the
key is inside the vehicle. When you remove the
key from the vehicle, the electronic immobilizer
is automatically activated once again.
A WARNING
-Always take the key with you when you leave
the vehicle. The key can disarm the electronic
engine immobilizer and permit an unauthor
iz ed person to start the engine and enable op
e rat ion of the vehicle systems such as power
window or power s unroof leading to serious
personal injury .
@ Tips
-The vehicle cannot be started if an unau
thorized key is used. The vehicle may not
start if another radio device such as a key
for another vehicle or a transponder is lo
cated on the key ring.
- For Declaration of Compliance to United
States FCC and Industry Canada regulations
Qpage 276 .
Central Locking
General description
The power locking system locks or unlocks all
doors and the rear lid simultaneously.
You can lock and unlock the vehicle centrally. You have the following choices:
111>
31
Page 34 of 294
Opening and closing
-Remote master key¢ page 33,
-Door handles with convenience key*
¢page 34,
- Lock cylinder at the driver's door¢ page 35,
or
- Power locking switch inside¢
page 35.
Selective unlocking
When you lock the vehicle, the power locking sys
tem will lock the doors and the rear lid . When
unlocking, you can set in the MMI whether only
the driver's door or the entire vehicle should be unlocked
¢ page 33.
Automatic locking
The automatic locking feature locks all the vehi
cle doors and the rear lid when you drive faster
than 9 mph (15 km/h) .
The car is unlocked again, when the opening
function in the power locking system switch or at
one of the door levers is actuated.
Anti-theft alarm warning system
If the anti-theft alarm warning system detects a break-in into the vehicle, acoustic and visual
warning signals are triggered.
The anti-theft warning system is activated auto matically when you lock the vehicle. It is deacti
vated when unlocking using the remote key, with
the mechanical key, and when you switch the ig nition on.
The alarm also turns off when the alarm cycle has
expired.
Turn signals
When you unlock the vehicle , the turn signals
flash twice. When you lock the vehicle the turn
signals flash once. If they do not flash, one of the
doors, the rear lid or the hood is not locked.
Unintentionally locking yourself out
In the following cases there safeguards to pre
vent you locking your remote master key in the
vehicle:
- The vehicle does not lock with the central lock
ing switch ¢
page 35 if the driver's door is
open.
32
- On vehicles with convenience key*, if the most
recently used master key is in the luggage com
partment, the rear lid is automatically unlocked
again after it is closed .
Do not lock your vehicle with the
remote master
key or convenience key*
until all doors and the
rear lid are closed. In this way you avoid locking
yourself out accidentally.
Power side door closer*
The vehicle doors are equipped with a power side door closer. When closing a door, you only have
to let it fall lightly into the latch. The door will
then automatically close by itself¢&..
A WARNING
-
-When you lock your vehicle from outside,
nobody - especially children - should remain
inside the vehicle . Remember , when you
lock the vehicle from the outside the win
dows cannot be opened from the inside.
- When you leave the vehicle, always take the ignition key with you. This will prevent pas
sengers (children, for example) from acci
dentally being locked in the vehicle should
they accidentally press the power locking
switch in the doors.
- Do not leave children inside the vehicle un
supervised. In an emergency it would be im
possible to open the doors from the outside
without the key.
- Applies to vehicles with power side door
closer*:
- When closing a door, make sure nothing
can interfere with the door. This could
cause serious personal injury .
- You can stop the door from closing at any
time by pulling on the inside or outside
door handle.
(D Tips
- In the event of a crash with airbag deploy
ment all locked doors will be automatically
unlocked to give access to the vehicle occu
pants from the outside.
Page 37 of 294
.... N
0 CJ '
Operating locks with the key
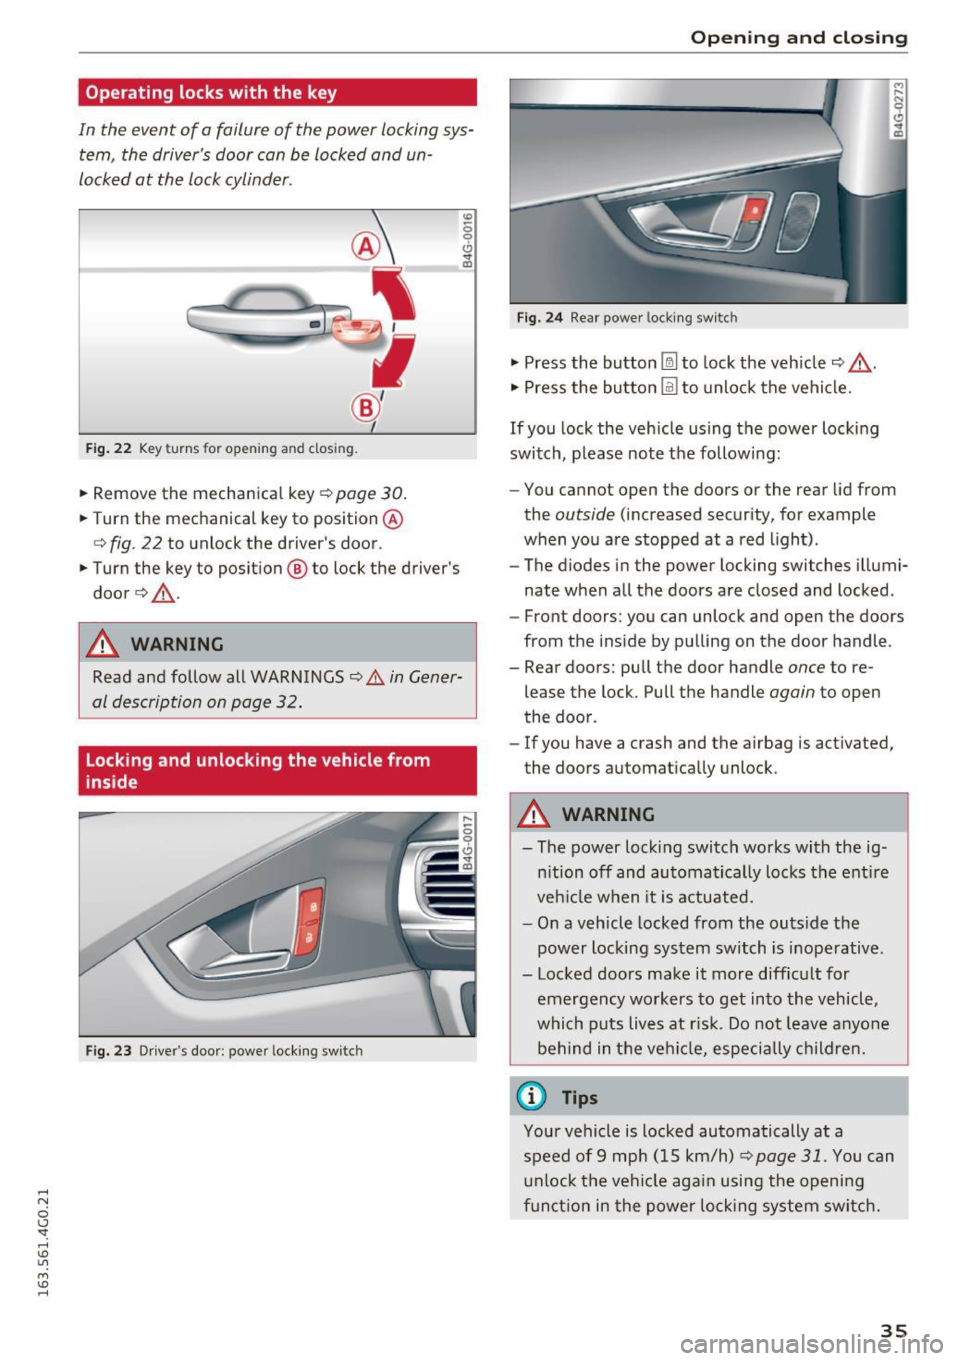
In the event of a failure of the power locking system, the driver's door can be locked and un
locked at the lock cylinder.
• p.
Fig . 22 Key turns fo r open ing a nd clos ing.
• Remove the mechanica l key c::> page 30.
• Turn the mechanical key to position @
<=>fig . 22 to unlock the driver's door .
• Turn the key to position ® to lock the driver's
door
c::> & -
A WARNING
co
0 9 (!)
" ID
Read and follow all WARNINGS c::> .&. in Gener
al description on page 32.
Locking and unlocking the vehicle from
inside
Fig. 23 Driver's doo r: powe r locking sw itc h
Open ing and closing
Fig. 24 Rear powe r lock ing switc h
• Press the button @l to lock the vehicle c::> ,&.
• Press the button @I to unlock the vehicle.
If you lock the veh icle using the power locking
switch, p lease note the follow ing:
- You cannot open the doors or the rear lid from
the
outside (increased security, for example
when you are stopped at a red light).
- The diodes in the power locking switches illumi
nate when all the doors are closed and locked .
- Front doors: you can unlock and open the doors
from the ins ide by pulling on the door handle.
- Rear doors: pull the door handle
once to re
lease the lock. Pull the handle
again to open
the door .
- If you have a crash and the airbag is activated,
the doors automatically unlock .
A WARNING
-- The power locking switch works with the ig-
nition off and automatically locks the entire
veh icle when it is actuated.
- On a vehicle locked from the outs ide the
power locking system switch is inoperative.
- Locked doors make it more difficult for emergency workers to get into the vehicle,
which puts lives at ris k . Do not leave anyone
behind in the vehi cle, especially children.
(0 Tips
Your vehicle is locked automatically at a
speed of 9 mph (15 km/h)
~ page 31. You can
unlock the vehicle aga in usi ng the opening
function in the power locking system switch.
35
Page 44 of 294
Opening and clo sin g
~ To close the sunroof comp letely, press the
switch forward briefly to the second level
c::> ,&. .
~ To select an intermediate pos ition, press/pull
the switch forward/back to the first level until
the desired position is reached .
The sun shade can be opened and closed by hand
when the roof is closed. The sun shade opens au
tomatically when the roof is opened.
You can still operate the sliding/tilt ing sunroof
for about 10 minutes after the ignition is switch
ed off. The switch is deactivated once the driver's
or front passenger 's door is opened.
A WARNING
Pay careful attent ion when closing the slid
ing/t ilting sunroof -otherw ise ser ious injury
cou ld result! Always take the ign ition key with
you when leaving the vehicle .
@ Note
Always close your sliding/tilting sunroof when
leaving your veh icle. Sudden ra in can cause
damage to the interior equ ipment of your ve
hicle, particularly the electron ic equ ipment.
@ Tips
- For informat ion on convenience opening, re
fer tor:::.>
page 40.
-The sunroof will only open down to -20 °C
(-4 °F) .
Sunroof power emergency closing
-
If the sunroof detects an object in its path whe n
it is clos ing, it w ill open again automatically. In
this case, you can close the roof with the power
emergency closing function .
~ Within five seconds afte r the sunroof opens au
tomat ica lly, pull the switch unt il the roof
closes.
I f you let go of the sw itch early, the sunroof will
open aga in.
42
Garage door opener
(Homelink)
Description
App lies to vehicles : wit h garage door o pener (Horne Link)
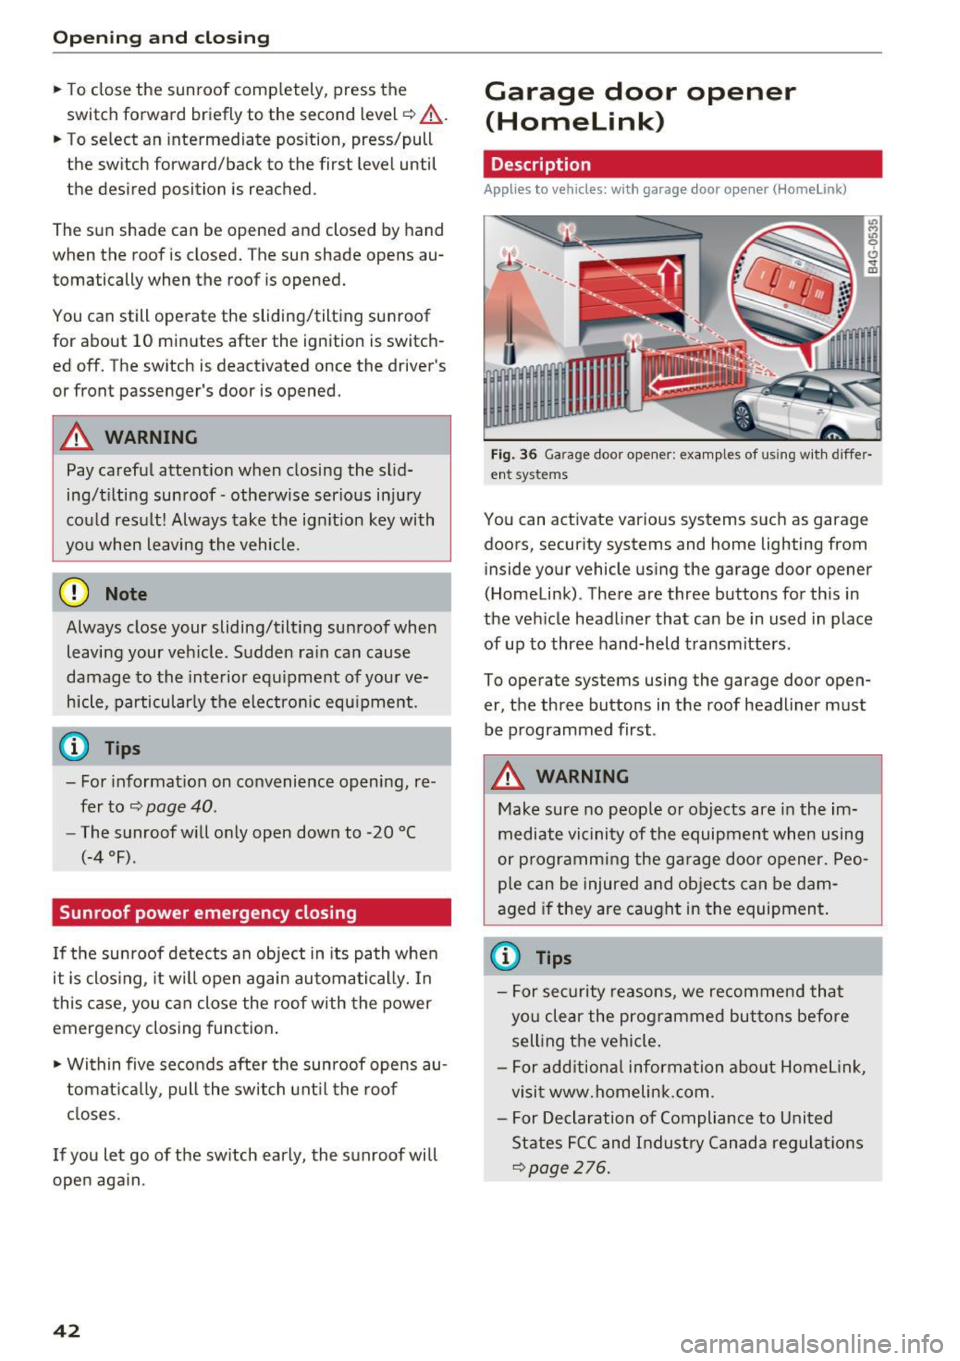
Fig. 36 Ga rage door opener: examples of using w ith differ·
ent syste ms
You can act ivate various systems such as garage
doors, security systems and home lighting from inside your vehicle using the garage door opener
(Homelink) . There are three buttons for th is in
the veh icle headliner that can be in used in place
of up to three hand-held transmitters .
To operate systems using the garage door open
er, the three buttons in the roof headliner must be programmed first .
A WARNING
Make sure no people or objects are in the im
mediate vicinity of the equipment when using
or p rogramming the garage door opener. Peo
ple can be injured and objects can be dam
aged if they are caught in the equipment .
(D Tips
-For security reasons, we recommend that
you clear the prog rammed buttons before
sell ing the vehicle .
- For add itiona l information about Homel ink,
visit www.homelink .com .
- For Declaration of Compliance to United
States FCC and Indust ry Canada regulat ions
<::.>page 276.
Page 46 of 294
Lights and Vision
Lights and Vision
Exterior lighting
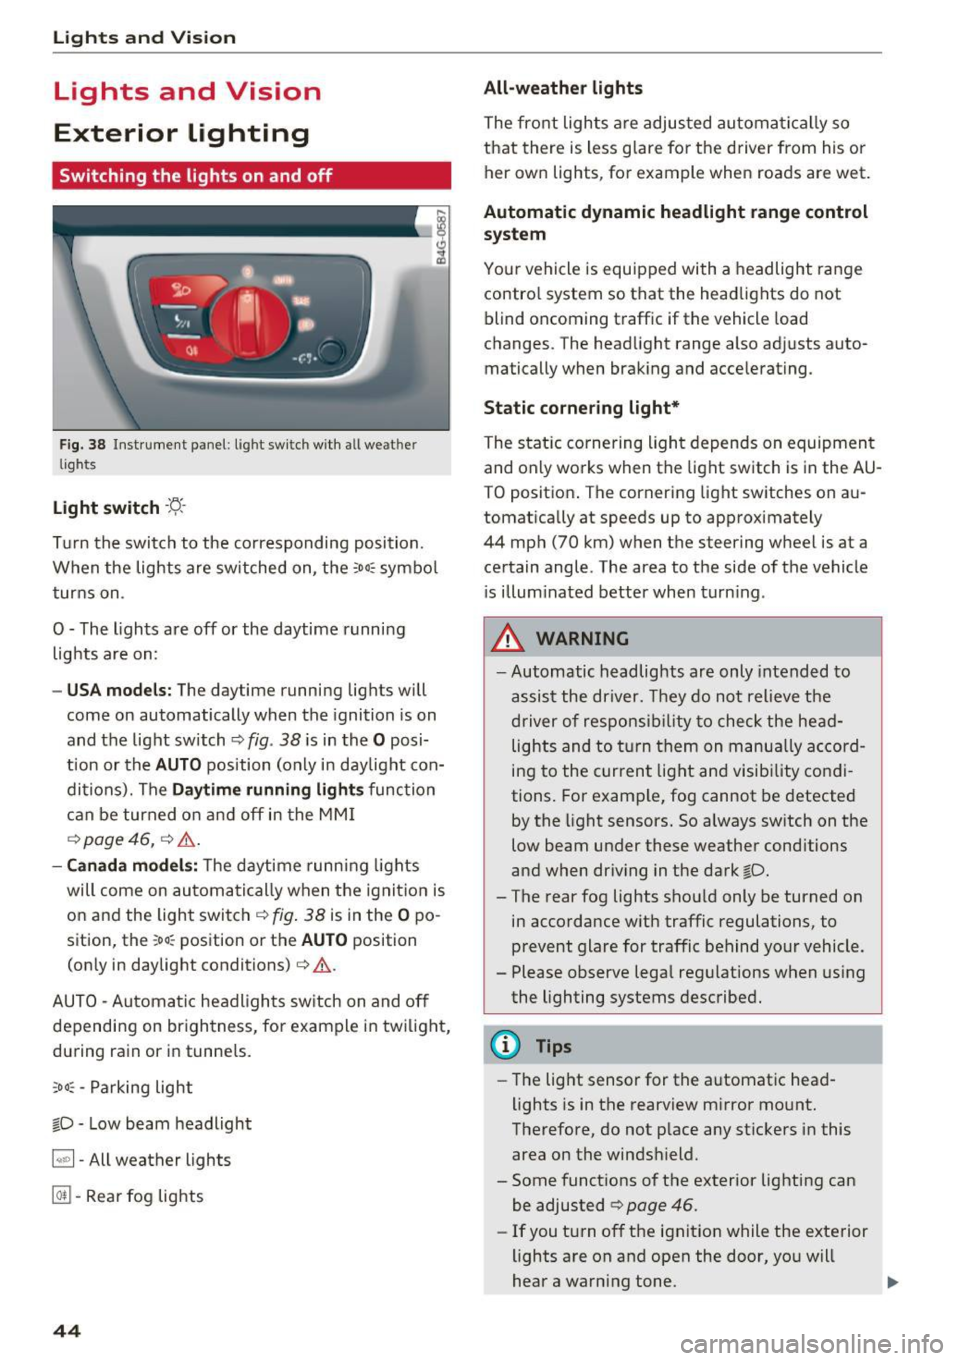
Switching the lights on and off
Fig. 38 Instrument panel : lig ht sw it c h with all we ath er
li gh ts
Light switch ·t:/.. ·
Tu rn the switch to the corresponding posi tion .
When the lights are sw itched on, the
:o o:c symbo l
turns on .
O - The lights are off or the daytime running lights are on :
-USA mode ls: The daytime running lig hts will
come on automatically when the ignition is on
and the light switch¢
fig. 38 is in the O posi
t ion or the
AUTO position (only in day light con
ditions). The
D aytime running light s function
can be turned o n and off in the MM I
¢ page 46, ¢ &.
- Canada mo del s: T he d aytime runn ing lights
will come on automati cally when the ignit io n is
on and the ligh t swi tch ¢
fig. 38 is in the O po
sition, the
; oo :c position or th e AUTO position
(on ly in daylight conditions) ¢
&.
AUTO - Automatic hea dlights sw itch on and off
depending on br igh tness, for example i n tw ilig ht,
du ring rain or in tunne ls.
;oo :c -Parking light
io -Low beam headlight
~ - All weather lights
@TI -Rear fog lights
44
All-weather lights
The front lights a re adjusted au toma tically so
that there is less g lare fo r the d river from his o r
her ow n lights , fo r example when roads are wet .
Automatic dynamic headlight range control
system
Your vehicle is equ ipped with a headlight range
contro l system so tha t the head lights do not
blind oncoming t raff ic if the vehicle load
changes. The head light range also adjusts auto
matically when brak ing and acce lerating .
Static cornering light*
The static co rnering light depends on equipmen t
and only wo rks when the light sw itch is in the AU
T O positio n. The corn ering light switches on au
tomatically at speeds up to app roximately
44 mph (70 km) when the steer ing wheel is at a
ce rtain angle. The area to the side of the vehicle
i s illum inated better when t urn ing .
,&. WARNING
-Automatic headlights are only intended to
assis t the driver. They do not relieve t he
driver of respons ibility to check the he ad
lights and to t urn them on manu ally a ccord
ing to the current light and visibility co ndi
tions. For exam ple, fog cannot be detected
by the light sensors. So always sw itch on the
low beam under these weather cond itions
and when dr iv ing in the dark
io.
-The rear fog lights shou ld only be turned on
in acco rdance with traffic regulations, to
p revent glare for traffic behind your vehicle .
- Please observe lega l reg ulations when using
the lighting systems described .
@ Tips
-Th e light sensor for the a utomat ic head
lights is in the rearview m irror mo unt.
Therefore, do not p lace any st ickers in this
area on the winds hield.
- Some funct ions of t he exterior lighting can
be adjusted ¢ page
46 .
-If you t urn of f the ignit ion while the e xte rior
lights are on a nd open the door, yo u will
hear a warning tone .
Page 47 of 294
.... N
0 CJ '
-In cool or damp weather, the inside of the
headlights, turn signals and tai l lights can
fog over due to the temperature difference
between the inside and outside. They will
clear short ly after switching them on. This
does not affect the service life of the light
i ng.
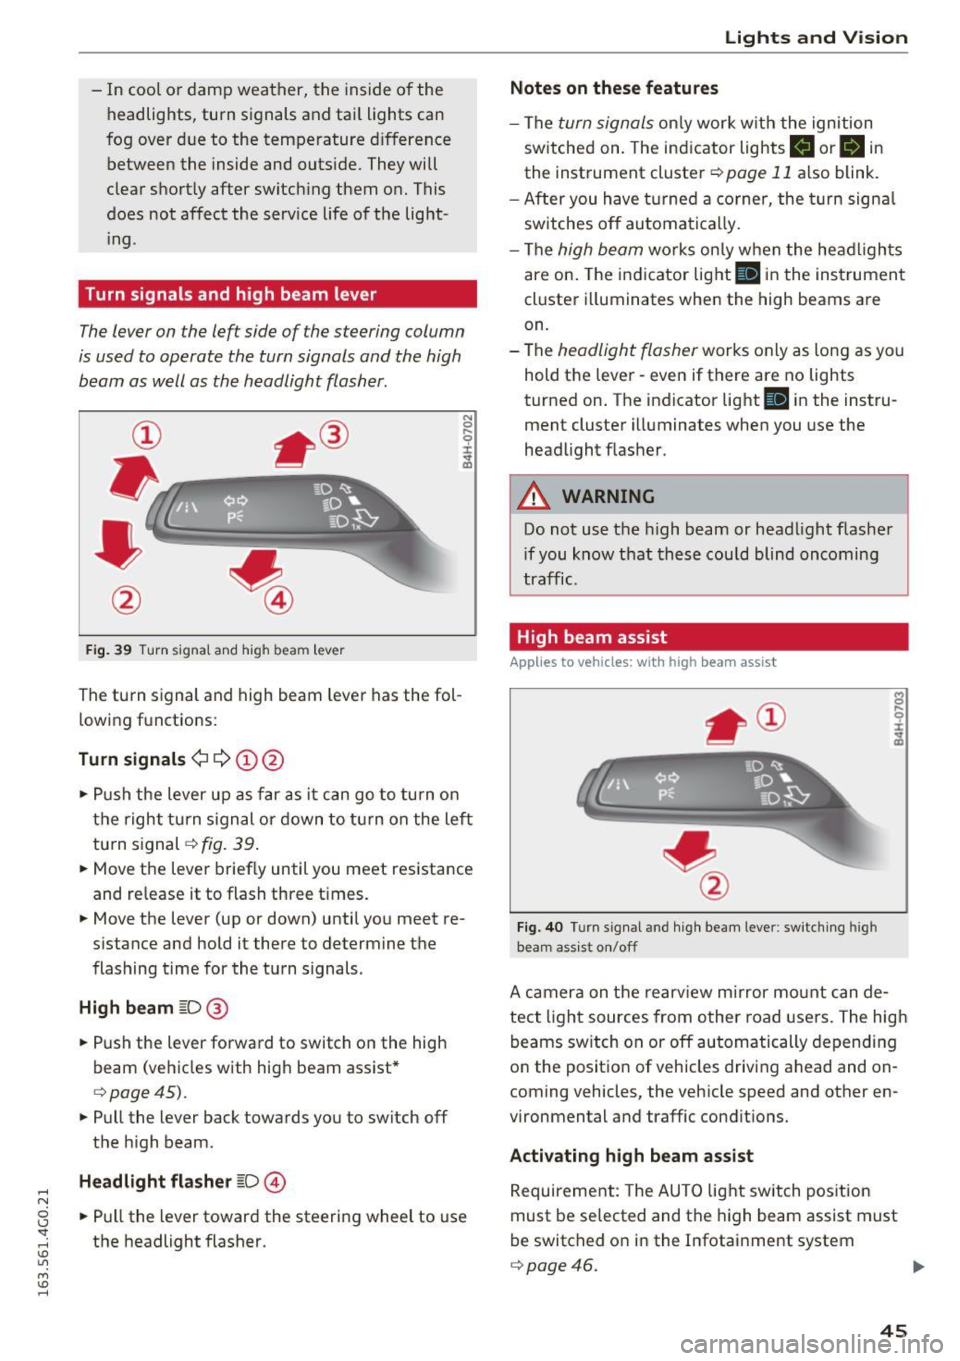
Turn signals and high beam lever
The lever on the left side of the steering column
is used to operate the turn signals and the high
beam as well as the headlight flasher.
F ig . 39 Turn signal and high beam lever
The turn s ignal and high beam lever has the fol
lowing fu nctions:
Turn signals¢¢ (!)@
N
0
..... 0
~ IJl
• Push the lever up as far as it can go to turn on
the right turn s ignal or down to turn on the left
turn signal¢
fig. 39 .
• Move the lever brief ly until you meet resistance
and re lease it to flash three times.
• Move the lever (up or down) until you meet re
s istan ce and hold it there to determine the
flashing time for the turn signals.
High beam ~D@
• Push the lever forward to switch on the high
beam (vehicles with high beam assist*
¢ page45).
• Pull the lever back towards you to switch off
the high beam .
Headlight flasher ~D@
• Pull the lever toward the steering wheel to use
the headlight flasher .
Lights and V ision
Notes on these features
-The turn signals only work w ith the ignition
sw itched on. The indicator lights
B or B in
the instrument cluster¢ page 11 also blink.
- After you have turned a corner , the turn signa l
switches off automatically.
- The
high beam works on ly when the headlights
are on. The indicator light
II in the instrument
cluster illuminates when the high beams are
on.
- The
headlight flasher works only as long as yo u
hold the lever -even if there are no lights
turned on. The indicator light
Iii in the instru
ment cluster illuminates when you use the
headlight flasher .
A WARNING
-Do not use the high beam or headlight flasher
i f you know that these could blind oncoming
traffic.
High beam assist
Applies to veh icles: w ith high beam assist
Fig. 40 Turn signal and high beam lever: switching high
beam assist on/off
A camera on the rearview mirror mount can de
tect light sources from other road users. The high
beams switch on or off automatically depending
on the posit ion of vehicles driving ahead and on
coming vehicles, the vehicle speed and other en
vironmental and traffic conditions.
Activating high beam assist
Requirement: The AUTO light switch position
must be selected and the high beam assist must
be switched o n in the Infotainment system
¢page 46.
45
Page 48 of 294
Lights and Vi sion
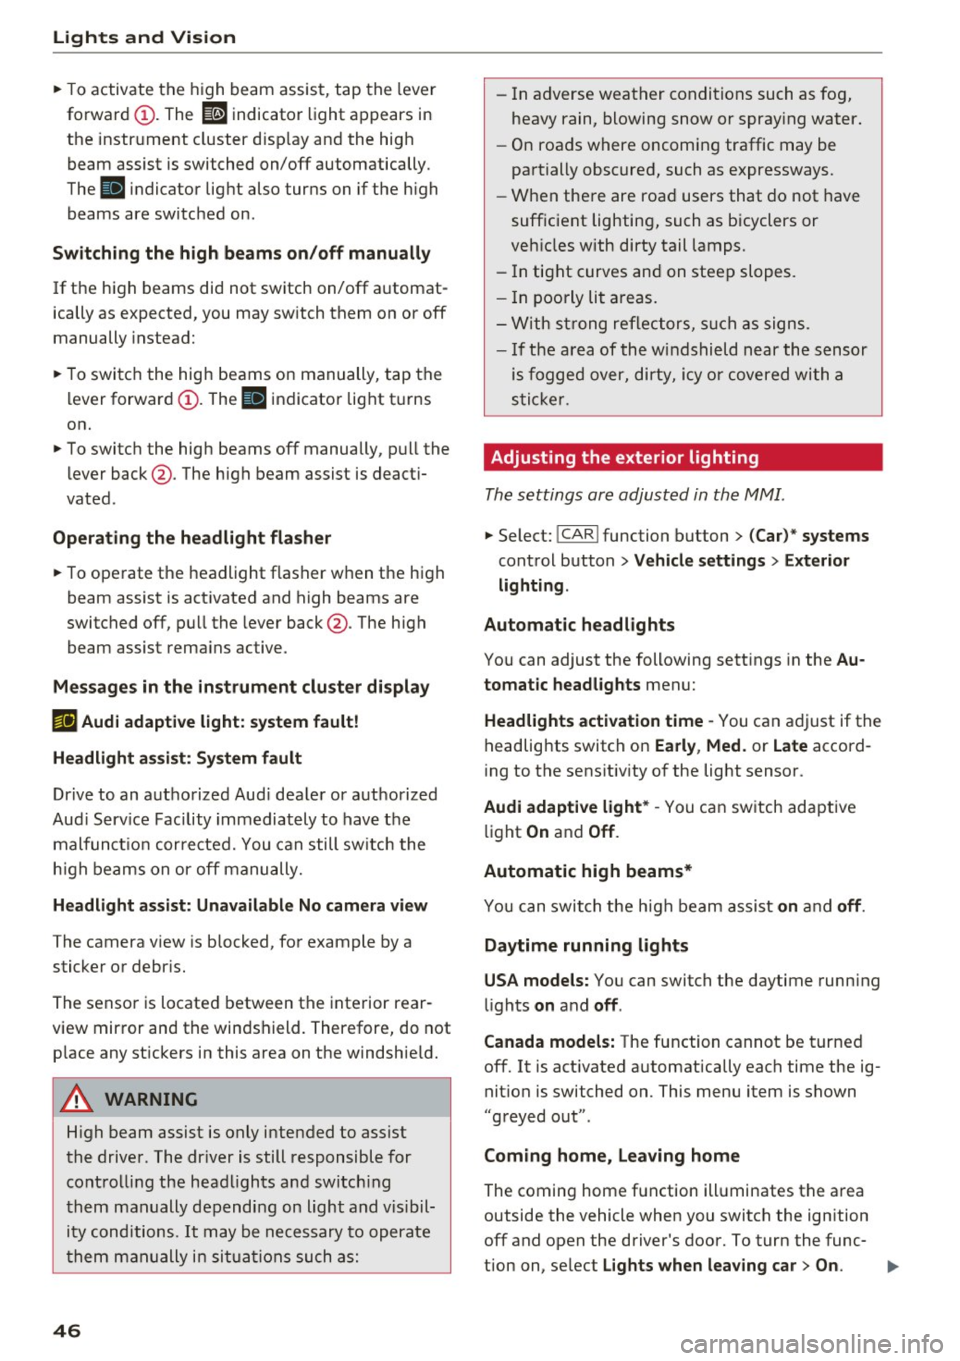
"'T o activ ate t he h igh beam assist, tap the lever
forward
(D . The ii indicator light appears in
the instr ument cluster d isp lay an d the high
beam assist is switched on/off automatically.
The
Bl indicator lig ht also turns on if the h igh
beams are switched on .
Switching the high beam s on /off manually
If the high beams did not sw itch on/off a utomat
ically as expected, you may sw itch them on or off
manually instead:
"'T o swi tc h the high beams on manually, tap the
l ever forward
(D . The Bl indicator lig ht t urns
on.
"' To switc h the high beams off manually, p ull the
lever back@. The h igh beam assist is deact i
vated .
Operating the headlight flasher
"'To ope rate the headlight flasher w hen the h igh
beam assist is act ivated and high beams are
switched off, p ull the leve r back @. The high
beam assist rema ins ac tive .
Me ssages in the instrument cluster display
ml Audi adaptive light: system fault!
Headlight a ssist: System fault
Dr ive to an a uthorized Aud i dea ler or a uth orized
Aud i Serv ice Fac ility immediately to have t he
malfunct io n co rrected. You can still switc h the
h igh beams on or off ma nually.
Headlight assist: Unavailable No camera view
The camera v iew is b locked, fo r example by a
sticke r or debr is.
The senso r is locate d between the interior rear
view m ir ror and the windshield. Therefore, do not
p lace any st ic kers in this area on the windshie ld.
A WARNING
-
H igh beam assist is only intended to assist
the drive r. The dr iver is still responsible for
cont rolli ng the headligh ts a nd switch ing
t hem ma nually de pendi ng on light and vis ibil
i t y conditions.
It ma y be ne cess ary to operate
t he m man ually i n situ at io ns such as:
46
- In adverse weat her condi tions such as fog,
heavy rain, blowing snow or spray ing water.
- On roads where oncoming traffic may be
pa rtially obscure d, such as expressways.
- When the re are roa d users that do not have
suff icient lighting, such as bicyclers or
veh icles with dirty tail lamps.
- In tig ht curves an d on stee p slopes.
- In poorly lit a re a s.
- W it h st ro ng refle cto rs, such a s signs .
-If th e ar ea of the wi ndshi eld n ear the s ensor
i s f ogged over, dirty, icy or covered with a
s tick er.
Adjusting the exterior lighting
The settings are adjusted in the MMI.
"'Select: !C A R! function button> (Car) * systems
cont rol button > Vehicle settings > Exterior
lighting .
Automatic headlights
You can adjust the following sett ings in the Au
tomatic headl ights
menu:
Headlights activation time -You can adjust if the
h eadlights switch o n
Early, Med . or Late accord
i ng to the sens itiv ity o f the lig ht sensor .
Audi adaptive light* -You can sw itch ad aptive
li ght
On an d Off .
Automatic high beams*
Y ou can switch the hig h beam assist on an d off .
Daytime running lights
USA models:
You can switch the daytime runn ing
li gh ts
on and off .
Canada models:
The function cannot be turned
off. It is act ivated a utomatically each time the ig
nit ion is switched on. This menu item is shown
"g reye d out" .
Coming home, Leaving home
The coming home function ill uminates the a rea
outside the vehicle when you switch the ign ition
off and open the driver's door. To turn the func-
tion on , se lect
Lights when leav ing car > On . .,._
Page 50 of 294
Lights and Vision
.. To increase or reduce the brightness, turn the
knob and press it.
The interior lighting turns on when you switch
the headlights on while the ignition is on .
(i)} Tips
The setting is a utomat ica lly stored and as
signed to the remo te control key th at is in
use.
Instrument illumination
The brightness of the illumination for the instru
ments, display and head-up display* con be ad
justed .
Fig . 44 Inst rument illuminat ion
.. Press the knob to release it.
.. Turn the knob toward" -" o r"+" to reduce or in
c rease the brightness .
" Press th e knob again to re turn it to its original
pos ition.
(D Tips
The instr um ent ill umination for th e need les
a n d dia ls tur ns on when the igni tio n is tur ned
on and t he lights are turned off. The i llumina
t ion for t he dia ls reduces automatically and
eventua lly tu rns off as brightness outside in
creases . T hi s function reminds the drive r to
turn the headlights on at the appropriate
time.
48
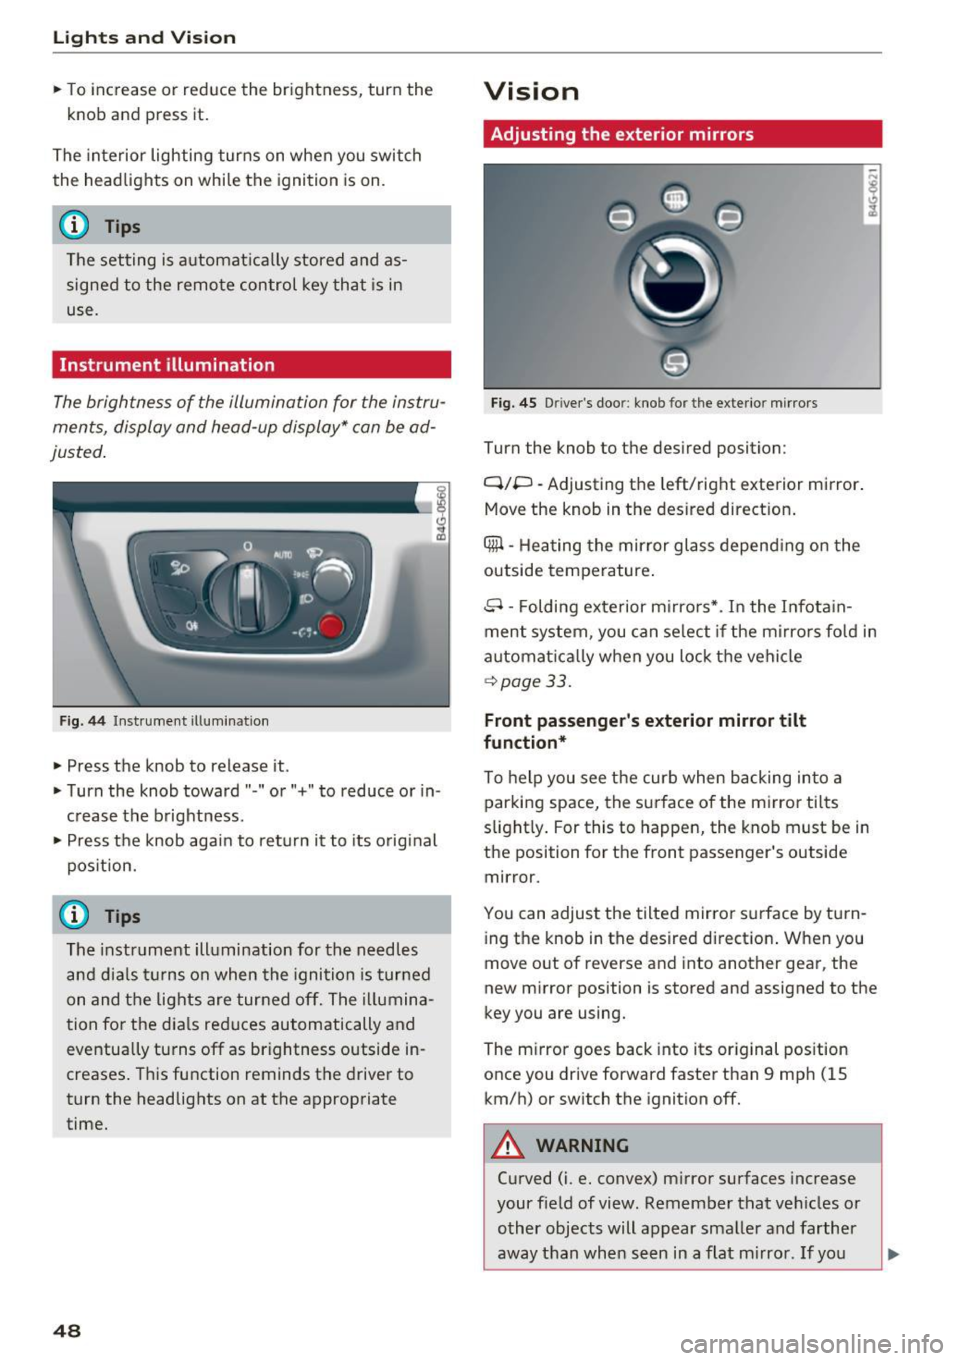
Vision
Adjusting the exterior mirrors
Fig. 45 Driver's door: kno b for the ex terio r mirrors
Turn the knob to the desired position :
Q/P -Adjusting the left/right exterior mirror.
Move the knob in the des ired dir ect ion .
Qill -Hea ting the mirror glass depend ing on the
outside temperature .
8 -Folding exterior m irro rs*. I n the I nfota in
ment system , you can se lect if the m irro rs fo ld in
automat ica lly when you lock the vehicle
~ page 33.
Front passenger 's exterior mirror tilt
function*
To help you see the curb when backing into a
par king space, the surface of the m irror tilts
s light ly . For this to happen, the knob must be in
the position for the front passenger's outside
mirror.
You can adjust the tilted mirror s urface by tu rn
i ng the knob in the desired directio n. When you
move out of reverse and i nto anot her gea r, the
new m irror position is stored and assigned to the
key you are using.
The m irror goes back into its or ig inal pos ition
once you drive forward faster than 9 mp h (15
km/h) or switch the ignition off.
A WARNING
Curved (i .e. convex) m irror surfaces increase
your f ield of view. Remember that ve hicles or
o ther objects will appear sma ller and farther
away than when s een in a flat m irro r. If yo u
Page 51 of 294
.... N
0 CJ '
use this m irror to estimate distances of fol
lowing veh icles when changing lanes, you
could estimate incorrect ly and cause an acci
dent.
CJ) Note
- If the mirror housing was moved by force
(for example, by running into an object
when maneuvering the vehicle), the mirror must be folded all the way in using the pow
er folding function. The mirror housing
must not be moved back into place by hand
because this would impair the f unct ion of
the mirror mechan ism.
- If you wash the veh icle in an automatic car
wash, yo u m ust fold the exterior m irrors in
to reduce the risk of damage to the mirrors.
Never fold power folding exterior mirrors *
by hand. Only fo ld them in and out using
the power contro ls.
@ Tips
- If the power adjusting f unction ma lf u nc
tions, t he g lass in both mirrors can be ad
justed by press ing on the edge of it by hand .
- The exterior mirror sett ings are stored with
the memory function*~
page 57.
Dimming the mirrors
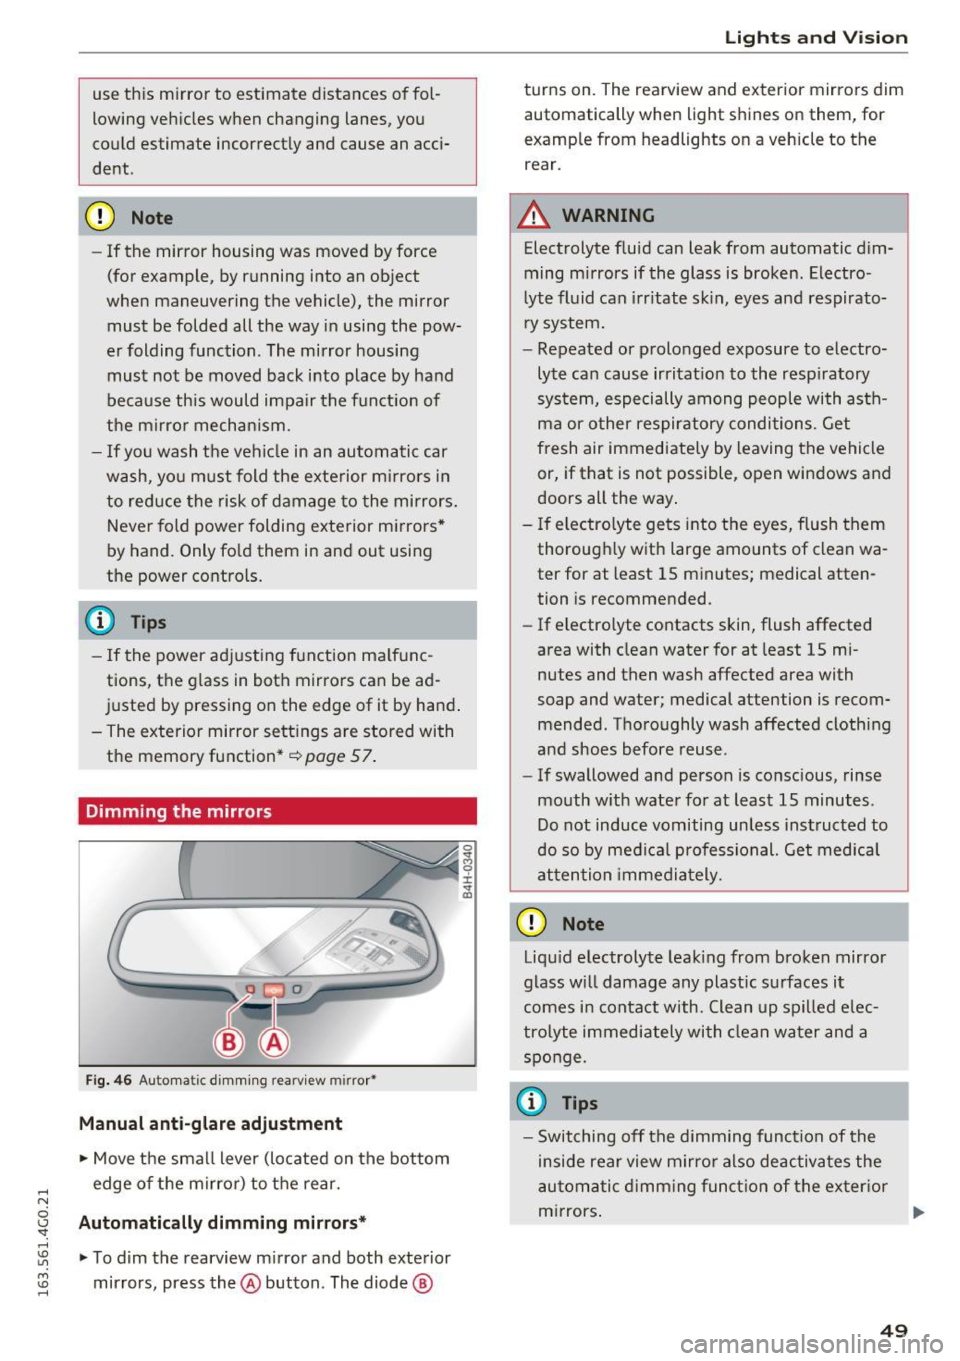
Fig. 4 6 Auto m atic d imm ing rearv iew m irro r•
Manual anti-glare adjustment
• Move the small lever (located on the bottom
edge of the mirror) to the rear.
Automatic ally dimming mirrors*
• To dim the rearview m irror and both exterior
mirrors, press the@ button. The diode @
Lights and Vision
turns on. The rearview and exterior mirrors dim
automatically when light shines on them, for
examp le from headlights on a vehicle to the
rear.
A WARNING
-Electrolyte fluid can leak from automatic dim-
ming mirrors if the glass is broken. Electro
lyte fl uid can irritate sk in, eyes and respirato
r y system.
- Repeated or prolonged exposure to electro lyte can cause irritat ion to the resp iratory
sys tem, especially among people with asth
ma or other respiratory conditions. Get
fresh air immediately by leaving the vehicle
or, if that is not possible, open windows and
doors all the way .
- If electro lyte gets into the eyes, flush them
thorough ly with large amounts of clean wa
ter for at least 15 minutes; medical atten
tion is recommended.
- If electro lyte contacts skin, flush affected
area with clean water for at least 15 mi
nutes and then wash affected area with
soap and water; medical attention is recom
mended . Thoroughly wash affected clothing
a nd shoes before reuse.
- If swallowed and person is conscious, rinse
mouth w ith water for at least 15 minutes .
Do not induce vomiting unless inst ructed to
do so by medical professional. Get medical
attention immediately.
(D Note
Liqu id e lectrolyte leak ing from bro ken mirror
glass w ill damage any plastic surfaces it
comes i n contact with. Clean up spilled e lec
tro lyte immediately with clean water and a
sponge.
(0 Tips
- Switching off the dimming function of the
inside rear view m irro r also deactivates the
au tomatic d imm ing funct ion of the ex ter ior
m irrors . .,..
49
Page 52 of 294
Lights and Vision
-The automatic dimming mir rors do not dim
when the interior lighting is turned on or
the reverse gear is selected.
- Automatic dimming for the mi rror only op
erates properly if the light str iking the in
s ide mirror is not hindered in any way.
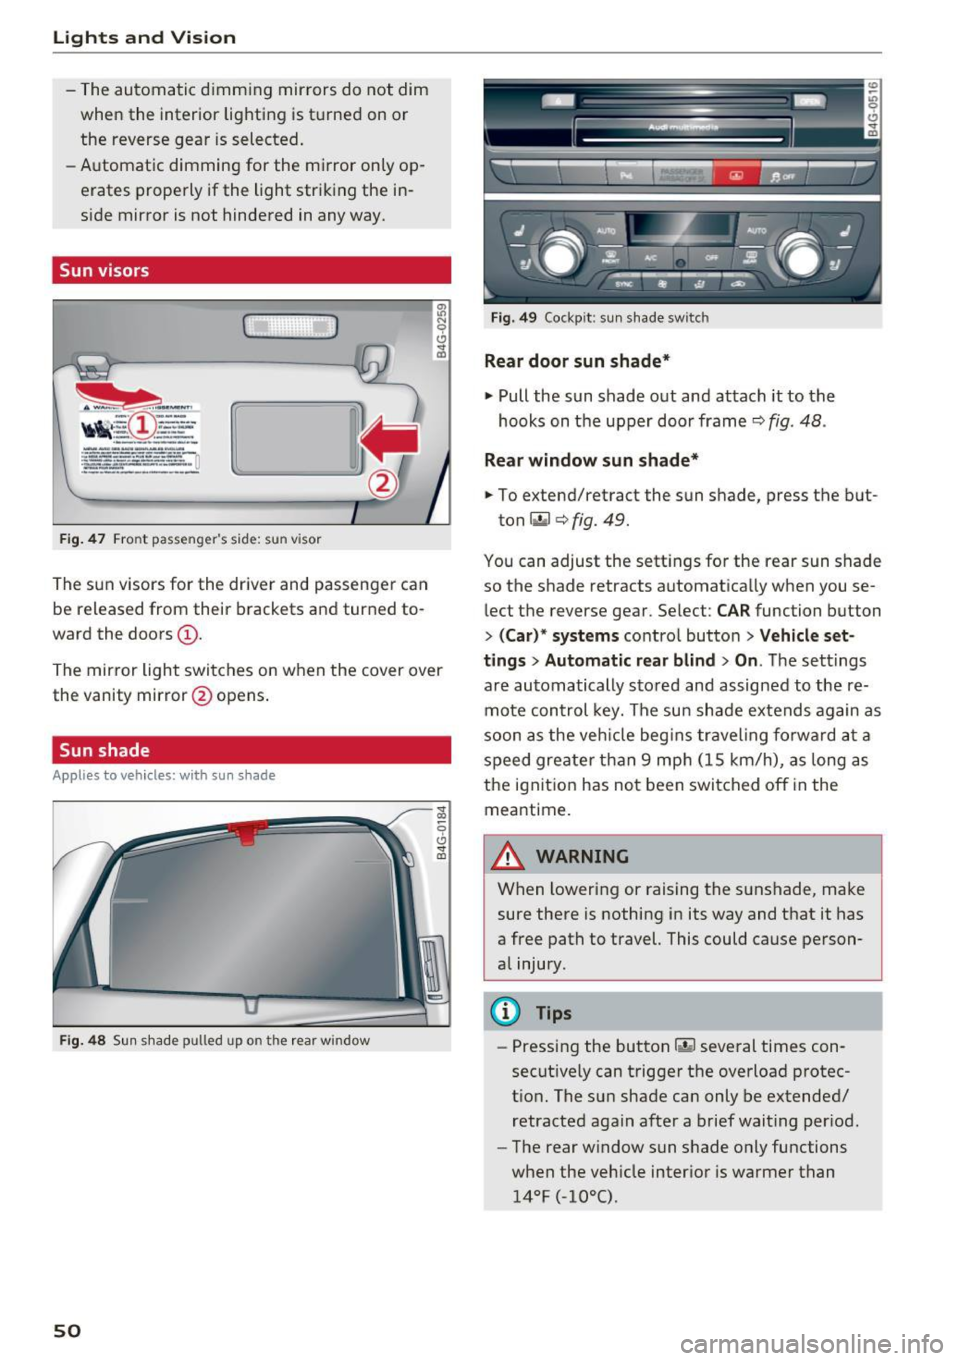
Sun visors
( )
Fig . 4 7 Front passenger 's side: sun v isor
The sun visors for the driver and passenger can
be released from their brackets and turned to
ward the doors
(D .
The mirror light switches on when the cover over
the vanity mirror @opens .
Sun shade
A ppl ie s to ve hicles: w ith s un shade
Fig. 4 8 Sun shade pulled up on the rear window
50
Fig. 49 Cockp it: sun s hade switch
Rear door sun shade*
~ Pull the sun shade out and attach it to the
hooks on t he upper door frame¢
fig. 48 .
Rear window sun shade*
~ To extend/retract the sun shade, press the b ut-
ton
r.,.I ¢ fig. 49.
You can adjust the sett ings fo r the rear sun shade
so the shade retracts automatically when you se
lect the reverse gear. Select:
CAR function button
> ( Car )* systems contro l button > Vehicle set
t ings > Automatic rear blind
> On . The sett ings
a re automatically sto red and assigned to the re
mote con trol key. The su n shade e xtends again as
soon as the veh icle beg ins traveling fo rwa rd a t a
speed greate r tha n 9 mp h (15 km/h) , as long as
the ignit ion has no t been swi tched off in the
meantime.
A WARNING
When lowering or raising the sunshade, make
sure there is nothing in its way and t hat it has
a free path to travel. This could cause person
a l injury.
@ Tips
- Pressing the button~ several times con
secut ively can trigger the overload protec
t ion. The sun shade can only be extended/
retracted again after a brief wait ing per iod.
- The rear w indow sun shade only functions
when the veh icle inter ior is warmer than
14°F (-10°().