low oil pressure AUDI S7 2013 Owners Manual
[x] Cancel search | Manufacturer: AUDI, Model Year: 2013, Model line: S7, Model: AUDI S7 2013Pages: 310, PDF Size: 77.45 MB
Page 15 of 310
Instrument s and warnin g/indic ator ligh ts 13
compartment, stop the engine and let it
cool down. Always exercise extreme cau
t ion when working under the hood
<=> page 224, Engine compartment
@ Tips
Ma lf u nctions or faults wi ll be identified ei
ther with a red symbo l (pr iority 1 -Dan
ger!) or with a yellow symbol (pr iority
2 -
Warn ing).
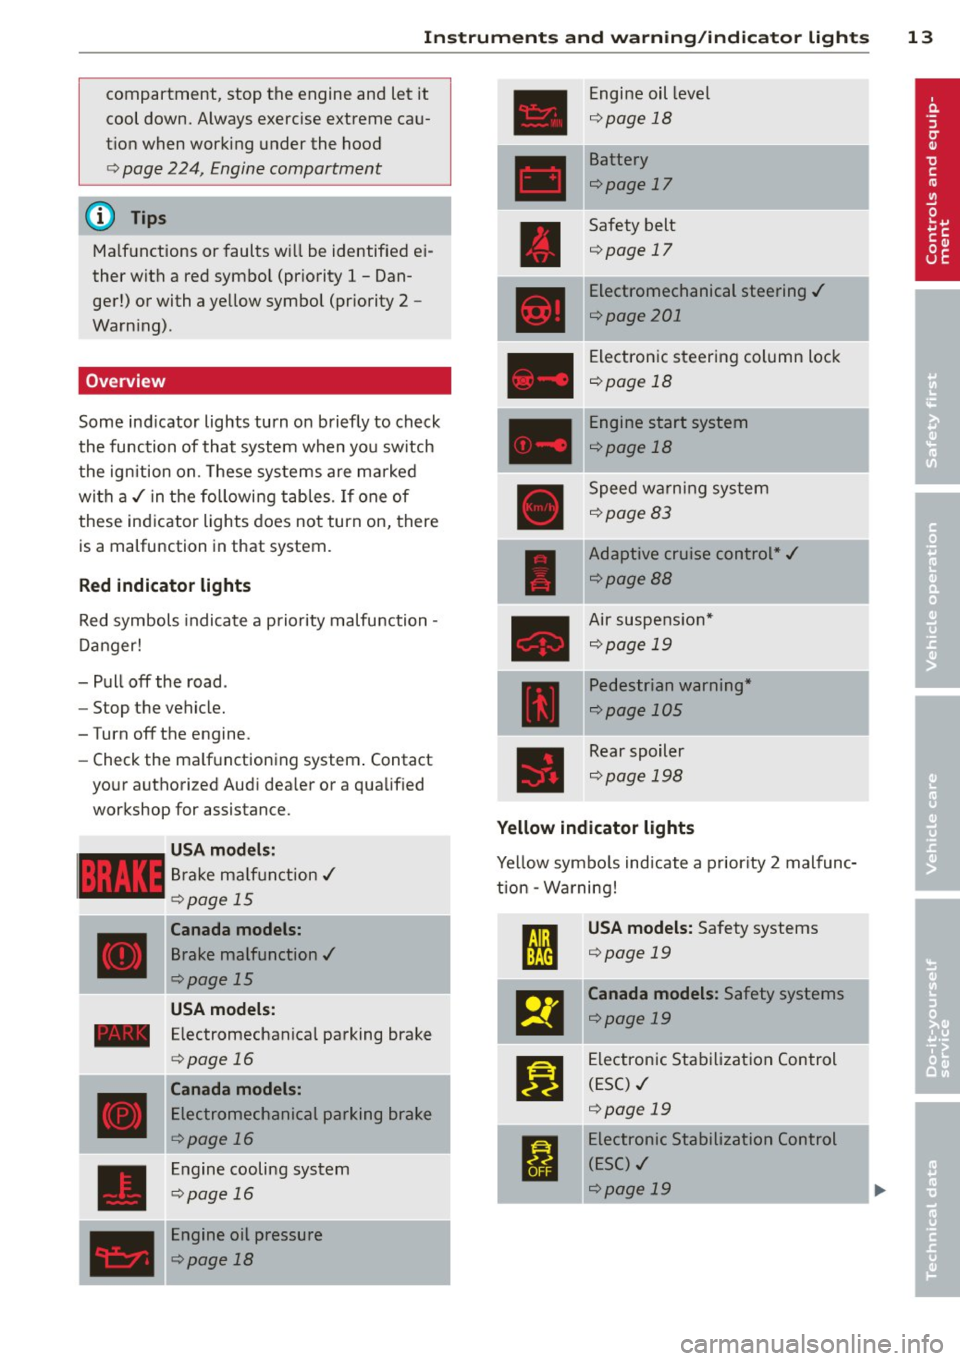
Overview
Some ind icator lights turn on briefly to check
the function of that system when you switch
the ignition on. These systems are ma rked
with a ,/ in the following tables. If one of
these indicator lights does not turn on, there
is a malfunction in that system.
Red indicator lights
Red symbols indicate a prio rity malfunction -
D anger!
- Pull off the road.
- Stop the vehicle.
-Turn off the engine.
- Check the ma lf u nctioning system . Contact
your authorized Audi dea ler or a qualified
workshop for assistance.
USA mode ls:
Brake ma lf u nction,/
c::>page 15
Canada models:
Brake malfunction,/
c::>page 15
USA models:
- Electromechanical parking brake
____ ,
D
<=> page 16
Canada models:
Electromechanical parking brake
<=>page 16
Engine cooling system
c::> page 16
Engine oil pressure
c::> page 18
Engine oil level
Q page 18
Battery
<=>page 17
Safety belt
<=>page 17
Electromechanical steering ,/
<=> page 201
Electronic steering column lock
<=>page 18
Engine start system
<=>page 18
Speed warning system
<=>page 83
Adaptive cruise control*,/
<=>page88
Air suspe nsion*
Qpage 19
Pedestrian warning*
Qpage 105
Rear spoiler
c::>page 198
Yellow indicator lights
Yellow symbo ls indicate a prior ity 2 malfunc
tion - Wa rning!
m
l:ml
El
fl
USA models: Safety systems
<=> page 19
Canada models: Safety systems
c::> page 19
Electronic Stabilization Control
(ESC) ,/
<=>page 19
Electronic Stabilization Control
( E SC) ,/
c::> page 19
Page 20 of 310

18 Instruments and warning/indicator lights
9:::r. Engine oil pressure malfunction
The re d engin e oil pr essure warning symbol
require s immediat e ser vice or repair . Driving
with a low-oil- pre ssure indicat ion is lik ely to
inflic t seve re damage to the engine .
• Switch off engine and check oil level
If the indicator light turns on and the mes
sage appears , the oil pressure is too low.
,,. Pull
off the road.
"' Stop t he ve hicl e.
,,. Turn
off the engine.
"' Check the engine oil level¢ page 235 .
• If the engi ne oil leve l is to o low, add engine
o il ¢
page 235 . Make sure that the oil p res
s ur e warning symbol. appea rs no longe r
i n t he d is pl ay before y ou sta rt driving again .
• If the engi ne oil leve l is c orre ct and t he ind i
cat or lig ht still t urn s on, tur n t he eng ine
off
and do not conti nue d riving . Seek p ro fessio
nal assistance .
(D Tips
- The engine oil pressure symbol. is
not an indicator for a low engine oil lev
el. Do not rely on it. Instead, check the
oil level in your engine at regular inter
vals, preferably each time you refuel,
and always before going on a long trip.
- The yellow oil level warning indication
II requires oil refill or workshop serv
ice without delay . Do not wait until the
red oil pressure warning. starts to
flash before you respond to the low oil level warning
11-By then, your engine
may already have suffered serious dam
age.
~ . Engine oil level
• WARNING: Please add oil immediately
When the sy mbo l and t he dr ive r message a p
pear, the oil has to be reple nis he d rig ht no w
¢page 232.
If t he in dicator light and the message appear,
a dd engine oil imme diate ly
¢ page 235 .
II Add oil, max. x qt (l). You may continue
driving
W hen the sy mb ol an d the d river message a p
pear, add the amoun t of oil appe aring in the
display at the nex t op port unity ¢
page 232.
® -e Steering column lock
• Do not drive veh icle: Steering defective
If t he indic ato r ligh t turns on an d the mes
sage a ppears, there is an e lec tronic stee ring
co lumn lock malfunct io n. You cannot switc h
t h e i gnit io n on.
Do
not tow yo ur vehicle becau se it c annot b e
stee red. See k professiona l assistance .
!Ill Steering lock: system fault. Please con
tact dealer
If th e indicato r light turns on and the mes
sage appears, there is an e lectronic steering
co lu mn l ock malfunct io n.
Drive to y our auth orized A udi dealer immedi
ately to hav e th e malfunction corr ecte d.
A WARNING
-~
Yo ur v ehicl e m ust no t be tow ed in t he
event of a malfu nction in the elec tronic
stee ring colum n lock be cau se it ca nno t be
s teere d due to th e l ock ed steeri ng. If it is
towe d wit h the s teeri ng locke d, there is
the r isk o f an accide nt.
© -e Engine start system
• Engine start system fault . Please con
tact dealer
If the indica to r ligh t turns on and the mes
sage appears, do
not switch the ig nition off
because you may not be a ble to sw itch it on
again.
Dr ive to your au thor ized A udi dea ler immed i
ate ly to have the ma lfunction corrected.
Ill Engine start system fault . Please con
tact dealer
Page 78 of 310

76 On the road
By pressing the I STAR T ENGINE ST OP I button
without depressing the brake peda l, the igni
tion is on and switched
off by pressing it
again .
After a cold engine is started, the re may be a
brief period of increased noise because oil
pressure must first bu ild up in the hydraulic
va lve adjusters. This is normal and not a cause
f or concern.
If the engine should not start immediately,
the starting process is automatically stopped
after a short time . Repeat starting procedure.
Start-Stop-S ystem *:
When you stop and the Start-Stop-System*
turns
off the engine, the ignition still remains
switched on.
- If you press the I STAR T ENGINE STOPI but
ton now, the ignition wi ll be switched
off.
T he engine will not start ¢ page 82 .
-Make sure tha t th e ig nit ion is swi tched off
before ex iting the vehicle.
Sw itching the ignition /engine off
automat icall y*
The fo llow ing applies to vehicles with Start
Stop -System*: to prevent the battery from
draining, the ignition and the engine wi ll
switch
off automatically under the following
conditions :
- T he vehicle has already been dr iven.
- T he d river's door is opened.
- T he driver's seat be lt is removed.
- The brake pedal is not pressed down .
- The veh icle is sta tionary.
In t his case, the activated low beam w ill be re
p laced by the side marker lights. The side
marker lights will switch
off after a certain pe
riod of time or when you lock the vehicle.
Driver m essage in the in strument clu ster
di spl ay
P ress b rake pedal to start engine
This message appears i f you press the
I S TAR T ENGINE STOP ! button to start the en
gine and do not depress the brake peda l. The engine can only be started if the brake pedal
is depressed.
!I C
o nveni ence key: I s ke y not in th e vehi
cle?
T h is message appears along with the !I sym
bol if the master key is removed from the ve
hicle with the eng ine runn ing.
It is in tended
to rem ind yo u (e.g . when chang ing dr ivers)
not to continue the journey without the mas
ter key.
If the master key is no longe r in t he ve hicl e,
yo u canno t swi tch on the igni tion after stop
ping the engine and you also cannot start the
engine again. Moreover, you cannot lock the
vehicle from the outside with the key.
Tu rn off ignition before leav ing car
This message appears if the drive r's door is
opened wh ile the ign ition is switched on. Al
ways swi tch
off the ignit io n if you a re leav ing
the vehi cle. See also ¢
page 76.
Shift to P, otherwi se vehicle can roll away.
Doors do not lock if lever is not in P .
This message appears for safety reasons
along with an audible warning tone if the P
selector lever position is not engaged when
stopp ing the eng ine with t he
I S TAR T ENGI NE ST OP I but ton. Select the P se
l ector lever posi tion. Otherwise the vehicle
could roll and it cannot be locked.
Ke y not r ecogni sed . Hold back of ke y again st
marked ar ea . See owner' s manual.
If the indicato r light turns on and this mes
sage appears, there is a malfunct ion
~ page 78.
Turn off ignition b efore leaving car
This message appears if the driver's door is
opened wh ile the ignition is switched on. Al
ways switch
off the ignit ion if you a re leav ing
the vehicle. See also ¢
page 76.
Shift to P and turn off ignition before leav-
ing car, otherwise vehicle can roll awa y
This message appears if the drive r's door is
opened while the ignition is switched on and
jll,,
Page 217 of 310
sponges to prevent scratches. It is best
to use soapy water .
- You should remove debris (such as in
sects) from the headlight lenses on a
regular basis, for example when refuel
ing your vehicle. Never clean the head
lights w ith a dry cloth or sponge. Use a
wet cloth or sponge. It is best to use
soapy water .
@ For the sake of the environment
Only wash the vehicle in facilit ies specially
designed for that purpose. Th is w ill reduce
the risk of d irty water contaminated with
oil from entering the sewer system . In
some areas, washing veh icles outs ide of
t hese facilit ies is prohib ited.
Washing your vehicle with a power
washer
Cleaning the exterior of your car with a high
pressure power washer is safe as long as you
observe a few simple rules .
.,. Befo re using the power washe r, make sure
you have read and understood the WARN INGS ¢
A. in General information on
page 213.
.,. Always fo llow the operating instructions for
the power washer .
.,. Make sure that the jet on the spray hose
produces a "fan shaped spray" .
.,. Do
not ho ld the spray no zzle too close to
soft mate ria ls .
Keep a d istance from soft materials such as
rubber hoses or insulat ing mater ial as we ll as
sensors and camera lenses .
When clean ing the vehicle w it h a power wash
er
always follow the operating instructions.
This applies particularly to the operating pres
sure and the spraying distance . Do not po int
the spray directly at t he sea ls around the side
windows, aro und the doors, o n the rea r lid or
on the sunroof *. L ikew ise, do not point it di
rectly at tires, r ubber hoses, ins ulation mate
rial or sensors ¢
page 216. Hold the spray
Cleaning and protec tion 215
nozzle at least 1.3 ft (0.4 m) away from the
vehicle.
Do no t use a high-p ressure power w asher to
remove snow and ice .
Do not use a jet which sprays wate r in a d irect
stream o r one that has a rotating jet.
Water temperature should not exceed 140 °F
(60 °() .
A WARNING
Neve r wash t ires with a jet that sprays wa
ter in a direct stream . Thi s could cause in
v isible damage to the t ires and we aken
them, even if the spray is from a re lative ly
l ong dis tance and for a short time. Dam
aged and wea kened tires can fail and cause
accidents and personal in jury.
(D Note
To avoid damaging yo ur vehicle, a lways
make sure tha t the re is sufficien t distance
between the s pray head and soft materia ls
lik e rubber hoses, plastic parts and sound
deaden ing mater ia ls as well as sensors
and camera lenses. Never a im t he spray
head at the same point for a long time .
This also applies to cleaning headlights
and paint ed bumpers. Remembe r: the
closer the no zzle is to the surfa ce of the
m at eria l, the gre ater the s tress on the m a
terial.
Caring for vehicles with matte finish
paint
App lies to vehicles : wit h matte finish paint
Vehicles with matte finish paint require spe
cial care due to the characteristics of the
paint.
Washing by hand
T o avoid d amaging the pain t when washing,
first remove dust and la rge particles from
your vehicle . Insects, grease spots and finger
prints are best removed with a
special cleane r
for matte fin ish paint .
1111>
•
•
Page 236 of 310
234 Checking and filling
temperatures stay below freezing point for long periods.
Detergent additives in the oil w il l make fresh
oil look dark after the eng ine has been run
ning for a short time . This is norma l and is not
a reason to change the oi l more often than
recommended.
Damage or malfun ctions due to lack of
maintenance
It is essential that you change your oil at the
recommended intervals using only engine o il
that complies with Audi oi l standard
VW 502 00. Your Limited New Vehicle War
ranty does not cover damage or malfunctions
due to fail ure to fo llow recommended mainte
nance and use requ irements as set forth in
the Audi Owner's Manual and Warranty &
Maintenance booklet . Your dealer will have to
deny warranty coverage unless you present to
the dea ler proof in the form of Service or Re
pa ir Orders that all scheduled ma intenance
was performed in a timely manner.
Eng ine oil consumption
The engine in your vehicle depends on an ade
quate amount of oil to lubricate and cool all
of its moving parts.
In order to provide effective lubrication and
cool ing of internal engine components, all in
ternal combustion eng ines consume a certain
amount of oil. Oil consumption varies from
engine to engine and may change significantly
over the life of the engine. Typically, engines
with a specif ied break-in period (see
¢ page 204) consume more oil during the
break-in period than they consume after oil
consumption has stabilized.
Under norma l conditions, the rate of oil con
sumption depends on the quality and viscosity
of the oil, the RPM (revolutions per minute) at
which the engine is operated, the ambient
temperature and road condit ions . Further fac
tors are the amount of oil d ilution from water
condensat ion or fuel residue and the oxida
tion level of the oil. As any engine is subject to wear as mi
leage builds up, the oil consump
tion may increase over time until replacement
of worn components may become necessary.
With all these variables coming into play, no
standard rate of oil consumption can be es
tablished or specified. There is no alternative
to regu lar and frequent checking of the o il lev
el, see Note.
If the yellow engine oil leve l warning symbo l
in the instrument cluster
II lights up, you
sho uld check the oil leve l as soon as possible
c:> page 235. Top off the oil at your earliest
convenience
c:> page 235.
A WARNING '"---
Before you check anythi ng in the engine
compartment, always read and heed all
WARNINGS
c:> A in Working in the engine
compartment on page 230.
(D Note
Driving with an insufficient o il level is like
ly to cause severe damage to the engine.
(D Tips
- The oil pressure warning display . is
not an indicator of the oil level. Do not
rely on it. Instead, check the oil level in
your engine at regular intervals, pref
erably each time you refuel, and always
before going on a long trip.
- If you have th e impression your engine
consumes excessive amounts of oil, we
recommend that you consult your Audi
dealer to have the cause of your concern
properly diagnosed. Keep in mind that
the accurate meas urement of oil con
sumption requ ires great care and may
take some t ime. Your Audi dealer has in
structions about how to measure oil con
sumption accurately.
-
Page 240 of 310
238 Checking and filling
the level may be slightly above the "max"
marking.
The location of the coolant expansion tank
can be seen in the engine compartment illus
tration
¢ page 232.
To obtain an accurate reading, the engine
must be switched off.
The expansion tank in your vehicle is equipped
with an electric coolant level sensor.
When the coolant level is too low, the warning light in the Auto-Check System¢
page 16 will
illuminate until you add coolant and the level
has been restored to normal. Even though
there is an electric coolant level sensor , we
still recommend you check the coolant level
from time to time.
Coolant loss
Coolant loss may indicate a leak in the cooling
system. In the event of coolant loss, the cool
ing system should be inspected immediately
by your authorized Audi dealer.
It is not
enough merely to add coolant.
In a
sealed system, losses can occur only if
the boiling point of the coolant is exceeded as
a result of overheating.
_& WARNING
The cooling system is under pressure and
can get very hot. Reduce the risk of scald
ing from hot coolant by following these
steps. -
- Turn off the engine and allow it to cool
down.
- Protect your face, hands and arms from
escaping fluid and steam by covering the
cap with a large, thick rag.
- Turn the cap slowly and very carefully in
a counter-clockwise direction while ap
plying light, downward pressure on the
top of the cap .
- To avoid being burned, do not spill anti freeze or coolant on the exhaust system
or hot engine parts. Under certain condi
tions, the ethylene glycol in engine cool
ant can catch fire .
(D Note
Do not add any type of radiator leak seal
ant to your vehicle's engine coolant. Add
ing radiator repair fluid may adversely af
fect the function and performance of your
cooling system and could result in damage not covered by your New Vehicle Limited
Warranty .
Adding coolant
Be very careful when adding engine coolant.
Before you check anything in the engine com
partment,
always read and heed all WARN
INGS ¢&. in Working in the engine compart
ment on page 230.
.. Turn off the engine .
.. Let the engine cool down.
.. Place a thick rag over the coolant expansion
tank ¢
fig. 192 and carefully twist the cap
counter-clockwise ¢,&. .
.,. Add coolant.
.. Twist the cap on again
tightly.
Replacement engine coolant must conform to
exact specifications ¢
page 23 7, Coolant. We
recommend using only coolant additive G12+
+, G13 or in an emergency G12+. Do
not use a
different additive. In an emergency use plain
water until you can get the correct additive
and can restore the correct ratio. This should
be done as soon as possible .
If you have lost a considerable amount of
coolant , then you should add cold antifreeze
and cold water only when the engine is cold.
Always use
new engine coolant when refilling.
Do not fill coolant above the "MAX" mark. Ex
cess coolant will be forced out through the
pressure relief valve in the cap when the en
gine becomes hot.
_& WARNING
-= -- The cooling system is under pressure and
can get very hot. Reduce the risk of ..,_
Page 248 of 310
24 6 T ire s and whee ls
Tires and wheels
Tires
General notes
Tires may be the least appreciated and most
abused parts of a motor vehicle .
Tires may be the least appreciated and most
abused parts of a motor vehicle . Tires are,
however, one of the most important parts of a
vehicle, particularly considering the compara
tive ly small patch of rubber on each tire that
assures that all -important contact between
you, your vehicle and the road.
Maintaining the correct tire pressure, making
sure that your vehicle and its tires do not have
to carry more weight than they can safe ly han
d le, avoiding damage from road hazards and
reg ularly inspecting t ires for damage includ
ing cuts, slashes irregu la r wear and overall
condition are the most important things that
you can do to he lp avoid sudden tire failure in
cluding tread separation and blowouts.
A vo idin g dama ge
I f you have to drive over a curb or similar ob
stacle, drive very slow ly and as close as possi
ble at a right angle to the curb.
A lways keep chem icals including grease, oil,
gasoline and b rake fluid off the tires.
Inspect the tires regularly for damage (cuts,
cracks or bl isters, etc.). Remove any foreign
bod ies embedded in the treads.
St orin g tire s
Mark tires when you remove them to indicate
the direction of rotation . Th is ensures you to
be ab le to mount them correctly when you re
install them.
When removed, the wheels or tires should be
stored in a cool, dry and preferably dark place .
Store tires in a vertical position if they are not mounted on rims, in a horizontal position if
they are mounted on rims. N
ew tir es
New t ires have to be broken in¢&,. .
The tread depth of new t ires may vary, accord
ing to the type and make of t ire and the tread
pattern .
Hidden damag e
Damage to tires and r ims is often not readily
vis ible . If you notice unusual vibrat ion or the
vehicle pulls to one s ide, th is may ind icate
that one of the t ires has been damaged . T he
t ir es must be checked immed iate ly by an au
tho rized Aud i dea le r or q ualified wor kshop.
Unidirecti onal t ires
A un idirectional tire can be identified by ar
rows on the sidewall, that po int in the direc
t ion the t ire is designed to rotate. You must
fol low the specified direction of rotation . This
is necessary so that these tires can develop
their optimum characteristics regarding grip, road noise, wear and hydrop laning resistance.
For more information
¢ page 274.
A WARNING
-New tires or tires that are old, worn or
damaged cannot provide maximum con
trol and braking ability .
-
-New tires tend to be slippery and must
be broken in . To reduce the risk of losing
control, a collision and ser ious personal
injuries, drive w ith special ca re for the
fi rst 350 m iles (560 km).
- Driving with worn or damaged tires can lead to loss of control, sudden tire fail
ure, including a blowou t and sudden de
flation, c rashes and serious personal in
juries . Have worn or damaged tires re
p laced immediate ly .
- Tires age even if they are not being used
and can fai l sudden ly, especially at high
speeds. Tires that are more than 6 years
old can only be used in an emergency
and then w ith special care and at low
speed.
Page 265 of 310
@ Tips
Where snow chains are mandatory oncer
tain roads, this normally also applies to
veh icles with all-wheel dr ive.
Wheel bolts
Wheel bolts must always be tightened to the
correct torque .
The design of whee l bolts is matched to the
factory insta lled rims . If different rims are fit
ted, the correct wheel bolts with the right
length and correctly shaped bolt heads must
be used. This ensures that wheels are f itted
securely and that the brake system functions
correctly .
In certain circumstances, you may not use
wheel bolts from a different vehicle -even if it
is the same model
<=> page 291.
.&_ WARNING
Improperly tightened or maintained wheel
bolts can becom e loose caus ing loss of
cont ro l, a co llision and serious persona l in
Jury .
- Always keep the wheel bolts and the
threads in the wheel hubs clea n so the
w heel bolts can t urn easily and be prop
erly t ightened .
- Never grease or oil the wheel bolts and
the threads in the wheel hubs. They can
become loose while d riving if greased or
oi led, even if tightened to the specif ied
torque.
- Only use whee l bolts that belong to the
rim being installed .
- Never use different whee ls bolts on your
vehicle.
- Always maintain the co rrect tighten ing
torq ue for the wheel bo lts to reduce the
risk of a wheel loss . If the tightening tor
que of the wheel bolts is too low, they
can loosen and come out when the vehi
cle is moving. If the tightening torque is
too high, the whee l bolts and threads
Tire s an d wheel s 263
can be damaged and the whee l can be
come loose.
(D Note
The specified torque for the whee l bolts is
90 ft lb (120 Nm) with a tolerance of± 7,4
ft lb(± 10 Nm) . Torq ue whee l bolts diago
nally. After changing a whee l, the torq ue
must be checked as soon as possible with a
torque wrench -preferably by an author
i zed Audi dealer or qualified workshop.
Low aspect ratio tires
You r Aud i is facto ry-equ ipped w it h low aspect
ra tio tires. These tires have been tho ro ughly
tested and been se lec ted spe cifically for you r
model for their superb perfo rmance, road fee l
and handling under a variety of driving condi
tions. Ask your authorized Audi dealer for
more details .
T he low aspect ratio of these t ires is ind icated
by a numera l of
55 or le ss in the tire's s ize
designation. The numera l represents the ratio
of the t ire's sidewa ll height in relation to its
tread width expressed in percentage. Conven
tiona l tires have a he ight/w idth rat io of 60 or
more .
The performance of low-aspect -ra tio tire s is
particularly sens it iv e to improper inflation
pressure. It is therefore important that low
aspect ratio t ires are inflated to the specified
pre ssure and that the inflation pressur e is
regularly che cked and maintain ed. Tire pre s
s ures should be checked at least on ce a
m onth and alwa ys before a long trip
¢ page 2 52, Checking tire pressure .
What you can do to avoid tire and rim
damage
Low aspect ratio tires can be damage d mo re
easily by impact w ith potholes, curbs, g ull ies
or ridges on t he road, partic ularly if the tire is
u nderinflated.
Ill>-
•
•