check engine AUDI S8 2008 Service Manual
[x] Cancel search | Manufacturer: AUDI, Model Year: 2008, Model line: S8, Model: AUDI S8 2008Pages: 404, PDF Size: 52.7 MB
Page 320 of 404
___ C_ h_e _c _ k_ i_ n ~g~ a_ n_ d_ f_ i_ll _in _g~--------------------------------------------
-Read the brake fluid level from the brake fluid reservoir
=> fig. 268. The brake fluid level must be between the
"MIN" and "MAX" markings.
The brake fluid reservoir is located at the rear partition of the engine
compartment on the left
side~ page 308.
The fluid level may drop slightly after some time due to the auto
matic adjustment of the brake pads. This is not cause for alarm.
If the brake fluid level falls considerably below the "MIN" mark, the
brake warning/indicator light (U.S. models:
BRAKE , Canadian models:
«D>l will come on~ page 22 and~ page 30. Do not continue to
operate the vehicle. The complete brake system should be thor
oughly checked by an authorized Audi dealer or other qualified
facility and the cause corrected. If the brake fluid level is too low, the
brake warning/indicator light will illuminate. Contact an authorized
Audi dealer
immediately. •
Changing brake fluid
Have the brake fluid changed by an experienced techni
cian.
Brake fluid absorbs moisture from the air. If the water content in the
brake fluid is too high, corrosion in the brake system may result
after a period of time. The boiling point of the brake fluid will also
decrease considerably and decrease braking performance.
Therefore, the brake fluid must be changed
every two years. Always
use new brake fluid which conforms to Federal Motor Vehicle Stan
dard "FMVSS 116 DOT 4".
The brake fluid reservoir can be difficult to reach, therefore, we
recommend that you have the brake fluid changed by your autho
rized
Audi dealer. Your dealer has the correct tools, the right brake
fluid and the know-how to do this for you.
& WARNING
• Brake fluid is poisonous . It must be stored only in the closed
original container out of the reach of children!
• Brake failure can result from old or inappropriate brake fluid .
Observe these precautions:
-Use only brake fluid that meets SAE specification J 1703 and
conforms to Federal Motor Vehicle Standard 116. Always check
with your authorized Audi dealer to make sure you are using
the correct brake fluid. The correct type of brake fluid is also indicated on the brake fluid reservoir .
- The brake fluid must be new. Heavy use of the brakes can
cause a vapor lock if the brake fluid is left in the system too
long. This can seriously affect the efficiency of the brakes as
well as your safety . This could result in an accident .
0 Note
Brake fluid will damage the paint of your vehicle .
<£> For the sake of the environment
Because of the problem of proper disposal of brake fluid as well as
the special tools required and the necessary expertise, we recom
mend that you have the brake fluid changed by your authorized Audi
dealer. •
Battery
General information
Under normal operating conditions, the battery in your Audi does
not need any maintenance. With high outside temperatures or long
daily drives we recommend that you have the electrolyte level .,,_
Page 321 of 404
_____________________________________________ C_h_ e_ c
_ k_in -= g_a
_ n_d _ f_il _li _n ..;::g ;;.___.IIIII
checked by a service facility. The e lectrolyte level should also be
checked each time the battery is charged =>
page 321.
Have the battery checked when you take your vehicle in for service.
You are well advised to replace a battery that is older than 5 years.
With ce rtain types of airbag deployment, the battery is discon
nected from the vehicle electrical system for safety reasons=>
& in
"Repair, care and disposal of the airbags" on
page 232.
Di sconn ecting the b atte ry terminal s
Some veh ic le functions (power window regulators, for example) are
lost if the battery terminals are disconnected. These functions have
to be relearned after the battery terminals are connected again. To
prevent this, the battery should only be disconnected from the
veh icle electrical sys tem when absolu tely necessary for repairs.
Veh icl es not driv en for lo ng p eriods
If you do not drive your vehicle over a period of several days or
weeks, electrical components are gradually cut back or switched off.
This reduces energy consumpt ion and maintains starting capability
over a longer period
=> page 274 .
Be aware that when you unlock your vehicle, some of the conve
nience functions may not operate, such as the Advanced Key*, the
remote control or the power seat adjustment. The convenience
functions will be ava ilable again when you turn on the ignition and
start the engine.
W int er operati on
During the winter months, battery capacity tends to decrease as
temperatures drop. This is because more power is also consumed
while starting, and the headlights, rear window defogger, etc. , are
used more often .
Avoid unnecessary power consumption, particularly in city traffic or
when trave ling only short distances . Let your authorized Audi dea ler
check the capacity of the vehicle battery before winter sets in
=> page 321. A well charged battery will n ot only prevent starting
problems when the weather is cold, but wi ll also last longer.
[ i ] Tips
If your vehic le is left standing for severa l weeks at extreme ly low
temperatures, the vehicle battery should be removed and stored
where it will not freeze. Th is wil l prevent it from be ing damaged and
having to be replaced.•
Working on the battery
Be espe cially careful when w orking on or near the battery.
Fig . 2 69 Lugg age
co mpartment : R ight
si de sto ra ge c omp art
m ent
F ig. 2 70 Lugg age
co mp artment : B atte ry
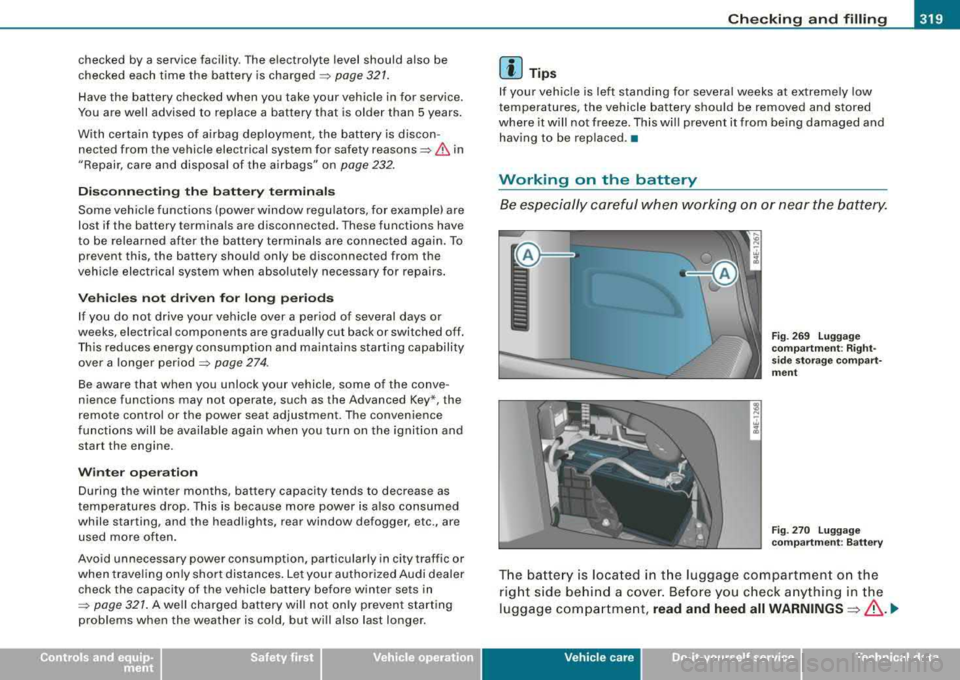
T h e ba tter y is lo ca te d in t he luggage compartm ent on the
r ight side b ehind a c ove r. Before you check a nything in the
luggag e co m partment,
read and heed all WARNINGS =>& . .,.
Vehic le care I I irechnical data
Page 323 of 404
Checking and filling Ill
-------------~~~
•
& WARNING (continued )
• When disconnecting the battery, first disconnect the negative
cable and then the positive cable.
• Before reconnecting the battery, make sure all electrical
consumers are switched off. Reconnect the positive cable first and
then the negative cable . Never interchange the cables -this could
start a fire!
• Never charge a frozen or a thawed-out battery . It could
explode! If a battery has frozen, then it must be replaced . A
discharged battery can freeze over at 32 °F (0
°CI.
• Make sure the vent hose is always attached to the opening on
the side of the battery.
• Never use batteries which are damaged. There is the danger of
an explosion
I Always replace a damaged battery .
& WARNING
California Proposition 65 Warning :
• Battery posts , terminals and related accessories contain lead
and lead compounds, chemicals known to the State of California
to cause cancer and reproductive problems . Wash hands after
handling.
0 Note
• Do not disconnect the vehicle battery when the ignition is
switched on or when the engine is running, otherwise, you will
damage electronic components in the electrical system.
• I f your vehicle is going to stand for a long period of time without
being driven, protect the battery from "freezing", otherwise it will
be damaged and will then have to be replaced .•
Battery charging
Starting the engine requires a well charged battery.
Always read and heed all WARNINGS below ~ & and~ &
in "Working on the battery" on page 319.
-Turn off the ignition and all electrical consumers.
- Make sure the area is well ventilated when you charge
the battery.
- Attach the red (positive
8) clamp of the charging equip
ment to the positive terminal of the battery and the black
(negative(:)) clamp to the jumper terminal.
- Only now plug the mains lead for the charging equip
ment into the wall outlet and turn it
on~ &.
-Make sure the charging rate is not over 30 amps/14.8
Volt.
-When the battery is fully charged: Turn the charging
equipment off and remove the mains lead from the wall
outlet.
- Now remove the clamps for the charging equipm ent.
A discharged battery can freeze at temperatures of only O °C . Allow
a frozen battery to thaw completely before attempting to charge it
=> ,&. . However, we recommend not using a thawed battery again
because the battery casing can be cracked due to ice formation and
can leak battery acid.
Battery charging (Maximum charging rate of 30
amps/14.8 Volt)
When charging at low voltages (e.g . with a trickle charger ), the
battery cab les do not have to be disconnected first. The battery caps
should
not be opened when charging a battery. ~
Vehicle care
Page 324 of 404
-Checking and filling PW~---=---=----------------
It is not necessary to remove the battery from the luggage compart
ment, and it is also not necessa ry t o disco nnec t the cab les.
F a st ch arging th e batt ery ( charging rate above 14 .8
V olts )
For technical reasons do not use a battery charger that uses voltage
greater tha n 14.8 Vo lts to charge your veh ic le's battery.
& WARNING
C harging a b attery can be dangerou s.
• Always follow the operating in structions provided by the
battery charger manufacturer when ch arging your b attery .
• Never charge a frozen battery . It may expl ode because of ga s
t rapped in the ice . Allow a frozen batter y to tha w out fir st .
• Do not reu se batteries which were fro zen. The battery hou sing
m ay have cracked and weakened when the battery froze.
• Charge the battery in a well ventilated are a. Keep aw ay from
open flame or electric al spar k. Do not smoke . Hydr ogen gas gener
ated by the battery i s explosive.
• To reduc e the danger of e xplosion , never conne ct or dis conn ect
charger cable s while the charger i s oper ating.
• Fa st charging a batter y is dangerous and should only be
a ttempted by a competent technician with the proper equipment .
• Battery ac id that may spill during charging should be washed
off with a solution of warm water and b aking soda to neutralize
the a cid .
0 Note
Never use a fast charger as a booster to start the engine. This wil l
ser iously damage sens it ive elect ronic compo nents, such as control
units, r elays, radio , etc ., as wel l as the battery charger. •
Battery replacement
The new batte ry mus t have t he s ame s pecificati ons and
dimensions as the original equipment battery.
I ntel ligent energy management in your vehicle is responsible for
distr ibut ing the e lectr ica l energy throughout your veh icle
~ page 274. The inte lligent energy management system will keep
t he engine ba ttery charged be tter than vehicles without t his sys tem.
T o make sure the add it ional electr ical energy is avai lab le once aga in
after you have changed t he battery, we recommend that you ins tall
batteries of the same type and manufacture only (the same as those
insta lled at the time your vehicle was delivered). Specifications are
listed on the battery housing . Your authorized Audi dea ler wi ll then
code the battery management contro l unit .
The new battery must have the same capacity, voltage (12 volts), amperage, construction and p lug sea ling.
When instal ling the battery, make sure the ign ition and all elect rica l
consumers are turned off .
0 Note
Make sure the ventilation hose on the side of the battery is
connected, otherwise fumes or battery acid can leak out.
'£> For the sake of the environment
Because of the problem of proper disposal of a battery, we recom
mend your authorized Audi dealer change the battery for you.
Batteries contain sulfur ic acid and lead and must always be
disposed of proper ly i n compliance with all environmental regula
tions . Disposing of vehicle batteries improper ly is very dangerous to
t he environment .•
Page 325 of 404
Checking and filling -
----------------=--_;::;;.__,
Windshield/headlight washer
container
Using plain water is not adequate for filling the wind
shield washer system and the headlight washer system.
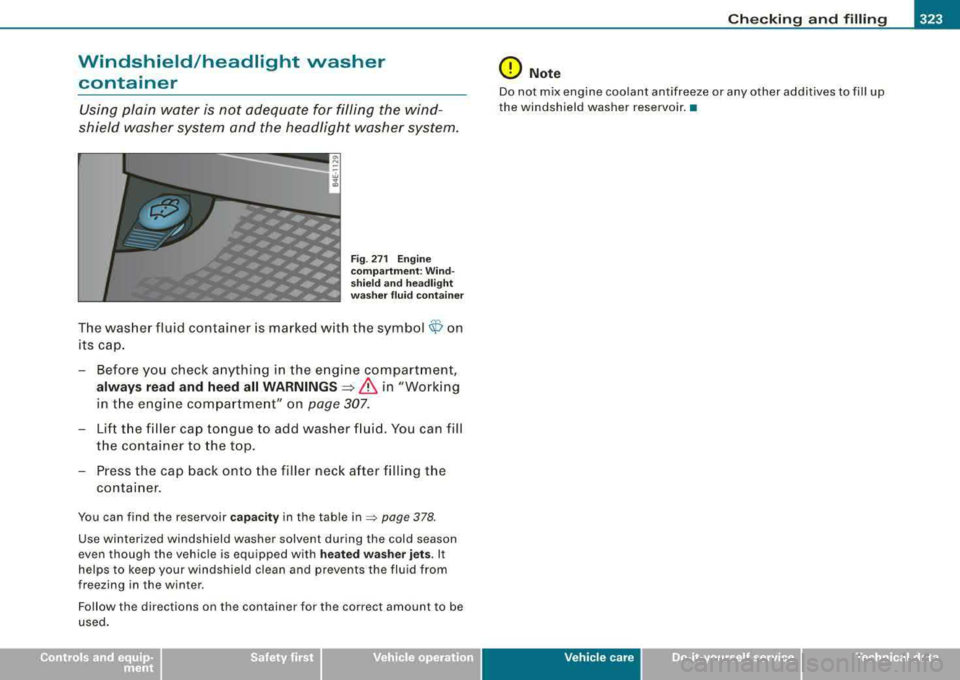
Fig . 271 Engine
compartment: Wind·
shield and headlight
washer
fluid container
1-.•,
The washer fluid container is marked with the symbol
- Before you check anything in the engine compartment,
always read and heed all WARNINGS~ & in "Working
in the engine compartment" on
page 307.
- Lift the filler cap tongue to add washer fluid. You can fill
the container to the top.
- Press the cap back onto the filler neck after filling the
container .
You can find the reservoir capacity in the table in=> page 378.
Use winterized windshield washer solvent during the cold season
even though the vehicle is equipped with heated washer jets. It
helps to keep your windshield clean and prevents the fluid from
freezing in the winter.
Follow the directions on the container for the correct amount to be
used.
0 Note
Do not mix engine coolant antifreeze or any other additives to fill up
the windshield washer reservoir. •
Vehic le care
I I irechnical data
Page 353 of 404
What do I do now? Ill
------------------~;___
•
-Disengage and lower the floor panel before you close the
luggage compartment lid again.
Storing the replaced wheel
-Place the replaced wheel inside the spare wheel well in
the luggage compartment.
Tighten the knurled retaining screw clockwise to secure
the wheel in place.
-Disengage and lower the floor panel before you close the
luggage compartment lid again.
& WARNING
Loose items in the passenger compartment can cause serious
personal injury during hard braking or in an accident .
• Never store the spare wheel or jack and tools in the passenger
compartment.
• Always store all jacking equipment, tools, and the spare wheel
in the luggage compartment .
• Tighten the knurled retaining screw for the spare wheel
securely.
[ i] Tips
Check the inflation pressure of the spare tire periodically to keep the
tire ready for use. •
Changing a wheel
Before changing a wheel
Observe the following precautions for your own and your
passenger's safety when changing a wheel.
-After you experience a tire failure, pull the car well away
from moving traffic and try to reach level ground before
you stop
~ &,. .
-All passengers should leave the car and move to a safe
location (for instance, behind the
guardrail) ~&,. .
-Engage the parking brake to prevent your vehicle from
rolling
unintentionally ~&,. .
-Move selector lever to position P ~ &,..
-If you are towing a trailer: unhitch the trailer from your
vehicle.
-Take the jack and the spare tire out of the luggage
compartment~ page 349.
& WARNING
You or your passengers could be injured while changing a wheel if
you do not follow these safety precautions:
• If you have a flat tire, move a safe distance off the road. Turn off
the engine, turn the emergency flashers on and use other warning
devices to alert other motorists.
• Make sure that passengers wait in a safe place away from the
vehicle and well away from the road and traffic.
• To help prevent the vehicle from moving suddenly and possibly
slipping off the jack, always fully set the parking brake and block
the wheel diagonally opposite the wheel being changed. When one _..
Do -it -yourself service
Page 367 of 404
________________________________________________ E=..:.; m:..:.:: e:.:.r.::g ~e::.:..: n:.:c ~y~ s:: i:.:t .=u :.:a:. t:: i:.:o :.:n..:.:: s~_JIIII
fl::. WARNING (continued)
• Before you check anything in the engine compartment, always
read and heed all
WARNINGS~ page 299, "Engine compartment".
0 Note
• Applying a higher voltage booster battery will cause expensive
damage to sensitive electronic components, such as control units,
relays, radio, etc .
• There must be no electrical contact between the vehicles as
otherwise current could already start to flow as soon as the positive
( + ) terminals are connected.
[ i) Tips
• The discharged battery must be properly connected to the
vehicle's electrical system. When jump starting or charging the battery , never connect the negative ground cable to the battery
negative post because the battery manager system must be able to
detect the battery's state of charge. Always connect the negative
ground cable to the negative ground post of the battery manager
control unit .•
Use of jumper cables
Make sure to connect the jumper cable clamps in exactly
the order described below!
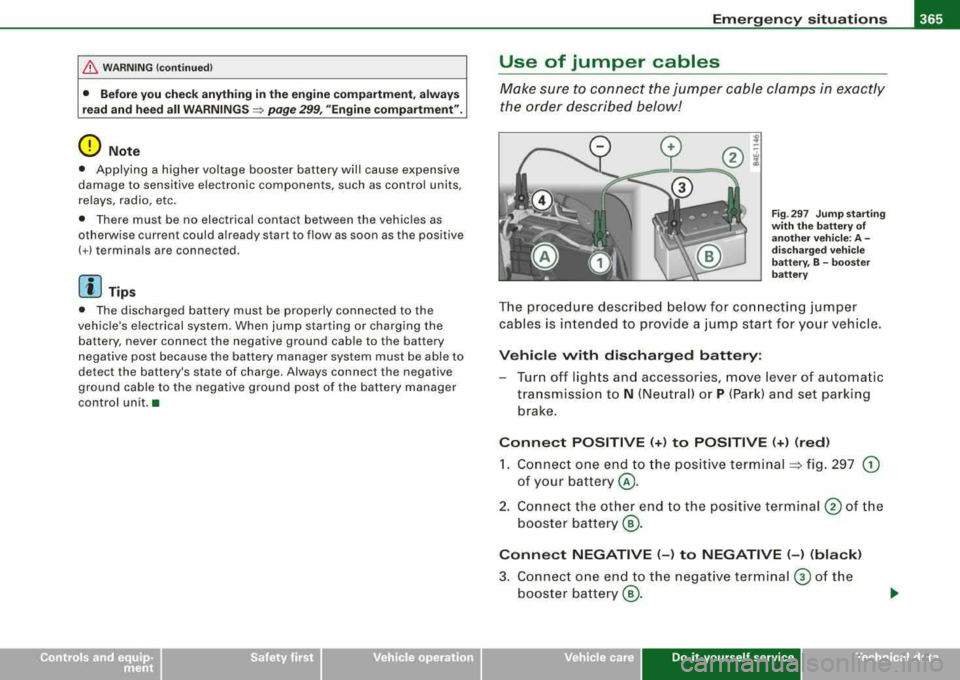
Fig. 297 Jump starting
with the battery of
another vehicle: A -
discharged vehicle
battery, B -booster
battery
The procedure described below for connecting jumper
cables is intended to provide a jump start for your vehicle.
Vehicle with discharged battery:
-Turn off lights and accessories, move lever of automatic
transmission to
N (Neutral) or P (Park) and set parking
brake.
Connect POSITIVE (+) to POSITIVE (+) (red)
1. Connect one end to the positive terminal => fig. 297 G)
of your battery @.
2. Connect the other end to the positive terminal
@ of the
booster battery
@.
Connect NEGATIVE (-) to NEGATIVE (-) (black)
3. Connect one end to the negative terminal @ of the
booster battery
@.
Vehicle care Do-it-yourself service irechnical data
Page 368 of 404
____ E_m _ e_r-=g =- e_ n_c ..: y,_ s_ i_ t _u _a_ t_ i_ o _ n_ s ______________________________________________ _
4. Connect the other end to the negative ground post of the
battery manager control unit located next to the battery.
Starting the engine
-Start the engine of the vehicle with the booster battery.
Run the engine at a moderate speed.
- Start engine with discharged vehicle battery in the usual
manner .
- If the engine fails to start: do not keep the starter
cranking for longer than 10 seconds. Wait for about 30
seconds and then try again.
- With engine running, remove jumper cables from both vehicles in the exact
reverse order.
The battery is vented to the outside to prevent gases from entering
the vehicle interior . Make sure that the jumper clamps are well
connected with their metal ports in full contact with the battery
terminals.
& WARNING
To avoid serious personal injury and damage to the vehicle, heed all warnings and instructions of the jumper cable manufacturer. If
in doubt, call for road service.
• Jumper cables must be long enough so that the vehicles do not
touch.
• When connecting jumper cables, make sure that they cannot
get caught in any moving parts in the engine compartment.
• Before you check anything in the engine compartment, always
read and heed all
WARNINGS ~ page 299, "Engine compartment".
0 Note
Improper hook -up of jumper cables can ruin the generator. •
Always connect POSITIVE(+) to POSITIVE(+), and NEGATIVE(-) to
NEGATIVE( -) ground post of the battery manager control unit.
• Check that all screw plugs on the battery cells are screwed in
firmly. If not, tighten plugs prior to connecting clamp on negative
battery terminal.
• Please note that the procedure for connecting a jumper cable as
described above applies specifically to the case of your vehicle
being jump started. When you are giving a jump start to another
vehicle, do not connect the negative(-) cable to the negative(-)
terminal on the discharged
battery @~ page 365, fig. 297. Instead,
securely connect the negative(-) cable to either a solid metal
component that is firmly bolted to the engine block or to the engine
block itself. If the battery that is being charged does not vent to the
outside, escaping battery gas could ignite and explode! •
Emergency towing with commercial
tow truck
General hints
Your Audi requires special handling for towing.
The following information is to be used by commercial tow truck
operators who know how to operate their equipment safely.
• Never tow your Audi, towing will cause damage to the engine
and transmission.
• Never wrap the safety chains or winch cables around the brake
lines.
• To prevent unnecessary damage, your Audi must be transported
with a flat bed truck.
• To load the vehicle on to the flat bed, use the towing loop found
in the vehicle tools and attach to the front or rear anchorage
~ page 367 and ~ page 368 . .,,_
Page 372 of 404
lffll....__E_ m_ e_r -=g :....e_ n
_ c-=y _ s_ i_t _u _a _t_ i_o _n_ s _______________________________________________ _
-Read and hee d WARNI NG =:> & .
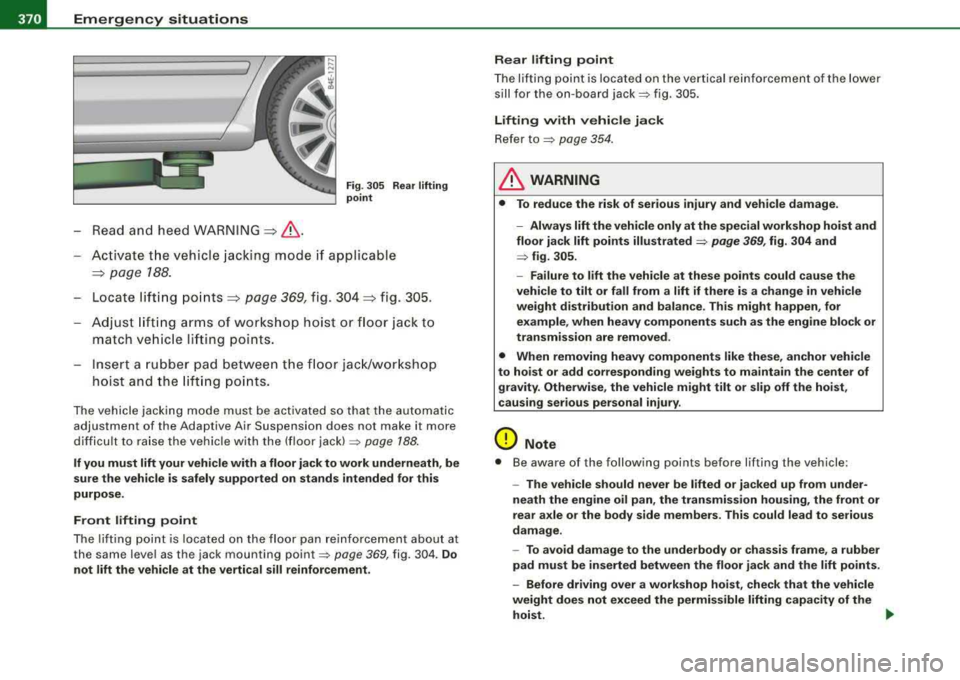
Fig. 305 Re ar lifting
point
Ac tivate t he vehicle jackin g mode if a pp licable
=:> p age 188 .
-Loc ate lift ing po in ts=:> page 369 , fig. 3 04 =:> fig. 3 05.
Ad just lift in g a rms of works hop hoi st or floor jack t o
match ve hicle li ftin g points.
Ins ert a ru b be r pad betwe en the floor jack/work shop
h o ist and t he li ftin g poin ts.
The vehicle jacki ng m ode mus t be ac tiva ted so that the au tomatic
adjustment of the Adaptive Air Suspension does not make it more
d ifficu lt to ra ise the vehic le w ith the (floor
jac k) => page 188 .
If you must lift your vehicle with a floor jack to work underneath , be
sure the vehicle is safely supported on stands intended for this
purpo se.
Front lifting point
T he lif ti ng po int is locat ed o n th e floor pan re inforc ement abou t at
the same level as the jack mounting
point => page 3 69, fig. 304. Do
not lift the vehicle at the vertical sill reinforcement. Rear lifting point
Th
e lif tin g po int is loca ted o n the vertical re info rce ment of the l ower
s ill for t he o n-board
jack=> fig . 305.
Lifting with vehicle jack
Refer to => page 354.
& WARNING
• To reduce the risk of serious injury and vehicle damage.
-Always lift the vehicle only at the special workshop hoist and
floor ja ck lift points illustrated
=> page 369 , fig. 304 and
=> fig . 305.
- Failure to lift the vehicle at these points could cause the
vehicle to tilt or fall from a lift if there is a change in vehicle
weight distribution and balance. This might happen , for
example , when heavy components such as the engine block or
transmission are removed .
• When removing heavy components like these, anchor vehicle
to hoist or add corresponding weights to maintain the center of gravity. Otherwise , the vehicle might tilt or slip off the hoist,
c ausing serious personal injury .
0 Note
• Be awar e of the following points before lifting the vehicle :
-The vehicle should never be lifted or jacked up from under
neath the engine oil pan , the transmission housing , the front or
rear axle or the body side members . This could lead to serious
damage .
-To avoid damage to the underbody or chassis frame , a rubber
pad must be inserted between the floor jack and the lift point s.
- Before driving over a workshop hoist, check that the vehicle
weight does not exceed the permissible lifting capacity of the
hoid . ~
Page 383 of 404
_______________________________________________ C
_ o_ n
_ s_u _ m_ e_ r_l_ n _f_o _ r_ m_ a_ t
_ i
_ o _ n
__ l'III
re liabi lity . For detailed vehicle maintenance consult your Warranty &
Maintenance book le t.
Und er diff icult oper ating conditi ons, for example at extreme ly low
outside temperatures, in very dusty regions, when towing a trailer
very frequently, etc ., some serv ice work shou ld be performed
between the intervals specified. This applies particu lar ly to :
• oil changes, and
• cleaning or replacing the air filter.
c£> For the sake of the environment
By regularly maintaining your vehicle, you help make sure that emis
sion s tandards are maintained, thus minimizing adverse e ffec ts on
the environment. •
Important considerations for you and your
vehicle
The increasing use of electronics, sophisticated fue l injection and
emission contro l systems, and the genera lly increasing techn ica l
complexity of today's automobiles, have steadily reduced the scope
of maintenance and repairs which can be carr ied out by veh ic le
owners.
Also , safet y and env ironmental concerns p lace very strict
l im its on the nature of repairs a nd adjustmen ts t o engine and trans
mission parts which an owner can perform.
Maintenance, adjustments and repairs usually require special tools,
testing devices and other equipment availab le to spec ia lly trained
workshop personne l in order to assure proper performance, reli
abil ity and sa fety of the vehicle a nd its many systems.
I mproper maintenance, adjustments and repairs can impair the
operat ion a nd rel iabil ity of your vehicle and even vo id your vehicle
warranty. Therefore , proof of servicing in accordance with the main
t enance sched ule may be a cond ition fo r uphold ing a p ossi ble
warranty claim made within the warranty period.
Controls and equip ment Safety first Vehicle operation
Above all, operational safety can be adverse
ly affected, creating
unnecessary risks for you a nd yo ur passengers .
If in doubt about any servicing, have it done by your authorized Audi
dea ler or any other properly equipped and qualified workshop. We
strongly urge you to give your authorized Audi dea ler the opportu
nity to perform all scheduled maintenance and necessary repairs.
Your dealer has the fac ilities, origina l parts and trained spec ialists
to keep your vehic le running proper ly.
P e rforming limited maintenan ce yourself
The following pages describe a limited number of procedures which
ca n be performed on your vehicle with ord inary tools, should the
need arise and trained personne l be unavailab le. Before performing
any of these procedures, a lways t hor oughly read all o f the app li
cable text and carefu lly fo llow the instruct ions given. Always rigor
ously observe t he
WARNINGS provided .
Before you che ck anything in the engine comp artment , alwa ys re ad
and heed all
WARNING S=> & and => & in "Working in the engine
compartment" on
page 307.
& WARNING
• Serious personal injury may occur a s a result of imprope rly
performed maintenance , adju stments or repair s.
• Always be e xtremely careful when working on the vehi cle .
Always follow commonly accepted safety practice s and general
c ommon sen se . Ne ver risk per sonal injur y.
• Do not attempt any of the maintenance , checks or repairs
de scribed on the following pages if you are not fully familiar with
these or other pro cedures with re spe ct to the vehicle , or are uncer
tain how to pro ceed .
• Do not do any work without the proper tools and equipment.
Have the ne ce ssary work done by your authorized Audi dealer or
another properly equipped and qualified workshop .
~
Vehicle care Do-it-yourself service Technical data