brake AUDI S8 2008 Manual PDF
[x] Cancel search | Manufacturer: AUDI, Model Year: 2008, Model line: S8, Model: AUDI S8 2008Pages: 404, PDF Size: 52.7 MB
Page 362 of 404
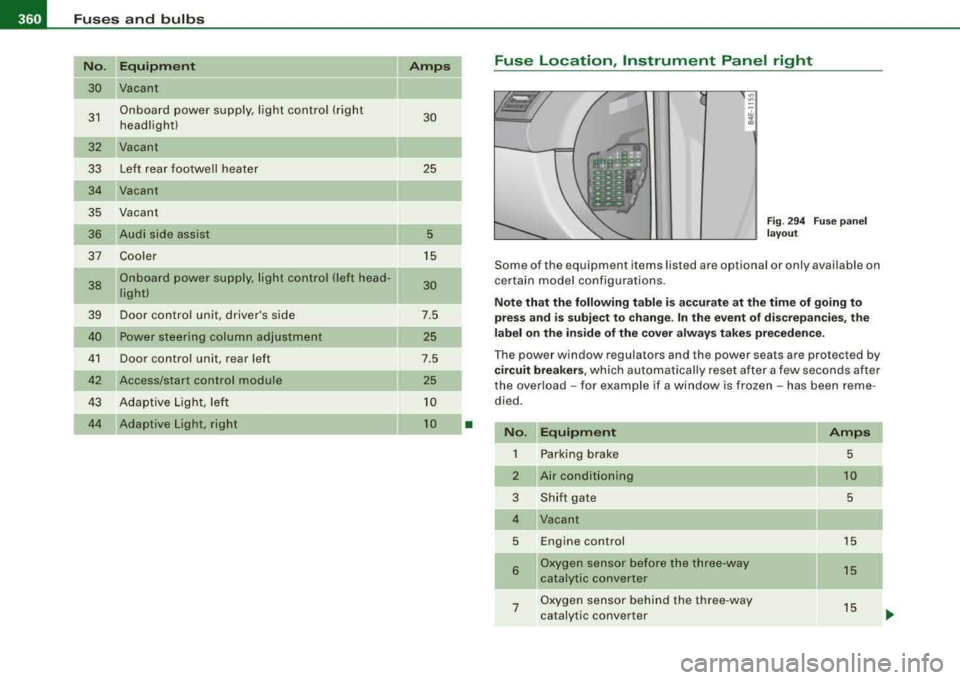
111!1....__F_ u_ s_ e_s _ a_n _ d_ b_ u_lb _ s _______________________________________________ _
No. Equipm ent
30 Vacant
31
32
33
34
35
36
37
38
39
40
On board power supply, light control (right headlight)
Vacant L eft rear footwell heater
Vacant
Vacant
Audi side assist Cooler
Onboard power supply, light control (left head light)
Door control unit, driver 's side
Power ste ering column adjustment
41 Door control unit, rear left
Amps
30
25
5
15
30
7.5
25
7.5
25 42 Access/start control module
43 Adaptive Light, left ______ _,., __
--44 Adaptive Light, right 10 10
.
•
Fuse Location
, Instrument Panel right
Fig. 29 4 Fuse pa nel
lay ou t
Some of the equipment items listed are optional or only available on
certain model configurations.
Not e th at th e follo wing t able is acc urate at th e tim e o f going to
pr ess and is s ubject t o c hange . In th e event o f di screp ancies, the
la bel on the in side of the cov er a lways ta k es prece de nce.
The power window regulators and the power seats are protected by
cir cuit br eak ers, which automatically reset after a few seconds after
the over load -for example if a window is frozen - has been reme
died .
No. Equipm ent
1 Parking brake
2
3
4
5
6
7
Air conditioning Shi ft gate
Vacant
Engine control
Oxygen senso r before the three-way
catalytic converter
Oxygen sensor behind the three-way
catalytic converter
Amp s
5
10
5
15
15
15
-
Page 363 of 404
_________________________________________________ F_ u_ s_ e_s _ a_n _d_ b_ u
_ lb_ s _ __,_
-
No . II Equipm ent
8 Engine control, auxiliary water pump
9
10 C
limate control front /rear, dash panel buttons
Suspension level control system
(Adaptive Air Suspension)
11 Light and rain sensor
1 2 Display -/control unit
13 Roof electronics control unit
CD/DVD d rive
15 Energy managemen t
16 Vacant
17 Radiator fan e lectronics
18 Airbag front passenger recognition
(weight sensor)
19 Vacant
20 Heated/ventilated seats
21 Engine control module
22 Vacant
23 Parking brake (switch)
24 Vehicle electrical syste m
25
26
27
Automatic transmission Air condi tioning water valves wate r pump,
rea r climate control
Sunroof
28 Engine control module
29 Fuel injectors
30 Ignition coils
Amps
10
5
1 0
5
5
10
5
5
5
5
5
5
5
1 0
15
10
20
5
1 5
30
-
No . Equipm ent
31 Fuel pump , right/fue l pump e lectronics
32 Automatic transmission
33
34
Right rear footwe ll heater
Heated/ventila ted seats, rear
35 Heated/ventilated seats, front
36 Cigarette lighter, front
37 Cigarette lighter, rear/socket, rear
38 Auxil iary cooler fan
39 Door contro l unit, front right
40 Brake booster
41 Door contro l unit, rear right
42 Vacant
43 Headlight washer system
44 A ir co nditioning heater fan
Amps
20/40
5
25
20
20
20
20/25 20
7.5
1 5
7.5
30
30 •
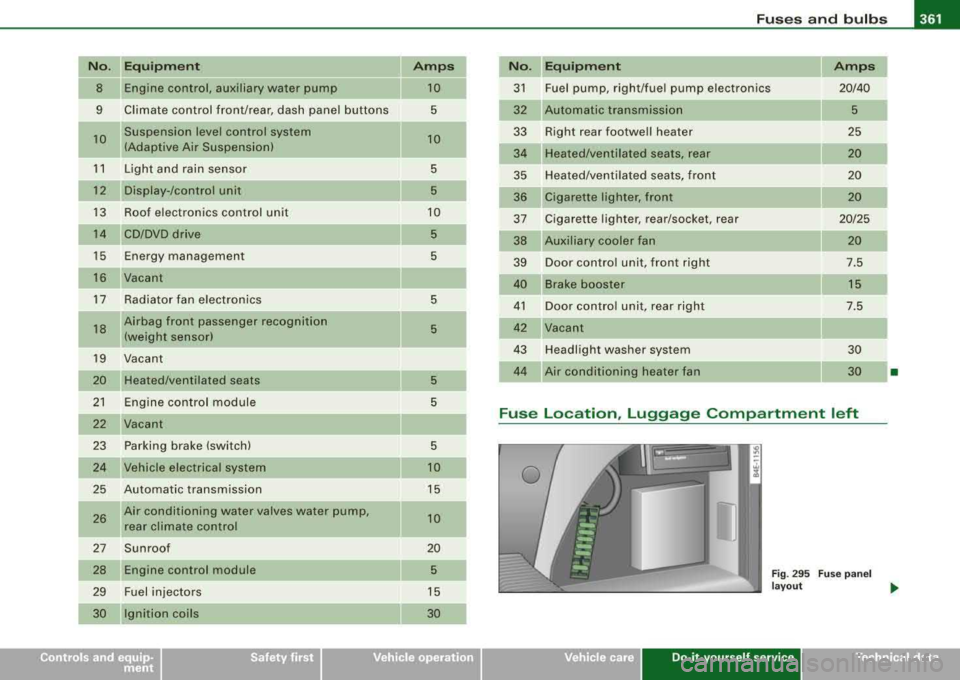
Fuse Location , Luggage Compartment left
0
Fig . 2 95 Fuse pan el
l a you t _.
Vehicle care Do-it-yourself service irechnical data
Page 364 of 404
111!1....__F_ u_ s_ e_s _ a_n _ d_ b_ u_lb _ s _______________________________________________ _
No. Equipment Amps
1
Vacant
2 Vacant
3 Vacant
4 Vacant
5 Digital sound system control module 30
6 Navigation 5
7
TV Tuner 10
8 Rear -view camera 5
9 Communications box 5
10 Subwoofer in rear window shelf (BOSE)/ 15/30 Amplifier (Bang & Olufsen)
--
1 1 Socket 20
12
Vacant
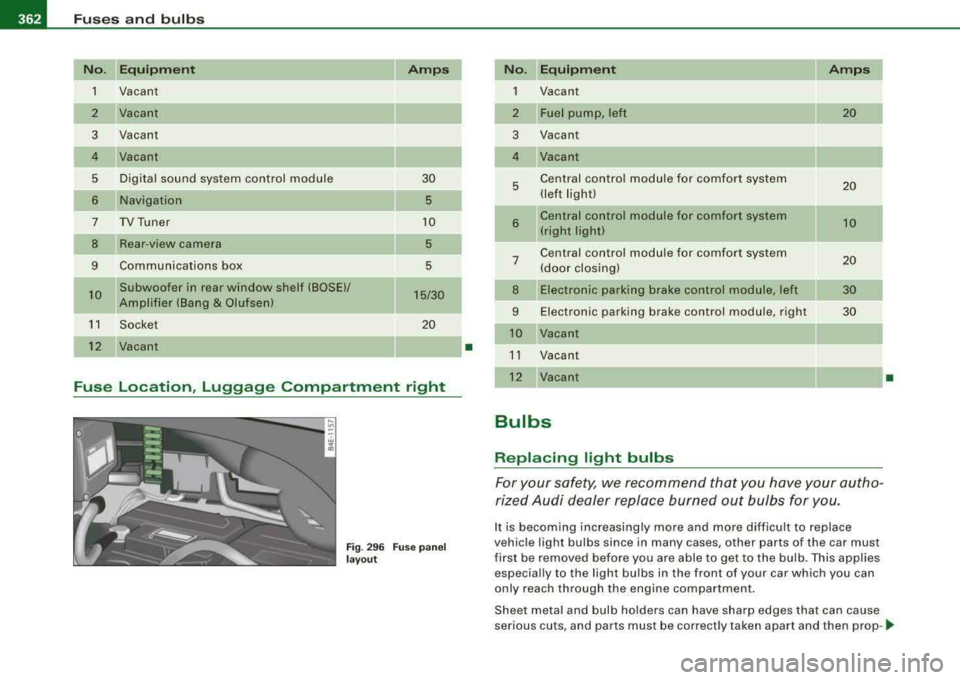
Fuse Location, Luggage Compartment right
Fig. 296 Fuse pan el
l a y out
I
•
N o. Equipm ent Amps
1
Vacant
2 Fuel pump, left 20
3 Vacant
4 Vacant
5 Central control module for comfort system 20 (left light)
-
6 Central control module for comfo rt system 10 (right light)
Central control module for comfort system 7 (door closing) 20
8 Electronic parking brake control module, left 30
9 Electronic parking brake control module, right 30
Vacant
11 Vacant
12 Vacant
Bulbs
Replacing light bulbs
For your safety, we recommend that you have your autho
rized Audi dealer replace burned out bulbs for you.
It is becoming increasing ly more and more difficult to replace
vehic le light bulbs since in many cases, other parts of the car must
first be removed before you are able to get to the bu lb. This applies
especially to the light bulbs in the front of your car which you can
only reach through the engine compartment.
•
Sheet metal and bulb holders can have sharp edges that can cause
serious cuts, and parts must be correctly taken apart and then prop -
...
Page 367 of 404
________________________________________________ E=..:.; m:..:.:: e:.:.r.::g ~e::.:..: n:.:c ~y~ s:: i:.:t .=u :.:a:. t:: i:.:o :.:n..:.:: s~_JIIII
fl::. WARNING (continued)
• Before you check anything in the engine compartment, always
read and heed all
WARNINGS~ page 299, "Engine compartment".
0 Note
• Applying a higher voltage booster battery will cause expensive
damage to sensitive electronic components, such as control units,
relays, radio, etc .
• There must be no electrical contact between the vehicles as
otherwise current could already start to flow as soon as the positive
( + ) terminals are connected.
[ i) Tips
• The discharged battery must be properly connected to the
vehicle's electrical system. When jump starting or charging the battery , never connect the negative ground cable to the battery
negative post because the battery manager system must be able to
detect the battery's state of charge. Always connect the negative
ground cable to the negative ground post of the battery manager
control unit .•
Use of jumper cables
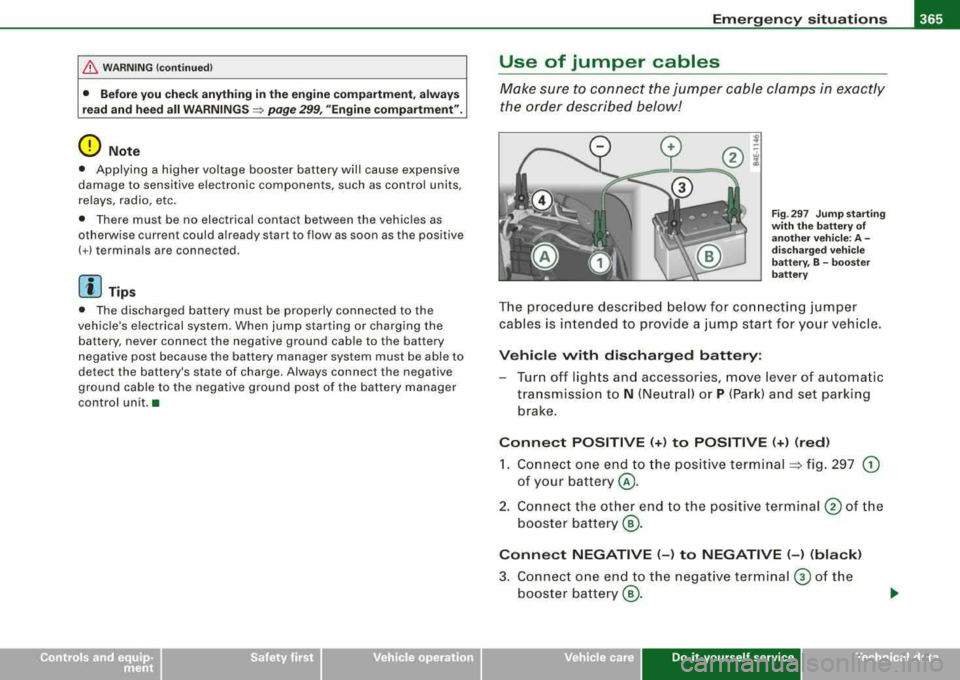
Make sure to connect the jumper cable clamps in exactly
the order described below!
Fig. 297 Jump starting
with the battery of
another vehicle: A -
discharged vehicle
battery, B -booster
battery
The procedure described below for connecting jumper
cables is intended to provide a jump start for your vehicle.
Vehicle with discharged battery:
-Turn off lights and accessories, move lever of automatic
transmission to
N (Neutral) or P (Park) and set parking
brake.
Connect POSITIVE (+) to POSITIVE (+) (red)
1. Connect one end to the positive terminal => fig. 297 G)
of your battery @.
2. Connect the other end to the positive terminal
@ of the
booster battery
@.
Connect NEGATIVE (-) to NEGATIVE (-) (black)
3. Connect one end to the negative terminal @ of the
booster battery
@.
Vehicle care Do-it-yourself service irechnical data
Page 368 of 404
____ E_m _ e_r-=g =- e_ n_c ..: y,_ s_ i_ t _u _a_ t_ i_ o _ n_ s ______________________________________________ _
4. Connect the other end to the negative ground post of the
battery manager control unit located next to the battery.
Starting the engine
-Start the engine of the vehicle with the booster battery.
Run the engine at a moderate speed.
- Start engine with discharged vehicle battery in the usual
manner .
- If the engine fails to start: do not keep the starter
cranking for longer than 10 seconds. Wait for about 30
seconds and then try again.
- With engine running, remove jumper cables from both vehicles in the exact
reverse order.
The battery is vented to the outside to prevent gases from entering
the vehicle interior . Make sure that the jumper clamps are well
connected with their metal ports in full contact with the battery
terminals.
& WARNING
To avoid serious personal injury and damage to the vehicle, heed all warnings and instructions of the jumper cable manufacturer. If
in doubt, call for road service.
• Jumper cables must be long enough so that the vehicles do not
touch.
• When connecting jumper cables, make sure that they cannot
get caught in any moving parts in the engine compartment.
• Before you check anything in the engine compartment, always
read and heed all
WARNINGS ~ page 299, "Engine compartment".
0 Note
Improper hook -up of jumper cables can ruin the generator. •
Always connect POSITIVE(+) to POSITIVE(+), and NEGATIVE(-) to
NEGATIVE( -) ground post of the battery manager control unit.
• Check that all screw plugs on the battery cells are screwed in
firmly. If not, tighten plugs prior to connecting clamp on negative
battery terminal.
• Please note that the procedure for connecting a jumper cable as
described above applies specifically to the case of your vehicle
being jump started. When you are giving a jump start to another
vehicle, do not connect the negative(-) cable to the negative(-)
terminal on the discharged
battery @~ page 365, fig. 297. Instead,
securely connect the negative(-) cable to either a solid metal
component that is firmly bolted to the engine block or to the engine
block itself. If the battery that is being charged does not vent to the
outside, escaping battery gas could ignite and explode! •
Emergency towing with commercial
tow truck
General hints
Your Audi requires special handling for towing.
The following information is to be used by commercial tow truck
operators who know how to operate their equipment safely.
• Never tow your Audi, towing will cause damage to the engine
and transmission.
• Never wrap the safety chains or winch cables around the brake
lines.
• To prevent unnecessary damage, your Audi must be transported
with a flat bed truck.
• To load the vehicle on to the flat bed, use the towing loop found
in the vehicle tools and attach to the front or rear anchorage
~ page 367 and ~ page 368 . .,,_
Page 384 of 404
___ C_ o_n_ s_ u_m _ e_ r_ ln_ f_o _r_m _ a_ t_ i_o _n ______________________________________________ _
&, WARNING (continued )
• The engine compartment of any motor vehicle is a potentially
hazardous area . Never reach into the area around or touch the
radiator fan . It is temperature controlled and can switch on
suddenly -even when the engine is off and the ignition key has
been removed . The radiator fan switches on automatically when
the coolant reaches a certain temperature and will continue to run until the coolant temperature drops .
• Always remove the ignition key before anyone gets under the
vehi cle .
• Always support your vehicle with safety stands if it is neces
sary to work underneath the vehicle . The jack suppl ied with the
vehicle is not adequate for this purpose and could collapse causing serious personal injury .
• If you must work underneath the vehicle with the wheels on
the ground , always make sure the vehicle is on level ground , that
the wheels are always securely blocked and that the engine
cannot be started .
• Always make sure the transmission selector lever (automatic
transmission) is in
"P " (Park position ) and the park brake is firmly
applied.
W For the sake of the environment
• Cha ng ing the eng in e sett ings will adverse ly aff ect em iss ion
levels . This is detrimenta l to the environment and increases fuel
c o nsu mp tion .
• Always observe environmenta l regu lations when disposing of
o ld eng ine oil, u sed b ra ke flu id, d irty e ng in e coo la nt, spe nt batter ies
or worn out tires.
• Undeployed airba g modul es and pret ensioners might be classi
fied as Perchlorate Material -special handling may apply, see
www .dtsc.ca .gov/ haza rdouswast e/p erc hlor ate . W hen the vehicle or
parts of the restraint s ystem including airbag modules safety be lts
w it h p ret en sio ner s are scra p pe d, a ll ap pl icable l aw s and reg ula- tions must be observed
. Your authorized Audi dea ler is familiar with
th ese re q ui re me nts a nd we reco mmend th at you h ave your dea le r
perform this serv ice for you .•
Additional accessories,
modifications and parts replacement
Additional accessories and parts
replacement
Always consult an author ized Audi dealer before
pu rcha sing a ccess ories .
Your vehicle incorporates the latest safety design featu res ensuring
a high sta nd ard of ac tive a nd pass iv e sa fet y.
T his sa fety could be compromised by non -approved chang es to th e
veh ic le . Fo r th is reason, if pa rts have to be replaced, please o bse rve
the followi ng po ints wh en insta lling addi tio na l acc essor ies:
A pprove d Audi accesso ries and genuine A udi parts are avai lable
fr om autho rized Aud i d eale rs.
T hese deale rs also have the necessary fac ilities, tools and tra ined
spec ial is ts to ins tal l the part s and accesso rie s prope rly.
L1}. WARNING
Using the wrong spare parts or using non -approved accessories
can cause serious personal injury.
• Use only accessories expressly approved by Audi and genuine
Audi spare parts
• These parts and accessories have been specially designed to
be used on your vehicle .
• Never install accessories such as telephone cradles or
beverage holders on airbag covers or within the airbag deploy-
Page 389 of 404
______________________________________________ A_ l.!. p _h_ a_ b_e _ t_i c_ a..:..l ...:.. in :..:..:. d:..:e :..: x_;__ _,n
Kne e airbags ...... ... .. .... ..... 234 ASR
Moni to ring .. ... .... .... ....... .. 229 How the Anti-S lip Regu la tion Sys tem
PASSENGER AIR BAG OFF ligh t .... . 230 works ...... ... .... .... .... .... 270
Repairs ........ .... .... ......... 232
Safety instructions ... .... ... .... . 231
Side airbags ... .. .... .... ... .... . 237
Side curtain air bags (SIDEGUARD) .. 240
Warning/indicator lights ...... .... .. 19
Weight -sens ing mat ...... ... .... . 2 44
When mu st the syst em be insp ected?
229
Aircra ft
T ransporting your v ehicle .. ........ 369
All W hee l Dr ive ...... .... ... .... .... 273
Alloy whee ls ... .... .... .... ... .... .. 293
A ll-whee l drive
W int er tir es . ..... .... ... ... . .... . 34 1
A lternator
See Ge ne ra tor . ....... ... .... .... . 18
An ti-free ze
See Engine coolan t ..... .... .... .. 314
An ti- lock brak e system
How th e ABS syst em works ....... . 272
Wa rning /indi cato r ligh ts .. .. .. .... .. 21
Anti -Sl ip Reg ulat io n System (ASR)
H ow the system works .... .... .... 270
Anti -theft systems
Anti -theft alarm system .. ... .... ... 61
E lectron ic immob ilizer . .... .... .... 49
Ashtray Fron t .. .... ... .. .... ...... .... .. 106 Aud
i Service Repa ir Manua ls and Literatu re
380
A UTO mode
AC climate con tro l .. .. .... .... .... 117
Auto Safety Hotline .... .... .... ... .. . 207
A ut o-C heck Con trol ...... .... ... .... .. 28
Automatic belt retracto r ... .. .... .... . 213
Automati c car wash
See Washing . .............. .... .. 289
A ut om atic Sh ift Loc k (ASU . ...... .... . 165
Automat ic transmission
6 -speed automat ic t rans missio n .... 163
Auto matic S hift Lock (ASU .... .... . 165
Dr iving . ...... .... .... .... .... ... 163
Dynamic sh ift p rogram .. ...... .... 166
Em ergency release fo r selecto r leve r 168
F a il- safe mode . ...... .... .... .... 168
I gnition key s afety lock . ...... .... . 130
K ick -down .... .... .... .... ... .... 166
Manual sh ift program ....... .... .. 167
S ele ctor le ve r ... ........... .... .. 164
Shift buttons ... .... .... .... .... . 168
S teering wheel w ith tiptronic . ...... 168
Average speed . ...... .... .... .... ... . 38
Avo id damaging the ve hicle .. ...... ... 279
B
Rear . ...... .. ...... .... ......... 107 Background lighting . ...... .... ... .. .. 76 Ba
ttery .... ... .. .... .... ...... .... . 318
Ba ttery location ins ide the luggage
compa rtmen t ... .... ... .... .... . 319
Chargi ng .. .... .... ... .... .... ... 321
Impo rtant wa rnings when working on the
battery .. .... .... ... .... ...... . 319
low ...... .... .... .... ... .... .... 274
Replaci ng t he battery .. ... .... ... . 3 22
State of cha rge . ...... .... .... ... . 27 4
Winter operat ion ..... .... .... .. . . 318
Wo rking on the batte ry . ....... ... . 319
Battery vo ltage .. .. .. .... .... .... ..... 35
B efo re driving ... .... .... ...... .... . 199
Blended gasoline ... .. .... .... .... ... 30 1
Body cavity sealing ........ .... .... .. 294
Boos ter seat ... .. .... .... ... .... .... 251
How do I properly install a booster seat in my veh ic le? . .... .... ... .... .... 251
Safety instructions .. ...... .... ... . 251
Brake flu id
Changing the brake fluid ...... .... . 318
Check ing the brake fluid leve l .... .. 317
What is the co rrect brake fluid leve l? 317
What s hould I do i f th e brake fluid warning
l ight com es on? . .... .... .... .... 317
Brake system Ant i- lock brake sys tem .... .... .... . 21
B rake assis ta nt .... .... ... .... .... 272
Brake booster .. ... .... ... .... .... 271
Brake flu id . ... .... .... ... .... .... 317
Brake f luid specifications for ref ill and
replace men t . .... .... .... ...... . 318
Bra ke light de fective . .... . .... .. .. . 26
Brake pads . ...... .... ... .... .... 278
Controls and equip
ment Safety first Vehicle operation
Vehicle care Do-it-yourself service Technical data
Page 390 of 404
___ A_ l-=- p _ h_ a_ b_e _t_ ic _ a_l _in _ d_e_ x ____________________________________________ _
Electromechanical parking brake ... 134
Fluid reservoir . . . . . . . . . . . . . . . . . . . 317
How does moisture or road sal t affect the
brakes? ....................... 270
Malfunction ..... ... ... .. .... .... . 30
Warning/indicator lights ... .... .... 22
Worn brak e pads symbol ..... .. .... 34
Break -in period . . . . . . . . . . . . . . . . . . . . . 277
B rake pads .. ...... .... ......... . 278
Tires ..... .. .. .... .... ......... . 277
Bu lbs ... .... .... .... ....... .... ... 362
Bumper cover Caution when parking near a parking bar -
rier or curb ...... ... .... .... ... 135
C
Ca lifornia Proposition 65 Warning 308
Battery specific . . . . . . . . . . . . . . . . . . 321
Capacit ies .. .... .... .... .... ... .... 378
Car care . .... .... .... .... .... .... .. 288
Int erior .. .... .... .... .... ...... . 295
P lastic and vinyl .. .... .... ... .... 292
Weatherstrips ...... ... .. ...... .. 293
Car carrier Transporting your vehicle ........ . 369
Care of exterior . .... .... .... .... .... 288
Cargo area
See Loading the luggage compartment ..
205
Cargo net .... .... .... .... ... .... ... 101
Catalyt ic converter . . . . . . . . . . . . . . . . . . 278 Central locking
Emergency locking . . . . . . . . . . . . . . . . 54
Changing a flat tire ...... .... ... .. .... 45
Changing a wheel .... ..... .. .... .... 351
Changing engine oi l .. .... .... .... ... 313
Chassis Undercoating ... .. .... .... .... ... 294
See also Adaptive Aur Suspension . .. 185
CHECK button .... .... .... ..... .. .... 15
Checking Engine coolant level ... .... ..... .. 315
Checking tire pressure ... .. .... .... .. 331
Child restraints Danger of using child restraints in the front seat ... ....... ...... .... .. 220
What types o f child restraint anchors are
avai lable? ... ....... ...... .... .. 256
Where can I get additional information
about child r estraints? ...... ... .. 257
Child safety ...... .. . ... .... ... . 243, 248
Additiona l information ............ 262
Booster seat ... .... ... .... .... ... 251
Convertible child safety seat .... ... 249
Conv ert ible locking r etractor ... .... 253
Guidance fixtures for lower anchorages
259
Important safety instructions for using
child safety seats ..... .. .... .... 246
Important things to know when driving with children . .... .... .... ...... 243
Infant seat .... .... .... .... ... ... 248
Installing a child restrain t using the
LATCH system ...... ...... ..... . 261 Mounting and releasing the anchorage
hook .......................... 262
Older children and safety belts ..... 252
Safety belts and older children .... . 252
Tether anchors .. ...... .... ... .. . 262
Tether strap ........... .... .... .. 263
Which restraint system should my older chi ld wear? .................. .. 252
Child safety lock
Rear doors (mechanical! ...... .... .. 58
Rear doors (power) .... .... .... .... 58
Child safety seat .. .... .... ...... .... 248
Convertible locking r etractor .... ... 253
How do I properly insta ll a chi ld safety
seat in my vehicle? .. ........ .... 246
Installing .. .. .. .... .... ..... .. ... 253
LATCH system ................... 261
Safety instructions .. ...... .... ... 246
Cigarette I ig hter . . . . . . . . . . . . . . . . . . . . 107
Cleaning Alcantara (synthetic suede) .... .... 298
Engine compartment ...... .... ... 299
Fab rics and fabric coverings ... .... 295
Instrument panel ...... ....... .... 296
Interior ... .... .... .... .... .... .. 295
Leather ... .... .... .... ..... .. ... 297
MMI display .............. .... ... 295
MMI terminal ...... .... ..... .. ... 295
Plastic and viny l ... .... .... ....... 292
P lastic parts ..................... 296
Safety belts ... .... .... ... .... ... 299
Trim strips . ....... .... ... .... ... 291
trim strips . ....... .... ....... .... 292
Lower anchorages ........... ..... 258 Cleaning and protection ............. 288
Page 392 of 404
lll'ffll_....:..A..:.;l~ p :..;h..:.; a= b..:e :..;t:.:..i c::..:: a.:..l .,;. in :..:..:. d:..;e :..;x..:..,_ ___________________________________________ _
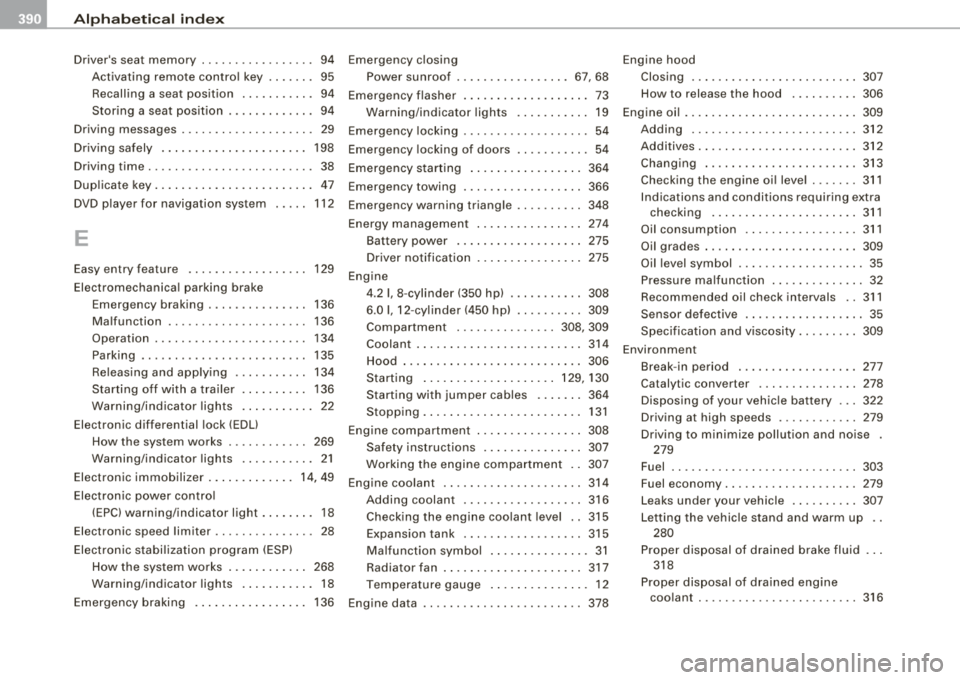
Driver's seat memory . . . . . . . . . . . . . . . . . 94
Activating remote contro l key .. ... .. 95
Recalling a seat position ...... .... . 94
Storing a seat position ............. 94
Driving messages .................... 29
Dr ivingsafely .... .... .... ...... .... 198
Driving time .... ... .. .... .... ...... .. 38
Dup licate key ......... ............... 47
DVD p layer for navigation system . . . . . 112
E
Easy entry feature 129
Electromechanica l parking brake
Emergency braking ............... 136
Malfunction ........ .... .... .... . 136
Operation . . . . . . . . . . . . . . . . . . . . . . . 134
Parking . . . . . . . . . . . . . . . . . . . . . . . . . 135
Re leasing and app lying .... .... ... 134
Starting
off with a trailer . ...... ... 136
Warning/indicator lights ........... 22
Electronic differential lock (EDU
How the system works . . . . . . . . . . . . 269
Warning/indicator lights ........... 21
Electronic immobilizer .. ...... ..... 14, 49
Electron ic power contro l
(EPC) warning/indicator light .. .... .. 18
Electronic speed limiter .. .. .. .... ..... 28
Electronic stabi lization program (ESP)
How the system works . . . . . . . . . . . . 268
Warning/indicator lights ........... 18
Emergency braking .. ....... .. ...... 136 Emergency
closing
Power sunroof ................. 67, 68
Emergency flasher . . . . . . . . . . . . . . . . . . . 73
Warning/indicator lights ..... ...... 19
Emergency locking ....... .... .... .... 54
Emergency locking of doors ........... 54
Emergency starting ........ .... ... .. 364
Emergency towing ..... .. .... .... ... 366
Emergency warning triangle ... ....... 348
Energy management .... .... ... .. ... 274
Battery power . . . . . . . . . . . . . . . . . . . 275
Driver notification ................ 275
Engine 4.2 I, 8-cylinder (350 hp) .... .... ... 308
6 .0 I, 12-cylinder (450 hp) .......... 309
Compartment . .... .... .... .. 308, 309
Coolant ......................... 314
Hood ... .. .... .... .... .... .... .. 306
Starting ...... .............. 129, 130
Starting with jumper cables .. ... .. 364
Stopping ........................ 131
Engine compartment ... .. .... .... ... 308
Safety instructions .......... ..... 307
Working the engine compartment .. 307
Engine coolant ..................... 314
Adding coolant ............. ..... 316
Checking the engine coo lant level .. 315
Expansion tank .................. 315
Malfunction symbo l ...... .... .... . 31
Radiator fan ...... .... .... .... ... 317
Temperature gauge . . . . . . . . . . . . . . . 12
Engine data ........................ 378 Engine hood
Closing ..... .. .... .... ...... ... . 307
How to release the hood . . . . . . . . . . 306
Engine oi l ..... ... .... .... .... ...... 309
Adding ......................... 312
Additives ........................ 312
Changing .. .... .... ..... .. .... .. 313
Checking the engine oil level ....... 311
Indica tions and conditions requiring extra
checking .. ...... .... ...... .... 311
Oil consumption ................. 311
Oil grades .. .... .... ... .... .... .. 309
Oil level symbol .... .... ...... ... .. 35
Pressure ma lfunction ... ... .... .... 32
Recommended oil check intervals .. 311
Sensor defective . . . . . . . . . . . . . . . . . . 35
Specification and viscosity ......... 309
Environment Break -in period .................. 277
Catalytic converter .... .... .... ... 278
Disposing of your vehicle battery ... 322
Driving at high speeds ....... ... .. 279
Driving to minimize pollution and noise .
279
Fuel ...... .... ........... .... ... 303
Fuel economy .......... .... .... .. 279
L eaks under your vehicle .......... 307
Le tting the vehicle stand and warm up ..
280
Proper disposal of drained brake fluid
318
Proper disposal of drained engine coolant . .... .... .... .... ....... 316
Page 396 of 404
lll'ft __ A_l-=- p _h_ a_ b_e _t_ic _ a_l _in _ d_e _x ____________________________________________ _
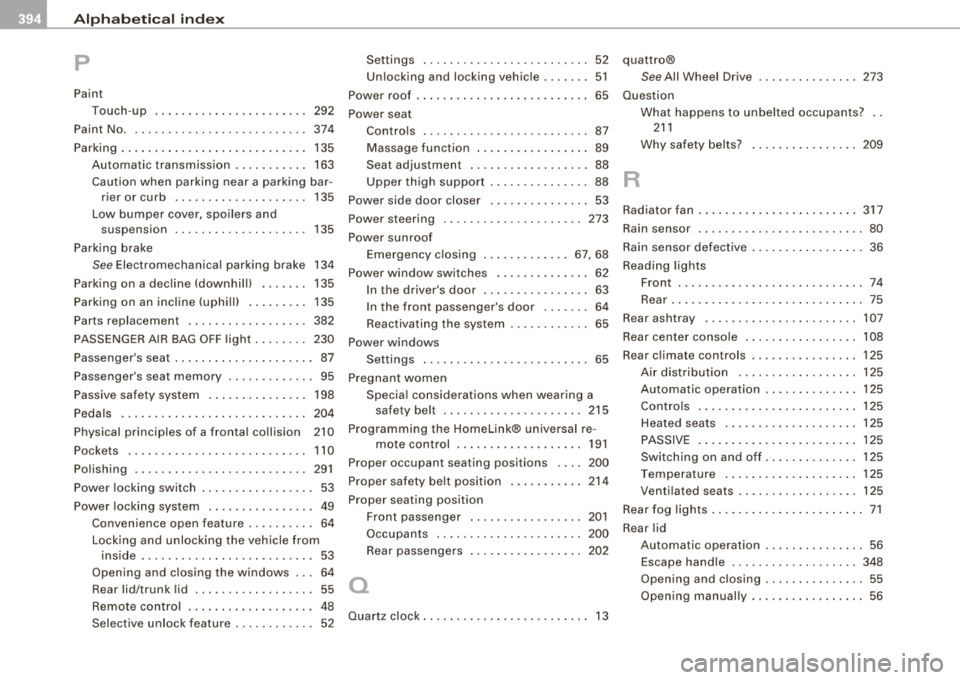
p
Paint
Touch-up 292
Paint No. . . . . . . . . . . . . . . . . . . . . . . . . . . 374
Parking . . . . . . . . . . . . . . . . . . . . . . . . . . . . 135
Automatic transmission ... .... .... 163
Caution when parking near a parking bar -
rier or curb .. .... ....... .... ... 135
Low bumper cover, spoilers and suspension . . . . . . . . . . . . . . . . . . . . 135
Parking brake
See Electromechanica l parking brake 134
P arking on a dec line (downhill) ....... 135
Parking on an incline (uphill) ... .. .... 135
Parts replacement . . . . . . . . . . . . . . . . . . 382
PASSENGER AIR BAG OFF ligh t ........ 230
Passenger's seat . . . . . . . . . . . . . . . . . . . . . 87
Passenger's seat memory . . . . . . . . . . . . . 95
Passive safety system . . . . . . . . . . . . . . . 198
Pedals ............................ 204
Physical principles of a frontal collision 210
Pockets . . . . . . . . . . . . . . . . . . . . . . . . . . . 110
Polishing .... ..... .. .... .... ...... . 291
Power locking switch . . . . . . . . . . . . . . . . . 53
Power locking system . . . . . . . . . . . . . . . . 49
Conven ience open feature .......... 64
Locking and unlocking the vehicle from
inside ........... ....... .... .... 53
Opening and closing the windows .. . 64
Rear lid/trunk lid ...... .... .... .... 55
Remote control . . . . . . . . . . . . . . . . . . . 48
Selective unlock feature . . . . . . . . . . . . 52 Settings
. . . . . . . . . . . . . . . . . . . . . . . . . 52
Unlocking and locking vehicle ... .... 51
Power roof . . . . . . . . . . . . . . . . . . . . . . . . . . 65
Power seat Contro ls .. .... ... .... .... .... .... 87
Massage function ....... ...... .... 89
Seat adjustment ........ ....... ... 88
Upper thigh support .. ...... .... ... 88
Power side door closer . . . . . . . . . . . . . . . 53
Power steering ..................... 273
Power sunroo f
Emergency c losing ............. 67, 68
Power window switche·s ... .... ....... 62
In the driver's door ................ 63
In the front passenger's door . . . . . . . 64
Reactivating the system ............ 65
Power windows Settings . . . . . . . . . . . . . . . . . . . . . . . . . 65
Pregnant women Specia l considerations when wearing a
safety belt ..................... 215
Programming the Homelink® universal re-
mote control . . . . . . . . . . . . . . . . . . . 191
Prop er occupant seating positions .... 200
Proper safety be lt position .. .... ... .. 214
Proper seating position Front passenger ................. 201
Occupants ...................... 200
Rear passengers 202
a
Quartz clock . . . . . . . . . . . . . . . . . . . . . . . . . 13 quattro®
See All Wheel Drive
............... 273
Question
R
What happens to unbelted occupants? . .
211
Why safety belts? ................ 209
Radiator fan ........................ 317
Rain sensor ......................... 80
Rain sensor defective ... .. .... .... .... 36
Reading lights
Front . .... .... .... .... ....... .... 74
Rear ............................. 75
Rear ashtray ....................... 107
Rear center console ...... .... .... ... 108
Rear c limate controls ................ 125
Air distribution .... ....... .... ... 125
Automatic operation . ...... .... ... 125
Contro ls . ...... ..... .. .... .... .. 125
Heated seats . . . . . . . . . . . . . . . . . . . . 125
PASSIVE . ... .. .... .... ...... .... 125
Switching on and off . ...... .... ... 125
Temperature ...... .... .... .... .. 125
Ventilated seats .................. 125
Rear fog lights .. ...... .... ...... .... . 71
Rear lid
Automatic operation ............... 56
Escape handle .... .... .... .... ... 348
Opening and clos ing ... .... .... .... 55
Opening manual ly ...... .... .... ... 56