refuelling AUDI S8 2008 Owners Manual
[x] Cancel search | Manufacturer: AUDI, Model Year: 2008, Model line: S8, Model: AUDI S8 2008Pages: 404, PDF Size: 52.7 MB
Page 305 of 404

The label on the inside of the fuel filler flap tells you the correct fuel
for your vehicle . For more information about fuel specifications, see
=> page 301.
Your vehicle fuel tank has an onboard refuelling vapor recovery
system. This feature helps to prevent fuel vapors from escaping
from the tank and polluting the environment while you refuel your
vehicle. In order to fill the tank properly while protecting the envi
ronment, please follow this refueling procedure carefully.
& WARNING
Under normal operating conditions , never carry additional fuel
containers in your car. Gas canisters and other containers used to
transport fuel can be dangerous . Such containers , full or empty,
may leak and could cause a fire in a collision . If you must transport
fuel to use for your lawn mower , snow blower, etc., be very careful
and always observe local and state laws regarding the use, trans
portation and storage of such fuel containers. Make certain the
container meets industry standards (ANSI/ASTM F852 -861.
0 Note
Never drive your vehicle until the fuel tank is completely empty. The
irregular supp ly of fuel can cause misfiring. Gasoline could enter
the exhaust system and damage the catalytic converter. •
Fuel supply and filling your fuel tank
Refuelling
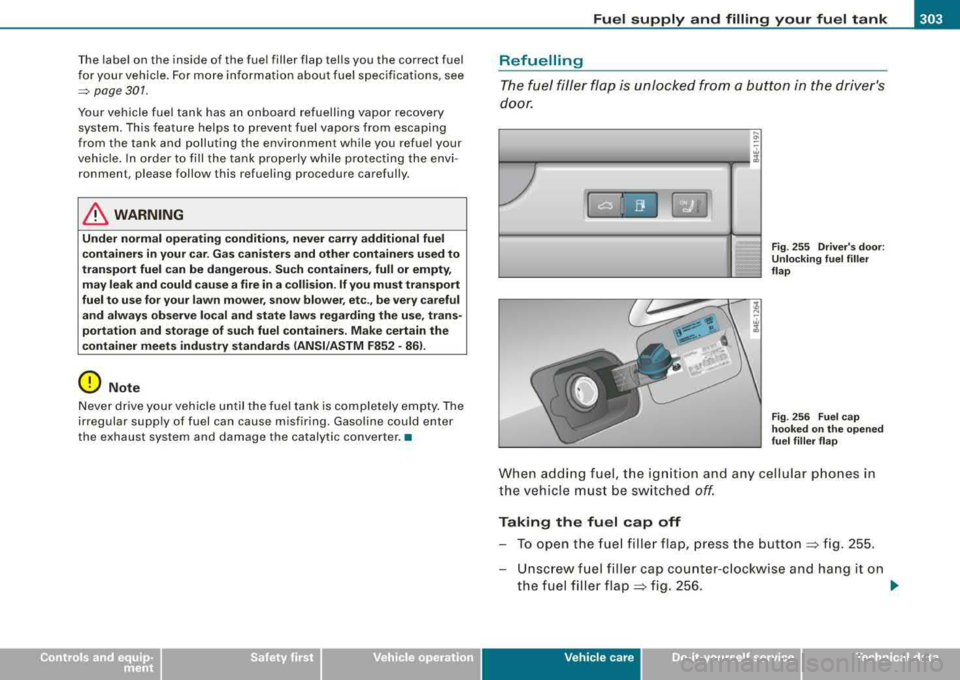
The fuel filler flap is unlocked from a button in the driver's
door.
,-..
"'
Fig . 255 Driver 's door :
Unlocking fuel filler
flap
Fig . 256 Fuel cap
hooked on the opened
fuel filler flap
When adding fuel, the ignition and any cellular phones in
the vehicle must be switched
off.
Taking the fuel cap off
To open the fuel filler flap, press the button ~ fig. 255.
Unscrew fuel filler cap counter-clockwise and hang it on
the fuel filler
flap ~ fig. 256. .,,_
Vehic le care I I irechnical data
Page 306 of 404

Fuel supply and filling your fuel tank
Refuelling procedure
- Insert the fuel nozzle from the gasoline pump into the
fuel filler neck as far as it will go.
- Select a medium refuelling rate so that the nozzle switches off automatically when the tank is full.
Putting the fuel cap back on
-After filling your tank, twist the fuel filler cap clockwise
until you hear a definite click.
- Close the fuel filler flap.
To avoid fuel spilling or evaporating from the fuel tank always close
fuel filler cap properly and completely. An improperly closed fuel
filler cap may also cause the MIL
lamp=> page 27 to come on.
& WARNING
Improper refueling or handling of fuel can cause fire, explosion
and severe burns.
• Fuel is highly flammable and can cause severe burns and other
injuries.
• Failure to shut the engine off while refueling and/or to insert
the pump nozzle fully into the fuel filler neck could cause fuel to spray out of filler neck or to overflow. Fuel spray and overflowing
fuel can cause a fire.
• Never use a cellular telephone while refueling. The electromag
netic radiation can cause sparks that can ignite fuel vapors and
cause a fire.
• Never get back into your vehicle while refueling. If in excep
tional circumstances you must get back in your vehicle while refu
eling, make certain that you close the door and touch metal to
discharge static electricity before touching the filler nozzle again.
Static electricity can cause sparks that can ignite fuel vapors
released during refueling .
& WARNING (continued)
• Never smoke or have an open flame anywhere in or near your
vehicle when refueling or filling a portable fuel container.
• For your safety, we strongly recommend that you do not travel
with a portable fuel container in your vehicle. The container, full or
empty may leak and could cause a fire, especially in a crash.
• If, under exceptional circumstances, you must transport a
portable fuel container, please observe the following:
-Never fill a portable fuel container while it is anywhere in or
on the vehicle (for example, in the luggage compartment, or on
the trunk). Static electricity can build up while filling and can
ignite fuel vapors causing a fire.
- Always place a portable fuel container on the ground before
filling.
- Always keep the filler nozzle completely inside the portable
container before and during filling.
- If filling a portable container made of metal, the filler nozzle
must always be in contact with the container. This will help
prevent static electricity from discharging and cause a fire.
- Never spill fuel inside the vehicle or luggage compartment. Fuel vapors are highly flammable .
- Always observe local and state/provincial laws regarding the
use, storage and transportation of fuel containers.
- Make certain the fuel container meets industry standards
(ANSI / ASTM F852-86).
0 Note
If any fuel has spilled onto the car, it should be removed immedi-
ately to prevent damage to the paint.
~
Page 307 of 404

<£' For the sake of the environment
As soon as the correctly operated nozzle switches off automatically
for the first time, the tank is full. Do not try to add more fuel because
fuel may spill out . In addition, the expansion space in the fuel tank
will be filled
-causing the fuel to overflow when it becomes warm
and pollute the environment .
[ i ] Tips
• Running your engine while refuelling may cause vapors to
escape or even cause fuel to spill out of the tank. This would then
shut off the fue l nozzle before the tank is full.
• Do not refuel your vehicle with the ignition turned on. The fuel
gauge may otherwise not indicate the correct fuel level after
refuelling. •
Unlocking the fuel filler flap by hand
You can open the fuel filler flap by hand if the power
locking system should fail.
Fig. 257 Luggage
compartment : Right
side storage area
Fuel supply and filling your fuel tank
Fig. 258 Luggage
compartment : Emer
gency opening of fuel
filler flap
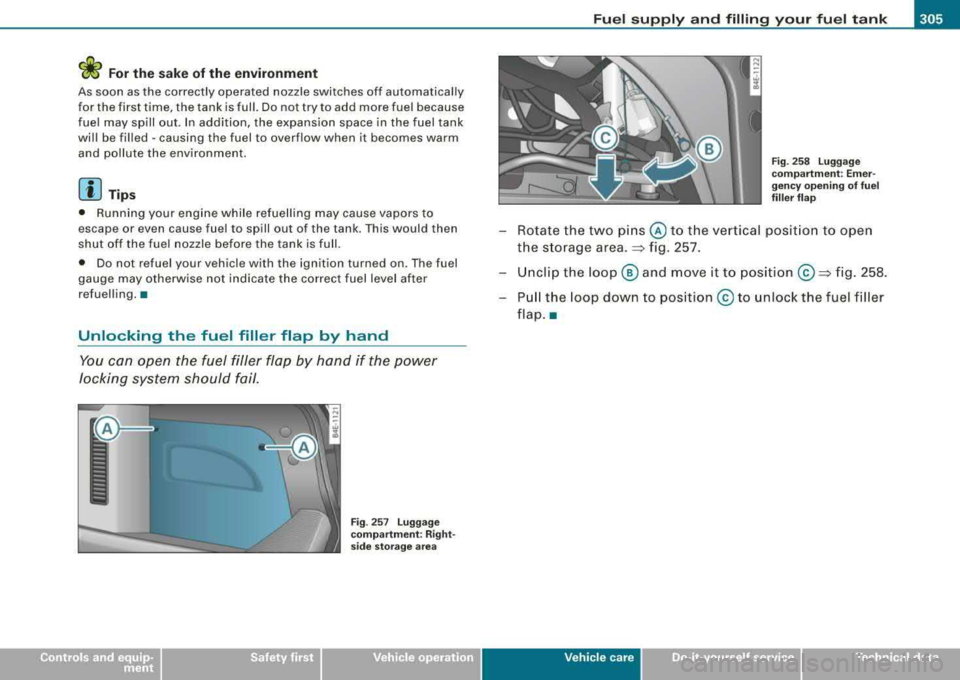
-Rotate the two pins @ to the vertical pos ition to open
the s torage area.
~ fig. 257.
-Unclip the loop@ and move it to position ©~fig. 258.
-Pull the loop down to position © to unlock the fuel filler
flap. •
Vehic le care I I irechnical data
Page 397 of 404

______________________________________________ A_ l_,_ p _h_ a_ b_e _t_i c_ a_l _in _ d_e _ x __ llll
Rear light
Defe ctive ....... .... .... .......... 26
Rear seat Contro ls ... .. .... .... ... .... .... . 97
Easy entry . . . . . . . . . . . . . . . . . . . . . . . 100
Head restraint adjustment . ......... 99
Lumbar support .. ... .... .... ... 96, 99
Massage function ......... ...... .. 98
Seat adjustment . ...... .... .... ... 98
Setting in the MMI ..... .. .... .... . 100
Rear view
See Rear -v iew cam era .... .... .... . 170
Rear w indow def ogger ...... .... .... . 12 4
Rear window shelf ... .... ...... .... .. 97
Rear -view camera . ....... ... .... 1 70, 173
Parking mode 1 ....... ... .... .... 175
Parkingmode2 ... .... ... .... .... 176
Red sym bols . ...... .... .... ... .... .. 30
Refuelling .. ... .... .... .... ......... 303
Re lease leve r for hood . ...... .... .... 306
Remote control . .... .... .... ... .... .. 48
Unlock ing and locking . ...... .... .. 51
Remo te con trol garage door opener
(Homelink®) . ....... ... .... .... 1 91
Remo te rear lid release . ....... .... ... 55
Repair manuals ... .. .... .... ... .... . 380
Repa irs
Airbag system . ....... ... .... .... 232
Replacing Wheel rims .. .. .. ...... .... .... .. 338
Replacing a fuse . ...... .... .... .... . 358
Rep lacing light bulbs .... .... ...... .. 362
Controls and equip
ment Safety first
Replacing tires and wheels
......... .. 337
Report ing Safety Defects ... .. .... 207, 208
Reset button ..... .. ...... .... .... ... 14
Retractor .. ... ... .. ...... .... .... .. 213
Ri ms
Cast alloy .. ...... .... .... ... .... 293
Replaci ng .. ...... .... ... .... .... 338
Roof rack .. .... .... ...... .... ... .. . 103
L oading .. ... .... ... .... .... .... . 104
Mounting locat ions ... .... ........ 104
Roof w eight .... .... ...... .... ... .. . 10 4
s
SA FE ...... .... ....... .... .... .... .. 14
Sa fe driving hab its ...... .... .... .... 1 98
Safe ty bel t height adjustment ... .. .... 2 16
Safety belt position ... .... .... .... ... 214
Saf ety belt h eight adjustm ent .. ... . 216
Saf ety bel ts worn by pr egnan t wom en ..
215
Safety bel t pretensioner .. ...... .... .. 216
Service and disposal . ....... ... .. . 217
Safety belt warning light ... .. .... . 20, 209
Safety belts . .... .... .... .... .... ... 213
clean ing ... .. .... .... .... .... ... 299
Danger t o passengers who do no t wear a
safety belt ... .... .... .... ... ... 211
Fastening .... ...... .... .... .... . 213
I mp roper ly worn . .......... .... .. 216
Not worn . .... ...... .... ... .... .. 211
Sa fety belt position ... .... .... .... 214
Sa fety instruc tions ... .. .... ... .... 212 Securing child safety seats
....... .. 2 53
Specia l considerations for pregnant
wome n ...... .... ... .... .... ... 215
U nfastening ...... .... .. . .... .. .. 215
Warning /ind icator light .... .... .... 209
Why YOU MUST wear them . .... ... 209
Worn properly ...... .. ...... .... . 212
Safety co mpliance st icke r .... .... .... 374
Safety equipment ..... .. .... .... .... 198
Safety features for occ upant rest raint and
protection .. .... .... .... .... ... . 198
Safety guide lines
S eat adjustment .. .. .. .... .... ..... 86
Safety instruct ions
Engine compartment ...... .... ... . 307
for a booster seat ...... ... .... .... 251
for side curtain airbags .. ..... ... .. 241
for using a convertible chi ld sa fety seat .
2 49
f or us ing an in fan t seat . ....... .... 248
f or using chi ld safety seats ....... .. 246
f or us ing sa fe ty bel ts .. .... .... .... 212
Monitoring the Advanced Airbag System 231
Safety lock Ignit ion key, automatic transmission 130
Seat adjustmen t
Adj usting the sea tback ... .. ..... .. . 89
Driver 's seat ...... .... .... .... .... 86
Driver 's seat memory ...... .... .... . 94
Front passenger's seat .... .... .... . 87
Front seats ... .... .... ... .... .... . 86
Head restraints .... .... ... .... . 91, 203
Lumbar suppor t .. .... .... .... ... .. 90
Vehicle operation Vehicle care Do-it-yourself service Technical data