relay AUDI S8 2008 Owners Manual
[x] Cancel search | Manufacturer: AUDI, Model Year: 2008, Model line: S8, Model: AUDI S8 2008Pages: 404, PDF Size: 52.7 MB
Page 284 of 404

llffll.___T_ r_a _il _e_ r_ t_o _w_ i_ n """g"'- ---------------------------------------------------
Trailer towing
Driving with a trailer
General information
Your Audi was designed primarily for passenger transpor
tation.
If you plan to tow a trailer, please remember that the add it ional load
wi ll affect durability, economy and performance.
Tra iler towing not on ly p laces more stress on the vehicle, it a lso ca lls
for more concentration from the driver.
For this reason, always fol low the ope rating and driv ing instruc tions
provided and use common sense.
(D Note
If you are go ing to tow a trai ler, you must activate the trailer opera
tion
mode => page 189, "Towing a Trailer". •
Technical requirements
Traile r hit ch
Use a we ight-carrying hitch conforming to the gross trai ler weight.
The hitch must be suitable for your vehic le and trailer and must be
mounted secure ly on the ve hicle's chass is at a
technically sound
location. Use only a trailer hitch with a removable ball mount.
Always check wit h the trai ler hitch manufacturer to make s ure that
you are using the correct hitch .
Do not use a bumper hit ch.
The hitc h must be installed in such a way t hat it does not interfere
with the impact-absorbing bumper system. No modifications
should be made to the veh ic le exhaust a nd brake systems. F rom time to time, check that all hitch mounting bolts remain secure
ly
fastened .
When yo u are no t towing a trailer, re move the tra ile r hitch ball
mount. This prevents the hitch from causing damage shou ld your
vehic le be struck from
behind =>& .
Traile r br ake s
If your tra iler is equipped with a braking syste m, check to be sure
that it conforms to al l regu lations .
The tra iler hydraul ic brake sys tem must not be di rect ly co nnected to
t he vehic le's hydrau lic brake system .
Safety chains
Always use safety chains between your vehicle and the trailer.
Trailer light s
Trai ler lights must meet a ll regulations. Be sure to check with your
Aud i dea ler for correc t wir ing, sw itch es and relays .
Mirrors
If you are unable to see the traf fic behind you using the regu lar
outside mirrors, then you
must instal l extended mirrors. It is impor
t ant that you
always have c lear v ision to the rear.
& WARNING
After removing the tr ailer hitch , do not store it in your vehi cle . In
ca se of sudden braking , the hitch could fl y forward and injure you
or your p assenger s.•
Page 367 of 404

________________________________________________ E=..:.; m:..:.:: e:.:.r.::g ~e::.:..: n:.:c ~y~ s:: i:.:t .=u :.:a:. t:: i:.:o :.:n..:.:: s~_JIIII
fl::. WARNING (continued)
• Before you check anything in the engine compartment, always
read and heed all
WARNINGS~ page 299, "Engine compartment".
0 Note
• Applying a higher voltage booster battery will cause expensive
damage to sensitive electronic components, such as control units,
relays, radio, etc .
• There must be no electrical contact between the vehicles as
otherwise current could already start to flow as soon as the positive
( + ) terminals are connected.
[ i) Tips
• The discharged battery must be properly connected to the
vehicle's electrical system. When jump starting or charging the battery , never connect the negative ground cable to the battery
negative post because the battery manager system must be able to
detect the battery's state of charge. Always connect the negative
ground cable to the negative ground post of the battery manager
control unit .•
Use of jumper cables
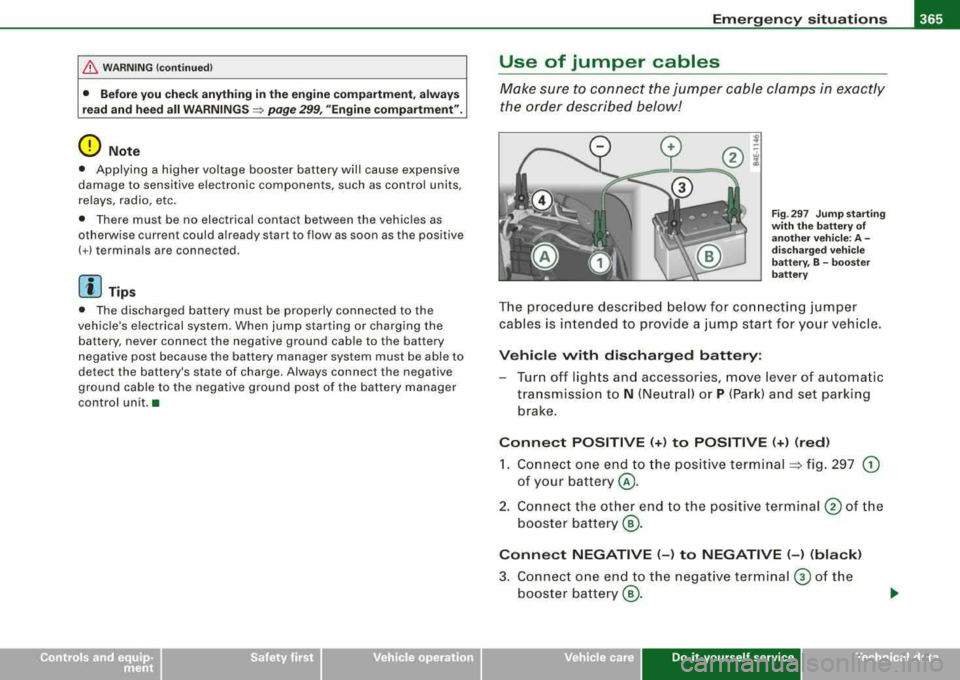
Make sure to connect the jumper cable clamps in exactly
the order described below!
Fig. 297 Jump starting
with the battery of
another vehicle: A -
discharged vehicle
battery, B -booster
battery
The procedure described below for connecting jumper
cables is intended to provide a jump start for your vehicle.
Vehicle with discharged battery:
-Turn off lights and accessories, move lever of automatic
transmission to
N (Neutral) or P (Park) and set parking
brake.
Connect POSITIVE (+) to POSITIVE (+) (red)
1. Connect one end to the positive terminal => fig. 297 G)
of your battery @.
2. Connect the other end to the positive terminal
@ of the
booster battery
@.
Connect NEGATIVE (-) to NEGATIVE (-) (black)
3. Connect one end to the negative terminal @ of the
booster battery
@.
Vehicle care Do-it-yourself service irechnical data