flat tire AUDI S8 2011 Owner's Manual
[x] Cancel search | Manufacturer: AUDI, Model Year: 2011, Model line: S8, Model: AUDI S8 2011Pages: 302, PDF Size: 76.07 MB
Page 257 of 302
chains because t he vehicle will be ex
tremely low. If you do drive with snow
chains on while the vehicle is at this lev
el, the snow chains might severe ly dam
age the wheelhouse and other parts of
the veh icle.
@ Tips
Where snow cha ins are mandatory oncer
tain roads, this normally also applies to ve
hicles with All Wheel Drive.
Wheel bolts
Wheel bolts must always be tightened to the
correct torque .
The design of whee l bolts is matched to the
factory installed r ims. If different rims are fit
ted, the correct wheel bolts with the right length and correctly shaped bolt heads must
be used . This ensures that wheels are fitted
secure ly and that the brake system f unctions
correctly .
In certain circumstances, you may not use
wheel bolts from a d iffe rent vehicle -even if it
i s the same mode l
¢page 285.
A WARNING
Imprope rly tig hte ned or maintained whee l
bolts can be come loose causing loss of
contro l, a co llision and serious persona l in
jury .
- Alw ays keep the w heel bolts and the
th reads in the wheel hubs clea n so the
wheel bolts can turn easily and be prop
er ly tightened .
- Never grease or oil the wheel bo lts and
the threads in the w heel h ubs. They can
become loose wh ile driving if greased or
o iled, even if tightened to the specif ied
torque.
- Only use wheel bolts that belong to the
rim being installed.
- Never use different whee ls bolts on your
vehicle.
- Always maintai n the co rrect tightening
torq ue for the wheel bo lts to reduce the
Tire s an d wheel s 255
risk of a wheel loss. If the tightening tor
que of t he wheel bolts is too low, they
can loosen and come out when the vehi
cle is mov ing. If the tighte ning torque is
too h igh, the wheel bol ts and threads
can be damaged and the whee l can be
come loose.
(I) Note
The specified torque for the whee l bolts is
90 ft lb ( 120 Nm) wi th a tole rance of± 7,4
ft lb(± 10 Nm). Torq ue whee l bolts diago
nally. Afte r cha nging a whee l, the torq ue
must be checked as soon as possible wi th a
torque w rench -prefe rably by an au thor
ized Audi dealer or qualif ied workshop .
Low aspect ratio tires
Your Audi is facto ry-eq uipped with low aspect
ratio tires. These tires have been thoro ughly
tested and been se lected specifically for your
model for their superb performance, road fee l
and handling u nder a variety of driving cond i
tions . Ask your authorized Audi dealer for
more details.
The low aspect ratio of these t ires is ind icated
by a numeral of
55 or less in the tire's size
designation . The numeral rep resents the ratio
of the t ire's sidewall height in relation to its
t read width ex pressed in pe rce ntage. Conven
tiona l tires have a he igh t/w idth ratio of 60 or
more.
The performance of low-aspe ct-ratio tire s is
particularly sensitiv e to improper infla tion
pres sure. It is therefore important that low
a spect ratio tires are inflated to the specified
pre ssure and that the inflation pressure i s
regularly checked and maintained. Tire pre s·
sures should be checked at least once a
month and always befo re a long trip
¢ page 244, Checking tire pressure.
What you can d o to avoid tire and rim
damage
Low aspect ratio tires can be damaged more
easily by impact w it h potholes , curbs, gul lies ..,.
•
•
Page 258 of 302
256 Tires and wheels
or ridges on the road, particularly if the tire is
underinflated.
I n o rder to minim ize the occurrence of impact
damage to the tires of your vehicle, we recom
mend that you observe the following precau
tions:
- Always maintain recommended inflation
pressures. Check your tire pressure every
2,000 miles (3,000
km) and add air if neces
sary.
- Drive carefully on roads with potholes, deep
gullies or ridges. The impact from driving
through or over such obstacles can damage
your tires. Impact with a curb may also cause damage to your tires.
- After any impact, immediately inspect your
tires or have them inspected by the nearest
authorized Audi dealer. Replace a damaged
tire as soon as possible .
- Inspect your tires every 2,000 miles (3,000
km) for damage and wear . Damage is not al
ways easy to see. Damage can lead to loss of
air and underinflation, wh ich could eventu
ally cause tire failure . If you be lieve that a
t ir e may have been damaged, replace the
t ir e as soon as possible.
- T hese tires may wear mo re quick ly than oth
ers.
- Please also remember that, while these t ires
deliver respons ive handling, they may ride
less comfortably and make more no ise than
other choices.
Reduced performance in winter/cold
season conditions
All tires are designed for certain purposes.
The low aspect ratio, ultra high performance
tires originally installed on your vehicle are in
tended for maximum dry and wet road per
formance and handling. They are not suitable
for cold, snowy or icy weather condit ions. If
you drive under those circumstances, you should equip your vehicle with all -season or
winter tires, which offer better traction under
those cond it ions. We suggest you use the rec
ommended snow or all-season tires specified
for your vehicle, or their equivalent. Refer
to
q page 253 for more detailed infor
mation regarding winter tires.
Tire pressure monitoring system
(D General notes
Applies to veh icles: w ith tire pressure monitoring system
Each tire, including the spare ( if provided),
shou ld be checked monthly when co ld and in
flated to the inflation pressure recommended
by the veh icle manufacturer on the vehicle
placard or tire inflation pressure label. (If your
vehicle has tires of a different size than the
s ize indicated on the vehicle placard or tire in
flation pressure label, you should dete rmine
the proper tire inflation p ressure fo r those
t i res).
As an added safety feature, your veh icle has
been equipped with a tire pressure mon itoring
system (TPMS) that illuminates a low tire
pressure tel ltale when one or more of your
tires is significant ly under-inflated. According
ly, when the low tire pressure telltale illumi
nates, you should stop and check your tires as
soon as possible, and inflate them to the
proper pressure. Driving on a sign ificantly un
der-inflated t ire causes the tire to overheat
and can lead to tire failure . Under-inflation al
so reduces fuel efficiency and tire tread life,
and may affect the vehicle 's handling and
stopp ing ability.
Please note that the TPMS is not a substitute
for proper tire ma intenance, and it is the driv
er's respons ibility to maintain correct tire
pressure, even if under-inflation has not
reached the level to trigger illuminat ion of the
TPMS low tire pressu re tellta le .
Your vehicle has also been equipped with a
TPMS malfunction indicator to indicate when
the system is not operating properly. The
T PMS ma lfunction indicator is combined with
the low tire pressure telltale. When the sys
tem detects a malfunction, the telltale will
flash for approximately one minute and then ..,_
Page 259 of 302

remain continuously illuminated. This se
quence will continue upon subsequent vehicle
start-ups as long as the malfunction exists.
When the malfunction indicator is illuminat
ed, the system may not be able to detect or
signal low tire pressure as intended . TPMS
malfunct ions may occur for a variety of rea
sons, including the installation of replace ment or alternate tires or wheels on the vehi
cle that prevent the TPMS from functioning
properly . Always check the TPMS malfunct ion
tellta le after replacing one or more t ires or
wheels on your vehicle to ensure that the re
placement or alternate tires and wheels allow
the TPMS to continue to function properly.
Tire pressure indicator appears
Applies to vehicles: with tire pressure monitoring system
The tire pressure indicator in the instrument
cluster informs you if the tire pressure is too
low or if there is a system malfunction.
Fig. 189 Display : underinflatio n warning
Fig. 190 Display: System malfu nctio n
Using the ABS sensors, the tire pressure moni
toring system compares the tire tread circum
ference and vibration characteristics of the in
dividual tires . If the pressure decreases in one
or more tires, this is indicated in the instru-
Tires and wheels 257
ment cluster with a warning symbol [I) and a
message
r::!) fig. 189.
The tire pressure monitoring system must be
reset via MMI each t ime the pressures are ad
justed (e.g. when switching between partial
and full load pressure) or after changing or re
placing a tire on your vehicle
r::!) page 258. You
can find the recommended tire pressures for
your vehicle on the label on driver's side 8-pil
lar
r::!) page 242 .
Tire tread circumference and vibration charac
teristics can change and cause a tire pressure
warning if:
- the tire pressure in one or more tires is too
low,
- the tire has structural damage,
- the tir e pressure was changed, wheels rotat-
ed or replaced but the TPMS was not reset
r::!) page 258 .
Warning symbols
[I) Loss of pressure in at least one tire co& .
Check the tire or tires and replace or repa ir if
necessary. The indicator light
[I) in the instru
ment cluster also illuminates
r::!) page 11.
Check/correct the pressures of all four tires
and resetTPMS via MMI.
lli§ffl (Tire Pressure Monitoring System) Tire
pressure! System malfunction.
If llilffl appears after switching the ignition
on or while driving co
fig. 190 and the indica
tor light
[I) in the instrument cluster blinks
for approximately one minute and then stays
on, there is a system malfunction . See your
authorized Audi dea ler as soon as possible .
A WARNING
-If the tire pressure indicator appears in
the instrument cluster display , one or
more of your tires is significant ly under
inflated . Reduce your speed immediately
and avoid any hard steering or braking
maneuvers. Stop as soon as possible and
check the tires and their pressures . In
flate the tire pressure to the proper pres-
sure as indicated on the vehicle's tire .,.
Page 260 of 302

258 Tires and wheels
pressure label~ page 242 . Driving on a
significantly under-inflated tire causes
the tire to overheat and can lead to tire
failure. Under-inflation also is likely to
impair the vehicle's handling and stop
ping ability.
- The driver is responsible for maintaining
the correct tire pressures. You must
check the tire pressures regularly.
- Under certain cond itions (such as a spor
ty driving style, winter condit ions or un
paved roads), the pressure monitor indi
cator may be delayed.
- Ask your author ized Audi dealer if run
flat tires may be used on your veh icle.
Your vehicle registration becomes invalid
if you use these tires when not permit
ted. Damage to your vehicle or accidents
cou ld also result.
(D Tips
- The tire pressure monitoring system
stops working when there is an ESP/ABS
malfunction.
- Using snow chains may result in a system
malfunction.
- To ensure a proper TPMS function use
AUDI Original Tires which are marked
with "AO" or "RO" on the tire sidewall.
~p age 249.
- The tire pressure monitoring system on
your Audi was syntonized using tires with
the "AO" or "RO" identification. We rec
ommend using these tires.
Reset tire pressure monitoring system
App lies to vehicles: with tire pressure monitoring system
If the tire pressure is adjusted, wheels are ro
tated or changed, the TPMS must be reset via
MMI .
.. Switch on the ignition .
.. Se lect in the MMI: !CAR !function button>
Car systems contro l button > Servicing &
checks > Tire pressure monitoring > Store
tire pressures > Yes, store now.
(D Tips
Before resetting the TPMS, the current
pressures of all four tires must correspond
to the specif ied values. Adjust the tire
pressure and reset the pressure in the tire
pressure monitoring system according to
the load you are carrying~ page 242.
- Do not store the tire pressures if you are
dr iving with snow chains. Otherwise, a
system malfunction may occur.
Page 263 of 302
Space-saving spare tire (compact spare
tire)*
A pplies to vehicles: with space-sav ing spa re tire
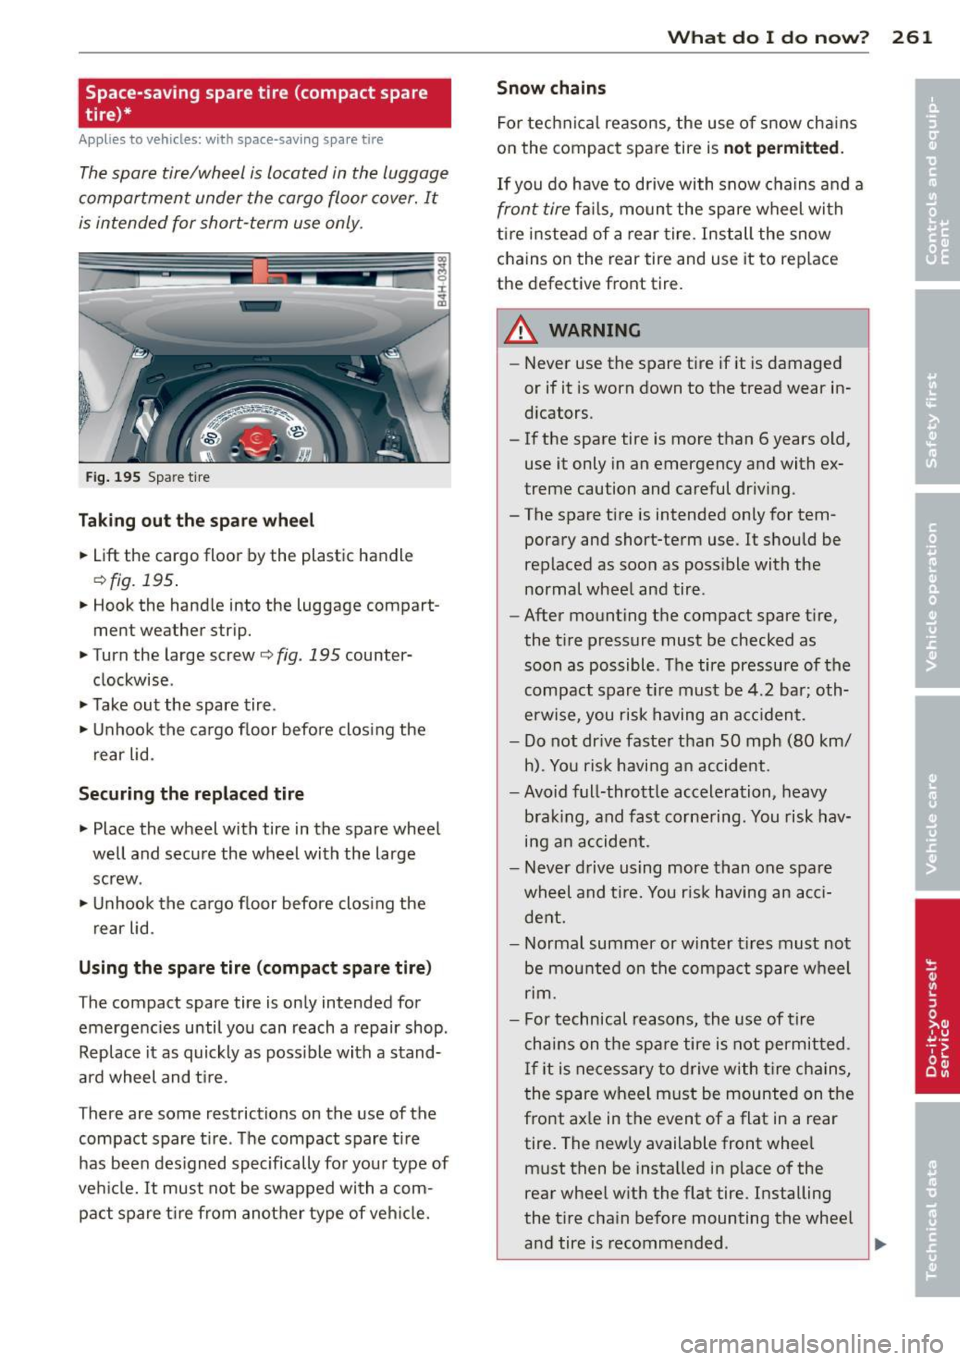
The spare tire/wheel is located in the luggage
compartment under the cargo floor cover. It
is intended for short-term use only.
F ig . 195 Spare t ire
Tak ing ou t the sp ar e whee l
.. Lift the cargo floor by the plast ic handle
¢ fig. 195.
.. Hook the hand le into the luggage compart
ment weather strip.
.. Turn the large screw
¢fig. 195 counter
clockwise .
.,. Take out the spare tire.
.,. Unhook the ca rgo floor before clos ing the
rear lid.
Securing the repl aced tire
.. Place the wheel with tire in the spare wheel
well and secure the wheel with the large
screw .
.,. Unhook the ca rgo f loor before clos ing the
rear lid.
Using the spare tire (compact spare tir e)
The compact spare tire is only intended for
emergenc ies until you can reach a repair shop .
Replace it as quickly as poss ible with a stand
ard wheel and t ire.
There are some restrictions on the use of the
compact spare t ire . The compact spare t ire
has been des igned specifically fo r your type of
ve hicl e. It must not be swapped with a com
pact spare t ire from another type of veh icle.
What do I d o now ? 261
Snow chains
For technical reasons, the use of snow cha ins
o n the compact spare tire is
not permitted .
If you do have to drive with snow chains and a
front tire fails, moun t the spare wheel wi th
ti re i nste ad of a rear tire. Install the snow
chains on the rear tire and use it to replace
the defective front tire .
A WARNING
-Never use the spare tire if it is damaged
or if it is worn down to the tread wear in
dicators.
- If the spare tire is more than 6 years old,
use it only in an emergency and with ex
treme caution and careful driv ing.
- The spare tire is intended only for tem
porary and short-term use. It s hould be
replaced as soon as poss ible with the
normal whee l and tire .
- After mounting the compact spare tire,
the t ire pressure must be checked as
soon as possible . T he tire pressu re of the
compact spare t ire must be
4.2 ba r; oth
erwise, you risk having an a ccident.
- Do not dr ive faste r than
SO mph (80 km/
h). You ris k having a n accide nt.
- Avoid full-throttle acceleration, heavy
brak ing, and fast corne ring . You risk hav
i n g an accident .
- Never d rive using more than one spare
wheel and t ire. You r is k having an acci
dent.
- Normal summer or winter t ires must not
be mou nted on the compact spare w heel
nm.
- For t echnical reasons, the use of tir e
chains on the spa re tire is not permit ted .
I f it is ne cessary to drive with t ire chains,
the spare wheel must be mounte d on the
fro nt ax le in the event of a flat in a rear
tire. The newly available front whee l
must then be insta lled in place of the
rear whee l w ith the flat tire . Installing
the t ire cha in before mounting the whee l
and tire is recomme nded .
Page 264 of 302

262 What do I do now ?
-Loose items in the passenger compar t
ment can cause serious personal inj ury
during hard braking or in an acc ident.
- Never store the inflatable spa re tire or
jack and tools in the passenger com
partment .
- Always s to re a ll jack ing equipmen t,
too ls, and the inflatab le spa re tire in
the l uggage compa rtment .
- Tighten the kn ur led retaining screw for
the inflatable spare tire sec urely.
Spare wheel
Applies to vehicles: with spare wheel
The spare wheel is stored in the wheel well
underneath the floor panel in the luggage
compartment.
Fi g. 1 96 Lu ggage co mp artm ent: spare whee l
Taking out the spa re wh eel
.. Lift the cargo floor by the plastic handle
¢ fig. 196 .
.. Hook the hand le into the luggage compart
men t wea ther s trip.
.. Tu rn the l arge screw
¢ fig. 196 coun ter
clockwise .
.. Take out the spare tire .
.,. Unhook the ca rgo floor before clos ing the
rear lid .
Securing the replaced tire
.. Place the wheel with tire in the sp are wheel
well and secure the wheel with the large
sc rew .
.,. Unhoo k the ca rgo f loor before clos ing the
r ear lid.
A WARNING
-Loose items in the passenger compart-
ment can cause serious persona l injury
d uring hard b rak ing o r in an accident .
- Never store the spa re wheel or jack and
too ls in the passenger compartment .
- Always store all jack ing equipment,
tools, and the spare wheel in the luggage
compa rtment .
- Tighten the knurled retaining screw for
the spare wheel securely .
@ Tips
Check the inflation pressure of the spare
tire periodically to keep the t ire ready for
use.
Changing a wheel
Before changing a wheel
Observe the following precautions for your
own and your passenger's safety when chang
ing a wheel.
.,. After you experience a t ire failur e, pull the
car we ll away from mov ing traffic and try to
re ach
level ground before you stop ¢ .&,.
.. All passengers should lea ve th e car and
move to a safe location (for instance, b ehind
the guardrail) ¢
_A .
.. Engage the pa rking brake to prevent your
ve hicle from rolling uninten tionally ¢
_A .
.. Move selecto r le ver to pos ition P ¢ _A .
.,. If you are towing a tra iler, unhitch the trailer
from your ve hicle .
.,. Ta ke the
jack a nd the spare tire out of the
luggage compartmen t¢
page 260,
¢ page 261.
A WARNING
You o r your passengers could be i nju red
while changing a wheel if you do not fo l
l ow these sa fety precaut ions:
- If you have a flat tire, move a safe dis
tance off the road. Turn off the engine,
turn the eme rgency flashers on and use
-
Page 265 of 302
other warning devices to alert other mo
torists.
- Make sure that passengers wait in a safe
place away from the vehicle and well
away from the road and traffic.
- To help prevent the vehicle from moving
suddenly and possibly slipping off the
jack, always fully set the parking brake
and block the wheel diagonally opposite
the wheel being changed. When one
front wheel is lifted off the ground, plac
ing the Automatic Transmission in "P"
(Park) will
not prevent the vehicle from
moving.
- Before you change a wheel, be sure the
ground is level and firm. If necessary,
use a sturdy board under the jack.
- After installing the spare wheel, make
sure that you replace the flat tire/wheel
in its storage area properly and tighten
the knurled retaining screw securely.
@ Tips
Before changing the wheel, you must acti·
vate the jacking mode, so that the auto
matic controls for the Adaptive Air Sus
pension do not make it more difficult to
lift the vehicle with the jack ¢
page 265.
Changing a wheel
When you change a wheel, follow these
quence described below step-by-step and in
exactly that order.
1. Activate the vehicle jack mode
¢ page 265.
2. Remove the decorative wheel cover*. For
more details see also¢
page 264, Deco
rative wheel covers
or ¢ page 264,
Wheels with wheel bolt caps.
3 . Loosen the wheel bolts¢ page 264 .
4. Locate the proper mounting point for the
jack and align the jack below that point
¢page 265.
5. Raise the car with the jack¢ page 265.
6. Remove the wheel with the flat tire and
then install
the spare ¢ page 266.
What do I do now? 263
7. Tighten all wheel bolts lightly.
8.
Lower the vehicle with the jack.
9. Use the wheel bolt wrench and
firmly
tighten all wheel bolts¢ page 264.
10. Replace the decorative wheel cover*.
11. Deactivate the vehicle jack mode in the
MMI:
ICARI function button > Car systems
control button > Servicing & checks> Air
susp.: jack mode> Off .
The vehicle jack mode switches off automati
cally at speeds above 10 km/h .
A WARNING
Always read and follow all WARNINGS and
information¢ .&
in Raising the vehicle on
page 265
and ¢ page 267.
After changing a wheel
A wheel change is not complete without the
doing the following.
.. Store and secure the wheel you replaced in
the spare wheel well.
.. Replace the tools and the jack in their prop
er location.
.. Check the
tire pressure on the spare wheel
immediately after mounting it.
.. As soon as possible, have the
tightening
torques
on all wheel bolts checked with a
torque wrench. The correct tightening tor
que is 90
ft lb (120 Nm).
.. Have the flat tire
replaced as soon as possi
ble .
(D Tips
-If you notice that the wheel bolts a re
corroded and difficult to turn while
changing a tire, they should be replaced
before you check the tightening torque.
- Drive at reduced speed until you have the
tightening torques checked.
•
•
Page 269 of 302

and the hub. R emove a ll dirt from these
su rfaces before remo unt ing the wheel.
Tires with unidirectional tread design
Tires with unidirectional tread de sign must be
mounted with their tread pattern pointed in
the right direction.
Using a spare tire with a tread pattern
intended for use in a specific direction
When using a spa re tire w ith a tread patte rn
inte nded for use in a specific direction, please
note t he following:
- T he direction o f rotation is marked by an a r
r ow on the side of the tire.
- If the spare tire has to be install ed in the in
correct di rection, use the sp are tire only
temporar ily since the t ire will not be a ble to
achieve its optimum pe rformance character
ist ics with regard to aquaplaning, noise and
wear.
- We recommend that you pay particular at
tent ion to this fact during wet weat he r and
t h at you adjust your speed to matc h road
condit ions .
- Replace the flat tire w ith a new one and
have it installed on your ve hicle as soon as
poss ib le to restore the hand ling advantages
of a uni direct io na l ti re .
Notes on wheel changing
Pl ease rea d the information ¢ page 2 49, New
t ires and repl acing tires and wheels
if you are
goi ng to use a s pare t ire which is differen t
from the tires on your ve hicle.
Afte r you cha nge a tire:
- Check the tire pressure on the spare imme
diately after installation .
- Have the wheel bolt tightening torque
checked with a torque wrench as soon as
possible by your authorized Audi dealer or
a qualified service station .
- With steel and alloy wheel rims, the wheel
bolts are correctly tightened at a torque of
90 ft lb (120 Nm). What do I do now? 267
-
If you notice that the wheel bolts are cor
roded and difficult to turn while changing
a tire , they should be replaced before you
check the t ightening torque.
- Replace the flat ti re with a new one and
have it installed on your vehicle as soon as
possible. Remount the wheel cover.
Until then , drive with extra care and at re
duced speeds.
A WARNING
- I f you are g oing to eq uip your vehicle
wit h tires o r rims which differ from those
which were factory installed, then be sure to read the information
¢ pag e 249,
N ew tires and replacing tires and
w heels.
- Always ma ke sure t he damag ed wheel o r
e ven a fla t tire an d the jack a nd tool ki t
a re prope rly se cu red in t he luggage co m
p art me nt and a re not loo se in the pas
senger compartment .
- I n an a ccide nt or sudde n maneuver they
could fly forward, injuring anyone in the
veh icle.
- Always s tore da mage d wheel, j ack and
t oo ls se curely in the lugg age comp art
men t. Othe rwise, in an accident o r su d
den maneuver they co uld f ly forwa rd,
causing inju ry to passengers in the veh i
cle.
- Do not use commerc ia lly available t ire
sealants. Othe rwise, the electrical com
ponents of the tire pressure mon itor ing
system * will no lo nger work p roperly and
the sensor for the tire p ress ure monito r
i n g sys tem * will have to be re placed by a
qua lified wor kshop. •
•
Page 279 of 302
@ Tips
Check carefully to make sure the hook-up
is secure be fore moving the ca r up the flat
bed tr uck ramp .
Vehicle transport
Whenever you hove your vehicle transported,
be sure to note the following:
(D Note
Mount the tie-down chains/cab les over the
r u nning surface (ci rcumference) o f the
tires. Never secure the vehicle by the axle,
the suspensi on struts or the front or rear
towline eye . For tec hnical reaso ns, the
pressure i n the s uspension struts may
change du ring th e transport and this will
adve rsely affect vehicle handling.
Lifting vehicle
Lifting with workshop hoist and with
floor jack
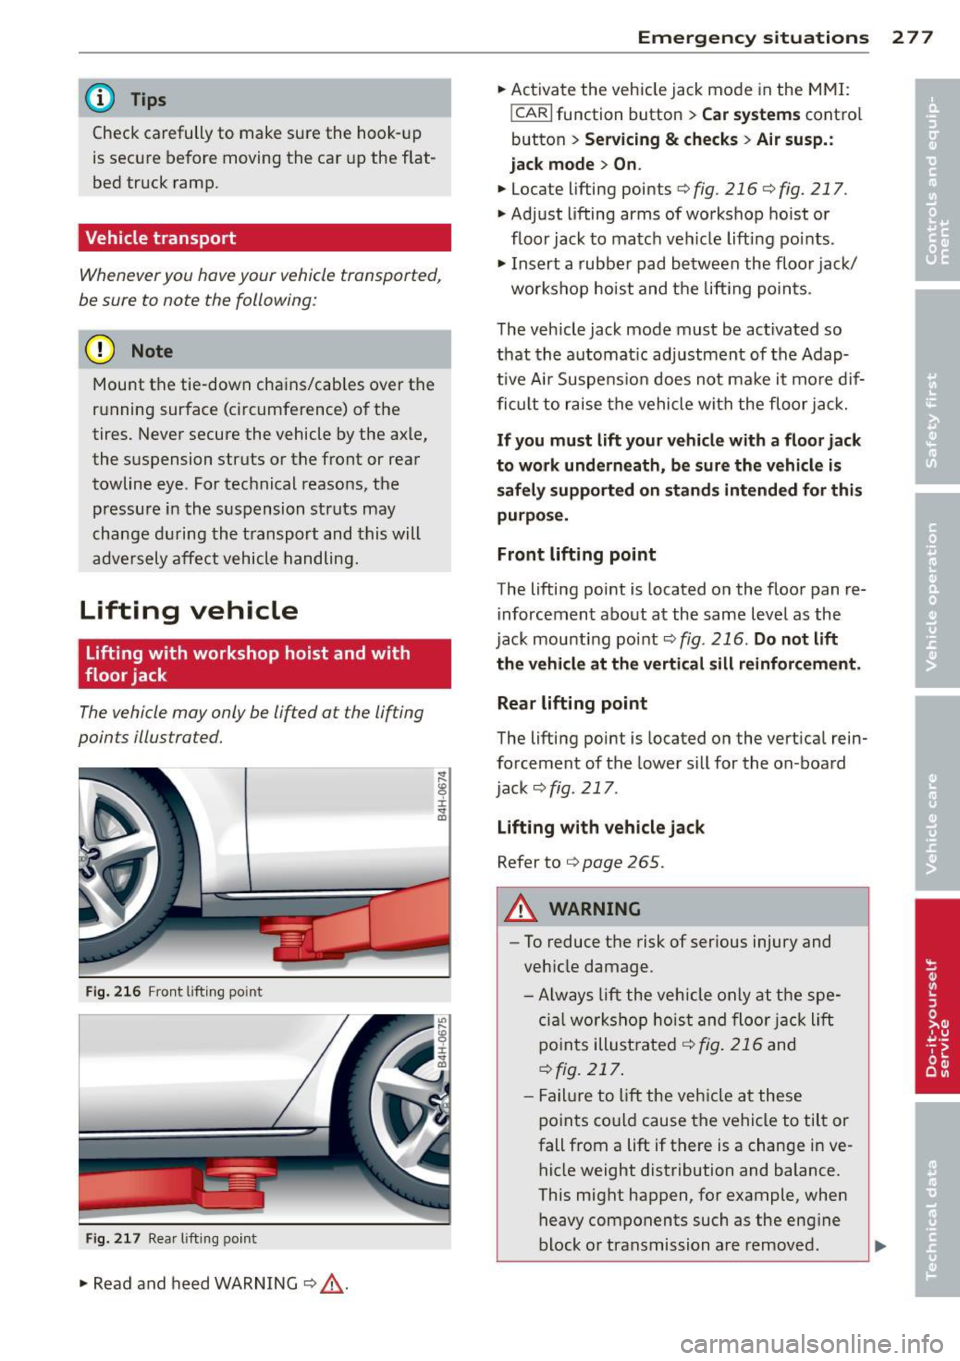
The vehicle may only be li~ed at the lif ting
points illu stra ted.
Fi g. 2 16 Front l ift in g po int
Fi g. 217 Rea r lifti ng point
.. Read and heed WARNING r:::;, ,&. .
Emergency s itu ations 2 7 7
.. Ac tivate the vehicle jack mode in the M MI:
!CAR I fu nction button > Car systems contro l
button>
Servicing & checks > Air susp.:
jack mode > On .
.. Locate lifting points r:::;, fig . 216 r:::;, fig. 217 .
.. Adjust lifting arms of workshop ho ist o r
floor jack to matc h ve hicle lift ing po ints .
.. Insert a rubbe r pad b etween the floo r jac k/
works hop hoist and the li fting po in ts .
The vehicle jack mode must be activated so
that the a utomat ic adjustment of the Adap
tive Ai r Suspe nsio n does not make it mo re dif
fi cu lt to raise the vehicle wit h the floor j ack.
If you must l ift your vehicle with a floor jack
to work und erneath, be sure the vehicle is
safely supported on stand s intended for this
purpo se.
Front lifting point
The lifti ng point is located o n the floor pan re
inforcement a bout at the same level as the
jack mount ing point
r:::;, fig . 216. Do not lift
the vehicle at th e verti cal sill reinforcem ent .
Rear lifting point
The lifti ng point is located o n the vert ica l rein
forcement of the lower sill for the on -board
jack
r:::;, fig . 217 .
Lifting with vehicle jack
Refer tor:::;, page 265 .
A WARNING ~
-To reduce the risk of ser ious injury and
ve hicle damage.
- Alway s lift the vehicle only at th e spe
cial worksho p hois t and floor jack lift
po ints illust rate d
r:::;, fig. 216 and
¢ fig. 217 .
- Fail u re t o lift the ve hicle at these
po ints co uld cause t he vehicle to til t or
fall from a lift if there is a change in ve
hicle weight distribution and balance.
This mig ht happen, fo r example, when
heavy components such as the eng ine
block o r transmissi on are removed .
-
Page 291 of 302
How do I properly install a child safety
seat in my vehicle? .............. .. . 172
Infant seats . . . . . . . . . . . . . . . . . . . . . . 17 4
Installing .. ............. .... .. ... 178
Installing a child restraint us in g the
LATCH system ..................... 184
LATCH system .... .. ... ... .. .. .. .. . 184
Lower anchorages ............... .. 182
Mounting and releasing the anchorage
hook .... .. ................. .. ... 184
Safety instructions ............ .. .. . 172
Clean ing and protection ......... .. .. . 206
A lcantara (synthet ic suede) .......... 215
Cooler ... .. ................. .. ... 216
Engine compartment ............... 216
Exhaust tail pipes ............ ... .. . 212
Fabrics and fabric coverings . ... .. .. . 212
Instrument panel ............ ... .. . 213
Interior . . . . . . . . . . . . . . . . . . . . . . . . . . 212
Leather . . . . . . . . . . . . . . . . . . . . . . . . . . 214
MMI display/controls ............... 212
Plastic and vinyl ................. .. 210
Plastic parts ..... .. ... ... .. .. .. .. . 213
Safety belts . . . . . . . . . . . . . . . . . . . . . . 216
tr im strips . ............. .. .. .. .. . 210
Trim strips . ............. .... .. ... 209
Climate controls . . . . . . . . . . . . . . . . . . . . . 7 4
Clock ....... .. ................ ..... 26
Closing Panoramic sunroof ........ .. .. .. .. .. 41
Sliding/tilting sunroof ............... 40
Sun shade (panoramic sunroof) ... .. .. 42
Cold tire inflation pressure ... .. .. .. .. . 242
Coming home ............. .... .. .. .. 45
Compact spare tire .................. 261
Compartments .... .. ... ... .. .. .. .. .. 70
Compass in the mirror ......... ... .. .. 52
Compliance .. .. ........... .. .. .. ... 286
Consumer Information . . . . . . . . . . 135, 283
Consumption (fuel) . . . . . . . . . . . . . . . . . . 24
Contacting NHTSA .................. 135
Convenience key .............. ... .... 33
Starting the engine ................. 79
Stopping the engine (START ENGINE
STOP button) . . . . . . . . . . . . . . . . . . . . . . 80
Switching the ignition on ............ 79
Unlocking and locking vehicle ........ . 33
Index 289
Convertib le child safety seats
Convertible locking retractor 17S
Activating . .. .. .. ................. 180
Deact ivating . .. .. .... ........... .. 181
Using to secure a child safety seat 1.78, 180
Coolant
refer to Engine coolant ............. 229
Cooler ....... .. .. .... ............. . 72
Cleaning .. .. .. .. .. ............... 216
Operation . . . . . . . . . . . . . . . . . . . . . . . . . 72
Cooling mode (automatic climate control) 75
Cornering light ........... .......... 106
Cruise control Changing speed .. .................. 84
Presetting your speed ............... 85
Switching off .. .. .. . .. ... .... ..... . 85
Switching on . . . . . . . . . . . . . . . . . . . . . . . 84
Warning/ind icator lights ............ . 22
(upholder .. .. .. .. ................. . 70
D
Data .............................. 282
Data recorder . .. .. .. .. ........... .. 190
Date display .. .. .. ... ... ...... ..... . 26
Daytime running lights .............. .. 43
Declaration of compliance Adaptive cruise control ............. 286
Audi s ide ass ist .. ............. .... 286
Cell phone package . . . . . . . . . . . . . . . . 286
Convenience key .. .. .............. . 286
Electronic immobilizer .............. 286
Homelink ® universal remote control .. 286
Remote control key ... ......... .. .. 286
Tire pressure monitoring system ..... 286
DEF What does this mean when it appears in
the trip odometer display? ........... 26
Defective light bulb warning ........... 21
Defrosting (windows) .. .. ... .... ..... . 76
Deluxe automatic climate control ..... .. 75
Determining correct load limit ........ 247
Digital compass . . . . . . . . . . . . . . . . . . . . . 52
Dimensions ....... .. . .............. 280
Dimming the rearview mirror .......... 51
Distance ....... .... ................ 24
Door/rear lid warning ... ............. . 23
•
•