battery replacement AUDI S8 2011 Owners Manual
[x] Cancel search | Manufacturer: AUDI, Model Year: 2011, Model line: S8, Model: AUDI S8 2011Pages: 302, PDF Size: 76.07 MB
Page 32 of 302

30 Opening and clo sing
Removing the mechanical key
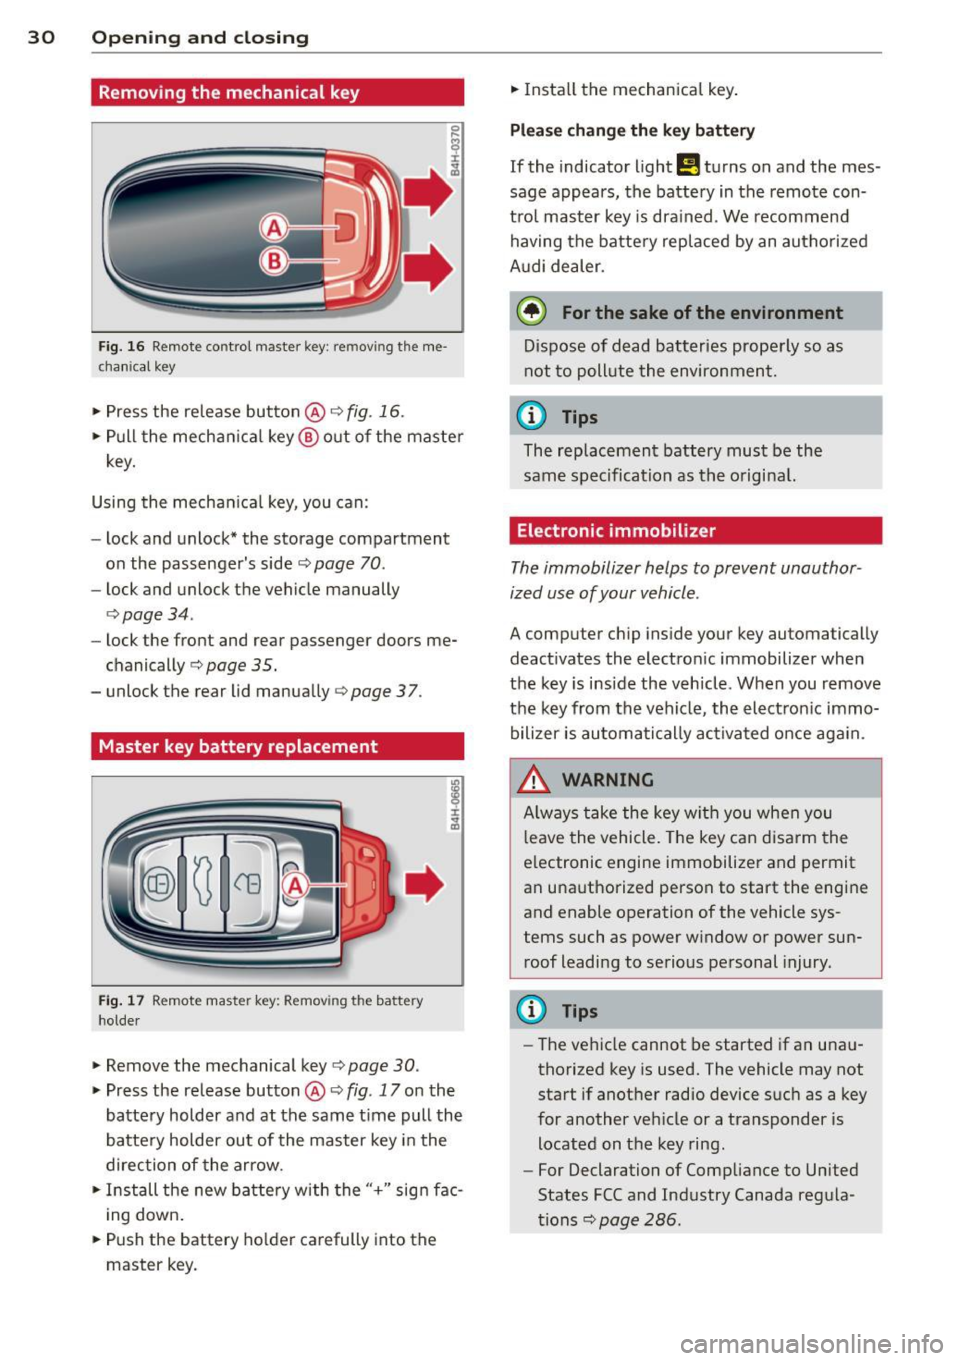
Fig. 16 Remote control master key: removing the me
chanica l key
> Press the release button @ r:::> fig. 16.
• Pull the mecha nica l key @ out of the master
key.
Using the mechan ica l key, you can:
- lock and unlock* the storage compartment
on the passenger's sider:::>
page 70.
-lock and unlock the vehicle manually
r:::>page34.
-lock the front and rear passenger doors me
chanically
r:::> page 35.
- unlock the rear lid manually r:::> page 3 7.
Master key battery replacement
Fig. 17 Remote master key: Removing the battery
holde r
• Remove the mechanical key r:::> page 30.
> Press the release button @ r:::> fig. 17 on the
battery holder and at the same t ime pull the
battery holder out of the master key i n the
direction of the arrow.
• Install the new battery with the"+" sign fac
i ng down.
• Push the battery holder carefully into the
master key. •
Insta ll the mechanica l key .
Please ch ange the k ey battery
If the indicator light!! turns on and the mes
sage appears, the batte ry in the remote con
tro l master key i s drained. We recommend
having the battery replaced by an autho rized
A udi dealer.
@) For the sake of the environment
Dispose of d ead batteries properly so as
not to pollute the environment.
(D Tips
The replacement battery must be the
same spec ification as the o riginal.
Electronic immobilizer
The immobilizer helps to prevent unauthor
ized use of your vehicle .
A computer chip inside your key automatically
deact ivates the electron ic immobilizer when
the key is inside the veh icle. When you remove
the key from the vehicle, the ele ct ron ic immo
bilizer is automati cally activated once aga in.
.8_ WARNING
A lways take the key w ith you when you
l eave the vehicle. The key can disa rm the
e lectronic engine immobilizer and permit
an unauthorized person to start the engine
and enable operation of the vehicle sys
tems such as power window or power sun roof leadi ng to se rious pe rsonal injury.
@ Tips
- The ve hicle cannot be started if an una u
thorized key is used. The vehicle may not start if another radio device s uch as a key
for another ve hicle or a transponder is
located on the key ring.
- For Declaration of Compliance to United
States FCC and Industry Canada regula
tions r:::>
page 286.
Page 71 of 302

-Never exceed the maximum permissible
load carry ing capacity of the roof of your
vehicle, the perm issible axle weights and
the permiss ible total weight of your veh i
cle
~ page 2 79, Weights .
-Always drive slowly, avoid sudden brak
ing and maneuvers when transporting
cargo on the roof of your vehicle .
@) For the sake of the environment
Sometimes it may be easier to leave a roof
rack installed even though you are not us
ing it. Due to the increased a ir resistance
your vehicle will unnecessarily use more
fuel. Remove the roof rack if you are not
going to use it.
12-volt sockets
App lies to vehicles: 12-volt sockets
Electrical accessories can be connected to ev
ery 12 -volt socket.
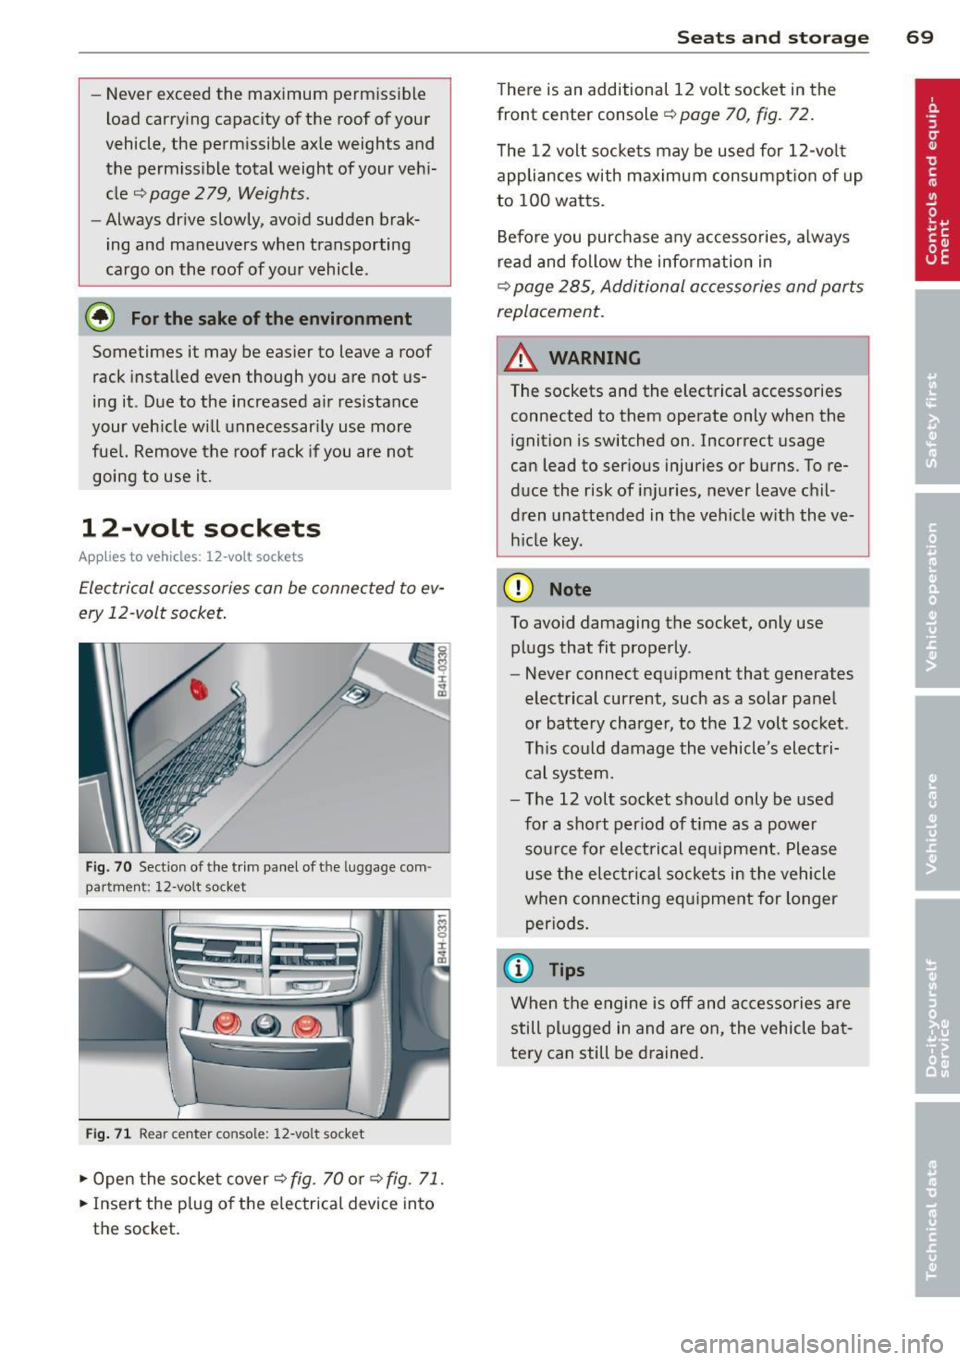
Fig. 70 Sect io n of the trim panel of t he luggage com
p ar tm en t: 12 -v ol t so cke t
Fig . 71 R ear cente r c ons ole : 12 -vo lt s ocket
~ Open the socket cover ~ fig . 70 or ~ fig. 71.
~ Inse rt the plug o f the el ectrical device into
t h e socket.
S ea ts a nd s to rage 69
There is an additional 12 volt socket in the
front center console~
page 70, fig . 72.
T he 12 volt socke ts may be used for 12-volt
appliances with maximum consumpt ion of up
to 100 watts.
Before you purchase any accessories, always
read and follow the info rmation in
~ page 285 , Additional accessories and parts
replacement.
A WARNING
The sockets and the electrical accessories
connected to them operate only when the
ignition is switched on .1ncorrect usage
can lead to ser ious injuries or burns . To re
duce the risk of injuries, never leave chil
dren unattended in the vehicle w ith the ve
h icle key.
(D Note
To avoid damaging the socket, only use
plugs that fit properly .
- Never connect eq uipment that generates
electrical current, such as a solar panel
or battery charger, to the 12 volt socket .
Th is could damage the vehicle 's electri
cal system.
- The 12 volt socket sho uld only be used
for a short per iod of t i me as a powe r
so urce for electrical equipme nt. Please
use the elec trical sockets in the vehicle
when connecting equ ipment for longer
periods .
(D Tips
When the engine is off and ac ce ssories are
still plugged in and are on , the vehicle ba t
tery can still be drained .
Page 238 of 302

236 Checking and filling
-Never charge a frozen battery. It may ex
plode because of gas trapped in the ice.
Allow a frozen battery to thaw out first.
- Do not reuse batteries which were fro
zen. The battery housing may have cracked and weakened when the battery
froze .
- Charge the battery in a well ventilated
area . Keep away from open f lame or elec
trical spark . Do not smoke. Hydrogen gas
generated by the battery is exp losive.
- To reduce the danger of explosion, never
connect or disconnect charger cables
wh ile the charger is operating.
- Fast charg ing a battery is dangerous and
should only be attempted by a compe
tent technician with the proper equip
ment.
- Battery acid that may spill during charg
ing should be washed
off with a solution
of warm water and bakin g soda to neu
tralize the acid.
Never use a fast charger as a booster to
start the engine. This will se riously dam
age sensitive electronic components, such
as control units, relays, radio, etc., as we ll
as the battery charger .
Battery replacement
The new battery must have the same specifi
cations and dimensions as the original equip
ment battery.
I ntell igent energy management in your vehi
cle is respo nsible for distributing the electr i
cal energy throughout your vehicle
c::> page 195. The intelligent energy manage
ment system wi ll keep the engine battery
charged better than vehicles without this sys
tem. To make sure the additional electrical en
ergy is available once again after you have
changed the battery, we recommend that you install batte ries of the same type and man u
facture only (the same as those installed at
the time your vehicle was delivered). Specifi- cations are listed on the
battery housing. Your
authorized dealer must code the battery in
the energy management system to enab le you
to use the energy management functions cor
rectly after replacing the battery.
T he new battery must have the same capacity,
voltage (12 volts), amperage, construction and plug sealing .
When installing the battery, make sure the ig
nition and all electrical consumers are switch
ed off.
(D Note
Make sure the ventilation hose on the side
of the battery is connected, otherwise
fumes or battery acid can leak out .
@ For the sake of the environment
Because of the prob lem of proper disposal
of a battery, we recommend your author
i zed Audi dealer change the battery for
you. Batteries contain sulfuric acid and
lead and must always be disposed of prop
erly in compliance with a ll environmental
regulations. Disposing of veh icle batter ies
improperly is very dangerous to the envi
ronment .
Windshield/headlight
washer container
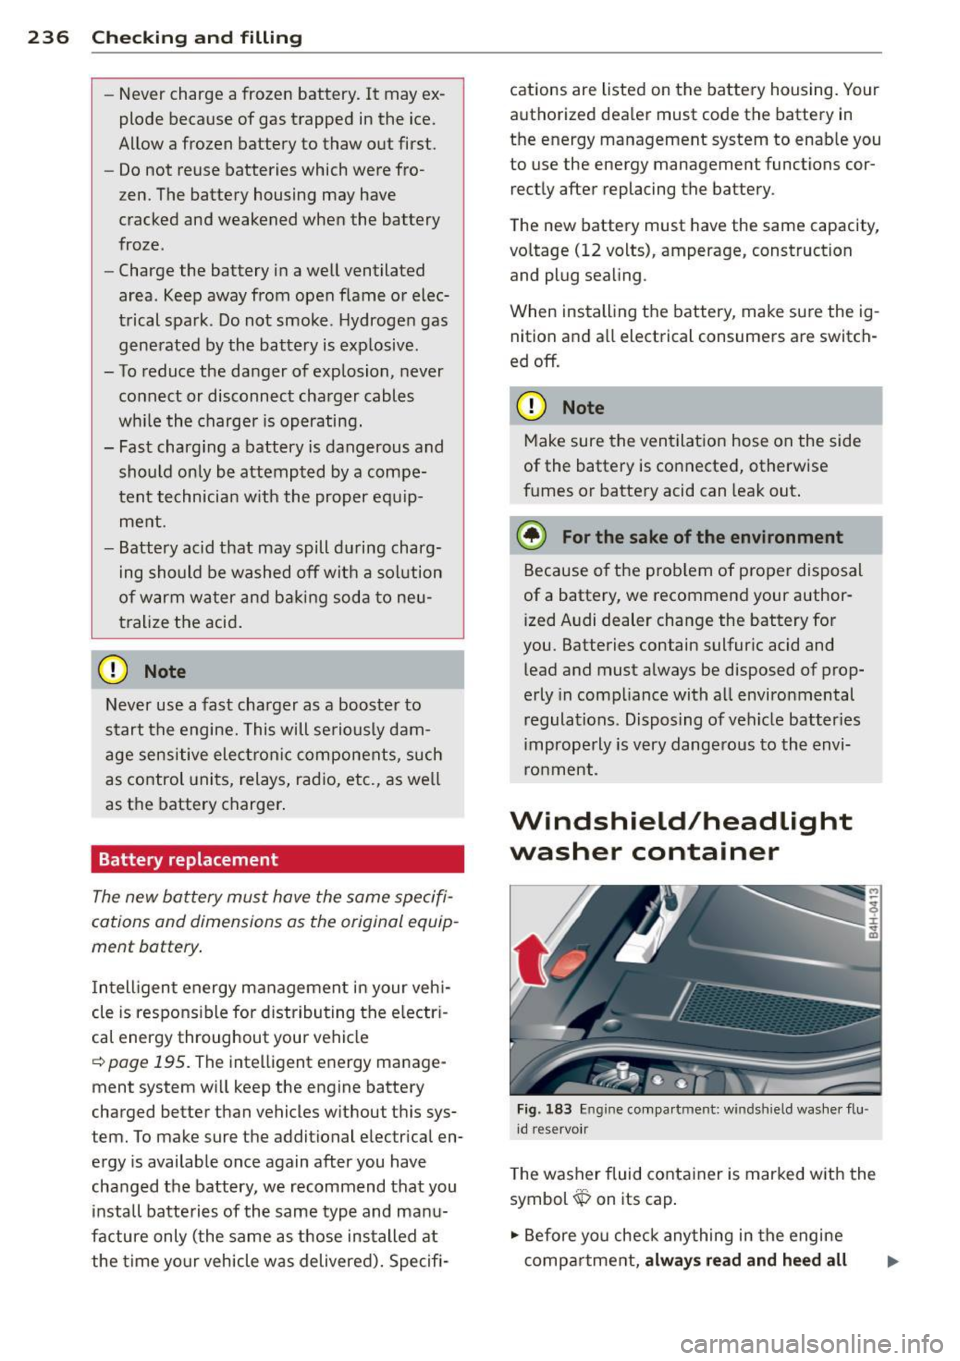
Fig. 183 En g in e compa rtm ent: w indshi eld washe r flu
i d reservo ir
T he washer fluid conta iner is marked w ith the
symbol~ on its cap .
.,. Before you check anything in the engine
compartment,
always read and heed all
Page 294 of 302

292 Index
Glossary of tire and loading termino logy 239
Glove compartment (cooled) . . . . . . . . . . . 70
G ross Vehicle Weight Rating (GVWR) ... 279
H
Headlig hts
C leaning system .............. .... .. 48
Defective . . . . . . . . . . . . . . . . . . . . . . . . . 21
Headlight range control . . . . . . . . . 21, 43
Washer reservoir .......... ... .. .. . 236
Head restraints . . . . . . . . . . . . . . . . . 61, 131
Adjusting . ............... ... .... . 131
H eated
exterior mirrors .......... .. .. .. .. .. 51
rear window . . . . . . . . . . . . . . . . . . . . . . . 76
seats . ..... ................ ..... .. 76
windshield washer spray no zzles . ..... 48
H eating ... .. .... ......... .. .. .. .. .. 74
Heavy clothing and safety belts . . . . . . . . 140
High beam ... ................ ..... .. 45
H igh voltage warn ing label ...... .. .. . 279
Homelink ® universal remote control . . . 124
H ood (release lever) . ..... .. .. .. .. .. . 222
Horn ..... .. ................ ... .. ... 8
How are child restraint system anchors re-
lated to child safety ........ .. .. .... . 181
Ho w many airbags does my vehicle have? 152 Instruments
and controls
General illustration . . . . . . . . . . . . . . . . . . 8
Instrument cluster ................ .. 10
Interior lighting Amb ience lighting ............. .... . 46
Front and rear ... ................ .. 46
Intermittent (windshield w ipers) ..... .. 48
J
Jack 260
Jump-starting ..... ................ . 273
Jumper cables ... .. .. .. ...... ... .. .. 274
K
Key ........... ... .. ................ 29
Battery replacement master key . . . . . . . 30
Emergency key ... ............. .. .. . 29
Key replacement . . . . . . . . . . . . . . . . . . . 29
Master key . . . . . . . . . . . . . . . . . . . . . . . . 29
Mechanical key ... ............. ..... 30
Valet key . ..... .. .. .............. .. 29
Kick-down (automatic transmission) .... 115
Knee airbags .. .. .. .. ....... .... .... 161
Descrip tion .... ............. ...... 161
How they work . .. .......... ...... . 162
Important safety instructions .. .. .. .. 162
How often should I check my t ire pres-
L
sures? .. .. .. ................ ... ... 245
How safety belt pretensioners work ... . 143
H ydroplaning 249
I
Immobilizer . . . . . . . . . . . . . . . . . . . . . . . . 26
Important things to do before driving .. 127
Im properly worn safety belts . .. .. .. .. . 143
Indicator lights
refer to Warning/ind icator lights .. .... 11
Infant seats . . . . . . . . . . . . . . . . . . . . . . . 17 4
Installing child safety seats
Safety belts ............. .. .. .... . 178
Installing the upper tether strap on the
anchorage . .. .......... ...... ... .. . 186
Instruments Adjusting the lighting ..... .... .... .. 47 Lane assist
Activating and deactivating ......... .. 95
Cleaning camera area .... ...... .. .. 208
Description .. .. .. ............. .. .. . 95
Instrument cluster indicator light .... . 95
Messages . .... .. ............. .... . 96
Notes on instrument cluster display ... . 95
Setting the steering wheel vibration ... . 97
Setting the warning point ........... . 97
LATCH ....... .. .. .. ........... .... 181
Description .. .. .. ............. .. .. 182
Guidance fixtures for lower anchorages 183
Installing a child restraint .......... . 184
Location . ..... .. .. .............. . 182
Mounting and releasing the anchorage
hook ..... .. .. .. .. ........... .... 184
Leather ........ .. ............. .... 213
Leather (cleaning) .. ................ . 214