mirror AUDI S8 2011 Owners Manual
[x] Cancel search | Manufacturer: AUDI, Model Year: 2011, Model line: S8, Model: AUDI S8 2011Pages: 302, PDF Size: 76.07 MB
Page 4 of 302
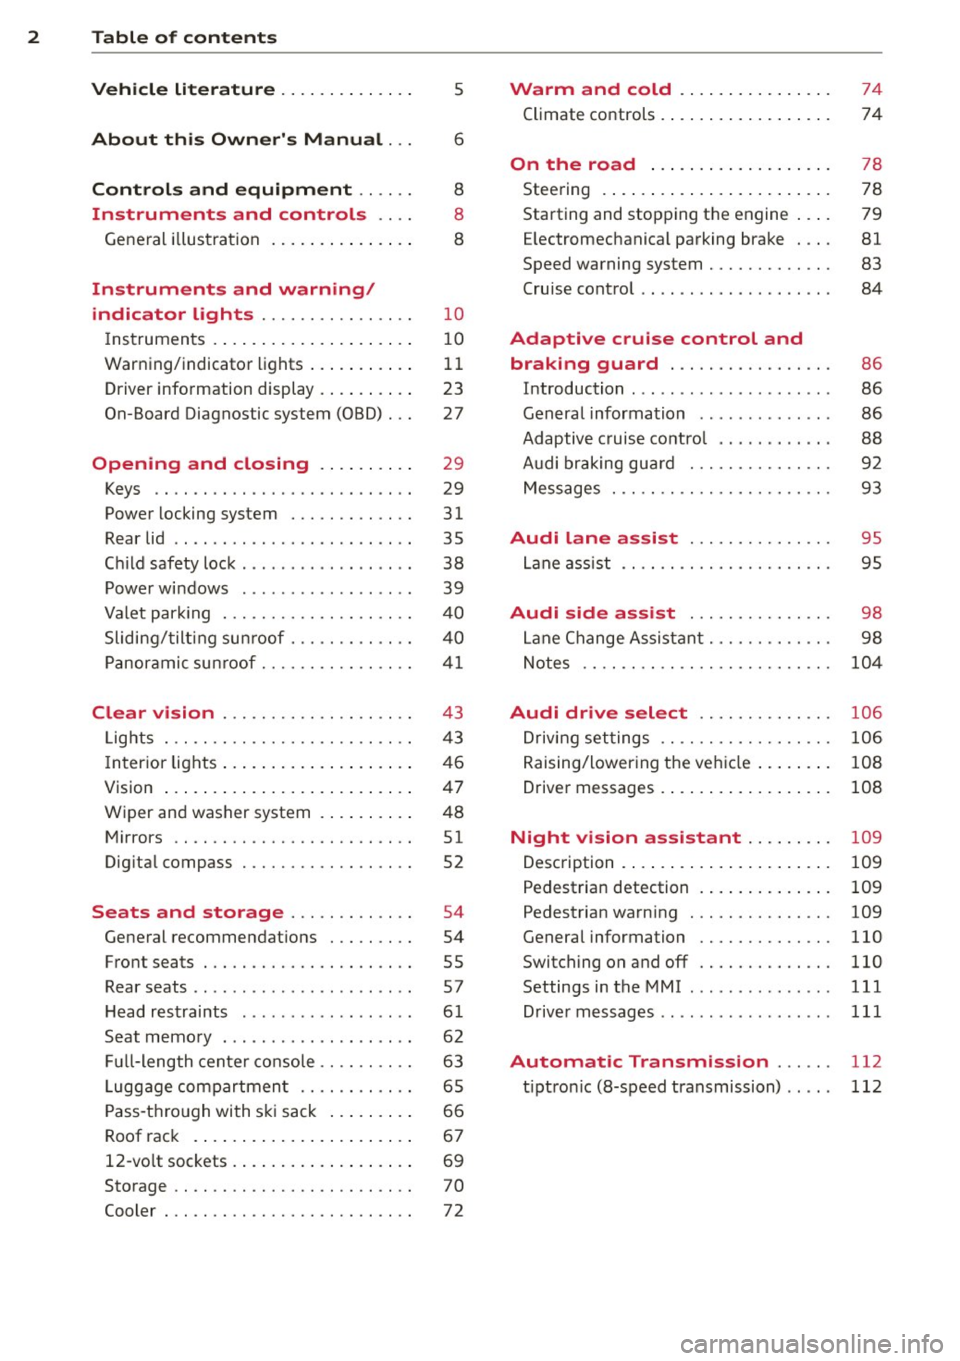
2 Table of contents
Vehicle liter ature .. .. .. .. .. ... .
5
About this Owner's Manual . . . 6
Controls and equipment .. ... .
Instruments and controls .. . .
General illus tra tion .... ... .. .. ... .
Instruments and warning/
indicator lights ........ .. .. .. . .
Instruments . .. .. ..... ... .. .. ... .
War ning/indicator lights ... .. ... .. .
Driver information display .... .. ... .
On-Board Diagnostic system (OBD) . . .
Opening and closing .. .. .... . .
Keys .. ...... ........... .. .. ... .
Power locking system ..... .. .. .. . .
Rear lid .. .. ........ ........ .... .
Child safety lock ........... .... .. .
Power windows ............... .. .
Valet par king . ........... .. .. ... .
Sliding/ tilt ing su nroof ... .. .. .. .. . .
P anoramic sun roof ........ .. .. ... .
Clear vision .. ........ .. .. .. .. . .
Lig hts . .. .. ............. .. .. .. . .
I n ter ior lights .. .. ..... ... .. .. ... .
V 1s 1on ..... ... . ...... ... .. .. ... .
W iper and washer system . ... .. .. . .
Mirrors ................. .. .. ... .
Dig ita l compass .......... .... ... .
Seats and storage ....... .. .. . .
General recommendat ions ..... .. . .
Front seats ... ........... .... ... .
Rear seats .. ... .... ...... .. .. .. . .
H ead restraints .............. .. . .
Seat memo ry ................... .
Full- length cen te r console .. .. .. ... .
L ugg age compartmen t ........... .
P ass-t hrou gh with s ki sack ... ... .. .
Roof rack . .. .. .. ..... ... .. .. ... .
12-vo lt sockets . .. ..... ... .. .. ... . 8
8
8
10
1 0
11
23
27
2 9
29
31
35
38
39
4 0
4 0
4 1
43
43
46
47
48 51
52
54
54
55
57
6 1
62
63
6 5
66
6 7
69
Sto rage . . . . . . . . . . . . . . . . . . . . . . . . . 70
Cooler . . . . . . . . . . . . . . . . . . . . . . . . . . 72
Warm and cold ... .. ..... .... . .
Climate co ntrols .. .. ... ..... ... .. . 74
74
On the road
. . . . . . . . . . . . . . . . . . . 78
Stee ring . . . . . . . . . . . . . . . . . . . . . . . . 78
Starting and stopping t he engine . . . . 79
E lectromechanical parking brake . . . . 81
Speed warning system . . . . . . . . . . . . . 83
Cru ise cont ro l . . . . . . . . . . . . . . . . . . . . 84
Adaptive cruise control and
braking guard . . . . . . . . . . . . . . . . .
8 6
I n troduction . . . . . . . . . . . . . . . . . . . . . 86
Genera l information . . . . . . . . . . . . . . 86
Adaptive c ruise control . . . . . . . . . . . . 88
Audi braking gua rd . . . . . . . . . . . . . . . 92
Messages . . . . . . . . . . . . . . . . . . . . . . . 93
Audi lane assist . . . . . . . . . . . . . . . 95
La ne assist . . . . . . . . . . . . . . . . . . . . . . 95
Audi side assist . . . . . . . . . . . . . . . 98
La ne Change A ssistant. . . . . . . . . . . . . 98
Notes . . . . . . . . . . . . . . . . . . . . . . . . . . 104
Audi drive select . . . . . . . . . . . . . . 106
D riv ing se ttings . . . . . . . . . . . . . . . . . . 106
Raising/lower ing the ve hicle . . . . . . . . 108
Drive r messages . . . . . . . . . . . . . . . . . . 108
Night vision assistant . . . . . . . . . 109
Desc ription . . . . . . . . . . . . . . . . . . . . . . 109
Pedestria n detection . . . . . . . . . . . . . . 109
Pedestrian warn ing . . . . . . . . . . . . . . . 109
General information . . . . . . . . . . . . . . 110
Switching on and off . . . . . . . . . . . . . . 110
Settings in the MMI . . . . . . . . . . . . . . .
111
D river messages . . . . . . . . . . . . . . . . . . 111
Automatic Transmission . . . . . . 112
t ipt ron ic (8-speed transmission) . . . . . 112
Page 34 of 302

32 Opening and clos ing
-When closing a door, make sure noth
ing can interfere w ith the door. This
could cause ser ious personal injury.
- You can stop the door from closing at
any time by pulling on the inside or
outside door handle.
(D Tips
- In the event of a crash with airbag de
ployment all locked doors will be auto
matically unlocked to give access to the
vehicle occupants from the outside.
- If the power locking system should ma l
function, you can lock the dr iver's door
using the mechanical key¢
page 35 .
-If the power lock ing system should fail,
you can st ill open the fuel tank flap in an
emergency ¢
page 221.
-You are well advised not to keep valua
bles inside an unattended vehicle, visib le
or not . Even a properly locked vehicle
ca nnot provide the sec urity of a safe .
- If the LED in the upper edge of the driv er's door panel comes on for abo ut 30
seconds after t he vehi cle is locked, there
i s a ma lf u nction in the power loc king or
t h e anti- theft warni ng sys tem. Have the
malfunction corrected by an authorized
A udi dealersh ip or q ua lified repair facili
ty .
Setting power locking
The driver can determine the functions for
power locking in the MMI.
,.. Se lect : I CAR I fu nction button > Car sy ste m s
control button > Vehicle setting s > Central
locking .
Unl ock door s -
You can decide if All doors or
on ly the
Driver should unlock . The rear lid al
so unlocks when
All is se lected. If you select
Dri ver in a vehicle with a convenience key *,
only the door whose handle you pull will un
l ock. If you se
lect
Dri ver , all the doors and rear lid
will unlock if you press them button on the re
mote control maste r key twice.
Loc k exterior trunk handle -If you se lec t On ,
the rear lid handle is locked . In this case the
rear lid can be opened with the b utton
cs on
the master key or with the
cs button * in the
driver's door . In veh icles with a convenience
key* , you can still open the rear lid using the
handle if an authorized master key is near the
proxim ity sensor .
Fold mir rors * -If you select On , the exterior
rearview mirrors fold in automatically w hen
you press the
ffi button on the remote control
master key or touch the sensor* in the ha ndle.
Lock when dr iving -If you select On, the vehi
cle locks automatically when driv ing. All of
the doors and rear lid lock .
Tone when locking -When you select On , a
confirmat ion tone sounds when you lock the
vehicle.
Locking and unlocking the vehicle with
the remote control
Fig . 18 Re mote co ntrol : f u nct ion buttons
Either the driver's door o nly or the entire vehi
cle w ill unlock when the unlock button mis
pressed once, depending on the settings in
the MMI
r=;,page32 .
.,. Press button 0 to unlock the vehicle
¢fig. 18.
,.. Press button ffi to lock the vehicle ¢ .& in
General description on page 31 .
,.. Press button cs briefly to un lock the rear
lid.
Page 49 of 302

Selecting a color profile
You can select from the Ivory , Polar and Ru
b y/ Pol ar
color profiles .
(D Tips
The settings are automa tically sto red and
assigned to the remote con tro l key that is
in use.
Instrument illumination
You con adjust the brightness of the instru
ment and display illumination .
Fig . 40 In strument ill um ination
• Press the knob to release it.
• Turn the knob toward"-" or"+" to reduce or
increase the brightness .
• Press the knob again to return it to it s or ig i
nal position .
Q Tips
The instrument illumination (for dials and
needles) lights on when the ig nitio n is
sw itched on and the vehicle lights are
turned off. As the daylight fades, the illu
m ina tion of the dials likewise dims auto
mat ically and wi ll go out com plete ly when
t he o utside light is very low . This fea ture is
meant to remind you to switch on the
headlights when o utside light conditions
become poor. Clear vi
sion 4 7
Vision
Sun visors
E J
Fig . 4 1 S un viso r
The sun visors for the driver and passenger
can be re leased from their bracke ts and
turned toward the doors
c:> fig. 41 (D . They
can a lso be moved back and forth lengthwise
in th is position .
The m irror light switches on when the cover
ove r the vanity m irror @opens.
T here is a shade between the dr iver 's and pas
senger's s un visors that can be used to cover
the gap above the rearview mirror.
. Sun Shade
Fi g. 42 Cock pit: Sun shade swit ch
F ig. 4 3 Rear doo r: S un s had e butto n
Page 50 of 302

48 Clear vis ion
Extending /retracting th e rear window
sh ad e*
• To extend or retract the sun shade fr om the
cockpit ,
press the~ button in the center
console
¢ fig . 42 .
• To extend or retract the sun shade
from th e
r e ar of th e vehicle,
press the liiil button in
the door
¢ fig . 43 .
Extending the rear door sun shade s
• Close the window in the rear door.
• To extend the sun shade
from the d riv er 's
s eat ,
pull the left/right rear power window
switch ~ in the dr iver's door .
• To extend the sun shade from the
rear of
th e v ehi cle,
pull the power window sw itch
~ i n the left/right rear door.
Retr acting the re ar doo r sun shades*
• To retract the sun shade from th e dri ver 's
sea t,
press the left/right rear power window
switch~ in the driver's door.
• To retract the sun shade from the
re ar of the
vehicle ,
press the power window switch~
in the left/right rear door.
You can adj ust the settings for the rear sun
sh ade so the shade ret ra cts automatica lly
when you selec t the reve rse gear. Select:
CAR
function button > Ca r sys tems control button
> Vehicle settings > Automatic rear blind >
On. T he sett ings are automat ica lly stored and
assigned to the remote control key. The sun
shade extends again as soon as the vehicle be
g ins traveling forward at a speed greater than
9 mph (1S km/h), as long as the ignition has
not been switched off in the meantime .
& WARNING
When lowe ring or raisi ng the sunshade,
make s ure there is no thing in its way a nd
t ha t it has a free path to trave l. This could
cause personal injury.
{D) Tips
- If the sun shade is operated repeatedly
wi thin a sho rt time, the bui lt-in overload
protection circui t may be tr ipped. If this occurs, you will have to wait briefly be
fore yo u can operate the shade again.
- Because of the decrease in the f lexibility
of the shade materia l at temperatures
below freezing, the electrica l circuit
which operates the shade shuts off when
the temperature in the vehicle falls be
low
14 °F ( - 10 °C). The shade cannot be
operated until the passenger compart
ment warms up above this temperature.
Vanity mirror in the rear
App lies to veh icles: w ith vanity mir rors in th e rea r
Fig. 44 Rear headliner : van ity mirro r
• Press the button to fold the mirror open.
The mirror light ing turns on automatically.
• To change the mirror's ang le, move it for
ward/back w ith your hand .
Wiper and washer
system
Switching the windshield wipers on
F ig . 4 5 Winds hield w iper lever
Move the windshie ld w iper lever to the corre
sponding position:
@ -Windshield wipe rs off
Page 53 of 302
Mirrors
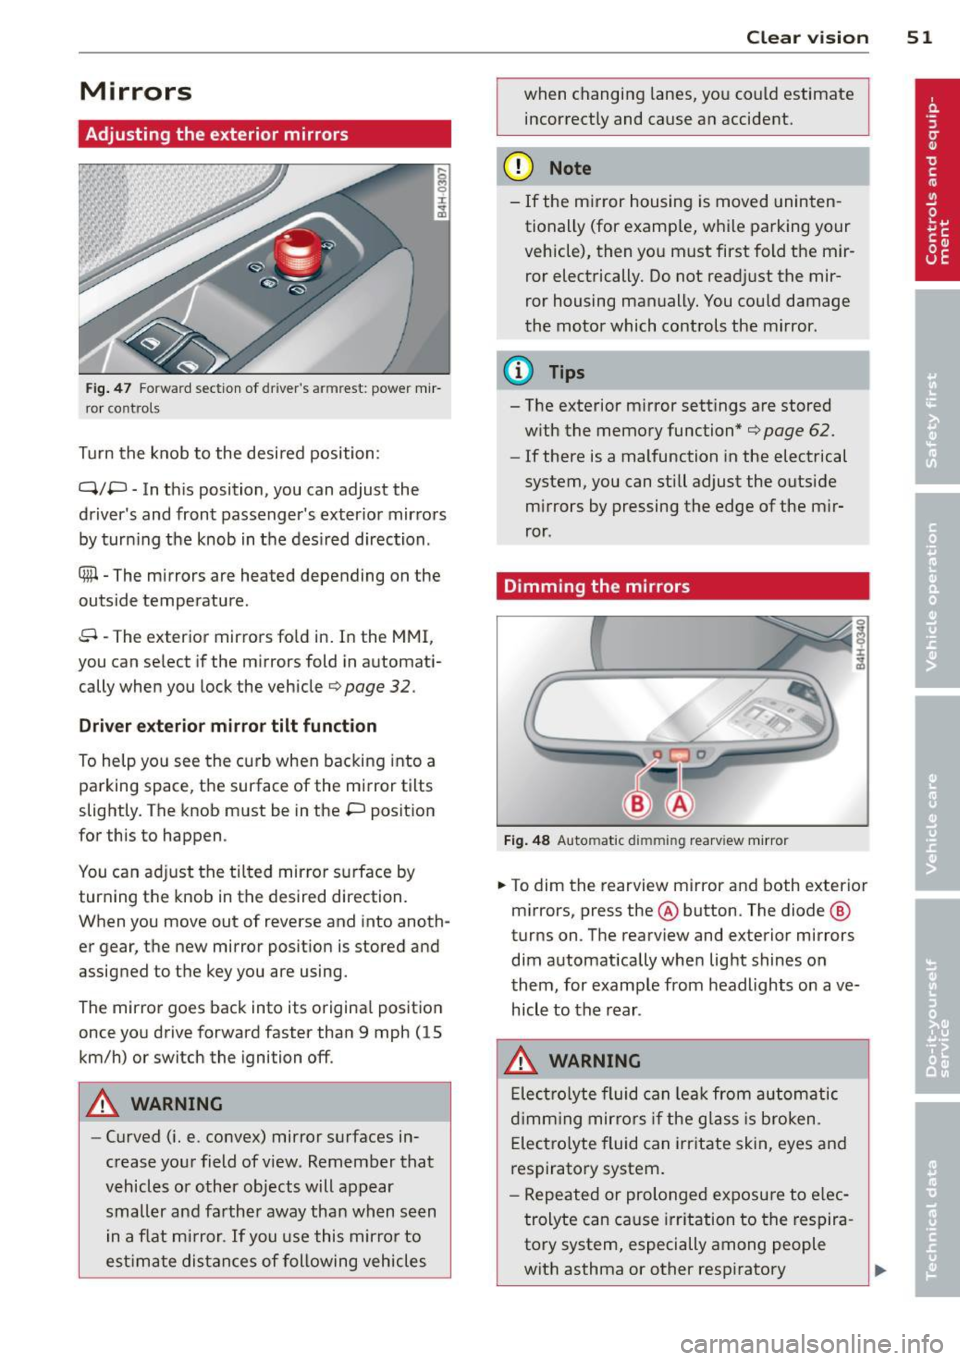
Adjusting the exterior mirrors
Fig . 47 Fo rw ar d section of driver's armrest: powe r m ir
r or co nt rols
Turn the knob to the desi red position :
Q/P -In th is position, you can adjust the
driver's and front passenger's exter ior mir rors
by turn ing the knob in t he des ired direction .
® -The m irrors are heated depending on the
out side temperature .
8 -The exterior mirrors fo ld in. In the MMI,
you c an se lect if the m irro rs fold in automat i
cally when you lock the vehicle
¢ page 32 .
Driver exter io r mi rro r tilt funct ion
To help yo u see the curb when backing into a
parking space, the surface of the mirror tilts
slightly. The knob must be in the P position
for this to happen .
You can ad just the tilted mirror s urface by
turning the knob in the desired direction.
When you move out of reverse and into anoth
er gear, the new mirror position is stored and
assigned to the key you a re using.
The mirror goes back into its origina l posit io n
once yo u dr ive forward faster than 9 mph (15
km/h) or switch the ignition off .
A WARNING
-Curved ( i.e. convex) mirror s urfaces in
crease your field of view . Remember that
vehicles or other objects will appear
small er and farther away than when seen
in a f lat m irror .
If you use this mirro r to
est imate distances of following vehicles
.
Clear vi sion 51
when changing lanes, you co uld estimate
incor rectly and cause an accident.
(D Note
- If the m irror housing is moved uninten
tionally (for examp le, w hile pa rking your
vehicle), then yo u must first fold the mir
ror electrically. Do not read just the mir
ror housing man ually. You cou ld damage
the motor which controls the mirror.
(D Tips
- The exterior m irror settings are stored
w ith the memory function*
¢ page 62.
- If there is a malfunction in the electrical
system, you can still adjust the outside
mi rrors by pressing the edge of the m ir
ror .
Dimming the mirrors
Fig . 48 Automatic dimming rearview mirro r
.. To dim the re arview mirror and both exterior
m irrors, press the@ button . The diode ®
turns on. T he rearv iew and exterior mirrors
dim automatically whe n light shines o n
t hem, for examp le from headlights on ave
hicle to the rear .
A WARNING
Elect ro lyte fluid can lea k from au to matic
d imm ing mir rors if the g lass is b roken .
E lec tro lyte fluid can irr itate skin, eyes and
respiratory system.
- Repeated or prolonged exposu re to e lec
trolyte can cause irritation to the respira
tory system, especially among people
with asthma or other resp iratory
.
Page 54 of 302
52 Clear vis ion
condit ions. Get fresh a ir immediately by
leaving the vehicle or, if that is not possi
ble, open windows and doors all the way.
- If electrolyte gets into the eyes, flush
them thoroughly with large am ounts of
clean water for at least 15 m in utes;
med ica l attent ion is recommended .
- If electrolyte contacts sk in, flush affect
ed area with clean water for at least 15
m in utes and then was h affec ted area
with soap and wat er; medical atten tion
is re commen ded . Th oroug hly wash af
fec ted clot hing and sh oes bef ore reu se .
- If swa llowed and person is conscious,
r in se mouth w it h wate r fo r at le ast 15
min utes . Do no t induc e vom itin g un less
ins truc ted to do so by medica l professio
nal. Get medical attention immediately.
(D Note
Liquid ele ct ro lyte leaking from broken mir
ror g la ss will dam age a ny p lastic surf aces
it comes in contact w ith . C lean up s pille d
e lectro lyte immediately with clean water
and a sponge.
(D Tips
- Switching off the dimming function of
the inside rear view mirror also deacti
vates the automatic dimming function
of the e xterior mirrors .
-Automatic dimmi ng for the m irror only
ope rates properly i f th e sun shade * fo r
the rea r window is not in use or the light
strik ing the ins ide mirro r is not hindered
by other objects . - T
he automatic dimming mi rrors do not
dim when the inte rior lighting is turned
on or the reve rse gear is selected .
Digital compass
Switching the compass on and off
Applies to vehicles: wit h digital compass
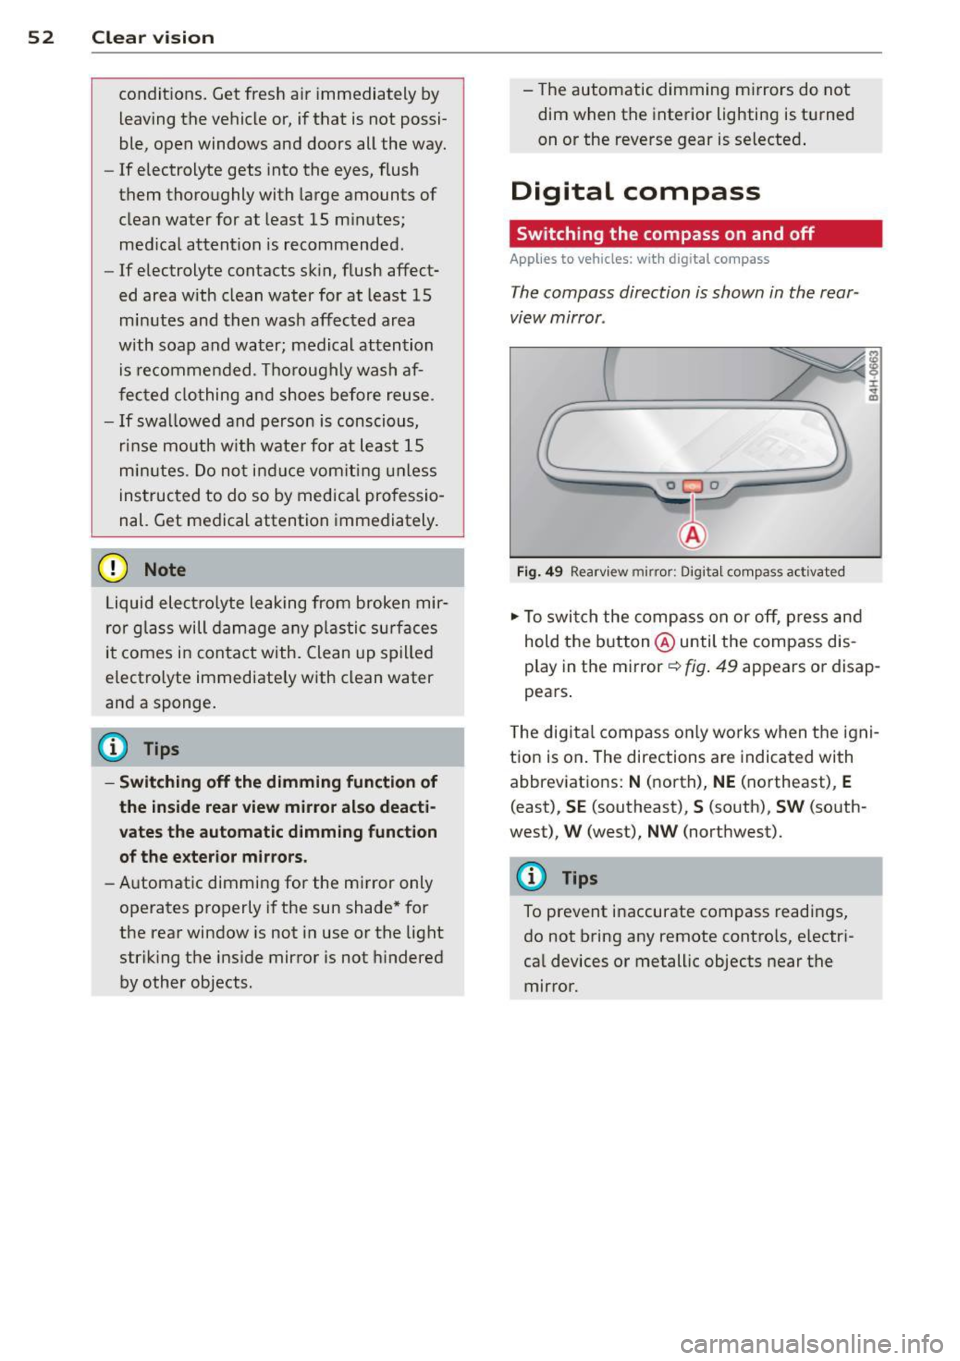
T he compass direction is shown in the rear
view mirror .
J
Fig . 49 Rearv iew mirr or: Digi tal compass act ivated
.,. To swi tch the comp ass o n or off, p ress an d
hold the b utt on @ until the compass dis
p lay in the mirror
c::> fig . 49 appears o r disap
pea rs .
T he dig ita l compass o nly works when the igni
tion is o n. The directions are indica ted with
abbrev iat ions:
N ( n orth) , NE (northeast), E
(east), SE (southeast), S (so uth), SW (south
west) ,
W (west), NW (northwest).
@ Tips
To prevent inaccurate compass readings,
do not bring any remote cont ro ls, e lectr i
ca l devices or metallic objects near t he
mir ro r.
Page 55 of 302

Clear vision 5 3
Adjusting the magnetic zone
Applies to vehicles: with digital compass
The magnetic zone must be adjusted correctly for the compass to read accurately.
Fig. SO Magnet ic zone map
~ Press and ho ld the button @ ¢page 52,
fig . 49
until the number of the magnetic
zone appears in the rearview mirror .
~ Press the button@repeated ly to select the
correct magnetic zone. The select ion mode
turns off after a few seconds .
Calibrating the compass
Applies to vehicles: with digital compass
You must recalibrate the compass if it does
not display the correct direction .
~ Press and hold the button @unti l a C ap
pears in the rearview mirror.
~ Drive in a c ircle at about 6 mph (10 km/h)
until a direction is disp layed in the rearview
mirror .
A WARNING
-
To avoid endangering yourself and other
drivers, calibrate the compass in an area
where there is no traffic.
0 co
co
0 ' I ~ co
-
Page 61 of 302
Operating the reclining rear seat
App lies to v ehicles: with reclining rea r seat
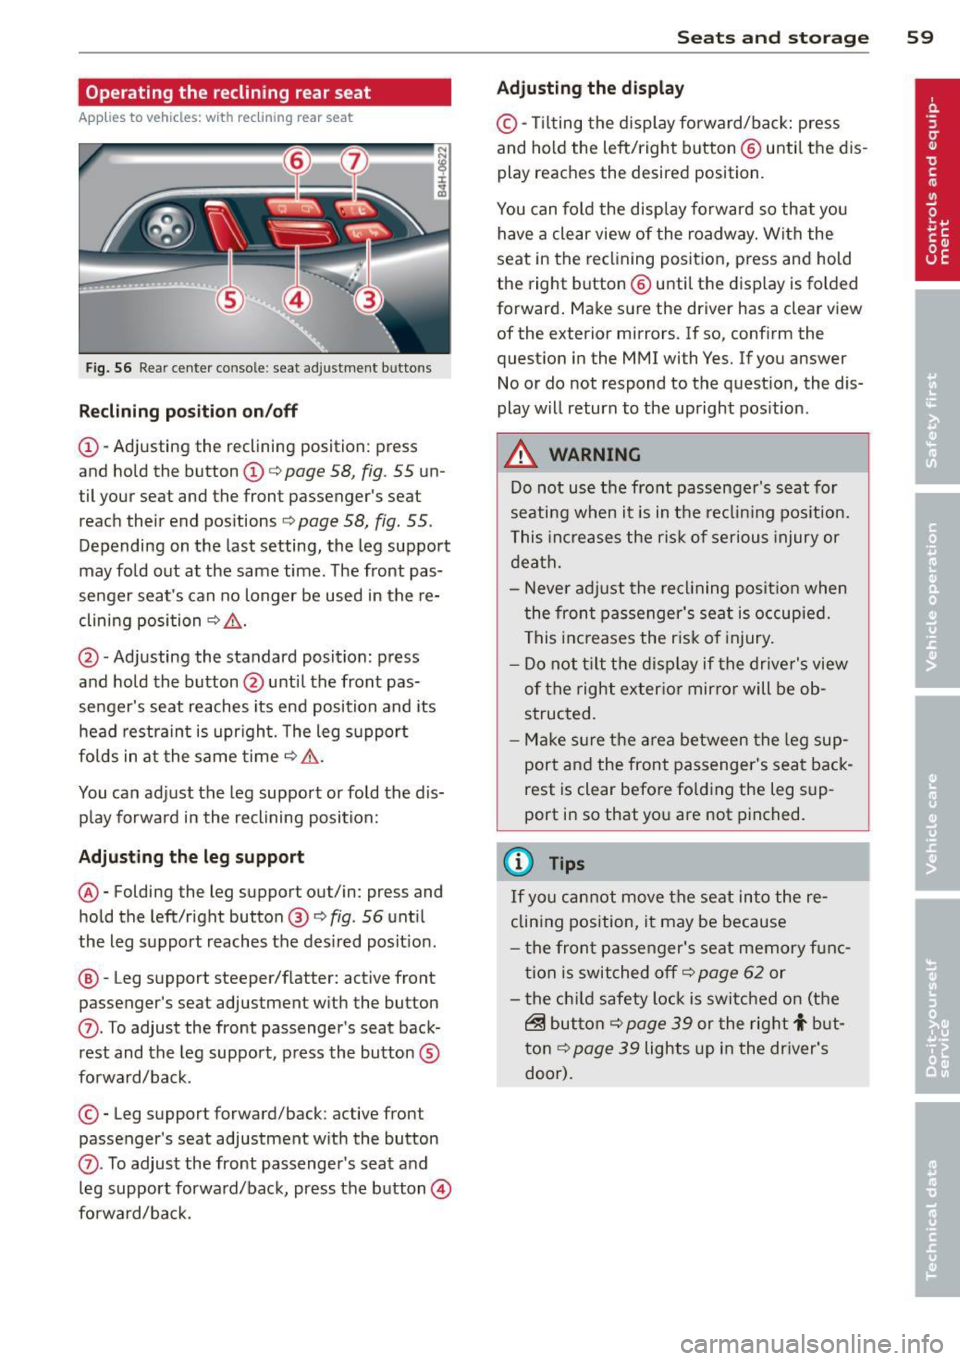
Fig. 56 Rear cente r co nso le : seat adjustment bu tto ns
Reclining position on/off
@-Adjusting the reclining position: press
and hold the button@c:::>
page 58, fig. 55 un
til your seat and the front passenger's seat
reach their end positions
c:::> page 58, fig. 55.
Depending on the last setting, the leg support
may fold out at the same time. The front pas
senger seat's can no longer be used in the re
clining position c:::>
&,.
@ -Adjusting the standard position: press
and hold the button @until the front pas
senger's seat reaches its end position and its
head restraint is upright. The leg support
folds in at the same time c:::>
&,.
You can adjust the leg support or fold the dis
play forward in the reclining position:
Adjusting the leg support
®-Folding the leg support out/in: press and
hold the left/right button ®
c:::>fig . 56 until
the leg support reaches the des ired posit ion .
@ -Leg support steeper/flatter: active front
passenger's seat adjustment with the button
(J) . To adjust the front passenger's seat back
rest and the leg support, press the button ®
forward/back.
© -Leg support forward/back: active front
passenger 's seat adjustment with the button
(J) . To adjust the front passenger's seat and
l eg support forward/back, press the button@
forward/back.
Seats and storage 59
Adjusting the display
©-Tilt ing the display forward/back: press
and hold the left/right b utton @ until the dis
play reaches the desired position.
You can fold the display forward so that you
have a clear view of the roadway. With the
seat in the reclining position, press and hold
the right button@ unti l the display is folded
forward. Make sure the driver has a clear view
of the exterior mirrors. If so, confirm the
question in the MMI with Yes. If you answer
No or do not respond to the question, the dis
play will return to the upright pos ition .
A WARNING
Do not use the front passenger's seat for
seating when it is in the reclin ing position.
This increases the risk of serious injury or
death.
- Never adjust the reclining position when
the front passenger's seat is occupied.
This increases the risk of injury.
- Do not t ilt the display if the driver's view
of the right exterior mirror will be ob
structed.
- Make sure the area between the leg sup
port and the front passenger's seat back
rest is clear before fo lding the leg sup
port in so that you are not pinched.
(!) Tips
If yo u cannot move the seat into the re
clining position, it may be because
- th e front passenger's seat memory func
tion is switched off c:::>
page 62 or
- the child safety lock is switched on (the
~ button c:::> page 39 or the rig ht t but
ton c:::>
page 39 lights up in the driver's
door).
Page 64 of 302
62 Seats and storage
-Correctly adjusted head restraints and
safety be lts are an extreme ly effective
combination of safety features.
Seat memory
Description
App lies to vehicles: with memory function
The memory function allows you to quickly
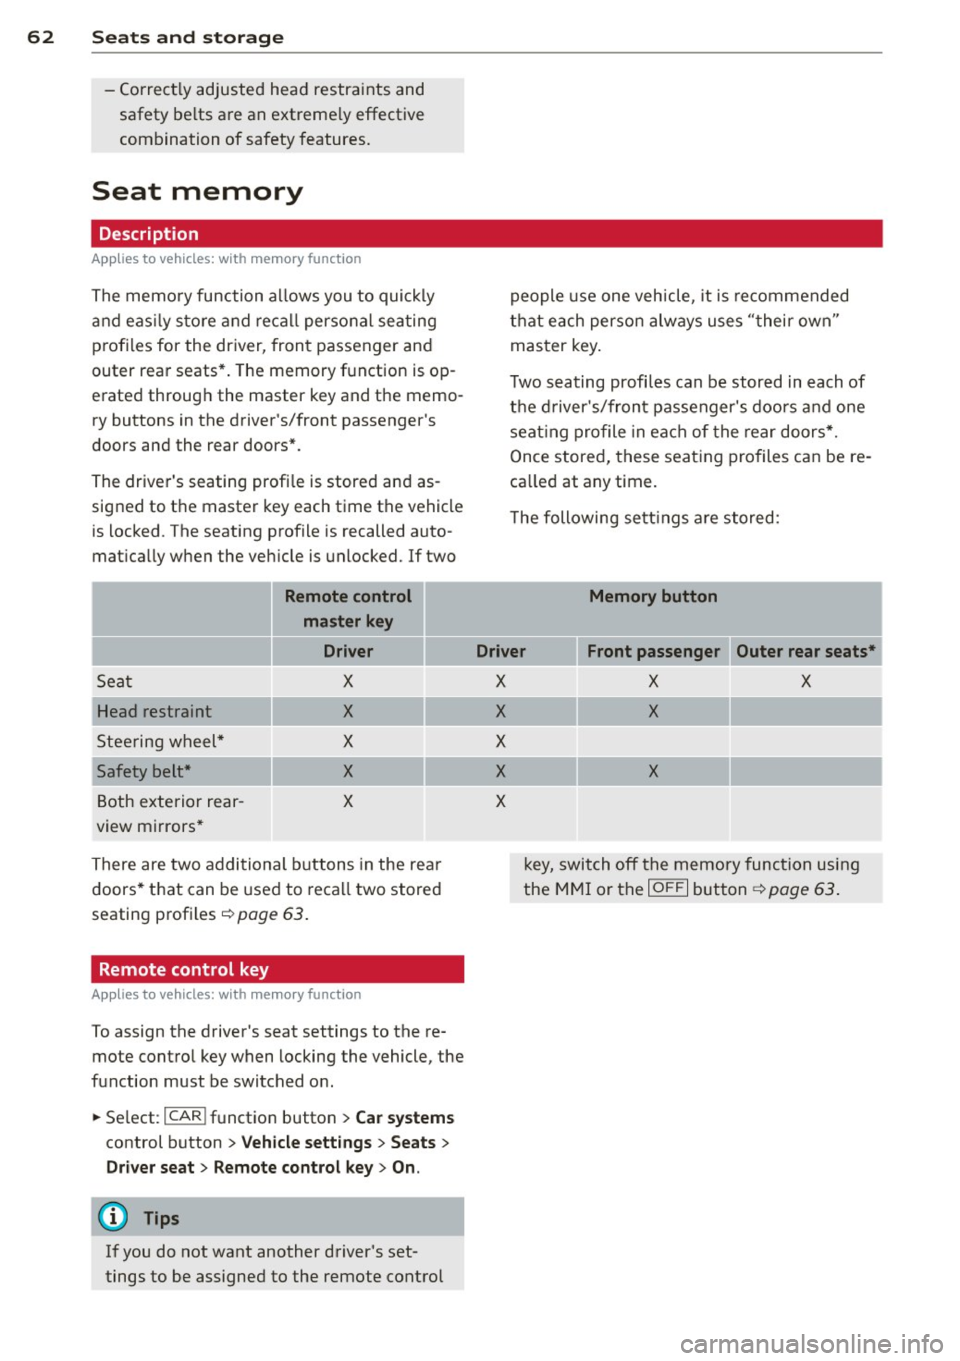
and easily sto re and recall personal seating
profiles for the driver, front passenger and
outer rear seats*. The memory function is op
erated through the master key and the memo ry buttons in the driver 's/front passenge r's
doors and the rear doors*.
The driver's seating profi le is stored and as
signed to the master key each time the vehicle
is locked . The seating profile is recalled auto
mat ically when the veh icle is unlocked . If two
Remote control
master key
Driver
Sec1t X
Head restraint X
Steering wheel* X
Safety belt* X
Both exterior rear-X
view mirrors*
There are two additional buttons in the rear
doors* that can be used to recall two stored
seating profiles
r:=> page 63.
Remote control key
Applies to vehicles: with memory function
To assign the driver's seat settings to the re
mote contro l key when locking the vehicle, the
function must be switched on.
• Se lect :
I CAR ! function button > Car systems
control button > Vehicle settings > Seats >
Driver seat > Remote control key> On .
(D Tips
If you do not want another driver's set
tings to be assigned to the remote control people
use one veh icle, it is recommended
that each person always uses "their own"
master key.
T wo seating profi les can be stored in each of
the driver's/front passenger's doors and one
seat ing profile in each of the rear doors*.
Once stored, these seating profiles can be re
ca lled at any time.
T he following sett ings are stored:
Memory button
Driver Front passenger Outer rear seats*
X
X
X
X
X
X X
X
X
k ey, switch off the memory function using
the MMI or the
IO FF I button ~ page 63.
Page 100 of 302

98 Audi side assist
Audi side assist
Lane Change Assistant
Description
App lies to vehicles: with si de assist
The side assist helps you when changing
lanes.
GID
A UDI
Fig. 99 Rear bumper: Posit ion of radar se nsors (not
vis ible on outs ide)
Fig. 100 Signal light on the outside mirror -driver's
side
ID ,._
8
i
.. a,
Side assist uses radar sensors (not visib le on
outside) ¢
fig. 99 to help the driver check
blind spots, and see what is happening in traf
fic behind the vehicle
¢page 99, fig. 102.
Signal lights are built into both outside mir
rors ¢
fig. 100. The signal light on the left
outside mirror assists when moving over into
the left lane and the signal light on the right
outside mirror assists when moving over into
the right lane.
The s ignal light comes on to tell you that side
assist has detected a vehicle on that side and
that the position of this other vehicle should
be taken into account if you were to change
lanes. This is called the
informational stage
signal ¢page 100.
The informational stage signal
is designed so that you notice it only
when you are looking in the outside mirror.
When you activate the turn signal and side as
s ist detects a vehicle in a notable location, the
corresponding signal on the outside mirror
flashes briefly and brightly several times. This
is the
alert stage signal ¢ page 100.
Activating and deactivating
App lies to vehicles: wit h side assist
Fig. 101 Driver 's door: Side assist button
Activating
a,
ij
:r
" a,
"' Press the button¢ fig. 101. The indicator on
the button lights up.
Deactivating
"' Press the button again. The indicator light
on the button goes out .
The system works at speeds faster than 19 mph (30 km/h) .
A WARNING
-- Improper reliance on the side assist sys-
tem can cause collis ions and serious per
sonal injury:
- Never rely on ly on side assist when
changing lanes.
- Always check rear view mirrors to make
sure that it is safe to change lanes.
- Side assist cannot detect all veh icles un
der all conditions- danger of acc ident!
- Side assist cannot detect vehicles in time
to a lert you when they approach from
behind at very high speed, or fall drop
back very quickly. ..,_