belt AUDI TT 1998 8N / 1.G AEB ATW Engines Engine Assembly Workshop Manual
[x] Cancel search | Manufacturer: AUDI, Model Year: 1998, Model line: TT, Model: AUDI TT 1998 8N / 1.GPages: 38, PDF Size: 0.74 MB
Page 4 of 38
13-4
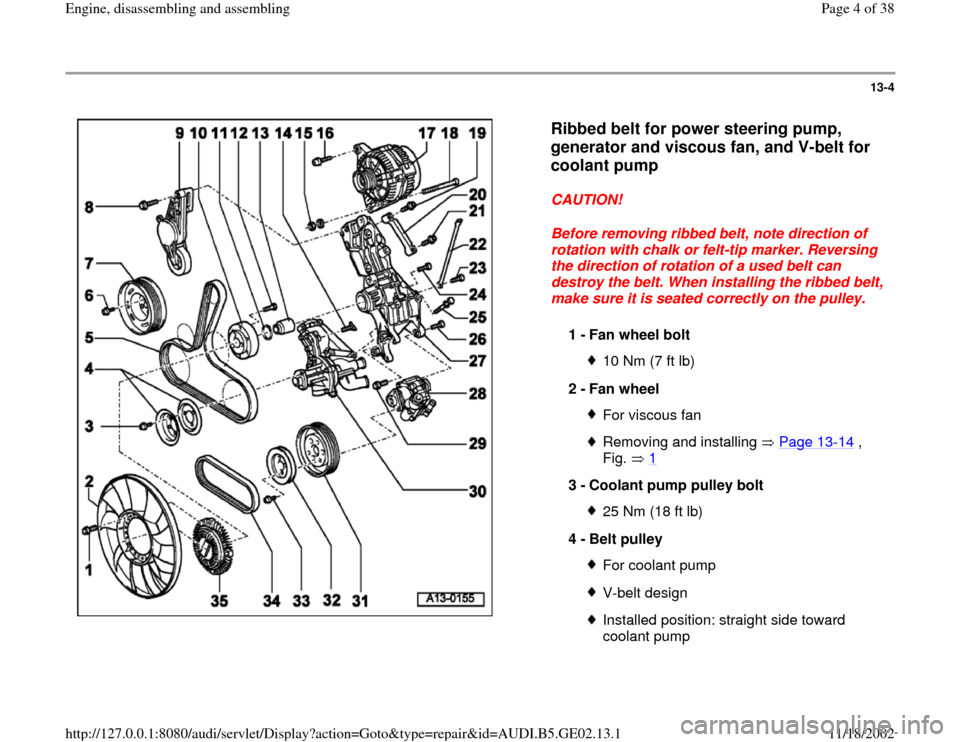
Ribbed belt for power steering pump,
generator and viscous fan, and V-belt for
coolant pump
CAUTION!
Before removing ribbed belt, note direction of
rotation with chalk or felt-tip marker. Reversing
the direction of rotation of a used belt can
destroy the belt. When installing the ribbed belt,
make sure it is seated correctly on the pulley.
1 -
Fan wheel bolt
10 Nm (7 ft lb)
2 -
Fan wheel For viscous fanRemoving and installing Page 13
-14
,
Fig. 1
3 -
Coolant pump pulley bolt
25 Nm (18 ft lb)
4 -
Belt pulley For coolant pumpV-belt designInstalled position: straight side toward
coolant pump
Pa
ge 4 of 38 En
gine, disassemblin
g and assemblin
g
11/18/2002 htt
p://127.0.0.1:8080/audi/servlet/Dis
play?action=Goto&t
yp
e=re
pair&id=AUDI.B5.GE02.13.1
Page 5 of 38
13-5
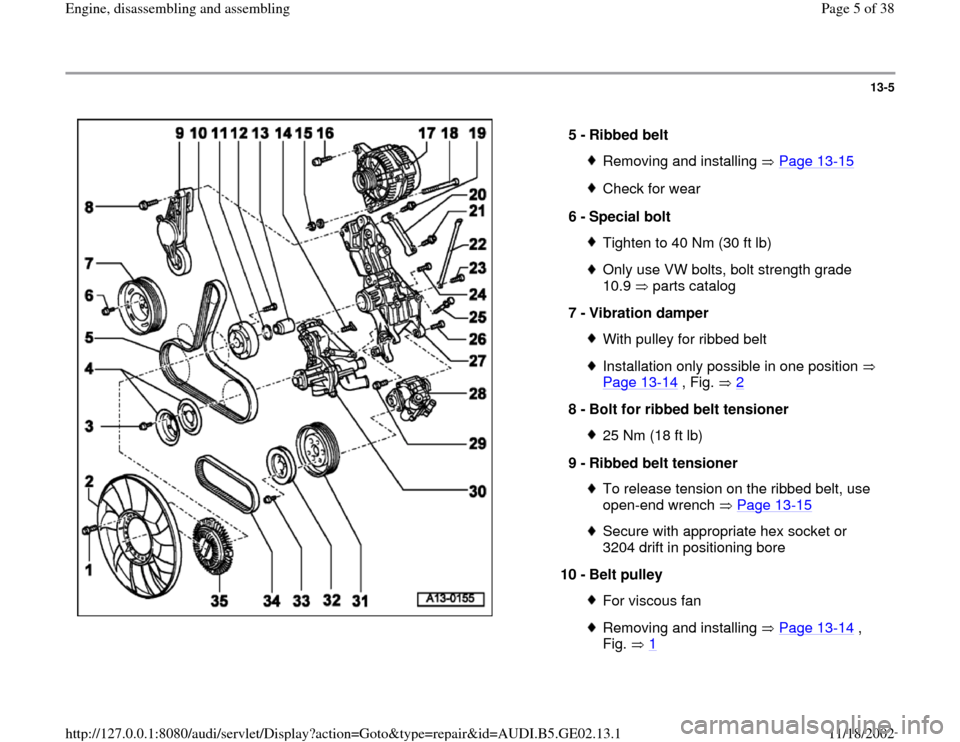
5 -
Ribbed belt
Removing and installing Page 13
-15
Check for wear
6 -
Special bolt Tighten to 40 Nm (30 ft lb)Only use VW bolts, bolt strength grade
10.9 parts catalog
7 -
Vibration damper
With pulley for ribbed beltInstallation only possible in one position
Page 13
-14
, Fig. 2
8 -
Bolt for ribbed belt tensioner
25 Nm (18 ft lb)
9 -
Ribbed belt tensioner To release tension on the ribbed belt, use
open-end wrench Page 13
-15
Secure with appropriate hex socket or
3204 drift in positioning bore
10 -
Belt pulley For viscous fanRemoving and installing Page 13
-14
,
Fig. 1
Pa
ge 5 of 38 En
gine, disassemblin
g and assemblin
g
11/18/2002 htt
p://127.0.0.1:8080/audi/servlet/Dis
play?action=Goto&t
yp
e=re
pair&id=AUDI.B5.GE02.13.1
Page 6 of 38
13-6
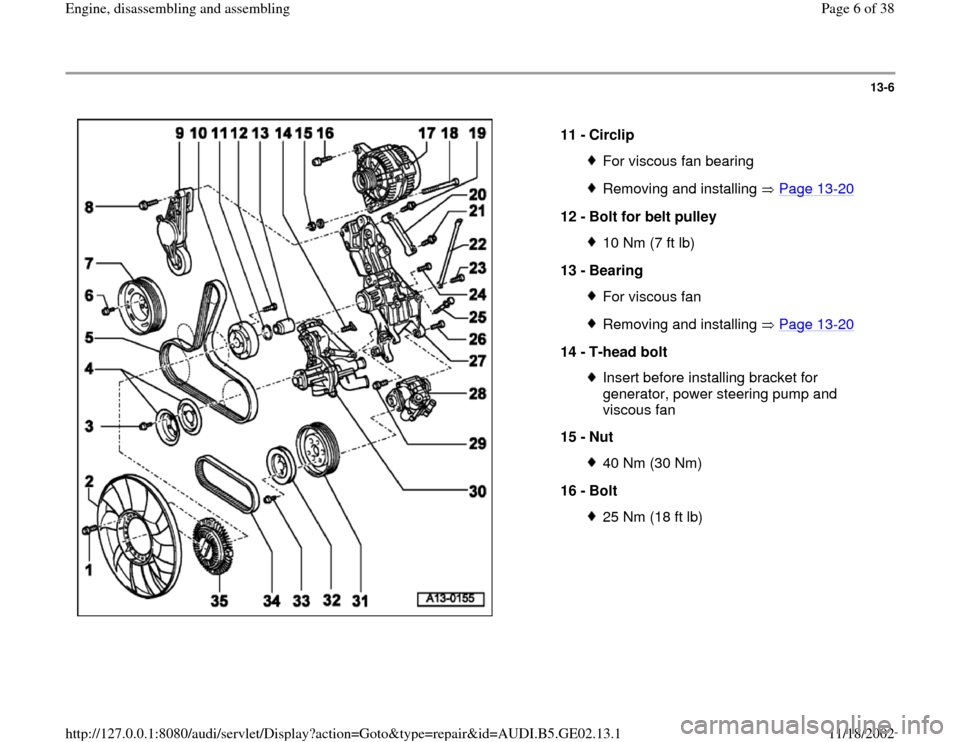
11 -
Circlip
For viscous fan bearingRemoving and installing Page 13
-20
12 -
Bolt for belt pulley
10 Nm (7 ft lb)
13 -
Bearing For viscous fanRemoving and installing Page 13
-20
14 -
T-head bolt
Insert before installing bracket for
generator, power steering pump and
viscous fan
15 -
Nut 40 Nm (30 Nm)
16 -
Bolt 25 Nm (18 ft lb)
Pa
ge 6 of 38 En
gine, disassemblin
g and assemblin
g
11/18/2002 htt
p://127.0.0.1:8080/audi/servlet/Dis
play?action=Goto&t
yp
e=re
pair&id=AUDI.B5.GE02.13.1
Page 7 of 38
13-7
Note:
For easier installation of generator into the bracket,
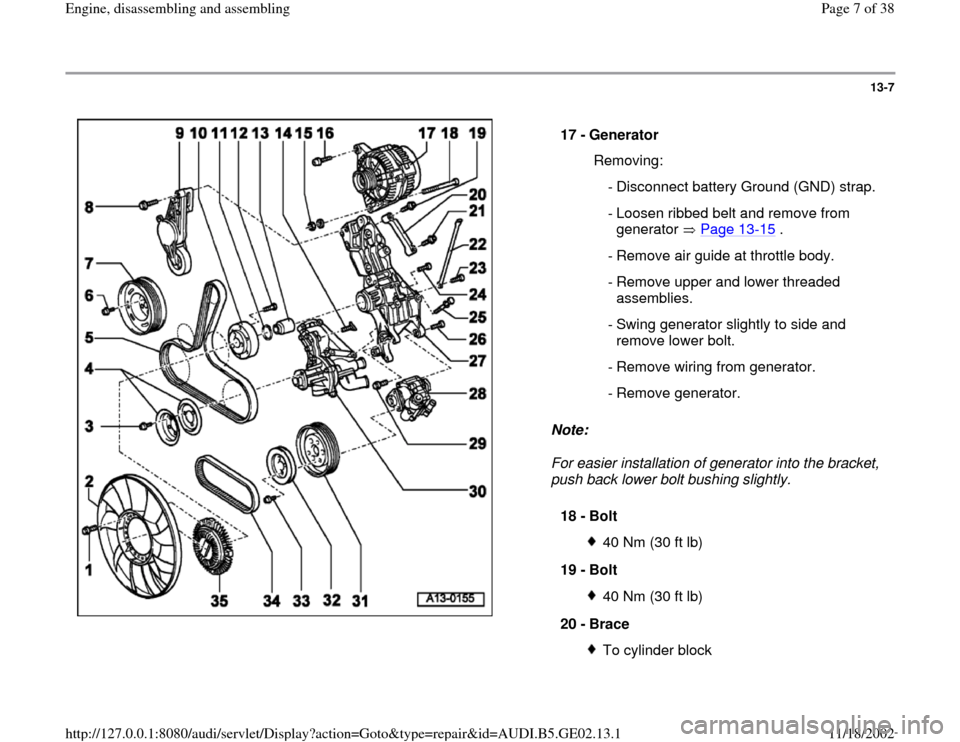
push back lower bolt bushing slightly. 17 -
Generator
Removing:
- Disconnect battery Ground (GND) strap.
- Loosen ribbed belt and remove from
generator Page 13
-15
.
- Remove air guide at throttle body.
- Remove upper and lower threaded
assemblies.
- Swing generator slightly to side and
remove lower bolt.
- Remove wiring from generator.
- Remove generator.
18 -
Bolt
40 Nm (30 ft lb)
19 -
Bolt 40 Nm (30 ft lb)
20 -
Brace To cylinder block
Pa
ge 7 of 38 En
gine, disassemblin
g and assemblin
g
11/18/2002 htt
p://127.0.0.1:8080/audi/servlet/Dis
play?action=Goto&t
yp
e=re
pair&id=AUDI.B5.GE02.13.1
Page 11 of 38
13-9
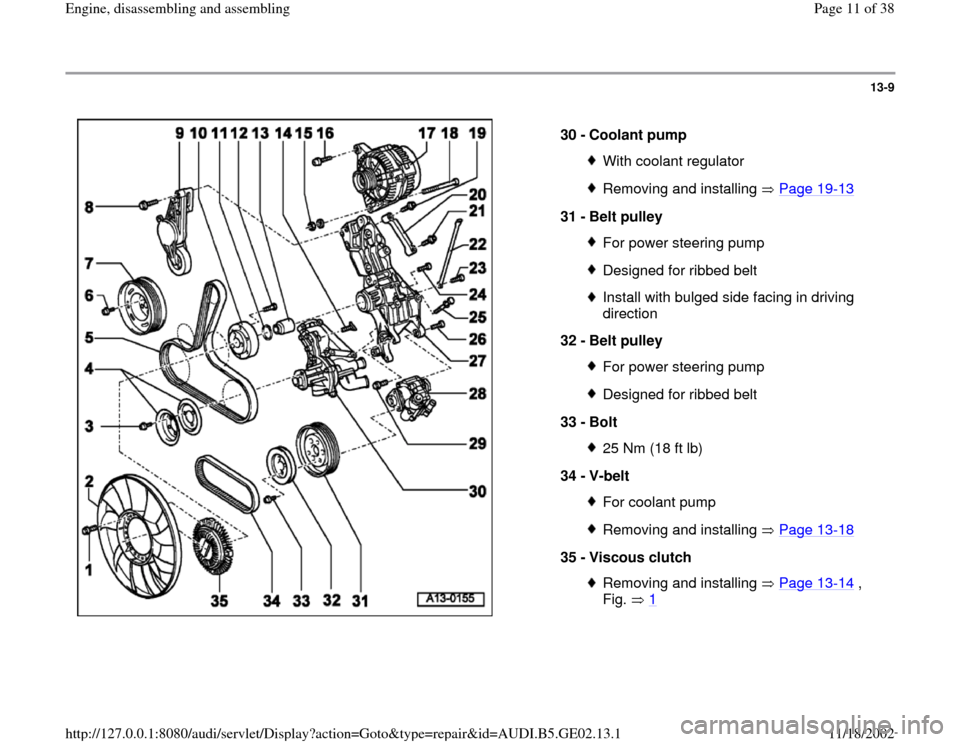
30 -
Coolant pump
With coolant regulatorRemoving and installing Page 19
-13
31 -
Belt pulley
For power steering pumpDesigned for ribbed beltInstall with bulged side facing in driving
direction
32 -
Belt pulley For power steering pumpDesigned for ribbed belt
33 -
Bolt 25 Nm (18 ft lb)
34 -
V-belt For coolant pumpRemoving and installing Page 13
-18
35 -
Viscous clutch
Removing and installing Page 13
-14
,
Fig. 1
Pa
ge 11 of 38 En
gine, disassemblin
g and assemblin
g
11/18/2002 htt
p://127.0.0.1:8080/audi/servlet/Dis
play?action=Goto&t
yp
e=re
pair&id=AUDI.B5.GE02.13.1
Page 12 of 38

13-10
Ribbed belt for air conditioning
CAUTION!
The A/C refrigerant circuit must not be
opened.
Before removing ribbed belt, note direction of
rotation with chalk or felt-tip marker.
Reversing the direction of rotation of a used
belt can destroy the belt. When installing the
ribbed belt, make sure it is seated correctly
on the pulley.
1 -
Bolt
25 Nm (18 ft lb)
2 -
Refrigerant lines Do not unbolt or separate
3 -
Bushing Verify proper seating in bracket
4 -
Bolt For bolt strength grade 8.8, tighten to 25
Nm (18 ft lb) parts catalog For bolt strength grade 10.9, tighten to 30
Nm (22 ft lb) parts catalog
Pa
ge 12 of 38 En
gine, disassemblin
g and assemblin
g
11/18/2002 htt
p://127.0.0.1:8080/audi/servlet/Dis
play?action=Goto&t
yp
e=re
pair&id=AUDI.B5.GE02.13.1
Page 13 of 38
13-11
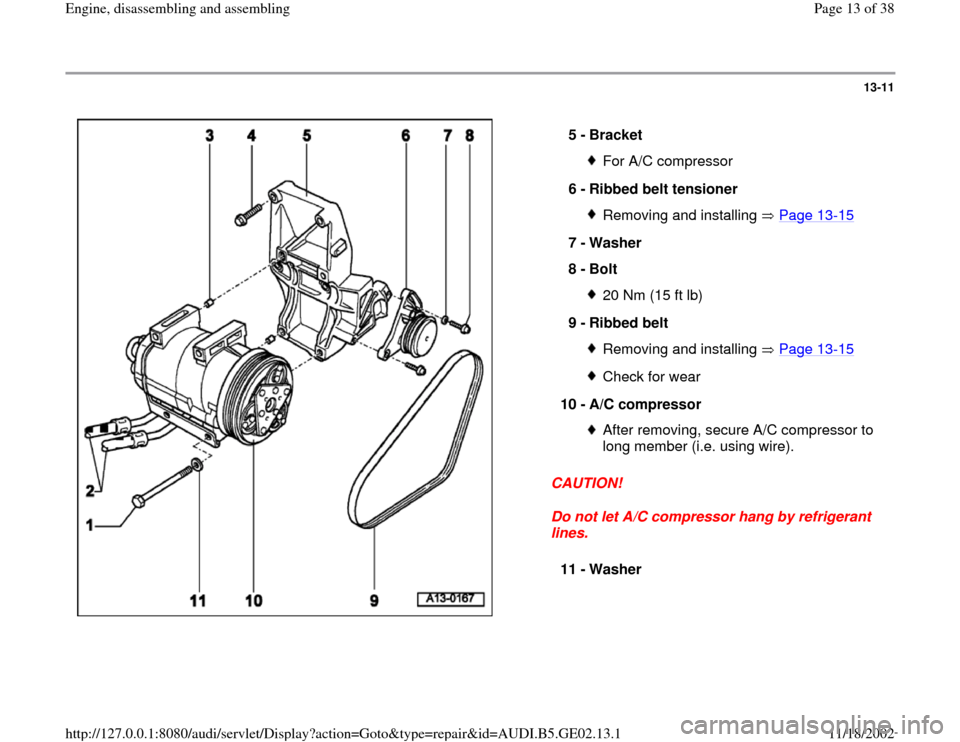
CAUTION!
Do not let A/C compressor hang by refrigerant
lines. 5 -
Bracket
For A/C compressor
6 -
Ribbed belt tensioner Removing and installing Page 13
-15
7 -
Washer
8 -
Bolt
20 Nm (15 ft lb)
9 -
Ribbed belt Removing and installing Page 13
-15
Check for wear
10 -
A/C compressor After removing, secure A/C compressor to
long member (i.e. using wire).
11 -
Washer
Pa
ge 13 of 38 En
gine, disassemblin
g and assemblin
g
11/18/2002 htt
p://127.0.0.1:8080/audi/servlet/Dis
play?action=Goto&t
yp
e=re
pair&id=AUDI.B5.GE02.13.1
Page 14 of 38
13-12
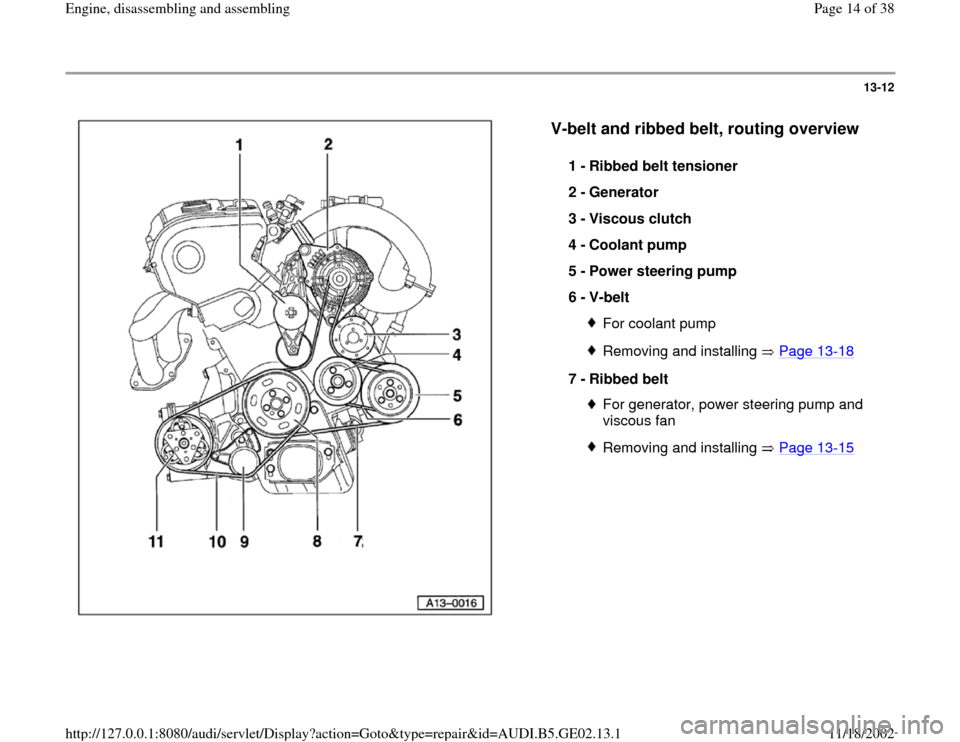
V-belt and ribbed belt, routing overview
1 -
Ribbed belt tensioner
2 -
Generator
3 -
Viscous clutch
4 -
Coolant pump
5 -
Power steering pump
6 -
V-belt
For coolant pumpRemoving and installing Page 13
-18
7 -
Ribbed belt
For generator, power steering pump and
viscous fan Removing and installing Page 13
-15
Pa
ge 14 of 38 En
gine, disassemblin
g and assemblin
g
11/18/2002 htt
p://127.0.0.1:8080/audi/servlet/Dis
play?action=Goto&t
yp
e=re
pair&id=AUDI.B5.GE02.13.1
Page 15 of 38

13-13
8 -
Vibration damper
9 -
Ribbed belt tensioner
For A/C compressor
10 -
Ribbed belt For A/C compressor Removing and installing Page 13
-15
11 -
A/C compressor
Pa
ge 15 of 38 En
gine, disassemblin
g and assemblin
g
11/18/2002 htt
p://127.0.0.1:8080/audi/servlet/Dis
play?action=Goto&t
yp
e=re
pair&id=AUDI.B5.GE02.13.1
Page 16 of 38

13-14
Fig. 1 Viscous fan, removing and installing
Lock carrier in service position Page 13
-1
Ribbed belt free of tension Page 13
-15
- Secure belt pulley for viscous fan with 5 x 60 mm bolt and remove
using hex socket wrench.
- Remove viscous fan.
- When installing viscous fan, tighten to 45 Nm (33 ft lb).
Installation is only possible in one position: the bore hole of the vibration
damper (arrow) must align with raised portion of toothed belt gear. Fig. 2 Install vibration damper
Lock carrier in service position Page 13
-1
Ribbed belt removed Page 13
-15
- Install vibration damper using only original equipment bolts (bolt
strength grade 10.9) parts catalog. - Tighten vibration damper bolts to 40 Nm (30 ft lb).
Pa
ge 16 of 38 En
gine, disassemblin
g and assemblin
g
11/18/2002 htt
p://127.0.0.1:8080/audi/servlet/Dis
play?action=Goto&t
yp
e=re
pair&id=AUDI.B5.GE02.13.1