oil AUDI TT 1998 8N / 1.G AEB ATW Engines Lubrication System Components Workshop Manual
[x] Cancel search | Manufacturer: AUDI, Model Year: 1998, Model line: TT, Model: AUDI TT 1998 8N / 1.GPages: 33, PDF Size: 0.6 MB
Page 1 of 33
17-1
Lubrication system
components, removing and
installing
WARNING!
Do not re-use any fasteners that are worn or
deformed in normal use.
Some fasteners are designed to be used only
once, and are unreliable and may fail if used
a second time. This includes, but is not
limited to, nuts, bolts, washers, circlips and
cotter pins. Always follow the
recommendations in this manual-replace
these fasteners with new parts where
indicated, and any other time it is deemed
necessary by inspection.
CAUTION!
If large quantities of metal particles or other
deposits (caused, for example, by partial
seizure of the crankshaft or connecting rod
bearings) are found in the engine oil, the oil
passages must be cleaned thoroughly and
the oil cooler replaced in order to prevent
further damage from re-occurring.
Do not overfill with oil past the MAX mark on
Pa
ge 1 of 33 Lubrication s
ystem com
ponents, removin
g and installin
g
11/18/2002 htt
p://127.0.0.1:8080/audi/servlet/Dis
play?action=Goto&t
yp
e=re
pair&id=AUDI.B5.GE02.17.1
Page 2 of 33
the oil dipstick. Damage to the Three Way
Catalytic Converter (TWC) could result.
Markings, refer to illustration Page 17
-27
.
Viscosity classes and oil specifications Page
17
-26
.
Pa
ge 2 of 33 Lubrication s
ystem com
ponents, removin
g and installin
g
11/18/2002 htt
p://127.0.0.1:8080/audi/servlet/Dis
play?action=Goto&t
yp
e=re
pair&id=AUDI.B5.GE02.17.1
Page 5 of 33
17-3
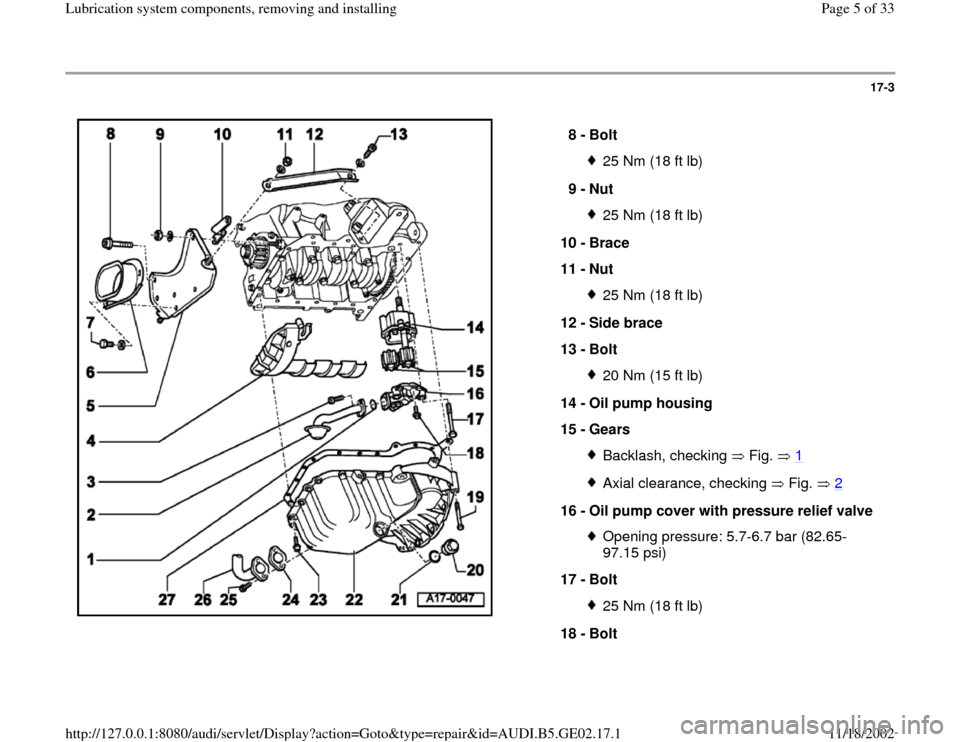
8 -
Bolt
25 Nm (18 ft lb)
9 -
Nut 25 Nm (18 ft lb)
10 -
Brace
11 -
Nut 25 Nm (18 ft lb)
12 -
Side brace
13 -
Bolt 20 Nm (15 ft lb)
14 -
Oil pump housing
15 -
Gears Backlash, checking Fig. 1Axial clearance, checking Fig. 2
16 -
Oil pump cover with pressure relief valve
Opening pressure: 5.7-6.7 bar (82.65-
97.15 psi)
17 -
Bolt 25 Nm (18 ft lb)
18 -
Bolt
Pa
ge 5 of 33 Lubrication s
ystem com
ponents, removin
g and installin
g
11/18/2002 htt
p://127.0.0.1:8080/audi/servlet/Dis
play?action=Goto&t
yp
e=re
pair&id=AUDI.B5.GE02.17.1
Page 7 of 33
17-4
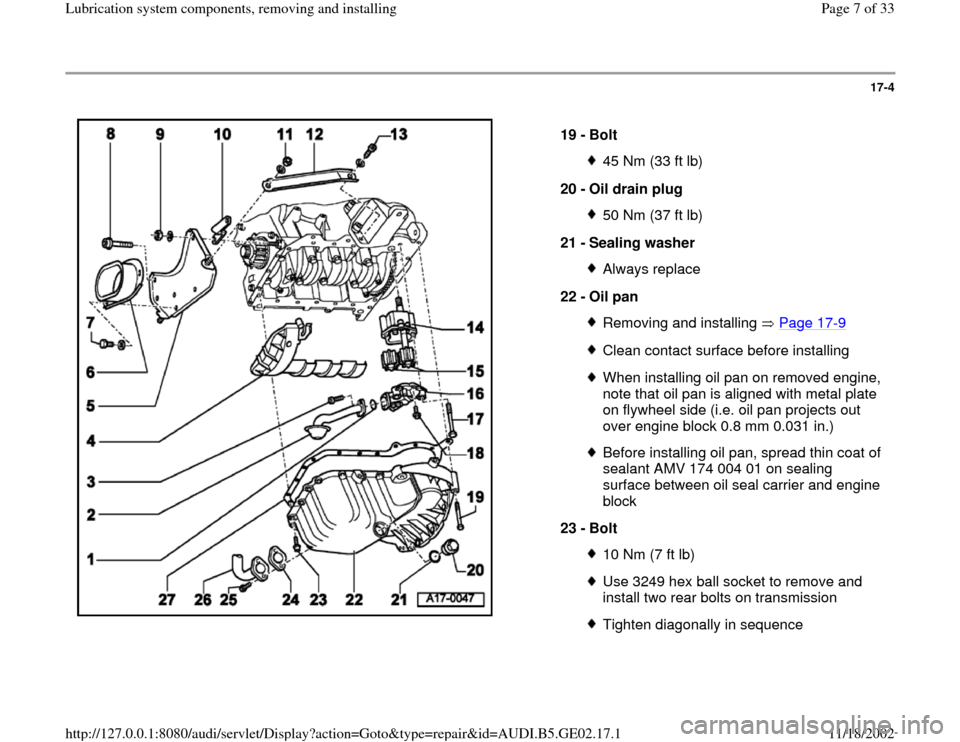
19 -
Bolt
45 Nm (33 ft lb)
20 -
Oil drain plug 50 Nm (37 ft lb)
21 -
Sealing washer Always replace
22 -
Oil pan Removing and installing Page 17
-9
Clean contact surface before installingWhen installing oil pan on removed engine,
note that oil pan is aligned with metal plate
on flywheel side (i.e. oil pan projects out
over engine block 0.8 mm 0.031 in.) Before installing oil pan, spread thin coat of
sealant AMV 174 004 01 on sealing
surface between oil seal carrier and engine
block
23 -
Bolt 10 Nm (7 ft lb)Use 3249 hex ball socket to remove and
install two rear bolts on transmission Tighten diagonally in sequence
Pa
ge 7 of 33 Lubrication s
ystem com
ponents, removin
g and installin
g
11/18/2002 htt
p://127.0.0.1:8080/audi/servlet/Dis
play?action=Goto&t
yp
e=re
pair&id=AUDI.B5.GE02.17.1
Page 8 of 33
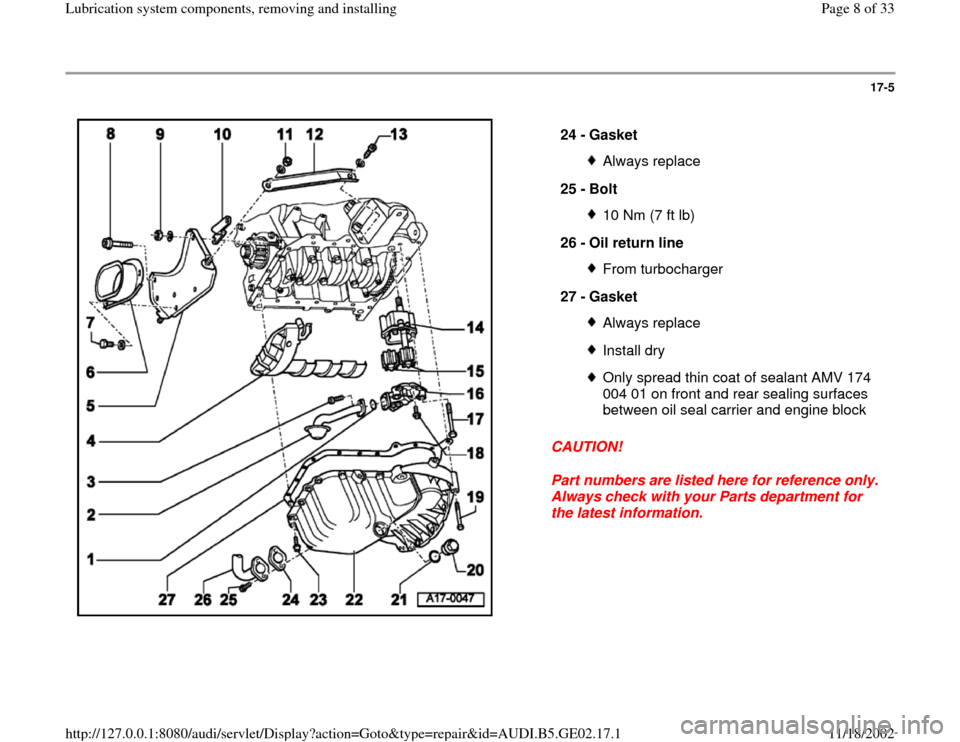
17-5
CAUTION!
Part numbers are listed here for reference only.
Always check with your Parts department for
the latest information. 24 -
Gasket
Always replace
25 -
Bolt 10 Nm (7 ft lb)
26 -
Oil return line From turbocharger
27 -
Gasket Always replaceInstall dryOnly spread thin coat of sealant AMV 174
004 01 on front and rear sealing surfaces
between oil seal carrier and engine block
Pa
ge 8 of 33 Lubrication s
ystem com
ponents, removin
g and installin
g
11/18/2002 htt
p://127.0.0.1:8080/audi/servlet/Dis
play?action=Goto&t
yp
e=re
pair&id=AUDI.B5.GE02.17.1
Page 9 of 33
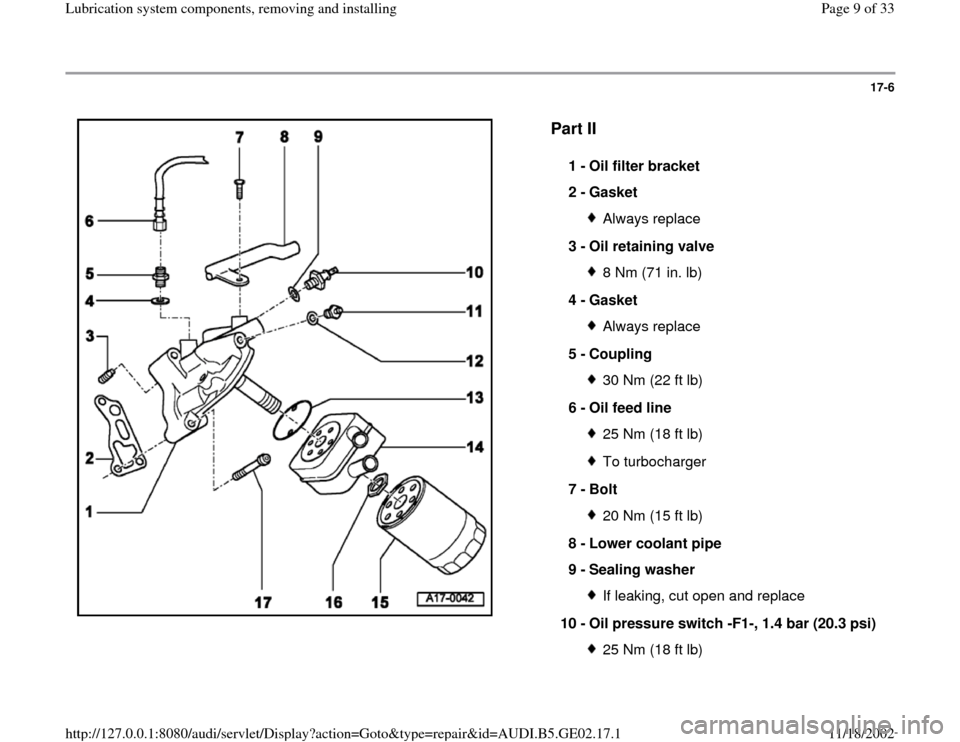
17-6
Part II
1 -
Oil filter bracket
2 -
Gasket Always replace
3 -
Oil retaining valve 8 Nm (71 in. lb)
4 -
Gasket Always replace
5 -
Coupling 30 Nm (22 ft lb)
6 -
Oil feed line 25 Nm (18 ft lb)To turbocharger
7 -
Bolt 20 Nm (15 ft lb)
8 -
Lower coolant pipe
9 -
Sealing washer If leaking, cut open and replace
10 -
Oil pressure switch -F1-, 1.4 bar (20.3 psi) 25 Nm (18 ft lb)
Pa
ge 9 of 33 Lubrication s
ystem com
ponents, removin
g and installin
g
11/18/2002 htt
p://127.0.0.1:8080/audi/servlet/Dis
play?action=Goto&t
yp
e=re
pair&id=AUDI.B5.GE02.17.1
Page 11 of 33
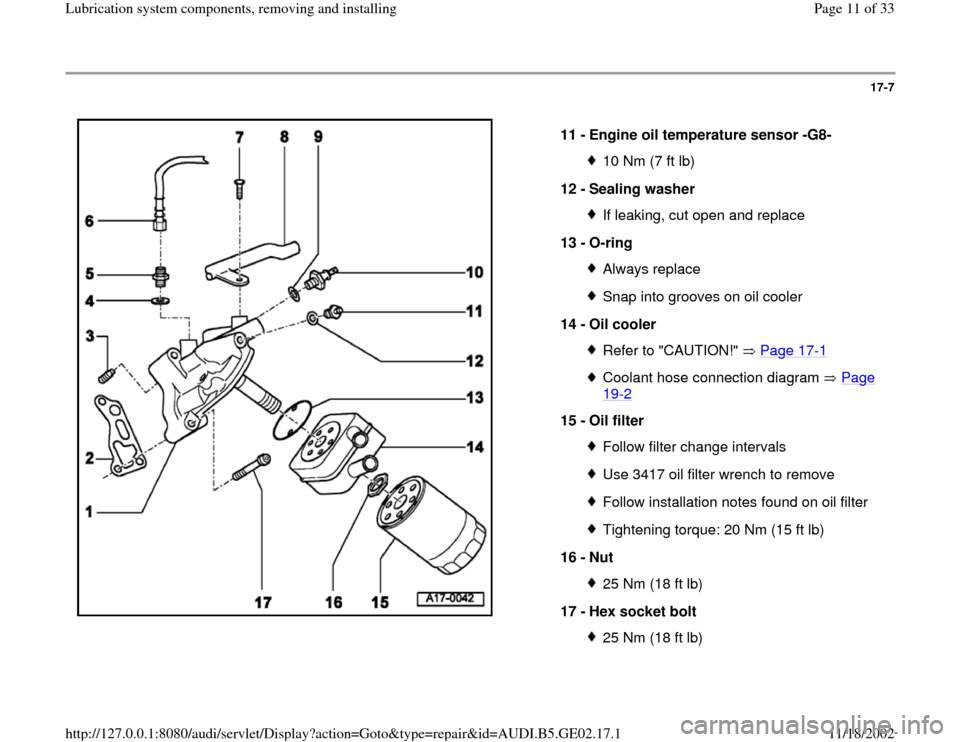
17-7
11 -
Engine oil temperature sensor -G8-
10 Nm (7 ft lb)
12 -
Sealing washer If leaking, cut open and replace
13 -
O-ring Always replaceSnap into grooves on oil cooler
14 -
Oil cooler Refer to "CAUTION!" Page 17
-1
Coolant hose connection diagram Page 19
-2
15 -
Oil filter
Follow filter change intervalsUse 3417 oil filter wrench to removeFollow installation notes found on oil filterTightening torque: 20 Nm (15 ft lb)
16 -
Nut 25 Nm (18 ft lb)
17 -
Hex socket bolt 25 Nm (18 ft lb)
Pa
ge 11 of 33 Lubrication s
ystem com
ponents, removin
g and installin
g
11/18/2002 htt
p://127.0.0.1:8080/audi/servlet/Dis
play?action=Goto&t
yp
e=re
pair&id=AUDI.B5.GE02.17.1
Page 12 of 33
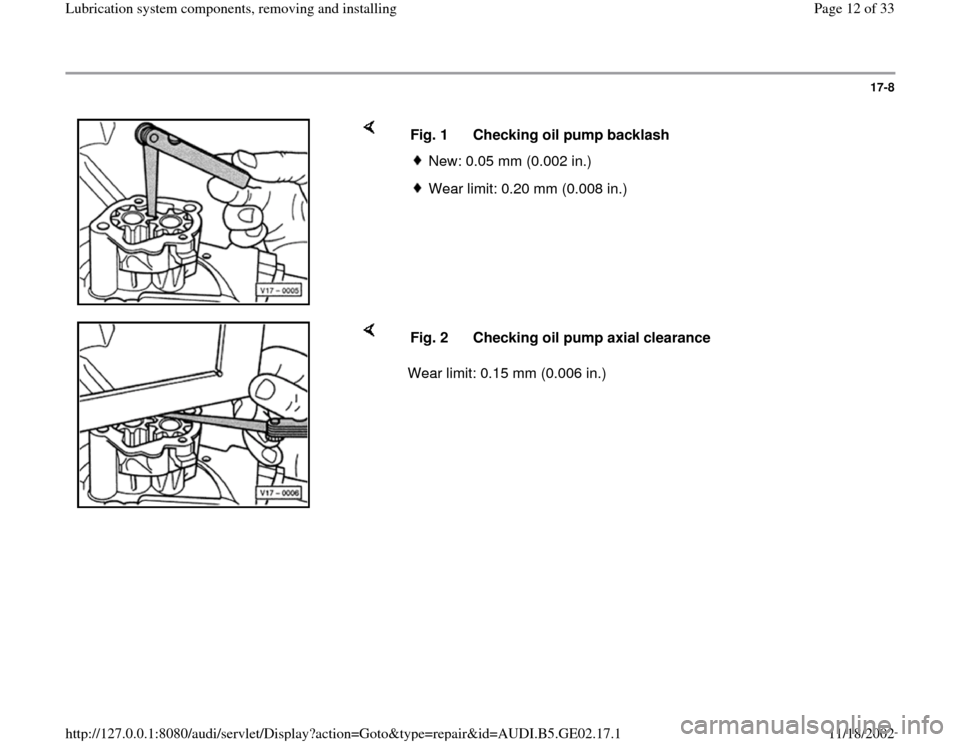
17-8
Fig. 1 Checking oil pump backlash
New: 0.05 mm (0.002 in.) Wear limit: 0.20 mm (0.008 in.)
Wear limit: 0.15 mm (0.006 in.) Fig. 2 Checking oil pump axial clearance
Pa
ge 12 of 33 Lubrication s
ystem com
ponents, removin
g and installin
g
11/18/2002 htt
p://127.0.0.1:8080/audi/servlet/Dis
play?action=Goto&t
yp
e=re
pair&id=AUDI.B5.GE02.17.1
Page 13 of 33
17-9
Oil pan, removing and installing
Special tools and equipment
10-222A engine support bridge with 10-222A/1
bracket for engine
2024A engine sling
3249 puller
VAG1202A engine hoist
AMV 174 004 01 sealant
Note:
Always replace gaskets.
Removing
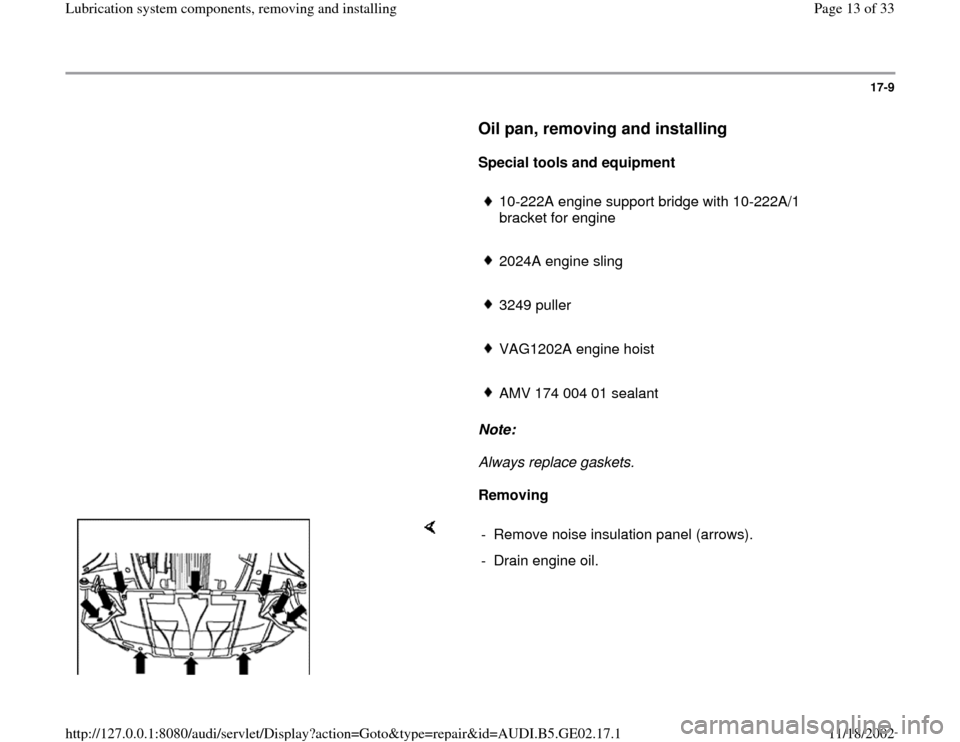
- Remove noise insulation panel (arrows).
- Drain engine oil.
Pa
ge 13 of 33 Lubrication s
ystem com
ponents, removin
g and installin
g
11/18/2002 htt
p://127.0.0.1:8080/audi/servlet/Dis
play?action=Goto&t
yp
e=re
pair&id=AUDI.B5.GE02.17.1
Page 21 of 33
17-17
All models
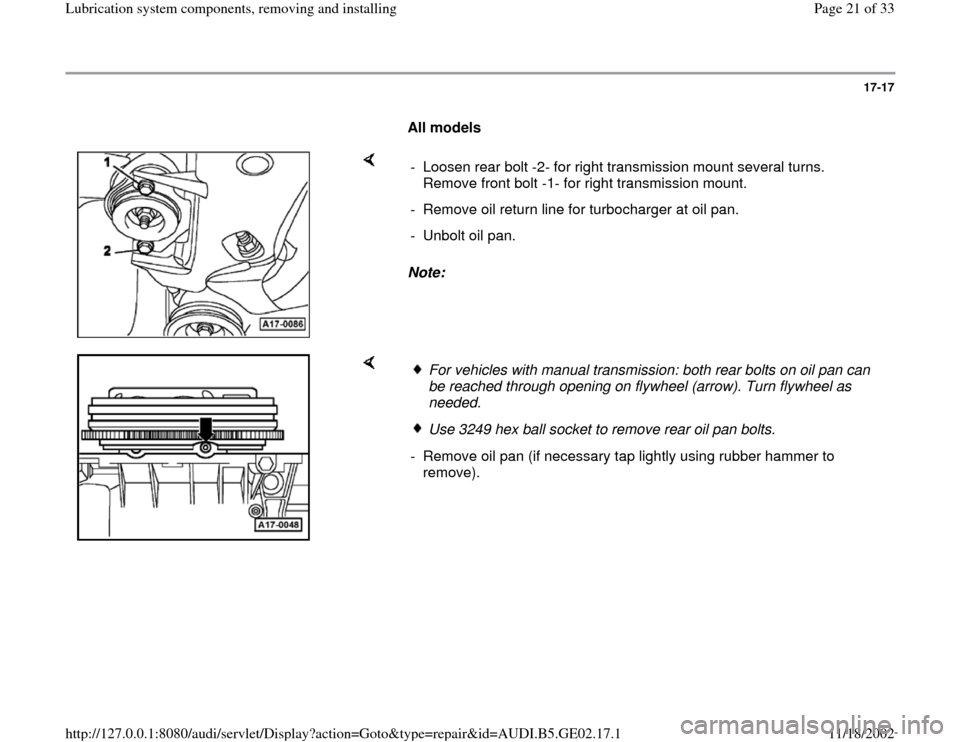
Note: - Loosen rear bolt -2- for right transmission mount several turns.
Remove front bolt -1- for right transmission mount.
- Remove oil return line for turbocharger at oil pan.
- Unbolt oil pan.
For vehicles with manual transmission: both rear bolts on oil pan can
be reached through opening on flywheel (arrow). Turn flywheel as
needed. Use 3249 hex ball socket to remove rear oil pan bolts.
- Remove oil pan (if necessary tap lightly using rubber hammer to
remove).
Pa
ge 21 of 33 Lubrication s
ystem com
ponents, removin
g and installin
g
11/18/2002 htt
p://127.0.0.1:8080/audi/servlet/Dis
play?action=Goto&t
yp
e=re
pair&id=AUDI.B5.GE02.17.1