service AUDI TT 2021 Owner´s Manual
[x] Cancel search | Manufacturer: AUDI, Model Year: 2021, Model line: TT, Model: AUDI TT 2021Pages: 280, PDF Size: 99.18 MB
Page 34 of 280
Power top
— Make sure no one will be injured by the pow-
er top supports or other moving compo-
nents when opening and closing the top.
@) Note
— To prevent damage to the power top:
— do not store any objects in the power top
storage compartment.
— make sure there is enough space above
the vehicle when opening or closing the
power top.
0} Tips
— To avoid draining the vehicle battery unnec-
essarily, do not open and close the power
top repeatedly when the engine is switched
off.
— The power top can be operated manually if
there is a malfunction > page 33, Power
top emergency operation. Have the problem
corrected immediately by an authorized
Audi dealer or authorized Audi Service Fa-
cility.
— If you park the vehicle with the power top
open, the vehicle interior will not be pro-
tected from damaging weather or unauthor-
ized access. Lock any items you leave behind
in the luggage compartment. Close the
power top before leaving the vehicle.
— The side windows automatically lower
slightly when opening or closing the power
top.
Power top convenience opening and closing
Applies to: vehicles with power top
BFV-0271
®
”
lon
— o
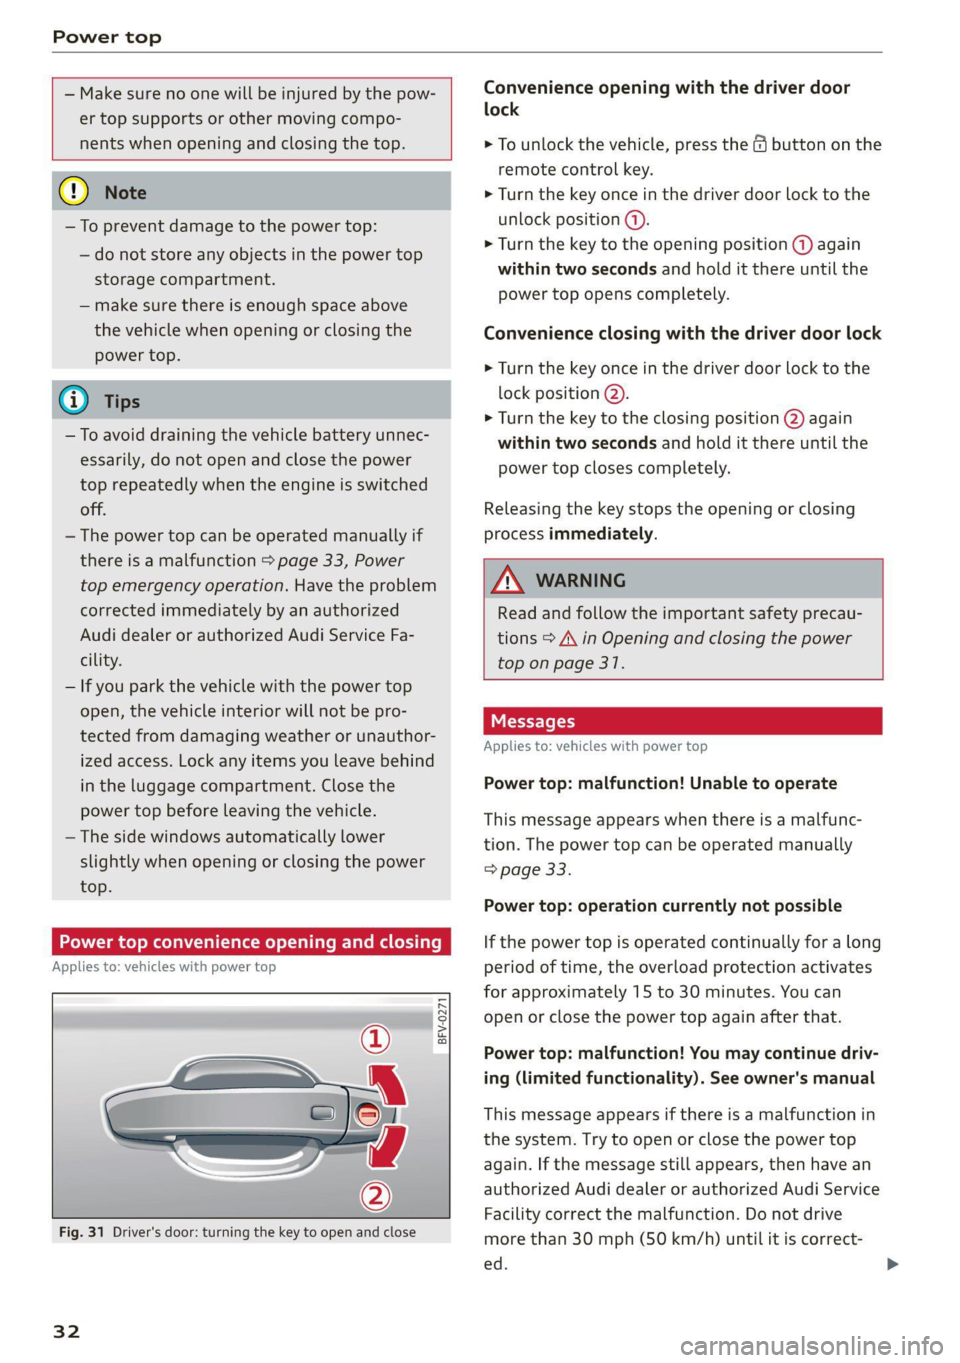
Fig. 31 Driver's door: turning the key to open and close
32
Convenience opening with the driver door
lock
> To unlock the vehicle, press the & button on the
remote control key.
> Turn the key once in the driver door lock to the
unlock position (@).
> Turn the key to the opening position @ again
within two seconds and hold it there until the
power top opens completely.
Convenience closing with the driver door lock
> Turn the key once in the driver door lock to the
lock position @).
> Turn the key to the closing position @) again
within two seconds and hold it there until the
power top closes completely.
Releasing the key stops the opening or closing
process immediately.
ZA\ WARNING
Read and follow the important safety precau-
tions > A\ in Opening and closing the power
top on page 31.
Applies to: vehicles with power top
Power top: malfunction! Unable to operate
This message appears when there is a malfunc-
tion. The power top can be operated manually
=> page 33.
Power top: operation currently not possible
If the power top is operated continually for a long
period of time, the overload protection activates
for approximately 15 to 30 minutes. You can
open or close the power top again after that.
Power top: malfunction! You may continue driv-
ing (limited functionality). See owner's manual
This message appears if there is a malfunction in
the system. Try to open or close the power top
again. If the message still appears, then have an
authorized Audi dealer or authorized Audi Service
Facility correct the malfunction. Do not drive
more than 30 mph (50 km/h) until it is correct-
ed.
Page 35 of 280
8S1012721BE
Power top
ZA WARNING
Never drive with the power top unlocked. The
wind from driving could cause the power top
to open. This can result in injuries and dam-
age to the vehicle.
Wind deflector
Applies to: vehicles with wind deflector
+ a
= oa
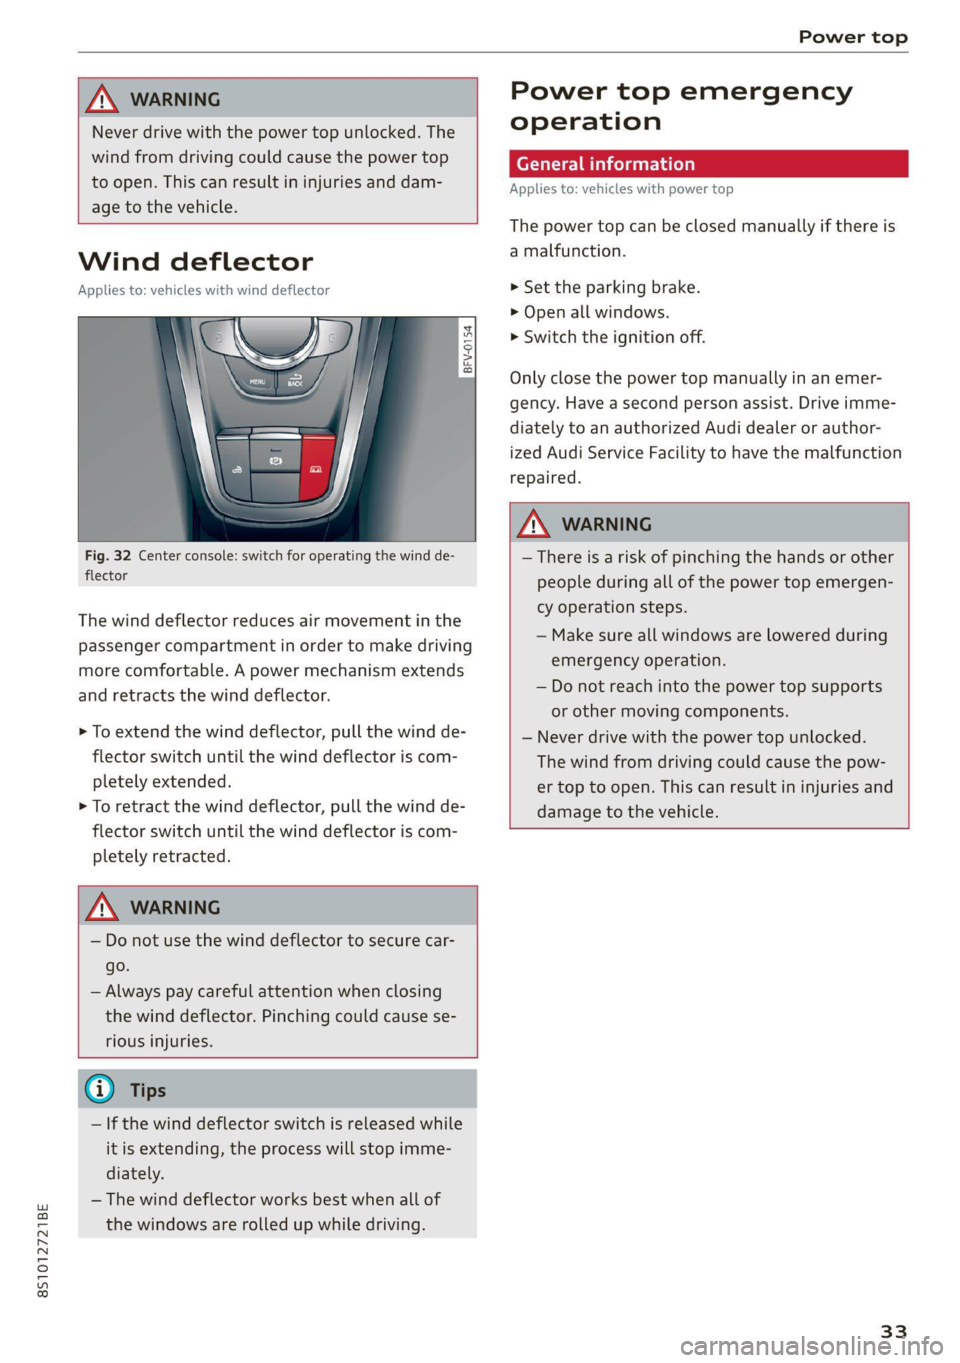
Fig. 32 Center console: switch for operating the wind de-
flector
The wind deflector reduces air movement in the
passenger compartment in order to make driving
more comfortable. A power mechanism extends
and retracts the wind deflector.
> To extend the wind deflector, pull the wind de-
flector switch until the wind deflector is com-
pletely extended.
> To retract the wind deflector, pull the wind de-
flector switch until the wind deflector is com-
pletely retracted.
A WARNING
— Do not use the wind deflector to secure car-
go.
— Always pay careful attention when closing
the wind deflector. Pinching could cause se-
rious injuries.
@ Tips
— If the wind deflector switch is released while
it is extending, the process will stop imme-
diately.
— The wind deflector works best when all of
the windows are rolled up while driving.
Power top emergency
operation
General information
Applies to: vehicles with power top
The power top can be closed manually if there is
a malfunction.
> Set the parking brake.
> Open all windows.
> Switch the ignition off.
Only close the power top manually in an emer-
gency. Have a second person assist. Drive imme-
diately to an authorized Audi dealer or author-
ized Audi Service Facility to have the malfunction
repaired.
ZX WARNING
— There is a risk of pinching the hands or other
people during all of the power top emergen-
cy operation steps.
— Make sure all windows are lowered during
emergency operation.
— Do not reach into the power top supports
or other moving components.
— Never drive with the power top unlocked.
The wind from driving could cause the pow-
er top to open. This can result in injuries and
damage to the vehicle.
33
Page 39 of 280
8S1012721BE
Lights and Vision
—To reduce glare for traffic behind your vehi-
cle, the rear fog lights* should only be
turned on in accordance with the legal regu-
lations in the country where you are operat-
ing the vehicle.
— If the battery has been discharging for a
while, the parking light may switch off auto-
matically. Always make sure your vehicle is
parked and adequately illuminated accord-
ing to the legal regulations in the country
where you are operating the vehicle. Avoid
using the parking lights for several hours.
G) Tips
— When using lighting equipment, the driver
is responsible for adhering to any local ap-
plicable regulations while driving and when
parking the vehicle.
— The light sensor for the automatic head-
lights* is in the rearview mirror mount. Do
not place any stickers in this area on the
windshield.
— Some exterior lighting functions can be ad-
justed > page 37.
— In some markets, the tail lights will switch
on when the daytime running lights switch
on.
—In cool or damp weather, the inside of the
headlights, turn signals, and tail lights can
fog over due to the temperature difference
between the inside and outside. They will
clear shortly after switching them on. This
does not affect the service life of the light-
ing.
Turn signal and high beam lever
BFV-0012
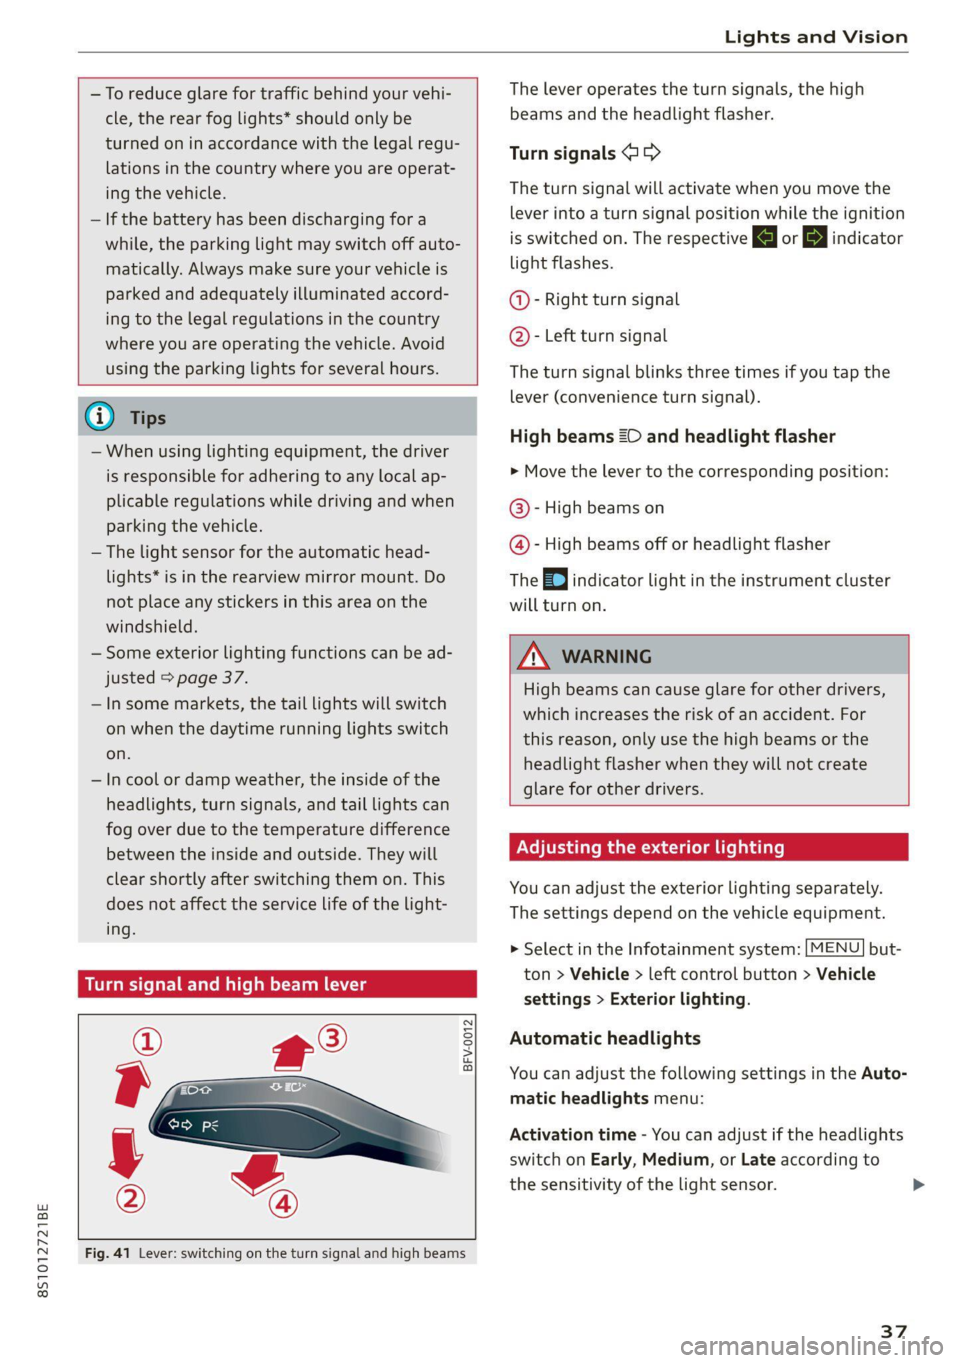
Fig. 41 Lever: switching on the turn signal and high beams
The lever operates the turn signals, the high
beams and the headlight flasher.
Turn signals >>
The turn signal will activate when you move the
lever into a turn signal position while the ignition
is switched on. The respective a or indicator
light flashes.
@- Right turn signal
@- Left turn signal
The turn signal blinks three times if you tap the
lever (convenience turn signal).
High beams ZO and headlight flasher
> Move the lever to the corresponding position:
@®- High beams on
@- High beams off or headlight flasher
The
EJ indicator light in the instrument cluster
will turn on.
Z\ WARNING
High beams can cause glare for other drivers,
which increases the risk of an accident. For
this reason, only use the high beams or the
headlight flasher when they will not create
glare for other drivers.
Adjusting the exterior lighting
You can adjust the exterior lighting separately.
The settings depend on the vehicle equipment.
> Select in the Infotainment system: [MENU] but-
ton > Vehicle > left control button > Vehicle
settings > Exterior lighting.
Automatic headlights
You can adjust the following settings in the Auto-
matic headlights menu:
Activation time - You can adjust if the headlights
switch on Early, Medium, or Late according to
the sensitivity of the light sensor.
37
Page 40 of 280
Lights and Vision
Daytime running lights
USA models: the daytime running lights can be
switched on or off using the MMI. Select On or
Off.
Canada models: this function cannot be switched
off. They activate automatically each time the ig-
nition is switched on. This menu item is shown
with a “gray background”.
Entry/exit lighting
The Entry/exit lighting illuminates the area
around the vehicle when the vehicle is unlocked
or when the driver’s door is opened while the ig-
nition is off. The entry/exit lighting works when it
is dark and the light switch is in the AUTO posi-
tion. The front and rear daytime running lights*
switch on automatically each time the vehicle is
unlocked regardless of how bright it is outside
the vehicle.
Emergency flashers
a 2 3 g
g|
z a.
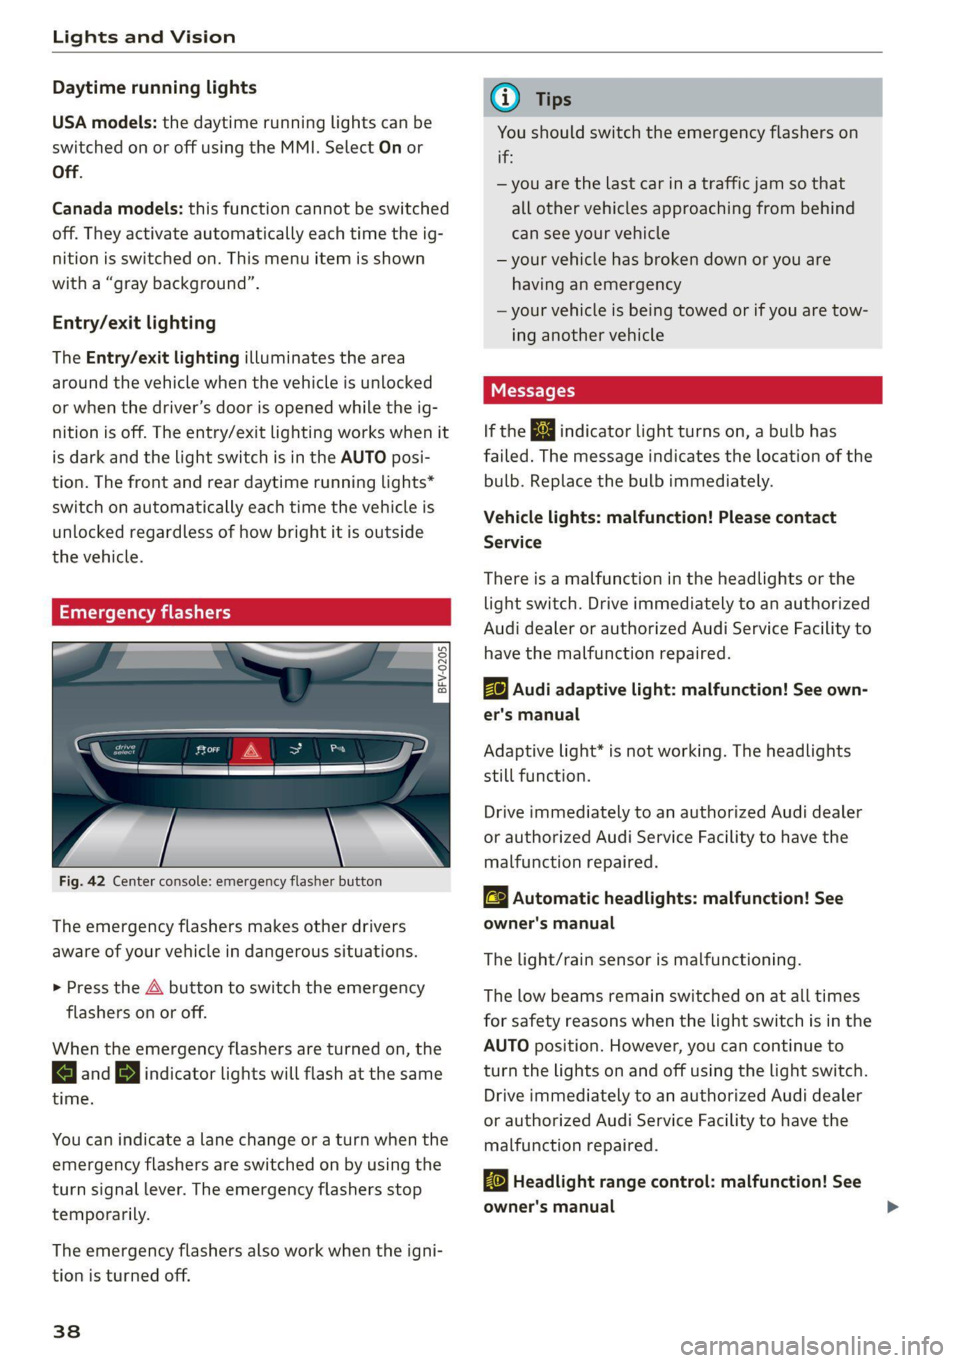
Fig. 42 Center console: emergency flasher button
The emergency flashers makes other drivers
aware of your vehicle in dangerous situations.
> Press the A button to switch the emergency
flashers on or off.
When the emergency flashers are turned on, the
a and B indicator lights will flash at the same
time.
You can indicate a lane change or a turn when the
emergency flashers are switched on by using the
turn signal lever. The emergency flashers stop
temporarily.
The emergency flashers also work when the igni-
tion is turned off.
38
G) Tips
You should switch the emergency flashers on
if:
— you are the last car in a traffic jam so that
all other vehicles approaching from behind
can see your vehicle
— your vehicle has broken down or you are
having an emergency
—your vehicle is being towed or if you are tow-
ing another vehicle
Messages
If the & indicator light turns on, a bulb has
failed. The message indicates the location of the
bulb. Replace the bulb immediately.
Vehicle lights: malfunction! Please contact
Service
There is a malfunction in the headlights or the
light switch. Drive immediately to an authorized
Audi dealer or authorized Audi Service Facility to
have the malfunction repaired.
Bg) Audi adaptive light: malfunction! See own-
er's manual
Adaptive light* is not working. The headlights
still function.
Drive immediately to an authorized Audi dealer
or authorized Audi Service Facility to have the
malfunction repaired.
a Automatic headlights: malfunction! See
owner's manual
The light/rain sensor is malfunctioning.
The low beams remain switched on at all times
for safety reasons when the light switch is in the
AUTO position. However, you can continue to
turn the lights on and off using the light switch.
Drive immediately to an authorized Audi dealer
or authorized Audi Service Facility to have the
malfunction repaired.
Ba Headlight range control: malfunction! See
owner's manual
Page 41 of 280
8S1012721BE
Lights and Vision
There is a malfunction in the headlight range
control system, which may cause glare for other
drivers.
Drive to an authorized Audi dealer or authorized
Audi Service Facility immediately to have the
malfunction corrected.
Ww
— Light bulbs are pressurized and can explode
when they are replaced, which increases the
risk of injury.
—To reduce the risk of fatal injury, the high-
voltage component on HID headlights (xe-
non lights) must be handled correctly.
Interior lighting
Interior lighting
BFV-0181
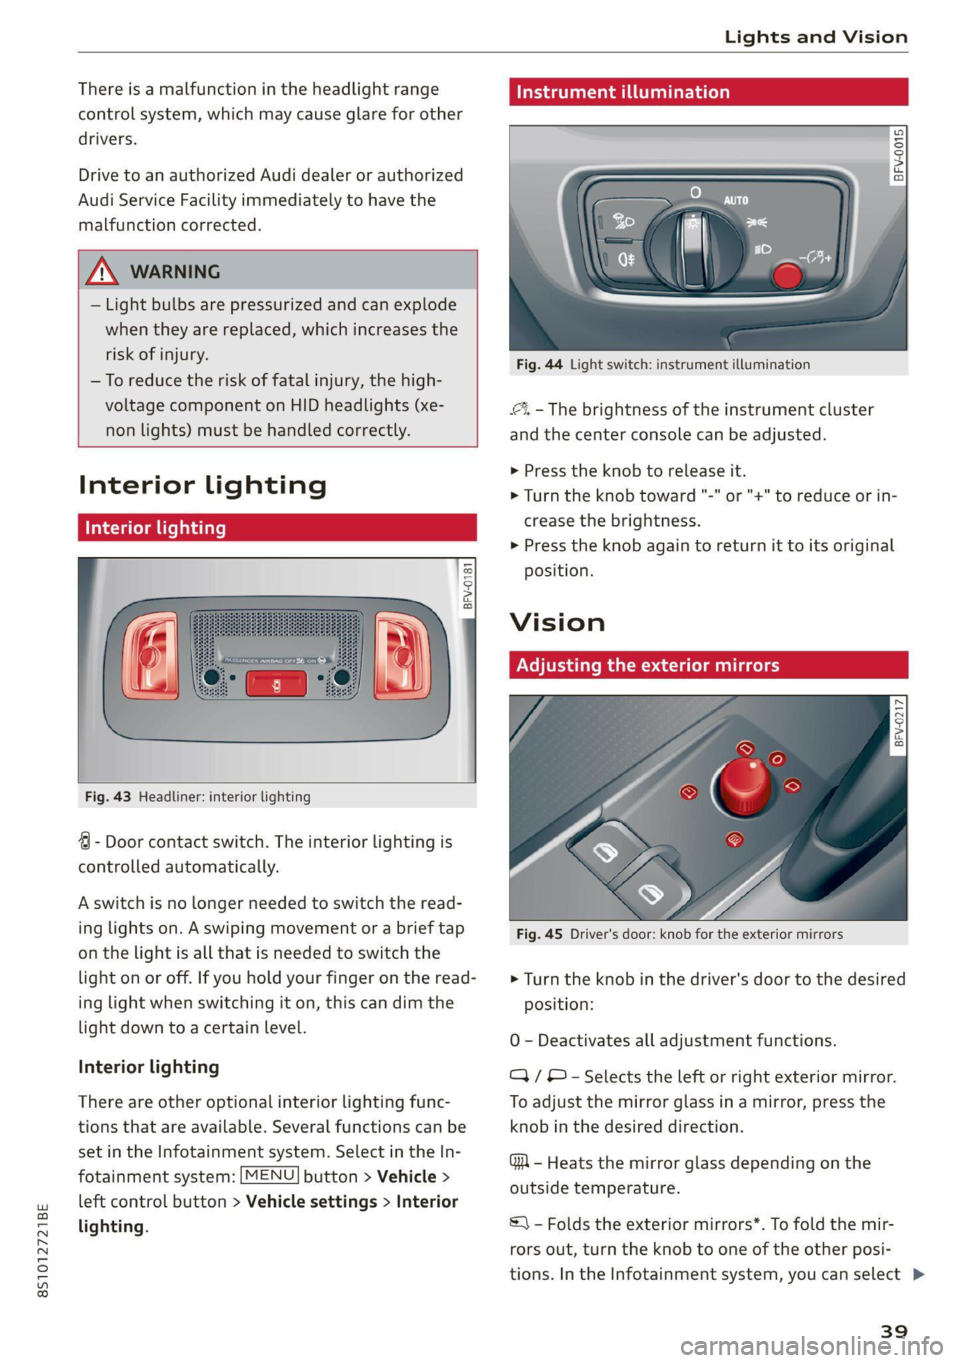
Fig. 43 Headliner: interior lighting
4 - Door contact switch. The interior lighting is
controlled automatically.
A switch is no longer needed to switch the read-
ing lights on. A swiping movement or a brief tap
on the light is all that is needed to switch the
light on or off. If you hold your finger on the read-
ing light when switching it on, this can dim the
light down to a certain level.
Interior lighting
There are other optional interior lighting func-
tions that are available. Several functions can be
set in the Infotainment system. Select in the In-
fotainment system: [MENU] button > Vehicle >
left control button > Vehicle settings > Interior
lighting.
Instrument i
a
Ss
g 3 a o
Fig. 44 Light switch: instrument illumination
4%, - The brightness of the instrument cluster
and the center console can be adjusted.
> Press the knob to release it.
> Turn the knob toward "-" or "+" to reduce or in-
crease the brightness.
> Press the knob again to return it to its original
Position.
Vision
Adjusting the exterior mirrors
| BFv-0217|
Fig. 45 Driver's door: knob for the exterior mirrors
> Turn the knob in the driver's door to the desired
position:
0 - Deactivates all adjustment functions.
/ © - Selects the left or right exterior mirror.
To adjust the mirror glass in a mirror, press the
knob in the desired direction.
GA - Heats the mirror glass depending on the
outside temperature.
S\ - Folds the exterior mirrors*. To fold the mir-
rors out, turn the knob to one of the other posi-
tions. In the Infotainment system, you can select >
39
Page 44 of 280
Lights and Vision
— The windshield must not be treated with
water-repelling windshield coating agents.
Under unfavorable conditions, such as wet-
ness, darkness, and when the sun is low,
these coatings can cause increased glare,
which increases the risk of an accident. They
can also cause wiper blade chatter.
— Properly functioning windshield wiper
blades are required for a clear view and safe
driving > page 42, Replacing windshield
wiper blades.
> Place the windshield wiper arms in the service
position > page 42.
> Fold the windshield wiper arms away from the
windshield.
ZX WARNING
Dirty windshield wiper blades can impair vi-
sion, which increases the risk of an accident.
Replacing windshield wiper blades
@) Note
— If there is frost, make sure the windshield
wiper blades are not frozen to the wind-
shield. Switching on the windshield wipers
when the blades are frozen to the wind-
shield can damage the wiper blades.
— The windshield wiper system must be
switched off (lever in position 0) before us-
ing a car wash. This prevents the wipers
from switching on unintentionally and caus-
ing damage to the windshield wiper system.
@ Tips
— The windshield wipers switch off when the
ignition is switched off. You can activate the
windshield wipers after the ignition is
switched on again by moving the windshield
wiper lever to any position.
— Worn or dirty windshield wiper blades result
in streaking. This can affect the rain sensor*
function. Check your windshield wiper
blades regularly.
— The washer fluid nozzles in the windshield
washer system are heated* at low tempera-
tures when the ignition is on.
— When stopping temporarily, such as ata
traffic light, the speed of the windshield
wipers automatically reduces by one level.
Cleaning windshield wiper blades
Clean the wiper blades when you see wiper
streaks. Clean the wiper blades with a soft towel
and glass cleaner.
42
B8R-0379
A
> 2
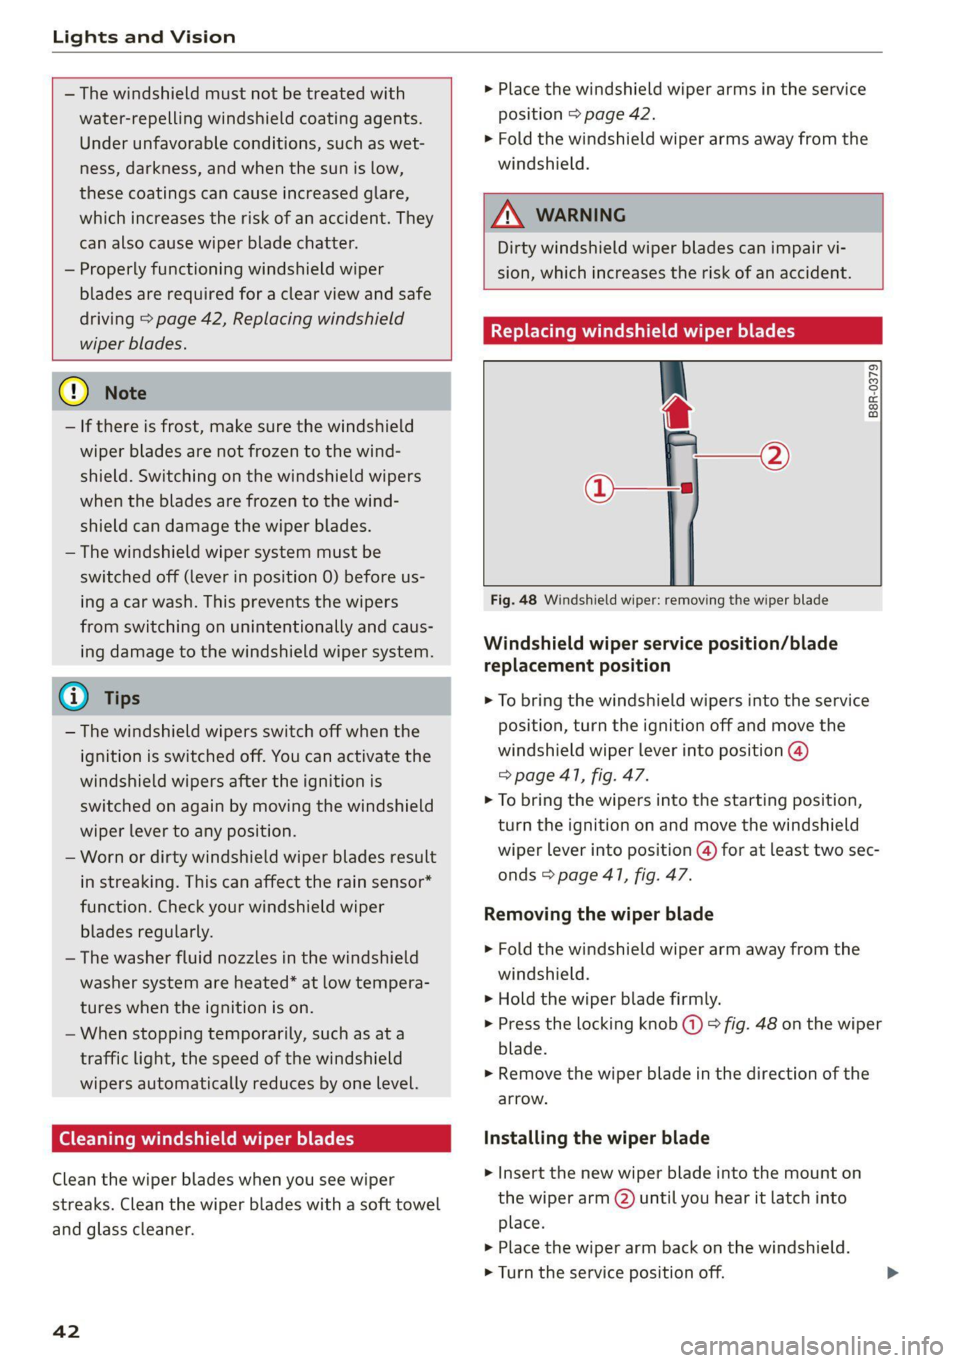
Fig. 48 Windshield wiper: removing the wiper blade
Windshield wiper service position/blade
replacement position
> To bring the windshield wipers into the service
position, turn the ignition off and move the
windshield wiper lever into position @)
=> page 41, fig. 47.
> To bring the wipers into the starting position,
turn the ignition on and move the windshield
wiper lever into position (@) for at least two sec-
onds & page 41, fig. 47.
Removing the wiper blade
> Fold the windshield wiper arm away from the
windshield.
> Hold the wiper blade firmly.
> Press the locking knob (+) > fig. 48 on the wiper
blade.
> Remove the wiper blade in the direction of the
arrow.
Installing the wiper blade
> Insert the new wiper blade into the mount on
the wiper arm () until you hear it latch into
place.
>» Place the wiper arm back on the windshield.
> Turn the service position off.
Page 45 of 280
8S1012721BE
Lights and Vision
ZA WARNING
For safety reasons, the windshield wiper
blades should be replaced once or twice each
year.
@) Note
— The windshield wipers must only be folded
up when in the service position! Otherwise,
you risk damaging the paint on the hood or
the windshield wiper motor.
— You should not drive your vehicle or press
the windshield wiper lever when the wiper
arms are folded away from the windshield.
The windshield wipers would move back in-
to their original position and could damage
the hood and windshield.
G) Tips
— You can also use the service position, for ex-
ample, if you want to protect the windshield
from icing by using a cover.
— You cannot activate the service position
when the hood is open.
If the & indicator light turns on, then there is a
windshield wiper malfunction. Drive to an au-
thorized Audi dealer or authorized Audi Service
Facility immediately to have the malfunction cor-
rected.
a Automatic wipers: malfunction! See owner's
manual
The light/rain sensor is malfunctioning.
You can still control all functions that are not
controlled by the rain sensor using the wind-
shield wiper lever.
Drive immediately to an authorized Audi dealer
or authorized Audi Service Facility to have the
malfunction repaired.
Digital compass
SU ica liars maar meel ial eee mela
Applies to: vehicles with digital compass
BFV-0288
a
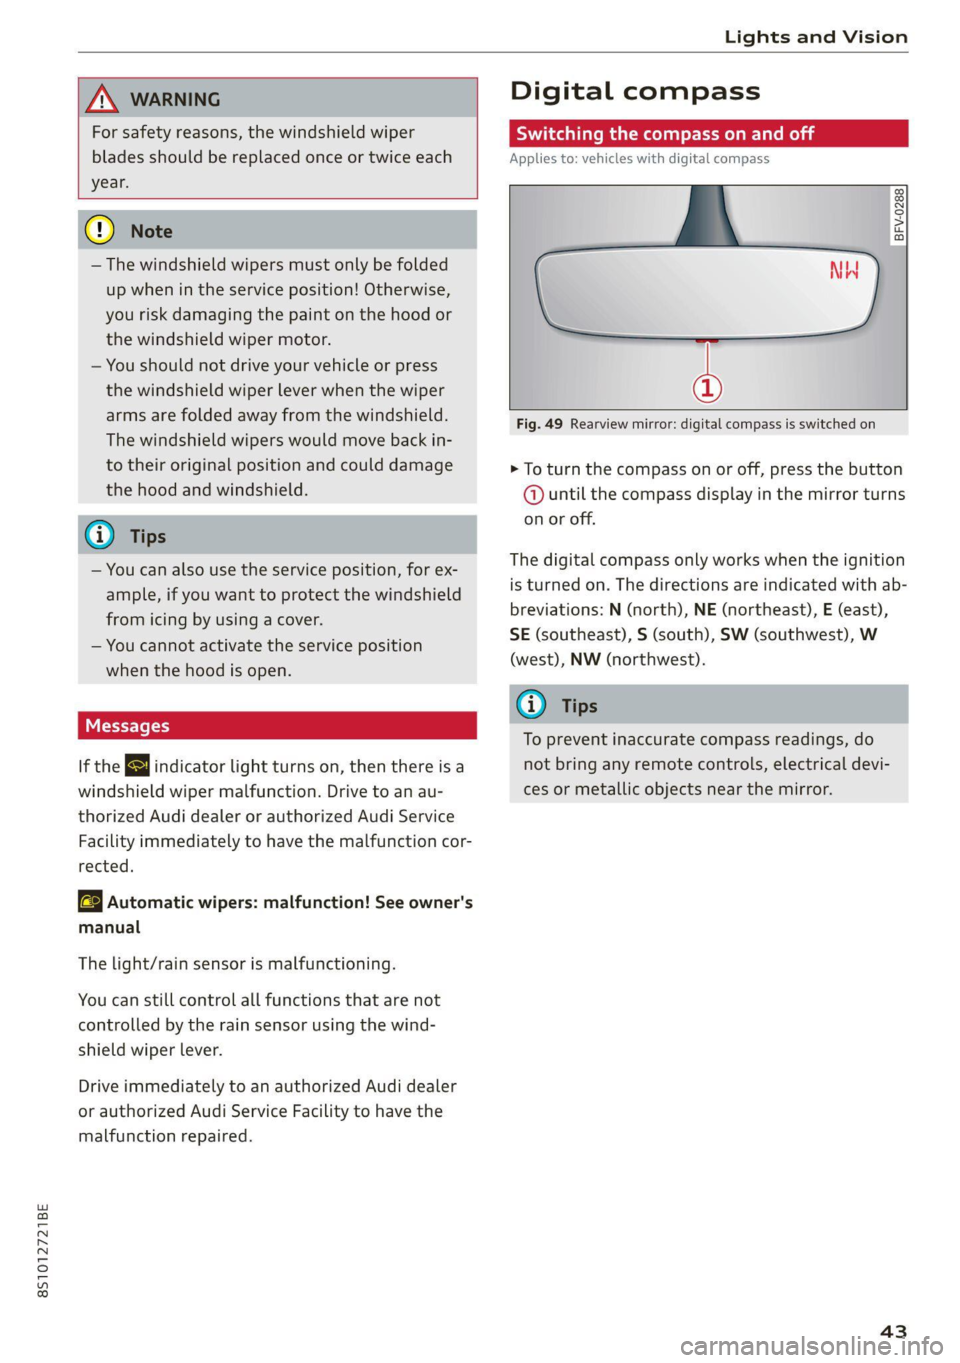
Fig. 49 Rearview mirror: digital compass is switched on
> To turn the compass on or off, press the button
@ until the compass display in the mirror turns
on or off.
The digital compass only works when the ignition
is turned on. The directions are indicated with ab-
breviations: N (north), NE (northeast), E (east),
SE (southeast), S (south), SW (southwest), W
(west), NW (northwest).
@ Tips
To prevent inaccurate compass readings, do
not bring any remote controls, electrical devi-
ces or metallic objects near the mirror.
43
Page 47 of 280
8S1012721BE
Sitting correctly and safely
Sitting correctly and
safely
Correct passenger
seating position
General information
As the driver, you are responsible for making sure
every passenger is sitting correctly in their seat
and maintaining this seating position while driv-
ing. Make sure that:
— Every passenger in the vehicle has adjusted his
or her seat correctly > page 45
— Applies to: Coupe: Passengers in the rear seats
must observe the height requirements and the
minimum distance between the head and the
rear window > page 48.
— The steering wheel is adjusted correctly
=> page 48
—The mirrors are adjusted so that there is a suffi-
cient view of the area around the vehicle
=> page 39
— Every passenger in the vehicle has his or her
safety belt fastened correctly > page 49
— The activation status of the front passenger's
airbag is suitable for the passenger in the front
passenger's seat > page 55
— Children are secured in suitable child safety
seats that are secured to appropriate vehicle
seats > page 57. Read and observe the impor-
tant safety information pertaining to the use of
child safety seats on the front passenger's seat
= A in General information on page 58.
Examples of incorrect seating positions
Safety belts can only provide its optimal protec-
tion when they are routed correctly. Incorrect
seating positions significantly reduce the protec-
tive functions of the safety belts and increase the
risk of injury due to incorrect belt routing.
The following list includes examples of seating
positions that could be dangerous for all vehicle
occupants. This is not a complete list. Audi would
simply like to increase your awareness of the top-
ic. The following points apply when the vehicle is
in motion:
— Never stand inside the vehicle.
— Never stand on the seats.
— Never kneel on the seats.
— Never tilt your backrest too far back.
— Never lean against the instrument panel.
— Never lie down on the rear bench seat.
— Never sit only on the front section of the seat.
— Never sit sideways on the seat.
— Never lean against the window.
— Never place your feet out of the window.
— Never place your feet on the instrument panel.
— Never place your feet on the seat cushion.
— Never ride in the footwell.
— Never sit on the armrest.
— Never drive or ride in a seat without fastening
your safety belt.
— Never ride in the luggage compartment.
ZA WARNING
Incorrect seating positions, failure to wear a
safety belt, or being too close to an airbag in-
crease the risk of serious or fatal injury to ve-
hicle occupants, especially if the airbags de-
ploy and come into contact with occupants
who are not seated correctly. Note the impor-
tant information and warnings in the chapters
for the topics given above.
G) Tips
— If physical circumstances do not allow you
to assume the correct seating position, con-
tact an authorized Audi dealer or authorized
Audi Service Facility.
— If you or other vehicle passengers have
physical limitations that prevent sitting in a
correct position, modifications to the vehi-
cle may be necessary. For more information,
contact an authorized Audi dealer or author-
ized Audi Service Facility, or call Audi cus-
tomer support at 1-800-822-2834.
Front seats
General information
Make sure that:
4s
>
Page 51 of 280
8S1012721BE
Sitting correctly and safely
Safety belts
Each seat is equipped with a three-point safety
belt. Safety belts that are worn correctly are the
most effective way to reduce the risk of serious or
fatal injuries in a collision. Therefore, wear your
safety belt correctly and make sure that all vehi-
cle passengers are also wearing their safety belts
correctly when the vehicle is moving.
Even though your vehicle is equipped with an air-
bag system, every vehicle passenger must still al-
ways wear the appropriate safety belt. In addition
to their normal protective function, safety belts
also hold vehicle occupants in the correct seating
position in the event of a collision so that the air-
bags can deploy correctly and provide additional
protection. Safety belts provide protection during
collisions when the airbags do not deploy or if
they have already deployed.
Z\ WARNING
The risk of serious or fatal injury increases if
the safety belt is not fastened, if it is worn in-
correctly, or if it is damaged.
— All vehicle occupants, including the driver,
must fasten their safety belts correctly be-
fore every trip and must always keep their
safety belts fastened during the trip, re-
gardless of whether the seat is equipped
with an airbag or not. This also applies to
children that are seated in a child safety
seat that is appropriate for their weight and
age and that is secured with a safety belt.
— In the event of a collision, vehicle occupants
that are not wearing safety belts could be
propelled through the vehicle interior and
collide with vehicle components, such as the
steering wheel, instrument panel, wind-
shield, or doors. In some situations, vehicle
occupants could also be ejected from the ve-
hicle. Vehicle occupants who do not wear
safety belts not only endanger themselves,
but also other people in the vehicle.
— Only one person may be fastened with a
safety belt at a time. Never secure more
than one person, including children, with a
single safety belt.
— Never allow children or infants to ride on an-
other person's lap and be belted into the
safety belt with them.
— Insert the belt buckle only in the belt latch
belonging to the corresponding seat, so that
the protective function is not impaired.
— To ensure the maximum protective function
of the safety belts, all vehicle passengers
must sit in the correct seating position
=> page 45.
— Check the condition of your vehicle’s safety
belts regularly > page 237. If you find dam-
age to the belt webbing, the belt connec-
tions, the retractor, or the buckle, have the
damaged safety belt replaced by an author-
ized Audi dealer or authorized Audi Service
Facility.
—The safety belts must not be removed or
modified in any way. Do not attempt to re-
pair the safety belts yourself.
— Safety belts that are strained during an acci-
dent must be replaced by an authorized
Audi dealer or authorized Audi Service Facili-
ty.
49
Page 54 of 280
Sitting correctly and safely
loosen. This reduces forward movement by the
vehicle passengers.
ZA\ WARNING
The pyrotechnic system can only provide pro-
tection during one collision. If the pyrotechnic
belt tensioners deploy, the pretensioning sys-
tem must be replaced by an authorized Audi
dealer or authorized Audi Service Facility.
@) Tips
Smoke may be released when pyrotechnic belt
tensioners deploy. This is not a sign of a vehi-
cle fire.
Airbag system
(ee elu lao)
Z\ WARNING
— If you have not fastened your safety belt,
you are in an incorrect seating position, or
you are too close to the airbag system, the
airbag system will not be able to protect
you. This increases the risk of serious or fa-
tal
injuries. Make sure that every vehicle
passenger has their safety belt correctly fas-
tened and is sitting in a correct seating posi-
tion = page 45. This is necessary regardless
of whether the seat is equipped with an air-
bag or not.
— Never place your feet on the instrument
panel, out of the window, or on the seat sur-
faces. To help ensure that the airbag system
can deploy correctly, never bend forward or
lean on the door or the side window. Other-
wise, serious and possibly fatal injuries can
occur if the airbags deploy.
— People, animals, or objects between the
Passengers and the airbag system can inter-
fere with the correct deployment of the air-
bag or can be thrown through the vehicle in-
terior, increasing the risk of serious or fatal
injuries. Make sure that nothing is located
between the vehicle occupants and the air-
bag system. Do not secure or transport any
objects within the deployment zone of the
airbag systems, especially on the steering
wheel, on the instrument panel, on the
doors, on the windows, or in the footwell.
— Never put stickers on the airbag system cov-
ers or cover them with any objects.
— Applies to: Coupe: Only lightweight clothing
should be hung from the garment hooks in
the vehicle. Do not use clothes hangers to
hang clothing. The pockets of the clothing
must not contain any heavy, breakable, or
sharp-edged objects. This could impair the
effectiveness of the side curtain airbags.
— You must not use seat or protective covers
that are not specifically approved for use on
Audi seats with side airbags. Since the side
airbags deploy from the seat backrest, such
covers could impair the protective function
of the side airbags.
— Damage to the original seat covers in the
side airbag deployment area must always be
repaired by an authorized Audi dealer or au-
thorized Audi Service Facility.
— Airbag system components are installed at
various locations in your vehicle. Incorrect
work or repairs on the vehicle could damage
the airbag system components or impair
their functionality. This may prevent the air-
bags from deploying or cause them to de-
ploy incorrectly in the event of an accident,
which increases the risk of serious or fatal
injuries. Only have an authorized Audi dealer
or authorized Audi Service Facility make re-
pairs or modifications to a vehicle.
— The airbag system can only provide protec-
tion during one collision. If there is another
collision, the airbag system will not deploy
again. If the airbag system has deployed,
have it replaced immediately by an author-
ized Audi dealer or authorized Audi Service
Facility.
— Fine dust may appear if the airbags deploy.
This is completely normal and does not indi-
cate a fire in the vehicle. The fine dust can ir-
ritate the skin and mucous membranes in
the eyes and can cause difficulty breathing,
particularly for individuals who have or have
52