technical data AUDI TT COUPE 2009 Owners Manual
[x] Cancel search | Manufacturer: AUDI, Model Year: 2009, Model line: TT COUPE, Model: AUDI TT COUPE 2009Pages: 316, PDF Size: 71.16 MB
Page 5 of 316

Child Safety . . . . . . . . . . . . . . . . . . . . 157
Important things to know . . . . . . . 157
Child safe ty seats . . . . . . . . . . . . . . 162
Instal ling a ch ild safety sea t . . . . . 168
Addi tional Inform ation . . . . . . . . . . 171
Lower anchorages and tether for
chi ldren (LATCH) ............... .
172
t
Vehicle operation . . . . . . . . 181
Intelligent technology . . . . . . . . . . 182
Notice about data recorded by
vehicle control modules . . . . . . . . 182
Electronic Stabilization Program
(ESP) . . . . . . . . . . . . . . . . . . . . . . . . . . 182
Rear spoiler . . . . . . . . . . . . . . . . . . . 185
B raking . . . . . . . . . . . . . . . . . . . . . . .
186
Electro-mechanical power assist . 188
Driving with your quattro® . . . . . . 189
Driving and environment . . . . . . 190
The first 1,000 miles (1,500 km) and
afterwards . . . . . . . . . . . . . . . . . . . .
190
Ca tal ytic converter . . . . . . . . . . . . . 191
Avoid damaging the veh icle . . . . .
192
Operate your vehicle economically
and minimize pollution ........ .
Trailer towing ...........•......
192
194
Table of contents
Vehicle care . . . . . . . . . . . . . . . 197 Do-it-yourself service ... 253
C leaning and protection . . . . . . . 198 What do I do now? . ............ 264
General information . . . . . . . . . . . . 198
Care of exterior . . . . . . . . . . . . . . . . . 198
Care of interior . . . . . . . . . . . . . . . . . 205
Fue l supply and filling your fuel
tank . . . . . . . . . . . . . . . . . . . . . . . . . . . . 211
Gasoline .................. •....
Fuel tank ..................... .
Checking and filling ... ..... ... .
Eng ine hood ........ .......... .
Engine compartment .......... .
Engine oil ........ ... ...... ... . .
E ngine cooling system ......... .
Brake fluid ... ... ...... .... •....
Battery ............ ......... .. .
W indshield /headlight washer
conta iner .. .... ... .... ... ..... .
Tires and whee ls .............. .
Tires ................... · · · · · · ·
T ire pressure monitoring system .
Run-flat tire s ....... ...... ..... .
2 11
2 12
2 16
216
218
219
224
22 7
228
233
234
234
253
258
Vehic le tool kit . . . . . . . . . . . . . . . . . . 264
Tire r epair . . . . . . . . . . . . . . . . . . . . . . 264
What should I be aware of when
changing a tire ?
268
Fuses and bulbs ....... ......... 274
Fuses ... .............. ... ... ... 274
Bulbs ...... ...... ..... ......... 278
Emergency situations . . . . . . . . . . 279
General . . . . . . . . . . . . . . . . . . . . . . . . 279
Starting by pus hing or towing . . . . 279
Starting with jumper cables . . . . . . 279
Use of jumpe r cables . . . . . . . . . . . . 280
Emergency towing with commercial
tow t ruck . . . . . . . . . . . . . . . . . . . . . .
282
Lifting vehicle . . . . . . . . . . . . . . . . . . 284
Technical data
General information 287
288
Explanation
of technical data . . . . 288
Veh ic le ident ification . . . . . . . . . . . . 288
Vehicle care I I irechnical data
Page 7 of 316

Vehicle literature
In addition to this Owner's Manual, your Audi comes with a
Warranty
& Maintenance booklet.
Moreover, depending on the model and the equipment. there may
be additiona l instruction book lets delivered with your vehic le (for
examp le, Operating Instructions for your Sound System, Navigation
Syst em e tc.) .
I f you are missing one of these publ ications, or if you believe tha t
the information is not comp lete , contact your author ized Audi
dea ler for assistance .
The Warranty & Maintenance booklet
explains how you can keep your Audi in top driving condition by
having it serviced regu larly and contains detai led information about
the warranties cove ring your Audi . Always have the booklet with you
when you take your vehicle to an authorized Audi dea ler for service .
Your Audi Service Adviser will record each scheduled service and
can answer any questions you may have regarding how to ma inta in
your vehicle .
In Canada,
the vehicle literature is a lso availab le in French . To obtain a copy,
contact your dealer or write to :
Au Canada , on peut se procurer un exemplaire en frarn;ais de ce
document aupres du concessionna ire ou de:
Volkswagen Canada, Inc .
Client Assistance
Assistance a la Clientele
777 Bay ly Street , West,
Ajax, Ontario L 1 S 7G7
If you sell your Audi
all literature should be left in t he vehicle to make t he Warranty te rms
as we ll as all operating, safety and maintenance in formation avail
able to the ne xt owner.
Controls and equip
ment Safety first Vehicle operation
V
ehi cle litera tur e
If you change your address or if you bought this
Audi used
be sure to send in a "No tice of Add ress Change"/ " Notice of Used
Car Purchase" post card. This card can be found in the Warranty
&
Ma intenance booklet or obtai ned from your authorized Aud i dealer.
It is in your own intere st t hat we are able to contact you shou ld the
need arise .•
Vehicle care Do-it-yourself service Technical data
Page 9 of 316

Controls and equipment Safety first
Vehicle operation Vehicle care
About this Owner's Manual
Do-it-yourself service Technical data
Page 29 of 316

Sele cting the fun ctions
- Push in the uppe r (lower) protrusion on the function
se lector switch
@ =>page 26, fig. 12. The functions for
the trip compu ter are d isp layed in succession on the
respective memory levels.
R ese ttin g the function to z ero
- Push the [Reset ] button ® for at least two seconds .
You can reset the fo llowing values to zero using the [R eset] button:
• driving time
• distance
• average fuel mileage
• average speed
The trip computer only opera tes when the ignition is on . When you
turn on the ignit ion, the function that was in use when you last
turned the ignition off will be displayed.
[ i ] T ip s
• You can also set the va lues for the functions to zero in the menu
display (R es et) ~
page 27 .
• All stored values wil l be lost if the vehic le battery is
disconnected .•
Con tro ls and eq uip
ment
Menu display
Introduction Dri
ver in form ati on syst em
Fig . 13 W ip er leve r:
Co ntrols for the men u
di sp la y
Fig . 14 Di spl ay: Star t
menu
Some functions in your vehicle can be set, activated, and controlled
by Men us (e.g. Acoustic park assist*) . With these menus you can
also select the informa tion shown in the driver information system ,
which operates only with the ignition switched on . Operation is
controlled by the
I Res et I button and the rocker switch on the wiper
lever~fig .13 . .,_.
Vehicle care
I I Technical data
Page 41 of 316

Master key with remote control
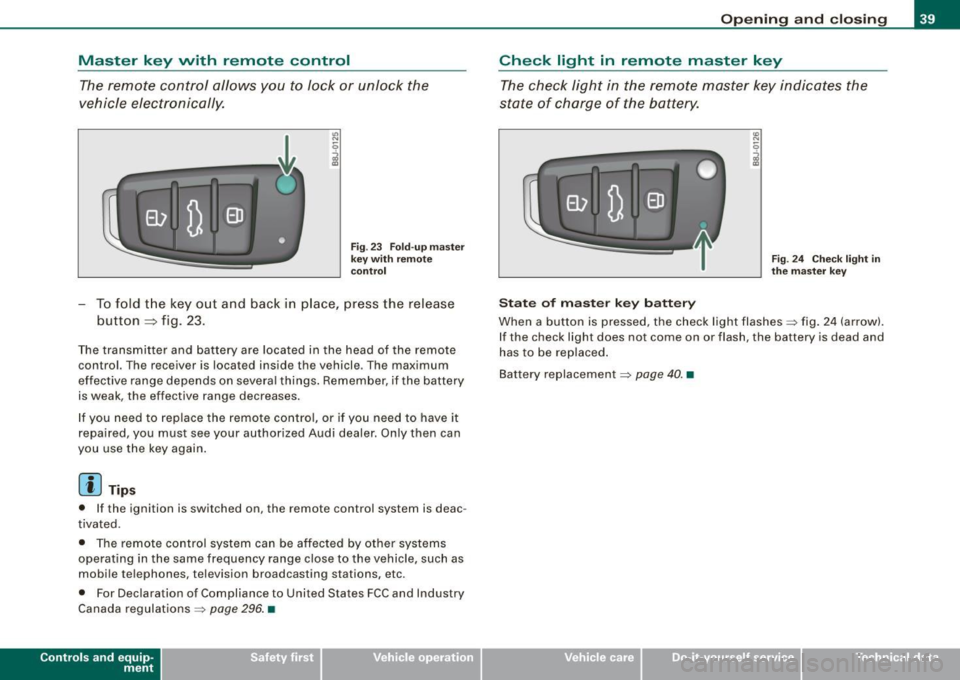
The remote control allows you to lock or unlock the
vehicle electronically.
"' N
0
i
F ig . 23 Fold -u p m as ter
k ey wit h re mo te
co ntrol
- To fold t he key out and back in place, p ress the release
button
=> fig. 23.
The transmitter and battery are located in the head of the remote
control. The receiver is located inside the vehicle . The maximum
effective range depends on severa l things . Remember, if the battery
is weak, the effective range decreases.
I f you need to replace the remote co ntro l, or if you need to have it
repaired , you must see your authorized Audi dealer. Only then can
you use the key again .
[ i] Tip s
• If the ignition is switched on, the remote control system is deac
tivated .
• T he remote control system can be affected by other systems
operating in the same frequency range close to the vehicle , such as
mobi le telephones, television broadcasting stations, etc.
• For Declaration of Compliance to United States FCC and Industry
Canada regulations =>
page 296. •
Contro ls and eq uip
ment
Op ening and clo sing
Check light in remote master key
The check light in the remote master key indicates t he
state of charge of the battery.
St ate o f m aster k ey b att ery
Fig . 2 4 Chec k ligh t in
th e m as ter k ey
When a button is pressed, the check light flashes~ fig . 24 (arrow).
I f the check light does not come on or flash, the battery is dead and
has to be replaced .
Bat tery replacement
~ page 40. •
Vehicle care I I Technical data
Page 65 of 316

Replacing front wiper blades
Wiper blades in good condition help keep the windshield
clear.
Removing the wiper blade
Fig . 52 Unlatching
wiper blades
Fig . 53 Removing
wiper blades
- Move the wipers to the service position ~ page 62
~ page 62, fig. 51.
- Fold the windshield wiper arm away from the glass.
- On the upper end of the wiper arm at the corrugation,
squeeze the plastic retainer together on both sides in the
direction of the arrow~ fig. 52.
Contro ls and eq uip
ment
Clear vision
- Rotate the wiper blade in the direction of the arrow@
~ fig. 53 away from the wiper arm.
- Lift the wiper blade off in the d irection of the arrow @.
Attaching the wiper blade
- Place the rounded end of the wiper onto the end of the
wiper arm in the
opposite direction to the arrow @
~ fig. 53.
- Swing the wiper in the
opposite direction to the arrow @
onto the wiper arm.
- Squeeze t he cor rugation on the wiper until you hear it
click in the wiper arm.
- Fold the wiper arm back onto the windshield.
Switch the ignit ion on and move the wiper lever down
briefly ~
page 62, fig. 51. The wiper will move back to the
park position .
The front wiper blades measure left side 23.20 in. (590 mm ) and
right side 18 .50 in . (470 mm) in length,
Clean your wiper b lades regularly with a windshield washer solution
to prevent streaking. If the blades are
very dirty, for example with
insects, carefully clean the b lades w ith a sponge or a soft brush.
If the wiper blades begin to streak the windshield , this could be
caused by residue left on the windshield by automatic car washes .
Fill the windshield washe r container with a special solution avail
able at your authorized Audi dealer to
remove the residue.
Be sure to inspect the condition of your wiper blades regular ly . For
safety reasons, rep lace your wiper blades once or twice a year if
necessary. See your authorized Audi dealer for replacement blades . .,
Vehicle care I I Technical data
Page 69 of 316

Digital compass
Applies to vehicles: with di gital co mpass
Activating or deactivating the compass
The direction is displayed on the interior rear view mirror.
Fig . 56 Inside rear
view mirror : digital
compass activated
To activate or deactivate, hold the @~fig. 56 button
down until the red display appears or disappears.
The digital compass only works with the ignition turned on. The
directions are displayed as initials :
N (North), NE (Northeast), E
(East), SE (Southeast), S (South), SW (Southwest), W (West), NW
(Northwest).
[ i) Tips
To avoid inaccura te directions , do not allow any remote controls,
electrical systems, or metal parts close to the mirror. •
Contro ls and eq uip
ment
Clear vision
Ap plies to vehi cles: wit h dig ital compass
Setting the magnetic deflection zone
The correct magnetic deflection zone must be set in order
to display the directions correctly.
.
• ,_,;a;..~>, I I
I I
I I
I ' I I
I I
' I I I
I @ I
l '
l
I ' I ,, l ----
'
'
'
®
\, ,, ...... _______ ,.,.
©
@
Fig. 57 North America: magnetic deflection zone boundaries
Hold the@~ fig. 56 button down until the number of
the set magnetic deflection zone appears on the interior
rear view mirror.
Adjust the magnetic deflection zone by repeatedly
pressing on the@ button. The set mode automatically
deactivates after a few seconds . •
Vehicle care I I Technical data
Page 117 of 316

Driving Safely 1111
----------------
-Make sure that all lights and signals are operating
correctly.
- Make sure that the tire pressure is correct.
- Make sure that all windows are clean and afford good
visibility to the outside.
- Secure all luggage and other items carefully =>
page 83.
-Make sure that nothing can interfere with the pedals.
- Adjust front seat, head restraint and mirrors correctly for
your height.
- Instruct passengers to adjust the head restraints
according to their height.
- Make sure to use the right child restraint correctly to
protect children =>
page 157, "Child Safety".
- Sit properly in your seat and make sure that your passen
gers do the same=>
page 69, "General recommenda
tions".
- Fasten your safety belt and wear it properly. Also instruct
your passengers to fasten their safety belts properly
=>
page 125. •
What impairs driving safety?
Safe driving is directly related to the condition of the
vehicle, the driver as well as the driver's ability to concen
trate on the road without being distracted.
The driver is responsible for the safety of the vehicle and all
of its occupants. If your ability to drive is impaired, safety risks for everybody in the vehicle increase and you also
Controls and equip ment Safety first Vehicle operation
become a
hazard to everyone else on the road =>&, .There
fore:
- Do not let yourself be distracted by passengers or by
using a cellular telephone.
- NEVER drive when your driving ability is impaired (by
medications, alcohol, drugs, etc .).
- Observe all traffic laws, rules of the road and speed limits
and plain common sense.
- ALWAYS adjust your speed to road, traffic and weather
conditions.
- Take frequent breaks on long trips. Do not drive for more
than two hours at a stretch.
- Do NOT drive when you are tired, under pressure or when
you are stressed.
in. WARNING
Impaired driving safety increases the risk of serious personal
injury and death whenever a vehicle is being used. •
Vehicle care Do-it-yourself service Technical data
Page 119 of 316

________________________________________________ D_r_iv _ i _n_ g~ S_ a_ fe_ ly __ !II
& WARNING (continued)
• Always adjust the driver's seat and the steering wheel so that
there are at least 4 inches (10 cm) between the knees and the
lower part of the instrument panel.
• Always hold the steering wheel on the outside of the steering
wheel rim with your hands at the
9 o'clock and 3 o'clock positions
to help reduce the risk of personal injury if the driver's airbag inflates .
• Never hold the steering wheel at the
12 o'clock position or with
your hands at other positions inside the steering wheel rim or on
the steering wheel hub. Holding the steering wheel the wrong way
can cause serious injuries to the hands, arms and head if the
driver's airbag inflates
• Pointing the steering wheel toward your face decreases the
ability of the supplemental driver's airbag to protect you in a colli
sion .
• Always sit in an upright position and never lean against or
place any part of your body too close to the area where the airbags
are located.
• Before driving, always adjust the front seats and head
restraints properly and make sure that all passengers are properly
restrained .
• Never adjust the seats while the vehicle is moving. Your seat
may move unexpectedly and you could lose control of the vehicle.
• Never drive with the backrest reclined or tilted far back! The
farther the backrests are tilted back, the greater the risk of injury due to incorrect positioning of the safety belt and improper
seating position.
• Children must always ride in child seats=>
page 157. Special
precautions apply when installing a child seat on the front
passenger seat =>
page 135. •
Controls and equip
ment Safety first
Vehicle operation
Proper seating position for the front
passenger
The proper front passenger seating position is important
for safe, relaxed driving.
For your own safety and to reduce the ris k of injury in the
event of an accident, we recommend that you adjust the
seat for the front passenger to the following pos ition:
- Move the front passenger seat back as far as possible.
There must be a minimum of 10 inches (25 cm) between
the breastbone and the instrument panel =>
&.
- Adjust the angle of the seatback so that it is in an upright
position and your back comes in full contact with it
whenever the vehicle is moving.
- Adjust the head restraint so that the upper edge is as
even with the top of your head as possible but not lower
than eye level and so that it is as close to the back of your
head as possible =>
page 119.
-Keep both feet flat on the floor in front of the front
passenger seat.
- Fasten and wear safety belts correctly=>
page 129.
For detailed information on how to adjust the front passenger's
seat, see => page 69.
& WARNING
Front seat passengers who are unbelted, out of position or too
close to the airbag can be seriously injured or killed by the airbag
as it unfolds. To help reduce the risk of serious personal injury : .,
Vehicle care Do-it-yourself service Technical data
Page 121 of 316

Driving Safely 111111 ______________________________________________________ __,::::;..._ _______ _
Proper adjustment of head restraints
Correctly adjusted head restraints are an important part
of your vehicle's occupant restraint system and can help to reduce the risk of injuries in accident situations.
Fig. 98 Correctly
adjusted head restraint
viewed from the side
The head restraints must be correctly adjusted to achieve
the best protection.
- Adjust the head restraint so that the upper edge of the
restraint is level with the top of your head, but no lower
than eye level and so it is as close to the back of your
head as possible ~ fig. 98.
Adjusting head restraints=> page 74.
& WARNING
Driving without head restraints or with improperly adjusted head
restraints increases the risk of serious injuries in a collision. To
help reduce the risk of injury :
• Always drive with the head restraints in place and properly
adjusted.
• Every person in the vehicle must have a properly adjusted head
restraint.
Controls and equip ment Safety first Vehicle operation
& WARNING (continued)
•
Always make sure each person in the vehicle properly adjusts
their head restraint. Each head restraint must be adjusted
according to occupants' size so that the upper edge is as even
with the top of the person's head, but no lower than eye level and
so it is as close to the back of to the head as possible .
• Never attempt to adjust head restraint while driving. If you
have driven off and must adjust the driver headrest for any reason,
first stop the vehicle safely before attempting to adjust the head
restraint.
• Children must always be properly restrained in a child restraint
that is appropriate for their age and size=>
page 157. •
Examples of improper seating positions
The occupant restraint system can only reduce the risk of
injury if vehicle occupants ore properly seated.
Improper seating positions can cause serious injury or
death . Safety belts can only work when they are properly
positioned on the body. Improper seating positions reduce
the effectiveness of safety belts and will even increase the
risk of injury and death by moving the safety belt to critical
areas of the body. Improper seating positions also increase
the risk of serious injury and death when an airbag deploys
and strikes an occupant who is not in the proper seating
position. A driver is responsible for the safety of all vehicle
occupants and especially for children. Therefore:
- Never allow anyone to assume an incorrect seating posi
tion when the vehicle is being used~& .
The following bullets list only some sample positions that will
increase the risk of serious injury and death. Our hope is that these .,_
Vehicle care Do-it-yourself service Technical data