tow AUDI TT COUPE 2009 User Guide
[x] Cancel search | Manufacturer: AUDI, Model Year: 2009, Model line: TT COUPE, Model: AUDI TT COUPE 2009Pages: 316, PDF Size: 71.16 MB
Page 89 of 316
To set a lower temperature, turn the rotary knob to the left. To set a
higher temperature, turn the rotary knob to the right. There are addi
tional intermediate settings available to adjust the temperature as
needed. •
Switching climate control on and off
Switching the climate control system on and off
- Turn the knob@==> page 85, fig. 76 to the right to switch
climate control on. The LED next to the word OFF goes
out.
Turn the knob@==>
page 85, fig. 76 to the left to switch
the climate control system off. The LED next to the word
OFF comes on.
Setting fan speed ~
- Turn the knob @==> page 85, fig. 76 to the setting you
want to adjust fan speed (air quantity).
In automatic mode the climate control system automatically regu
lates fan speed depending on interior temperature. You can adjust
the volume of air produced by the fan to meet your own require ments .
[ i] Tips
If the difference between the desired temperature set by you and
the vehicle's interior temperature is too great, the fan speed will change automatically. This is done so that the desired temperature
setting is reached as quickly as possible. •
Contro ls and eq uip
ment
Warm and cold
Air distribution
0
§
i
Fig. 77 Instrument panel: Location of air vents
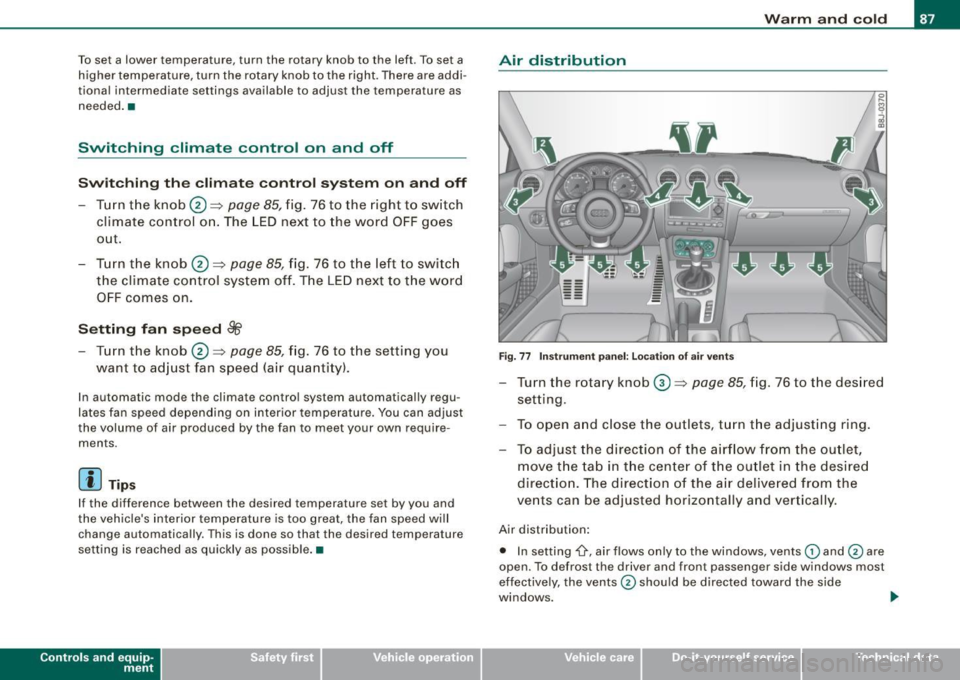
-Turn the rotary knob 0 ==> page 85, fig. 76 to the desired
setting .
- To open and close the outlets, turn the adjusting ring.
- To adjust the direction of the airflow from the outlet,
move the tab in the center of the outlet in the desired
direction. The direction of the air delivered from the
vents can be adjusted horizontally and vertically.
Air distribution:
• In setting
-0-, air flows only to the windows, vents (D and 0 are
open. To defrost the driver and front passenger side windows most
effectively, the vents
0 should be directed toward the side
windows. .,,_
Vehicle care I I irechnical data
Page 95 of 316
Starting and stopping the engine
Starting the engine
The engine can only be started with on original Audi key
and the clutch pedal* depressed.
- Set the parking brake.
Move the selector lever to the neutral position (automatic
transmission: selector lever in P or N)
~ & .
- On vehicles with manual transmission, fully depress the
clutch pedal.
- Turn the ignition key to position
0 ~ page 92, fig. 79 -
do not depress the gas pedal when starting the engine!
- Let go of the key as soon as the engine starts.
A cold engine may at first be loud after it has been started. This is
due to the hydraulic valves building up the oil pressure . This normal
and no need for concern.
If the engine does not start immediately, stop trying after 10
seconds and then try to restart the engine about 30 seconds later.
& WARNING
Never start or let the engine run in a confined or enclosed area.
Exhaust fumes from the engine contain carbon monoxide, a color
less and odorless gas. Carbon monoxide can be fatal if inhaled.
• Never leave the engine idling unattended. An unattended
vehicle with a running engine poses a danger of personal injury or
theft.
Controls and equip
ment
On the road
0 Note
• Avoid high engine speeds, fast acceleration or heavy engine
loads while the engine is still cold. This could damage the engine.
• The engine cannot be started by pushing or towing the vehicle.
~ For the sake of the environment
To avoid unnecessary engine wear and to reduce exhaust emis
sions, do not let your vehicle stand and warm up. Be ready to drive
off immediately after starting your vehicle. Maintain moderate
speed until the engine is completely warm. Remember, the engine
performs best at operating temperature. •
Stopping the engine
-Turn the ignition key to position G) ~ page 92, fig. 79.
& WARNING
• Never turn off the engine until the vehicle has come to a
complete stop.
• The brake booster and servotronic only work when the engine
is running. With the ignition turned off, you have to apply more
force when steering or braking. Since you cannot steer and stop
normally, this can lead to accidents and serious injuries.
• The radiator fan can continue to run for up to 10 minutes even
after you have turned off the engine and removed the ignition key.
The radiator fan can also turn on again if the engine coolant heats
up because of intense sunlight or heat build-up
in the engine
compartment. .,
I • •
Page 97 of 316

-Wit h a manual transm issi on, engage 1st gea r, or with a n
a utomatic transmission place the se lector lever in P
=> & .
- Remove the ignition key from the ignit io n lock.
Wha t el se you should do wh en parking yo ur v ehi cle on
a n incli ne or d ecline
Turn the steering whee l so that if the vehicle shou ld start to rol l, it
wi ll roll into the curb.
I f you are park ing on a
decline (the front of you r ve hicle facing
downhill) , turn the front wheels to the right so that they poin t
toward the curb .
If you are park ing on an in cline (the font of your vehicle facing
uphill!, turn the front whe els to the left so that they point
away from
the curb .
& WARNING
This is how you can reduce the ri sk of injury when le avi ng your
vehicle .
• Never p ark the vehi cle w here it can come
in cont act w ith dry
gra ss, s pilled fuel or any other flammable mater ial s.
• Never allow anyone -espe cially small ch ildren -to remain
in the
vehicle when it is locked . Locked doors make it more difficult for
re scu ers to ac ce ss the pa ssenger compartment in the e vent of an
emergency . Danger to life!
• Never lea ve childr en un super vis ed in the vehicle . Children
c ould release the parking brake or move the gearsh ift l ever out of
gear . The vehicle could start to r oll away a nd cau se an a ccident .
• No matter what the season i s, the temperature
in a parked
v ehi cle can reach dangerou s level s. •
Controls and equip
ment
On th e road
Acoustic parking system
Applies to veh ic les : wit h 4 -ch anne l a cou stic park ass is t
Rear acoustic park assist
Acoustic park assist gives a warning a bout o bstacles
behind the vehicle.
Description
The rear acoustic park assist (4 -channel acoustic park assist) deter
mines the d istance of the vehic le from an obstac le using u ltrasonic
sensors. The sensors are in the rear bumper. The volume and the
pitch of the chimes can be adjusted through the menu display
=> page 27.
The range at which the sensors start to m easure is about :
To the side
Center rear
Acti v atio n
2 feet (0 .60 m)
5 feet (1.60 ml
The pa rking assist is activated when rever se ge ar is engaged . A brief
tone confirms that the system is activated .
Backing up
Distance warning when backing up starts when an obstacle is
detec ted in the range of the park ass ist system . As the distance
decreases, the time interval between the aud ible tones becomes
shorter .
When the distance is less than 1 foot (0.30 m) , the tone becomes
continuous . At this point you should stop backing up.
Please note that low objects a lready signalled by a warning can
disappear from the sys tem's detection range and wil l not continue
t o be signa lled . ..,
I • •
Page 99 of 316
CRUISE (US mod ell/ f-f (Canadian mod ell will also light up in the
instrument cluster .
& WARNING
• Always pay att enti on to traffic ev en whe n the c rui se control is
swi tched o n. Yo u are alway s resp onsi ble for your spe ed and the
di stanc e betw een your veh icle and other ve hic le s.
• Fo r sa fet y re as on s, th e c ruise control shou ld not be u sed in the
c it y, in stop -and -go traffic , on twi sting road s and when road condi
t ion s a re poor (such as ice, fog, gra vel, hea vy ra in and hydro
planing ) - risk of accid ent.
• Turn off the cr uis e control t empor arily when e nte ring turn
lane s, highwa y ex it lane s or in con stru ctio n z one s.
• Please note that inad vertentl y "re sting " your foot on the a ccel
er ato r ped al ca use s t he crui se control not to br ake . Thi s is because
the cru ise control i s overridden b y the dri ve r's acc eleration .
[ i] Tip s
• Vehicles w ith manua l transmission : You can at tain the set speed
only if the currently engaged gear allows it and the engine is not
stressed. Shifting to a higher or lower gear promptly will allow the
engine to run smooth ly .
• The cruise control cannot maintain a constant speed when
driving downhi ll. The vehicle will acce lerate under its own weight .
Downshift to a lower gear or use the brakes to s low down. •
Changing speed
-Press lever in the 0 or O direction => page 96, fig. 81 to
increase or decrease your speed.
- Release the lever to save that speed .
Controls and equip
ment
On th e road
Change speed in increments of 1 mph (1 km/h) by lightly pressing
the lever . If you keep the lever pressed down, you will a lter your
speed in 5 mph (10 km /h) increments .
You can a lso press the acce lerator pedal down to increase your
speed, e.g. if you want to pass someone. The speed you saved
earlier will resume as soon as you release the accelerator pedal.
I f , however, you exceed your saved speed by 5 mph (10 km/h) for
longer than 5 minutes, the cruise control will turn off temporarily .
The symbol will go ou t but the saved speed will be retained. •
Presetting your speed
You can preset your desired speed while the vehicle is not
moving.
Turn on the ignition.
P ull lever into posit ion
G) => page 96 , fig . 81.
Press the lever in the
0 or O direction to increase or
decrease your speed.
- Release the lever to save that speed .
This function makes it possible, for example, to save the speed you
want before driving on the highway . Once on the highway, activate
the cruise contro l by pulling the lever toward
(D . •
Switching the system off
Tempor ary d ea ctiv ati o n
Press the brake pedal, or
- Keep the c lutch pedal pressed down
longer, or
- Press th e l ever into position @ (n ot c licked into place)
=>
page 96 , fig. 8 1, or ~
I • •
Page 106 of 316
• ..__T_ ra_ n_s_ m_ i_ s _s_ i_ o _n ___________________________________________________ _
Switching to manual
-Push the selector lever to the right from D. As the trans
mission has switched,
6 5 4 3 2 1 appears in the display,
with the gear that is engaged highlighted.
Upshifting
Tap the selector lever forward (in the tiptronic setting)
=> page 103, fig. 88 G).
Downshifting
- Tap the selector lever backward (in the tiptronic setting)
o.
Switching to manual can be carried out with the vehic le stationary
as well as moving .
When accelerating, the transmission shifts into the next gear in gears 1 , 2, 3, 4 and 5 shortly before the maximum permissible
engine speed is reached.
If you have selected a lower gear than the current one , the transmis
sion will only shift down when the engine cannot be overspeeded.
If kick -down is actuated, the transmission shifts into a lower gear
independently of speed and engine rpm .•
Ap plies to vehicles: w ith S tronic ® and wi th Tipt ro nic co ntrols o n the st eer in g w hee l
Steering wheel with Tiptronic ® controls
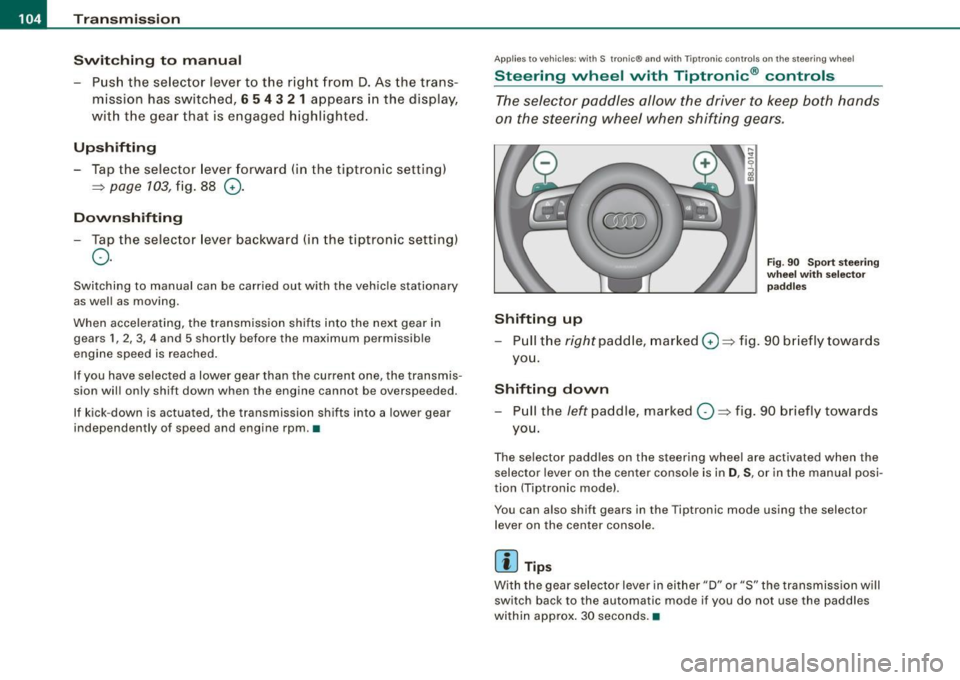
The selector paddles allow the driver to keep both hands
on the steering wheel when shifting gears.
Shifting up
Fig. 90 Sport steering
wheel with selec tor
paddles
- Pull the right paddle, marked 0=> fig. 90 briefly towards
you.
Shifting down
- Pull the left paddle, marked O => fig. 90 briefly towards
you.
The selector padd les on the steering wheel are activated when the
selector lever on the center console is in
D, S, or in the manual posi
tion (Tiptronic mode) .
You can also shift g ears in the Tiptronic mode using the selector
lever on the center console.
[ i ] Tips
With the gear selector lever in ei ther "D" or "S" the transmission will
switch back to the automa tic mode if you do not use the paddles
within approx . 30 seconds. •
Page 108 of 316
• ..__T_ ra_ n_s_ m_ i_ s _s_ i_ o _n ___________________________________________________ _
• The manual shift program (tiptronic) is switched off in the fail
safe mode.
If the transmission switches to fail-safe mode, you should take the
vehicle to an authorized Audi dealership as soon as possible to have
the condition corrected .•
A pp lies to vehi cles: wit h S tronic ®
Emergency release for selector lever
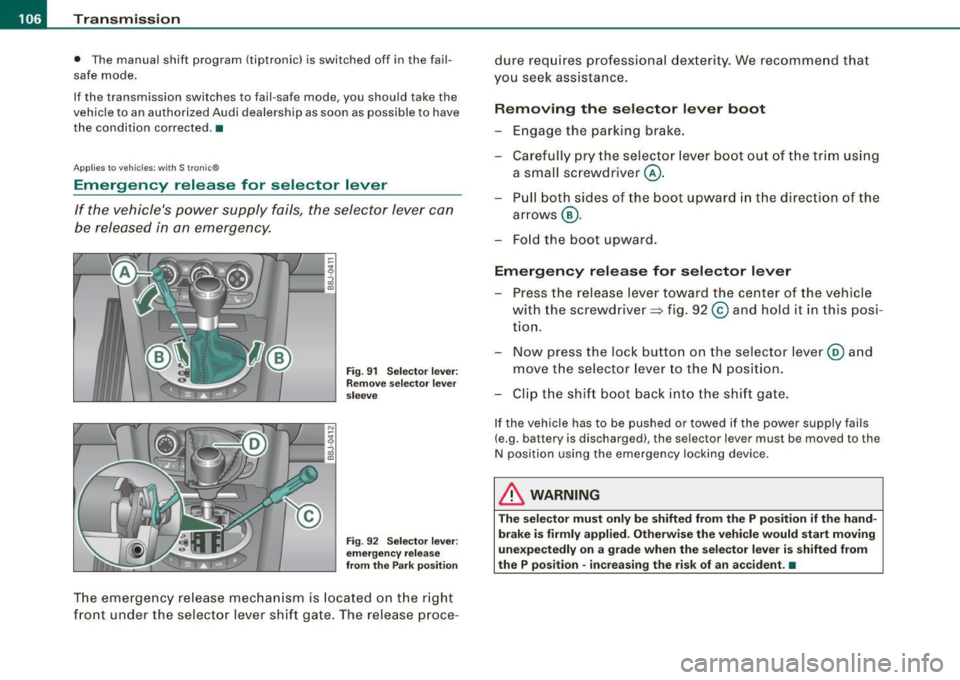
If the vehicle's power supply fails, the selector lever can
be released in an emergency.
rr- ~v r::.~=::::::= ::;~~,:,:J ::: __ -tg
i
Fig. 91 Selector lever:
Remove selector lever
sleeve
Fig . 92 Selector lever:
emergency release
from the Park position
The emergency release mechanism is located on the right
front under the selector lever shift gate. The release proce- dure
requires professional dexterity. We recommend that
you seek assistance.
Removing the selector lever boot
-Engage the parking brake.
- Carefully pry the selector lever boot out of the trim using
a small screwdriver @.
- Pull both sides of the boot upward in the direction of the
arrows @.
- Fold the boot upward.
Emergency release for selector lever
-Press the release lever toward the center of the vehicle
with the screwdriver ~ fig. 92
© and hold it in this posi
tion.
- Now press the lock button on the selector lever@ and
move the selector lever to the N position.
- Clip the shift boot back into the shift gate.
If the vehicle has to be pushed or towed if the power supply fails
(e.g . battery is discharged), the selector lever mus t be moved to the
N position using the emergency locking device.
& WARNING
The selector must only be shifted from the P position if the hand
brake is firmly applied. Otherwise the vehicle would start moving
unexpectedly on a grade when the selector lever is shifted from
the P position -increasing the risk of an accident. •
Page 119 of 316

________________________________________________ D_r_iv _ i _n_ g~ S_ a_ fe_ ly __ !II
& WARNING (continued)
• Always adjust the driver's seat and the steering wheel so that
there are at least 4 inches (10 cm) between the knees and the
lower part of the instrument panel.
• Always hold the steering wheel on the outside of the steering
wheel rim with your hands at the
9 o'clock and 3 o'clock positions
to help reduce the risk of personal injury if the driver's airbag inflates .
• Never hold the steering wheel at the
12 o'clock position or with
your hands at other positions inside the steering wheel rim or on
the steering wheel hub. Holding the steering wheel the wrong way
can cause serious injuries to the hands, arms and head if the
driver's airbag inflates
• Pointing the steering wheel toward your face decreases the
ability of the supplemental driver's airbag to protect you in a colli
sion .
• Always sit in an upright position and never lean against or
place any part of your body too close to the area where the airbags
are located.
• Before driving, always adjust the front seats and head
restraints properly and make sure that all passengers are properly
restrained .
• Never adjust the seats while the vehicle is moving. Your seat
may move unexpectedly and you could lose control of the vehicle.
• Never drive with the backrest reclined or tilted far back! The
farther the backrests are tilted back, the greater the risk of injury due to incorrect positioning of the safety belt and improper
seating position.
• Children must always ride in child seats=>
page 157. Special
precautions apply when installing a child seat on the front
passenger seat =>
page 135. •
Controls and equip
ment Safety first
Vehicle operation
Proper seating position for the front
passenger
The proper front passenger seating position is important
for safe, relaxed driving.
For your own safety and to reduce the ris k of injury in the
event of an accident, we recommend that you adjust the
seat for the front passenger to the following pos ition:
- Move the front passenger seat back as far as possible.
There must be a minimum of 10 inches (25 cm) between
the breastbone and the instrument panel =>
&.
- Adjust the angle of the seatback so that it is in an upright
position and your back comes in full contact with it
whenever the vehicle is moving.
- Adjust the head restraint so that the upper edge is as
even with the top of your head as possible but not lower
than eye level and so that it is as close to the back of your
head as possible =>
page 119.
-Keep both feet flat on the floor in front of the front
passenger seat.
- Fasten and wear safety belts correctly=>
page 129.
For detailed information on how to adjust the front passenger's
seat, see => page 69.
& WARNING
Front seat passengers who are unbelted, out of position or too
close to the airbag can be seriously injured or killed by the airbag
as it unfolds. To help reduce the risk of serious personal injury : .,
Vehicle care Do-it-yourself service Technical data
Page 123 of 316
---------------------------------------------------=D..:.r..:..iv .:....:..: in..:. 9 ::!-- S .=..::a:..:f...:e :..: l~y ---
& WARNING
Pedals that cannot move freely can cause loss of vehicle control
and increase the risk of serious injury.
• Never place any objects in the driver's footwell . An object could
get into the pedal area and interfere with pedal function. In case
of sudden braking or an accident, you would not be able to brake
or accelerate!
• Always make sure that nothing can fall or move into the
driver's footwell. •
Floor mats on the driver side
Always use floor mats that can be securely attached to
the floor mat fasteners and do not interfere with the free
movement of the pedals.
- Make sure that the floor mats are properly secured and
cannot move and interfere with the pedals =>& .
Use only floor mats that leave the pedal area unobstructed and that
are firmly secured so that they cannot slip out of position . You can
obtain suitable floor mats from your authorized Audi Dealer.
Floor mat fasteners are installed in your Audi.
Floor mats used in your vehicle must be attached to these fasteners .
Properly securing the floor mats will prevent them from sliding into
positions that could interfere with the pedals or impair safe opera
tion of your vehicle in other ways.
& WARNING
Pedals that cannot move freely can result in a loss of vehicle
control and increase the risk of serious personal injury.
• Always make sure that floor mats are properly secured.
Controls and equip ment Safety first
Vehicle operation
& WARNING (continued)
• Never place or install floor mats or other floor coverings in the
vehicle that cannot be properly secured in place to prevent them
from slipping and interfering with the pedals or the ability to
control the vehicle.
• Never place or install floor mats or other floor coverings on top
of already installed floor mats. Additional floor mats and other
coverings will reduce the size of the pedal area and interfere with
the pedals.
• Always properly reinstall and secure floor mats that have been
taken out for cleaning.
• Always make sure that objects cannot fall into the driver foot
well while the vehicle is moving. Objects can become trapped
under the brake pedal and accelerator pedal causing a loss of
vehicle control. •
Stowing luggage
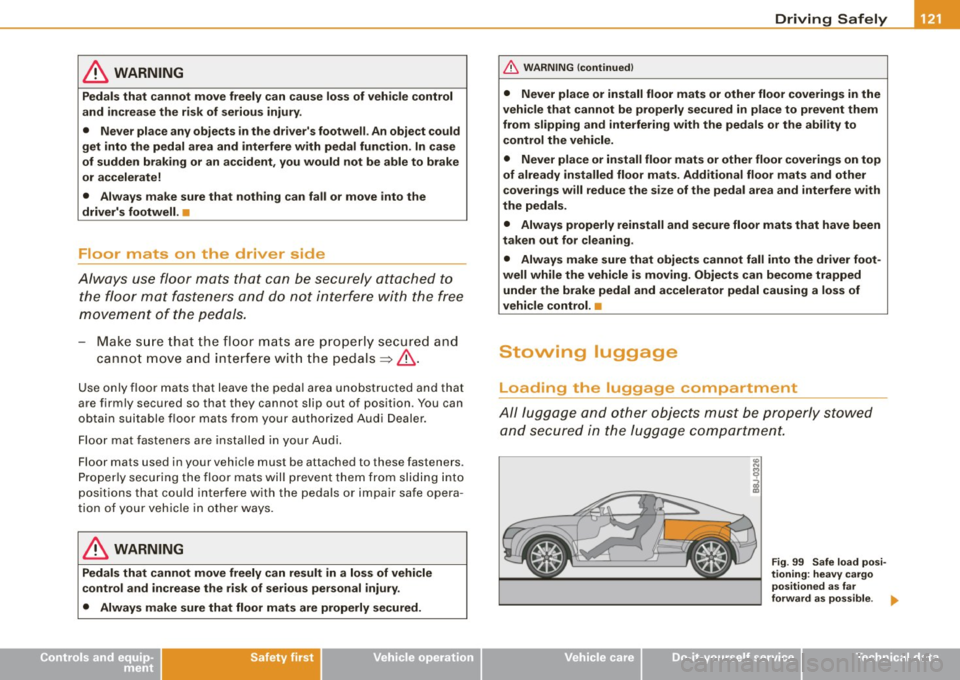
Loading the luggage compartment
All luggage and other objects must be properly stowed
and secured in the luggage compartment.
Vehicle care
co N
9
g!
Fig. 99 Safe load posi
tioning: heavy cargo
positioned as far
forward as possible. ..
Do-it-yourself service Technical data
Page 126 of 316
lllffl Driving Safely
individual problems between you, your dealer,
or Audi of America, Inc.
To contact NHTSA, you may call the Vehicle
Safety Hotline toll -free at:
Tel.: 1-888-327-4236 (TIY: 1-800-424-9153)
or write to:
Administrator NHTSA
1200 New Jersey Avenue, SE
Washington, D.C. 20590
You can also obtain other information about
motor vehicle safety from:
http://www.safercar.gov
Applicable to Canada
Canadian customers who wish to report a
safety-related defect to Transport Canada, Defect Investigations and Recalls, may tele
phone the toll free hotline:
Tel.: 1-800-333-0371
or contact Transport Canada by mail at:
Road Safety and Motor Vehicle Regulation
Di recto rate
Transport Canada
Tower C, Place de Ville, 330 Sparks Street
Ottawa, ON K1A 0N5
For additional road safety information, please
visit the Road Safety website at:
http://www. tc.gc.ca/roadsafety/menu .htm •
Page 134 of 316
-Safety belts ----=-----------------
& WARNING
Improperly positioned
safety belts can cause serious personal
injury in an accident.
• Expectant mothers must always wear the lap portion of the
safety belt as low as possible across the pelvis and below the
rounding of the abdomen.
• Always read and heed all WARNINGS and other important infor
mation =>
& in "Fastening safety belts" on page 129. •
Unfastening safety belts
Unbuckle the safety belt with the red release button only
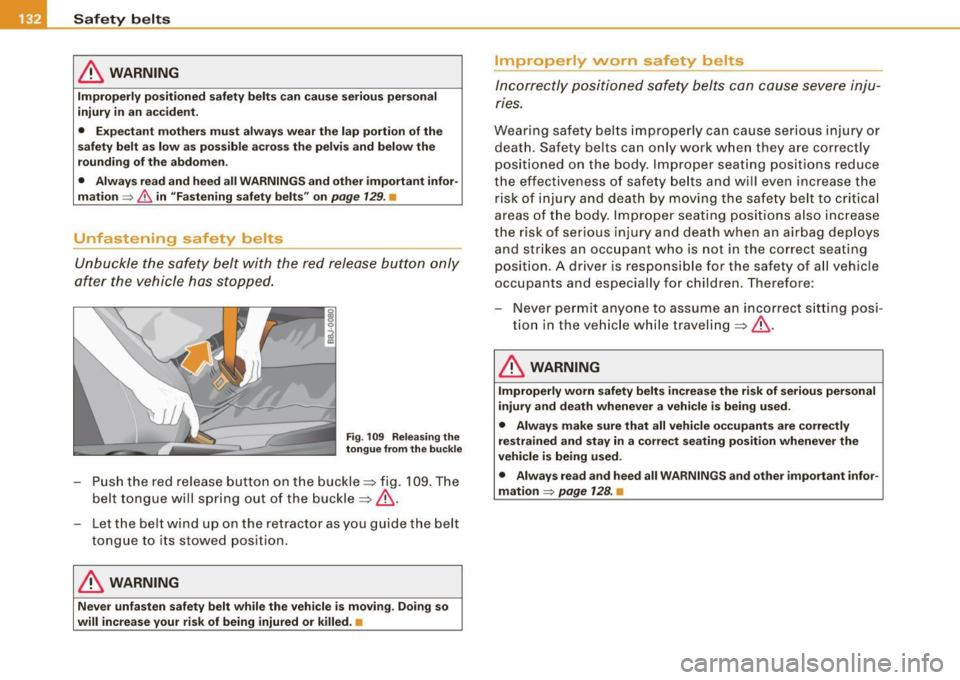
after the vehicle has stopped.
Fig . 109 Releasing the
tongue from the buckle
-Push the red release button on the buckle=> fig. 109. The
belt tongue will spring out of the buckle=>& .
- Let the belt wind up on the retractor as you guide the belt
tongue to its stowed position.
& WARNING
Never unfasten safety belt while the vehicle is moving. Doing so
will increase your risk of being injured or killed .•
Improperly worn safety belts
Incorrectly positioned safety belts can cause severe inju
ries.
Wearing safety belts improperly can cause serious injury or
death. Safety belts can only work when they are correctly positioned on the body. Improper seating positions reduce
the effectiveness of safety belts and will even increase the
risk of injury and death by moving the safety belt to critical
areas of the body. Improper seating positions also increase
the risk of serious injury and death when an airbag deploys
and strikes an occupant who is not in the correct seating
position . A driver is responsible for the safety of all vehic le
occupants and especially for children. Therefore :
- Never permit anyone to assume an incorrect sitting posi
tion in the vehicle while traveling=>&.
& WARNING
Improperly worn safety belts increase the risk of serious personal
injury and death whenever a vehicle is being used.
• Always make sure that all vehicle occupants are correctly
restrained and stay in a correct seating position whenever the
vehicle is being used.
• Always read and heed all WARNINGS and other important infor
mation
=> page 128. •