airbag AUDI TT COUPE 2009 Owners Manual
[x] Cancel search | Manufacturer: AUDI, Model Year: 2009, Model line: TT COUPE, Model: AUDI TT COUPE 2009Pages: 316, PDF Size: 71.16 MB
Page 4 of 316
Table of contents
Table of contents
Vehicle literature ........ .
About this Owner's Manual .............. ...... . .
Controls and
equipment .. .. ... . .. ... ... . .
Cockpi t ... .......... ...... ..... .
Genera l ill ustration ............. .
Instruments and
warning/indica tor lig hts ....... .
Instruments .............. ..... .
Warning/indicator lights ........ .
Driver informa tion system ..... .
Introduction ............... .. .. .
Gearshift recommendation ...... .
Service interval d isplay .... ..... .
On -Boa rd Diag nos tic sys tem (OBD)
Trip computer ..... ... .. ..... .. .
Menu display ............•......
Speed war ning system ....... .. .
Warnings and symbo ls .... ... .. .
O pening and closing .......... .
Keys .......................... .
Powe r loc king system ......... . . 5 Rear
lid/trunk lid .............. .
45
Transmission . . . . . . . . . . . . . . . . . . . 9 9
Anti-theft a larm system ..... ... .
47 Manua l transmiss ion . . . . . . . . . . . . 99
Power w indows ...... ... .... . .
48 S tronic transmission . . . . . . . . . . . 99
Clear vision ................ ... .
6 Lights ........................ . 51
Home
link® . . . . . . . . . . . . . . . . . . . . . 107
51 Universa I remote control . . . . . . . . 107
9
11
11
1 2
12
1 5
22
2 2
23
23
24
25
27
30
32
38
38
41 In
ter io r ligh ts . . . . . . . . . . . . . . . . . . 59
Vis ion . . . . . . . . . . . . . . . . . . . . . . . . . 59
W iper and washer system . . . . . . . 60
M irrors . . . . . . . . . . . . . . . . . . . . . . . . 64
Digi tal compass . . . . . . . . . . . . . . . . 67
Seats and sto rage . . . . . . . . . . . . . 69
Genera l recommendat ions . . . . . . 69
Adjust ing front sea ts manua lly . . 70
Power seats ........ ......... . .
Lumbar support ............... .
Head restraints ........ ..... .. .
Rear sea ts . ... ... . .. ... ... .. .. .
Luggage compar tment ........ .
Roof rack ..... .......... ....• ..
Cup ho lder ... ... ...... ... .. .. .
Asht ray ................ .... .. .
Cigarette ligh ter /socke t ........ .
Storage ............ ....... ... .
Warm and cold .............. . .
Climate cont ro ls ........... ... .
Rear window defogger
Qiil ...•. ..
Heated seats ................. .
On t he road ... .• ..... .... ... ...
Steering ... ... ... ...... ... ... . .
Ignition lock and ignition switch .
Sta rting and stopping the engine
Par king bra ke ... ... ... .. .. .... .
Acoustic parking system ... .. .. .
Cruise control ................. .
Audi magnetic ride ......... ... . 71
Safety first
................ .
74
74 Driving Safe ly .... ............. .
75 General no tes ................. .
76 Proper occupant seating pos itions
79 D river and passenger side fo otwel l
81 Peda l area .................... .
81 Stow ing luggage .............. .
8 2 Report ing Safety Defects ...... . .
83 Sa fety belts ..... ... ... ....... . .
8 5 General no tes ................. .
85 Why safety be lts? .............. .
89 Safety bel ts ..... ... ... ... ... .. .
90 Safety belt pretensioners ....... .
91
Ai rbag system . ...... .......... .
91 Importa nt t hings to know ...... .
92 Fro nt airbags ................. .
93 Monitoring the Advanced Airbag
94 System ....................... .
95 Knee airbags ..... ............. .
96 Side airbags ... ... ............ .
98 1
13
1 14
1 14
116
120
1 2 0
121
123
125
125
126
129
133
135
13 5
139
146
151
154
Page 13 of 316
Cockpit
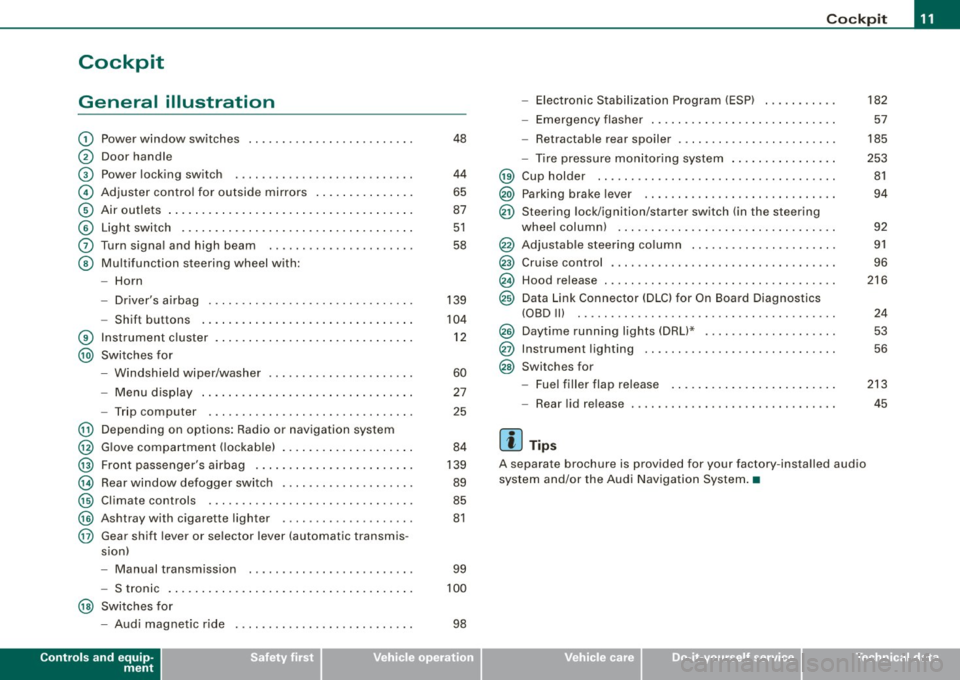
General illustration
G)
0
©
©
©
©
0
©
®
@
Power window switches
Door handle
Pow er lo cking switc h
Adjus te r contro l fo r ou tsid e mirro rs ...... .... ... . .
Air outlets ..... .. . ..... .... .... .. . .... .. . ..... .
Light switch .. ...... .... ... .... .... .... .... ... .
Turn signa l and high beam
Multifunc tion steering wheel with:
- Horn
- Driver's a irbag .... .... ... .... .... .... .... ... .
- Shift b uttons ... .. .... ... .... .... .... .... ... .
Instr um en t cluster . ...... ... .... .. ...... .. .. ... .
Switches for
- Windshield wipe r/wash er ... .... .. ....... .. ... .
- Menu d isplay ...... ... .. .. .... .... .... ... ... .
- Trip computer ..... .. .... .... ...... ....... .. .
@ Depending on options : Radio or navigation sys tem
@ G love compa rtmen t (loc kab le) ... .. .. .. ... .... ... .
@ Front passenger 's airbag .. ...... .. . .... .. .. .... .
@ Rear window defogger switch .... ..... .. .... .... .
@ Climate controls ..... .. .... .... ..... .. ... ... .. .
@ Ashtray wi th cigare tte lighter ....... ............ .
@ Gear shift l ever or s elector lever (automatic transmis -
sion)
48
4 4
65
87
5 1
58
139
104
1 2
60
27
25
84
139
89
85
81
- Manual transm ission . . . . . . . . . . . . . . . . . . . . . . . . . 99
- S tronic . . . . . . . . . . . . . . . . . . . . . . . . . . . . . . . . . . . . . 100
@ Switches for
- Aud i magnetic r ide
Controls and equip
ment
98
Co ckpit
- Electronic Stabilization Program (ESP) . .... .. ... .
- Emerge ncy flasher ... .. .. .. .... .... .... .. . ... .
- Retractab le r ear spoiler .... ...... .... .... .... . .
- Tire pressure mon itor ing system ..... .... .. . ... .
@ Cup holde r ....... .. .... .... .... ... ... ... .. ... .
@) Parking brake lever ... ...... .... ... .. .... .... .. .
@ Ste ering lock/ igni tion/starter switch (in the ste ering
whee l colum n) . .... .. .... ... .... .... .... .... .. .
@ Adjustab le steering co lumn .. .... ...... ... .. .... .
@ Cruise contro l .. .... .... ... .... .... ..... ... .... .
@ Hood release . .... ....... ... ... .. .... .... ...... .
@ Data Link Connector (DLC) for On Board Diagnos tics
(OBD Ill ..... .... ...... ... .. .... .... .... ... ... .
@ Daytime running ligh ts (DRU* ...... .. .... .... ... .
@ Instrumen t lighting .. ... ....... .... ....... ..... .
@ Switches for
- Fue l filler flap releas e .... .. .... .... .... ... ... .
- Rear lid release
[ i ] Tips
A separate b rochure is provided for your factory -ins ta lled audio
system and /or the Audi Navigation System .•
I • •
182
57
185
253 81
94
9 2
91
96
216
24
53
56
213
45
Page 18 of 316
Instruments and warning/indicator lights
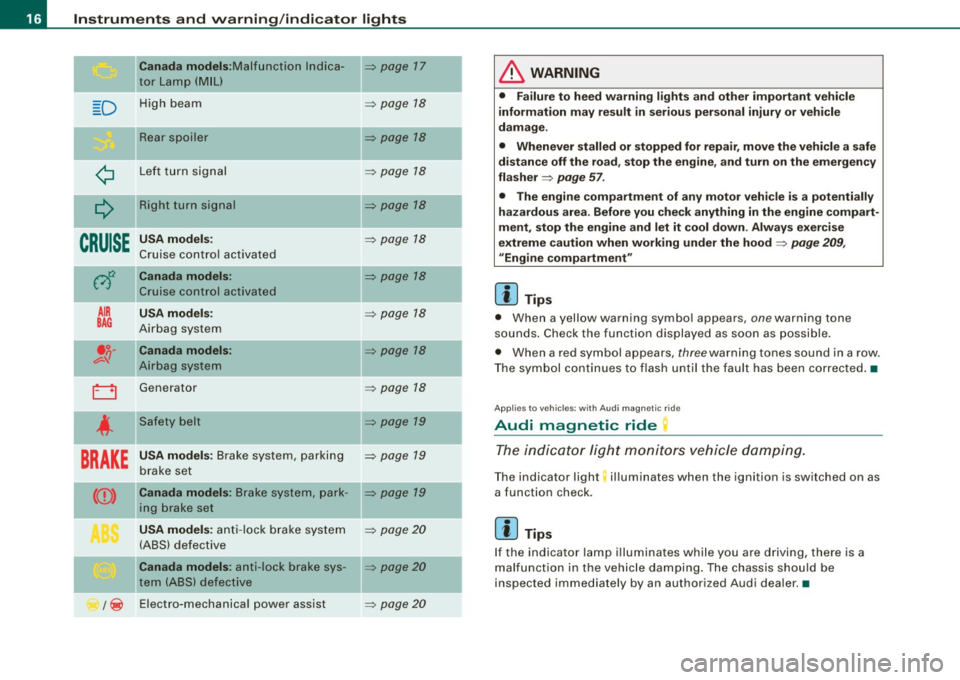
Canada models :M alfunct ion lndica -=> page 17
tor Lamp (MIU
D H ig h beam => page 18
Re ar s po iler => page 18
¢ L ef t tu rn s ignal => page 18
Q
Right turn signal => page 18
CRUISE
USA models: => page 18
Cruise con tro l ac tiva ted
0
Canada models: => page 18
Cr uise con trol activate d
AIR USA models : => page 18
BAG Airbag system
.o. Canada models : => page 18 v-q Airb ag system
0 Generat or => page 18
4
Safety belt => page 19
BRAKE
USA models : Brake system , parking => page 19
b rake se t
CCD> Canada models : Brake syst em, pa rk -=> pa ge 19
in g b rake set
USA models : anti -lo ck b rake s ystem => page 20
(A BS) defect ive
Canada models : anti- lock brake sys -=> page 20
tern (ABS) de fecti ve
/ ~ E
lectro-mechanica l po wer assist
=> page 20
-
-
-
-
& WARNING
• Failure to heed warning lights and other important vehicle
information may result in serious personal injury or vehicle
damage .
• Whenever stalled or stopped for repair, move the vehi cle a safe
distan ce off the road, stop the engine , and turn on the emergen cy
flasher
=> page 57.
• The engine compartment of any motor veh icle is a potentially
hazardous area. Before you check anything in the engine compart
ment , stop the engine and let it cool down . Always exer cise
extreme caution when working under the hood
=> page 209 ,
"Engine compartment "
[ i ] Tips
• When a yellow warn ing symbo l appears, one warning tone
so unds . C heck the function displayed as soon as possible.
• When a red symbol appears,
three warn ing tones sound in a row.
T he symbol contin ues t o flash until the faul t has been co rrec ted .•
Ap plies t o vehi cles: w it h Au di m agn etic r ide
Audi magnetic ride
Th e indi cato r lig ht monitor s vehicle dampin g.
The ind icator light; illuminates when the ignition is switched on as
a function check.
[ i ] Tips
If the indicator lamp i lluminate s while you are d riving, there is a
mal funct ion in the veh ic le da mpin g. Th e c hass is s hou ld b e
inspected immed iately by an authorized Audi dea ler. •
Page 20 of 316
Inst rum ents and w arnin g/indi cat or li ghts
For more information => page 24. •
High beam ~D
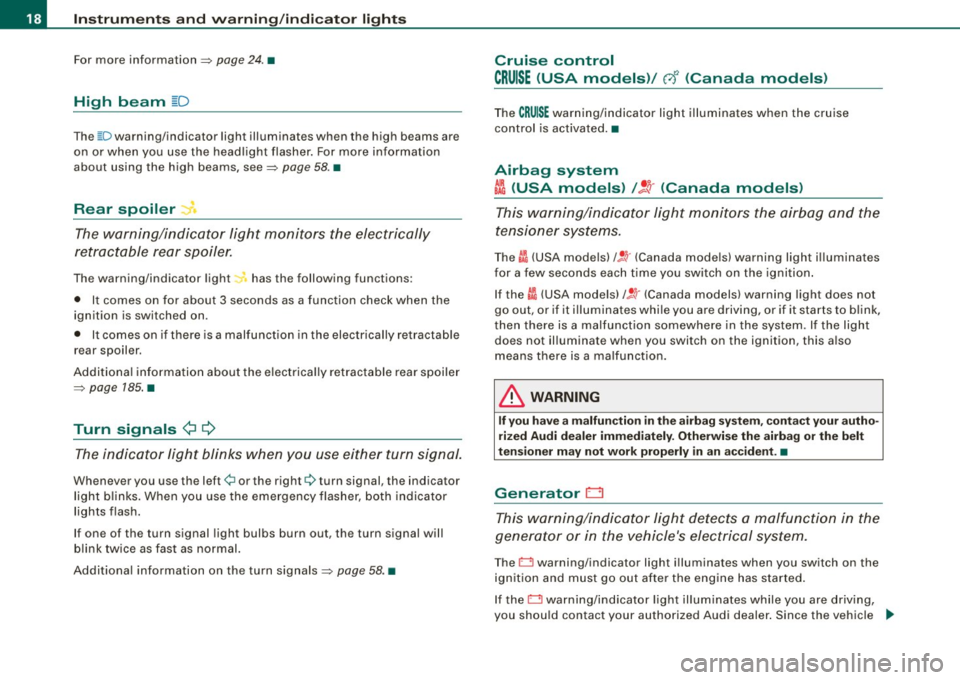
The ~D warning/indicator light illuminates when the high beams are
on or when you use the head light flasher . For more information
about using the high beams, see=>
page 58. •
Rear spoiler
The warning/indicator light monitors the electrically
retractable rear spoiler .
The warning/indicator light~ has the following functions:
• It comes on for about
3 seconds as a function check when the
ignition is switched on.
• It comes on if there is a malfunction in the electrically retractable
rear spoiler.
Additiona l information about the e lectrica lly retractable rear spoiler
=>
page 185. •
Turn signals ¢i Q
The indica tor light blinks when you use either turn signal.
Whenever you use the left¢ or the right¢ turn signal, the ind icator
light blinks. When you use the emergency flasher, both indicator
lights flash.
If one of the turn signal light bulbs burn out, the turn signal will
b link twice as fast as normal.
Additional information on the turn signals=>
page 58. •
Cruise control
CRUISE (USA models) / 0 (Canada models)
The CRUISE warning/indicator light illuminates when the cruise
control is activated. •
Airbag system
~ (USA models) / !_~-{Canada models)
This warning/i ndicator light monitors the airbag and the
tensioner systems .
The ~ (USA mode ls) / !l (Canada mode ls) warning light i lluminates
f or a few seconds each t ime you switch on the ignition .
If the
ffl (USA models) t ! !r (Canada models) warning light does not
go out, or if it i lluminates whi le you are driving, or if it sta rts to b link,
then there is a malfunction somewhere in the system. If the light
does not il luminate when you switch on the ignition, this a lso
means there is a malfunction.
& WARNING
If you ha ve a ma lfun ction in th e air bag sys tem, c ontact y our auth o
ri zed Audi d ealer imm ed ia te ly. Other wise the airb ag or the belt
te nsi oner may not wor k pr op erly in an ac cident . •
Generator 0
This warning/indi cato r light detects a mal function in the
generator or in the vehicle's electrical system.
T he D warning/indicator light i lluminates when you switch on the
ignition and must go out after the engine has started.
I f the
D warning/ind icator light illuminates while you are driving,
you shou ld contact your authorized Audi dealer . Since the vehicle .,_
Page 44 of 316
Opening and closing
[ i J Tip s
• In the event of a crash with airbag deployment all locked doors
will be automatically unlocked to give access to the vehicle occu
pants from the outside .
• If the power locking system should malfunction, you can lock
each door individually using the vehicle key.
• If the power locking system should fail, you can still open the
fue l tank flap in an emergency~
page 215.
• You are well advised not to keep va luables inside an una tten ded
vehic le, visib le or not . Even a properly locked vehic le cannot provide
the security of a safe! •
Unlocking and locking the vehicle vvith the
remote control
How the remote control works .
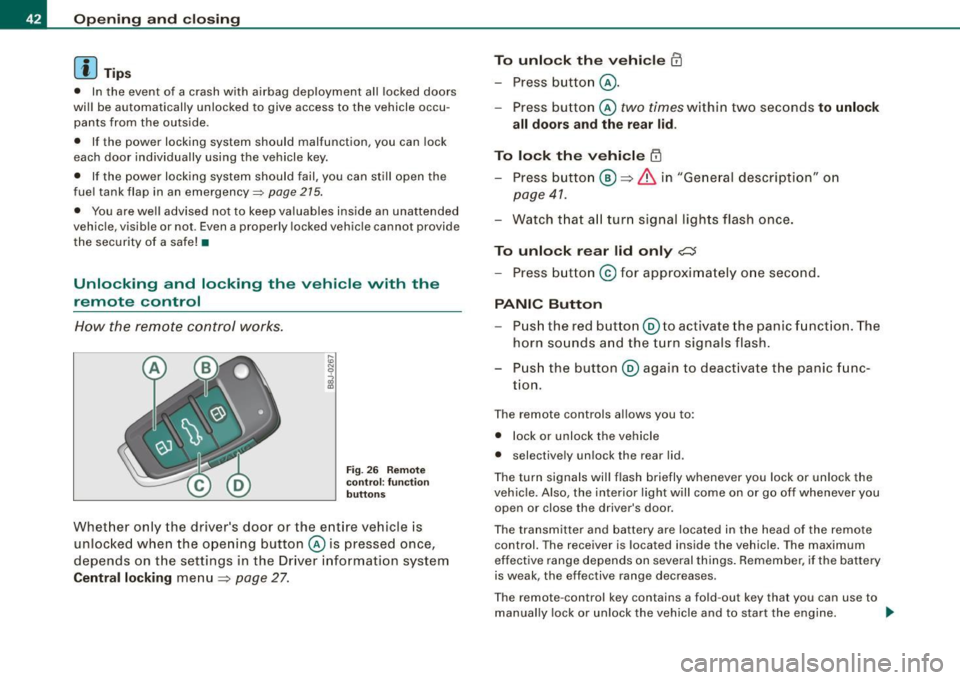
Fig. 26 Remote
co ntro l: functi on
butt on s
Whet her only the driver 's door or the ent ire vehicle is
unloc ked when the ope ning button © is pressed once,
depends on the settings in the Driver information system
Central locking menu
~ page 27.
To unlock th e vehicle CD
- Press b utton @ .
- Press button © two times within two seconds to unlock
all doors and the rear lid .
To lock the vehicle ~
- Press butto n@ ~ & in "Ge neral desc ripti on" o n
page 41.
- Watch t hat a ll turn s ignal lights flash once .
To unlock rear lid only c:J
- Press b utton © for approximately o ne second .
PANIC Button
-Pu sh the re d butto n@ to activate the panic funct ion . The
horn so unds a nd the turn signals flash .
P us h the button ® again to deact ivate the panic f unc
tion.
T he remote controls allows you to :
• l ock or unlock the vehicle
• selective ly unlock the rear lid .
The tu rn signa ls will flash briefly whenever you lock or un lock the
vehicle. Also , the interior light wi ll come on or go off whenever you
open or clos e the driver's door .
The transmitter and battery are located in the head of the remote
control. The receiver is located inside the vehicle. The maximum
effect ive range depends on several things. Remember, if t he battery
is weak , the effective range decreases.
T he remote -control key contains a fo ld -out key that you can use to
manually lock or unlock the vehicle and to start the engine. .,,_
Page 46 of 316
Opening and closing
& WARNING
Alw ay s re ad an d heed WARNIN G => & in uG eneral desc ripti on" on
pag e 41. •
Locking and unlocking the vehicle from inside
The vehicle can be locked or unlocked from the inside
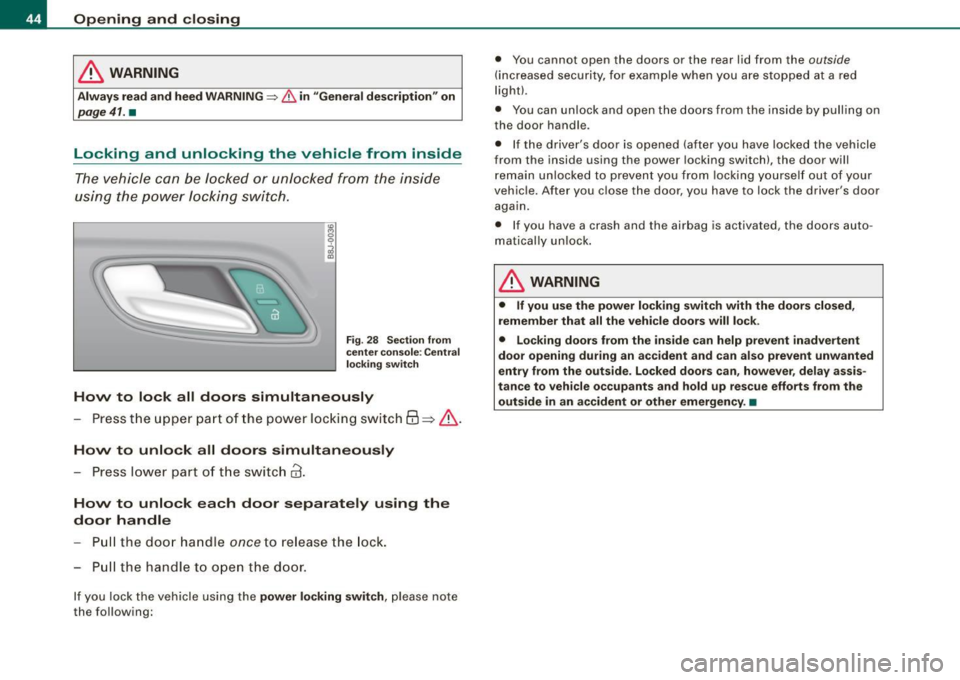
using the power locking switch .
Fig . 28 Sec tion fro m
ce nte r co nsol e: C entr al
lo cking swi tc h
How to lock all doors simultaneously
- Press t he upper part of the power locking switch
63 => & .
How to unlo ck all door s simultan eously
- Press lower part of t he switch
@ .
How to unlock each door separat ely us ing the
door h andle
Pu ll the door handle
once to re lease the lock.
- Pull the handl e to open the door .
If you lock the vehicle using the power locking sw it c h , p lease note
the following: •
You cannot open the doors or the rear lid from the
outside
(increased security, for examp le when you are stopped at a red
light).
• You can unlock and open the doors from the inside by pulling on
the door handle .
• I f the driver's door is opened (after you have locked the vehicle
from the inside us ing the power locking switch) , the door will
remain unlocked to prevent you from locking yourse lf out of your
veh ic le. After you close the door, you have to lock the driver 's door
again.
• If you hav e a crash and the airbag is activated, th e doors auto
matically un lock .
& WARNING
• If y ou us e the p ower lo ck ing switch with the door s close d,
remember th at all the vehi cle doors will lo ck .
• Lock ing door s from the in sid e ca n help pre vent in adver te nt
do or op enin g dur ing an a ccident and can also pre vent unwa nted
entry from the o uts ide . Lo cke d d oors c an, howe ver, de lay ass is
t a nc e to vehicle o ccupant s and h old up re scue efforts from the
out side in an a cciden t or other emergen cy . •
Page 59 of 316

Ignition ON , light swit ch at @ .
With the ignition switched ON, the g low of instrument needles can
be adjusted to appear brighter or dimmer.
Ignition ON , ligh t switch at :oo ; or io.
With the lights switched on , the brightness of instrument cluster
(i .e. needles, gauges and displays) and center conso le i llu m in ation
can be adjusted .
0 Note
The instrument c luster and center console illumination (gauges and
needles) comes on when you switch on the igni tion and the
vehicle
headlights are off .
Be aware of the followin g difference be tween
models built to US o r Canadian specifications :
• USA models : illumination of the in strument cluster (gauges and
needles), dash and center console around the gearshift lever is
controlled by a light sensor located in the instrument panel. The
instrument panel illum ination will automatically become dimmer
as the daylight fades away and eventually will go out completely
when outside light is very low . This is to remind you , the d river , to
s witch on the headlight s before it gets too dark.
• Canada models : instrument panel illum ination will stay br ight
regardle ss of the inten sity of ambient light . Always be aware of
c hanges in outside light conditions while you are driving . Respond
in time to fading dayli ght by turning the light switch to position
iD
(or "AUTO" if your car is equipped with this feature) to turn on your
headlights. •
Bi-Xenon headlights*
Afte r starting the engi ne, the b i- xeno n headlights are au tomatical ly
adjusted to the load and angle of the vehic le (for example, during
acce lera tion and braking). This prevents oncoming traffi c from
experiencing unnecessary headlight g lare from your bi -xenon head
lig hts .
Con tro ls and eq uip
ment
Clear vision
I f the system is not operating properly, a warning symbo l in the
Au to-Check C ontr ol is displayed
=> page 36 . •
Emergency flasher tfft,,.
T he e mergency flasher m akes other motor ists aware that
y o u or yo ur vehicle are i n an e merge ncy si tuation.
Fig . 46 Center
co nsole : emergency
fla sher sw itch
Press the sw itch ~=:,fig. 46, to s witch t he emergency
flasher on or off.
When the emergency flasher is on, all four turn signal blink at the
same time . The tu rn signal indi cato r lights
¢i Q in the instrument
c luster, as well as the light in the emergency flasher switch
J:&. b link
likewise.
The eme rgency flashe r will automat ically switch on i f you are in an
accident where the airbag has deployed .
[ i ] Tips
You should switch on the emergency flasher when:
• you are the last vehicle standing in a traffic jam so that any other
vehicles coming can see you, or when
• your vehicle has broken down or you are in an emergency s itua -
tion, o r when _,,,
Vehicle care I I irechnical data
Page 71 of 316
Seats and storage
General recommendations
Why is your seat adjustment so important?
The safety belts and the airbag system can only provide
maximum protection if the front seats are correctly
adjusted.
There are various ways of adjusting the front seats to provide safe
and comfortable support for the driver and the front passenger.
Adjust your seat properly so that:
• you can easily and quickly reach all the switches and controls in
the instrument panel
• your body is properly supported thus reducing physical stress
and fatigue
• the safety belts and airbag system can offer maximum protec
tion
~ page 135.
In the following sections, you will see exactly how you can best
adjust your seats.
There are special regulations and instructions for installing a child safety seat on the front passenger's seat. Always heed the informa
tion regarding child safety provided in~
page 157, "Child Safety".
& WARNING
Incorrect seating position of the driver and all other passengers
can result in serious personal injury.
• Always keep your feet on the floor when the vehicle is in motion
- never put your feet on top of the instrument panel, out of the
window or on top of the seat cushion! This applies especially to
the passengers. If your seating position is incorrect you increase
the risk of injury in the case of sudden braking or an accident. If
Controls and equip
ment
Seats and storage
& WARNING (continued)
the airbag inflates and the seating position is incorrect this could
result in personal injury or even death.
• It is important for both the driver and front passenger to keep
a distance of at least 10 inches (25 cml between themselves and
the steering wheel and/or instrument panel. If you're sitting any closer than this, the airbag system cannot protect you properly. In
addition to this, the front seats and head restraints must be
adjusted to your body height so that they can give you maximum
protection.
• Always try to keep as much distance as possible between your
self and the steering wheel or instrument panel.
• Do not adjust the driver's or front passenger's seat while the
vehicle is moving. Your seat may move unexpectedly, causing
sudden loss of vehicle control and personal injury. If you adjust
your seat while the vehicle is moving, you are out of position. •
Driver's seat
The correct seat position is important for safe and relaxed
driving.
We recommend that you adjust the driver's seat in the
following manner:
- Adjust the seat in fore and aft direction so that you can
easily push the pedals to the floor while keeping your
knee slightly bent:::>
& in "Why is your seat adjustment
so important?".
Adjust the seatback so that when you sit with your back against the seatback, you can still grasp the top of the
steering wheel. _..
I • •
Page 72 of 316
Seats and storage
- Position the head restraint according to the occupant's height ~
page 74. For maximum protection, the top of
the head restraint should be at least at eye level, prefer
ably higher and ideally level with the top of the head
~ page 119, fig. 98.
& WARNING
Never place any objects in the driver's footwell. An object could
get into the pedal area and interfere with pedal function . In case
of sudden braking or an accident, you would not be able to brake
or accelerate! •
Front passenger's seat
Always move the front passenger seat into the rearmost position.
To avoid contact with the airbag while it is deploying, do not
sit any closer to the instrument panel than necessary and
always wear the three-point safety belt provided adjusted
correctly. We recommend that you adjust the passenger's
seat in the following manner :
- Move the front passenger seat into the rearmost position
of t he fore and aft adjustment range~
& in "Why is
your seat adjustment so important?" on
page 69.
- Bring the backrest up to an (a lmost) upright position . Do
not ride with the seat reclined.
- The ideal position for the head restraint is with the upper
edge of the restraint level with the top of your head
~ page 74. You should not lower the top of the restraint
below the level of your eyes. -
Place your feet on the floor in front of the passenger's
seat. •
Adjusting front seats manually
Applies to vehic les: with manua l seat ad justment
Adjustment controls
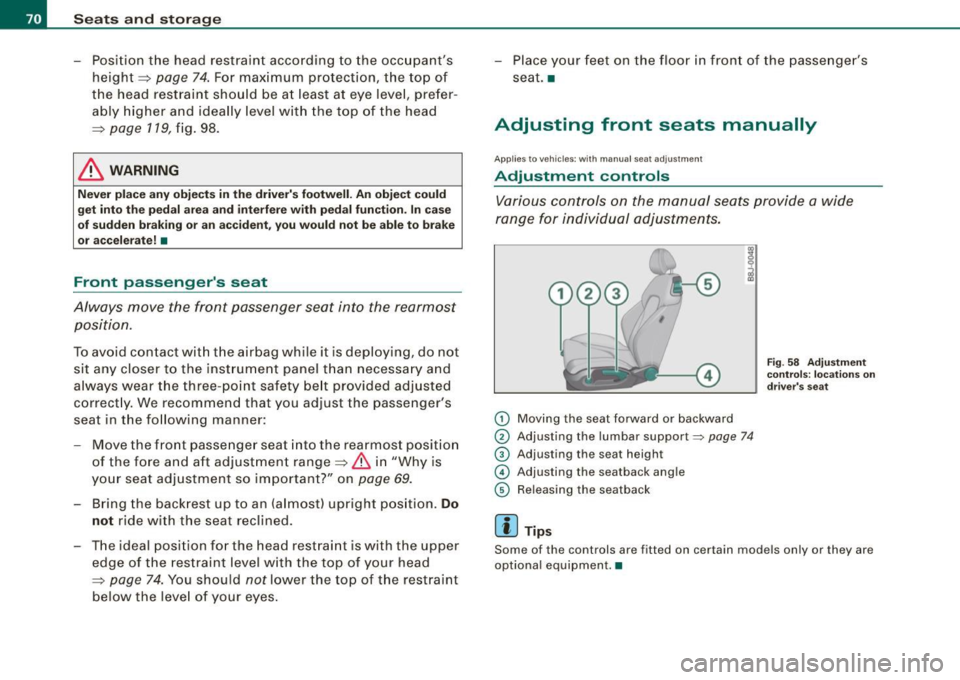
Various controls on the manual seats provide a wide
range for individual adjustments.
0 Moving the seat forward or backward
0 Adjusting the lumbar support~ page 74
® Adjusting the seat height
© Adjusting the seatback angle
© Releasing the seatback
[ i ] Tips
Fig. 58 Adjustment
controls: locations on
driver's seat
Some of the controls are fitted on certain models only or they are
optional equipment. •
Page 73 of 316
Applies to vehicles : wit h m anua l seat a djustment
Adjusting the manual seats
Position, angle and shape of the manual seats can be
adjusted to provide safe and comfortable seating.
Reed and heed all WARNINGS=:> & before you adjust your
seat.
Moving the front seats forward or backward
- Lift the lever (D =:> page 70, fig. 58 and slide the seat to
the desired position.
- Release the lever and then move the seat further until
you feel and hear it engage.
Adjusting the seat height
- Pull
the lever 0 up and pump it to raise the seat.
-Push the lever down and pump it to lower the seat.
Adjusting the seatback angle
-Lean forward to take your weight off the seatback.
- Turn the hand wheel© in the direction you want the
seatback to tilt .
Releasing seat back
-Pull the lever ® up.
- Push the seatback forward.
& WARNING
• Never adjust the driver's or front passenger's seat while the
vehicle is moving. If you do this while the vehicle is moving, you
Controls and equip
ment
Seats and storage
& WARNING (continued)
will be out of position . Always adjust the driver's or front
passenger's seat when the vehicle is not moving.
• Be careful when adjusting the seat height. Check to see that no
one is in the way, or serious injury could result!
• To reduce the risk of injury in the case of sudden braking or
accident, front passengers must never ride in a moving vehicle
with the seatback reclined . Safety belts and the airbag system
only offer maximum protection when the seatback is upright and
the safety belts are properly positioned on the body . The more the
seatback is reclined, the greater the risk of personal injury from an
incorrect seating position and improperly positioned safety
belts! •
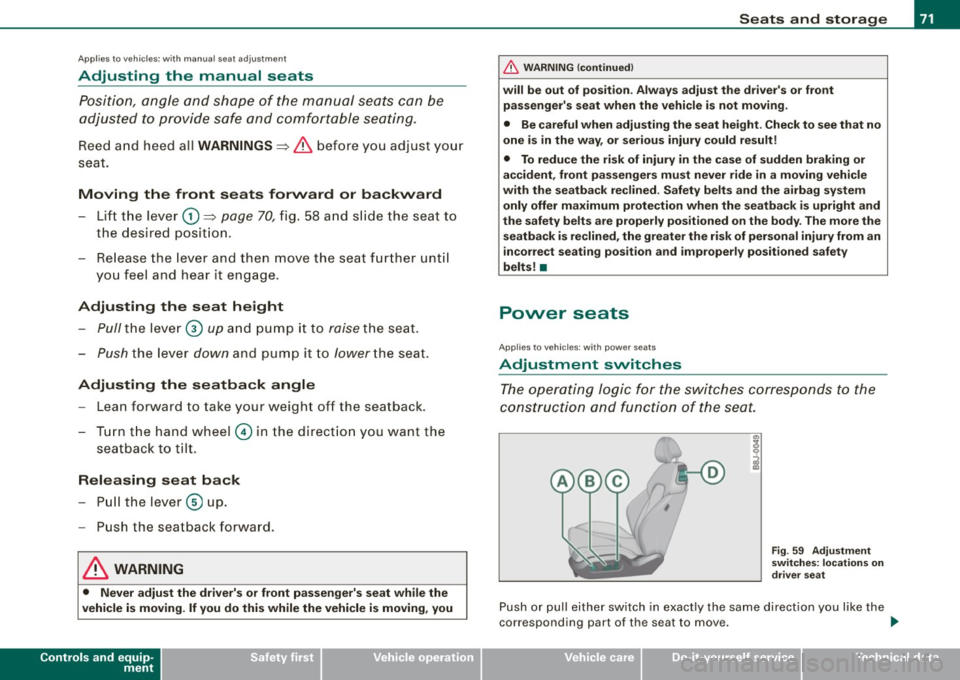
Power seats
Applies to vehi cles : w it h p ower sea ts
Adjustment switches
The operating logic for the switches corresponds to the
construction and function of the seat.
Fig. 59 Adjustment
switches: locations on
driver seat
Push or pull either switch in exactly the same direction you like the
corresponding part of the seat to move. ..,
I • •