wheel AUDI TT COUPE 2009 Owners Manual
[x] Cancel search | Manufacturer: AUDI, Model Year: 2009, Model line: TT COUPE, Model: AUDI TT COUPE 2009Pages: 316, PDF Size: 71.16 MB
Page 13 of 316
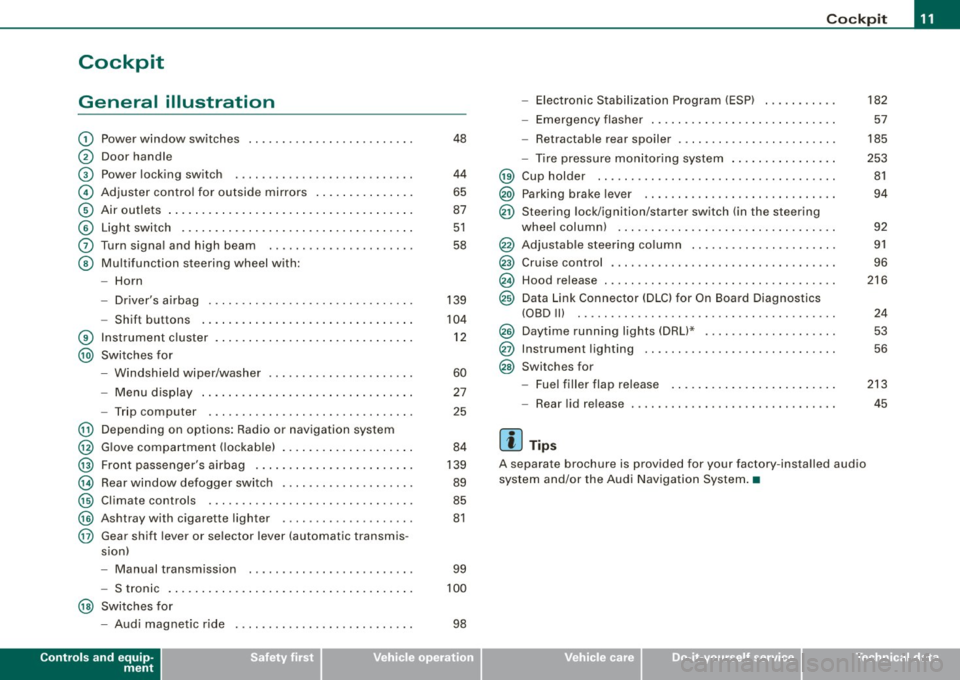
Cockpit
General illustration
G)
0
©
©
©
©
0
©
®
@
Power window switches
Door handle
Pow er lo cking switc h
Adjus te r contro l fo r ou tsid e mirro rs ...... .... ... . .
Air outlets ..... .. . ..... .... .... .. . .... .. . ..... .
Light switch .. ...... .... ... .... .... .... .... ... .
Turn signa l and high beam
Multifunc tion steering wheel with:
- Horn
- Driver's a irbag .... .... ... .... .... .... .... ... .
- Shift b uttons ... .. .... ... .... .... .... .... ... .
Instr um en t cluster . ...... ... .... .. ...... .. .. ... .
Switches for
- Windshield wipe r/wash er ... .... .. ....... .. ... .
- Menu d isplay ...... ... .. .. .... .... .... ... ... .
- Trip computer ..... .. .... .... ...... ....... .. .
@ Depending on options : Radio or navigation sys tem
@ G love compa rtmen t (loc kab le) ... .. .. .. ... .... ... .
@ Front passenger 's airbag .. ...... .. . .... .. .. .... .
@ Rear window defogger switch .... ..... .. .... .... .
@ Climate controls ..... .. .... .... ..... .. ... ... .. .
@ Ashtray wi th cigare tte lighter ....... ............ .
@ Gear shift l ever or s elector lever (automatic transmis -
sion)
48
4 4
65
87
5 1
58
139
104
1 2
60
27
25
84
139
89
85
81
- Manual transm ission . . . . . . . . . . . . . . . . . . . . . . . . . 99
- S tronic . . . . . . . . . . . . . . . . . . . . . . . . . . . . . . . . . . . . . 100
@ Switches for
- Aud i magnetic r ide
Controls and equip
ment
98
Co ckpit
- Electronic Stabilization Program (ESP) . .... .. ... .
- Emerge ncy flasher ... .. .. .. .... .... .... .. . ... .
- Retractab le r ear spoiler .... ...... .... .... .... . .
- Tire pressure mon itor ing system ..... .... .. . ... .
@ Cup holde r ....... .. .... .... .... ... ... ... .. ... .
@) Parking brake lever ... ...... .... ... .. .... .... .. .
@ Ste ering lock/ igni tion/starter switch (in the ste ering
whee l colum n) . .... .. .... ... .... .... .... .... .. .
@ Adjustab le steering co lumn .. .... ...... ... .. .... .
@ Cruise contro l .. .... .... ... .... .... ..... ... .... .
@ Hood release . .... ....... ... ... .. .... .... ...... .
@ Data Link Connector (DLC) for On Board Diagnos tics
(OBD Ill ..... .... ...... ... .. .... .... .... ... ... .
@ Daytime running ligh ts (DRU* ...... .. .... .... ... .
@ Instrumen t lighting .. ... ....... .... ....... ..... .
@ Switches for
- Fue l filler flap releas e .... .. .... .... .... ... ... .
- Rear lid release
[ i ] Tips
A separate b rochure is provided for your factory -ins ta lled audio
system and /or the Audi Navigation System .•
I • •
182
57
185
253 81
94
9 2
91
96
216
24
53
56
213
45
Page 16 of 316
Instruments and warning/indicator lights
& WARNING
• Always observe the warning in =;, page 209 , "Engine compart
ment" before opening the engine hood and checking the engine
coolant level.
• Never open the engine hood if you see or hear steam , or if you
see engine coolant dripping from the engine compartment . You
c ould burn your self. Let the engine cool off first so that you cannot
hear or see any steam or engine coolant .
0 Note
• Mounting additiona l lights or accessories in front of the a ir inlets
reduces the co oling effect of the radiat or. At high outside tempera
tures or h igh engi ne load , the eng ine could overheat.
• The fron t spoile r has been designed t o properly dist rib ute the
coo ling air when the veh icle is mov ing . If the spo iler is damaged,
this could red uce the coo ling effect and the engine cou ld then ove r
heat. Ask your authorized Audi deale r for assistance. •
Fuel gauge
The fuel gauge wor ks only when the ignition is on .
When the needle reaches the red area, the warning light in the instrument cluster w ill illu m ina te =;,
page 35 . Thi s means yo u
have approx imate ly 1.9 gallons (7 litres) of fuel left in the tank.
Time
to refuel!
The tota l tank capacity of your vehicle is listed in=;, page 297. Be
awa re of the diffe rent ta nk capaci ties of front -wheel a nd q uat tro®
a ll- w hee l d ri ve models .
0 Note
Never run the tank comple tely dry! An irre gular suppl y of fuel can
cause engine m isf iring and fuel could enter into the exhaust system.
The catalytic converter could then overheat and be
damag ed. •
Speedometer with odometer
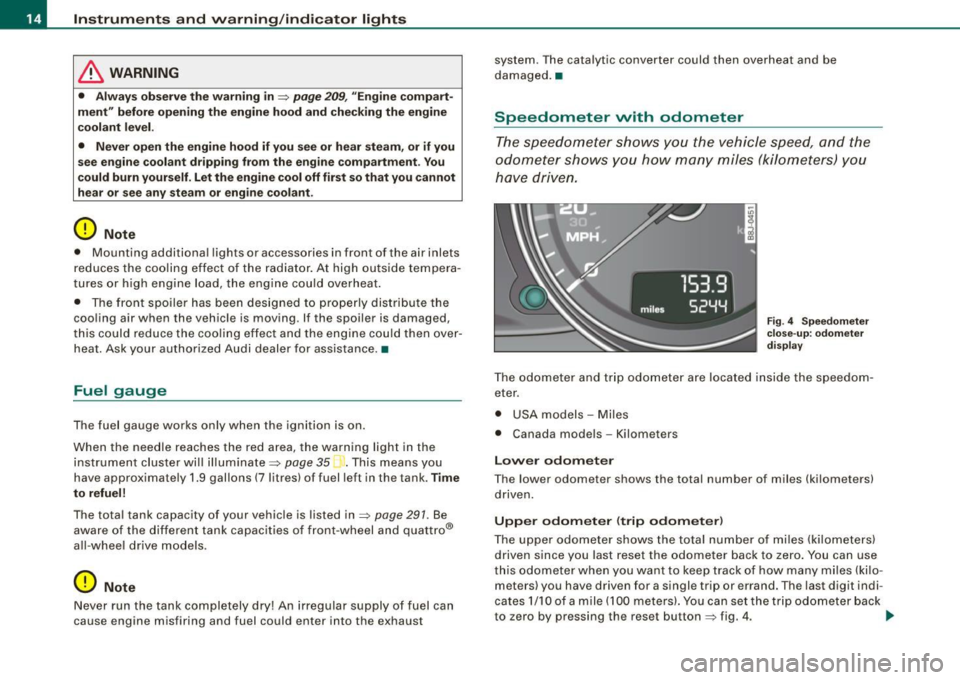
The speedometer shows y ou t he vehicle speed, and the
o dome ter sho ws you ho w ma ny m iles (kilo meters) yo u
hove dri ven.
Fig . 4 Speedomete r
close -up : odomet er
displ ay
T he od ometer an d trip odo mete r are locate d insid e th e spe edom
eter .
• USA model s - Miles
• Canada mode ls - Kilometers
Lower odometer
The lower odometer shows the total number of miles (kilometers)
d riven.
Upper odometer (trip odometer )
The upper o dometer shows the tota l number o f mi les ( kilom eters)
driven since you last reset the odometer bac k to ze ro . You can use
thi s odomete r w hen you want to keep track of how ma ny m iles ( kilo
meters) you have driven for a single trip or errand. The last digit indi
cates 1/10 of a m ile (10 0 meters). You ca n set th e tr ip od o meter back
to zero by pressing the reset button
=;, fig. 4 . ..,,
Page 21 of 316
battery is discharging, you should switch off any unnecessary elec
t rical consume rs (for exa mple, the air co nd itioner) .
0 Note
If the -~- warning/indicato r light (ma lfunc tion i n th e engi ne cool ing
system) in the instrument cluster shou ld illuminate:::::,
page 34, stop
t he vehicle and turn off the engine. The coo lant pump is no t work ing
- t his can cause eng ine damage! •
Applies to vehicles: with safety belt warning light
Safety belt warning light 4
The warning lig ht i s a reminder t o fasten safety belts.
T he warning light 4 comes on for a few seconds after the ignition
i s sw itched o n as a r em inder to fasten your sa fety be lt.
Additiona l information on safety belts :::::,
page 125. •
Brake system BRAKE (USA)/ (CD) (Canada)
Thi s wa rn in g/ind icator light i llumi nate s wh en the brak e
f lu id level is to o low or when t her e is a ma lfunc tion in the
ABS , or w hen the parking brake is set.
The ligh t ill umi nates whe n the igni tio n is t urned on . It goes out afte r
th e e ngine has be en started and the par king brake is fu lly released.
T his indicates that the bra ke warning light i s functioning pro perly.
If the brake warning light does not light up when the engine is
cranking or the parking brake is applied , there may be a malfunction
in the electrical system. In this case , contact your Audi dealer.
If th e ABS fai ls, the ABS warning/i ndicator light , ' (USA
m od els)/ (Ca nada mode ls) fla shes togethe r w ith the b rake sys te m
war ning/i nd icator ligh t:::::, &.
Controls and equip
ment
Instruments and warning /indi cator lights
(USA models): If the warnin g light BRAKE and the warning light
i llu min ate tog eth er, i m me dia te ly co nt ac t your author iz ed Au di
dea ler or qua lified wor kshop to have all brake pads inspected
=> page 36 .
When the li ght c omes on, a n aud ible wa rni ng sig nal i s a lso giv en.
Parking brake set
The BRAKE warnin g/indicator light i llum inates w hen the parking
brake is set:::::,& .
& WARNING
• USA models.: If both, the BRAKE warning light and the C
warning light come on at the same time , the rear wheels could
lock up first under hard braking . Lock -up of the rear wheel brakes
can cause loss of vehicle control and an accident . Have your
vehicle repaired immediately by your authorized Audi dealer or a qualified workshop . Dr ive slowly and avoid sudden , hard brake
appli cation .
• Canada models : If both, the brake warning light CCD> and the ABS
warning light ..,. come on at the same time, the rear wheels could
lock up first under hard braking . Lock -up of the rear wheel brakes
c an cause loss of vehicle control and an a ccident . Have your
vehicle repaired immediately by your authorized Audi dealer or a qualified workshop . Drive slowly and avoid sudden, hard brake
application
• If the brake warning /indicator light does not go out after a few
seconds and the parking brake released, or lights up while you are
driving, the fluid level in the brake fluid reservoir is too low . If you
believe that it is safe to do so, proceed immediately at low speed
to the nearest authorized Audi dealer or qualified workshop and
have the brake system inspected.
• Please be very careful and always keep in mind that after
several brake applications , you will need greater pressure on the
brake pedal to stop your vehi cle . Consequently , you must allow for .,_
I • •
Page 22 of 316
Instruments and warning/indicator lights
& W ARN ING (continued )
increased br aking dist ances . Trying to brake as quickly as usual
c ould lead to an a ccident. •
Anti-lock brake system , e (USA)/
(Canada)
T his war ning/ indic ator ligh t moni to rs the AB S and the
elect ronic diffe ren tial lock (EDL).
The J light wil l come on for a few seconds when the ignition is
swi tc hed on. The light w ill go out aft er a n aut omat ic check seque nce
is completed.
There is a malfunction in the
ABS when :
• T he warning/indicator light does not il luminate when you switch
on the ign ition.
• T he wa rning/indicator light does not go out after a few seconds.
• The wa rnin g/ind ica tor light il luminates wh ile driv in g.
The brake system will still respond even without the assistance of
the ABS system. See your authorized Audi dealer as soon as poss ible to restore full braking performan ce . For more information
regard ing the ABS ~ page 187.
The ABS warning light and the brake warning light come on
together . The ABS will not work and you will notice a change in
braking response and performance .
Malfunction in the brake system USA models: If both, t he
BRAKE warning light and the ,,[ warning
light co me on ~ page 79when the pa rking b ra ke is r eleased, there
may be a mal function in t he ABS , and t here may also be a malfunc
tion in the brake system itself ~ & .
Canada model s: If bo th, the b rake warn ing l ig ht
(Ci) and the ABS
warning light : come on~ page 79when the parking brake is released, there may be a malfunction in the ABS, and there may also
b e a ma lfunc tio n in t he b rake system itself~ & .
Malfun ction in the electronic differential lock (EDL )
T he two sys te m s ED L and ABS w ork together . The L warning ligh t
wi ll come on if there is a malfunction in the EDL system~ page 184.
See you r au thori zed A udi deale r as so on as possible.
& WARNING
• If the "warning light does not go out , or if it comes on while
driving , the ABS system is not working properly . The vehi cle can
then be stopped only with the brakes operating without ABS support . You will not have the protection ABS provides . Contact
your Audi dealer as soon as possible.
• USA models : If both , the
BRAKE w arning light and the
warning light come on at the same time, the rear wheels could lock up first under hard braking . Lock-up of the rear wheel brakes
can cause loss of vehicle control and an accident . Have your
vehicle repaired immediately by your authorized Audi dealer or a
qualified workshop. Drive slowly and avoid sudden, hard brake
appli cation .
• Canada models: If both, the brake warning light CCI» and the ABS
warning light come on at the same time , the rear wheels could
lock up first under hard braking. Lock -up of the rear wheel brakes
c an cause loss of vehi cle control and an a ccident . Have your
vehicle repaired immediately by your authorized Audi dealer or a
qualified workshop. Drive slowly and avoid sudden , hard bra ke
application •
Electro-mechanical power assist l / @
If the indicato r light i lluminates while you a re d riv ing, t here i s a
malfunction in the e lectro -mechanica l steering . If the indicator light
is showing , there may be a reduction in powe r stee ring assist. If
t h e ind icator light is show ing® , there may be a total loss o f power
~
Page 36 of 316
Driver information system
Parking brake set
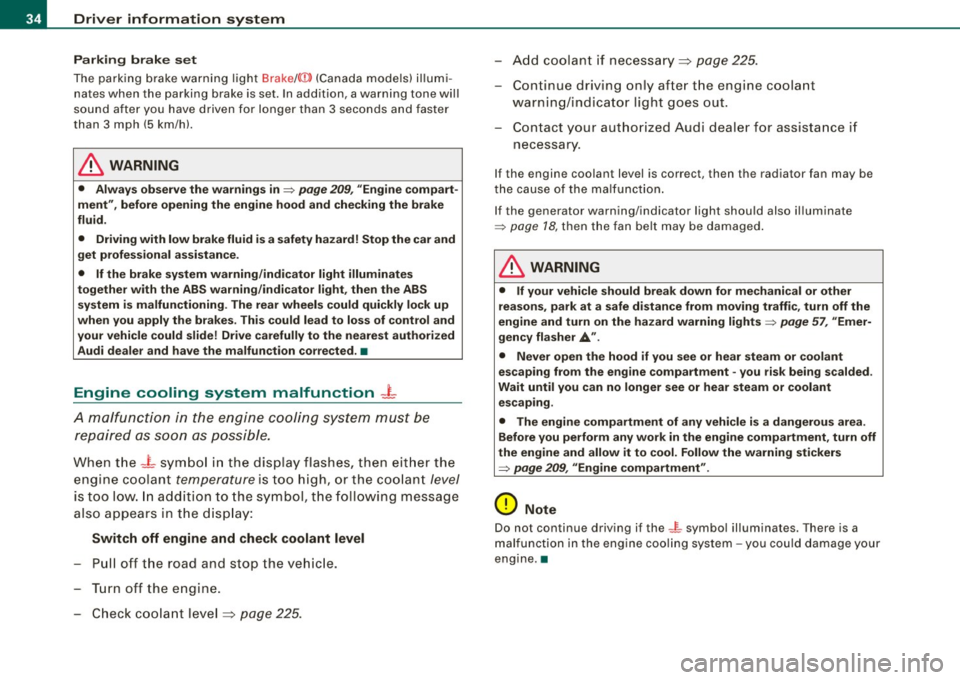
The parking brake warning light Brake /((D) (Canada models) illumi
nates when the parking brake is set. In addition , a warning tone will
sound after you have driven for longer than 3 seconds and faster
than 3 mph (5 km/h).
L1}. WARNING
• Always observe the warnings in => page 209, "Engine compart
ment", before opening the engine hood and checking the brake
fluid.
• Driving with low brake fluid is a safety hazard! Stop the car and
get professional assistance.
• If the brake system warning/indicator light illuminates
together with the ABS warning/indicator light, then the ABS system is malfunctioning. The rear wheels could quickly lock up
when you apply the brakes. This could lead to loss of control and
your vehicle could slide! Drive carefully to the nearest authorized
Audi dealer and have the malfunction corrected. •
Engine cooling system malfunction ¾
A malfunction in the engine cooling system must be
repaired as soon as possible.
When the _t symbol in the display flashes, then either the
engine coolant
temperature is too high, or the coolant level
is too low. In addition to the symbol, the following message
also appears in the display:
Switch off engine and check coolant level
-Pull off the road and stop the vehicle.
- Turn off the engine.
- Check coolant level
~ page 225.
-Add coolant if necessary ~ page 225.
-Continue driving only after the engine coolant
warning/indicator light goes out.
- Contact your authorized Audi dealer for assistance if
necessary .
If t he engine coolant lev el is correct, then th e radia tor fan may be
the cause of the malfunction.
If the gene rator warning/indicator light should also illuminate
=> page 18, then the fan belt may be damaged.
L1}. WARNING
• If your vehicle should break down for mechanical or other
reasons, park at a safe distance from moving traffic, turn off the
engine and turn on the hazard warning lights
=> page 57, "Emer
gency flasher A" .
• Never open the hood if you see or hear steam or coolant
escaping from the engine compartment -you risk being scalded.
Wait until you can no longer see or hear steam or coolant escaping.
• The engine compartment of any vehicle is a dangerous area.
Before you perform any work in the engine compartment, turn off
the engine and allow it to cool. Follow the warning stickers
=> page 209, "Engine compartment" .
0 Note
Do not continue driving if the-~- symbol illuminates. There is a
malfunction in the engine cooling system -you could damage your
engine .•
Page 58 of 316

Clear vision
Coming home situation
In
darkness, the activated system will turn on the headlights, side
marker lights , rear side marker lights , tail lights, and rear license
plate light as soon as the driver's door is opened from inside.
As long as one of the doors or the rear lid remains open, the set of
external lights will keep burning for about four minutes maximum.
To provide light for departure, the set of vehicle lights will keep
burning for about another 30 seconds after all doors and the rear lid
have been closed.
The factory-set time of 30 seconds until the lights are switched off can be adjusted if you prefer a longer or shorter duration. Have the
adjustment done by your authorized Audi dealer or a qualified work
shop. The system can be adjusted to keep the lights burning for a
maximum of 60 seconds.
Leaving home situation
As soon as the vehicle is unlocked by pressing the
CD button on your
remot e control, the set of external l ights is switched on .
The external lights are switched off as soon as the driver's door is
opened from outside . Even if you had the system readjusted to keep
the lights burning for an extended time for coming home, the
external lights will be turned off if you do not open the driver's door
within 60 seconds after unlocking. See chapter "Opening and
Closing" in your Owner's Manual. If the lights are switched off
before you reach the driver's door, press the@ button once more to
turn them on again.
[ i] Tips
• Do not attach any stickers to the windshield in front of the two
light sensors, as this would interfere with both the automatic oper
ation of the headlights and the automatic dimming of the inside
mirror(s). • If
the vehicle is remotely unlocked and locked three times in
succession, leaving home will not turn on the lights a fourth time to
safeguard the battery and lights.
• If you wish to use the coming home/leaving home function regu
larly, you can leave it activated at all times without risking perma
nent strain on the electrical system. As the system is controlled by
light sensors, it will only be energized in darkness .
• Frequent use of the coming home/leaving home function for
approaching and departing a vehicle parked in the dark will strain
the battery. This applies particularly if only short distances are
driven between stops . Occasionally drive longer distances to make
sure the battery is recharged sufficiently.
• If the fog lights have been switched on by the coming
home/leaving home function, they will always be switched off when
you switch on the ignition. •
Instrument panel illumination
The illumination of the instruments, displays and the
center console can be adjusted.
Fig. 45 Instrument
panel illumination
You regulate the brightness of the instruments with the left
thumbwheel
C J=> fig. 45. ~
Page 60 of 316
Clea r vis io n
• your vehicle is being towed by a tow truck or if you are towing
another vehicle behind you. •
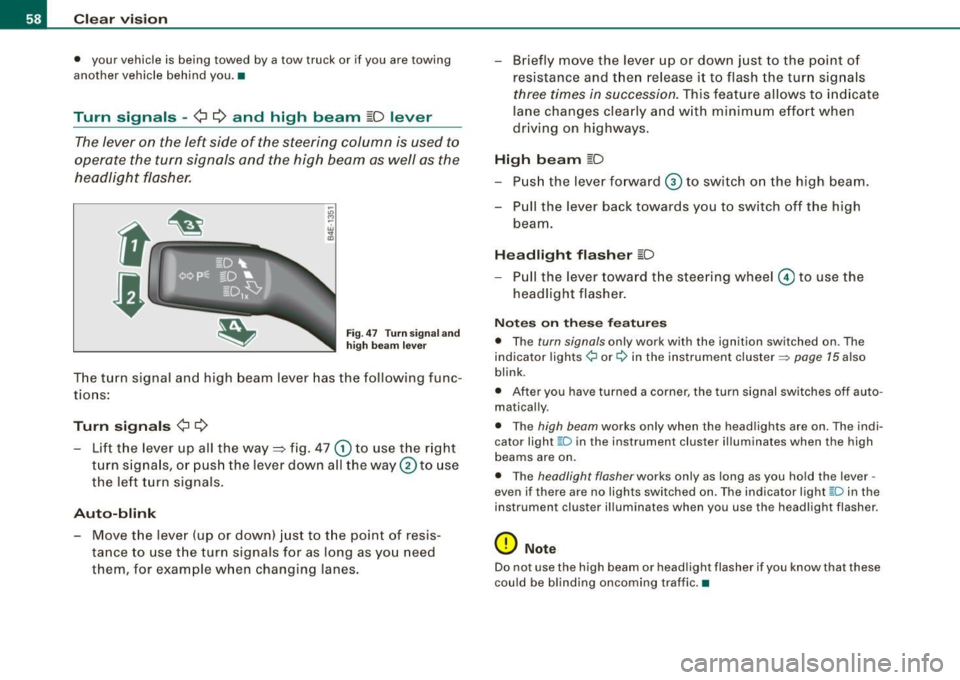
Turn signals -¢ ¢ and high beam ~D lever
The lever on the left side of the steering column is used to
operate the turn signals and the high beam as well as the
headlight flasher.
F ig. 47 Tu rn signa l a nd
h igh beam lever
The turn signal and high beam lever has the following func
tions:
Tu rn s ig na ls ¢ Q
- Lift the lever up all the way ::::, fig . 47 G) to use the right
turn s igna ls, or push the lever down all the way
0 to use
the le ft turn signals .
Auto-blink
- Move the lever (up or down) just to the point of resis
tance to use t he turn signals for as long as you need
them, for example when changing lanes. - Briefly move the
lever up or down just to the point o f
resistance and then release it to flash the turn signals
three times in succession. This feature allows to indicate
lane changes clearly and w ith minimum effort when
driving on highways.
Hi gh b eam [D
- Push the lever forward © to switch on the high beam.
- Pull the lever back towards you to switch off the high beam.
Headlight fl ash er [D
- P ull the lever toward the steering wheel© to use the
headlight flasher .
Notes o n these fea tures
• The turn signals only work with the ignition switched on . The
indicator lights ¢ or¢ in the instrument cluster => page 15 also
blink.
• After you have turned a corner, the turn signal switches off auto
matically.
• The high beam works only when the head lights are on. The indi
cator light ~D in the instrument cluster ill uminates when the high
beams are on.
• The headlight flasher works only as long as you hold the lever -
even if there are no lights switched on. The ind icator light ~D in the
instrument cluster illuminates when you use the headlight flasher.
0 Note
Do not use the high beam or head light flasher if you know that these
could be blinding oncoming traffic. •
Page 62 of 316

Clear vision
ically . It turns off when the lid is closed and the visor is folded up
again .
Between the visors for the driver and the passenger there is a
folding visor which can be used to cover the space above the rear
view mirror .•
Wiper and washer system
Windshield wiper -$
The windshield wiper lever controls bo th the windshield
wipers and the washer system.
Fi g. 50 Wiper l ever:
wind shie ld w iper l eve r
po sit io ns
T he windshield wipe r lever => fig. 50 has the fo llowing posi
t io ns:
Intermittent wiping <5;)1 (activating rain sensor)*
Move t he leve r up to pos ition G) .
- Move the in terva l set switch @, to change the in te rvals .
Low wiper speed
-Move the leve r up to pos ition @ .
High wiper sp eed
- Move the lever u p to position ®·
One-touch wiping
- Mov e the lev er t o posi tion 0 , w hen you wa nt to w ipe t he
windshield
briefly.
Automatic wiper /washer
- Pull the lever to position © (toward the steering wheel)
and hold.
- Release t he lever . The was her stops and the wipers keep
going for about four seconds.
Turning off the wipers
- Mov e the lever bac k t o posi tio n ®·
The windshield wipers and washer only work when the ign ition is
turned on. If you switch off the ignition with the windshield wiper
l ever still in the interval wipe p osition and the n come back a while
later and drive off , the rain sensor will reactivate itse lf after the
vehic le speed has exceeded 4 mph (6 km/h) .
The rai n se nsor* is only activa ted wit h the wiper lever set to posi
tion
G) . When it starts to rain , the rain sensor wil l automatically acti
vate the in termittent wipi ng mode .
To reduce the sens itiv ity of the sensor, move switch© down . To
increa se the sensitivity, move the switch up . The h igher you adjust
the sensitivity, the faster the sensor will react when it senses mois
ture on the w indshie ld. The pauses between wiper turns depend not
only on the sens itivity setting, but on the vehicle speed as well.
During brief stops, e .g . at a red light, wiper motion will automati
cally be reduced to the next lower speed. Wipers a lready turning at
low speed . change to intermittent wiping .
When the ignition is turned on, the washe r jets are heated. ...
Page 71 of 316
Seats and storage
General recommendations
Why is your seat adjustment so important?
The safety belts and the airbag system can only provide
maximum protection if the front seats are correctly
adjusted.
There are various ways of adjusting the front seats to provide safe
and comfortable support for the driver and the front passenger.
Adjust your seat properly so that:
• you can easily and quickly reach all the switches and controls in
the instrument panel
• your body is properly supported thus reducing physical stress
and fatigue
• the safety belts and airbag system can offer maximum protec
tion
~ page 135.
In the following sections, you will see exactly how you can best
adjust your seats.
There are special regulations and instructions for installing a child safety seat on the front passenger's seat. Always heed the informa
tion regarding child safety provided in~
page 157, "Child Safety".
& WARNING
Incorrect seating position of the driver and all other passengers
can result in serious personal injury.
• Always keep your feet on the floor when the vehicle is in motion
- never put your feet on top of the instrument panel, out of the
window or on top of the seat cushion! This applies especially to
the passengers. If your seating position is incorrect you increase
the risk of injury in the case of sudden braking or an accident. If
Controls and equip
ment
Seats and storage
& WARNING (continued)
the airbag inflates and the seating position is incorrect this could
result in personal injury or even death.
• It is important for both the driver and front passenger to keep
a distance of at least 10 inches (25 cml between themselves and
the steering wheel and/or instrument panel. If you're sitting any closer than this, the airbag system cannot protect you properly. In
addition to this, the front seats and head restraints must be
adjusted to your body height so that they can give you maximum
protection.
• Always try to keep as much distance as possible between your
self and the steering wheel or instrument panel.
• Do not adjust the driver's or front passenger's seat while the
vehicle is moving. Your seat may move unexpectedly, causing
sudden loss of vehicle control and personal injury. If you adjust
your seat while the vehicle is moving, you are out of position. •
Driver's seat
The correct seat position is important for safe and relaxed
driving.
We recommend that you adjust the driver's seat in the
following manner:
- Adjust the seat in fore and aft direction so that you can
easily push the pedals to the floor while keeping your
knee slightly bent:::>
& in "Why is your seat adjustment
so important?".
Adjust the seatback so that when you sit with your back against the seatback, you can still grasp the top of the
steering wheel. _..
I • •
Page 73 of 316
Applies to vehicles : wit h m anua l seat a djustment
Adjusting the manual seats
Position, angle and shape of the manual seats can be
adjusted to provide safe and comfortable seating.
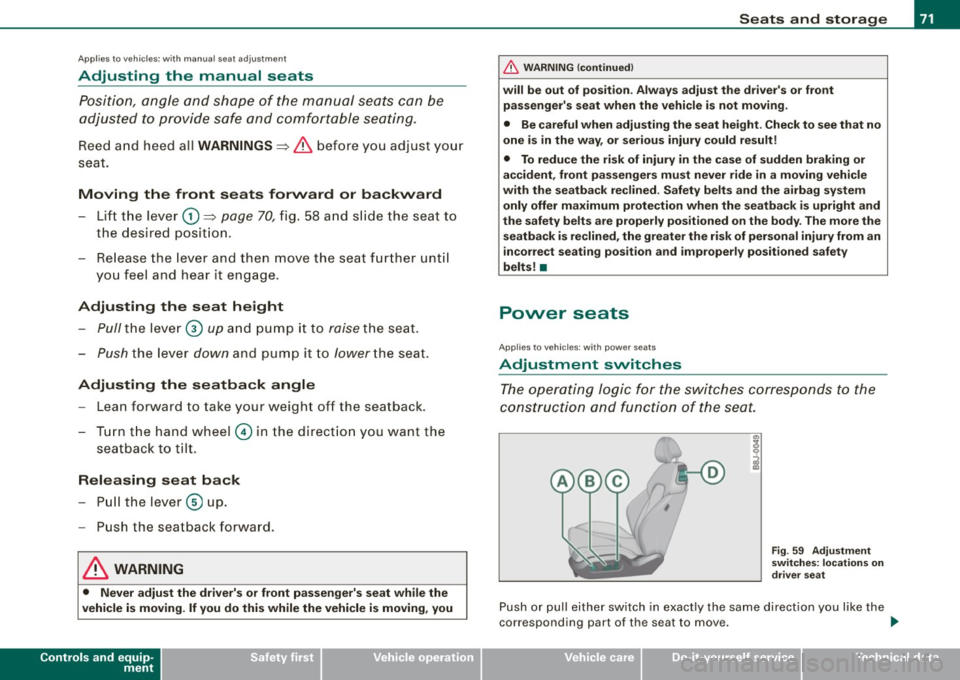
Reed and heed all WARNINGS=:> & before you adjust your
seat.
Moving the front seats forward or backward
- Lift the lever (D =:> page 70, fig. 58 and slide the seat to
the desired position.
- Release the lever and then move the seat further until
you feel and hear it engage.
Adjusting the seat height
- Pull
the lever 0 up and pump it to raise the seat.
-Push the lever down and pump it to lower the seat.
Adjusting the seatback angle
-Lean forward to take your weight off the seatback.
- Turn the hand wheel© in the direction you want the
seatback to tilt .
Releasing seat back
-Pull the lever ® up.
- Push the seatback forward.
& WARNING
• Never adjust the driver's or front passenger's seat while the
vehicle is moving. If you do this while the vehicle is moving, you
Controls and equip
ment
Seats and storage
& WARNING (continued)
will be out of position . Always adjust the driver's or front
passenger's seat when the vehicle is not moving.
• Be careful when adjusting the seat height. Check to see that no
one is in the way, or serious injury could result!
• To reduce the risk of injury in the case of sudden braking or
accident, front passengers must never ride in a moving vehicle
with the seatback reclined . Safety belts and the airbag system
only offer maximum protection when the seatback is upright and
the safety belts are properly positioned on the body . The more the
seatback is reclined, the greater the risk of personal injury from an
incorrect seating position and improperly positioned safety
belts! •
Power seats
Applies to vehi cles : w it h p ower sea ts
Adjustment switches
The operating logic for the switches corresponds to the
construction and function of the seat.
Fig. 59 Adjustment
switches: locations on
driver seat
Push or pull either switch in exactly the same direction you like the
corresponding part of the seat to move. ..,
I • •