spare wheel AUDI TT COUPE 2009 Owners Manual
[x] Cancel search | Manufacturer: AUDI, Model Year: 2009, Model line: TT COUPE, Model: AUDI TT COUPE 2009Pages: 316, PDF Size: 71.16 MB
Page 242 of 316
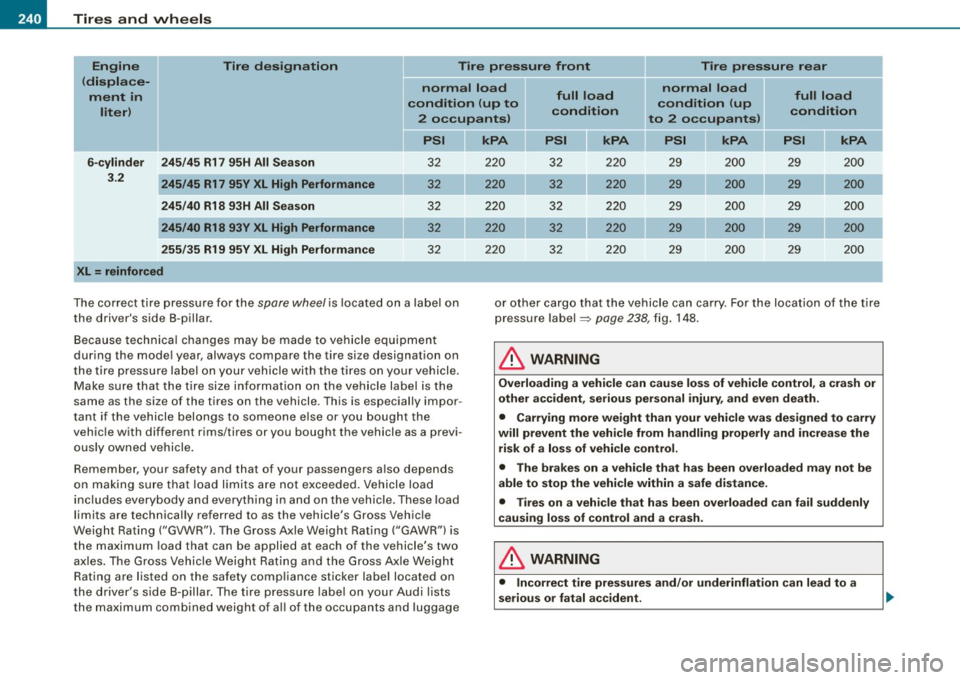
-~_T_ ir_e_ s_ a_ n_d _ w_ h_ e_e _l_s _________________________________________________ _
Engin e
(displa ce
ment in
lit er) Tire designation
Tir
e pressure front Tire pressure rear
normal load full load normal load
full load
condition (up to condition c
ondition (up
condition
2 o ccupants ) to 2 occupants)
6 -cylinder
3.2 245
/45 R1 7 95H All Season
245 /45 R17 95V XL High Performan ce
245 /40 R18 93H All Season
245 /40 R18 93V XL High Performan ce
255 /35 R19 95V XL High Performance
XL
= reinforced
PSI
32
32
32
32
32
The correct tire pressure for the spare wheel is located on a label on
the driver's side B-pillar .
Because technica l changes may be made to vehicle equip ment
during the mode l year, always compare the tire size designat ion on
the tire pressure la bel on y our vehicle with the tires on your vehicle.
Make sure tha t the t ire size information on the veh icle labe l is the
same as the size of the tires on the vehicle. Th is is especially impor
t ant if the vehicle belongs to someone e lse or you boug ht the
vehic le with different rims/tires or you bought the vehicle as a previ
ously owned vehicle.
Remember, your safety and that of your passengers a lso depends
on making su re tha t load limits a re not exceeded . Vehi cle loa d
inc ludes everybody and everything in and on the vehicle. These load
limits are technically referred to as the vehicle's Gross Vehicle
Weight Rating ("GVW R"). The Gross Axle Weight Rating ("GAWR") is
the maximum load that can be applied at each of the vehicle's two
ax les. The Gross Vehicle We ight Rat ing and the Gross Ax le Weig ht
Rating are listed on the safety comp liance sticker labe l located on
t he driver's side B- pillar. The tir e pressure labe l on y our Audi lists
the maximum combined weight of a ll of the occupants and luggage
kPA PSI kPA kPA kPA
220 32 220 29 2 00 29 200
220 32 220 29 200 29 200
220 3 2 220 29 2 00 29 200
220 32 220 29 2 00 29 200
220 3 2 220 29 200 29 200
or other ca rgo that the veh ic le can carry. For the location o f the t ire
pressure label::::;, page 238, fig. 148.
& WARNING
Overloading a vehi cle can cause loss of vehicle control , a crash or
other accident, serious personal injury, and even death .
• Carrying more weight th an your vehicle was de signed to carry
will prevent the vehicle from handling properly and increase the
risk of a loss of vehicle control.
• The brakes on a vehicle that has been overloaded may not be
able to stop the vehicle within a safe distance .
• Tires on a vehicle that has been overloaded c an fail suddenly
causing loss of control and a crash .
& WARNING
• Incorrect tire pressures and/or underinflation can lead to a
s erious o r fatal a ccident .
Page 248 of 316
___ T_ i_ r_e _s_ a_ n_ d_ w_ h_ e_ e _ ls _________________________________________________ _
New tires and replacing tires and wheels
New tires and wheels have to be broken in.
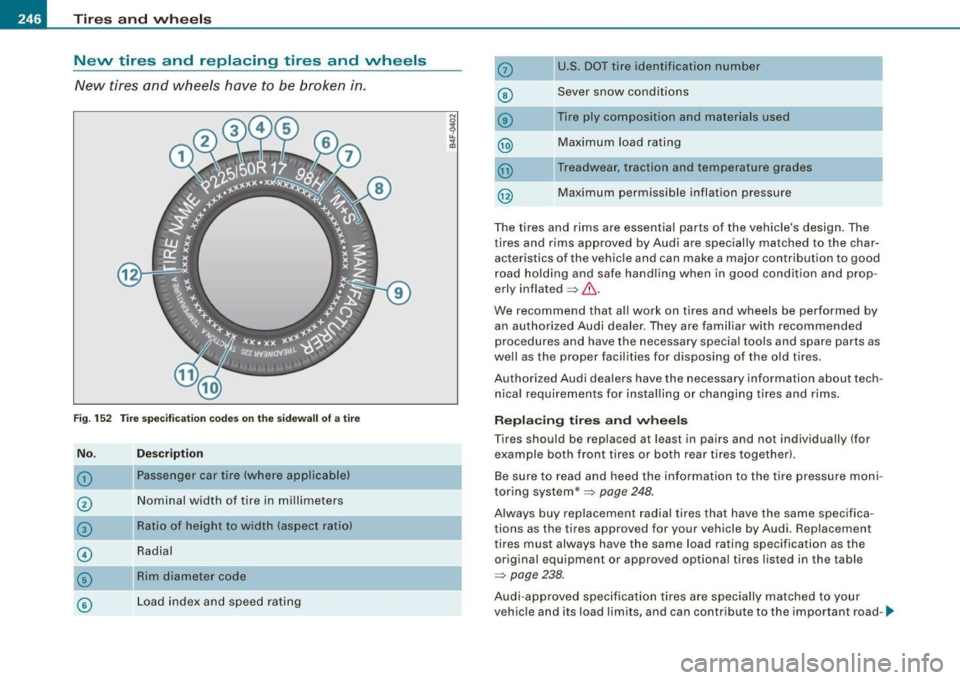
F ig . 1 52 Tir e spec ifi cati on co des o n the sid ewa ll of a t ire
No . Desc ription
G)
®
©
©
©
©
Passenger car tire (where a pplicable)
Nominal width of tire in mi llimeters
Ratio of he ight to width (aspect ratio)
Radial
Rim diameter code
Load index and speed rating
0
©
©
@
@
U.S. DOT tire identification number
Sever snow conditions
Tire ply composition and materials used
Maximum load rating
Treadwear, traction and temperature grades
@ Maximum permissible inflation pressure
The tires and rims are essential parts of the vehicle's design. The
tires and rims approved by Audi are special ly matched to the char
acteristics of the vehicle and can make a major contribution to good
road ho lding and safe hand ling when in good cond ition and prop
erly inflated
~ & .
We recommend that all work on tires and wheels be performed by
an authorized Audi dealer . They are familiar with recommended
procedures and have the necessary special too ls and spare parts as
well as the proper facilities for disposing of the old tires.
Authorized Audi dea lers have the necessary information about tech
n ical requirements for insta lling or changing tires and rims .
Replacing tires and wheel s
Tires should be replaced at least in pairs and not individual ly (for
example both front tires or both rear tires together) .
Be sure to read and heed the information to the tire pressure moni
toring system *~ page
248 .
Always buy replacement radial tires tha t have the same specifica
tions as the tires approved for your vehicle by Audi . Replacement
tires must always have the same load rating specification as the
original equipment or approved optiona l tires listed in the table
~ page 238.
Audi -app roved specification tires are specially ma tched to your
vehic le and its load limits, and can contribute to the important road-~
Page 251 of 316

________________________________________________ T.:......... ir--=e :....:s:......: a--=n..:.. d.::..:..... w..:....:.... h :....:..:e:....:e:..: 1-=s :...__IJlll
•
& W ARNING (continu ed )
• All four wheels must be fitted with radial tire s of the same type ,
s ize (rolling cir cumference ) and the same tread pattern . Driv ing
with different t ires redu ces vehicle h andling and can lead to a loss
of contro l.
• If the spare tire is not the same a s the tires that are mounted
on the vehicle -for e xample with winter tires -only use the spare
tire for a short period of time and dr ive with extra c are . Refit the
norm al road wheel as soon as safely possible .
• Never drive faster than the maximum speed for which the tires
on your vehicle are rated because tires that are driven faster than
their rated speed can fail suddenly .
• Overloading tires cause heat build-up , sudden tire failure ,
including a blowout and sudden deflation and loss of control.
• Temperature grades apply to t ires that are properly inflated and
not over or underinflated .
• For te chnical reasons it is not always possible to use wheels
from other vehicles -in some cases not even wheels from the
same vehicle model.
• If you install wheel trim discs on the vehicle wheels , make sure
that the air flow to the brakes is not blo cked . Redu ced airflow to
the brakes can them to overheat , in creasing stopp ing distances
and causing a collision .
• Run flat tires may only be u sed on vehicle s that were equipped
with them at the fa ctory . The vehicle must have a chassis de signed
for run flat tires and a factory -installed tire pressure monitoring
system* that indicates a loss of tire pressure. In correct use of run
flat tires can lead to vehicle damage or accidents . Check w ith an
autho riz ed Audi dealer or tire specialist to see if your vehicle can
be equipped with run flat tires . If run flat tires are used, they must
be installed on all four wheel s. Mixing tire types is not permitted .
0 Note
• For techn ica l reaso ns, it is not genera lly poss ib le to use t he
whee l rims from other vehicles. This can hold true fo r wheels of the
same vehicle type .
• I f the s pare t ire is d ifferent from the tires that you have mounted
on your vehicle ( fo r example win te r ti res or wide p rofile tires), then
use the spa re tire for a short period of time on ly and drive with extra
care. Replace t he flat tir e w ith the tire matching the others o n your
vehic le as soon as possib le.
• If you s hould put different whee ls a nd tires on your ve hic le (e.g.
winter wheels and tires), you must be certain that the whee ls and
t ires are co mpa tibl e w ith the tire pressure mon itor in g syste m*.
Otherwise the system w ill reg ister a malfunction and a fault
m essage w ill be d isplayed . For more info rma tion, co ntact your Aud i
dea ler.
0 Note
• When installing new tires, be careful not to damage the va lves or
tire p ressu re m on itoring system senso rs* .
• N ever drive without the valve stem cap. The valves could get
da mage d.
• I f the sensors must be replaced, then the valve must also be
r eplaced at the same time.
ci> For the sake of the environment
Dis p ose o f old tir es in acco rdance with the local requ ireme nts .•
Uniform tire quality grading
• Tread wear
• Traction AA A B C
• Temperature A B C
Vehicle care
I t •
Page 257 of 316

Tires and wheels -
----------------
•
& WARNING (continued)
• Do not adjust tire pressure when tire temperature is excessive.
This could lead to serious tire damage and even cause the tire to
burst, with the additional danger of an accident.
tread life.
[ i] Tips
• Each tire should be checked monthly when the temperature of
the tires is about the same as ambient air temperature and set to the
recommended inflation pressure as specified on the tire pressure
label =>
page 238.
• The factory supplied spare wheel is equipped with a sensor for
the tire pressure monitoring system *. As long as the spare wheel is
not mounted, the tire pressure of this tire will not be monitored.
• The tire pressure monitoring system * helps the driver to keep an
eye on tire pressures. But the driver still has the responsibility for
maintaining the correct tire pressure.
• Tire pressure must only be adjusted when the temperature of the
tires is about the same as ambient air temperature.
• When tires are replaced, the sensors and valves should not be
exchanged . The valve core, nut, valve sealing and seal washer
(replacement kit) needs to be replaced. If necessary, the valve and
the wheel electronics have to be replaced.
• If you should put different wheels and tires on your vehicle (e.g.
winter wheels and tires), you must be certain that the wheels and
tires are compatible with the tire pressure monitoring system*.
Otherwise the system will register a malfunction and a fault
message will be displayed. For more information, contact your Audi
dealer. •
Adjust the tire pressure and store the pressure in the tire pres
sure monitoring system* to the load you are carrying.
• For Declaration of Compliance to United States FCC and Industry
Canada regulations =>
page 296. •
Applies to vehicles : with tire pressu re mon itoring system
Significant loss of air pressure }
The yellow symbol appears in the event of a significant
loss of air pressure.
Fig. 153 Display:
yellow symbol with message
If the I warning light in the instrument cluster comes on
and then the(•' symbol appears in the display ~ fig. 153,
pressure in at least one tire is too low.
- Stop driving as soon as possible without endangering
yourself and other drivers on the road.
Inspect all tires.
- Change the tire if necessary ~
page 268.
The, warning light in the instrument cluster comes on when the
tire is significantly underinflated .
In addition, the tire symbol
J appears in the display together with
the message Please check tire pressure=> fig. 153. .._
Vehicle care
I t •
Page 258 of 316
___ T_ i_ r_e _s_ a_ n_ d_ w_ h_ e_ e _ ls _________________________________________________ _
After a few seconds, the message disappears again. If you would
like to show the message again, press the Set/Check button
=>
page 72 , fig. 2@ .
[ i) Tips
• In the case of an intentional loss of air pressure, for example,
when re -adjusting tire pressure, this has to be stored again after
wards=>
page 256.
• Tire pressure must only be adjusted when the temperature of the
tires is about the same as ambient air tempera ture.
• The yellow symbol disappears, when the tire pressure is
correc ted and the new pressure is stored in the system=>
page 256.
• After changing a wheel or replacing a wheel with the spare tire
you have to adjust the tire pressures on all wheels. In addition , you
must then initialize the new tire pressures in the tire pressure moni
toring system*=>
page 257. •
Ap plies to vehicles: w ith tir e pressure monitor in g system
Storing tire pressures
Correct storage of specified pressure is the basic require
ment for reliable tire pressure monitoring.
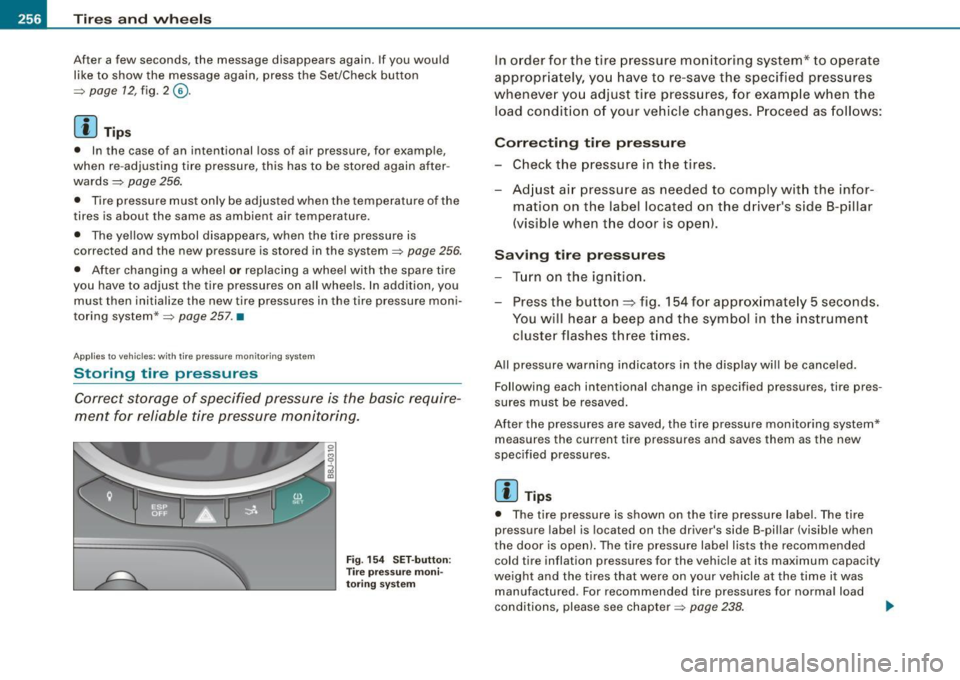
Fig. 154 SET-button :
Tire pressure moni
toring system
In order for the tire pressure monitoring system* to operate
appropriately, you have to re-save the specified pressures
whenever you adjust tire pressures, for example when the
load condition of your vehicle changes . Proceed as follows:
Correcting tire pressure
Check the pressure in the tires.
Adjust air pressure as needed to comply with the infor mation on the label located on the driver's side B -pillar
(vis ible when the door is open).
Saving tire pressures
Turn on the ignition.
Press the button=> fig. 154 for app roximately 5 seconds.
You will hear a beep and the symbol in the instrument
cluster flashes three times.
All pressure warning indicators in the display will be canceled.
Following each intentional change in specified pressures, tire pres
sures must be resaved.
After the pressures are saved, the tire pressure monitoring system* measures the current tire pressures and saves them as the new
specified pressures.
[ i J Tips
• The tire pressure is shown on the tire pressure label. The tire
pressure label is located on the driver's side B-pillar (visible when
the door is open). The tire pressure label lists the recommended cold tire inflation pressures for the vehicle at its maximum capacity
weight and the tires that were on your vehicle at the time it was
manufactured . For recommended tire pressures for normal load
conditions, please see chapter
=> page 238. .,_
Page 259 of 316

________________________________________________ T_ i _r_e _s_ a_n_ d_ w_ h_ e_e _ l_s __ !II
•
• The tire pressure monitoring system * helps the driver to keep an
eye on tire pressures. But the driver still has the responsibi lity for
maintaining the correct tire pressure .•
Applies to vehicles: with tire pressure mon itorin g system
Wheel change
If a wheel is changed, the wheels that were exchanged
have to be re-programmed .
- Turn on the ignition.
- Press the button~
page 256, fig. 154 for approximately 5
seconds. You will hear a beep and the symbol in the button flas hes three times.
Programming is necessary :
• after the tires have been rotated on the vehicle, or the spare tire
is used,
• if tires with new wheel sensors are used .
A ll pressure warning indicators in the display will be canceled. The
system malfunction error message wil l not disappear until the
vehicle is underway . With pressing the button~
page 256, fig. 154,
the re -programming of the new sensors and storing of ac tua l pres
sures starts. This learning phase can take up to 10 minutes driving
time .
During the learning process the tire pressure monitoring system* is
not avai lable. •
Applies to veh ic les: with tir e pressure monitoring system
Malfunctions •
A malfunction can have various causes.
F ig . 155 Display:
S yst e m m alfun ctio n
If the .J., warning light in the instrument cluster flashes for approxi
mately one minute and then remains continuously illuminated and
additional ly the T ~~ fig. 155 symbol appears in the display, the
tire pressure mon itoring system* is not available. This can have
various causes.
• If the message appears at the end of the lear ning process, the
system cannot recognize the wheels installed on the vehicle. This
can be because one or more wheels without a wheel sensor were
insta lled.
• A wheel sensor or other component may have failed .
• During initialization the system has detected more than 4 wheels
on the vehicle, for example whi le driving next to another car with a
tire pressure monitoring system*.
• A whee l change was made but the button
~ page 256 , fig. 154
was not pressed.
• Audi replacement parts were not used.
• I f snow chains are being used, system function can be compro
mised due to the shielding properties of the chains .
• The tire pressu re monitoring system* may not be available
because of a radio malfunction .
Vehicle care I t •
Page 274 of 316

-What d o I do novv ? P'cV:IL--.....:...:..:....:....:.:...:..::......;..;____ ___________ _
Taking the vvheel off
Follow these instructions step-by-step for changing the
wheel.
Fig. 166 Wheel
c han ge: usi ng th e
screwdriver handl e
!w ith t he b lade
re move d) to tu rn th e
bolts
F ig . 16 7 W hee l
c h a ng e: a lig nm ent p in
in side th e top ho le
After you have lo ose ned all wheel bolts and raised the
vehicle off the gro und , pe rform the following steps to
remove and replace the wheel :
Removing th e vvh eel
- Use t he
he xagonal sock et in th e sc rewdriver handle to
completely turn out the topmost wheel bo lt and set it
aside on a
clean surface => fig. 166. -
Screw the t hreaded en d of the
alignm ent pin from the
tool kit hand -tight into t he now vacant bo lt hole
=> fig . 167.
- Then comple tely unscrew the other wheel bolts as
described above .
- Take off the whee l leaving the alignment pin in the bolt
hole .
Putting on the vvhe el
- Lift the spare wheel and carefully s lide it over the align
ment p in to gu ide it in place.
- Use t he he xag onal socket in the sc rewdriver hand le t o
screw in and tig hten all whee l bolts
slightly.
Unscrew the alignment p in and insert and tighten t he
remai ning wheel bol t slightly like the rest.
- Tu rn the jack handle counter -c lockw ise to lower the
ve hicle until the jack is fully released.
- Use the whee l bolt w rench to tighten all wheel bolts
firmly =>
page 270. Tighten them crosswise , from one
bolt to the (approximately) opposite one, to keep the
wheel centered .
[ i ] Tip s
Never use the hexagonal socket in the handle of the screwdriver to
loosen or tighten the wheel bolts .
• Pull the reversible blade from the screwdriver before you use the
hexagonal socket in the handle to turn the wheel bolts.
• When mounting tires with
unid ire cti on al t re ad de sign make sure
the tread pattern is pointed the right way=>
page 273. ~
Page 275 of 316
What do I do now? -
----------------
•
• The whe el bo lts should be cl ean and easy to turn . C heck for dirt
an d corro sion on the mati ng s urfaces o f both th e wheel a nd the
hub. Remove a ll dirt fro m these surfaces before remountin g the
whee l.•
Notes on wheel change
Ple as e rea d th e informati on => pag e 246 , "New tir es an d r ep laci ng
tir es and whee ls", if you ar e goin g to us e a spar e tire which is
d ifferent from th e tir es on y our v ehic le .
After you ch ange a tire :
• Check the tire pressure on the spare immediately after
mounting.
• Have the wheel bolt tightening torque checked with a torque
wrench as soon as possible by your authorized Audi dealer or a qualified service station .
• With steel and alloy wheel rims, the wheel bolts are correctly
tightened at a torque of 90 ft lb (120 Nm l.
• If you notice while changing a tire that the wheel bolts are
corroded and difficult to turn , then they should be replaced before
you check the tightening torque.
• Replace the flat tire with a new one and have it installed on your
vehicle as soon as possible . Remount the wheel cover.
Until then , drive with extra care and at reduced speeds .
& WARNING
• If you are going to equip your vehicle with tires or rims which
differ from those which were factory installed , then be sure to read
the information
=> page 246, "New tires and replacing tires and
wheels ".
• Always store the tools securely in luggage compartment .
Otherwise, in an accident or sudden maneuver they could fly
forward, causing injury to passengers in the vehicle.
0 Note
D o not us e comme rc ia lly av ai labl e tire sea lants. Otherw ise, t he elec
trical components of the ti re pressure monitor ing system* will no
l o nger wor k properly a nd the se ns or fo r the tire pr essure moni
to ring system will have to be rep laced b y a qualified workshop. •
Tires with unidirectional tread design
T ires w ith unid ire ction al tread design must be m ounted
w ith their tread patte rn po inted t he r ight dire ction.
A un id irectiona l tir e ca n be iden tified by arrows on the sidewall ,
w hi ch point in th e dir ec tion of the r otation. You mus t follow th e
specified direction of rotati on. T his is necessa ry in o rder fo r these
t ire s to de ve lop their optimum ch arac ter ist ics rega rdin g grip, r oad
noise, wear, and h ydroplaning .•
Do-it -yourself service
Page 297 of 316
__________________________________________________ C_o_ n _ s_u_ m_ e ___ r_l_ n _f_ o_ r _m...:....:.. a:.;..:. ti .... o:.. n ........ _lllll
& WARNING (continued)
• The engine compartment of any motor vehicle is a potentially
hazardous area. Never reach into the area around or touch the
radiator fan. It is temperature controlled and can switch on
suddenly -even when the engine is off and the ignition key has
been removed. The radiator fan switches on automatically when
the coolant reaches a certain temperature and will continue to run
until the coolant temperature drops .
• Always remove the ignition key before anyone gets under the
vehicle.
• Always support your vehicle with safety stands if it is neces
sary to work underneath the vehicle. The jack supplied with the
vehicle is not adequate for this purpose and could collapse
causing serious personal injury.
• If you must work underneath the vehicle with the wheels on
the ground, always make sure the vehicle is on level ground, that
the wheels are always securely blocked and that the engine
cannot be started .
• Always make sure the transmission selector lever (automatic
transmission) is in "P" (Park position) (automatic transmission) or
Neutral (manual transmission) and the hand brake is firmly
applied.
<£> For the sake of the environment
• Changing the engine settings will adversely affect emission
levels. This is detrimental to the environment and increases fuel
consumption .
• Always observe environmental regulations when disposing of
old engine oil, used brake fluid, dirty engine coolant, spent batteries
or worn out tires.
• Undeployed airbag modules and pretensioners might be classi
fied as Perchlorate Material -special handling may apply, see
www.dtsc.ca.gov/hazardouswaste/perchlorate . When the vehicle or
parts of the restraint system including airbag modules safety belts
Controls and equip ment Safety first Vehicle operation with pretensioners are scrapped, all applicable laws and regula
tions must be observed. Your authorized Audi dealer is familiar with
these requirements and we recommend that you have your dealer
perform this service for you. •
Additional accessories,
modifications and parts replacement
Additional accessories and parts
replacement
Always consult an authorized Audi dealer before
purchasing accessories.
Your vehicle incorporates the latest safety design features ensuring
a high standard of active and passive safety.
This safety could be compromised by non -approved changes to the
vehicle. For this reason, if parts have to be replaced, please observe
the following points when installing additional accessories:
Approved Audi accessories and genuine Audi parts are available
from authorized Audi dealers .
These dealers also have the necessary facilities, tools and trained specialists to install the parts and accessories properly .
& WARNING
Using the wrong spare parts or using non-approved accessories
can cause serious personal injury.
• Use only accessories expressly approved by Audi and genuine
Audi spare parts
• These parts and accessories have been specially designed to
be used on your vehicle.
• Never install accessories such as telephone cradles or
beverage holders on airbag covers or within the airbag deploy-
Vehicle care Do-it-yourself service Tec hn ica l da ta