battery AUDI TT COUPE 2014 Owners Manual
[x] Cancel search | Manufacturer: AUDI, Model Year: 2014, Model line: TT COUPE, Model: AUDI TT COUPE 2014Pages: 284, PDF Size: 34.42 MB
Page 6 of 284
Downloaded from www.Manualslib.com manuals search engine Table
of Contents
Service and care . . . . . . . . . . . . . . . . . . 217
Checking and topping up fluids . 217
Fuel ............................... 217
Filling the tank ...................... 218
Emission control systems . . . . . . . . . . . . .
220
Engine compartment . . . . . . . . . . . . . . . . .
220
Engine oil . . . . . . . . . . . . . . . . . . . . . . . . . .
223
Cooling system . . . . . . . . . . . . . . . . . . . . . .
224
Brake fluid . . . . . . . . . . . . . . . . . . . . . . . . .
226
Battery . . . . . . . . . . . . . . . . . . . . . . . . . . . .
226
Windscreen washer . . . . . . . . . . . . . . . . . . 229
Service interval display
229
Wheels and tyres . . . . . . . . . . . . . . . . 231
Wheels . . . . . . . . . . . . . . . . . . . . . . . . . . . . 231
Tyre pressure loss indicator . . . . . . . . . . . .
234
Care of vehicle and cleaning . . . . . 236
General notes . . . . . . . . . . . . . . . . . . . . . . . 236
Washing the vehicle .. . . . . . . . . . . . . . . . .
236
Notes on cleaning and care . . . . . . . . . . . . 237
Taking the vehicle out of service . . . . . . . .
240
Self-help . . . . . . . . . . . . . . . . . . . . . . . . . . 241
Mobility . . . . . . . . . . . . . . . . . . . . . . . . . . 241
General notes . . . . . . . . . . . . . . . . . . . . . . . 241
Equipment . . . . . . . . . . . . . . . . . . . . . . . . . 241
Tyre repair kit . . . . . . . . . . . . . . . . . . . . . . . 242
Changing a wheel . . . . . . . . . . . . . . . . . . . . 244
Spare wheel . . . . . . . . . . . . . . . . . . . . . . . .
247
Jump-starting . . . . . . . . . . . . . . . . . . . . . . . 248
Tow-starting/ towing away . . . . . . . . . . . .
250
Fuses and bulbs . . . . . . . . . . . . . . . . . .
254
Fuses.............................. 254
Bulbs......... ..................... 256
Technical data and accessories . . 257
Technical data . . . . . . . . . . . . . . . . . . . . 257
Vehicle identification data . . . . . . . . . . . . . 257
Dimensions . . . . . . . . . . . . . . . . . . . . . . . . . 257
Capacities . . . . . . . . . . . . . . . . . . . . . . . . . . 258
Explanation of technical data . . . . . . . . . . 258
4 Petrol
engines . . . . . . . . . . . . . . . . . . . . . .
259
Diesel engine . . . . . . . . . . . . . . . . . . . . . . .
259
Accessories and modifications
to the vehicle . . . . . . . . . . . . . . . . . . . . .
260
Accessories, replacement parts and
repairs . . . . . . . . . . . . . . . . . . . . . . . . . . . . 260
Modifications . . . . . . . . . . . . . . . . . . . . . . .
260
Radio transmitters and business
equipment . . . . . . . . . . . . . . . . . . . . . . . . . 261
Component protection . . . . . . . . . . . . . . . 261
Environmental compatibility . . . . . . . . . . . 262
Index .............. ............... 263
Page 12 of 284
Downloaded from www.Manualslib.com manuals search engine Instruments
and warning/indicator lamps
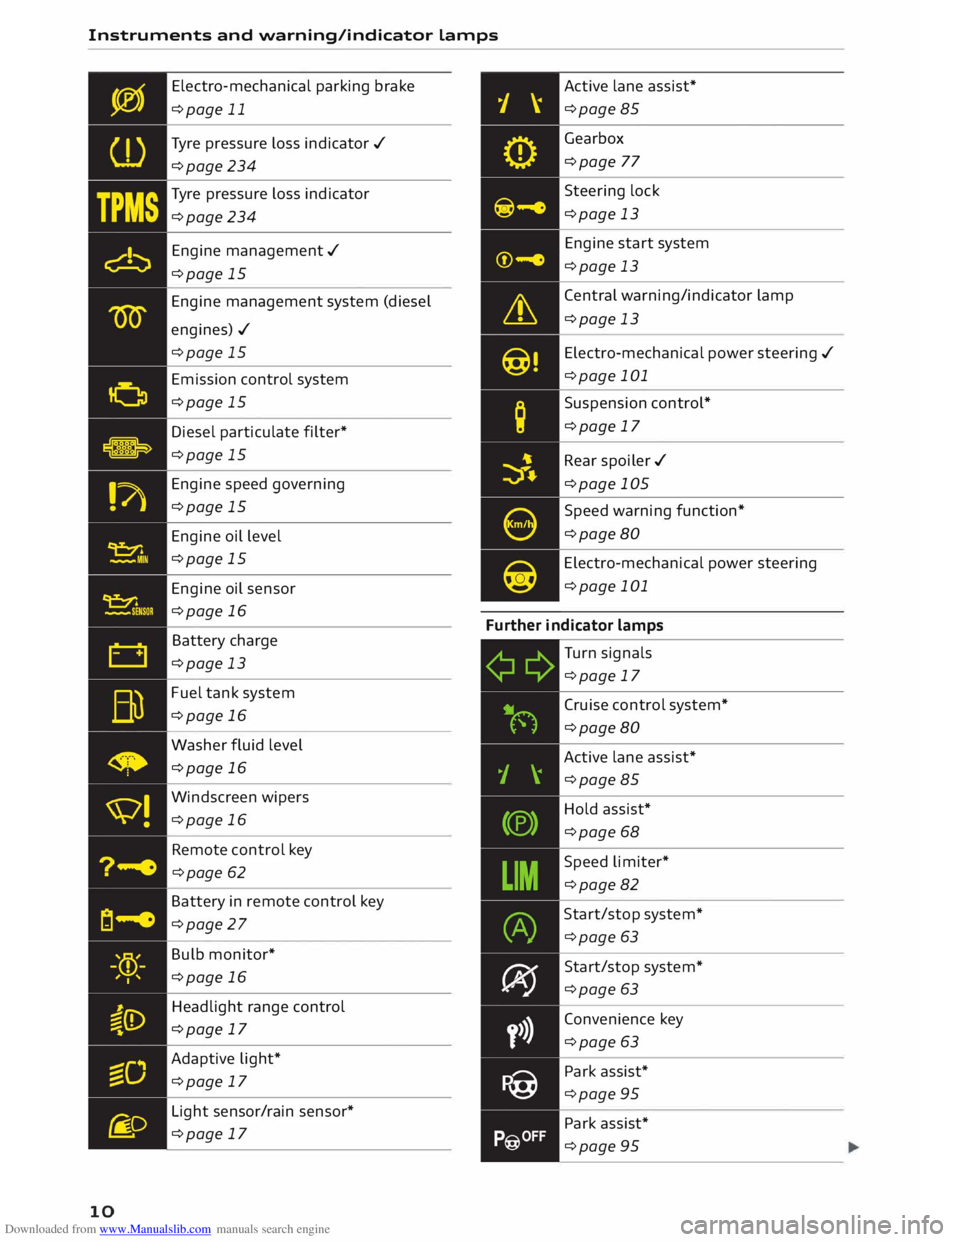
10 Electro-mechanical
parking brake
¢page 11
Tyre pressure loss indicator ./
¢page 234
Tyre pressure loss indicator
¢page 234
Engine management./
¢page 15
Engine management system (diesel
engines)./ ¢page 15
Emission control system
¢page 15
Diesel particulate filter*
¢page 15
Engine speed governing
¢page 15
Engine oil level
¢page 15
Engine oil sensor
¢page 16
Battery charge
¢page 13
Fuel tank system
¢page 16
Washer fluid level
¢page 16
Windscreen wipers
¢page 16
Remote control key
¢page 62
Battery in remote control key
¢page 27
Bulb monitor*
¢page 16
Headlight range control
¢page 17
Adaptive light*
¢page 17
Light sensor/rain sensor*
¢page 17 Active
lane assist*
¢page 85
Gearbox ¢page 77
Steering lock
¢page 13
Engine start system
¢page 13
Central warning/indicator lamp
¢page 13
Electro-mechanical power steering ./
¢page 101
Suspension control*
¢page 17
Rear spoiler ./
¢page 105
Speed warning function*
¢page 80
Electro-mechanical power steering
¢page 101
Further indicator lamps
Turn signals
¢page 17
Cruise control system*
¢page 80
Active lane assist*
¢page 85
Hold assist*
¢page 68
Speed limiter*
¢page 82
Start/stop system*
¢page 63
Start/stop system*
¢page 63
Convenience key
¢page 63
Park assist*
¢page 95
Park assist*
¢page 95
Page 15 of 284
Downloaded from www.Manualslib.com manuals search engine Instruments
and warning/indicator lamps
Switch off the engine and do not drive on. Check
the engine oil level ¢ page 22 3.
- If the engine oil level is too low, add more oil
¢ page 224. Do not drive on until the warning
lamp has gone out.
-If the engine oil level is OK and the warning
lamp is flashing, switch off the engine and do
not drive on. Obtain professional assistance.
(I}) Note
The oil pressure warning lamp is not an indi
cator for the oil level. The oil level should
therefore be checked regularly.
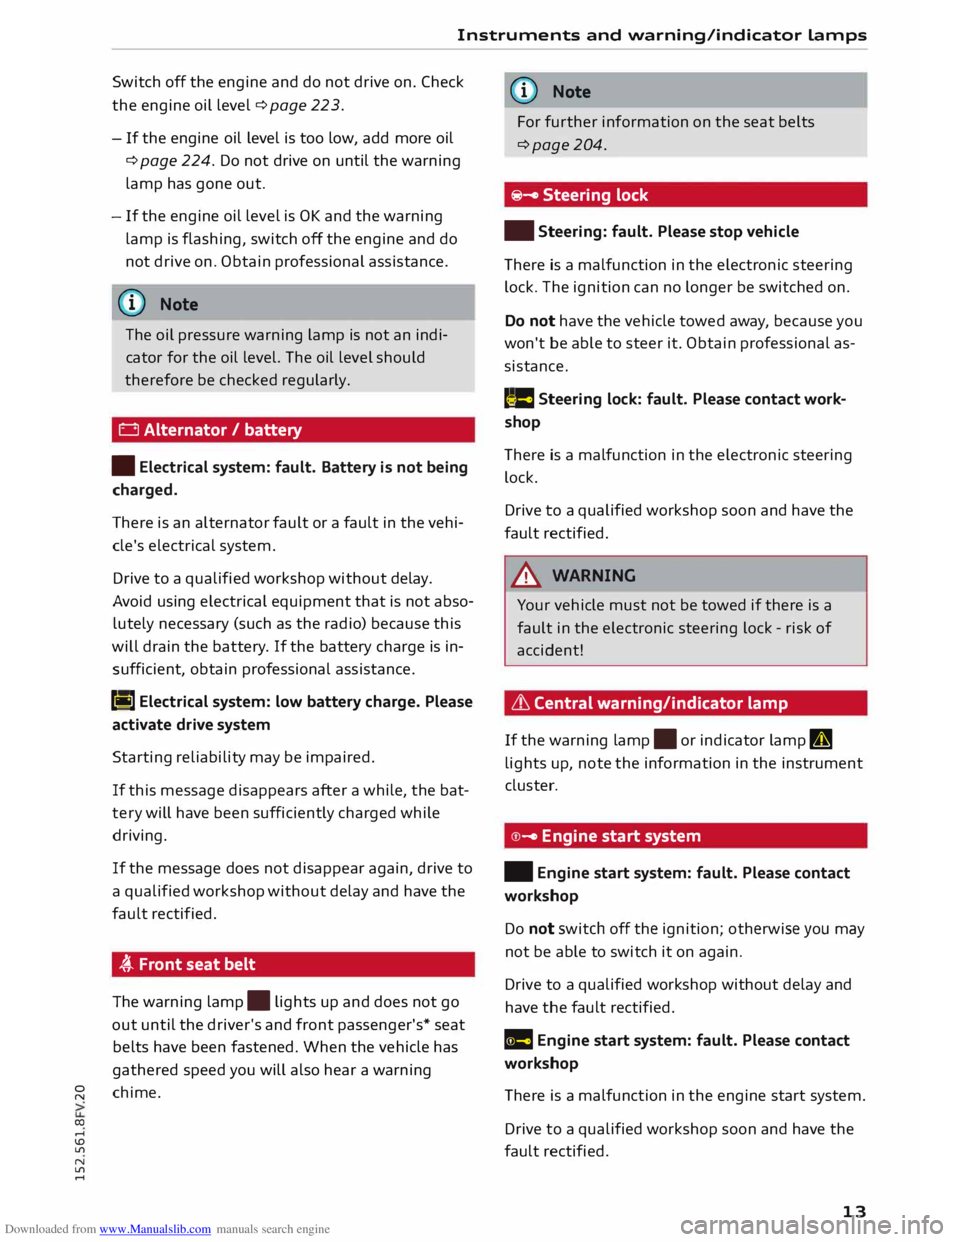
0 Alternator / battery
• Electrical system: fault. Battery is not being
charged.
There is an alternator fault or a fault in the vehi
cle's electrical system.
Drive to a qualified workshop without delay.
Avoid using electrical equipment that is not abso
lutely necessary (such as the radio) because this
will drain the battery . If the battery charge is in
sufficient, obtain professional assistance.
(•] Electrical
system: low battery charge. Please
activate drive system
Starting reliability may be impaired.
If this message disappears after a while, the bat
tery will have been sufficiently charged while
driving.
If the message does not disappear again, drive to
a qualified workshop without delay and have the
fault rectified.
� Front seat belt
The warning lamp.
lights up and does not go
out until the driver's and front passenger's* seat
belts have been fastened. When the vehicle has
gathered speed you will also hear a warning
� chime.
co ....
\D L/'l
N
L/'l
.... (D)
Note
For further information on the seat belts
¢page 204.
�- Steering lock
• Steering: fault. Please stop vehicle
There is a malfunction in the electronic steering
lock. The ignition can no longer be switched on.
Do not have the vehicle towed away, because you
won't be able to steer it. Obtain professional as
sistance.
,�. e Steering
lock: fault. Please contact work
shop
There is a malfunction in the electronic steering
lock.
Drive to a qualified workshop soon and have the
fault rectified.
,&. WARNING
Your vehicle must not be towed if there is a
fault in the electronic steering lock -risk of
accident!
L'.h Central warning/indicator lamp
If the warning lamp.
or indicator lamp II
lights up, note the information in the instrument
cluster.
© - Engine start system
• Engine start system: fault. Please contact
workshop
Do not switch off the ignition; otherwise you may
not be able to switch it on again.
Drive to a qualified workshop without delay and
have the fault rectified.
Ill Engine start system: fault. Please contact
workshop
There i
is
a malfunction in the engine start system.
Drive to a qualified workshop soon and have the
fault rectified.
13
Page 24 of 284
Downloaded from www.Manualslib.com manuals search engine Driver
information system
Mileage recorder
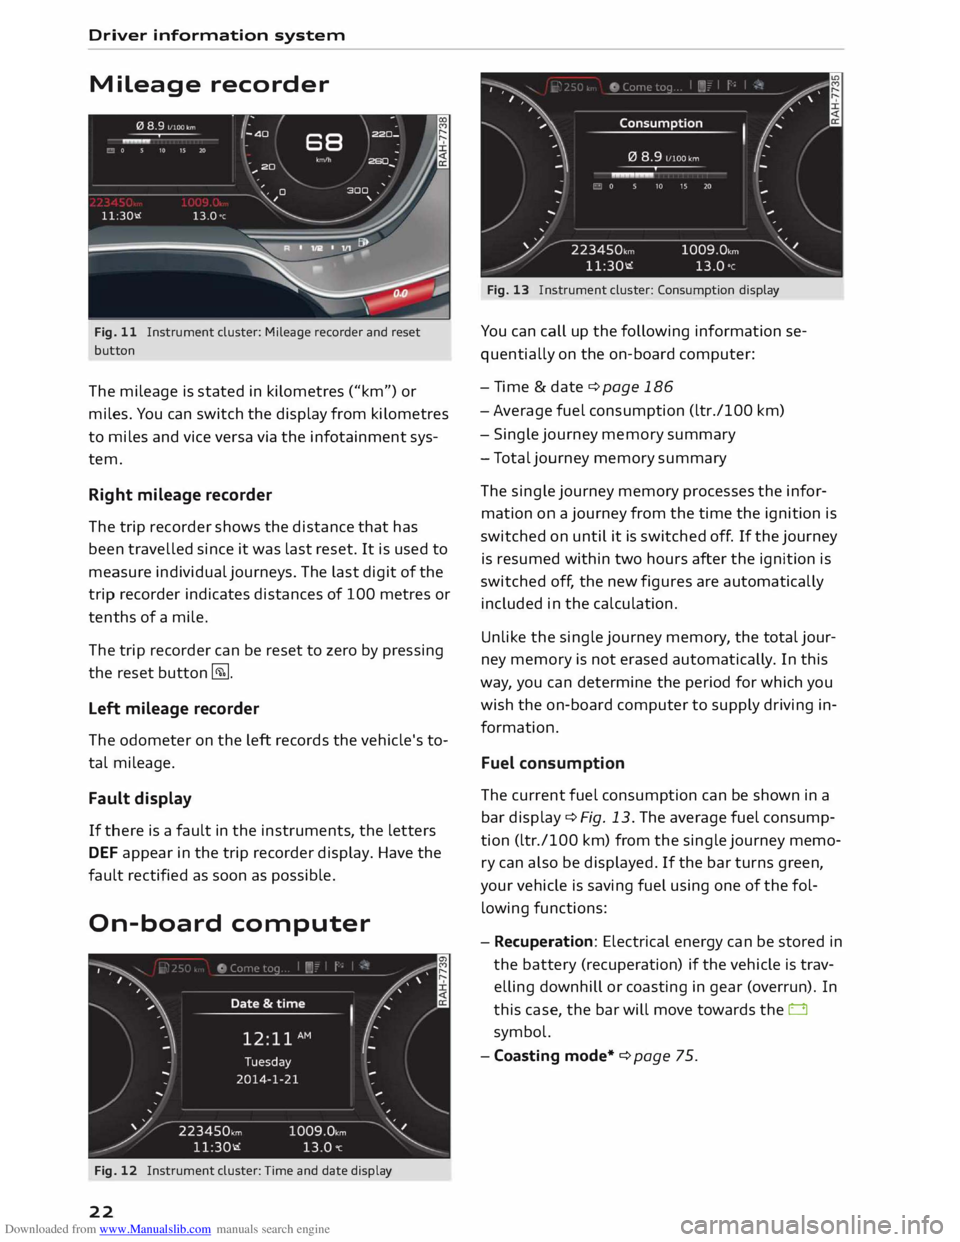
Fig. 11 Instrument cluster: Mileage recorder and reset
button
The mileage is stated in kilometres ("km") or
miles. You can switch the display from kilometres
to miles and vice versa via the infotainment sys
tem.
Right mileage recorder
The trip recorder shows the distance that has
been travelled since it was last reset. It is used to
measure individual journeys. The last digit of the
trip recorder indicates distances of 100 metres or
tenths of a mile.
The trip recorder can be reset to zero by pressing
the reset button �-
Left mileage recorder
The odometer on the left records the vehicle's to
tal mileage.
Fault display
If there is a fault in the instruments, the letters
DEF appear in the trip recorder display. Have the
fault rectified as soon as possible.
On-board computer
Fig. 12 Instrument cluster: Time and date display
22 Fig.
13 Instrument cluster: Consumption display
You can call up the following information se
quentially on the on-board computer:
- Time & date ¢ page 186
- Average fuel consumption (ltr./100 km)
- Single journey memory summary
- Total journey memory summary
The single journey memory processes the infor
mation on a journey from the time the ignition is
switched on until it is switched off. If the journey
is resumed within two hours after the ignition is
switched off, the new figures are automatically
included in the calculation.
Unlike the single journey memory, the total jour
ney memory is not erased automatical ly. In this
way, you can determine the period for which you
wish the on-board computer to supply driving in
formation.
Fuel consumption
The current fuel consumption can be shown in a
bar display ¢ Fig. 13. The average fuel consump
tion (ltr./100 km) from the single journey memo
ry can also be displayed. If the bar turns green,
your vehicle is saving fuel using one of the fol
lowing functions:
- Recuperation: Electrical energy can be stored in
the battery (recuperation) if the vehicle is trav
elling downhill or coasting in gear (overrun). In
this case, the bar will move towards the 0
symbol.
- Coasting mode*¢ page 75.
Page 29 of 284
Downloaded from www.Manualslib.com manuals search engine 0
N
co
....
\D Lfl
N
Lfl
.... Removing
the emergency key
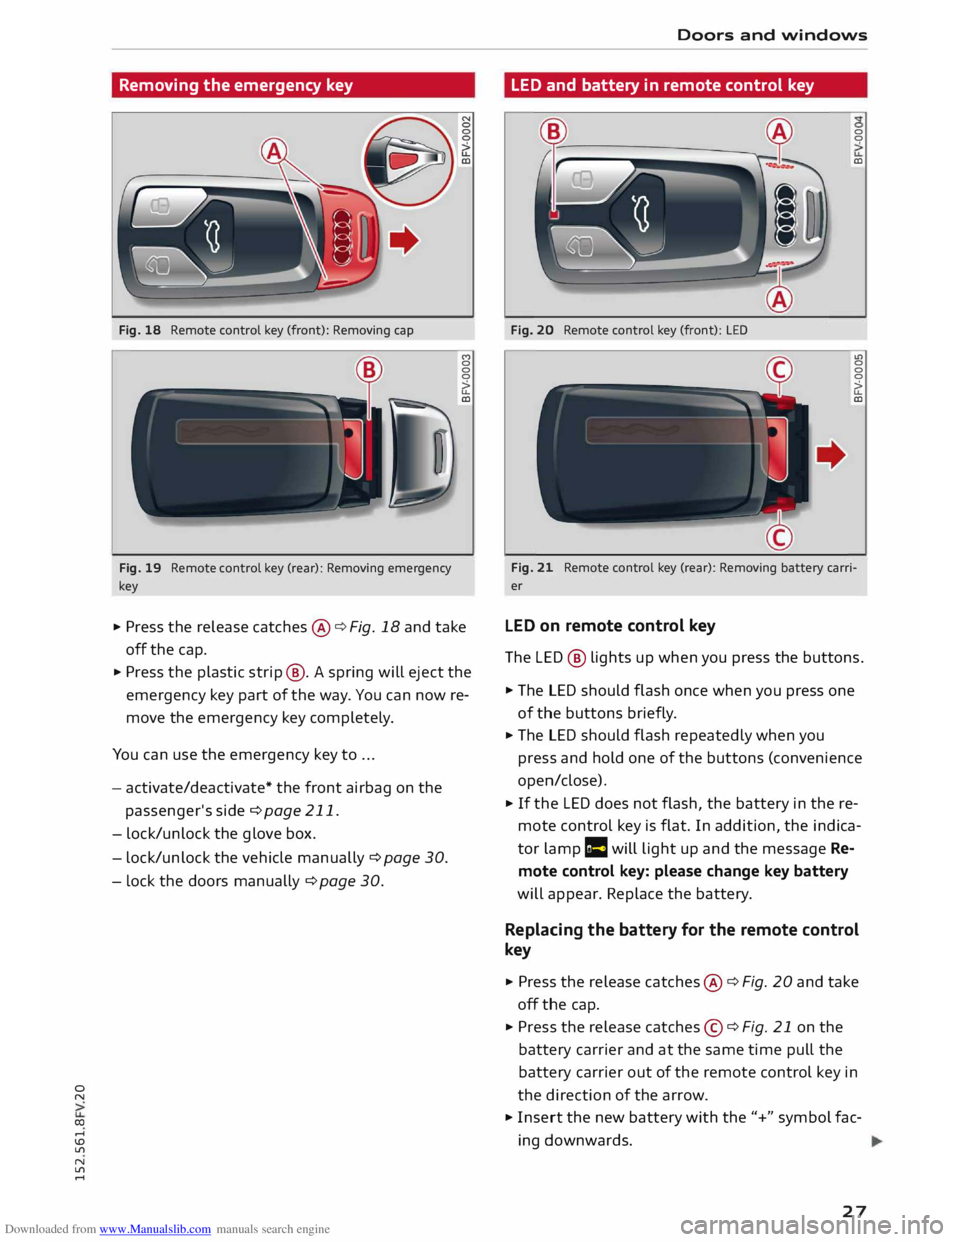
Fig. 18 Remote control key (front): Removing cap
Fig. 19 Remote control key (rear): Removing emergency
key (")
0
0
0
�
CD
... Press the release catches@¢ Fig. 18 and take
off the cap.
... Press the plastic strip@. A spring will eject the
emergency key part of the way. You can now re
move the emergency key completely.
You can use the emergency key to ...
- activate/deactivate* the front airbag on the
passenger's side ¢page 211.
- lock/unlock the glove box.
- lock/unlock the vehicle manually ¢ page 30.
- Lock the doors manually ¢page 30. Doors
and windows
LED and battery in remote control key
Fig. 20 Remote control key (front): LED 0
0
CD
u>
0
0
0
�
CD
Fig. 21 Remote control key (rear): Removing battery carri
er
LED on remote control key
The LED® lights up when you press the buttons .
... The LED should flash once when you press one
of the buttons briefly.
... The LED should flash repeatedly when you
press and hold one of the buttons (convenience
open/close).
... If the LED does not flash, the battery in the re
mote control key is flat. In addition, the indica
tor lamp r= will light up and the message Re
mote control key: please change key battery
will appear. Replace the battery.
Replacing the battery for the remote control
key
... Press the release catches@¢ Fig. 20 and take
off the cap .
... Press the release catches©¢ Fig. 21 on the
battery carrier and at the same time pull the
battery carrier out of the remote control key in
the direction of the arrow.
... Insert the new battery with the"+" symbol fac
ing downwards.
27
Page 30 of 284
Downloaded from www.Manualslib.com manuals search engine Doors
and windows
.. Slide the battery carrier carefully into the re
mote control key.
.. Fit the cap.
@) For the sake of the environment
Used batteries must be disposed of appropri
ately and must not be discarded with ordinary
household waste.
(CD) Note
The new battery must be of the same type as
the original one.
Locking and unlocking the vehicle by
remote control
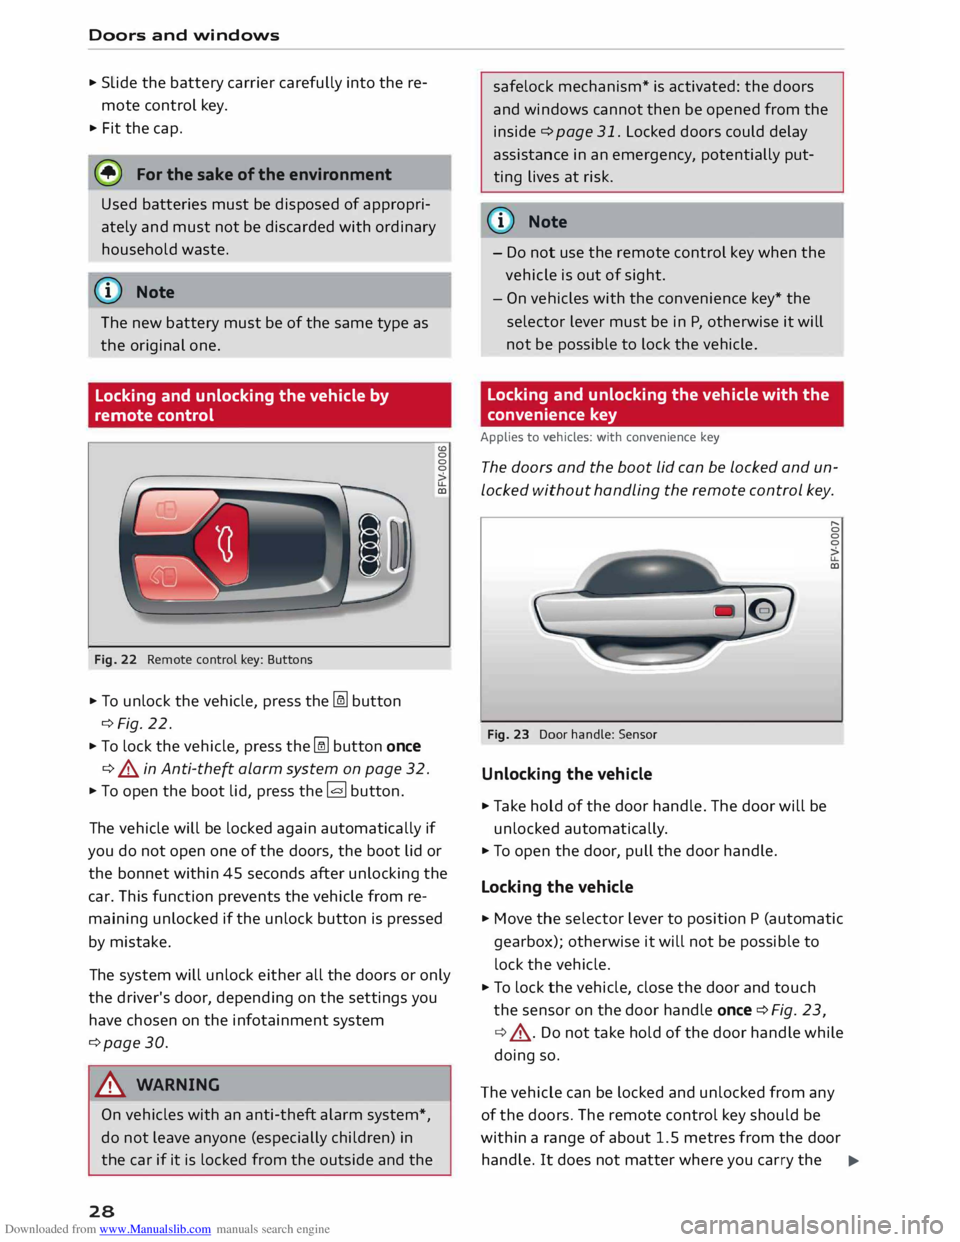
Fig. 22 Remote control key: Buttons
.. To unlock the vehicle, press the� button
¢Fig. 22.
.. To lock the vehicle, press the� button once
¢ & in Anti-theft alarm system on page 32.
"'To open the boot lid, press the [g button.
0
0
>
u.
cc
The vehicle will be locked again automatically if
you do not open one of the doors, the boot lid or
the bonnet within 45 seconds after unlocking the
car. This function prevents the vehicle from re
maining unlocked if the unlock button is pressed
by mistake.
The system will unlock either all the doors or only
the driver's door, depending on the settings you
have chosen on the infotainment system
¢page 30.
& WARNING
On vehicles with an anti-theft alarm system*,
do not leave anyone (especially children) in
the car if it is locked from the outside and the
28 safelock
mechanism* is activated: the doors
and windows cannot then be opened from the
inside ¢page 31. Locked doors could delay
assistance in an emergency, potentially put
ting lives at risk.
(Ci) Note
- Do not use the remote control key when the
vehicle is out of sight.
- On vehicles with the convenience key* the
selector lever must be in P, otherwise it will
not be possible to lock the vehicle.
Locking and unlocking the vehicle with the
conv enience key
Applies to vehicles: with convenience key
The doors and the boot lid can be locked and un
locked without handling the remote control key.
Fig. 23 Door handle: Sensor
Unlocking the vehicle
.. Take hold of the door handle. The door will be
unlocked automatically .
.. To open the door, pull the door handle.
Locking the vehicle "
0
0
0
>
u.
cc
.. Move the selector lever to position P (automatic
gearbox); otherwise it will not be possible to
lock the vehicle.
.. To lock the vehicle, close the door and touch
the sensor on the door handle once¢ Fig. 23,
¢ .,&. .Do not take hold of the door handle while
doing so.
The vehicle can be locked and unlocked from any
of the doors. The remote control key should be
within a range of about 1.5 metres from the door
handle. It does not matter where you carry the .,..
Page 31 of 284

Downloaded from www.Manualslib.com manuals search engine 0
N
co
....
\D L/'l
N
L/'l
.... key,
for instance whether it is in your jacket pock
et or in a briefcase.
The locking function may be affected if you grasp
the door handle while the vehicle is being locked.
Once the doors have been locked, they cannot be
opened again immediately. This will enable you
to check that the doors are properly closed.
The system will unlock either all the doors or only
one of the doors, depending on the settings you
have chosen on the infotainment system
¢page 30.
_& WARNING
On vehicles with an anti-theft alarm system*,
do not leave anyone (especially children) in
the car if it is locked from the outside and the
safelock mechanism* is activated: the doors
and windows cannot then be opened from the
inside ¢ page 31. Locked doors could delay
assistance in an emergency, potentially put
ting lives at risk.
((I)) Note
Please note the following points if the vehicle
is left parked for long periods:
- To save electrical power, the proximity sen
sors are switched off after a few days. You
will then need to pull the door handle once
to unlock the vehicle, and a second time to
open it.
- To prevent the battery from becoming dis
charged and thus maintain the vehicle's
starting ability for as long as possible, the
power management system will gradually
switch off convenience functions that are
not required. In this case you may not be
able to unlock the vehicle with this conven
ience function. Doors
and windows
Central locking switch
Fig. 24 Driver's door: Central locking switch
� To lock the vehicle, press the� button ¢.& -
� To unlock the vehicle, press the @J button.
Please note the following when you use the cen
tral locking switch to lock your vehicle:
- The doors and the boot lid cannot be opened
from the outside (for safety reasons, when
stopped at traffic lights, etc.).
- The LED in the central locking switch lights up
when all of the doors are closed and locked.
- You can open the doors individually from the in
side by pulling the inside door handle.
- In the event of an accident in which the airbags
inflate, doors locked from the inside will be au
tomatically unlocked to facilitate access and as
sistance.
_& WARNING
- The central locking switch is still operative
when the ignition is switched off and will
automatically lock the entire vehicle when
the @l button is pressed.
- The central locking switch inside the vehicle
is not operative if you lock the vehicle from
the outside .
- Locked doors could delay assistance in an
emergency, potentially putting lives at risk.
Do not leave anyone (especially children) in
the vehicle.
The doors and the boot lid are locked auto
matically when the vehicle reaches a speed of
about 15 km/h (Auto Lock) ¢page 25. You 1111>
29
Page 36 of 284

Downloaded from www.Manualslib.com manuals search engine Doors
and windows
Convenience open/close function
The windows can be opened or closed simultane
ously when the vehicle is unlocked or Locked.
Convenience open function
... Press and hold the� button on the remote
control key until all the windows have reached
the desired position, or
... First unlock the vehicle using the� button on
the remote control key, then insert the key in
the driver's door lock, turn it to the "unlock" po
sition and hold it there until all the windows
have reached the desired position.
Convenience close function
... Press and hold the locking button l'.D on the re
mote control key until all windows are closed
¢.&, ,or
... Lock the driver's door with the key and hold the
key in the "lock" position until all the windows
are closed
Convenience close function with convenience
key*
... Touch and keep your hand in contact with the
sensor* on the door handle until all the win
dows are closed. Do not rest your hand on the
door handle while this is happening.
Adjusting settings for convenience open
function via infotainment system
... Select the following on the infotainment sys
tem: l MEN u
I button > Car > left control button
> Vehicle settings.
If you wish to use the convenience open function
for the windows, select on for Front windows.
A WARNING
- Take care when closing the windows. Care
less use of the windows can cause injuries.
- For safety reasons, you should only use the
remote control open and close functions
within about 2 metres of the vehicle. To
avoid injuries, always keep an eye on the
windows when pressing the !filJ button to
close them. The windows and soft top stop
moving as soon as the !filJ button is released.
34 What
to do after a malfunction
The one-touch open and close function must be
reactivated if the battery has been disconnected.
... Pull and hold the electric window switch until
the window is fully closed .
... Release the switch and then pull it again for at
least one second.
Garage door opener
(Homelink)
Description
Applies to vehicles: with garage door opener (Homelink)
Fig. 32 Garage door opener: Examples of various devices
which can be activated
Th e garage door opener (Homelink) allows you
to activate garage doors, security systems, home
or office lighting and other electric devices by
means of control buttons inside your car. It com
prises three buttons integrated in the headliner
which perform the functions of up to three hand
held transmitters.
To operate the desired systems with the garage
door opener, you first need to program the but
tons in the headliner.
A WARNING
When you are operating or programming the
garage door opener, make sure that no per
sons or objects are close to the devices receiv
ing the transmitter signals. Otherwise, per
sons might be injured or other damage
caused by moving parts.
�
Page 51 of 284
Downloaded from www.Manualslib.com manuals search engine the
electrical sockets* in the vehicle when
connecting equipment for longer periods.
@ Note
- Using electrical appliances with the engine
switched off will drain the battery.
- Do not attempt to charge the battery of
your vehicle using a small battery charger of
the type that is connected to the cigarette
lighter or the electrical socket inside the ve
hicle.
Storage Cup holder
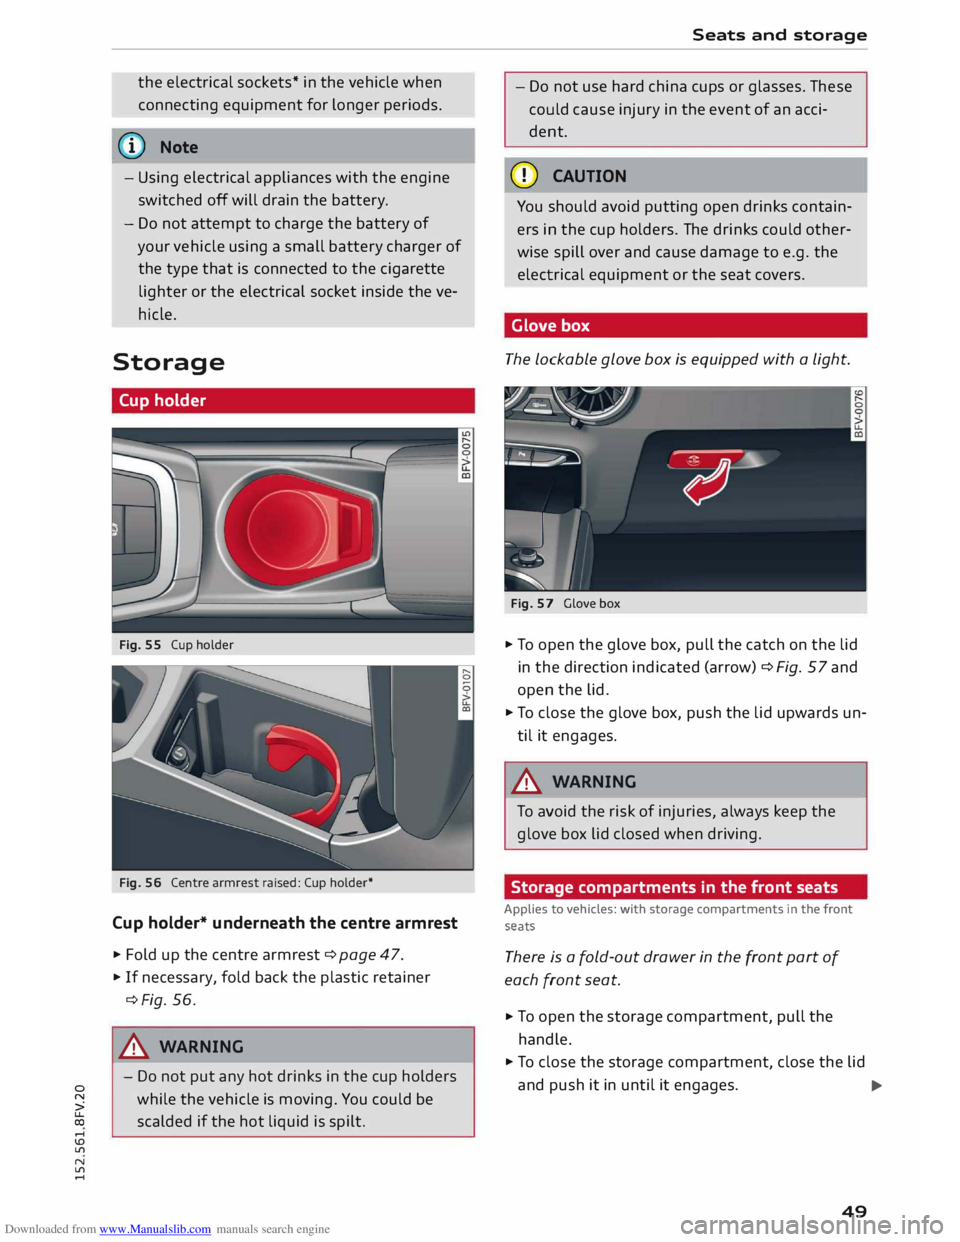
Fig. 55 Cup holder
Fig. 56 Centre armrest raised: Cup holder*
Cup holder* underneath the centre armrest
.. Fold
up the centre armrest ¢ page 47 .
.. If necessary, fold back the plastic retainer
¢Fig. 56.
_&. WARNING
- Do not put any hot drinks in the cup holders
0
� while
the vehicle is moving. You could be
� scalded if the hot liquid is spilt .
.-1
\D U'l
N
U'l
.-1 Seats
and storage
- Do not use hard china cups or glasses. These
could cause injury in the event of an acci
dent.
CD CAUTION
You should avoid putting open drinks contain
ers in the cup holders. The drinks could other
wise spill over and cause damage to e.g. the
electrical equipment or the seat covers.
Glove box
The lockable glove box is equipped with a light.
Fig. 57 Glove box
.. To open the glove box, pull the catch on the lid
in the direction indicated (arrow)¢ Fig. 57 and
open the lid .
.. To close the glove box, push the lid upwards un
til it engages.
_&. WARNING
To avoid the risk of injuries, always keep the
glove box lid closed when driving.
Storage compartments in the front seats
Applies to vehicles: with storage compartments in the front
seats
There is a fold-out drawer in the front part of
each front seat.
.. To
open the storage compartment, pull the
handle.
.. To close the storage compartment, close the lid
and push it in until it engages.
..,.
49
Page 56 of 284
Downloaded from www.Manualslib.com manuals search engine Heating
and cooling
windows from misting up. To demist the win
dows, we recommend that you increase the blow
er speed and set control @ to�-
IAJC! Switching
air cooling on/off
The air cooling system only works when the blow
er is switched on. When the air cooling is switch
ed off, the air is neither cooled nor dehumidified.
The windows may mist up as a result. The air
cooling is switched off automatically at low out
side temperatures (below zero).
I• I •I
Adjusting the temperature
The rotary control @ can be used to adjust the
temperature in small steps.
Adjusting the air distribution
The rotary control @ can be used to adjust the
air distribution.
At the� setting, the windscreen and side win
dows are defrosted or demisted. The air recircula
tion is switched off, but can be switched on again
manually by pressing the� button.
The round air outlets in the dashboard can be ad
justed ¢ page 56.
To prevent the front side windows from misting
up in wet weather, it's a good idea to open the
side air outlets and point them to the side.
G;l Switching air recirculation on/off
In air recirculation mode, the air from the interior
of the vehicle is filtered and recirculated. This
54 setting
prevents fumes etc. from entering the in
terior. We recommend switching on the air recir
culation mode when driving through a tunnel or
in traffic queues ¢,&..
The air recirculation mode is switched off when
the control is in the defrost position�-
I@ REAR!
Switching rear window heating on/
off
If rear window heating is activated with the igni
tion switched on, the battery management deter
mines whether or not the battery charge level is
sufficient for the rear window heating to be
switched on. Otherwise the rear window heating
operates when the engine is running, and
switches off automatically after about
10 -20 minutes, depending on the outside tem
perature.
To switch on the rear window heating permanent
ly, press and hold the llllil REAR! button for at least
two seconds. This setting will be stored for ap
proximately 15 minutes after the ignition is
switched off.
_&. WARNING
For reasons of safety you should not leave the
air recirculation switched on for too long. This
mode prevents fresh air from entering the ve
hicle, so the windows can mist over if the air
cooling is switched off. Bad visibility can cause
an accident.