check engine AUDI TT COUPE 2016 User Guide
[x] Cancel search | Manufacturer: AUDI, Model Year: 2016, Model line: TT COUPE, Model: AUDI TT COUPE 2016Pages: 322, PDF Size: 52.86 MB
Page 38 of 322
Downloaded from www.Manualslib.com manuals search engine Lights and Vision
Lights and Vision
Exterior Lighting
Switching lights on and off
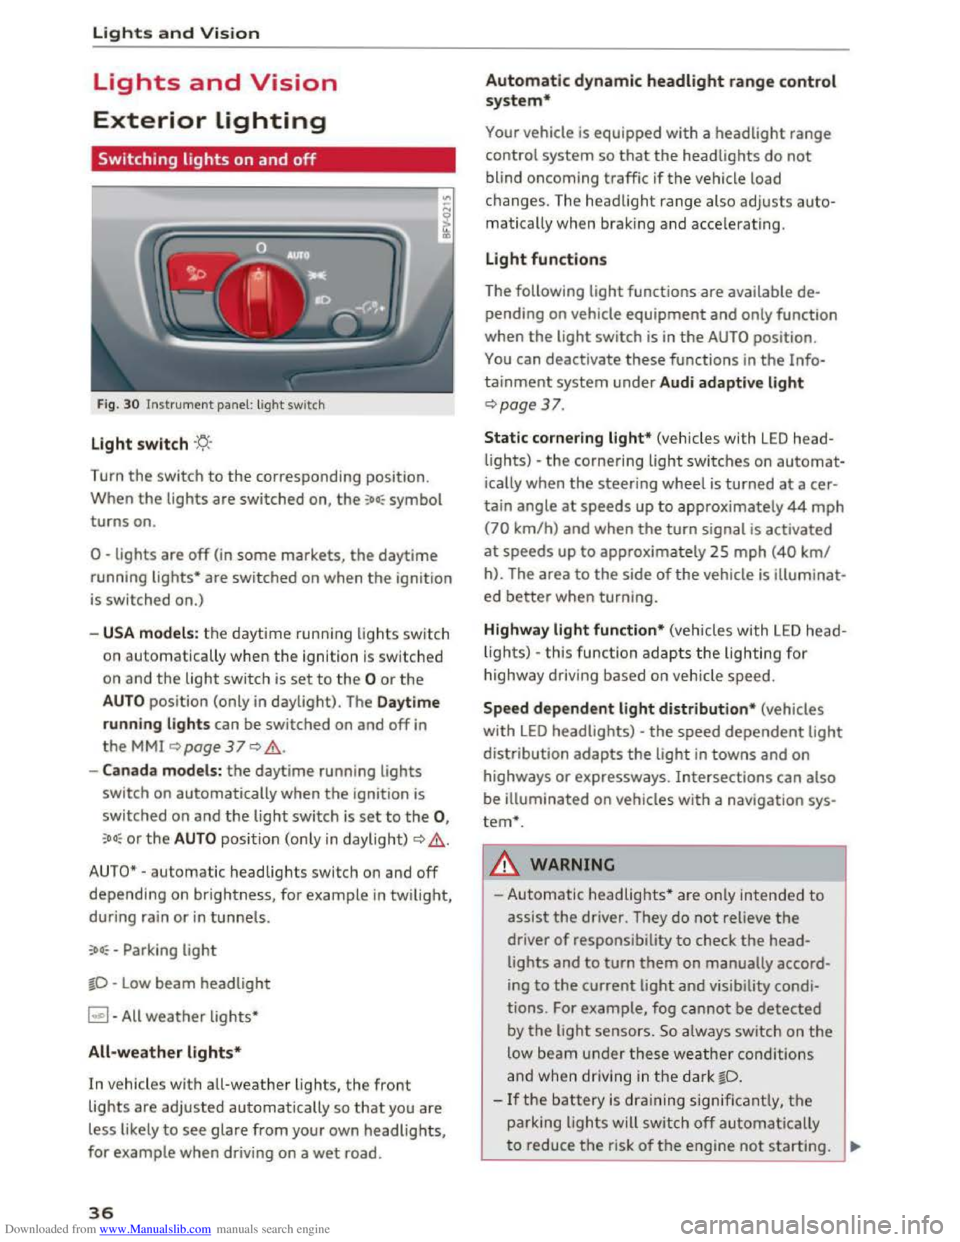
Fig. 30 Instrument panel: light switch
Light switch ·'t/;
Turn the switch to the corresponding position.
When
the lights are switched on, the :oo: symbol
turns on.
0 -lights are off (in some markets, the daytime
running
lights* are switched on when the ignition
is switched on.)
-USA models: the daytime running lights sw itch
on automatica
lly when the ignition is sw itched
on and
the light switch is set to the 0 or the
AUTO position (only in daylight). The Daytime
running lights
can be switched on and off in
the MMI ~page 37 Q &.
-Canada models: the daytime running lights
switch on automatically when the ignition is
switched on and the light switch is set to the 0,
:oo: or the AUTO position (only in daylight) QA .
AUTO* -automatic headlights switch on and off
depending on brightness, for example in twilight,
during rain
or in tunnels.
:oo: -Parking light
~D -Low beam headlight
~ -All weather lights*
All-weather lights*
In vehicles with all-weather lights, the front
lights are adjusted automatically so that you are
less likely
to see glare from your own headlights,
for example when driving on a wet road.
36
Automatic dynamic headlight range control
system*
Your vehicle is equipped with a headlight range
control system
so that the headlights do not
blind oncoming traffic if the vehicle load
changes. The headlight range also
adjusts auto­
matically when braking and accelerating .
Light functions
The following light functions are available de­
pending on vehicle equipment and only function
when the
light switch is in the AUTO position.
You can deactivate these functions in the Info­
tainment system under Audi adaptive light
Qpage 37.
Static cornering light* (vehicles with LED head­
lights) -the cornering light switches on automat­
ically when the steeri ng wheel is turned at acer­
tain angle at speeds up to approximately 44 mph
(70 km/h) and when the turn signal is activated
at speeds up to approxim ately 25 mph (40 km/
h). The area
to the side of the vehicle is illuminat­
ed better when turning.
Highway light function* (vehicles with LED head­
lights) -this function adapts the lighting for
highwa y driving based on vehicle speed.
Speed dependent light distribution* (vehicles
with LED headlights) -the speed dependent light
distribution adapts the light in towns and on
highways
or expressways. Intersections can also
be illuminated on vehicles
with a navigation sys­
tem*.
A WARNING
- Automatic headlights * are only intended to
assist the driver. They do not reliev e the
driver
of responsibility to check the head­
lights and to turn them on manually accord­
ing to the current ligh t and visibility condi­
tions. For example, fog cannot be detected
by
the light sensors . So always switch on the
low beam under these weather conditions
and when
driving in the dark ~D.
-If the battery is dra ining significantly, the
parking lights will switch off automatically
to reduce the risk of the engine not starting . ..,..
Page 43 of 322
Downloaded from www.Manualslib.com manuals search engine ..... N
G: CX)
.....
"' U"I
.....
"' .....
Windshield wipers
Switching the windshield wipers on
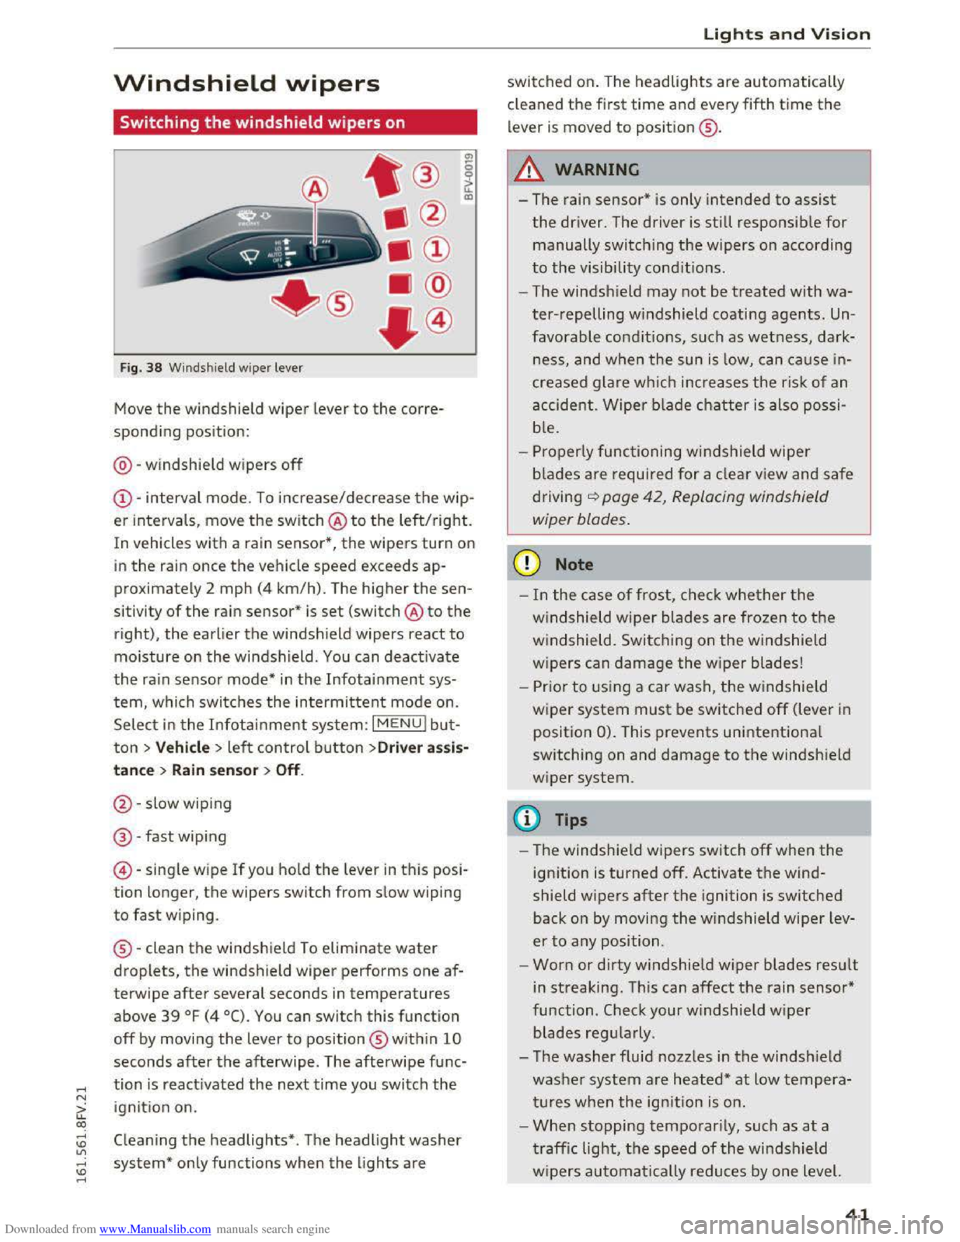
Fig. 38 Windshield wiper lever
Move the windshield wiper lever to the corre­
sponding position:
@ -windshield wipers
off
@-interval mode. To increase/decrease the wip­
er intervals , move
the switch @ to the left/right.
In vehicles with a rain sensor*, the wipers turn on
in the rain once the vehicle speed exceeds ap­
proximately 2 mph (4
km/h). The higher the sen­
sitivity
of the rain sensor* is set (switch @ to the
right),
the earlier the windsh ield wipers react to
moisture on the windsh ield. You can deact ivate
the rain sensor mode* in the Infotainment sys­
tem, which switches the intermittent mode on.
Select
in the Infotainment system: I MENU! bu t­
ton> Vehicle > left control button >Driver assis­
tance > Rain sensor > Off.
@-slow wiping
@ -fast wip ing
©
-singl e w ipe If you hold the lever in this posi ­
tion longer, the wipers switch from slow wiping
to fast wiping .
¬ģ -clean
the windshield To eliminate water
droplets, the windshield wiper performs one af­
terwipe
after several seconds in temperatures
above
39 ¬įF (4 ¬įC). You can switch this function
off by moving the lever to position ¬ģ within 10
seconds after the afterwipe . The afterwipe func­
tion is reactivated the next time you switch the
ignition on.
Cleaning the headlights* . The headlight washer
system*
only functions when the lights are
Lights and Vision
switched on. The headlights are automatically
cl eaned
the first time and every fifth time the
lever is moved to position ¬ģ ¬∑
A WARNING
f-==" -I
- The rain sensor* is only intended to assist
the driver. The driver is still responsib le for
manually switching the wipers on according
to the visibility conditions .
- The windsh ield may
not be treated with wa­
ter-repelling windshield coating agents. Un­
favorable conditions, such as wetness, dark­
ness, and when
the sun is low, can cause in­
creased glare which increases
the risk of an
accident.
Wiper blade chatter is also possi­
b l
e.
-Properly functioning windshield wiper
b lad
es are required for a clear view and safe
driving
<:::>page 42, Replacing windshield
wiper blades.
CD Note
-In the case of frost, check whether the
windshield wiper blades are frozen to the
windshield. Switching on the windshield
wipers
can damage the w ip er blades!
-
Prior to using a car wash, the windshield
w ip er system
must be switched off (lever in
position
0). This prevents unintentiona l
switching on and damage
to the windsh ield
wiper system .
@Tips
-The windshie ld wipers switch off when the
ignition is turned off. Activate the wind­
shield wipers
after the ignition is switched
back on by moving
the windshield wiper lev­
er
to any position.
-
Worn or dirty windshie ld wiper blades result
in streaking.
This can affect the rain sensor*
function .
Check your windshield wiper
blades regularly .
- The washer fluid nozzles in
the windshield
washer system are heated*
at low tempera­
tures when
the ignition is on.
- When stopping
temporarily, such as at a
traffic light, the speed of the windshield
w ipers automatically reduces by one level.
41
Page 54 of 322
Downloaded from www.Manualslib.com manuals search engine Warm and cold
Warm and cold
Climate control system
Description
The climate control system warms, cools and
adds humidity to the air in the vehicle interior. It
functions most effectively when the windows are
closed. If there is a build-up of heat inside the ve ­
hicle, ventilation can help to speed up the cooling
process.
Pollutant filter
The pollutant filter removes pollutants such as
dust and pollen from the air .
Key recogniti on
Certain settings are automatically stored and as­
signed to t h e remote control key being used.
.&. WARNING
Poor visibility can lead to accidents.
-For safer driving, keep all windows free of
ice, snow and fog.
- Become familiar
as quickly as possible with
the correct use and function of the climate
control system, especially with the defrost­
ing and defogging function.
-
When the temperature is below freezing,
only use the windshield washer system after
the windshield has been warmed by the cli­
mate control system. The washer flu id could
freeze on the windshield and impair visibili­
ty.
CD Note
-If you suspect that the climate control sys­
tem is damaged, sw itch the system off to
52
prevent further damage and have it checked
by an
authorized Audi dealer or authorized
Audi Service Facility.
- Repairs
to the Audi climate control system
require special technical knowledge and
special tools. See an authorized Audi dealer
or authorized Audi Service Facility.
¬ģ For the sake of the environment
Reducing the amount of fuel used also re­
duces the amount of pollutants that enter the
air.
('!) Tips
-To prevent interference with the heating
and cooling output a nd to prevent the win­
dows from fogging over, the air intake in
front of the windshield must be free of ice,
snow or leaves.
-
Condensation from the cooling system can
drip
and form a puddle of water under the
veh icle. This is normal and does not mean
there is a leak.
- The
energy management system may switch
the seat heating* or rear window defroster
off temporarily. These systems are available
again as soon as the energy balance has
been restored.
-The flows through the vents under the rear
window. Make sure the openings are not
covered when placing clothing on the lug­
gage compartment cover.
Page 59 of 322
Downloaded from www.Manualslib.com manuals search engine @ Tips
-Determine the depth before driving through
water.
-Do not stop the vehicle, drive in reverse or
switch the engine off when driving through
water.
- Keep in mind that oncoming vehicles may
create waves that raise the water level and
make it too deep for your vehicle to drive
through safely.
- Avoid driving
through salt water (corrosion).
Economical and environmentally-friendly
driving
The amount of fuel consumption, the envi ron­
mental impact and the wear to the engine,
b rakes and tires depends mostly on yo ur driving
style. Wit h
an anticipatory and economic driv ing
style, fu
el consumption can be reduced by ap­
proximately 10-lSo/o. The following tips will help
you conserve the environment and your money at
the same time.
Anticip atory driv ing
A veh icle uses the most fuel when a ccele rating.
When you drive with anticipation, you do not
need to brake as often and thus acce lerate less.
When possible, let your vehicle coast with a gea r
engaged -for example, when you notice that the
next traffic light is red.
Avoid full acceleration
You should rarely travel at the maximum vehicle
speed. High speeds cause a disproportionately
high increase in fuel consumption, emissions and
traffic noise. Slower driving saves fuel.
Reduce idling time
It pays off to stop the engine, for example when
at railroad crossings or traffic lights with longer
red lights. Stopping the engine for 30-40 sec­
onds already saves more fuel than the amount of
extra fuel needed to restart the engine.
It takes a very long time in idle to warm the en­
gine up to operating temperature. Wear and
emissions are especially high in the warm-up
Driving
phase. Therefore, you should begin driving im­
mediately after starting the engine. Avoid high
RPMs while doing this.
Service regularly
By servic ing you r vehicle regularly, you can help
to reduce fuel consumption before you even start
to drive . The maintenance condition of your vehi­
cle not only affects traffic safety and long-term
val ue b ut also impacts fuel co nsumptio n.
A poorly serviced engine can lead to fuel con­
sumption that is 10% higher than normal.
Also check the oil level when refueling. The oil
con sumpti on
depends largely on the engine load
and speed. It is no rmal for the oil consumption
of a new engine to reach its lowest point only af­
ter a certain amount of use. Therefore, the oil
consumption can only be properly judged after
approximately 3,000 mi (5,000 km) have been
driven.
Avoi d short trip s
The engine and exhaust cleaning system must
reach their optimal operating tempera tu re to ef­
fectively reduce consumption and emissions.
A cold engine consumes a disproportionately
high
amount of f u el. The engine is at operating
temperature and consumption has normalized
only after approximately four kilometers.
Q) Note
Do not leave engine idling unattended after
starting. If warning lights should come on to
indicate improper operation, they would go
unheeded. Extended idling also produces
heat, which could result in overheating or
other damage to the vehicle or other proper­
ty.
CD Note
-Have your vehicle maintained properly and
in accordance with the service recommenda­
tions in your Warranty & M ain tenance book-
let. Lac k of proper mai ntenance as well as
improper use of th e vehi cle w il l impair the
function of the emission control system and
cou ld lead to damage. .,..
57
Page 68 of 322
Downloaded from www.Manualslib.com manuals search engine Automatic t ra nsmission
Interlock button
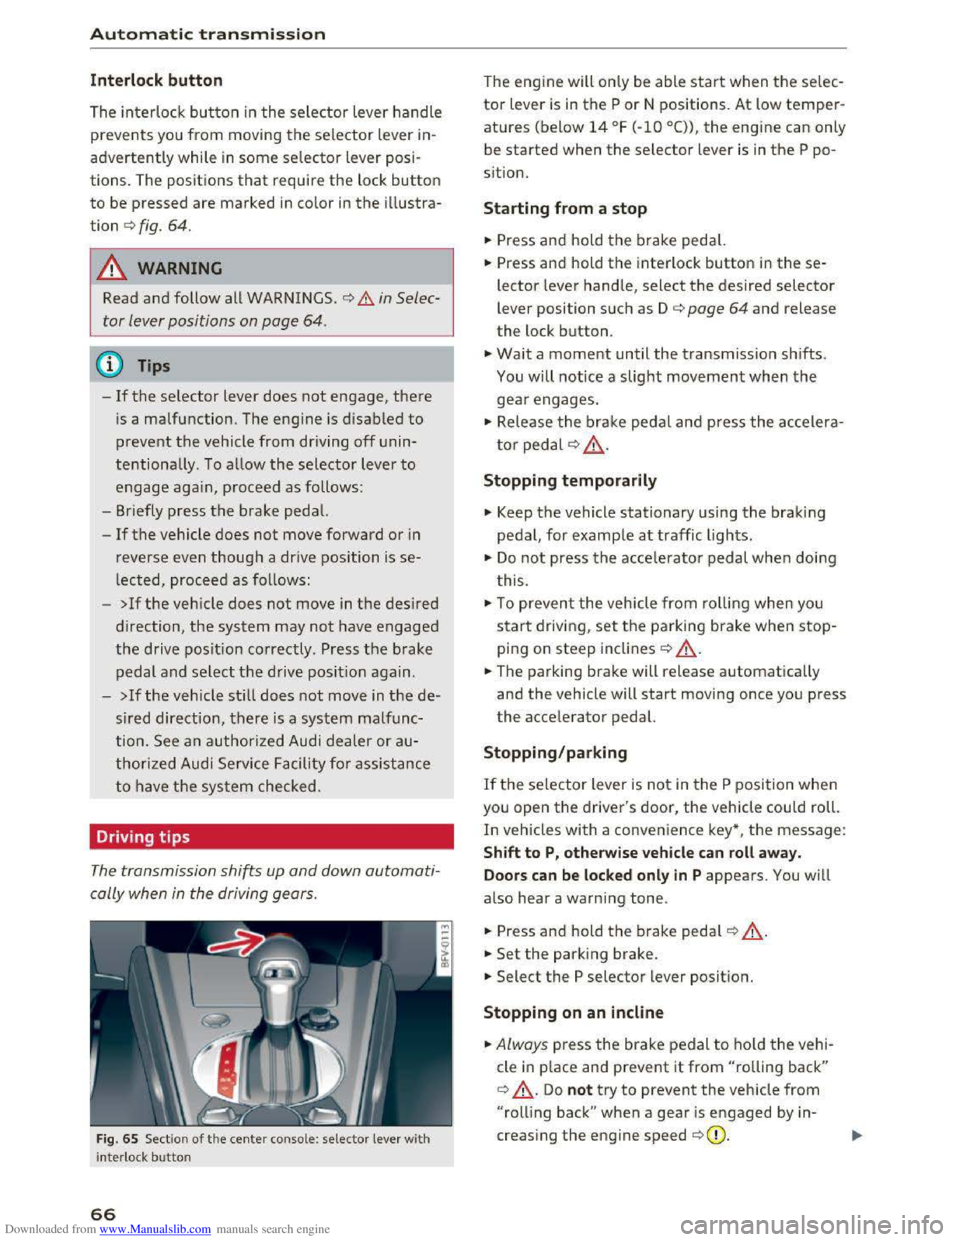
The interlock button in the selector lever handle
prevents you from moving the selector lever in­
advertently while in some selector lever posi­
tions. The positions that require the lock button
to be pressed are marked in color in the illustra­
tion c::> fig. 64.
A WARNING
Read and follow all WARNINGS . c::> .&. in Selec­
tor lever positions on page
64.
(!') Tips
-If the selector lever does not engage, there
is a malfunction. The engine is disabled to
prevent the vehicle from driving off unin­
tentionally. To allow the selector lever to
engage agai n , proceed as follows :
- Briefly
press the brake pedal.
-If the vehicle does not move forward or in
reverse even though a drive position is se­
lected, proceed as follows:
-
>Ifthe vehicle does not move in the desired
direction, the system may not have engaged
the drive position correctly . Press the brake
pedal and select the drive position again.
-
>If the veh icle sti ll does not move in the de­
s ired direction, there is a system malfunc­
tion. See an authorized Audi dealer or au­
thorized Audi Service Facility for assistance
to have the system checked.
Driving tips
The transmission shifts up and down automati­
cally when
in the driving gears.
Fig. 65 Sect io n of the cente r conso le: selecto r lever wit h
i nte rlock bu
tton
66
The engine will only be able start when the selec­
tor lever is in the P or N positions. At low temper­
atures (below 14 ¬įF (-10 ¬įC)), the engine can only
be
started when the selector lever is in the P po­
s i
tion.
Starting from a stop
... Press and hold the brake pedal.
... Press and hold the interlock button in these­
lector lever handle, select the desired selector
lever position such as D c::> page 64 and release
the lock button .
... Wait a moment until the transmission shifts.
You will notice a slight movement when the
gear engages.
... Release the brake pedal and press the accelera­
tor pedal c::> .& ..
Stopping temporaril y
.,. Keep the vehicle stationary using the braking
pedal, for example at traffic lights.
.,. Do not press the accelerat o r pedal when doing
t his .
.,. To preven t the vehicle from ro llin g when you
start driving, set the parking brake when stop­
ping on steep inclines c::> ,&..
... The parking brake will release automatically
and the vehicle will start moving once you press
the accelerator pedal.
Stopping/par king
If the selector lever is not in the P position when
you open the driver's door, the vehicle could roll.
In vehicles with a convenience key*, t he message:
S h ift to P, otherwise veh icle can roll awa y.
Door s can be locked only in
P appears. You will
also hear a warning tone .
... Press and hold the b rake pedal c::> ,&. .
... Set the park ing brake .
... Select the P selector lever position.
Stopping on an incl in e
... Always press the brake pedal to ho ld the vehi ­
cle
in p lace and prevent it from "rolling back"
c::> ,&.. Do not try to prevent the vehicle from
"rolling back" when a gear is engaged by in­
creasing the engine speed c::>(D.
Page 79 of 322
Downloaded from www.Manualslib.com manuals search engine ..... N
G: CX)
.....
"' U"I
.....
"' .....
the system, it warns you about vehicles that are
coming closer or
that are traveling with you with­
in sensor range(!) c::> fig. 74: if a lane change is
classified as critical, the display @ in the exterior
mirror c::>fig. 75 turns on.
General information
Applies to: veh icles wit h Aud i s ide assi st
¬ģ
Assist
The display in the left exterior mirror provides as­
sistance when making a lane change to the left,
while the disp lay in the right exterior mirror pro­
vides assistance when making a lane change
to
the right. @
Information stage
As long as you do not activate the turn signal,
side assist
informs you about vehicles that are
detected and class ified
as critical. The display in
the mirror turns on, but is dim.
The display remains
dim in the information stage
so that your view toward the front is not distur­
bed.
Warning stage
If you activate the turn signal, side assist warns
you about vehicles
that are detected and classi­
fied
as critical. The display in the respective mir­
ror blinks brightly. If this happens, check traffic
by glancing in the rearview mirror and over your
shoulder
c::> .& in General information on
page 78.
@ Tips
You can adjust the brightness on of the dis­
play on
the rearview mirror r::;, page 79.
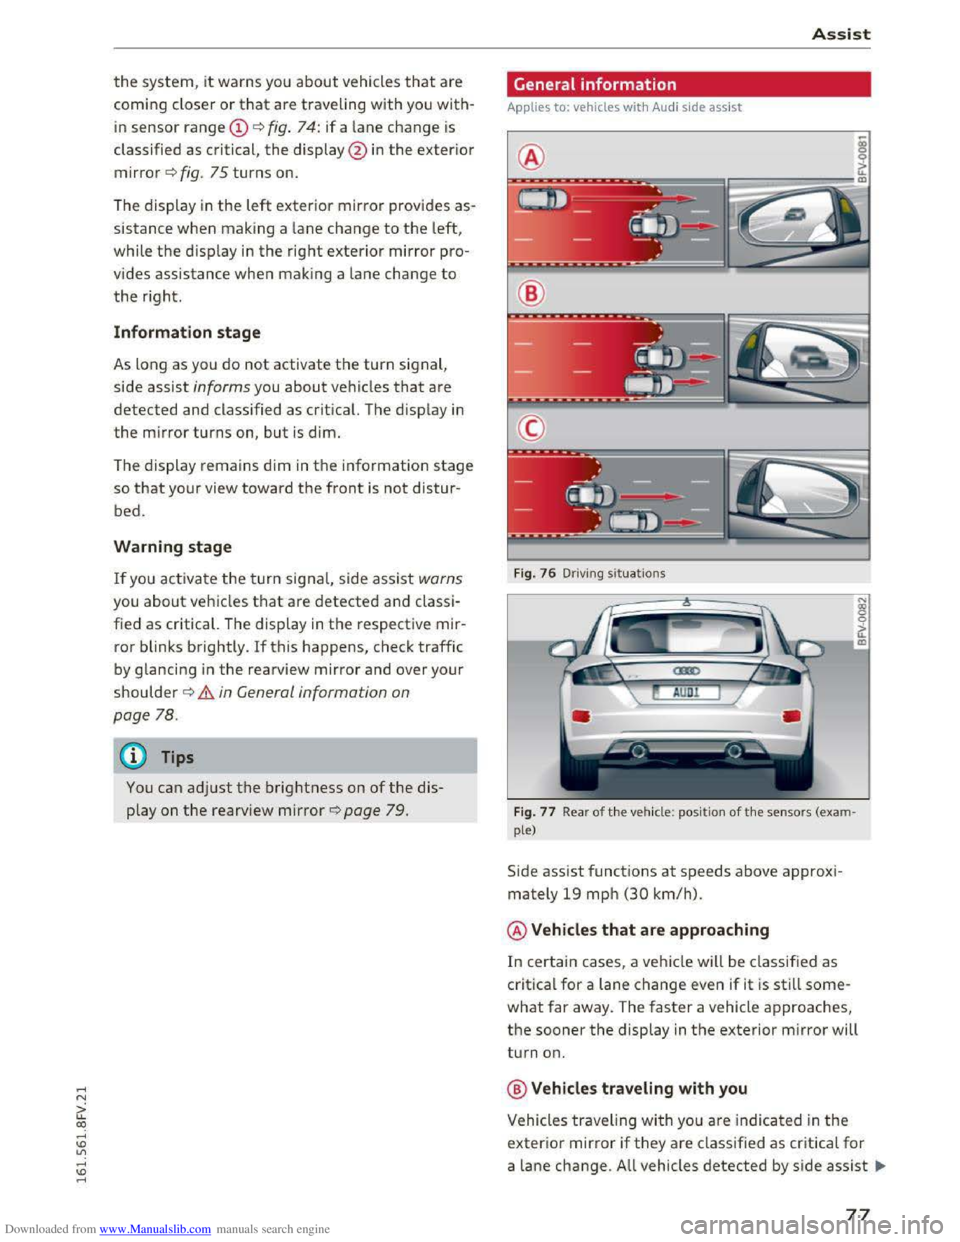
Fig. 76 Driv ing s ituations
Fig.
77 Rear of t h e vehicl e: positio n of the sensors (exam­
ple)
Side assist functions at speeds above approxi­
mately 19 mph
(30 km/h).
@Vehicles that are approaching
In certain cases, a vehicle will be classified as
critical for a lane change even if it is still some­
what far away. The faster a vehicle approaches,
the sooner the display in the exterior mirror will
turn on.
@Vehicles traveling with you
Vehicles traveling with you are indicated in the
exterior mirror if they are classified as critica l for
a lane change. All vehicles detected by side assist 111>-
77
Page 80 of 322
Downloaded from www.Manualslib.com manuals search engine Assis t
are indicated by the time they enter your "blind
spot",
at the latest.
© Vehicles left behind
If you slowly pass a vehicle that side assist has
detected ( the difference in speed betwee n the
vehicle and your vehicle is less than 9 mph or 15
km/h), the display in the exterior mirror turns on
as soon as the vehicle enters your blind spot.
The display will not turn o n if you quick ly pass a
vehicle that side assist has detected (the differ­
ence in speed between
the vehicle and your vehi­
cle
is greater than 9 mph or 15 km/h).
Functional limitations
The radar senso rs a re designed to detect the left
and right adjacent lanes when the road lanes are
the normal width. In some situations, the display
in the exter ior mirr or may turn on even though
there
is no vehicle located in the area that is criti­
cal
for a lane change. For example:
-
If the lanes are narrow or if your are driving on
the edge of your lane. If this is the case, the
system may have detected the vehicle in anoth­
er lane
that is not adjacent to your current lane.
-
If you are driving through a curve. Side assist
may react
to a vehicle that is one lane over
from the adjacent lane.
-
If side assist reacts to other objects (such as
high or displaced guard rails).
-
In poor weather conditions . The side assist
functions are limited.
Do not cover the radar senso rs c::> fig. 77 w it h
stic kers, deposits, bicycle wheels or
other ob ­
jects,
because this will affect the function. For in­
formation on cleaning, see c::>poge 270.
.&. WARNING
-Always pay attention to traffic and to the
area around your vehicle. Side assist cannot
replace a
driver's attention. The driver alone
is always responsible for lane changes and
similar driving maneuvers.
-
In some situati ons, the system may not
function or its function may be limited. For
example:
78
-If vehicles are app roaching or being left
behind very quickly . The display may not
turn on in time.
-
In poor weather condit ions such as heavy
r ain, snow or heavy
mist.
-
On very wide lanes, in tight curves, or if
there is a r ise in the road surface. Vehicles
i n
the adjacent lane may not be detected
because they are outside
of the sensor
range.
-
Audi side assist cannot detect all vehicles
under
all conditions, which can increase the
risk of acciden ts.
-Please note that side assist only disp lays ap­
proach ing vehicles
or veh icles in your blind
spot if your vehicle is traveling at l east
19 mph (30 km/h).
-In certain situations, th e system may not
work or its function may be limited. For ex­
ample:
- The displ
ay may not turn on at the right
time if vehicles are approaching or passing
very quickly.
-In poor weathe r condit ions, such as heavy
rain, snow or fog .
-
In very wide lanes, in tight cu rves or when
there are slopes in the roadway, vehicles
i n
the neighboring lanes may not be de­
tected because they a re outside
of the
senso r range.
CD Note
The sensors can be displaced by impacts or
damage
to the bumper, wheel housing and
underbody. This
can affect the system. Have
an authorized Audi dealer or authorized Audi
Service
Facility check thei r f unct ion .
(D Tips
-If the window glass in the driver's door or
front passenger 's door has been tinted, the
display in th e exterior mirror may be misin­
terpreted.
- For
an explanation on conform ity with the
FCC reg ulations in the United States and the
Industry Canada regulatio ns, refer to
c::>poge 297.
Page 81 of 322
Downloaded from www.Manualslib.com manuals search engine Switching on and off
App lies to: vehicles with Audi side assist
The system can be switched on/off in the Info­
tainment system.
"'Select in the Infotainment system: IM ENUI but­
ton >Vehicle > left control button >Driver as­
sistance >Audi side assist
An activated system will signal every time the ig­
nition is switched on by turning the displays in
the exterior mirrors on briefly.
Adjusting the display brightness
Applies to: vehicles with Audi side assist
The display brightness can be adjusted in the In­
fotainment system.
"'Select in the Infotainment system: IM ENUI but­
ton >Vehicle > left control button >Driver as­
sistance >Audi side assist
The display brightness adjusts automatically to
the brightness of the surroundings, both in the
information and in the warning stage. In very
dark or very bright surroundings, the display is
already set to the minimum or maximum level by
the automatic adjustment. In such cases, you
may notice no
change when adjusting the bright­
ness, or the change may only be noticeable once
the surroundings change.
Adjust
the brightness to a level where the display
in the information stage will not disrupt your
view forward. If you change the brightness, the
display in the exterior mirror will briefly show the
brightness level in the information stage. The
brightness of the warning stage is linked to the
brightness in the information stage and is adjust­
ed along with the information stage adjustment.
-Side assist is not active while you are mak­
ing the adjustment.
- Your settings are automatically stored and
assigned to the remote control key being
used.
Assist
Driver messages
Applies to: vehicles with Audi side assist
If the side assist switches off automatically, a
message appears in the Infotainment system dis ­
play.
@i Audi side assist: currently unavailable.
Sensor vision restricted due to surroundings.
See owner's
manual
The radar sensors' vision is affected. Do not cover
the area in front of the sensors with bike wheels,
stickers, dirt or other objects. Clean the area in
front of the sensors, if necessary q page 77,
fig. 77.
@i Audi side assist: currently unavailable.
See owner's
manual
Side assist cannot be switched on temporarily be­
cause there is a malfunction (for example, the
battery charge level may be too low).
@i Audi side assist: malfunction! Please
contact
Service
The system cannot guarantee that it will detect
vehicles correctly and it is switched off. The sen­
sors have been displaced or are faulty. Have the
system checked by an authorized Audi dealer or
authorized Audi Service Facility soon.
Audi drive select (drive
settings)
Introduction
Applies to: vehicles with Audi drive select
Drive select makes it possible to experience dif­
ferent types of vehicle settings in one vehicle.
The driver can
select from three modes, Comfort,
Auto and Dynamic, using the~.~;\,~ button in the
center console or by using the Infotainment sys­
tem. This allows you to switch between a sporty
and a comfortable driving mode, for example. In
the Individual mode, the settings can be adjust­
ed to your personal preferences. This makes it
possible to combine settings such as a sporty en-
gine
tuning with light steering. .,.
79
Page 84 of 322
Downloaded from www.Manualslib.com manuals search engine Parking systems
Parking systems
General information
Applies to: vehicles with rear parking system/parking system
plus
Depending on your vehicle's equipment, various
parking aids will
help you when parking and ma­
neuvering.
The r
ear pa rk ing syst em is an audible parking aid
that warns you of obstacles behind the vehicle
9page82.
The parking syste m plus assists you when park­
ing by audibly and visually indicating
objects de­
tected in front of and behind the vehicle
9page 83.
The rearv iew cam era shows the area behind the
vehicle in the Infotainment d isplay. The lines in
the rearview camera image help you to park or
maneuver~ page 84. The parking system plus
functions are also available~ page 83.
A WARNING
r-= ---'
-Always look for traffic and check the area
around your vehicle by looking at it directly
as well. The parking system cannot replace
the driver's attention. The driver is always
responsible when entering or leaving a park­
ing
space and during similar maneuvers.
-
Please note that some surfaces, such as
clothing,
are not detected by the system.
-Sensors and cameras have blind spots in
which people and objects cannot be detect­
ed. Be especia lly cautious of small children
and animals.
- The
sensors can be displaced by impacts or
damage to the radiator grille, bumper,
wheel housing and the underbody. The park­
ing
system may become impaired as a re­
sult. Have an authorized Audi dealer or au­
thorized Audi Service Facility check their
function.
- Make
sure the sensors are not obstructed by
stickers,
deposits or other materials. If they
are, the sensor function could be impaired.
For
additional information on cleaning, re­
fer to ~page 2 70.
82
-Some objects are not detected or displayed
by
the system under certain circumstances:
- Objects
such as barrier chains, trailer draw
bars, vertical poles or fences
- Objects above
the sensors such as wall ex­
tensions
-Objects with specific surfaces or struc­
tures such as chain link fences or powder
snow
-If you continue driving closer to a low-lying
object, it may
disappear from the sensor
range. Note that you will no longer be
warned about this obstacle.
- Keep enough distance from the curb to
avoid damage to the rims.
(D Tips
-The system may provide a warning even
though there are no obstacles in the cover­
age area in some situations, such as:
-
certain road surfaces or for long grass.
-external ultrasonic sources e.g. from
cleaning vehicles.
- heavy rain, snow,
or thick vehicle exhaust.
-We recommend that you practice parking in
a traffic-free location or parking lot to be­
come familiar with the system. When doing
this,
there should be good light and weath­
er conditions.
-
You can change the volume of the signals.
-
What appears in the display is slightly de-
layed.
- The
sensors must be kept clean and free of
snow and ice for the park assist to operate.
Rear parking system
Description
Applies to: vehicles with rear parking assist
The rear parking system is an audible parking
aid.
Description
There is a sensor in the rear bumper cover. If
these detect an obstacle, audible signals warn
you.
Page 87 of 322
Downloaded from www.Manualslib.com manuals search engine ..... N
G: CX)
.....
"' U"I
.....
"' .....
use the system for safety reasons. Have it
checked by an authorized Audi dealer or au­
thorized Audi Serv ice Facility.
-
Only use the rearview camera to assist you if
it shows a good, clear picture. For example,
the image may be affected by the sun shin­
ing into
the lens, dirt on the lens or ifthere
is a defect.
-Use the rearview camera only ifthe luggage
compartment lid is completely closed. Make
sure any objects you may have mounted on
the luggage compartment lid do not block
the rearview camer a.
- T
he camera lens enlarges and distorts the
field of vi sion. The object appears both al­
tered and inaccurate on the screen.
-In certain situations, people or objects in
the display appear close r or further away :
- For objects
that do not touch the ground,
such as the bumper of a parked vehicle, a
trailer hitch or the rear of a truck. Do not
use the help lines in this case.
-
If driven from a level surface onto an in­
cline, or a downward slope.
-
If driven toward protrudi ng objects.
-If the vehicle is carrying too much load in
the rear.
CD Note
- Always re ad and follow the applicable warn­
ings¬Ę(!) in General information on
page82.
-The orange colo red orientation lines in the
Infotainment display show the vehicle path
depending on the steering wheel angle. The
front of the vehicle front swings out more
than the rear of the vehicle. Maintain plenty
of distance so that your outside mirror or a
corner of your vehicle does not collide with
any
obstacles.
Switching on/off
App lies to: vehi cles with rearv iew camera
Switching on
‚ÄĘShift into reverse , or
Parking systems
‚ÄĘPress the P'#! button in the cen ter conso le
~page 83, fig . 81 . A short confirmation tone
sounds and the LE D in the button turns on.
Switching off
‚ÄĘDrive faster than 6 mph (10 km/h), o r
‚ÄĘ Press the P'#! button, or
‚ÄĘ switch the ign it ion off.
(!} Tips
- The visua l display in the left part of the dis­
play
shoul d he lp you detect the critical vehi­
cle areas.
-You can change the volume and display for
the signals ¬Ę page 86.
Cross parking
Applies to: veh icles wit h rearv iew camera
This view may be used when parking in a garage
or
in a parking space.
Fig. 86 Infotainme nt: aiming at a par king space
Fig. 87 Infotainme nt: al igning the vehicle
‚ÄĘ Turn the Infotainment on and shift into reverse
gear .
‚ÄĘThe orange orientation lines @show the direc¬≠
tion of travel of the vehicle. Turn the steering
wheel until the orange or ientation lines appear .,..
85