AUDI TT COUPE 2017 Owners Manual
Manufacturer: AUDI, Model Year: 2017, Model line: TT COUPE, Model: AUDI TT COUPE 2017Pages: 322, PDF Size: 79.73 MB
Page 101 of 322
CD
CD
.... N
" N ...... 0
0
Ill co
The MMI touch control pad @ q page 96, fig. 93
is located on the control knob (I)¢ page 96,
fig. 93.
Entering letters, numbers and symbols
Applies to: veh icles with MMI touch
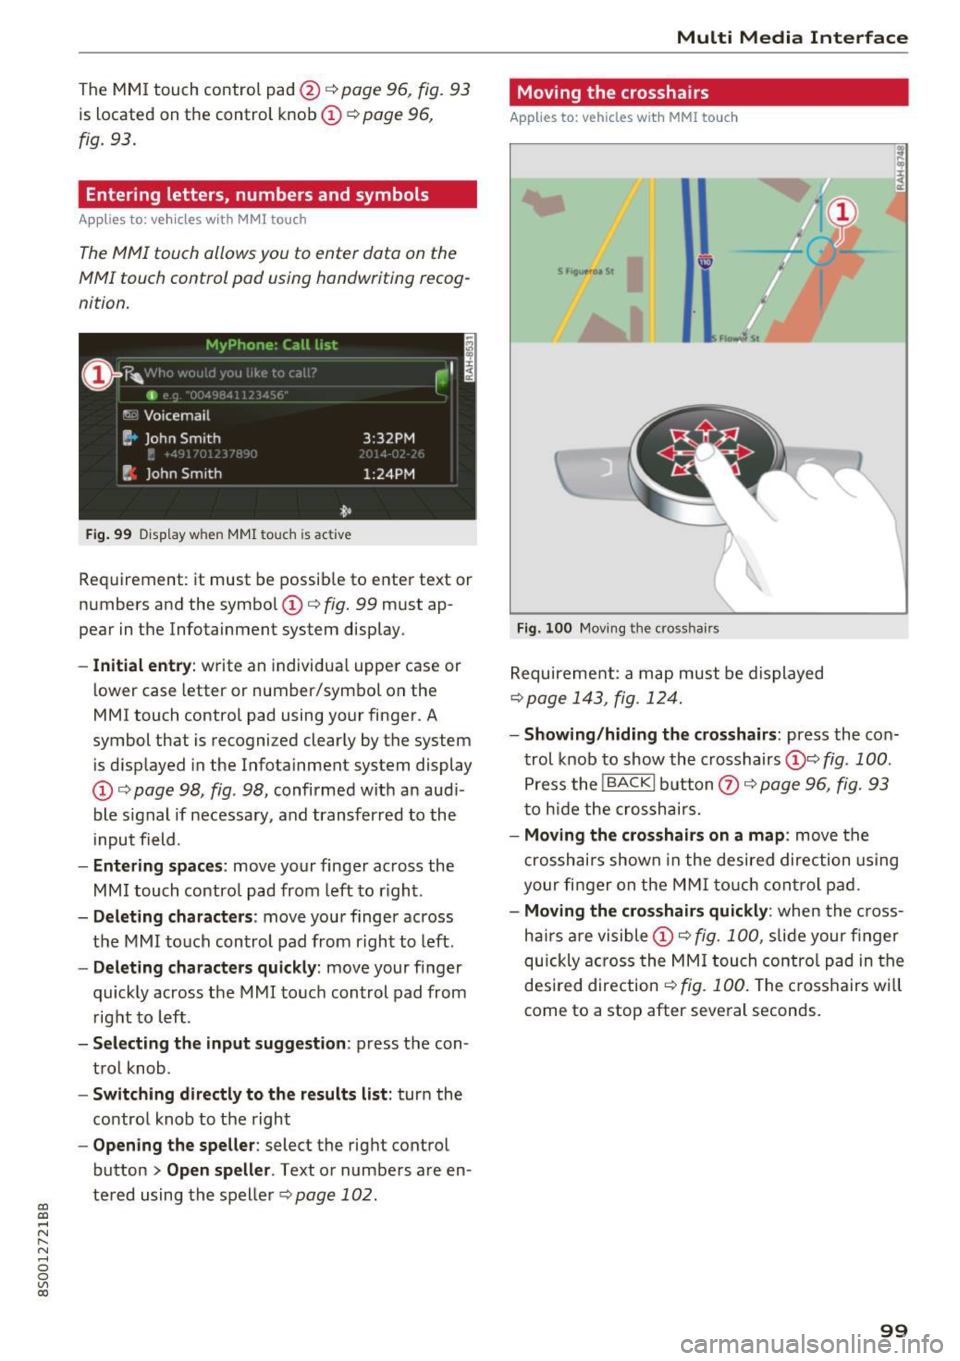
The MMI touch allows you to enter data on the
MMI touch control pad using handwriting recog
nition.
F ig. 99 Display w hen MMI touch is ac tive
Requirement : it must be possible to enter text or
numbers and the symbol
(I) q fig. 99 must ap
pear in the Infotainment system display.
- Initial entry : write an individual upper case or
lower case letter or number/symbol on the
MMI touch control pad using your finger . A
symbol that is recognized clearly by the system
is d isplayed in the Infotainment system display
(I) ¢ page 98 , fig . 98, confirmed with an aud i
ble signal if necessary, and transferred to the
input field .
-Entering spaces: move your finge r across the
MM I touch contro l pad from left to right.
- Deleting characters : move your finger across
t h e MMI touch control pad from right to left.
-Deleting characters quickly: move your finger
quickly across the MMI touch control pad from
right to left .
-Selecting the input suggestion : press the con
trol knob .
-Switching directly to the results list: turn the
control knob to the right
-Opening the speller: select the right control
button
> Open speller . Text or numbers are en
tered using the speller
q page 102.
Multi Media Interface
Moving the crosshairs
Applies to: vehicles with MMI touch
Fig. 100 Moving the cross hairs
Requirement: a map must be displayed
¢ page 143, fig. 124.
- Showing/hiding the crosshairs: press the con
trol knob to show the crosshairs
(!)¢ fig . 100 .
Press the I BACK I button Q) ¢ page 96, fig. 93
to hid e the crosshairs.
- Moving the cros shairs on a map : move the
crosshai rs shown in the desired direction using
your fi nger on the MMI touch control pad.
-Moving the crosshairs quickly : when the cross
ha irs are visible
(I)¢ fig. 100 , slide your finger
quickly across the MMI touch control pad in the
desired direction
¢ fig. 100. The crosshairs w ill
come to a stop after several seconds.
99
Page 102 of 322
Multi Media Interface
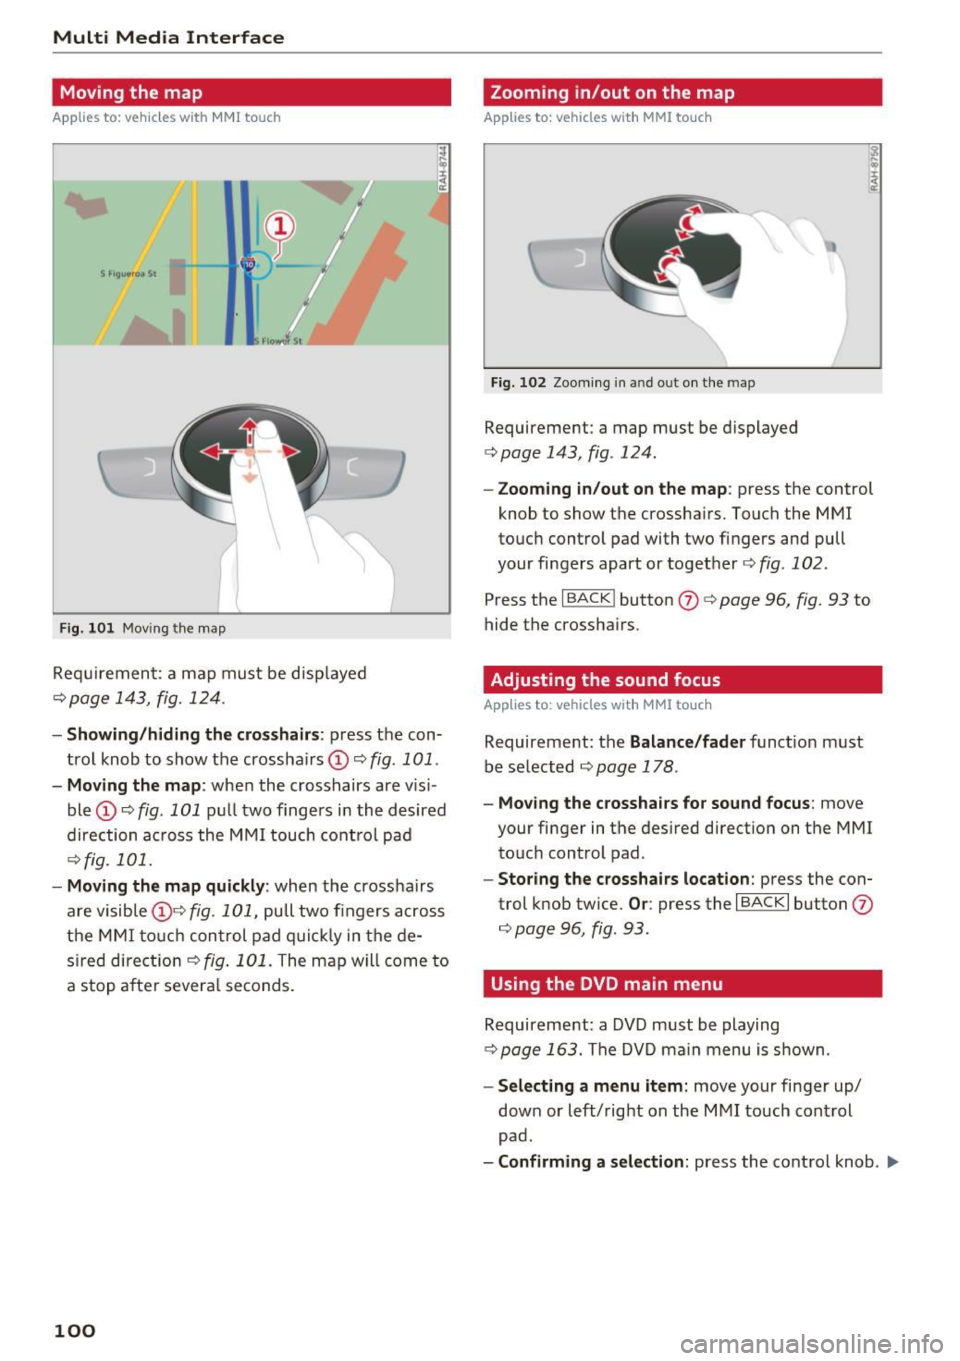
Moving the map
Applies to: vehicles with MMI touch
F ig . 101 Mov ing the map
Req uirement: a map must be d isp layed
¢page 143, fig. 124 .
I
-Showing /hiding the cro sshairs : press the con
trol knob to show the crossha irs
(!) ¢fig . 101 .
-Moving the map : when the crosshairs are vis i
ble
(D ¢ fig . 101 pull two fingers i n the desired
direction ac ross the MMI touch cont rol pad
¢fig. 101.
- Moving the map qu ickl y: when the cross hairs
are visible (!)¢
fig. 101, pull two fingers across
the MMI to uc h con trol pad q uic k ly in the de
s ired direct io n ¢
fig . 101. The map w ill come to
a stop a fte r several seconds.
100
Zooming in/out on the map
Applies to: vehicles with MMI touch
Fi g. 10 2 Zoo ming in a nd o ut on the m ap
Requirement : a map must be displayed
¢ page 143, fig . 124 .
-Zooming in /out on the map : press the control
knob to show the crossha irs . Touch the MMI
touc h control pad with two fingers and pull
your fingers apart or toget her ¢
fig. 102 .
Press the I BACK ! button (J) ¢ page 96, fig. 93 to
hide the crossha irs .
Adjusting the sound focus
Applies to : vehicles with MM! touch
Requirement: the Balance /fad er funct ion must
be se lected ¢
page 178.
-Moving the crossha ir s for sound focus : move
your finger in the desired direction on the MMI touch control pad.
- Storing the crosshairs location : press the con
trol knob twice.
Or : press the I BACK I button (J)
¢page 96, fig . 93.
Using the DVD main menu
Requirement: a DVD must be playing
c:}page 163. The DVD ma in menu is s hown.
- Select ing a menu item: move your finger up/
down or left/right on the M MI touch con trol
pad .
-Confirming a selection : press the control knob . .,.
Page 103 of 322
co
co
.... N
" N .... 0
0
Vl c:o
@ Tips
The volume of the prompts for the MMI
touch * can be adjusted separately
c:> page 179.
Operating
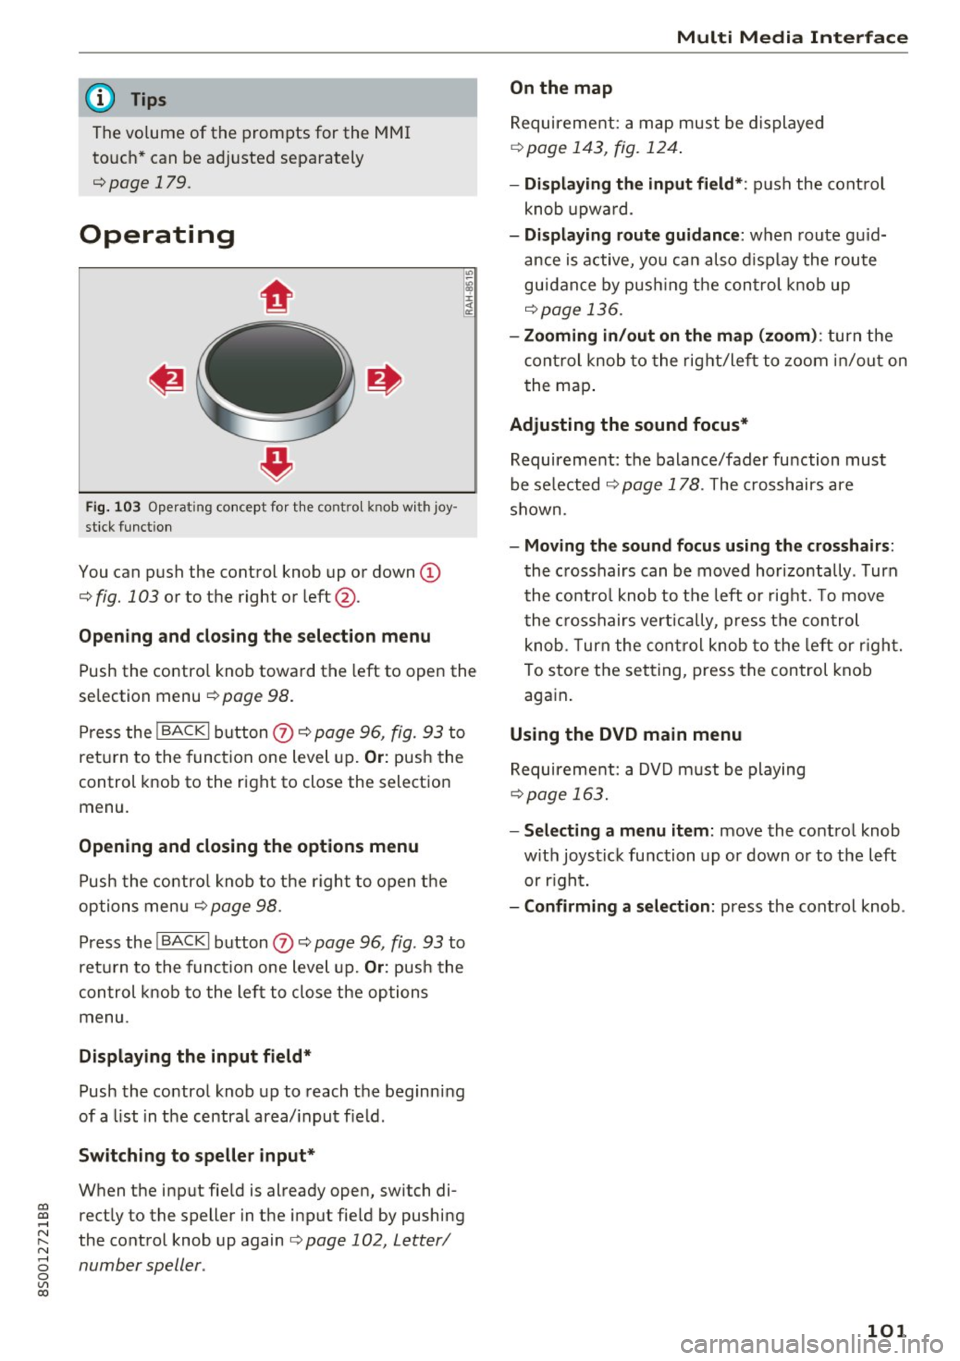
Fig . 103 Operat ing concept for t he cont ro l kn ob wi th joy
stick funct ion
You can push the control knob up or down (D
c:> fig. 103 or to the right or left@.
Open ing and closing th e selecti on menu
Push the contro l knob toward the left to open the
selection menu
c:> page 98 .
Press the I BACKI button (I) c:> page 96, fig. 93 to
r et urn to the function one level up.
Or: push the
control knob to the right to close the selection
menu .
Opening and clo sing th e opt ions menu
Push the contro l knob to the right to open the
options menu
c:> page 98.
Press the I BACKI button (I) c:> page 96, fig . 93 to
ret urn to the funct ion one level up.
Or : push the
control k nob to the left to close the options
menu .
Displaying the input field *
Push the control knob up to reach the beginning
of a list in the centra l area/ input field .
Switching to speller input *
When the input fie ld is already open, switch di
rectly to the speller in the input fie ld by pushing
the control knob up again
c:> page 102, Letter/
number speller .
Multi Media Interfac e
On the map
Requirement: a map must be displayed
c:>page 143, fig. 124 .
- Displ aying th e input field* :
push the cont rol
knob upwa rd .
- Di spl aying rout e gu idance : when route gu id
ance is active, you can also d isplay the route
guidance by push ing the control knob up
c:> page 136.
- Zooming in /out on th e map (zoom ):
turn the
cont rol knob to the right/left to zoom in/out on
t he map .
Adjusting the sound focus*
Requirement: the balance/fader function must
be se lected
c:> page 178 . The crosshairs are
shown.
- Moving th e sound focu s using th e crossh airs :
the crosshairs can be moved hor izontally . Turn
the co ntro l knob to the left o r rig ht. To move
the c rosshairs vertica lly, press the control
knob . T urn the cont rol knob to the left or r ight.
To store the setting, press the control knob again .
Using the DVD main menu
Requirement: a DVD m ust be playing
c:> page 163.
- Selecting a menu item:
move the co ntrol knob
w ith joystick function up or down or to the left
or r ight.
- Confirming a s election: press the control knob .
101
Page 104 of 322
Multi Media Interface
Opening the selection/
options menu with the
control knob
Applies to: vehicles with joystick function
Fig. 104 Opening the sele ctio n/op tions men u w ith the
con tro l knob
Letter/number speller
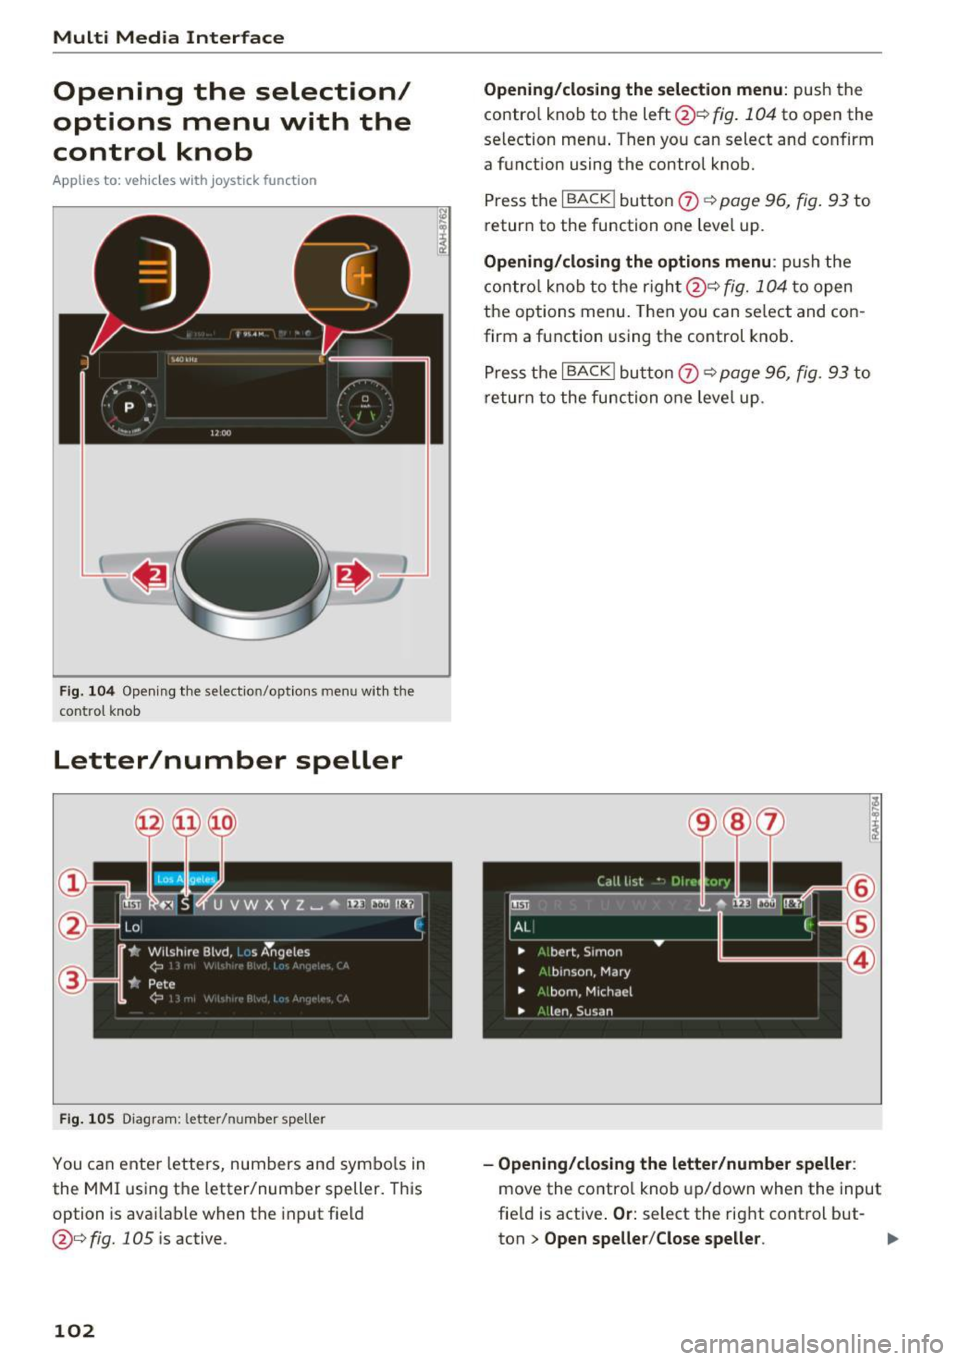
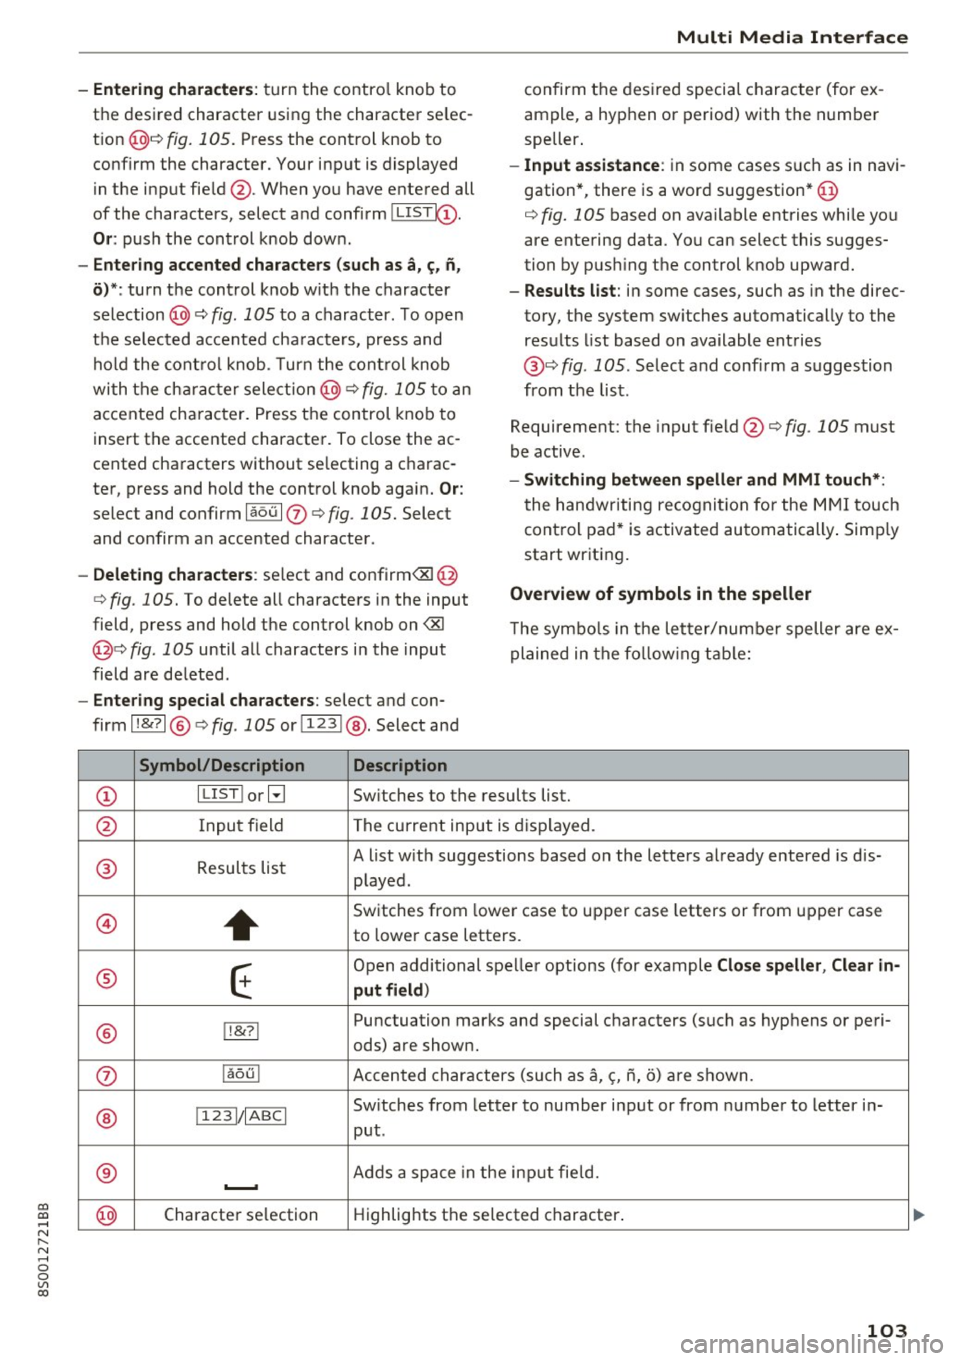
Fig. 105 Diagram : letter/ number spe ller
You can enter letters, numbers and symbo ls in
the MMI using the letter/number speller. This
option is available when the input field
@¢fig. 105 is active .
102
Opening/closing the selection menu: push the
contro l knob to the left @¢
fig. 104 to open the
selection menu . T hen you can select and confirm
a function using the control knob.
Press the
I BACK ! button 0 ¢ page 96, fig. 93 to
return to the funct ion one level up.
Opening/closing the options menu: push the
control knob to the right@¢
fig. 104 to open
the options menu. Then you can select and con
firm a function using the control knob.
Press the
I BACK I button 0 ¢ page 96, fig. 93 to
return to the function one leve l up .
-Opening/closing the letter/number speller:
move the contro l knob up/down when the input
field is active .
Or: select the right control but-
ton
> Open speller/Close speller. II>
Page 105 of 322
co
co
.... N
" N .... 0
0
Vl c:o
-Entering characters: turn the contro l knob to
the desired character using the character se lec
t ion @¢ fig.
105. Press the control knob to
confirm the character. Your input is displayed
in the input fie ld @ . When you have entered all
of the characters, select and confirm~
Or: push the control knob dow n.
-Entering accented characters (such as a, ~. n,
o) *: turn the control knob w it h the character
selection @¢ fig .
105 to a character. To open
the se lected accen ted cha racters, press and
hold the control knob. T urn the control knob
wi th the charact er selection @¢ fig.
105 to an
accented cha racter. Press the control knob to
insert the accented character. To close the ac
cented characters without se lecting a charac
ter, press and hold the control knob again.
Or:
select and confirm laou 10 ¢ fig . 105. Select
and confirm an accented character .
-Deleting characters: select and confirm<&! @
¢ fig .
105. To delete all characters in the input
field, press and hold the control knob on
<&I
@¢ fig . 105 until a ll characters in the input
field are de leted .
-Entering special characters : select and con
firm l!&?l @¢fig .
105 orll23 I@ . Select and
Symbol/Description Description
Multi Media Interface
confirm the desired special character (for ex
ample, a hyphen or period) with the number
speller .
-Input assistance : in some cases s uch as in navi
gation*, there is a word suggestion* @
¢ fig.
105 based on available entries while you
are entering data. You can select this sugges
tion by pus hing the control knob upward.
- Results list : in some cases, such as in the direc
tory, the system sw itches automatically to the
results list based on available entries
@ ¢
fig. 105 . Select and confirm a suggestion
from the list.
Requirement: the input field@¢
fig. 105 must
be active .
-Switching between speller and MMI touch*:
the handwriting recogn itio n for the MMI touch
control pad* is activated automatically . Simply
start wr iting.
Overview of symbols in the speller
T he symbo ls in the letter/numbe r speller are ex
plained in the following table:
CD ILIST lorB
Switches to the results list.
@ Input field The current input is displayed.
® Results list A list w
ith suggestions based on the letters already entered is dis-
played .
@
+
Switches from lower case to upper case letters or from upper case
to lower case letters.
® E
Open additional spe ller options (for example Close speller , Clear in -
put field )
® 1!&71 Punctuation
marks and special characters (such as hyphens or peri-
ods) are shown.
0 l
aou l Accented characters (such as
a, <;, ii, o) are shown .
Sw itches from letter to number input or from number to letter in-
® 11 231/ IABCI
put.
® ...__. Adds
a space in the inp ut fie ld .
@ Character
selection Highlights
the selected character .
103
Page 106 of 322
Multi Media Interface
Symbol /Description Description
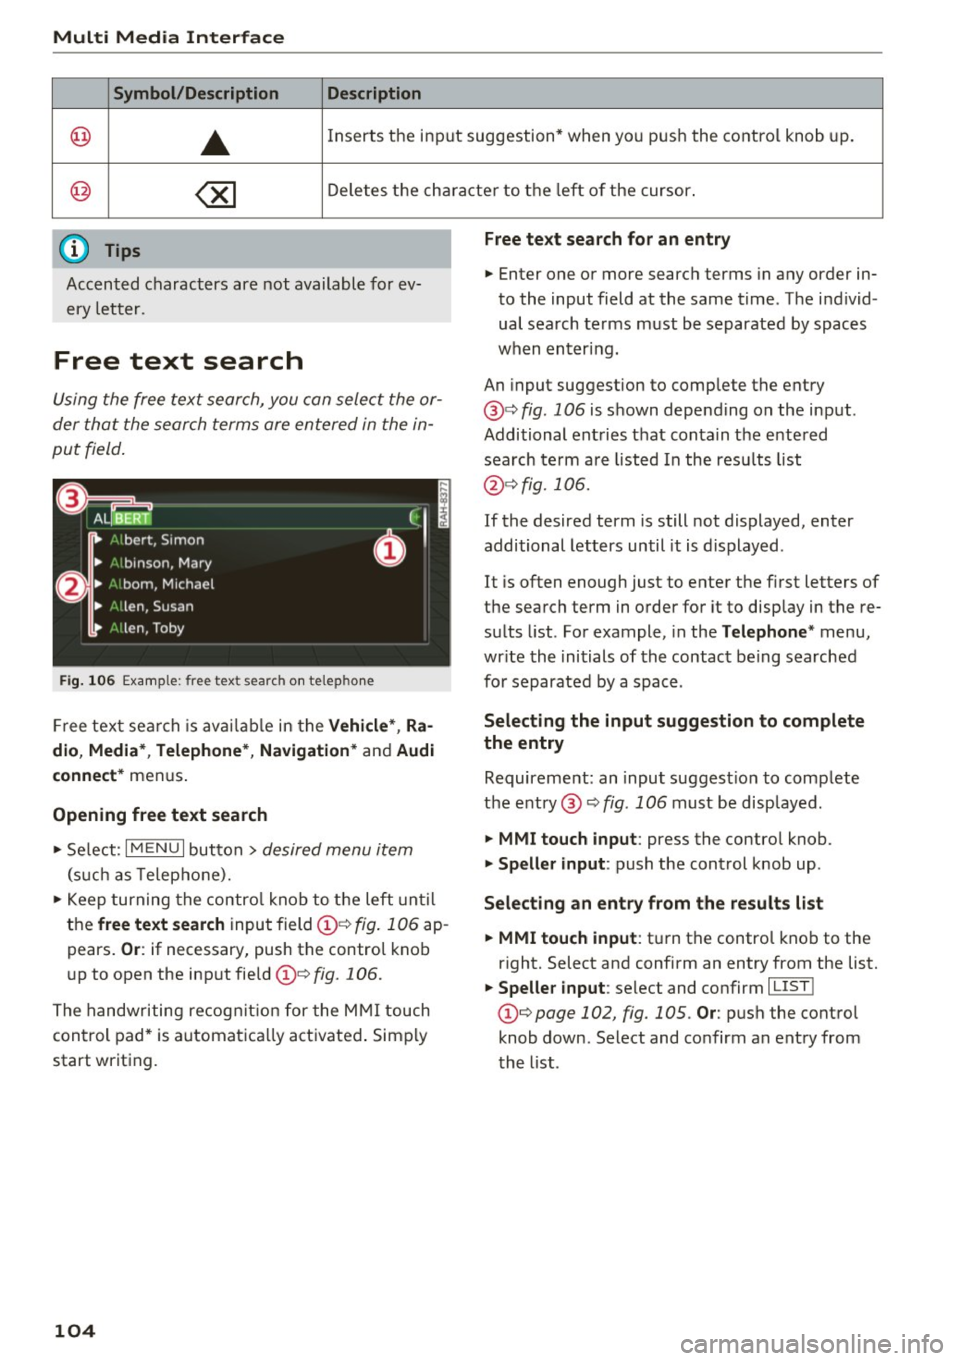
@ ..
Inserts the input s uggestion* when yo u pus h the co ntro l knob up .
@ ~ D ele tes t he chara cter to the left o f the cursor.
@ Tips
Accen ted characters are not available for ev
ery letter.
Free text search
Using the free te x t sear ch, you can select the or
der that the search term s are en tered in the in
pu t field .
Fig. 106 Exal'l'lple: free text searc h on telep hon e
Fr ee tex t se arc h is availabl e in the Vehicle *, Ra
dio, Media *, Telephone* , Navigation *
and Audi
connect*
men us.
Opening free text search
"' Se lect : I MENU I button> desired menu item
(such as Telep ho ne).
"' Keep turning the contro l knob to t he left until
the
free text search inpu t field @¢ fig. 106 ap
pears .
Or: if necessary, push the contro l kno b
u p to open the inp ut fie ld @ ¢
fig. 1 06.
The handwriting re cog nit ion for the M MI touch
control pad * is a utomatica lly act ivated . Simp ly
start writ ing.
104
Free text search for an entry
.. Enter one or more searc h terms in any order in
to the input field a t the same time . T he individ
ual sea rch terms must be separated by spaces
when en ter ing.
An input suggestion to comp lete the entry
@ ¢
fig. 106 is shown depending on the input.
Additional ent ries t hat conta in t he e nte red
sea rch te rm a re listed In the resu lts list
@ ¢fig. 106.
If the desired term is still not displayed, enter
additional letters until it is displayed .
It is often enough just to enter the f irst letters of
the search term in order fo r it to disp lay in the re
s ul ts list. Fo r example, in the
Telephone * menu,
wr ite the ini tials of the contac t be ing searched
for separated by a space .
Selecting the input suggestion to complete
the entry
Requireme nt: an input suggest io n to comp le te
the entry @¢
fig. 1 06 must be disp layed.
.. MMI touch input : press the control knob.
.. Speller input : push the control knob up .
Selecting an entry from the results list
.. MMI touch input :
tu rn the contro l knob to the
r ight. Select and confirm an entry from the list.
.. Speller input : select and confirm I LIST!
t he list .
Page 107 of 322
CD
CD
.... N
" N ...... 0
0
Ill co
Multi Media Interface
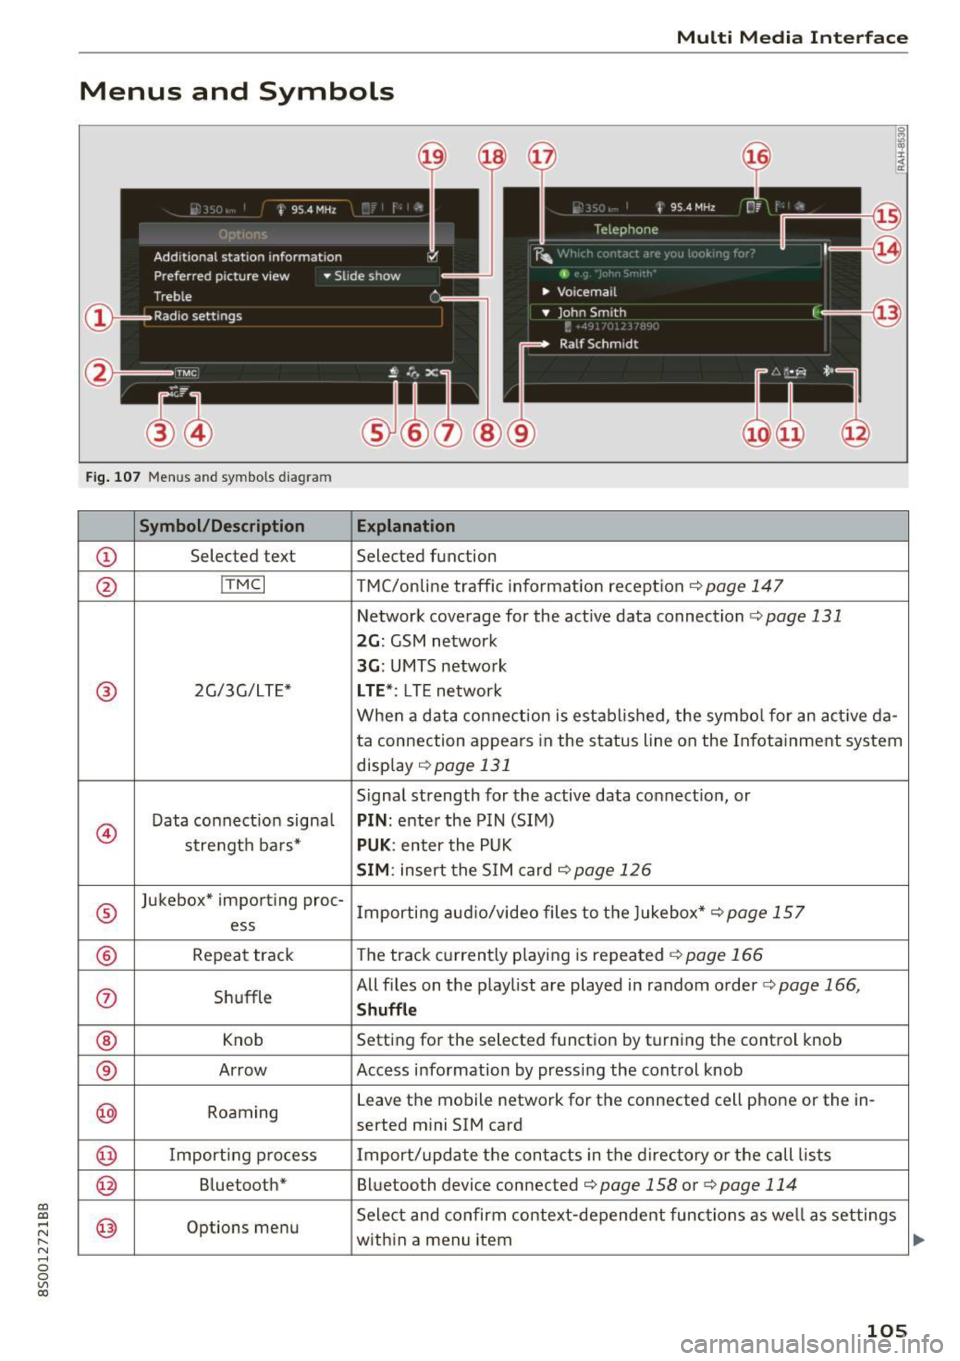
Menus and Symbols
I~ :c
' ~
@
14
Fig. 107 Menus and symbols diagram
Symbol/Description Explanation
CD Selected text Selected function
@ I
TMC I TMC/online traffic informat ion recept ion c::>page 147
Network coverage for the active data connection c::> page 131
2G: GSM network
3G : UMTS network
® 2G/3G/LTE* LTE *: LTE network
When a data connection is establ ished, the symbol for an act ive da-
ta connection appea rs in the status line on the Infota inment system
display
c::> page 131
Signal strength for the active data connect ion, or
@
Data connect ion signa l PIN: enter the PIN (SIM)
strength bars*
PUK : enter the PUK
SIM: insert the SIM card c::>page 126
®
Jukebox* importing proc-
Importing audio/video files to the Jukebox*
c::> page 157
ess
® Repeat track The track currently playing is repeated c::>page 166
0 Shuffle All files on the playlist are played in random o
rder
c::> page 166,
Shuffle
® Knob Setting for the selected function by turning the control knob
® Arrow Access information by pressing the control
knob
@ Roaming Leave the mobile network for the connected cell phone or the in-
serted mini SIM card
@ Importing process Import/update the contacts in the directory or the call lists
@ Bluetooth* Bluetooth device connected c::> page 158 or c::> page 114
@ Options menu Select
and confirm context-dependent functions as we ll as settings
within a menu item
105
Page 108 of 322
Multi Med ia Int erfac e
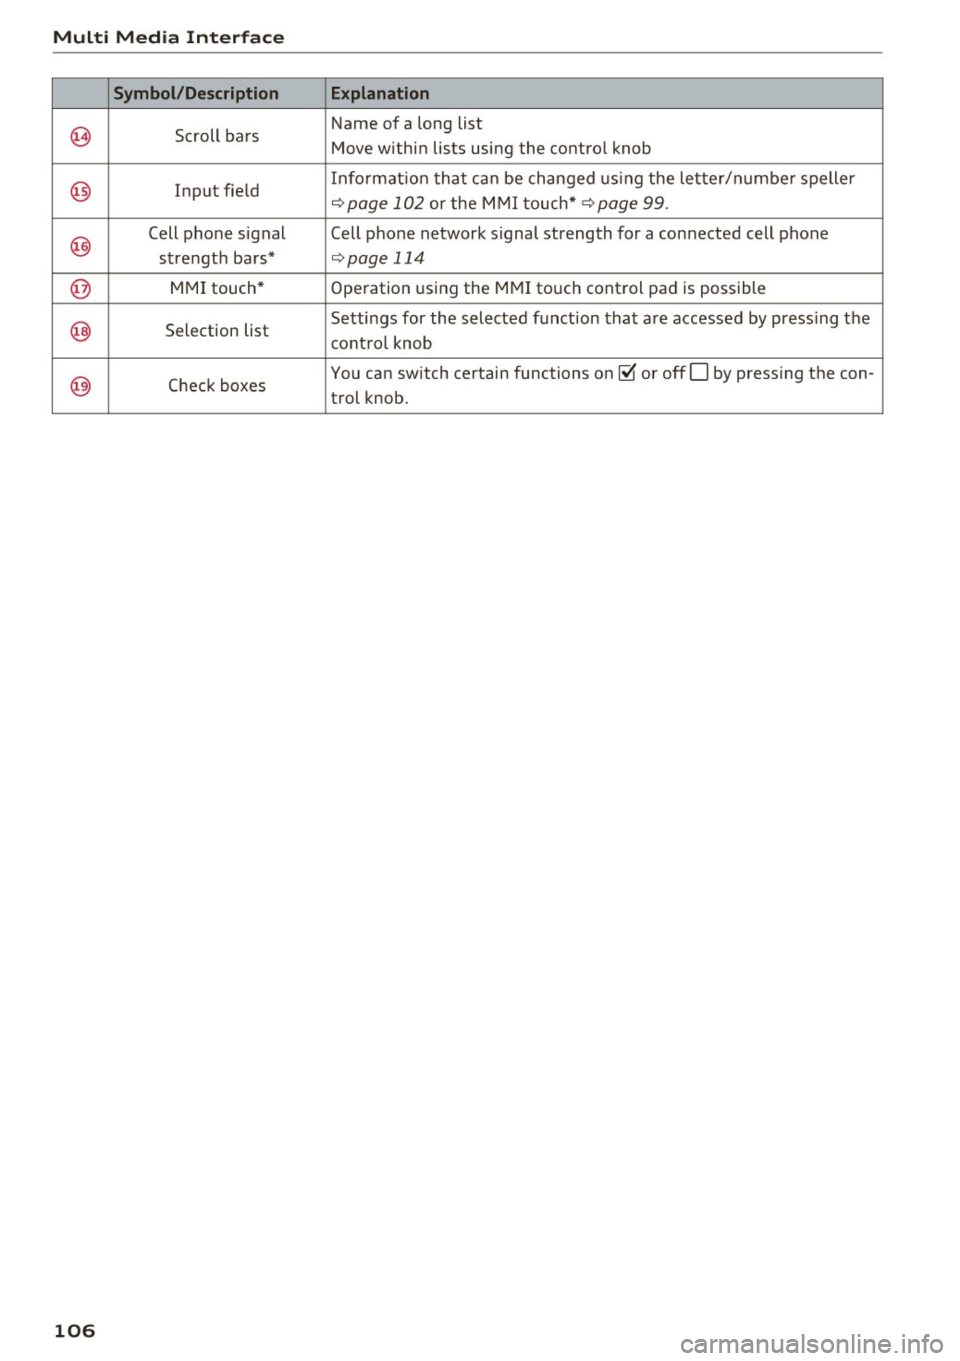
Symbol /Description E xplanation
~ Scroll bars Name of
a long list
Move within lists using the control knob
@ Input field Informat
ion that can be changed using the letter/numbe r spelle r q page 102 or the MMI touch* q page 99.
@
Cell phone signal Cell phone network signal strength for a connected cell phone
strength bars*
qpage 114
@ MMI touch* Operation using the MMI touch control pad is possible
@ Selection list Settings for the
selected function that are accessed by press ing the
control knob
@) Check boxes You
can switch certain functions on~ or offO by pressing the con-
trol knob.
106
Page 109 of 322

"'
"' ....
N
" N .... 0 0
"' CX)
• Telephone
• Audi connect
• Navigation
• Directory
• Radio
• Med ia
• Sound
• Help
• Help Speech dia log system
• Help Telephone
• Help Audi connect
• Help Navigation
• Help Map
• Help Radio
• Help Media
TELEPHONE
· Enter number
• Delete number/ correc tion
• Directory
• Call (XY)
·business/ private/ land line/ mobile
NAVIG:ATI0N
• Navigate to (XV)
• Business address/ Private address
• Start/ cancel route guidance
· Directory
• Last destinations
• N avigation favorites
• Drive home
• Enter address
• Enter country/ town/ street/ state
• Exclude routt / Exclude route for (XY) km/ m
• M ap
• Day map / Night map
Voice recognition system
• Favor ites
• Call (XY)
• Enter number
• Redial
• Read new tex t message
• N avigate to
(XV)
• Enter address/destination
• Onhne destinations
• Cancel route guidance
• M ap
• Line (XY)
• Next page/ previous page
• Cancel
• N o, l meant
()(Y)
• Correction
• Call list
• Redial
• Call mailbox
• Enter PIN/ delete PI N
• Telephone favori tes
• Exclude ne xt route section / Exclude
nex t street
• Route list
• Calculate alternative routes
· Online destinations
• Special destination
• 20 driving position map/ 20 north position map/ 30 map/ Destination map/ Overview map
AllJC !H C0NNECf
• Audi connect
• Travel information/ Parking Information
• Fuel prices
• Weather
RADIO
• Radio presets
• Last stations
• FM
• FM / AM/ SIRIUS XM
• Station (XY) / Frequency (XY)
• T raffic announcement on/ off
Fig . 108 Co mmand overv ie w
• Flight Information I Train Information
• City events
• Online news
• Twitter
MEDIA
• Jukebo x
• CO/ DVD y
• SO card l / SD card 2
· Audi music Interface/ !Pod/ USB / Bluetooth /
Wl ·Fi / Medium (XV)
• Media favorites/ Artists/ Albums/ Genres/
Tracks/ Playlists / Videos
• Folder up
· Random playback on / off
107
Page 110 of 322

Voice recognition system
Voice recognition system Operating
Applies to: vehicles with vo ice recognition system
You con operate many Infotainment functions
conveniently by speaking.
Req uirement: the ignition and the MM I must be
sw itched on, there m ust be no p hone call in p rog
ress and the park ing system must not be active .
... Switching on : briefly press the~ but ton @
¢page 21, fig. 10 on the mu ltifunction stee r
ing whee l an d say the desired command after
the
Beep .
... Switching off :
press and hold the l2!J button.
Or: say the command C ancel.
.., Pause :
say the command Pause . To resume,
press the
l2!I button .
... Corre cting : press the ~ button one t ime
@ ¢
page 20, fig. 8. Or: say the command Cor
r ec tion .
Input assistance
The system gu ides you through the input with
visual and audio feedback .
-Visual input assistance : after switching on
vo ice recognit ion, a display with a se lection of
poss ible commands appea rs. The command
display can be sw itched on/off under
I M ENU !>
Setting s> left control bu tton > MMI setting s>
Speech dialog sy stem .
-Audio input as sistance :
to have the poss ible
comma nds read, press the
10, I button on the
mul tifunction steering wheel briefly and say
Help .
For the syst em to understand you:
Speak clearly and dist inctly at a normal volume .
Speak louder when d riving faster .
Emphasize the words in the commands evenly
and do not leave long pauses .
Do not speak a command when the voice recogni
tion system is making an announcement .
Close the doors, the windows and the sunroof* to reduce bac kground noise. Make sure t hat passen-
108
gers are not speaking when you are giv ing a voice
command .
Only use the system from the dr ive r's seat be
c au se the hands free microphone is direc ted to
ward that seat .
Additional settings
See¢ page 179, Voice recognition system .
&_ WARNING
-Dire ct yo ur full attention to dr iv ing. As the
d river, you have complete responsibili ty fo r
safety in traff ic. Only use the functions in
such a way that you a lways maintain com
p lete contro l over your vehicle in all traffic
situations .
- Do not use the voice recognition system i n
emergencies beca use your voice may change
in stressful s ituations. It may take longer to
dia l the number or the system may not be
ab le to dia l it at all. Dial the emergency
number manually.
(D Tips
- The d ia log pauses when there is an incom
ing phone call and will continue if you ig
nore the call. The dia log ends if you answer
the ca ll.
- There are no navigation prompts* when a di
alog is act ive .
- You can select an item in the list using ei
ther the vo ice recognit ion system or the
cont rol knob .
Command overview
information
Applies to: vehicles with voice recognition system
The following overv iews des cribe the commands
t h at can be used to operate t he M MI using the
vo ice recognit ion system.
Alternative commands are separated using a"/",
fo r example say:
Telephone / (or) Navigation /
(or) Radio.
Sequences of commands used to perform an ac
tion are ident ified w ith a
"> ", fo r example say:
Enter addre ss > (then) Enter country /state . II>