tow AUDI TT COUPE 2020 Owner's Manual
[x] Cancel search | Manufacturer: AUDI, Model Year: 2020, Model line: TT COUPE, Model: AUDI TT COUPE 2020Pages: 280, PDF Size: 98.79 MB
Page 90 of 280
Assist systems
Switching the system on
Applies to: vehicles with cruise control system
@ #
©
f°
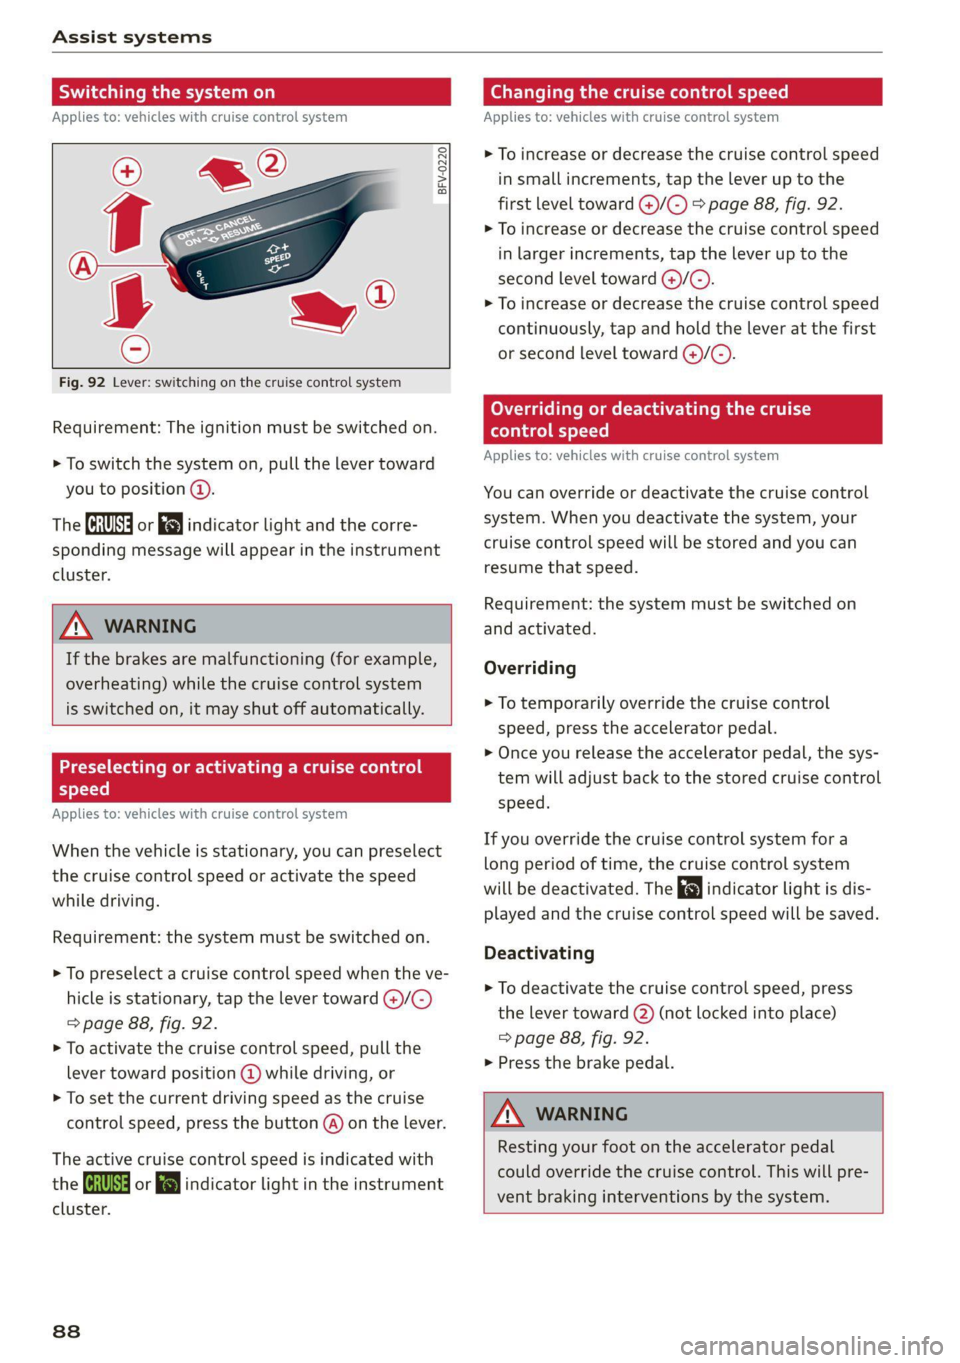
Fig. 92 Lever: switching on the cruise control system
Requirement: The ignition must be switched on.
> To switch the system on, pull the lever toward
you to position @).
The (a or 8] indicator light and the corre-
sponding message will appear in the instrument
cluster.
ZA WARNING
If the brakes are malfunctioning (for example,
overheating) while the cruise control system
is switched on, it may shut off automatically.
Preselecting or activating a cruise control
Cy ey-t-te)
Applies to: vehicles with cruise control system
When the vehicle is stationary, you can preselect
the cruise control speed or activate the speed
while driving.
Requirement: the system must be switched on.
> To preselect a cruise control speed when the ve-
hicle is stationary, tap the lever toward @)/G)
=> page 88, fig. 92.
> To activate the cruise control speed, pull the
lever toward position @ while driving, or
> To set the current driving speed as the cruise
control speed, press the button @) on the lever.
The active cruise control speed is indicated with
the ICRUISE| or i=} indicator light in the instrument
cluster.
838
Changing the cruise control speed
Applies to: vehicles with cruise control system
> To increase or decrease the cruise control speed
in small increments, tap the lever up to the
first level toward @)/G) > page 88, fig. 92.
> To increase or decrease the cruise control speed
in larger increments, tap the lever up to the
second level toward ()/C).
> To increase or decrease the cruise control speed
continuously, tap and hold the lever at the first
or second level toward @/G).
Overriding or deactivating the cruise
control speed
Applies to: vehicles with cruise control system
You can override or deactivate the cruise control
system. When you deactivate the system, your
cruise control speed will be stored and you can
resume that speed.
Requirement: the system must be switched on
and activated.
Overriding
> To temporarily override the cruise control
speed, press the accelerator pedal.
> Once you release the accelerator pedal, the sys-
tem will adjust back to the stored cruise control
speed.
If you override the cruise control system for a
long period of time, the cruise control system
will be deactivated. The indicator light is dis-
played and the cruise control speed will be saved.
Deactivating
> To deactivate the cruise control speed, press
the lever toward (2) (not locked into place)
=> page 88, fig. 92.
> Press the brake pedal.
A WARNING
Resting your foot on the accelerator pedal
could override the cruise control. This will pre-
vent braking interventions by the system.
Page 91 of 280
8S1012721BB
Assist systems
Switching the system off
Applies to: vehicles with cruise control system
When you switch the system off completely, the
cruise control speed will be deleted.
Requirement: the system must be switched on.
> To switch the system off, press the lever toward
@ (locked into place) > page 88, fig. 92, or
> Switch the ignition off.
Applies to: vehicles with cruise control system
ICRUISE| / 3) Speed control system: currently un-
available. See owner's manual
If the indicator light turns on and this message
appears, the cruise control system has been deac-
tivated. There is a temporary malfunction, for ex-
ample the brakes are overheating. Switch the
cruise control system on again later.
Audi active lane assist
Applies to: vehicles with Audi active lane assist
Active lane assist detects lane marker lines with-
in the limits of the system using a camera in the
windshield. If you are approaching a detected
lane marker line and it appears likely that you
will leave the lane, the system will warn you with
corrective steering. You can override this steering
at any time. If you pass over a line, the steering
wheel will vibrate lightly. In order for this warn-
ing vibration to occur, it must first be switched
on in the Infotainment system. Active lane assist
is ready for operation when the lane marker line
is detected on at least one side of the vehicle.
The system is designed for driving on express-
ways and highways and so it only activates at
speeds above approximately 40 mph (65 km/h)
(depending on the market).
Applies to vehicles with side assist*: If you acti-
vate a turn signal when active lane assist is ready
and it classifies a lane change as critical because
D_ The corrective steering function is not available in all mar-
kets.
of vehicles traveling alongside you or approach-
ing you, there will be noticeable corrective steer-
ing shortly before you leave the lane. This will at-
tempt to keep your vehicle in the lane.
Applies to vehicles without side assist*: When
the system is ready, it will not warn you if you ac-
tivate the turn signal before crossing the lane
marker line. In this case, it assumes that you are
changing lanes intentionally.
Z\ WARNING
— The system warns the driver that the vehicle
is leaving the lane using corrective steering.
The
driver is always responsible for keeping
the vehicle within the lane.
— The system can assist the driver in keeping
the vehicle in the lane, but it does not drive
by itself. Always keep your hands on the
steering wheel.
— Corrective steering may not occur in certain
situations, such as during heavy braking.
— There may be cases where the camera does
not recognize all lane marker lines. Correc-
tive steering can only take place on the side
of the vehicle where lane marker lines are
detected.
— Other road structures or objects could possi-
bly be identified unintentionally as lane
marker lines. As a result, corrective steering
may be unexpected or may not occur.
— The camera view can be restricted, for exam-
ple by vehicles driving ahead or by rain,
snow, heavy spray light shining into the
camera or by dirt on the window. This can
result in active lane assist not detecting the
lane marker lines or detecting them incor-
rectly.
— In certain situations where visibility is low,
the vehicle may switch internally from “ear-
ly” to “late” steering correction )).
— Under certain conditions such as ruts in the
road, an inclined roadway or crosswinds, the
corrective steering alone may not be enough
to keep the vehicle in the middle of the lane.
89
Page 96 of 280

Assist systems
the system, it warns you about vehicles that are
coming closer or that are traveling with you with-
in sensor range @) > fig. 99: if a lane change is
classified as critical, the display @) in the exterior
mirror > fig. 100 turns on.
The display in the left exterior mirror provides as-
sistance when making a lane change to the left,
while the display in the right exterior mirror pro-
vides assistance when making a lane change to
the right.
Information stage
As long as you do not activate the turn signal,
side assist informs you about vehicles that are
detected and classified as critical. The display in
the mirror turns on, but is dim.
The display remains dim in the information stage
so that your view toward the front is not distur-
bed.
Warning stage
If you activate the turn signal, side assist warns
you about vehicles that are detected and classi-
fied as critical. The display in the respective mir-
ror blinks brightly. If this happens, check traffic
by glancing in the exterior mirrors and over your
shoulder > A\ in General information on
page 95.
@ Tips
You can adjust the brightness on of the dis-
play on the rearview mirror > page 95.
94
General information
Applies to: vehicles with Audi side assist
BFV-0260
BFV-0082
Fig. 102 Rear of the vehicle: position of the sensors (exam-
ple)
Side assist functions at speeds above approxi-
mately 19 mph (30 km/h).
@ Approaching vehicles
In certain cases, a vehicle will be classified as
critical for a lane change even if it is still some-
what far away. The faster a vehicle approaches,
the sooner the display in the outside mirror will
turn on.
@ Vehicles traveling with you
Vehicles traveling in the same direction as your
vehicle are indicated in the exterior mirror if they
are classified as critical for a lane change. All >
Page 104 of 280
Parking aid
General information
Applies to: vehicles with rearview camera
© © 3
S cz o
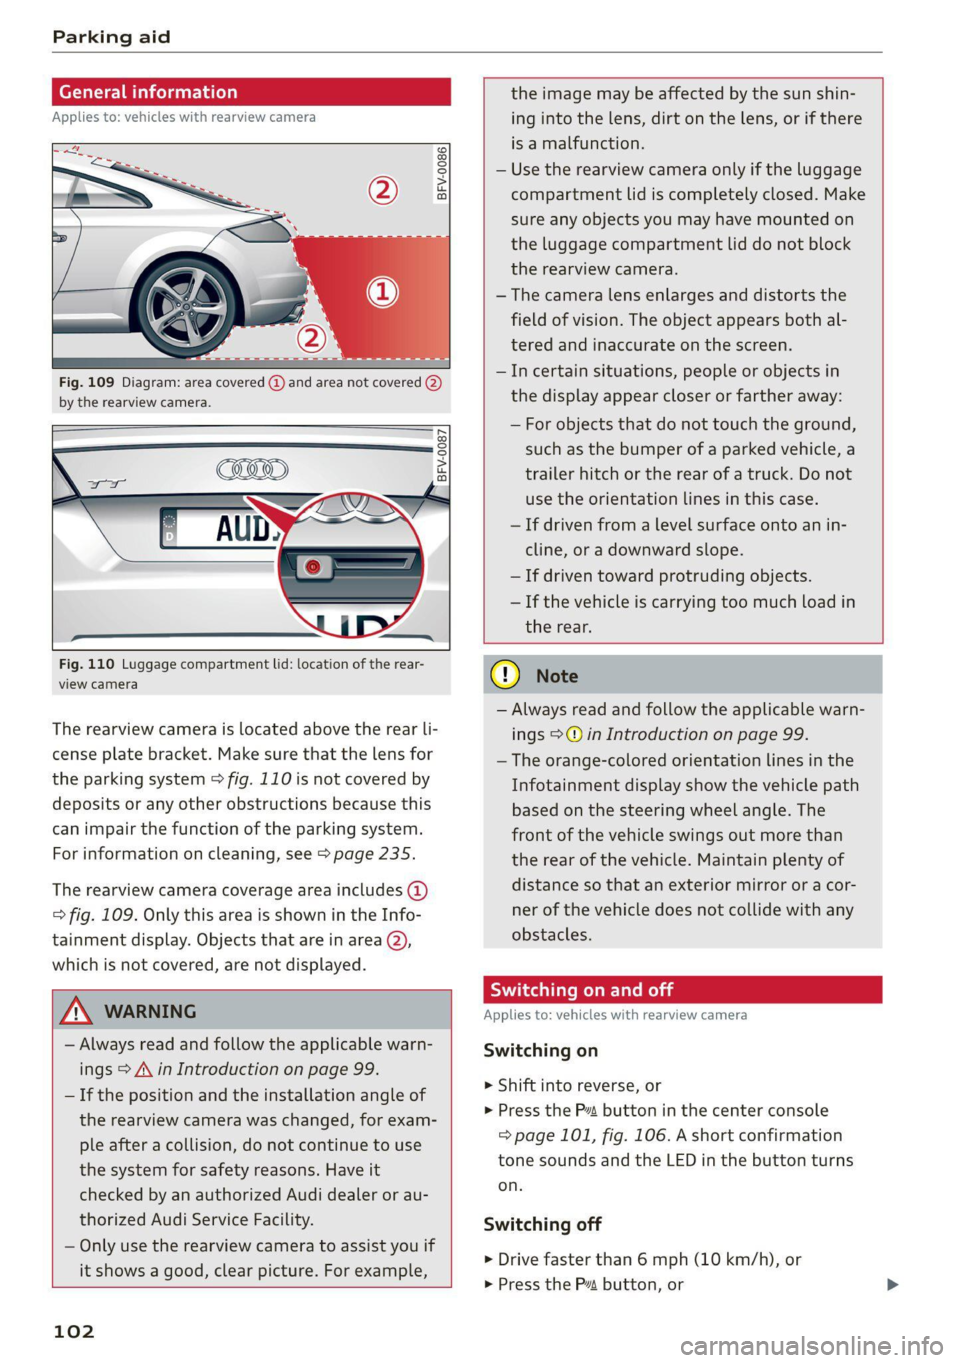
Fig. 109 Diagram: area covered @) and area not covered (2)
by the rearview camera.
BFV-0087
Fig. 110 Luggage compartment lid: location of the rear-
view camera
The rearview camera is located above the rear li-
cense plate bracket. Make sure that the lens for
the parking system > fig. 110 is not covered by
deposits or any other obstructions because this
can impair the function of the parking system.
For information on cleaning, see > page 235.
The rearview camera coverage area includes (4)
=> fig. 109. Only this area is shown in the Info-
tainment display. Objects that are in area Q),
which is not covered, are not displayed.
ZA\ WARNING
— Always read and follow the applicable warn-
ings > A in Introduction on page 99.
— If the position and the installation angle of
the rearview camera was changed, for exam-
ple after a collision, do not continue to use
the system for safety reasons. Have it
checked by an authorized Audi dealer or au-
thorized Audi Service Facility.
— Only use the rearview camera to assist you if
it
shows a good, clear picture. For example,
102
the image may be affected by the sun shin-
ing into the lens, dirt on the lens, or if there
is a malfunction.
— Use the rearview camera only if the luggage
compartment lid is completely closed. Make
sure any objects you may have mounted on
the luggage compartment lid do not block
the rearview camera.
— The camera lens enlarges and distorts the
field of vision. The object appears both al-
tered and inaccurate on the screen.
—Incertain situations, people or objects in
the display appear closer or farther away:
— For objects that do not touch the ground,
such as the bumper of a parked vehicle, a
trailer hitch or the rear of a truck. Do not
use the orientation lines in this case.
—If driven from a level surface onto an in-
cline, or a downward slope.
— If driven toward protruding objects.
— If the vehicle is carrying too much load in
the rear.
@) Note
— Always read and follow the applicable warn-
ings >@ in Introduction on page 99.
— The orange-colored orientation lines in the
Infotainment display show the vehicle path
based on the steering wheel angle. The
front
of the vehicle swings out more than
the rear of the vehicle. Maintain plenty of
distance so that an exterior mirror or a cor-
ner of the vehicle does not collide with any
obstacles.
Sct Rolal
Applies to: vehicles with rearview camera
Switching on
> Shift into reverse, or
> Press the Pz button in the center console
=> page 101, fig. 106. A short confirmation
tone sounds and the LED in the button turns
on.
Switching off
> Drive faster than 6 mph (10 km/h), or
> Press the Pa button, or
Page 107 of 280
8S1012721BB
Intelligent Technology
Intelligent Technology
Electronic Stabilization
Control (ESC)
Electronic Stabilization Control (ESC) supports
driver safety. It reduces the risk of slipping and
improves driving stability. ESC detects critical sit-
uations such as the vehicle oversteering and un-
dersteering or the wheels are spinning. The
brakes are applied or the engine torque is re-
duced in order to stabilize the vehicle. When the
ESC engages, the B indicator light blinks in the
instrument cluster.
The following systems are integrated in the ESC:
Anti-lock braking system (ABS)
ABS prevents the wheels from locking when brak-
ing. The vehicle can still be steered even during
hard braking. Apply steady pressure to the brake
pedal. Do not pump the pedal. A pulsing in the
brake pedal indicates that the system is acting to
stabilize the vehicle.
Brake assist system
The brake assist system can decrease braking dis-
tance. It increases braking power when the driver
presses the brake pedal quickly in emergency sit-
uations. You must press and hold the brake pedal
until the dangerous situation is over.
Anti-Slip Regulation (ASR)
ASR reduces drive power when the wheels begin
spinning and adapts the power to the road condi-
tions. This will increase the driving stability.
Electronic Differential Lock (EDL)
The EDL applies the brakes to wheels that are
slipping and transfers the drive power to the oth-
er wheels. This function is not available at higher
speeds.
In extreme cases, EDL automatically switches off
to keep the brake on the braked wheel from over-
heating. The vehicle is still functioning correctly.
EDL will switch on again automatically when con-
ditions have returned to normal.
Power steering
The ESC can also support vehicle stability
through steering.
Selective wheel torque control
Selective wheel torque control is used when driv-
ing on curves. Braking is targeted toward the
wheels on the inside of the curve as needed. This
allows more precise driving in curves.
Automatic post-collision braking system
The automatic post-collision braking system can
help to reduce the risk of sliding and of addition-
al collisions after an accident. If the airbag con-
trol module detects a collision above a certain ve-
hicle speed, the vehicle is braked by the ESC.
The vehicle does not brake automatically if one of
the following occurs:
— The driver presses the accelerator pedal
— The braking force generated by the pressed
brake pedal is greater than the braking force
that would be initiated by the system
— The ESC, the brake system, or the vehicle elec-
trical system is not functioning
ZA\ WARNING
—The ESC and its integrated systems cannot
overcome the limits imposed by natural
physical laws. This is especially important on
slippery or wet roads. If the systems begin
acting to stabilize your vehicle, you should
immediately alter your speed to match the
road and traffic conditions. Do not let the in-
creased safety provided tempt you into tak-
ing risks. This could increase your risk of a
collision.
— Please note the risk of a collision increases
when driving fast, especially through curves
and on slippery or wet roads, and when driv-
ing too close to objects ahead. There is still
a risk of accidents because the ESC and its
integrated systems cannot always prevent
collisions.
— Accelerate carefully when driving on
smooth, slippery surfaces such as ice and
snow. The drive wheels can spin even when
these control systems are installed and this
105
Page 113 of 280

8S1012721BB
Multi Media Interface
Multi Media Interface
Traffic safety
information
Audi recommends performing certain Infotain-
ment system functions, such as entering a desti-
nation, only when the vehicle is stationary. Al-
ways be prepared to stop operating the Infotain-
ment system in the interest of your safety and
the safety of other road users.
Z\ WARNING
Only use the Infotainment system when road,
traffic, weather, and visibility conditions per-
mit and always in a way that allows you to
maintain complete control over your vehicle.
@) Tips
Certain functions are not available while driv-
ing.
Introduction
[RAH-8837,
Fig. 115 MMI control panel: Overview
The Multi Media Interface, or MMI for short,
combines various systems for communication,
navigation* and entertainment in your Audi. You
can operate the MMI using the MMI control pan-
el, the multifunction steering wheel or the voice
recognition system*.
MMI control panel overview
@ Control knob with joystick function . 112
@ MMI touch control pad* ......... 113
@® Left control button ............. 112
@ Right control button ............ 112
© Buttons for opening menus directly . L142
(B) [MENU] button socscc co escvon ov comers «5
@ [BACK] button ............0.0..
MMI On/Off knob with
joystick function
fo} oy-e- 1 |
[RAH-8739]
Fig. 116 MMI control panel: On/Off knob with joystick
function
Switching the MMI on/off: the MMI can be
switched on/off manually.
> Switching on manually: press the On/Off knob
@ briefly > fig. 116, or press the [MENU] but-
ton © > page 111, fig. 115 or one of the but-
tons used to open a menu G) > page 111,
fig. 115.
> Switching off manually: press and hold the
On/Off knob @ © fig. 116 until the MMI
switches off. If the MMI has been switched off
manually, it does not switch on again automati-
cally the next time the ignition is switched on.
Additional functions:
> Adjusting the volume: turn the On/Off knob @
> fig. 116.
>» Muting: press the On/Off knob @ © fig. 116
briefly.
> Selecting the previous/next function (for ex-
ample, a radio station/track): press the On/Off
knob @ ® fig. 116 briefly toward the left KK or
right DDI.
> Fast forwarding/rewinding (for example
songs): press and hold the On/Off knob @)
=> fig. 116 toward the right D> or left KM.
ZX WARNING
To reduce the risk of an accident, adjust the
volume of the audio systems so that signals >
111
Page 118 of 280
Multi Media Interface
@ Tips
The volume of the prompts for the MMI touch
can be adjusted separately > page 194.
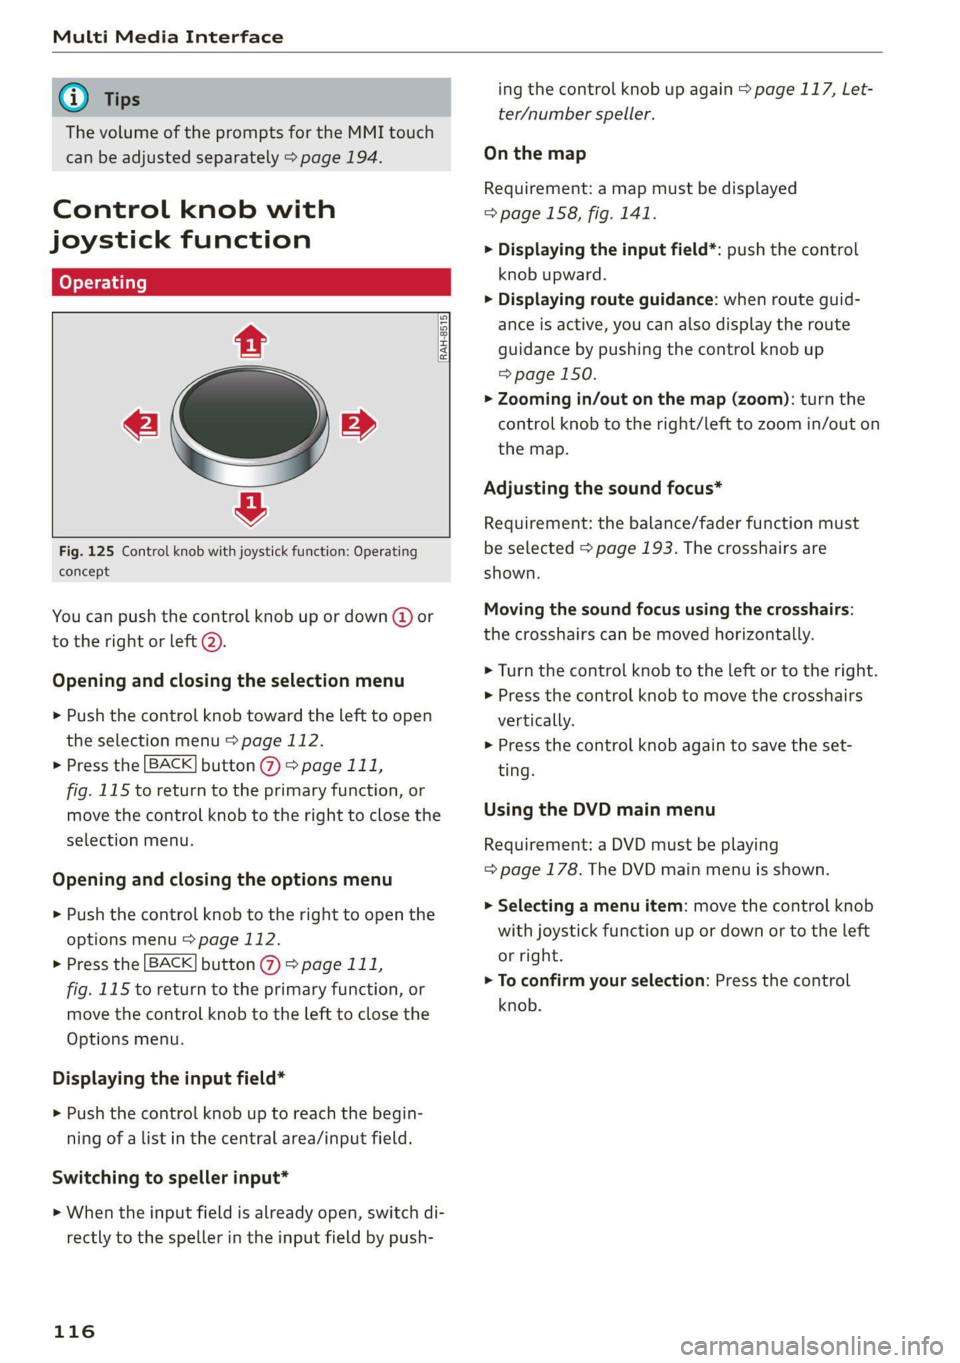
Control knob with
joystick function
RAH-8515|
e »
&
Fig. 125 Control knob with joystick function: Operating
concept
You can push the control knob up or down (@ or
to the right or left @).
Opening and closing the selection menu
> Push the control knob toward the left to open
the selection menu > page 112.
> Press the [BACK] button @ > page 111,
fig. 115 to return to the primary function, or
move the control knob to the right to close the
selection menu.
Opening and closing the options menu
> Push the control knob to the right to open the
options menu > page 112.
> Press the [BACK] button @ > page 111,
fig. 115 to return to the primary function, or
move the control knob to the left to close the
Options menu.
Displaying the input field*
> Push the control knob up to reach the begin-
ning of a list in the central area/input field.
Switching to speller input*
> When the input field is already open, switch di-
rectly to the speller in the input field by push-
116
ing the control knob up again > page 117, Let-
ter/number speller.
On the map
Requirement: a map must be displayed
=> page 158, fig. 141.
> Displaying the input field*: push the control
knob upward.
> Displaying route guidance: when route guid-
ance is active, you can also display the route
guidance by pushing the control knob up
=> page 150.
> Zooming in/out on the map (zoom): turn the
control knob to the right/left to zoom in/out on
the map.
Adjusting the sound focus*
Requirement: the balance/fader function must
be selected > page 193. The crosshairs are
shown.
Moving the sound focus using the crosshairs:
the crosshairs can be moved horizontally.
> Turn the control knob to the left or to the right.
> Press the control knob to move the crosshairs
vertically.
> Press the control knob again to save the set-
ting.
Using the DVD main menu
Requirement: a DVD must be playing
= page 178. The DVD main menu is shown.
> Selecting a menu item: move the control knob
with joystick function up or down or to the left
or right.
> To confirm your selection: Press the control
knob.
Page 119 of 280
8S1012721BB
Multi Media Interface
Opening the selection/options menu w
the
control knob
Applies to: vehicles with joystick function
RAH-8762|
rer
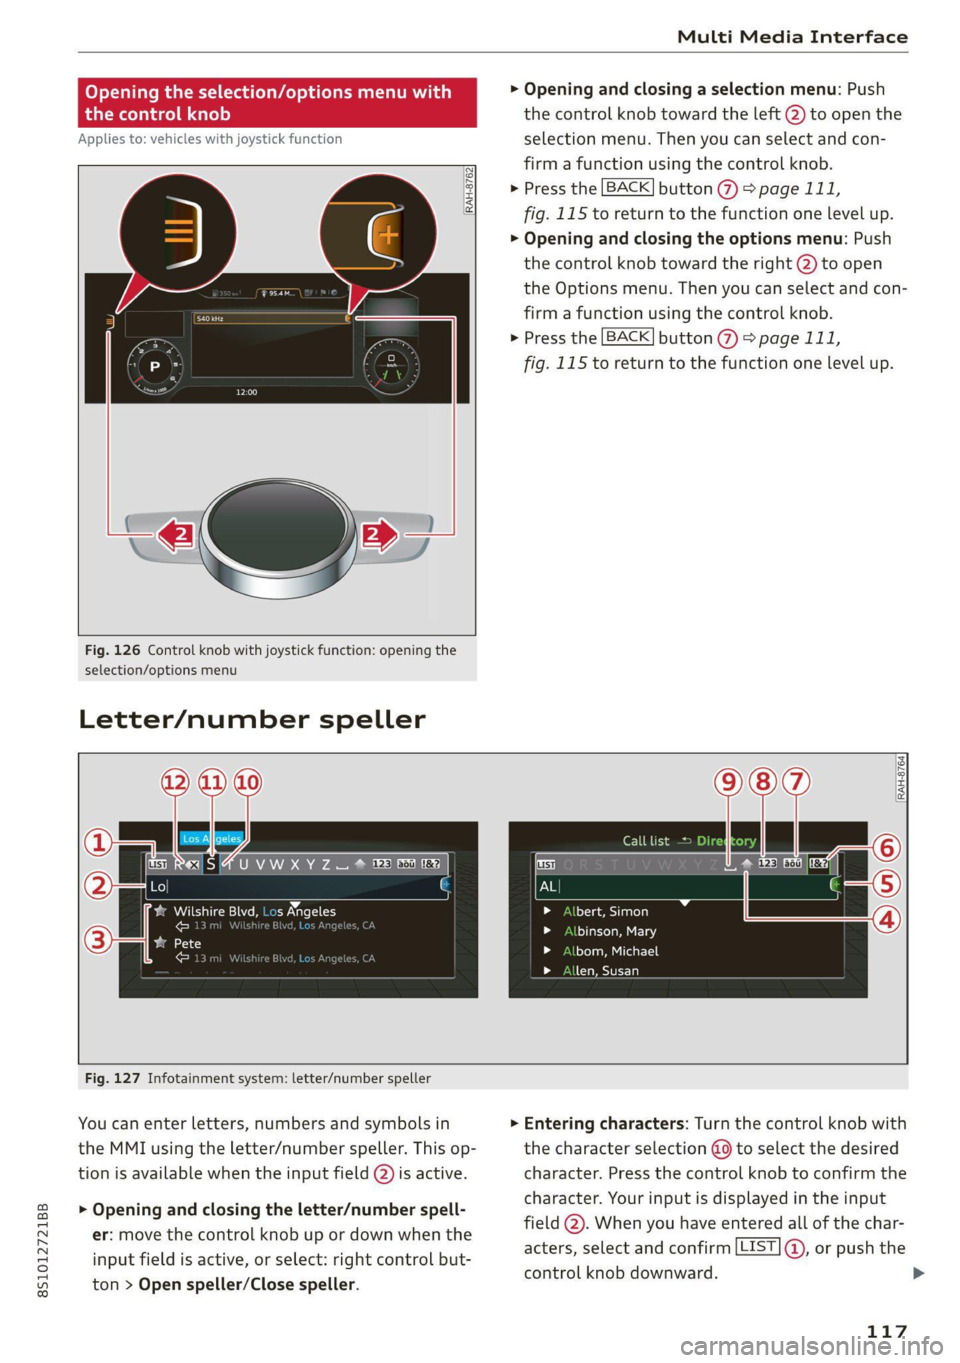
Fig. 126 Control knob with joystick function: opening the
selection/options menu
Letter/number speller
> Opening and closing a selection menu: Push
the control knob toward the left @) to open the
selection menu. Then you can select and con-
firm a function using the control knob.
> Press the [BACK] button > page 111,
fig. 115 to return to the function one level up.
> Opening and closing the options menu: Push
the control knob toward the right @) to open
the Options menu. Then you can select and con-
firm a function using the control knob.
> Press the [BACK] button (%) > page 111,
fig. 115 to return to the function one level up.
RES |4 U VW XY Z = @ ee Ee ee
Pa Meucns tr meeee ae elon
Pen enTnyT , er
ated ae
Call list =
tte aol
binson, Mary
bom, Michael
len, Susan
Fig. 127 Infotainment system: letter/number speller
You can enter letters, numbers and symbols in
the MMI using the letter/number speller. This op-
tion is available when the input field @) is active.
> Opening and closing the letter/number spell-
er: move the control knob up or down when the
input field is active, or select: right control but-
ton > Open speller/Close speller.
> Entering characters: Turn the control knob with
the character selection @ to select the desired
character. Press the control knob to confirm the
character. Your input is displayed in the input
field @). When you have entered all of the char-
acters, select and confirm [LIST ®, or push the
control knob downward.
117
Page 124 of 280
Voice recognition system
GLOEYAL COMMI/ANN
+ Telephone + Favorites
+ Audi connect * Call (XY)
* Navigation * Enter number
* Directory * Redial
* Radio * Read new text message
+ Media + Navigate to (XY)
+ Sound + Enter address/destination
* Help + Online destinations
+ Help Speech dialog system * Cancel route guidance
* Help Telephone * Map
* Help Audi connect * Line (XY)
* Help Navigation * Next page / previous page
* Help Map * Cancel
* Help Radio * No, I meant (XY)
* Help Media * Correction
TELEPHONE al
+ Enter number Call list
+ Delete number / correction Redial
+ Directory Call mailbox
* Call (XY) Enter PIN / delete PIN
«business / private / land line / mobile Telephone favorites
NAVIGATION i
+ Navigate to (XY) + Exclude next route section / Exclude
*Business address / Private address next street
+ Start / cancel route guidance * Route list
+ Directory * Calculate alternative routes
+ Last destinations * Online destinations
+ Navigation favorites * Special destination
+ Drive home
+» Enter address
+ Enter country / town / street / state
+ Exclude route / Exclude route for (XY) km /m
* Map
* Day map / Night map
* 2D driving position map / 2D north position map / 3D map / Destination map / Overview map
AUDI CONNECT
* Audi connect Flight information / Train information
* Travel information / Parking information * City events
* Fuel prices * Online news
* Weather + Twitter
RADIO)
+ Radio presets * Jukebox 6}
+ Last stations + CD/DVD aay e
*FM + SDcard1/SDcard2
*FM/AM/ SIRIUS XM « Audi music interface / iPod / USB / Bluetooth /
+ Station (XY) / Frequency (XY) Wi-Fi / Medium (XY)
* Traffic announcement on / off * Media favorites / Artists / Albums / Genres /
Tracks / Playlists / Videos
* Folder up
* Random playback on / off
RAH-8462|
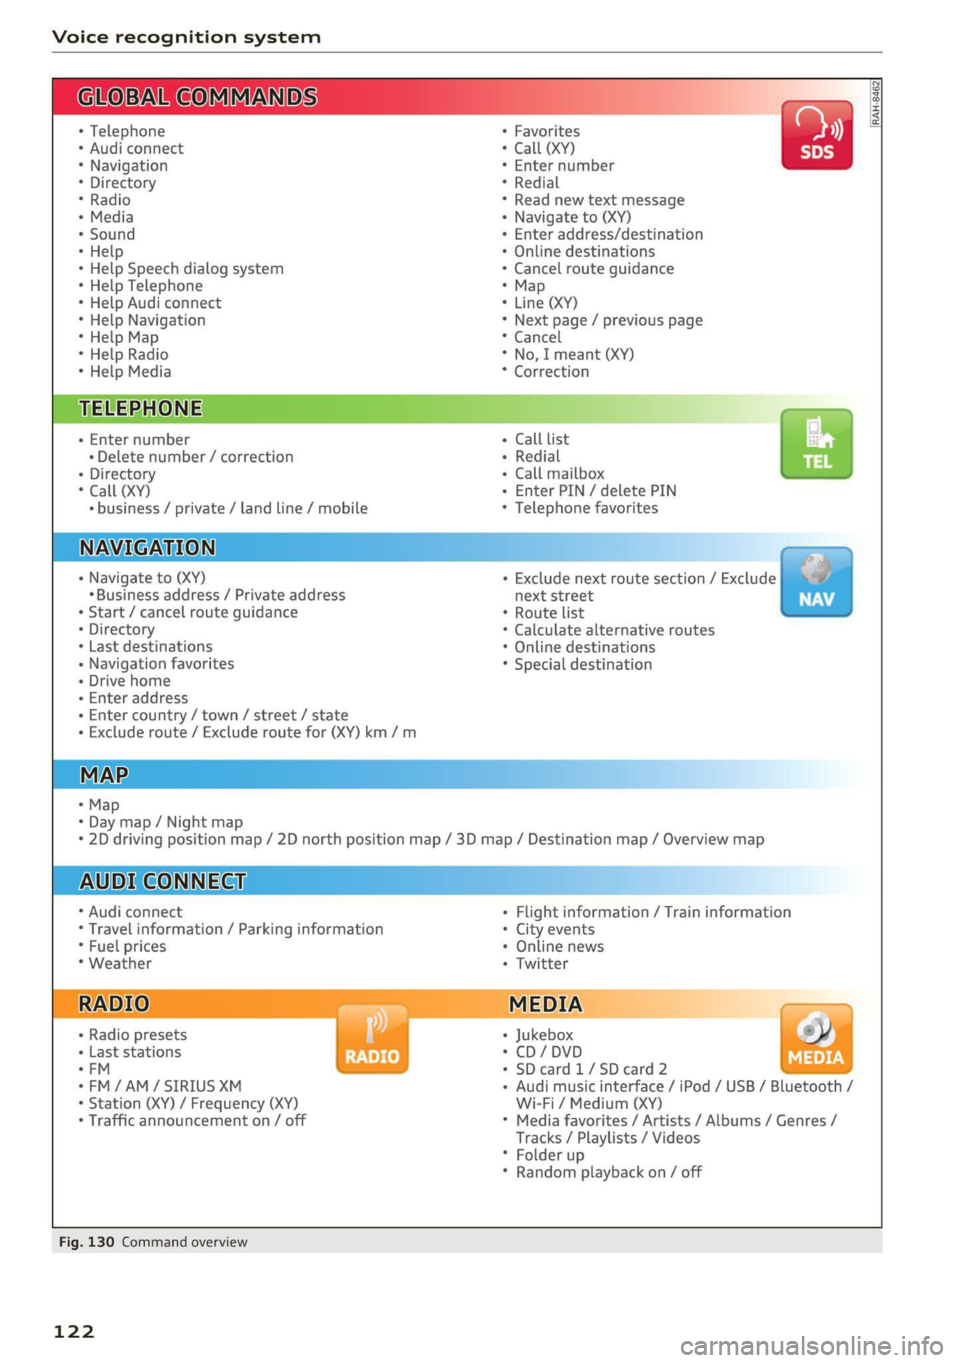
Fig. 130 Command overview
122
Page 125 of 280

8S1012721BB
Voice recognition system
Voice recognition system
General information
Applies to: vehicles with voice recognition system
You can operate many functions in the vehicle
easily using voice commands.
Using the voice recognition system optimally
> Speak clearly and distinctly at a normal volume.
Speak louder when driving faster.
» Emphasize the words in the commands evenly
and do not leave long pauses.
>» Close the doors, the windows, and the sunroof*
to reduce background noise. Make sure that
passengers are not speaking when you are giv-
ing a voice command.
> Do not direct the vents toward the hands-free
microphone, which is in the roof headliner/on
the driver’s safety belt* near the front interior
lights. For additional information on the safety
belt microphone’, see > page 141.
> Only the driver should speak to the system, be-
cause the handsfree microphone is aimed to-
ward this seating position.
Z\ WARNING
— Direct your full attention to driving. As the
driver, you have complete responsibility for
safety in traffic. Only use the functions in
such a way that you always maintain com-
plete control over your vehicle in all traffic
situations.
— Do not use the voice recognition system in
emergencies because your voice may change
in stressful situations. The system may take
longer to dial the number or may not be
able to dial it at all. Dial the emergency
number manually.
G) Tips
There are no voice guidance* prompts when a
dialog is active.
Operating
Applies to: vehicles with voice recognition system
Requirement: the ignition and the MMI must be
switched on. A system language supported by
the voice recognition system must be set. There
must be no phone calls in progress and the park-
ing aid must not be active.
> Switching on: briefly press the [2] button @)
=> page 14, fig. 10 on the multifunction steer-
ing wheel and say the desired command after
the Beep.
> Switching off: press and hold the |] button,
or:
» Say the command Cancel.
> Pausing: say the command Pause. To resume,
press the |] button.
> Correcting: press the [5] button one time ©)
=> page 12, fig. 6, or:
> Say the command Correction.
Input assistance
The system guides you through the input with
visual and audio feedback.
— Visual input assistance: after switching on
voice recognition, a display with a selection of
possible commands appears. This command
display can be switched on or off. Select:
MENU] > Settings > left control button > MMI
settings > Speech dialog system.
— Audio input assistance: to have the possible
commands read, press the [2] button on the
multifunction steering wheel briefly and say
Help.
Additional settings
See > page 194, Voice recognition system.
@) Tips
— The dialog pauses when there is an incom-
ing phone call and will continue if you ig-
nore the call. The dialog ends if you answer
the call.
— You can select an item in the list using ei-
ther the voice recognition system or the
control knob.
123