service reset AUDI TT ROADSTER 2008 Owners Manual
[x] Cancel search | Manufacturer: AUDI, Model Year: 2008, Model line: TT ROADSTER, Model: AUDI TT ROADSTER 2008Pages: 316, PDF Size: 70.1 MB
Page 14 of 316

Inst rum ent s a nd warning /indi cato r li ghts
Instruments and warning/indicator lights
Instruments
Instrument cluster and controls
The instrument cluster is your central source of informa
tion .
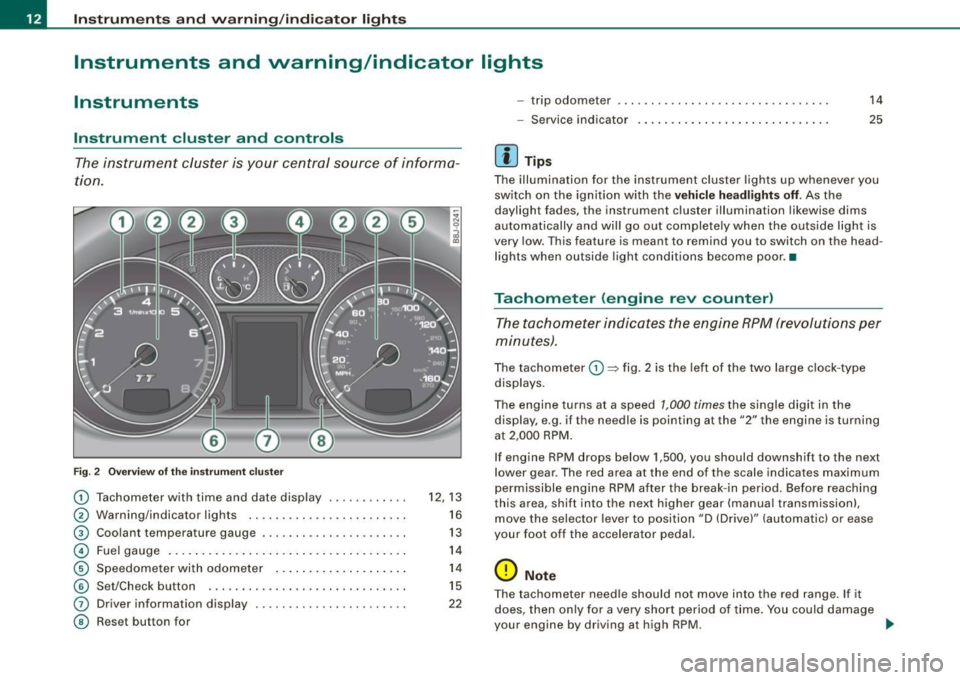
6
Fig . 2 Ove rv iew of the ins trum ent cluster
0
0
0
©
©
©
G)
©
Tachometer with time and date display ......•.....
Warning/indicator lights .. ... ..... ... ........ .. .
Coolant temperature gaug e .... ... ...... ...... .. .
Fuel gauge .. .... ... .. ...... .... ... ..... ... ... .
Speedome ter with odometer ..... .... ... .. .. ... .
Set/Chec k button ..... ... ..... ..... ... ........ .
Driver information display
Reset but ton for
~
"' N 9
i
12, 13
16
13
14
14
15
22
- trip odometer
- Service indicator
[ i ] Tip s
14
25
The illumination for the instrument cluster lights up whenever you
switch on the ign ition with the
ve hicle hea dlight s off. As the
daylight fades, the instrument cluster illumination likewise dims
automatically and wil l go out completely when the outside light is
very low. This feature is meant to remind you to switch on th e head
lights when outside light conditions become poor. •
Tachometer (engine rev counter)
The tachometer indicates the engine RPM (revolutions per
minutes) .
The tachometer 0 ~ fig. 2 is the left of the two large c lock -type
displays.
The engine turns at a speed
1,000 times the single digit in the
display, e.g . if th e ne edle is pointing a t the
"2" the engine is turning
at 2,000 RPM .
If engine RPM drops below 1,500, you should downshif t to the next
lower gear . The red ar ea at the end of th e scale indica tes maximum
permissible engine RPM after the break- in period. Before reaching
th is area , shift into the next higher gear (manua l transmission),
move the selec tor lever to position "D (Drive)" (automatic) or ease
your foot off the accelerator pedal.
0 Note
T he tachometer need le should not move into the red range . If it
does, then on ly for a very short period of time . You could damage
your engine by driving a t high RPM. ...
Page 27 of 316

If, however, the Malfunction Indicator Lamp (MIU comes on,
always drive to your nearest authorized Audi dealer or qualified
workshop and have the vehicle checked.
For more information =>
page 216, "Refuelling".•
Service interval display
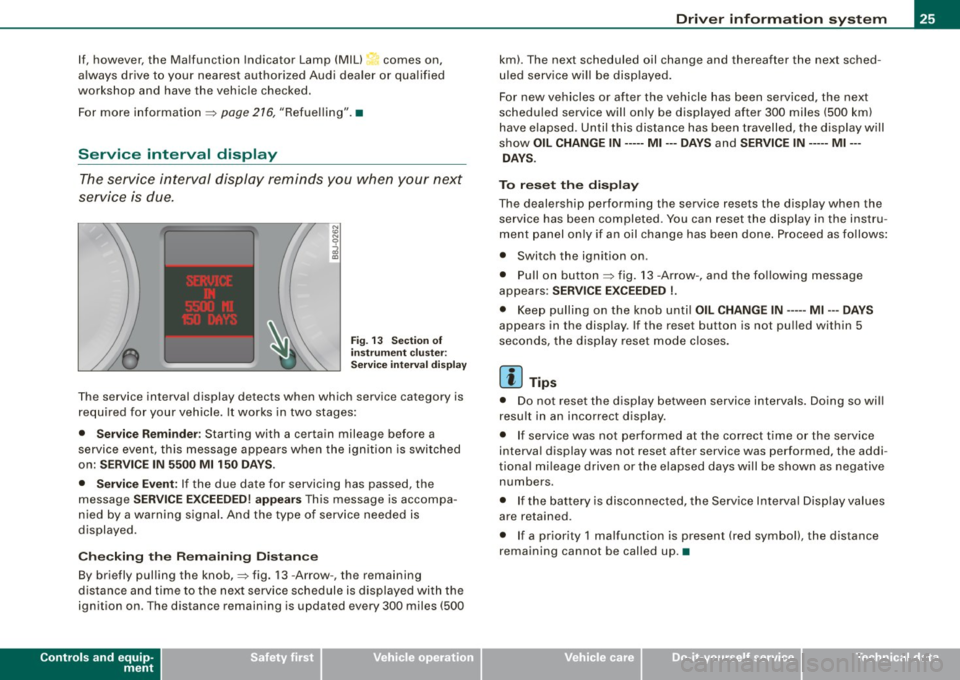
The service interval display reminds you when your next
service is due.
Fig. 13 Section of
instrument cluster:
Service interval display
The service interval display detects when which service category is
required for your vehicle. It works in two stages:
• Service Reminder : Starting with a certain mileage before a
service event, this message appears when the ignition is switched
on:
SERVICE IN 5500 Ml 150 DAYS.
• Service Event:
If the due date for servicing has passed, the
message
SERVICE EXCEEDED! appears This message is accompa
nied by a warning signal. And the type of service needed is
displayed.
Checking the Remaining Distance
By briefly pulling the knob,=> fig. 13 -Arrow -, the remaining
distance and time to the next service schedule is displayed with the
ignition on . The distance remaining is updated every 300 miles (500
Controls and equip
ment
Driver information system
km). The next scheduled oil change and thereafter the next sched
uled service will be displayed.
For new vehicles or after the vehicle has been serviced, the next
scheduled service will only be displayed after 300 miles (500 km)
have elapsed. Until this distance has been travelled, the display will
show
OIL CHANGE IN----- Ml ---DAYS and SERVICE IN----- Ml --
DAYS.
To reset the display
The dealership performing the service resets the display when the service has been completed . You can reset the display in the instru
ment panel only if an oil change has been done. Proceed as follows:
• Switch the ignition on .
• Pull on button=> fig.
13 -Arrow-, and the following message
appears:
SERVICE EXCEEDED !.
• Keep pulling on the knob until OIL CHANGE IN ---- -Ml ---DAYS
appears in the display. If the reset button is not pulled within 5
seconds, the display reset mode closes.
[ i] Tips
• Do not reset the display between service intervals. Doing so will
result in an incorrect display.
• If service was not performed at the correct time or the service
interval display was not reset after service was performed, the addi
tional mileage driven or the elapsed days will be shown as negative
numbers.
• If the battery is disconnected, the Service Interval Display values
are retained.
• If a priority 1 malfunction is present (red symbol), the distance
remaining cannot be called up. •
I • •
Page 29 of 316

& WARNING
Always observe the posted speed limits and adjust your speed to suit prevailing road, traffic and weather conditions. Never drive
your vehicle faster than the maximum speed rating of the tires
installed. •
Menu display
Introduction
0 ,...
"' 9 .., 00 m
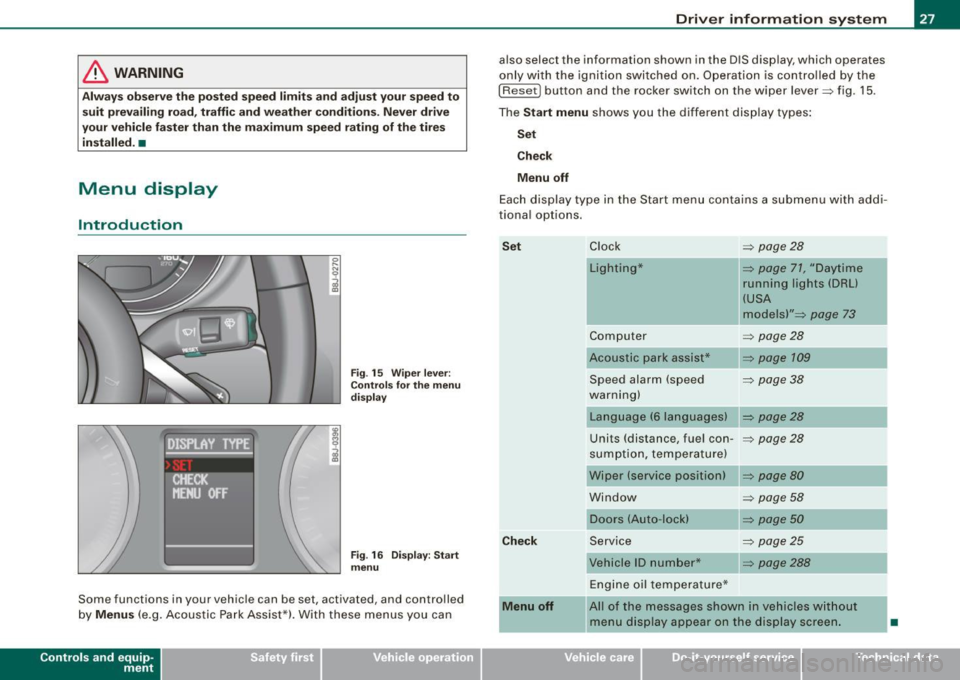
Fig. 15 Wiper lever:
Controls for the menu
display
"'
"'
~ m
Fig . 16 Display: Start
menu
Some functions in your vehicle can be set, activated , and controlled
by
Menus (e.g. Acoustic Park Assist*). With these menus you can
Con tro ls and eq uip
ment
Driver information system
also select the information shown in the DIS display, which operates
only with the ignition switched on. Operation is controlled by the
I Reset) button and the rocker switch on the wiper lever::::, fig. 15.
The Start menu shows you the different display types:
Set
Check
Menu off
Each display type in the Start menu contains a submenu with addi
tional options.
Set
Check
Menu off Clock ::::, page 28
Lighting* => page 71, "Daytime
running lights (DRU
(USA
models)" =>
page 73
Computer ::::, page 28
Acoustic park assist* => page 109
Speed alarm (speed ::::, page 38
warning)
Language (6 languages) => page 28
Units (distance, fuel con-::::, page 28
sumption, temperature)
Wiper (service position) => page80
Window => page 58
Doors (Auto-lock) => page 50
Service ::::, page 25
Vehicle ID number* => page288
Engine oil temperature*
l! AII of the messages shown in vehicles without
menu display appear on the display screen.
•
Vehicle care I I Technical data
Page 309 of 316

______________________________________________ A_ l_,_ p _h_ a_ b_e _t_ic _ a _ l _in _ d_e _ x __ lll
Pass-through .. ..... .... ... .... .... .. 93 Proper safety belt position . ... .. ...... 142 Remote control ....... ... .. .. ... .. ... 48
Pedals ...... .... ... ........ .... .... 134 Proper seating position Resetting remote control ...... ... .. 52
Physical principles of a frontal collision 138
Polishing ...... .... .... ....... .... . 204
Pollen filter ......................... 99
Pollutant filter .. .... .... .... .... ... .. 99
Power locking switch ........... .... .. 53
Power locking system ... .... .... .... .. 50
Convenience close/open feature .... . 58
Locking and unlocking the vehicle from
inside .. .. .. .... .... ... .... .... . 53
Opening and closing the windows ... 58
Rear lid/trunk lid ..... .... .... .... . 55
Remote control ...... .... .... ... .. 48
Unlocking and locking vehicle . .... .. 51
Power seats
Adjusting the seatback ....... .... .. 91
Adjustment .. .... .... .... ...... ... 89
Power steering
See Electro -mechanical power assist 21,
190
Power top
Care and cleaning . ....... .... .... 203
Convenience close/open feature ... .. 63
Convenience opening/closing ... .... 63
Power window switches ...... ...... ... 57
Reactivating the system .... .... .... 59
Pregnant women
Special cons iderations when wearing a
safety belt . .... .... .... ... .... . 143 Front
passenger . ...... ........... 131
Occupants .. ...... ...... ... .. .... 130
a
Quartz clock .. ...... ..... .. .... .... .. 13
quattro®
See All Wheel Drive ............... 191
Question
R
What happens to unbelted occupants? .
139
Why safety belts? ... .. .... .... .... 137
Radiator fan .... .... ..... .. .... .... . 229
Rain sensor defective ................. 36
Reading lights ... ... ..... ... .... .... . 77
Rear lid ........ ....... ...... .... .... 55
Emergency release ......... ...... . 56
Rear light
Defective . ................... .... . 36
Rear spoiler . .... .... ....... ........ 187
Rear window defoggeir ............... 103
Rearview mirror Inside rearview mirror .. .... .... ... . 82
See also Mirrors ........... ....... . 82
Red symbols . ... .... .... .... .... ... . 31
Programming the Homelink® universal re- Refuelling ............... .... .... ... 216
mote contro l ... .... .... ... .... . 121 Release lever for hood .. .... .... .... . 219
Proper occupant seating positions .. ... 130 Remote
control garage door opener
(Homelink®l .... .... .... .... ... 121
Remote control key Unlocking and locking ..... .... .... . 51
Remo te master key
Battery replacement ...... .... .... . 48
Check light .. ....... .. ...... ...... 48
Remote rear lid release .... ... .. ...... . 55
Repair manuals ...... .... .... .... ... 294
Repairs Airbag system ................... 160
Replacement parts ... .... ... .... .... 296
Replacing Wheel rims .... .... ... ....... 249, 251
Replacing a fuse .. ...... .... .... .... 273
Replacing light bulbs .. ... .. . .... .. . . 277
Replacing tires and wheels ...... ..... 250
Reporting safety defects .. ... .... 136, 293
Reset button . .... ........ .... ... .... . 14
Resetting remote control ......... .... . 52
Retractor .......... .. .... ...... .... . 141
Reverse Automatic transmission .... ... .... 115
Rims Cas t alloy ..... .... .... .... .... ... 207
Replacing .... .... ....... ... . 249, 251
Stee l rims . .... ... .... ...... ... .. 206
Controls and equip
ment Safety first Vehicle operation
Vehicle care Do-it-yourself service Technical data