fuel pressure AUDI TT ROADSTER 2011 Owners Manual
[x] Cancel search | Manufacturer: AUDI, Model Year: 2011, Model line: TT ROADSTER, Model: AUDI TT ROADSTER 2011Pages: 260, PDF Size: 64.11 MB
Page 5 of 260
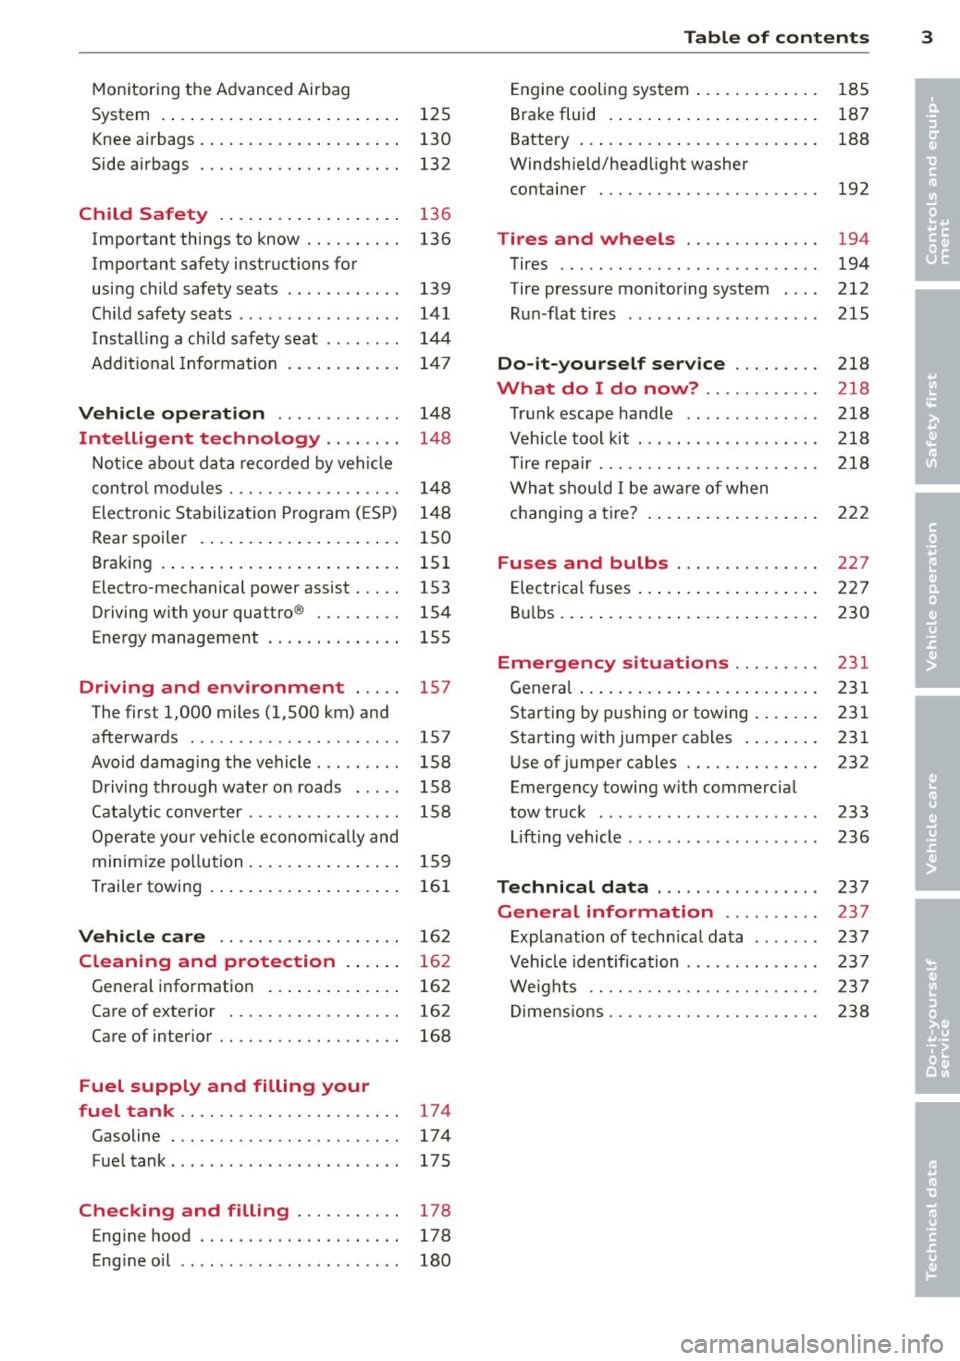
Monitoring the Advanced Airbag
System . . . . . . . . . . . . . . . . . . . . . . . . . 125
Knee airbags . . . . . . . . . . . . . . . . . . . . . 130
Side airbags . . . . . . . . . . . . . . . . . . . . . 132
Child Safety . . . . . . . . . . . . . . . . . . . 136
Important things to know . . . . . . . . . . 136
Important safety instructions for
using child safety seats . . . . . . . . . . . . 139
Ch ild safety seats . . . . . . . . . . . . . . . . . 141
Install ing a child safety seat . . . . . . . . 144
Addit io n al Information 14 7
Vehicle operat ion . . . . . . . . . . . . . 148
Intelligent technology . . . . . . . . 148
N ot ice about data recorded by vehi cle
con trol mod ules . . . . . . . . . . . . . . . . . . 148
E lect ronic S tabilization Program ( ESP) 1 48
Rear spoiler . . . . . . . . . . . . . . . . . . . . . 150
Braking . . . . . . . . . . . . . . . . . . . . . . . . . 151
Electro-mechanical power assist . . . . . 153
Driving w ith your quattro ® . . . . . . . . . 154
Energy management . . . . . . . . . . . . . . 155
Driving and environment . . . . . 157
The first 1,000 miles (1,500 km) and
afterwards . . . . . . . . . . . . . . . . . . . . . . 157
Avoid damaging the vehicle . . . . . . . . . 158
Driving through water on roads . . . . . 158
Cata lytic conve rter . . . . . . . . . . . . . . . . 158
Opera te you r vehi cle econom ic all y and
minim ize po llution . . . . . . . . . . . . . . . . 15 9
Trailer towing . . . . . . . . . . . . . . . . . . . . 161
Vehicle care . . . . . . . . . . . . . . . . . . . 162
Cleaning and protection . . . . . . 162
Gene ral information . . . . . . . . . . . . . . 162
Care of exterior . . . . . . . . . . . . . . . . . . 162
Care of inter ior . . . . . . . . . . . . . . . . . . . 168
Fuel supply and filling your
fuel tank .. ................. .. ..
174
Gasoline . . . . . . . . . . . . . . . . . . . . . . . . 17 4
Fue ltank ..... ................ ... 175
Checking and filling . . . . . . . . . . . 178
Eng ine hood . . . . . . . . . . . . . . . . . . . . . 178
Eng ine oil . . . . . . . . . . . . . . . . . . . . . . . 180
Table of contents 3
Engine cooling system .. ..... ... .. . 185
B rake fluid . ... .... . ... ...... ... . 187
•
Battery ... .. .. .. .. . .. ... .... ... . 188 •
Windsh ie ld/headlight washer
container . .. .. .. .... ........... .
192
Tires and wheels ........... .. . 194
Tires ..... .. .. .. .. . ............ . 194
Tire pressure mo nitoring system . .. .
212
R un -flat t ires .. .. .. . .. .... .... .. . 215
Do -it-yourself service ........ . 218
What do I do now? .. ...... ... . 218
T ru nk escape handle ............. . 218
V ehicle tool kit . .. ... .. .. ... ..... . 218
T ire repa ir ... .. ...... ........... . 218
What shou ld I be awa re of when
h . t
' 7 c anging a ire ... .. . .. .. ..... ... . 222
Fuses and bulbs .............. . 227
E lectr ica l fuses ... .. .. .. .. .... ... . 227
B ul bs ... .. .. .... .. . .. .. ..... ... .
230
Emergency situations ........ . 231
Genera l ... .. .... .. . .. .. ..... ... .
231
Starting by pushing or towing . ... .. . 231
Starting with jumper cables .. ... .. . 231
U se of jumper cables ............. .
232
Emergency towing wit h commercia l
tow truck ....... .. ............. . 233
Li fting vehicle .. .. .. .. .. ...... ... . 236
Technical data ..... .... ... .... . 237
General information ... ... ... . 237
E xplanation of techn ica l data ...... . 237
Vehicle identification ........... .. . 237
We ights .. .. .. .. .. .. ........... . 237
Di mens ions .. .. .. .. ............. . 238
Page 24 of 260
22 Driv e r in formation sy stem
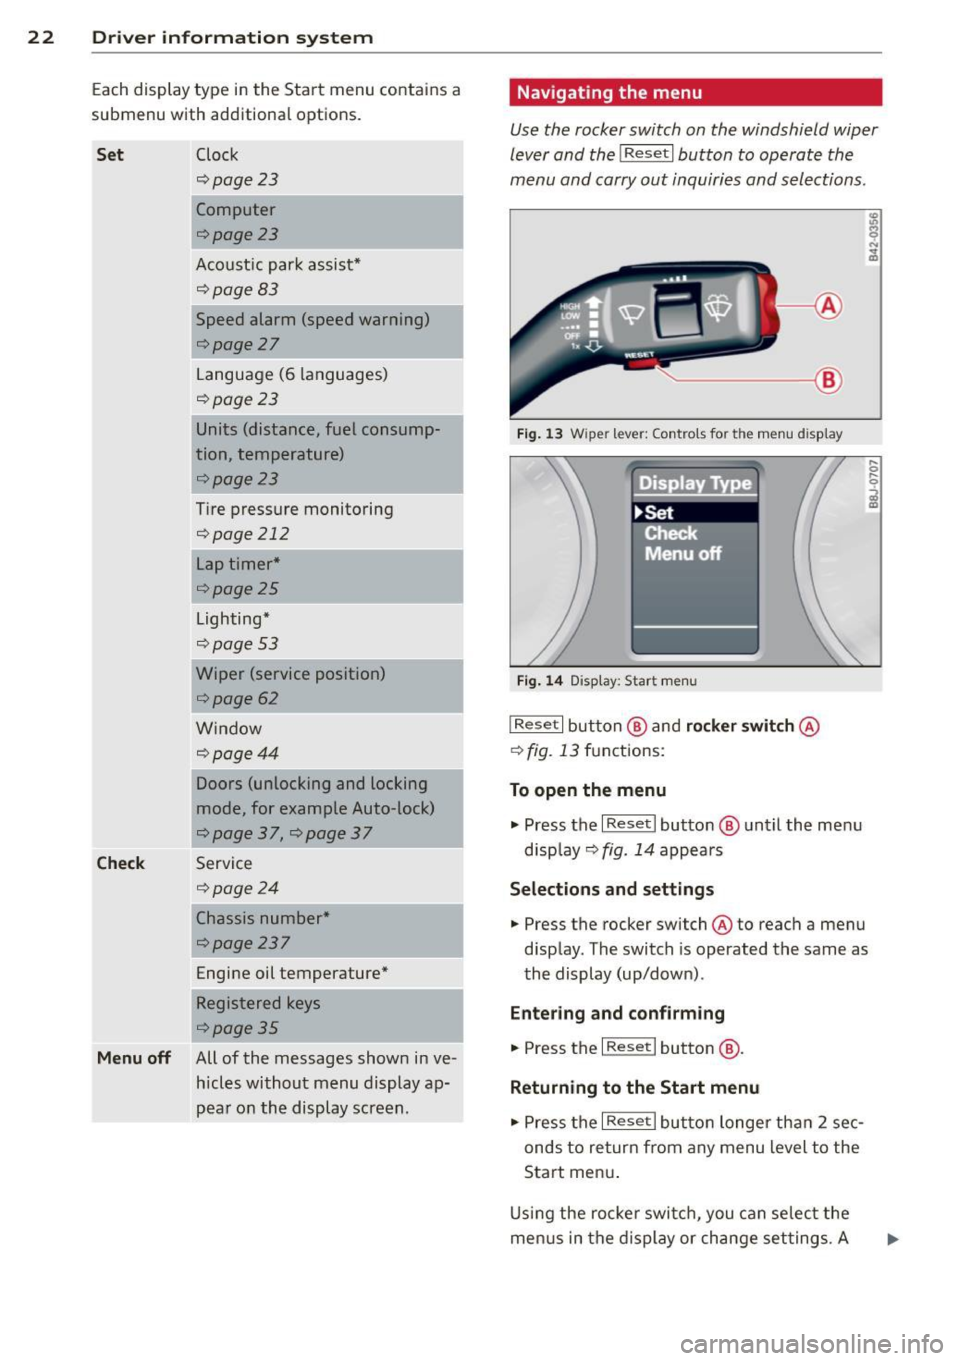
Each display type in the Start menu contains a
submenu with additional options.
Set Clock
c;:,page23
Computer
c;:,page23
Acoust ic par k assist*
¢page83
Speed alarm (speed warning)
c;:,page27
Language (6 languages)
c:;>page23
Units (distance, fuel consump-
tion, temperature)
c;:,page23
Tire pressure monitoring
c;:,page 212
Lap timer *
c;:,page 25
Lighting*
c;:,page53
Wiper (service position)
c;:,page62
Window
¢page44
Doors (unlocking and locking
mode, for example Auto-lock)
c;:,page 37, c:;>page 37
Check Service
c;:,page24
Chassis number *
c;:, page 23 7
Engine oil temperature*
Registered keys
c:;>page35
Menu off All of the messages show n in ve-
hides without menu display a p-
pear on the display screen.
Navigating the menu
Use the rocker switch on the windshield wiper
lever and the
I Reset I button to operate the
menu and carry out inquiri es and selections.
~-- @
Fig. 1 3 Wiper lever: Controls for the men u display
Fi g. 14 Display: Start menu
I Reset I button @ and rocker switch @
c:;> fig. 13 functions:
To open the menu
.,. Press the I Reset I button @ until the me nu
d isp lay¢
fig. 14 appears
Selections and settings
.,. Press the rocker switch @to reach a menu
disp lay. The switch is operated the same as
the display (up/down) .
Entering and c onfirm ing
.,. Press the I Reset I button @.
Returning to the Start menu
.,. Press the I Reset I butto n longe r tha n 2 sec
onds to return from any menu level to the
Start men u.
U sing the rocke r swi tch , you can se lec t the
me nus in the display or change set tings. A
Page 31 of 260
If the engine control unit receives fau lty vehi
cle roadspeed signa ls , the Ma lfunction Indica
tor Light (MIL)
Ill will illum inate . If th is oc
curs, contact the nearest authori zed Audi
dealer for assistance.
S mod els
Your vehicle 's top speed is e lectronically limit
ed to 155 mph (250 km/h).
If the engine control unit rece ives fa ulty vehi
cle roadspeed signa ls , the Ma lfunction Indica
tor Lamp (MIU ¢• will i lluminate. If this oc
curs, contact the nearest authorized Audi
dea ler for assistance.
A WARNING
-
Always observe the posted speed limits
and adjust your speed to suit prevailing
road, traff ic and weather conditions. Never
drive your vehicle faster than the maxi
mum speed rating of the tires insta lled.
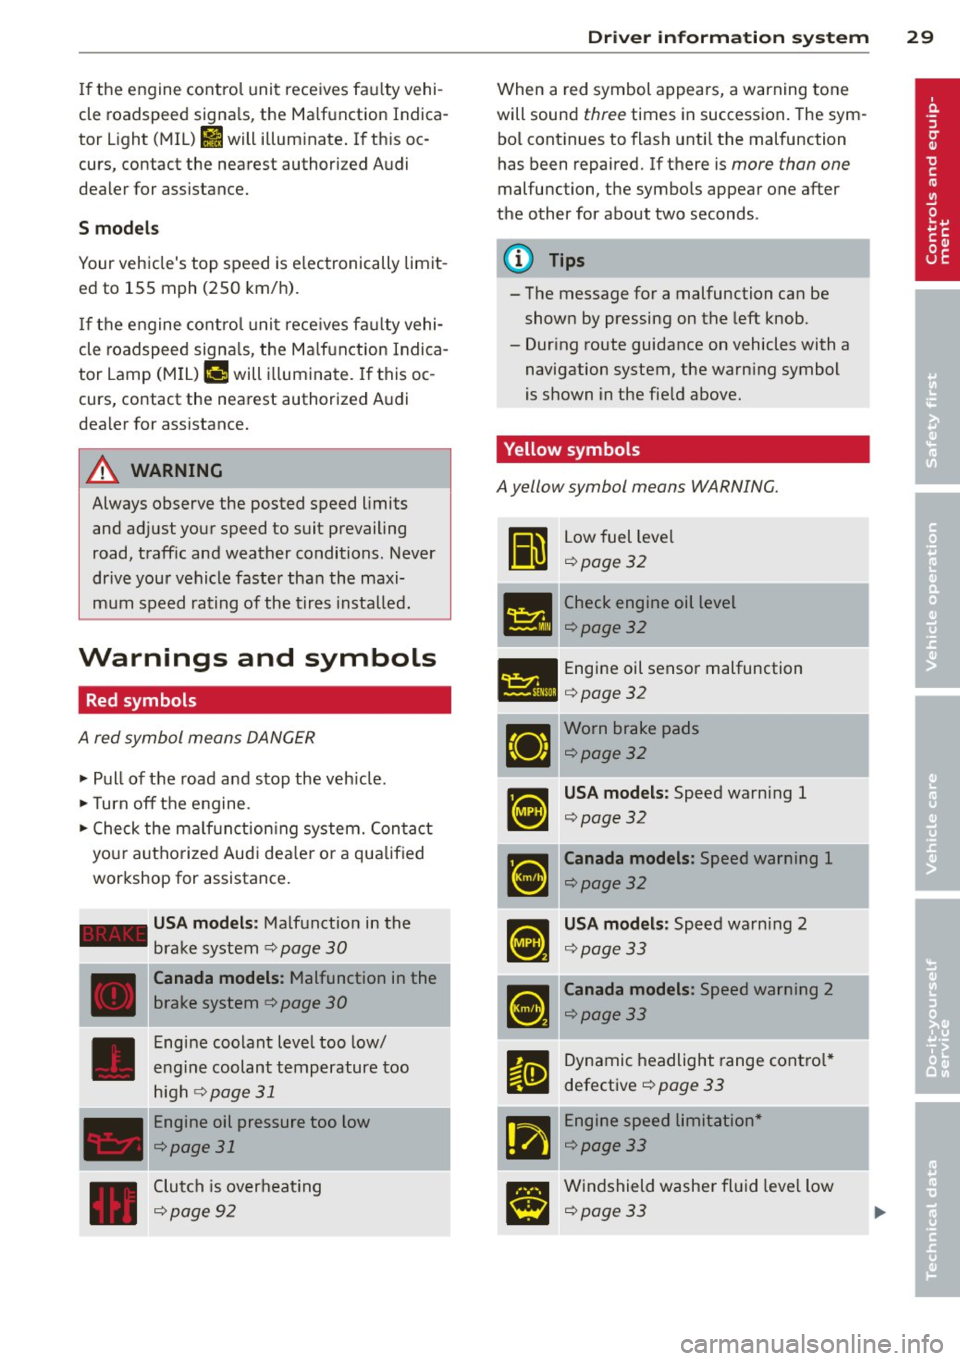
Warnings and symbols
Red symbols
A red symbol means DANGER
" Pull of the road and stop the veh icle .
"T urn off the engine.
" Check the ma lf u nction ing system. Contact
your autho rized Audi dea le r o r a qualified
workshop for assistance.
- USA models : Malfunction in the
brake system ¢
page 30
---·--
D
Canada models : Malfunction in the
brake system ¢
page 30
Engine coolant level too low/
engine coolant temperature too
high
r:1;> page 31
Engine oil pressure too low
¢page 31
Clutch is overheat ing
c:1;> page 92
Dr iver in formati on sys tem 29
When a red symbol appears, a warning tone
will sound
three times in succession . The sym
bo l cont inues to flash unti l the malfunction
has been repaired. If there is
more than one
malfunc tion, the symbo ls appear one after
the other for about two seconds .
(D Tips
- The message for a malfunction can be
shown by pressing on the left knob.
- Dur ing route guidance on vehicles with a
navigation system, the warn ing symbol
is shown in the field above.
Yellow symbols
A yellow symbol means WARNING.
Ii
Low fuel leve l
¢page32
- -- Check engine oil level
151!1 ¢page 32
- Engine oil sensor malfunction
l:ill ¢ page 32
Worn brake pads
¢page32
USA models : Speed warning 1
c:1;> page 3 2
Canada models : Speed warning 1
¢page32
USA models: Speed warning 2
c:1;> page 3 3
Canada models: Speed warning 2
c:1;> page 33
Dynamic headlight range contro l*
defective
¢ page 33
-Engine speed limitation *
c:1;> page 33
Windshield washer fl ui d leve l low
c:1;> page 33
Page 34 of 260

32 Driver information system
Engine oil level OK
If th e . symbol st arts flashin g ag ain eve n
though the engine oil leve l checks O K on the
dip stick,
do not start driving again and do
not let the engine run at idle .
Instead, con
tact your author ized Audi dealer for assis
tance.
@ Tips
- The engine oil pressure symbol. is
not an indicator for a low engine oil lev
el. Do not rely on it. Instead , check the
oil level in your engine at regular inter
vals, preferably each time you refuel,
and always before going on a long trip.
- The yellow oil level warning indication
II requires oil refill or workshop serv
ice without delay. Do not wait until the
red oil pressure warning symbol.
starts to flash before you respond to
the low oil level warning
II . By then,
your engine may already have suffered
serious damage.
fl) Fuel supply too low
When the (i1 symbo l ill uminates, this means
there are about 2.6 gallons (10 liters) of fue l
left i n the fuel tank . Time to ref uel!
r::;, page 17 5 .
If the symbol lights up, even when t he re is
ample fuel in the tank, and the text
Tank sys
tem malfunction! Please contact workshop
a ppears in the d isplay, there is a fault in the
sys tem. Contact a qualified wor ksh op to have
the fau lt rectified.
'l=:11 , Checking the engine oil level
II! Please add max . 1 qt of engine oil!
If th e II sy mbo l comes o n, add 1 quart( ! li
ter) of o il at t he nex t oppor tunity
<::;,page 183.
1) - : USA mod els onl y
~ Checking the engine oil level
W hen the Ill symbol illum ina tes, check t he
engi ne oil leve l as soon as po ssibl e
r::;, page 183 . Top off t he oil at your ear liest
oppo rtunity
<::;, page 183 .
~.,., Engine oil sensor defective
If the II symbol illum inates, contact yo ur
autho rized Aud i dea le r and have the oil senso r
i nspected .
{0) Worn brake pads
&J Brake pads!
If the warning light i lluminates, immed iate ly
contact your a uthori zed Audi d ealer or quali
fied works hop to have all b rake pads i nspect
ed. On USA mode ls t he war ning ligh t
&J
comes on together w ith the warning light
1111 . Bot h set s of bra ke pads o n an ax le
mu st al ways be re place d at th e same time.
A WARNING
Driving w ith bad bra kes ca n ca use a colli
sion and ser io us perso nal in jury.
- If th e warni ng light
&J an d th e warn ing
lig ht
11111> with t he mess age Brake
pads!
comes o n in the ins trum en t cluste r
d isp lay, immediate ly co ntact you r au
th orized A udi dealer or qualif ied work
shop to have all b rake pads checked or
re placed if nec essary.
0 /8 Speed warning 1
If the [i (USA models)l [i) (Canada mode ls)
symbol illum ina tes, this m ea ns you a re d riv
i ng fas ter than t he set vehicle speed . S low
down!
r::;, page 26.
-
Page 166 of 260
164 Cleaning and protection
regular basis, fo r example when
refuelling your vehicle.
- Never use a dry cloth or sponge to clean
the headlights . Only use wet cloths or
sponges to prevent scratches. It is best
to use soapy water.
@J For the sake of the environment
In the interest of the env ironment, the ve
hicle sho uld only be washed in special
wash bays.
Washing your vehicle with a power
washer
Cleaning the exterior of your car with a high
pressure power washer is safe as long as you observe a few simple rules .
.. Before us ing the power washer, make sure
you have read and understood the WARN INGS
c> & in General information on
page 162.
.. Always fo llow the operating instructions for
the power washer .
.. Make sure that the jet on the spray hose pro
duces a "fan shaped spray".
.. Do
not hold the spray nozzle too close to
soft materia ls.
N eve r u se a pow er w asher to clean the power
top itse lf.
When clea ning t he vehicle w it h a powe r wash
e r
always fo llow the operating instructions.
This applies particularly to the
o pera tin g
p re ssu re
and the s p ra yi ng dist ance. Maintain
a sufficient distance to soft materials such as
rubber hoses and so und/vibration deadening
materia ls (part icularly on the underside of the
engine hood). Do not use a jet wh ich sprays
water in a
dire ct st ream or one that has a ro
tat ing
jet .
Water temperature shou ld not exceed 140 °F
(60
°() .
A WARNING
Never wash tires w ith a jet that sprays wa
ter in a d irect stream. This could cause in- visible damage to the tires and weaken
them, even
if the spray is from a relative ly
long distance and for a short time. Dam
aged and weakened tires can fail and cause
accidents and personal inju ry.
(D Note
- Never use a power washer to clean the
power top itself.
- To avoid damaging your veh icle, always
make sure that there is sufficient dis
tance between the spray head and soft
materials like rubber hoses, plast ic parts
and sound-deadening materials. Never
aim the spray head at the same point for
a long time. This also app lies to cleaning
head lights and pa inted b umpe rs. Re
member: the closer the nozz le is to the
surface of the material, the greate r the
stress on the materia l.
Convertible top care
The convertible top requires special care.
Keeping you r top looking great and mak ing
certain tha t it lasts a long time depend to a
great extent on proper use and care . Remove
bird droppings as soon as possible, since the
corrosive chemicals in them will cause the
rubber impregnation in your top to swell and
poss ibly allow the fabric to leak .
With
normal soiling, all you need to do is
clea r the top with a soft br ush and clear wa
ter. A lways brush in the direction of the fabric
from front to rear.
If the top is very dirty and has spotted areas
clean it with a brush using a convertible top
cleaner . Always brush in the direction of the
fabric from front to rear. R inse with plenty of
clear water, and allow the top to air-dry.
Chamois are not suitable for drying the top.
Never use gaso line, spot remover, benzene,
paint thinner or solvents to remove spots . We
recommend that you on ly use cleaners espe
cia lly formulated for use on convertib le tops,
and that you fo llow the produce use directions ...
Page 184 of 260
182 Checking and filling
Deterge nt additives in the o il wi ll make fresh
oil look dark after the engine has been run
n ing for a short time . This is norma l and is not
a reason to change the oil more often than recommended.
D am ag e o r m alfun ction s due to lack of
m ainten ance
It is essent ial that yo u change your oil at the
recommended intervals using only engine oil
that complies with Audi oi l standard
VW 502 00. Yo ur Limited New Veh icle War
ranty does not cover damage or malfunctions
due to failure to follow recommended mainte
nance and use requ irements as set forth in
the Audi Owner's Manual and Warranty& Maintenance book let . Your dea ler will have to
deny warranty coverage un less you p resen t to
the dea ler proof in the form of Servi ce or Re
pa ir Orde rs that all schedu led maintenance
was performed in a timely manner.
Engine oil consumption
The engine in your vehicle depends on an ade
quate amount of oil to lubricate and cool all
of its moving ports.
I n o rder to prov ide effective lubr ication and
cooling of internal engine components, a ll in
ternal comb ustion engines consume a certain
amount of oil. Oi l consumption varies from
engine to engine and may change significantly
over the life of the eng ine . Typically, eng ines
with a specif ied break-in period (see
c::;, page 157) consume more oil during the
break-in per iod than they consume after oil
consumption has stabilized .
Under normal conditions, the rate of oil con
sumpt io n depends on the quality and viscosity
of the oil, the RPM (revolutions per m inute) at
which the engine is operated, the ambient
temperature and road cond it io ns. Furthe r fac
tors are the amo unt of o il d ilution from wate r
condensation or fuel residue and the ox ida
tion level of the oi l. As any engine is s ubject to
wear as mileage bui lds up, the oil consump
tion may increase over t ime until replacement
of worn components may become necessary. Wi
th a ll these variab les coming into p lay, no
standard rate of oil consumption can be es
tab lished or spec ified. There is no alte rnative
to regular and frequent check ing of the o il lev
el, see
Note .
If the yellow engine oil leve l warning symbo l
in the instr ument cluster
m lights up, yo u
sho uld check the oil leve l as soon as possib le
with the oil dipstick c::;, page 183. Top off the
o il at your earliest conve nience
c::;, page 183 .
A WARNING
-Before you chec k anything in the engine
compartment, a lways read and heed a ll
WAR NIN GS
c::;, .& in Working in the engine
comportment on page 178.
CI) Note
D riving with an insufficient o il level is like
l y to cause sever e damage to the engine.
(D Tips
- The oil pressure warn ing display. is
not an indicator of the oil level. Do not
re ly on it . Instead, check the oil level in
your engine at r egular interval s, pr ef
erably e ach time you refu el, and always
before going on a long trip.
- If you have the impressio n yo ur engine
cons umes ex cessive amoun ts of oil, we
recommend that you consult your Aud i
dealer to have the cause of your concern
properly diagnosed. Keep in mind that
the accurate meas urement of o il con
sumption requ ires great care and may
take some t ime . Your Audi dea ler has in
struct ions about how to measure oil con
sumption acc urately.
Page 197 of 260
-Never mount used tires on yo ur vehicle if
you are not sure of their "previous histo
ry." Old used tires may have been dam
aged even though the damage cannot be
seen that can lead to sudden tire failure
and loss of vehicle control.
Glossary of tire and loading terminology
Accessory weight
means the comb ined weight (in excess of
those standard items wh ich may be rep laced)
of automa tic tra nsmission, power steering,
power br akes, power w indows, power sea ts,
radio, and heater, to the ex tent that these
items are avai lab le as factory -installed eq uip
ment (whether installed or not).
Aspect ratio
means the rat io of the height to the w idt h of
the tire in percent . Numbers of 55 o r lower in
d icate a low sidewall fo r improve d steer ing re
sponse and better overall handling on dry
pavement.
Bead
means the pa rt of the t ire t hat is made o f
s teel wires, wrapped o r reinforce d by ply cor ds
and that is shaped to fit the r im.
Bead separation
means a b reakdown of the bond between
com ponents in the bead .
Cord
means the strands forming the plies in the
tire .
Cold tire infl ation pres sure
means the tire pressure recommended by the
vehicle manufacturer for a t ire of a designated
size that has not been dr iven for more than a
couple of miles (kilometers) at low speeds in
the three hour period before the tire pressure
i s measu red or adjusted.
Tire s an d wheel s 195
-If you notice un usua l vibration or if the
veh icle pulls to one side when driv ing, a l
ways stop as soon as it is safe to do so and check the wheels and tires for dam
age.
Curb weight
mea ns the we ight of a motor ve hicle w it h
standard equipment in cl ud ing t he maximum
capacity of fuel, o il, and coolant, ai r cond i
tion ing and addi tional weig ht o f optiona l
equipment .
Extra load tire
means a t ire designed to operate at higher
loads and at highe r inflat ion p ressu res tha n
th e co rresponding standard tire. Extr a load
tir es my be i dent ified as "X L", "xl", " EXTRA
L O AD", or "RF" on t he sidewall.
Gross Axle Weight Rating ("GAWR ")
mea ns the load-carry ing capac ity of a s ingle
axle system, measured at the tire-ground in
te rfaces .
Gross Vehicle Weight Rating ( "GVWR ")
mea ns the maximum total loaded we ight of
t h e ve hicle.
Groove
means the space between two adjacent tread
ribs.
Load rating (code )
means the maximum load tha t a t ire is rate d
to ca rry for a given inflation press ure. Yo u
may not find this information on all tires be
ca use it is not required by law.
Maximum load rating
me ans the loa d ra ting f or a t ire a t the maxi
mum pe rm issi ble inflat ion pressure for that
ti re . •
•
...
Page 204 of 260
202 Tires and wheels
@ For the sake of the environment
Underinflated tires will a lso increase the
fue l consumption.
Tires and vehicle load limits
There are limits to the amount of load or
weight that any vehicle and any t ire can carry.
A vehicle that is overloaded w ill not handle
well and is more difficult to stop. Overload ing
can not only lead to loss of vehicle control,
but can also damage important pa rts of the
vehicle and can lead to s udden tire failure, in
cluding a blowout and sudden deflation that
can cause the vehicle to crash.
Your safety and that of your passengers a lso
depends on making sure that load limits are
not exceeded. Vehicle load includes everybody
and everything in and on the vehicle. These
l oad limits are technically referred to as the
vehicle's
Gross Vehicle Weight Rating
("GVWR").
The "GVWR" includes the weight of the basic
vehicle, all factory installed accessories, a full
tank of fuel, oil, coo lant and other fluids plus
maximum load. The maximum load includes
the number of passengers that the vehicle is
intended to carry ("seating capacity") with an
assumed weight of 150 lbs (68 kg) for each
passenger at a designated seat ing pos ition
and the total weight of any l uggage in the ve
h icle.
The
Gross Axle Weight Rating ("GAWR") is
the maximum load that can be app lied at each
of the vehicle's two axles.
The Gross Vehicle Weight Rating and the
Gross Axle Weight Rating are listed on the
safety compliance stick er labe l located on the
driver 's side 8-p illar. Your Audi has 2 seat ing
positions. Each seating pos ition has a safety
be lt ¢
page 107, Safety belts.
The fact that the re is an upper limit to your
vehicle's Gross Vehicle Weight Rating means
that the tota l weight of whatever is being car
ried in the vehicle is limited. The more passen
gers in the vehicle or passengers who are heavier
than the standard weights assumed
mean that less weight can be carried as lug
gage.
T he tire pressure label on your Audi also lists
the maximum combined weight of a ll of the
occupants and luggage or other cargo that
the vehicle can carry. For the location of the
label ¢
page 198, fig. 146.
A WARNING
Overloading a vehicle can cause loss of ve
h icle control, a crash or other accident, se
rious personal injury, and even death.
- Carrying more we ight than your veh icle
was des igned to carry will prevent the
veh icle from handling properly and in
crease the risk of the loss of vehicle con
trol.
- The brakes on a vehicle that has been
overloaded may not be able to stop the
veh icle w ithin a safe distance .
- Tires on a vehicle that has been overload
ed can fail suddenly, including a blowout
and 5udden deflation, cau5ing lo55 of
control and a crash.
Determining correct load limit
Use the example below to cal
culate the total weight of the passengers and luggage or oth
er things that you plan to trans
port so that you can make sure
that your vehicle will not be
overloaded.
Steps for Determining
Correct Load Limit
1. Locate the statement "THE
COMBINED WEIGHT OF QC
CU PANTS AND CARGO
SHOULD NEVER EXCEED XXX .,..
Page 214 of 260

212 Tires and wheels
Tire pressure
monitoring system
General notes
Appl ies to vehicles: with tire pressure monitoring system
Each tire, including the spare (if provided),
should be checked monthly when cold and in
f lated to the inflation pressure recommended
by the vehicle manufacturer on the vehicle
placard or tire inflation pressure label. (If your
vehicle has t ires of a different size than the
size indicated on the vehicle placard or tire in
flation pressure label, you should determine
the proper tire inflation pressure for those
tires.)
As an added safety feature, your vehicle has
been equipped with a tire pressure monitoring
system (TPMS) that illuminates a low tire
pressure telltale when one or more of your
tires is significantly under-inflated. According
ly, when the low tire pressure telltale illumi
nates, you should stop and check your tires as
soon as possible, and inflate them to the proper pressure. Driving on a significantly un
der-inflated tire causes the tire to overheat
and can lead to tire failure. Under-inflation al
so reduces fuel efficiency and tire tread life,
and may affect the vehicle's handling and
stopping ability.
Please note that the TPMS is not a substitute
for proper tire maintenance, and it is the driv
er's responsib ility to ma inta in correct tire
pressure , even if under-inflation has not
reached the level to trigger illumination of the
TPMS low tire pressure telltale.
Your veh icle has also been equ ipped with a
TPMS malfunction indicato r to indicate when
the system is not operating properly. The
TPMS malfunction indicato r is combined with
the low tire pressure telltale. When the sys
tem detects a malfunction, the telltale will
f lash for approximately one minute and then
remain continuously illuminated. This se
quence will continue upon subsequent vehicle
start-ups as long as the ma lfunction exists. When the
malfunction indicator is illuminat
ed, the system may not be ab le to detect or
s ignal low tire pressure as intended. TPMS
malfunctions may occur for a variety of rea
sons, including the installation of replace
ment or alternate tires or wheels on the vehi
cle that prevent the TPMS from functioning
properly. Always check the TPMS malfunction
telltale after replacing one or more tires or
wheels on your vehicle to ens ure that the re
placement or alternate ti res and wheels allow
the TPMS to continue to function properly.
Tire pressure indicator appears
Applies to veh icles : w ith tire pressure monitoring system
The tire pressure indicator in the instrument
cluster informs you if the tire pressure is too
low or if there is a system malfunction.
Fig. 151 Display : underinflatio n warning
Fig. 152 Display: System malfunction
Using the ABS sensors, the tire pressure moni
toring system compares the tire tread circum
ference and vibration characteristics of the in dividual tires. If the pressure decreases in one
or more t ires, this is indicated in the instru
ment cluster with a warning symbol
g and a
message
r=:> fig. 151. Th e driver message in the
display goes out after 5 seconds. The driver
message can be displayed again by pressing
11--
Page 217 of 260
Returning to the Start menu
"' Pre ss the I Reset ! button longer than 2 sec
onds to return from any menu leve l to the
Start menu .
(D Tips
Before resetting the TPMS, the current
pressures of
all four tire s must correspond
to the specified values. Adjust the tire
pressure and reset the pressure in the tire
pressure monitoring system according to
the load you are carrying
c::;, page 198.
Run-flat tires
Introduction
Applies to vehicles: with Run-flat tires
Run-flat tires help keep you moving if a tire
goes flat.
Reinforced s idewalls give the tires run-flat ca
pability if tire pressure is lost.
We recommend that run-flat tires only be
mounted on vehicles that were originally
equ ipped w ith these special tires at the facto
ry and have a Tire Pressure Monitor ing Sys
tem.
Run-flat t ires can be ident ifi ed by th e lett ers
"RSC" on the tire sidewall.
If you do change the tires on yo ur vehicle from
normal to run-flat tires, you must buy the
specia l rims required for run-flat tires, and the
Ti re Pressure Monito ring System must be re
programmed by an a uthorized Audi dea ler or
other qualified workshop.
What do run-flat tires do?
These special tires have run-flat capabilities
that help keep you moving if a tire loses pres
sure and goes flat. Under favorable cond itions
tires can be driven
at l ea st 30 mil es (SO km ),
but you must not d rive fa ste r than SO mph
(80 km /h)
c::;, page 216, Driving with run-flat
tires .
Tire s an d wheel s 215
When it is not po ssible to continue
driv ing , ev en with run-flat tire s?
- If the Electronic Stabilization Program (ESP)
is not work ing or keeps coming on.
- If the Tire Pressure Monitoring System does
not work.
- If the tire has been severely damaged, in a
crash, for example. The tread can separate
from a damaged tire as the wheel turns, and
hit parts of the vehicle, such as the fuel tank
filler neck, fuel lines or brake lines.
- Do not continue driving if severe vibration
occurs or if the t ire starts to smoke because
the tire is ru nning hot.
- Do not continue driving if damage to the
tire, such as cracks in the sidewall, appears.
A WARNING
Improper use of run-flat tires can cause
vehicle damage that can lead to loss of ve h icl e cont ro l, a c rash and serious personal
in Jury.
- Run-flat tires can only be used with spe
cial rims.
- Run-flat tires must always be monito red
with a prope rly p rogrammed Tire Pre
ssure Monito ring System.
- Always inspect a tire that has lost air to
make sure it is sa fe to dr ive with the tire
in the run-flat mode.
- Never d rive with run-f lat t ires that have
been damaged in a co llision.
- Never d rive with run-flat t ires if heat
bu ild-up causes the tire to give off
smoke.
- Never d rive with run-f lat t ires if the vehi
cle shakes or vibrates severely.
- Never d rive with a run-flat ti re that de
velops s idewa ll cracks or other damage
while in use.
- I f you sw itch between standa rd and run
f lat ti res, an aut horiz ed Aud i dealer o r
qu alified wor kshop must reprogram the
con tro l mod ule.
•
•