checking oil AUDI TT ROADSTER 2014 Owners Manual
[x] Cancel search | Manufacturer: AUDI, Model Year: 2014, Model line: TT ROADSTER, Model: AUDI TT ROADSTER 2014Pages: 244, PDF Size: 60.87 MB
Page 5 of 244
Knee airbags . . . . . . . . . . . . . . . . . . . . . 124
Side airbags . . . . . . . . . . . . . . . . . . . . . 126
Child Safety . . . . . . . . . . . . . . . . . . . 130
Important things to know ......... .
Child safety seats ................ .
Instal ling a chi ld safety seat .. .. .. . .
Additional Information ........... .
Vehicle operation ............ .
Intelligent technology .. .. .. . .
Notice about data recorded by vehicle
control modules .............. ... .
Electronic Stabilization Control (ESC) .
Rear spoiler ................ ... . .
Braking ........................ .
E lect ro-me chan ical power assis t ... . .
D riving w ith your quattro ......... .
Energy management ............. .
Driving and environment .....
The first 1,000 miles (1,500 km) and
afterwards .............. .. .. .. . .
Avoid damaging the vehicle ........ .
Driving through water on roads ... . .
Catalytic converter ............... .
Shutting down vehicle ............ .
Operate your vehicle economically and
minimize pollution ............... . 130
135
138
141
142
142
142
142
144
145
146
1 47
147
1 5 0
150
151
151 151
152
15 2
Tra iler towing . . . . . . . . . . . . . . . . . . . . 154
Vehicle care . . . . . . . . . . . . . . . . . . . 155
Vehicle care and cleaning . . . . . 155
General information . . . . . . . . . . . . . . 155
Car washes . . . . . . . . . . . . . . . . . . . . . . 155
Cleaning and care information . . . . . . 156
Fuel supply and filling your
fuel tank . . . . . . . . . . . . . . . . . . . . . . .
16 1
Gasoline . . . . . . . . . . . . . . . . . . . . . . . . 161
Fuel tank. . . . . . . . . . . . . . . . . . . . . . . . 162
Checking and filling . . . . . . . . . . . 16 5
Engine hood . . . . . . . . . . . . . . . . . . . . . 165
Eng ine oil . . . . . . . . . . . . . . . . . . . . . . . 167
Eng ine cooling system............. 172
Brake fluid ...................... 174
Table of contents 3
Battery . . . . . . . . . . . . . . . . . . . . . . . . . 175
Windshield/headlight washer
container . . . . . . . . . . . . . . . . . . . . . . . 180
Tires and wheels ........... .. .
Tires ..... .. .... .. . .. .......... .
Tire pressure monitoring system ... .
Run-flat tire s .. .. ............... .
Do-it-yourself service ........ .
What do I do now? ........... .
Trunk escape handle ............. .
Vehicle tool kit .... .............. .
T ire repai r .... ... .. ............. .
What should I be aware of when
h . t
' 7 c angmg a ire .................. .
Fuses and bulbs .. .. .. ..... ... .
El ectr ical fuses . .. .. ............. .
Bulbs .......................... .
Emergency situations ........ .
General ........................ .
Starting by pushing or towing ...... .
Starting with jumper cables ....... .
U se of jump er cables ............. .
Emergency towing with commercia l
tow truck ...................... .
Lifting vehicle .. .. ............... . 181
181
199
202
205
205
205
205
206
209
213
213
216
217
217
217
217
218
219
222
Technical data
. . . . . . . . . . . . . . . . . 223
Technical Data . . . . . . . . . . . . . . . . . 223
Vehicle identification . . . . . . . . . . . . . . 223
Weights . . . . . . . . . . . . . . . . . . . . . . . . 223
Dimensions . . . . . . . . . . . . . . . . . . . . . . 224
Capacities . . . . . . . . . . . . . . . . . . . . . . . 224
Gasoline engines . . . . . . . . . . . . . . . . . 225
Consumer Information . . . . . . . 226
Warranty coverages . . . . . . . . . . . . . . . 226
Operating your vehicle outside the
U.S. A. or Canada . . . . . . . . . . . . . . . . . 226
Audi Service Repair Manuals and
Literature . . . . . . . . . . . . . . . . . . . . . . . 226
Maintenance. . . . . . . . . . . . . . . . . . . . . 226
Additional accessories, modifications
and parts rep lacement . . . . . . . . . . . . 228
•
•
Page 22 of 244
20 Instruments and warning /indicator lights
speed displayed in the driver information sys
tem . Keep in mind that the engine speed will
not exceed the va lue disp layed in the driver in
formation system, for example when down
shifting.
Please go to an authorized Audi dea ler or oth
er qualified workshop to have the ma lfunction
repaired.
~ . Checking the engine oil level
II Please add max . 1 qt of engine oil!
If the II symbol comes on, add 1 quart (1 li
ter) of oil at the next opportunity
¢page 170.
~ ... Engine oil sensor defective
If the II symbol illuminates, contact your
author ized Audi dealer and have the oil sensor
inspected .
Bi) Fuel supply too low
When the 001 symbol illuminates, this means
there are about 1.9 gallons (7 liters) of fuel
left in the fuel tank. Time to refuel!
¢ page 162.
If the symbol lights up, even when there is
ample fuel in the tank, and the text
Tank sys
tem malfunction! Please contact workshop
appears in the display, there is a fault in the
system. Contact a qualified workshop to have
the fault rectified.
If the -symbol illum inates, add w indshield
washer f luid to the washer system
¢page 180.
~ Defective light bulb warning
The defective light bulb warning tells you
when a vehicle light bulb has become defec
tive.
If a defective bulb has been detected by the
system or a light bulb burns out,
the m sym
bol w ith a message appears in the display to
te ll you which bulb is burnt out and where it is
located. For example :
Rear left turn signal
After 5 seconds, the message disappears. If
you want to recall the message into the dis play, press the CHECK button
¢ page 10,
fig. 3
(J) .
There are three reasons why the defective
bulb message would appear in the display:
- The light bu lb has burnt out
¢page 216.
-The f use is "blown" ¢ page 213, Replacing
fuses .
-The wire connection to the light bulb is de-
fective.
Have the bulb replaced or the connect ion re
paired by your authorized Aud i Service depart
ment .
A WARNING
-
-Light bulbs are pressurized and could ex
p lode while they are being changed caus
ing serious personal injury.
- Work with due care when handling the
high-vo ltage section of gas discharge
(xenon) lamps. Failing to do so could re
sult in death or serious injury!
BRAKE LIGHT!<®> Brake light defective
In case of a malfunction or component fail-
ure, the symbol (USA models)/
It:$
repaired or replaced, as necessary:
- Brake light bulbs
- All wiring connections
- Brake light switch
Page 168 of 244
166 Checking and filling
-Apply the parking brake.
- Move selector lever to "P" (Park).
- Always let the engine cool down. Hot
components will burn skin on contact.
- To reduce the risk of being burned, never
open the hood if you see or hear steam
or coolant escaping from the engine
compartment . Wait until no steam or
coolant can be seen or heard before care
fully opening the hood.
- Keep children away from the engine com
partment .
- Never spill fluids on hot engine compo
nents. They can cause a fire.
- Never touch the radiator fan. The auxili
ary electric fan is temperature controlled
and can switch on suddenly.
- Never open the coolant reservoir cap
when the engine is still warm. The cool
ant system is pressurized and hot cool
ant could spray out .
- Protect your face, hands and arm from
steam or hot engine coolant by placing a
thick rag over the cap when you open the coolant reservoir .
- Do not remove the engine cover under
any circumstances . This increases the
risk of burns.
- If work on the fuel system or the electri
cal system is necessary:
- Always disconnect the battery .
- Never smoke or work near heaters or
open flames. Fluids in the engine com
partment could start a fire.
- Keep an approved fire extinguisher im
mediately available.
- To avoid electrical shock and personal in
jury while the engine is running or being
started, never touch:
- Ignition cables
- Other components of the high voltage
electronic ignition system.
- If you must perform a check or repair
with the engine running: -
First, fully apply the parking brake,
move selector lever to "P" (Park) .
- Always use extreme caution to prevent
clothing, jewelry, or long hair from get
ting caught in the radiator fan, V-belts
or other moving parts, or from contact ing hot parts. Tie back hair before
starting, and wear no clothing that will hang or droop into the engine.
- Minimize exposure to emission and chemical hazards~&, .
A WARNING
=
California Proposition 65 Warning:
- Engine exhaust, some of its constituents, and certain vehicle components contain
or emit chemicals known to the State of
California to cause cancer and birth de
fects and reproductive harm. In addition,
certain fluids contained in vehicles and
certain products of component wear con
tain or emit chemicals known to the
State of California to cause cancer and
birth defects or other reproductive harm.
- Battery posts, terminals and related ac
cessories contain lead and lead com
pounds, chemicals known to the State of
California to cause cancer and reproduc
tive harms. Wash hands after handling.
(D Note
When adding fluids, always make sure that
they are poured into the proper container
or filler opening, otherwise serious dam
age to vehicle systems will occur.
@) For the sake of the environment
To detect leaks in time, inspect the vehicle
floor pan from underneath regularly. If
you see spots from oil or other vehicle flu ids, have your vehicle inspected by an au
thorized Audi dealer.
Page 169 of 244
Checking and fillin g 167
Eng ine compartment
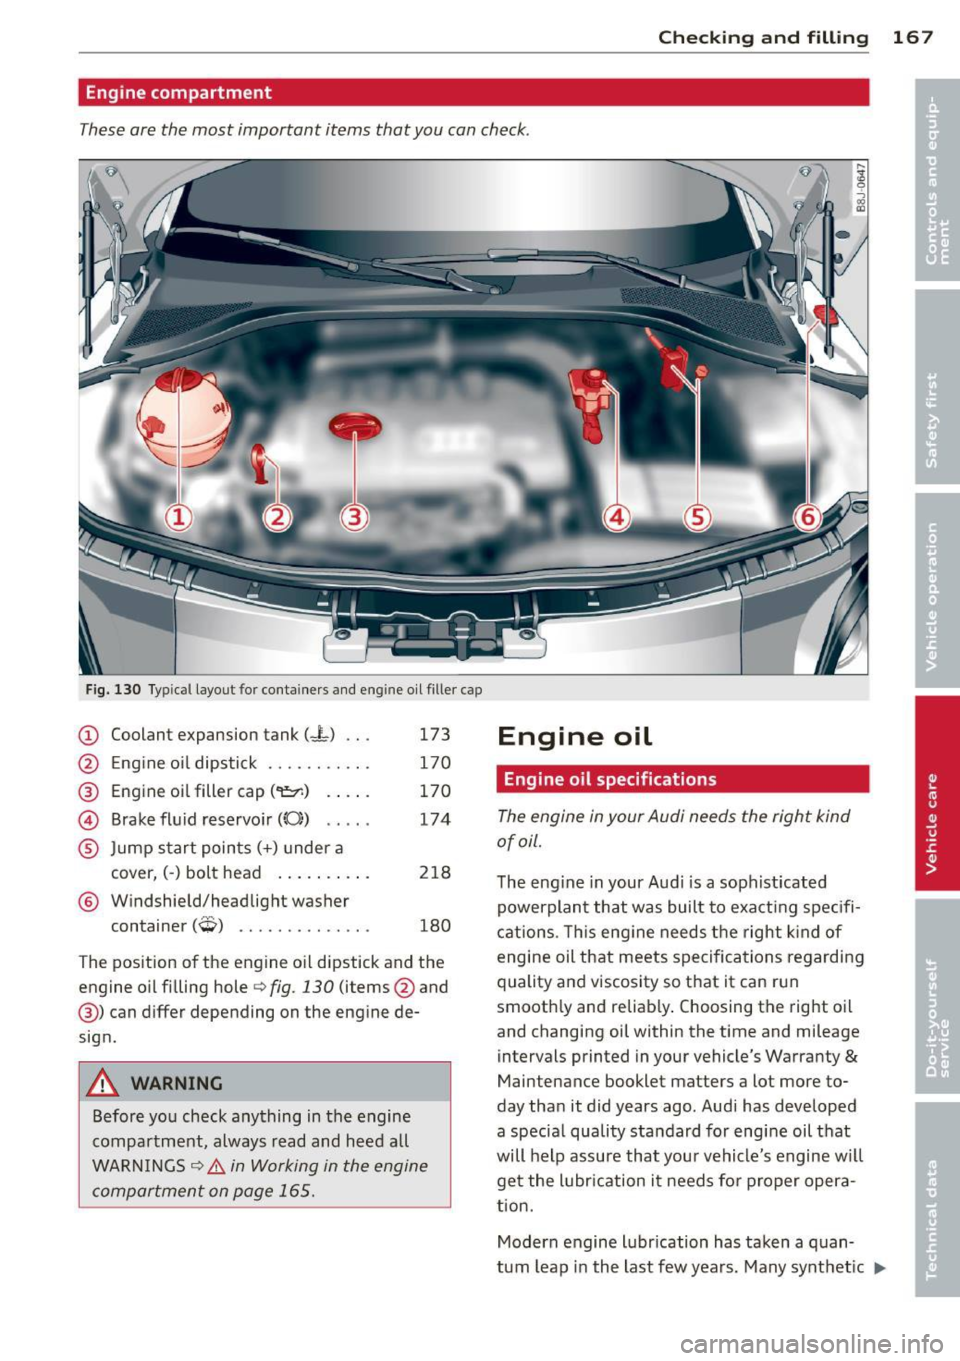
These are the most important items that you can check .
•
Fig. 130 Typ ical layout for containers and eng ine oil filler cap
(D Coolant expansion tank (-L) . . . 173
@ Eng ine oi l dipstick . . . . . . . . . . . 170
@ Engine oil filler cap (
® Jump start points(+) under a
cover,(-) bolt head . . . . . . . . . . 218
® Windshield/headlight washer
t . (ffi) con amer *
...... ....... . 180
The position of the engine o il dipstick and the
engine oil filling hole
i::> fig. 130 (items @and
@) can differ depending on the engine de
sign.
_&. WARNING
Before yo u check anything in the engine
compartment, always read and heed all
WARN INGS
i::> &. in Working in the engine
compartment on page 165.
Engine oil
Engine oil specifications
The engine in your Audi needs the right kind
of oil.
The eng ine in your Aud i is a sophist icated
powerplant that was built to exacti ng spec ifi
cations . T his eng ine needs t he right k ind of
engine oil that meets specifications regarding
quality and viscosity so that it can run
smoot hly and reliably . Choosing the right o il
and changing oil within the time and mileage
intervals printed in your vehicle's Warranty
&
Maintenance booklet matters a lot more to
day than it did years ago. Audi has developed
a specia l quality standard for engine oil t hat
will help assu re that you r vehicle's engine w ill
get the l ubr ication i t needs fo r proper opera
tion.
Modern engine lubr ication has taken a q uan
tum leap in the last few years. Many synt het ic
IJI,,
Page 170 of 244
168 Checking and filling
oils available today provide better engine lu
brication that can outlast traditional petrole
um-based oils, making them a smart choice
for use throughout the life of your Audi.
Whether you use synthetic or petroleum
based engine oil, the oil that you use must
conform to Audi's oil quality standard
VW 502 00 to help keep your vehicle's engine
running smoothly and help prevent the for
mation of harmful deposits, sometimes called
"sludge," that over t ime can lead to expensive
repairs .
At the time of printing, engine oils available in
the U .S . and Canada that meet the exacting
specifications of Audi oil standard VW 502 00
are synthetic engine oils. This does not mean, however, that every synthetic engine oil will
meet Audi oil standard VW 502 00. So always
be sure that you use an approved oil.
To help prevent the formation of harmful de posits use only oil with the following specifi
cations printed on the oil container:
Audi oil standard VW 502 00
Oil container labels may carry the specifica
tion singly or in combination with other desig
nations and oil quality standards .
Viscosity
Engine oils are graded according to their vis
cosity. The proper viscosity grade oil for your
engine depends on climactic or seasonal con
ditions where you drive. You can use oil with a
viscosity grade of SAE 5W40 across all tem
perature ranges for normal driving conditions.
However, if engine oil viscosity grade SAE
5W40 is not available, you can also use viscos
ity grade SAE 5W-30 or SAE OW-40 as long as
it meets Audi oil quality standard VW 502 00
specifications .
Because engine oil that meets the Audi oil
standard may not be available everywhere
when you need it, we strongly recommend
that you always carry with you an extra quart (liter) of oil that expressly conforms to the VW 502 00 specification, in case you have to
top
off the oil while on the road.
Only if the level of the oil is at or below the
minimum mark on the oil dipstick - and no oi l
that expressly conforms to Audi oil standard
VW 502 00 specifications is available -may
you top
off with a high quality engine oil, pref
erably synthetic-based, that meets ACEA A3
or API SM specifications, but even then, only
in viscosity grades SAE SW-40, SAE 5W-30, or
SAE OW-40 . However, during the entire time
between oil change intervals, never top
off
with more than a total of 0.5 qt/liter engine
oil that does not conform to Audi oil specifica
tion VW 502 00.
For more information about engine oil that
has been approved for your vehicle, please
contact either your authorized Audi dealer o r
Audi Customer Relations at 1 (800) 822-2834
or visit our web site at www.audiusa.com or
www.audicanada.ca . Here you will also find a
current list of oils (manufacturers, brand
names etc.) that conform to Audi oil standard
vw 502 00.
Changing the engine oil
The engine oil and oil filter must be changed
according to the mileage (kilometers) and
time intervals specified in your vehicle's War
ranty
& Maintenance booklet. Do not exceed
these intervals -harmful deposits from old
engine oil can reduce engine performance and
can lead to expensive engine repairs.
Changing the oil at the recommended inter
vals is so very important because the lubricat
ing properties of oil decrease gradually during
normal vehicle use. If you are not sure when
you have your oil changed, ask your author
ized Audi Service Advisor.
Under some circumstances the engine oil
should even be changed more frequently. Change oil more often if you drive mostly
short distances, operate the vehicle in dusty
areas or mostly under stop-and-go traffic con
ditions, or when you use your vehicle where
temperatures stay below freezing point for
long periods.
Page 172 of 244
1 70 Checking and filling
Checking the engine oil level
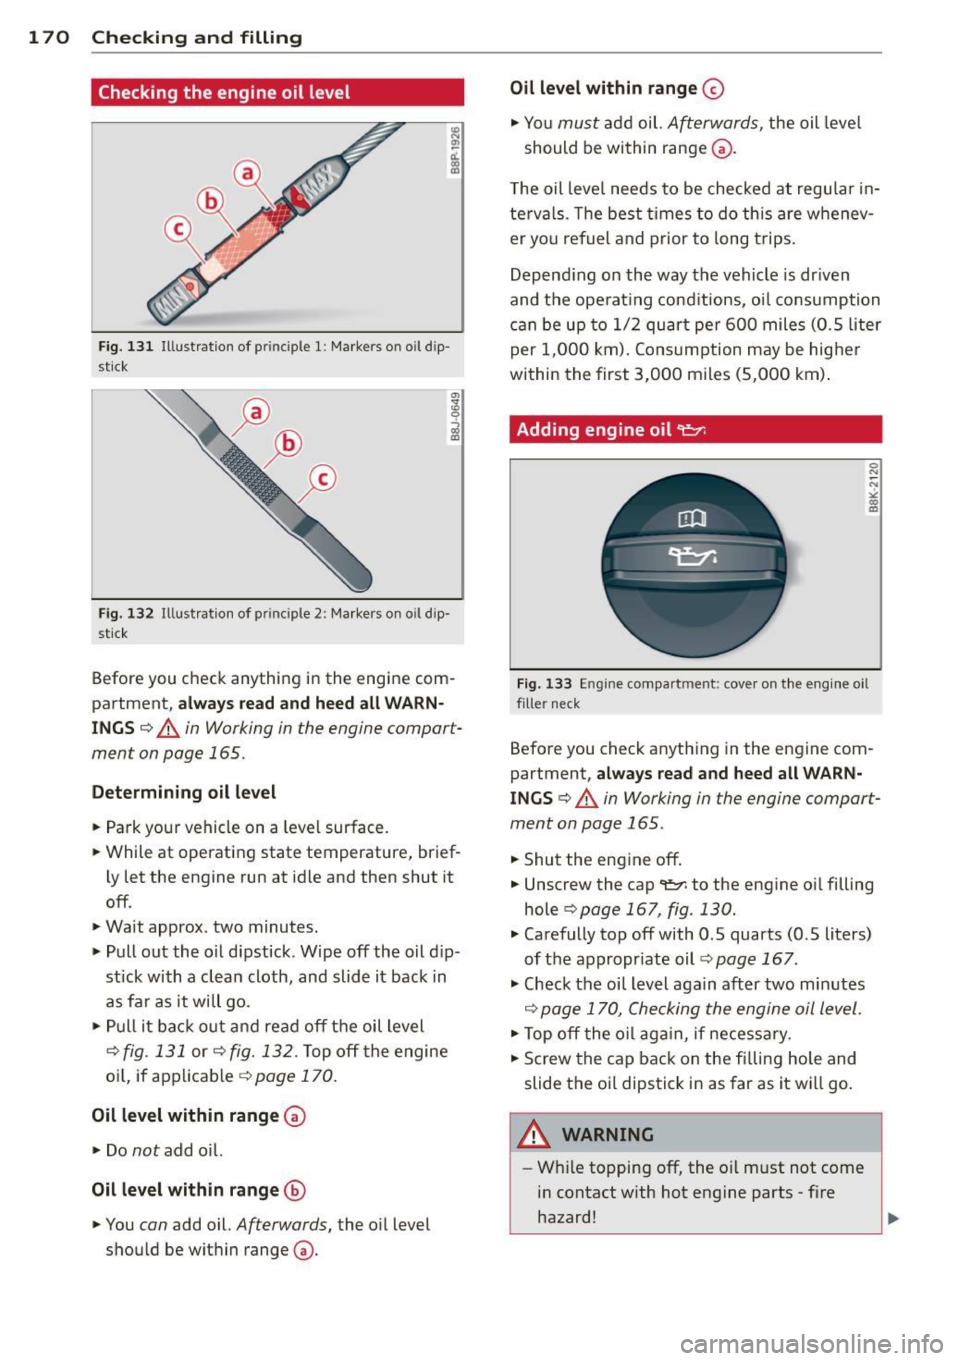
Fig. 131 Illustrat ion of p rinciple 1: Markers on o il dip
stick
F ig. 132 Illustration of princip le 2: Markers on oil dip·
stick
Before you check anything in the engine com
partment,
always read and heed all WARN·
INGS ¢ .&. in Working in the engine compart
ment on page 165.
Determining oil level
• Park your vehicle on a level surface.
• While at operating state temperature, brief
ly let the engine run at id le and then shut it
off .
• Wait approx . two minutes.
•Pu llout the oil dipstick. Wipe off the oil dip
stick with a clean cloth, and slide it back in
as far as it will go .
• Pull it back out and read off the oil level
<=?fig . 131 or ¢fig. 132 . Top off the engine
oi l, if applicable ¢
page 170.
Oil level within range~
• Do not add oil.
Oil level within range@
• You can add oil. Afterwards, the oil level
shou ld be within range~-
Oil level within range 0
• Yo u must add oil. Afterwards, the oil level
should be within range~-
T he oil leve l needs to be checked at regular in
tervals . Th e best times to do this are whenev
er you refuel and prior to long trips.
Depending on the way the vehicle is dr iven
and the operating conditions, oil consumption
can be up to 1/2 quart per 600 miles (0.5 liter
per 1,000 km). Consumption may be higher
within the first 3,000 miles (5,000 km) .
Adding engine oil "1::7-
0 N ,;;
><
"' IXl
Fig. 133 En g ine compartment: cove r on t he eng ine o il
fille r neck
Before you check anything in the engine com
partment,
always read and heed all WARN
INGS ¢.&. in Working in the engine comport·
ment on page 165 .
• Shut the engine off.
• Unscrew the cap
't::7-to the engine oil filling
hole
¢ page 167, fig . 130.
• Carefully top off with 0.5 quarts (0.5 liters)
of the appropriate oil
r::.>page 167.
• Check the oil level again after two minutes
¢ page 170, Checking the engine oil level.
• Top off the oil again, if necessary.
• Scr ew the cap back on the filling hole and
slide the oil dipstick in as far as it will go.
A WARNING
-While topping off, the oil must not come
in contact with hot engine parts -fire
hazard!
~
Page 174 of 244
172 Checking and filling
@ For the sake of the environment
- Before changing your oil , first make sure
you know where you can properly dispose
of the used o il.
- Always dispose of used engine oil proper
l y. Do not dump it on garden soi l, wood
ed areas, into open streams or down
sewage dra ins.
- Recycle used engine oil by taking it to a
used engine o il collection facility in your
area, or contact a service station .
Engine cooling system
Coolant
The engine coolant performs two functions: it
keeps the engine from overheating and it pro tects the engine from freezing in the winter.
The cooling system is sea led and generally re
q uir es little attention .
The cooling system has been filled at the fac
tory with a pe rmanent coolant which does not
need to be c hanged. The coolant consists of a
mixture of spec ia lly condi tioned water and the
manuf acturer 's glyco l-b asedcoolan t addi -
tive G l3 antifreeze with ant icorros ion addi
tives (50% for USA models ; 60% for Canadian
mod els). This mixture both assures the nec es
sary frost protection and p rotects metal com
ponents in the engine's cooling system from
corrosion and scaling . It a lso raises the boil
ing point of the coo lant .
Do not red uce the concentration o f the coo l
ant in the summer by adding plain water.
The
proportion of coolant add itive must be at
l e a st 50 % but not more than 60 %
to main
tain antifreez e protection and cooling efficien
cy . If the coolant frost prote ct ion is too low,
the coo lant cou ld free ze and damage the veh i
cle hea ting and eng ine cooling system.
For yea r-round d riving, antifreeze is added at
the fac to ry for temperatures down to:
-- 31°F( -35°C)USA
- -40 °F ( -40 °C) Canada. If
you must add coolant, use a mixture o f wa
ter and coolant additive . Mixing the coo lant
additive with distilled water is recommended.
A WARNING
-
Before you c heck anything in the engine
compartment, always read and heed a ll
WAR NINGS
c::, & in Working in the engine
compartment on page 165.
(D Note
- Before winter sets in, have the coo lant
checked to see if the coolant additive in
your vehicle is sufficient to meet the cli m ate conditions . This is especia lly impor
tan t if you live in a reg io n wher e the win
t er is ex treme ly col d. If ne cessa ry, i n
crease the proportion of coo lant add itive
t o 60%.
- Whe n adding coolant additive to yo ur
c oolin g sys tem, remembe r:
- We recommend using on ly coolant ad
d itive Gl2++ or Gl3 for your vehicle .
This coolant additive is avai lab le at au
thor ized Audi dealers . Other types of
ant ifre eze can s ignificant ly reduce cor
rosion prote ctio n. T he resulti ng cor ro
sion can ca use a lo ss o f coolan t and se
rio us en gine d amage.
- Do not add any ty pe of rad iator leak seal
a n t t o y our vehicle 's engine coolant.
Add ing radiator rep air fl uid may adverse
ly affect the function and performance of
yo ur cooling system and co uld resu lt in
damage not covered by yo ur New Vehicle
Limited Warranty.
-
Page 175 of 244

Checking the engine coolant level
The engine coolant level can be checked with
a quick glance .
Fig. 134 Eng ine compartme nt: cover o n the coolant
expansion tank
Before you check anything in the engine com
partment,
a lway s read and he ed all WARN
INGS ¢ A in Working in the engine compart
ment on page 165.
.,. Park your vehicle on a level surface.
.,. Switch the ignition
off .
.,. Read the coola nt level at the coolant expan
s ion tank
¢ page 167, fig . 130. With a cold
engine, it must be above the "min" mark.
With a hot engine, it can be a l ittle above
the indica ted range.
The location of the coolant expans ion tank
can be seen in the engine compar tment illus
tration
¢page 167.
To obtain an accurate read ing, the eng ine
must be switched
off.
The expans ion tank in your vehicle is equipped
with a n electric coolant level sensor.
When the coo lant level is too low, the warning
light in the Auto-Check System¢
page 17 will
illum inate until you add coolant and the level
has been restored to normal. Even though
there is an electric coolant level sensor, we
still recommend you check the coolant leve l
from time to time.
Coolant loss
Coolant loss may indicate a leak in the cool ing
system. In the event of coolant loss, the cool
i ng system should be inspected immediately
Checkin g and fillin g 173
by your authorized Audi dea ler . It is not
enough merely to add coo lant .
In a
s ealed system, losses can o ccu r on ly if
the boiling point o f the coo lant is exceeded as
a res ult of overheating.
(D Note
Do not ad d any type of radiator leak sea l
ant to your veh icle's engine coo lant. Add
ing radiator repa ir flui d may adverse ly af
fect the function and performance of yo ur
cooling system and could result in damage
not covered by your New Vehicle Limited
War ranty.
Adding coolant
Be very careful when adding engine coolant.
Before you check anyth ing in the engine com
partment,
alway s read and heed alt WARN
INGS ¢ A in Working in the engine compart
ment on page 165.
... Tu rn off the engine .
.,. Let the engine cool down.
.,. Place a thick rag ove r the coolant expansion
tank ¢
page 173, fig. 134 and carefully
twist the cap counter-clockwise ¢_& .
.,. Add coo lant m ixed in the correct rat io
¢ page 172, Coolant .
.,. Twist the cap on aga in tightly.
Rep lacement engine coo lant must conform to
exact specificat ions¢
page 172, Coolant.
We recommend using only coolant add itive
Gl2 ++, Gl3 or in an emergency Gl2+. Do not
use a different additive. In an emergency use
plain water until you can get the correct addi
tive and can resto re the correct ratio . Th is
shou ld be done as soon as possib le.
If you have lost a cons iderab le amount of
coolant, then you should add cold ant ifreeze
and co ld wate r on ly when the engine is cold.
Always use
new engine coolant when refilling.
Do not fill coolant above the "MAX" mark. Ex-
cess coolant will be fo rced o ut through the ..,_
•
•
Page 200 of 244
198 Tire s and wheel s
snow cha ins a re suitab ly covered. Check
the position of the snow chains after driving a few yards and correct if neces
sary. Follow the instr uctions from the
snow cha in manufacturer when doing so.
{O) Tips
Where snow cha ins are mandatory oncer
tain roads, this norma lly also applies to
veh icles with all-wheel dr ive.
Wheel bolts
Wheel bolts must always be tightened to the
correc t torque .
The design of whee l bolts is matched to the
factory installed r ims . If different rims are fit
ted, the correct wheel bolt s with the r ight
length and correctly shaped bol t heads mus t
be used . This ensures that wheel s are fitted
securely and that the brake system functions
correctly .
In certain circumstances, you may not use
wheel bolts from a d iffe rent vehicle -even if it
i s the same model
Q page 228.
A WARNING
Imprope rly tig htened o r maintained whee l
bolts can be come loose ca using loss of
cont ro l, a co llision and serious person al in
jury .
- Always keep the w heel bol ts and the
t h reads in t he wheel hubs clean so the
wheel bolts can t urn easily and be p rop
er ly t ightened .
- N ever grease or oil the wheel bo lt s an d
the threads in the wheel h ubs. They can
become loose w hile d riving if greased or
oi led, even if tightened to the specif ied
torque.
- Only use whee l bolts that be long to the
rim being installed.
- Never use different whee ls bolts on your
vehicle .
- Always mai ntai n the co rrect tighte ning
torq ue for the wheel bolts to reduce the
risk of a wheel loss. If the tightening tor- que of the whee
l bolts is too low, they
can loosen and come out when the vehi
cle is mov ing. If the tig hte ning torq ue is
too high, the w heel bolts a nd threads
can be damaged and the whee l can be
come loose.
(D Note
The specified torque for t he whee l bolts is
90 ft lb (120 Nm) with a tolerance of± 7,4
ft lb(± 10 Nm). Torque whee l bolts diago
nally . After changing a whee l, the to rq ue
must be checked as soon as possible with a
torque w rench - prefe rably by an author
iz ed A udi dealer or quali fied workshop .
Low aspect ratio tires
Your Audi is factory-eq uipped w ith low aspect
ratio tires. These tires have b een tho ro ughly
tested and been se lected specifically for your
model for their supe rb performance, road fee l
and hand ling under a variety of driving condi
t ions . Ask your author ized Audi dealer for
more de tails .
The low aspect ratio of these t ires is ind icated
by a numeral of
55 or less in the tire 's s ize
designation . The numera l rep resents the ratio
of the tire 's s idewa ll height in relation to its
t read width exp ressed in percentage. Conven
tiona l tire s have a he igh t/w idth rat io of 60 or
more.
The p erformance of low-a spect-ratio tire s is
particularly sensitiv e to improper inflation
pre ssure. It i s ther efore important that low
aspect ratio tires are inflated to the specified
pre ssure and that the inflation pre ssure i s
regularly checked and maintained. Tire pre s
sures should be checked at least once a month and always before a long trip
Q page 187, Checking tire pressure.
What you can do to avo id tire and rim
damage
Low aspect ratio tires can be damaged mo re
easily by impact w ith po tholes, curbs, gul lies ..,.
Page 232 of 244
230 Index
A
A/C operation . . . . . . . . . . . . . . . . . . . . . . . 71
Accessories . . . . . . . . . . . . . . . . . . . . . . . . 228
Acoustic park assist ........ .. .. .. .. . . 80
Adaptive light . . . . . . . . . . . . . . . . . . . 21, 49
Adding Eng ine coolant .............. ... .. .
Engine oil .. ..... ........... ... .. .
Windshield washer fluid ... .. .. .... .
Additional accessories
Addit ives
Engine oil . ...... ......... ... .... .
Adjustab le steer ing column ...... .. ... .
Adjusting front seats ....... .. .. .. .. . . 173
170
180
228
170 73
60
Adj usting steering column ... .... .... .. 73
Adjusting the seats ............... ... . 61
Advanced Airbag System Children 131
Components ............. .. .. .... . 115
Front airbags . ............. .. .... . 113
H ow the components work together . . 117
Monitoring .... ... ... .... .. .. .. .. . 119
Weight -se nsing mat ...... .. .. .. .. . 131
Airbag system . . . . . . . . . . . . . . . . . 109, 128
Care . .. .. .. ............... .. .... . 122
Ch ild restra ints .............. ... .. . 132
Components (front airbags) .. .. .. .. . 115
Danger of fitting a child safety seat on
the front passenger seat . . . . . . . . . . . . 110
Disposal ................ .. .. .... . 122
Fr ont airbags ..................... 113
How do the front airbags work? .. ... . 118
How many airbags does my vehicle
have? ... .. ............. .. .. .. ... 115
Important safety instructions on the knee airbag system ..... .. .. .. .. .. . 126
Important things to know ...... .. .. . 109
Indicator l ight .... ... .... .. .. .. .. . 119
Knee airbags ............. .. .. .. .. . 124
Monitoring ... ............. .. .... . 119
PASSENGER AIR BAG OFF light .. ..... 120
Repairs .... ................ ..... . 122
Side airbags . . . . . . . . . . . . . . . . . . . . . . 126
Warning/indicator lights ............. 15
When must the system be inspected? 119
A lcantara
C leaning ... .. .............. ..... . 158 All-wheel drive
.... ............. .... 147
Winter tires ..... ................ . 196
Alternator .. .... .. ............. .... . 16
Anti-free ze
refer to Eng ine cooling system . .. .. .. 172
Anti -lock brake system . . . . . . . . . . . . . . . 142
Warning/indicator lights ............. 18
Anti-s lip regulation ............. .... 142
Anti-theft systems Anti -theft alarm system ............. 38
Electronic immobilizer .......... .. .. . 33
Ashtray ... ..... .. .. .............. .. 64
Asterisk What does it mean when something is
marked with an asterisk? . . . . . . . . . . . . . . 6
Audi magnet ic r ide . . . . . . . . . . . . . . . 21, 80
Description . . . . . . . . . . . . . . . . . . . . . . . . 80
Indicator light . .. .. ........... .. .. . 21
Audi Service Repair Manuals and Li tera-
ture 226
Automatic be lt retractor ............ . 104
Automat ic convert ible top
closing
. .. .. .. .. ............. .. .. . 43
opening .. .. .. .. ................ .. 43
Automat ic transmission . . . . . . . . . . . . . . . 82
Driving Notes . . . . . . . . . . . . . . . . . . . . . . 84
Emergency program ........... .. .. . 87
Emergency release ............. .. .. . 87
Ignit ion key safety lock ........... .. . 74
Kick-down ..... .. ................ .. 86
Launch Control Program ............. 86
Se lector lever lock . . . . . . . . . . . . . . . . . . 83
Se lector lever positions ......... .. .. . 82
Tiptronic .. .... .. ............. .... . 85
T iptronic controls on the steering wheel 86
Auto Safety Hotline ................ .. 99
Average fuel mileage ............ .... . 23
Average speed . . . . . . . . . . . . . . . . . . . . . . . 23
Avoid damaging the vehicle ........ ... 151
B
Battery ...................... 175,178
Charg ing .. .... .. ............. .... 179
Checking battery acid level .......... 178
Connecting . ..... ................ . 175
Disconnecting 175