oil pressure AUDI TT ROADSTER 2014 Owners Manual
[x] Cancel search | Manufacturer: AUDI, Model Year: 2014, Model line: TT ROADSTER, Model: AUDI TT ROADSTER 2014Pages: 244, PDF Size: 60.87 MB
Page 5 of 244
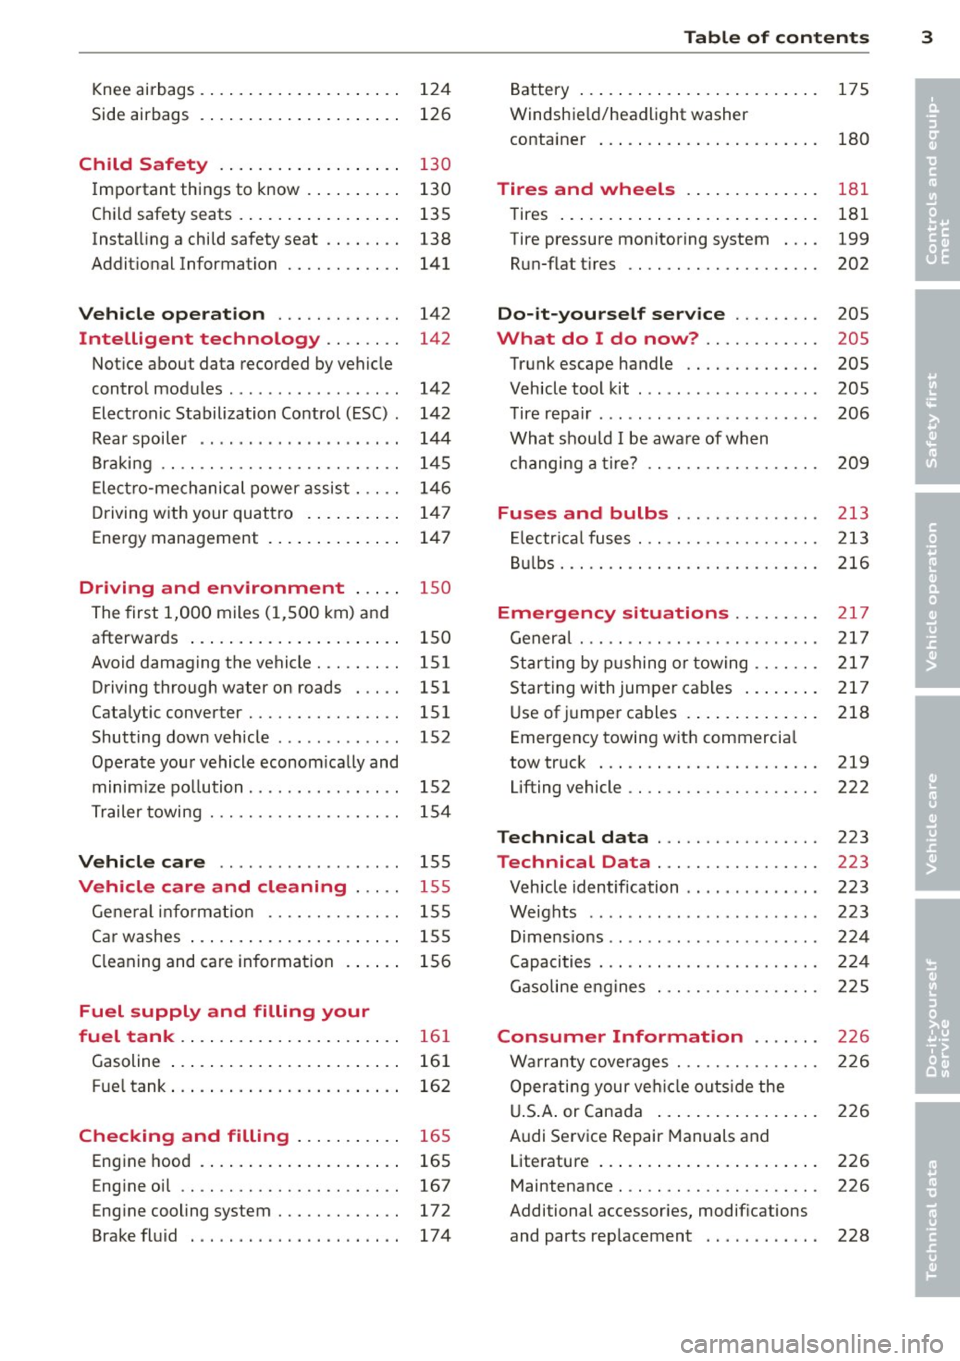
Knee airbags . . . . . . . . . . . . . . . . . . . . . 124
Side airbags . . . . . . . . . . . . . . . . . . . . . 126
Child Safety . . . . . . . . . . . . . . . . . . . 130
Important things to know ......... .
Child safety seats ................ .
Instal ling a chi ld safety seat .. .. .. . .
Additional Information ........... .
Vehicle operation ............ .
Intelligent technology .. .. .. . .
Notice about data recorded by vehicle
control modules .............. ... .
Electronic Stabilization Control (ESC) .
Rear spoiler ................ ... . .
Braking ........................ .
E lect ro-me chan ical power assis t ... . .
D riving w ith your quattro ......... .
Energy management ............. .
Driving and environment .....
The first 1,000 miles (1,500 km) and
afterwards .............. .. .. .. . .
Avoid damaging the vehicle ........ .
Driving through water on roads ... . .
Catalytic converter ............... .
Shutting down vehicle ............ .
Operate your vehicle economically and
minimize pollution ............... . 130
135
138
141
142
142
142
142
144
145
146
1 47
147
1 5 0
150
151
151 151
152
15 2
Tra iler towing . . . . . . . . . . . . . . . . . . . . 154
Vehicle care . . . . . . . . . . . . . . . . . . . 155
Vehicle care and cleaning . . . . . 155
General information . . . . . . . . . . . . . . 155
Car washes . . . . . . . . . . . . . . . . . . . . . . 155
Cleaning and care information . . . . . . 156
Fuel supply and filling your
fuel tank . . . . . . . . . . . . . . . . . . . . . . .
16 1
Gasoline . . . . . . . . . . . . . . . . . . . . . . . . 161
Fuel tank. . . . . . . . . . . . . . . . . . . . . . . . 162
Checking and filling . . . . . . . . . . . 16 5
Engine hood . . . . . . . . . . . . . . . . . . . . . 165
Eng ine oil . . . . . . . . . . . . . . . . . . . . . . . 167
Eng ine cooling system............. 172
Brake fluid ...................... 174
Table of contents 3
Battery . . . . . . . . . . . . . . . . . . . . . . . . . 175
Windshield/headlight washer
container . . . . . . . . . . . . . . . . . . . . . . . 180
Tires and wheels ........... .. .
Tires ..... .. .... .. . .. .......... .
Tire pressure monitoring system ... .
Run-flat tire s .. .. ............... .
Do-it-yourself service ........ .
What do I do now? ........... .
Trunk escape handle ............. .
Vehicle tool kit .... .............. .
T ire repai r .... ... .. ............. .
What should I be aware of when
h . t
' 7 c angmg a ire .................. .
Fuses and bulbs .. .. .. ..... ... .
El ectr ical fuses . .. .. ............. .
Bulbs .......................... .
Emergency situations ........ .
General ........................ .
Starting by pushing or towing ...... .
Starting with jumper cables ....... .
U se of jump er cables ............. .
Emergency towing with commercia l
tow truck ...................... .
Lifting vehicle .. .. ............... . 181
181
199
202
205
205
205
205
206
209
213
213
216
217
217
217
217
218
219
222
Technical data
. . . . . . . . . . . . . . . . . 223
Technical Data . . . . . . . . . . . . . . . . . 223
Vehicle identification . . . . . . . . . . . . . . 223
Weights . . . . . . . . . . . . . . . . . . . . . . . . 223
Dimensions . . . . . . . . . . . . . . . . . . . . . . 224
Capacities . . . . . . . . . . . . . . . . . . . . . . . 224
Gasoline engines . . . . . . . . . . . . . . . . . 225
Consumer Information . . . . . . . 226
Warranty coverages . . . . . . . . . . . . . . . 226
Operating your vehicle outside the
U.S. A. or Canada . . . . . . . . . . . . . . . . . 226
Audi Service Repair Manuals and
Literature . . . . . . . . . . . . . . . . . . . . . . . 226
Maintenance. . . . . . . . . . . . . . . . . . . . . 226
Additional accessories, modifications
and parts rep lacement . . . . . . . . . . . . 228
•
•
Page 15 of 244
Instrument s and warnin g/indic ator ligh ts 13
road, stop the engine, and turn on the
emergency flasher¢
page 51.
-The engine com partment of any motor
vehicle is a potentially hazardous area.
Before you check anything in the engine
compartment, stop the engine and let it
cool down. Always exercise extreme cau
t ion when wor king under the hood
¢ page 165, Working in the engine
compartment
(D Tips
Ma lfunctions or faults w ill be identified e i
ther with a red symbo l (pr iority 1 -Dan
ge r!) o r with a ye llow symbol (pr iority 2 -
Warn ing).
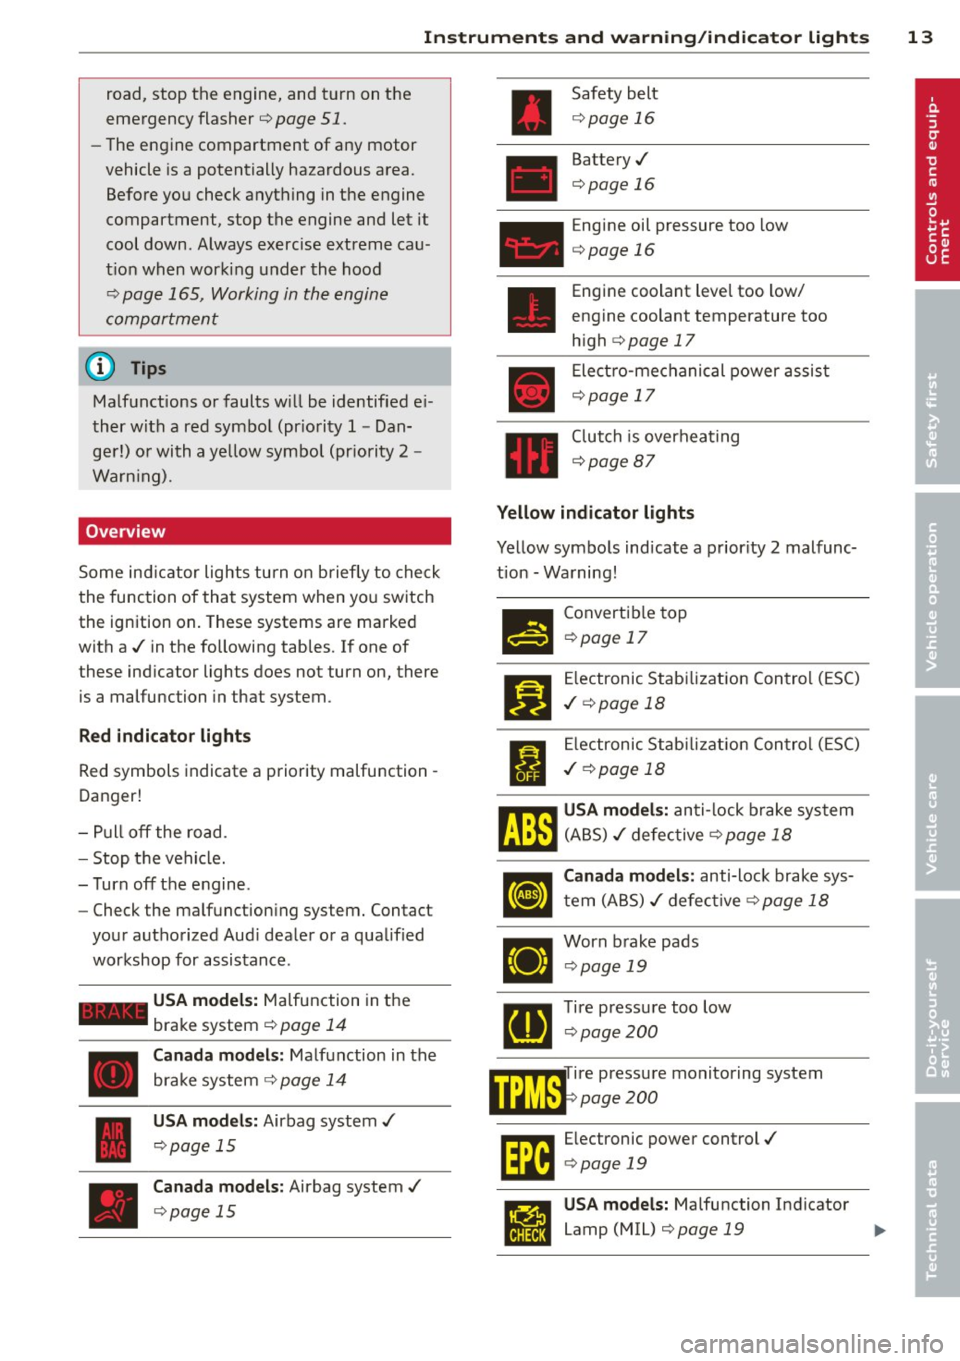
Overview
Some ind icator lights turn on briefly to check
the function of that system when yo u switch
the ignition on. These systems are marked
with a./ in the following tab les. If one of
these ind icator lights does not turn on, there
is a malfunction in that system.
R ed indicator lights
Red symbols indicate a priority malfu nction -
Danger!
- P ull off the road.
- Stop t he vehicle.
- T urn off the engine .
- Check the ma lfunction ing system. Contact
you r authorized Aud i dealer o r a qualified
workshop for assistance .
-USA model s: Ma lfunction in the
brake system ¢
page 14
Canada model s: Ma lf u nction in the
brake system ¢
page 14
USA models: Airbag system ./
¢page 15
Canada model s: Airbag system ./
¢page 15
Safety belt
¢page 16
Battery./
¢page 16
Engine oil pressure too low
¢ page 16
Engine coolant level too low/
engine coolant temperature too
h igh
¢ page 17
Electro-mechanical power assis t
¢page 17
Clutch is overhea ting
¢page 87
Yellow indicator lights
Yellow symbo ls indicate a prior ity 2 malfunc
t ion -Wa rning!
•
I
Convertib le top
¢ page 17
Electronic Stab ilizat ion Con tro l (ESC)
./ ¢page 18
Electronic St abiliz at ion Con tro l (ES C)
./ ¢page 18
~ USA models : anti- lock b rake system
liJ.:tl (A BS) ./ defec tive ¢ page 18
•
Canada models : anti-lock brake sys
t em (ABS) ./ defect ive ¢
page 18
Worn b rake pads
¢ page 19
Tire pressure too low
¢ page 200
mfflT ire pressure monitoring system
WiU.t:.F page 200
~ Electronic power control./
1.1&:J ¢ page 19
USA models: Malfunction Indicator
Lamp (MIL)
¢page 19
Page 18 of 244
16 Instruments and warning/indicator lights
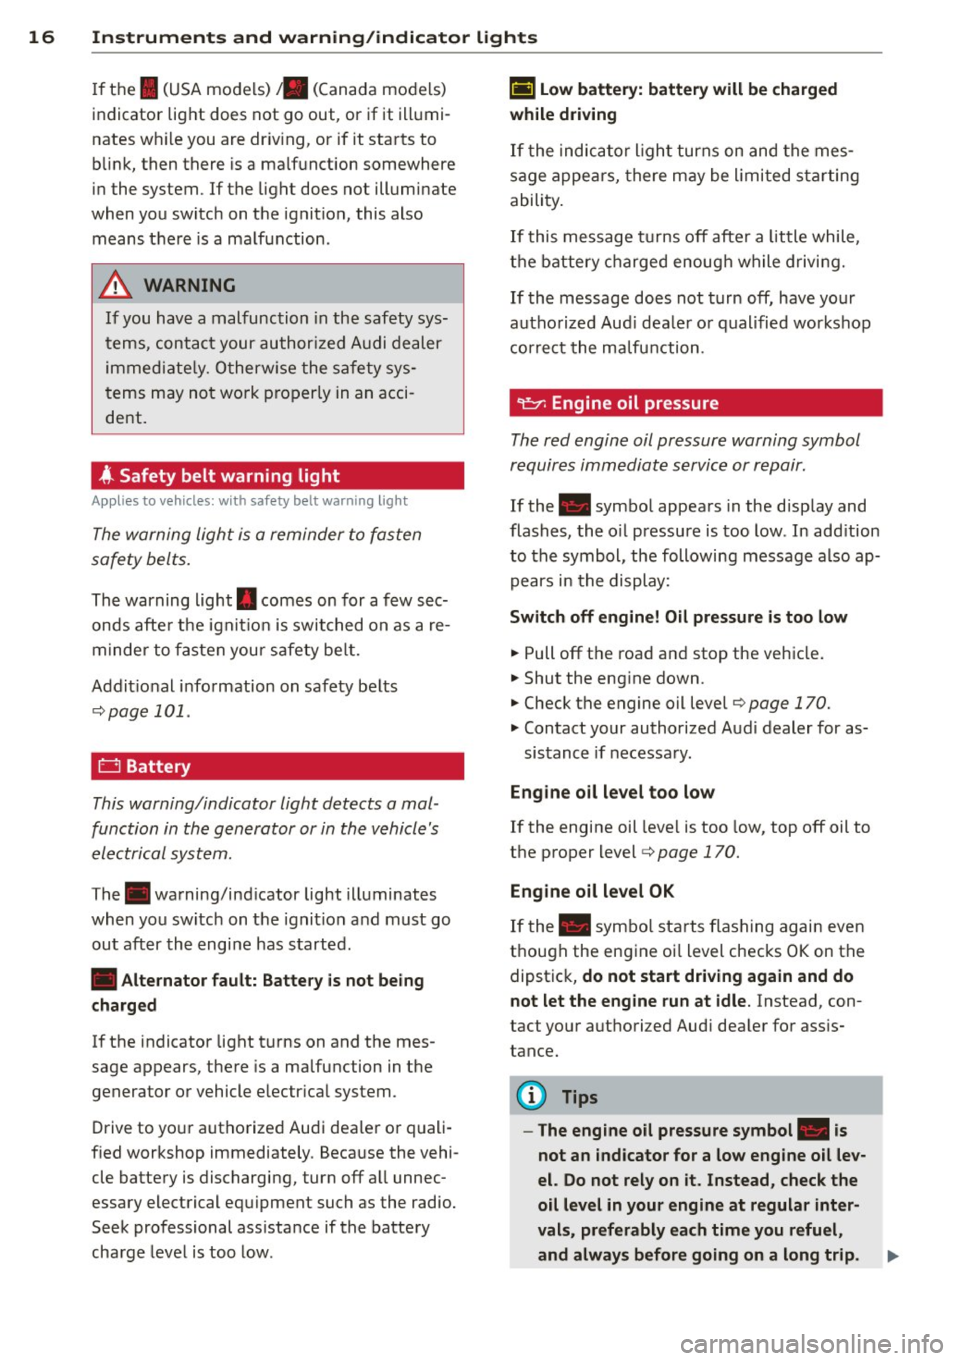
If the I (USA models) JII (Canada models)
indicator light does not go out, or if it illumi
nates wh ile you are driv ing, or if it starts to
blink, then there is a ma lfunction somewhere
in the system . If the light does not illuminate
when you switch on the ignition, this also
means there is a malfunction .
A WARNING
If you have a malfunction in the safety sys
tems, contact your authorized Audi dealer
immediate ly. Otherwise the safety sys
tems may not wo rk properly in an acci
dent.
4 Safety belt warning light
Applies to vehicles: with safety belt warning light
The warning light is a reminder to fasten
safety belts.
The warning light . comes on for a few sec
onds after the ignit ion is switched on as a re
m inder to fasten your safety belt.
Addit ional information on safety belts
Q page 101.
0 Battery
This warning/indicator light detects a mal
function in the generator or in the vehicle's
electrical system.
The. warning/ind icator light illuminates
when you sw itch on the ignit ion a nd must go
out after the engine has started.
• Alternator fault: Battery is not being
charged
If the indicator light turns on and the mes
sage appears, there is a ma lfunction in the
generator or vehicle electr ical system.
Drive to your authorized Audi dealer or quali
fied workshop immediately . Because the vehi
cle battery is discharging, turn off all unnec
essary electrical equipment such as the radio.
Seek professional ass istance if the battery
charge level is too low.
(•) Low battery: battery will be charged
while driving
If the indicator l ight turns on and the mes
sage appears, there may be limited starting
ability.
If this message turns off after a litt le while,
the battery charged enough while driving.
If the message does not turn off, have your
authorized Aud i dealer or qualified workshop
correct the malfunction.
requires immediate service or repair.
If the . symbol appears in the disp lay and
flashes, the oil pressure is too low. In add ition
to the symbol, the following message also ap
pears in the display:
Switch off engine! Oil pressure is too low
.,. Pull off the road and stop the vehicle.
• Shut the eng ine down.
.,. Check the engine oil level¢ page 170.
.,. Contact your authorized Aud i dealer for as-
sistance if necessary.
Engine oil level too low
If the engine oil leve l is too low, top off oil to
the proper level¢
page 170.
Engine oil level OK
If the . symbo l starts flashing again even
though the engine oi l level checks OK on the
dipstick,
do not start driving again and do
not let the engine run at idle.
Instead, con
tact your authori zed Aud i dealer for ass is
tance.
(D Tips
- The engine oil pressure symbol. is
not an indicator for a low engine oil lev
el. Do not rely on it. Instead, check the
oil level in your engine at regular inter
vals, preferably each time you refuel,
and always before going on a long trip.
Page 28 of 244
26 Driver information system
Selec- Selected func- Meaning
tion tion bar
0
Box Not selected
•
Triangle
point-Previous page
ing up
•
Triangle point- Next page
ing down
Selecting settings
The Driver Information System settings are
menu-guided .
Fig. 14 Display: Menu Set tings , computer selected
(page
l)
Select your settings as follows :
• Press the !Reset i button. The Start menu ap
pears¢
page 24, fig. 11.
• Press the rocker switch until Set is dis
played .
• Press the
I Reseti button. All the menus ap
pear.
• Press the rocke r switch u ntil the desired line
is highlighted (cursor)¢
fig. 14.
• Press the I Res et i button.
• If necessary, scro ll by se lecting and activat
ing the symbol for "Next page" or "Previous
page".
When you have selected the Computer menu
and activated it by pressing the!Reset i but
ton, two computer leve ls appear (computer 1
and computer 2). Now you have to select the
level you want using the rocker switch and ac
tivate it w ith the
I Reset I button .
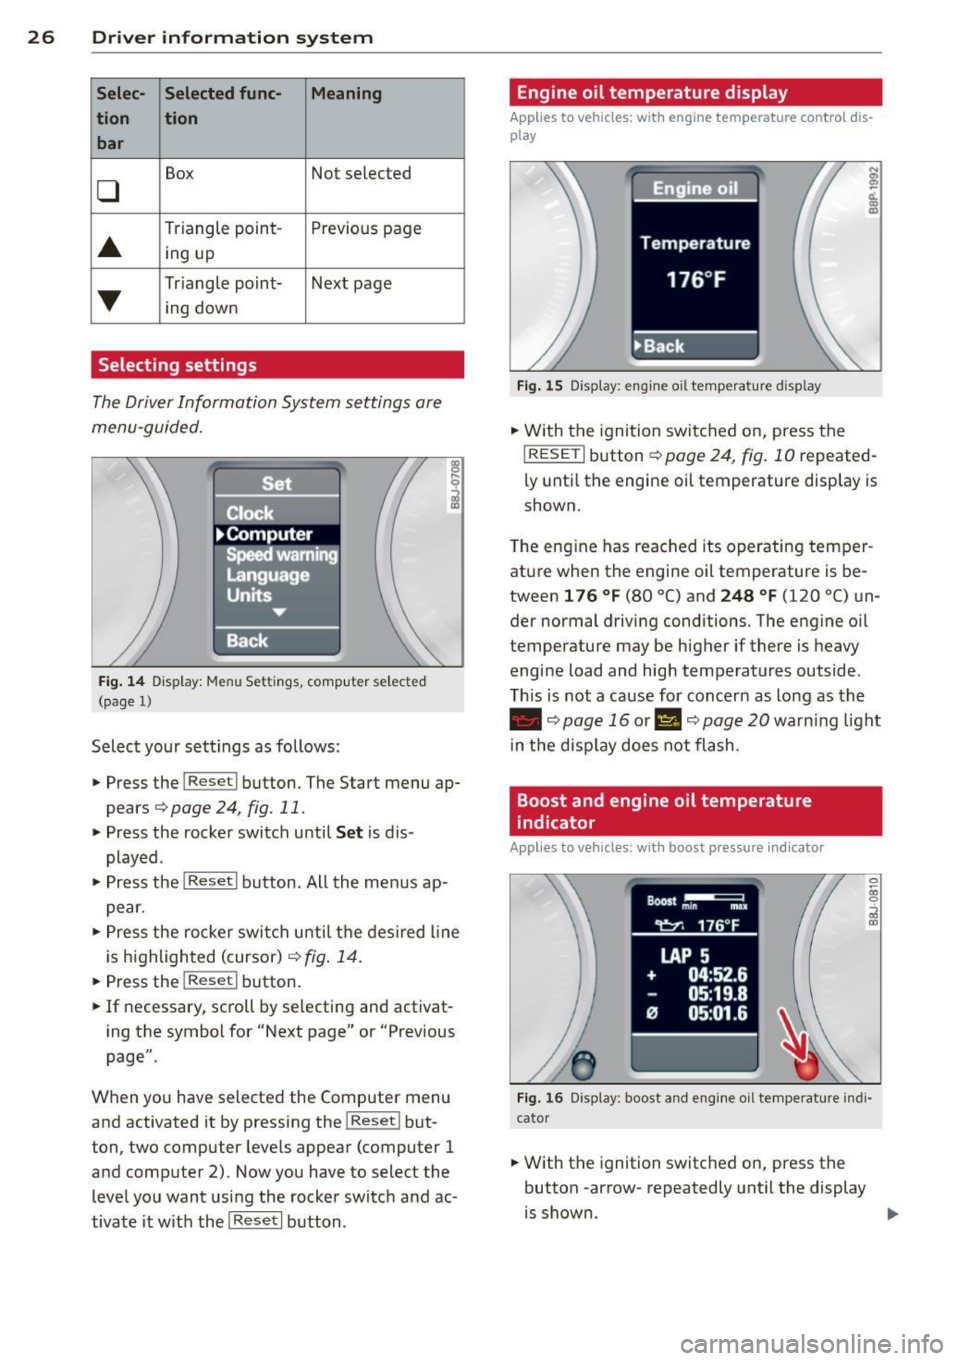
Engine oil temperature display
Applies to vehicles: with engine temperature con tro l dis
play
Fig. 15 Display : eng ine oil temperature d isp lay
;
ci.. a, ID
• With the ignition switched on, press the
! RESETi button
¢page 24, fig. 10 repeated
ly until the engine oil temperature display is
shown.
The engine has reached its operating temper
ature when the engine oil temperature is be
tween
1 76 °f (80 °C) and 248 °f (120 °C) un
der normal driving conditions. The engine oil
temperature may be higher if there is heavy
engine load and high temperatures outside .
This is not a cause for concern as long as the
• ¢page 16 or II ¢page 20 warning light
in the display does not flash .
Boost and engine oil temperature
indicator
Applies to vehicles: with boost pressure indicato r
0 ~ 00 0
;;i a,
Fig. 16 Disp lay: boost and eng ine oi l temperature indi
cator
• With the ignition switched on, press the
button -arrow- repeatedly until the display
is shown . ..,.
Page 29 of 244
Boost pressure indicator (boost )
A bar graph that begins on the left and fills in
towa rd the right indicates the engine's cu r
rent load (meaning the c urrent boost pres
sure) .
Engine oil t emperature indicator
If the engine oil temperat ure is be low 140 °F
(60 °C), the
't:::7-symbo l followed by th ree hy
phens" -- -'' and the °C unit is shown .
The engine has reached its opera ting temper
ature when the e ngine o il temperat ure is be
tween
176 °F (80 °() and 248 °F (1 20 °() un
der normal driving conditions. The engine oil
temperature may be higher if there is heavy
engine load and high temperatures outside.
This is not a cause for concern as long as the
• ¢ page 16 or 1\1 ¢ page 20 warning light
i n the display does not flash .
Efficiency program
Description
Applies to vehicles: with trip computer with efficiency
program
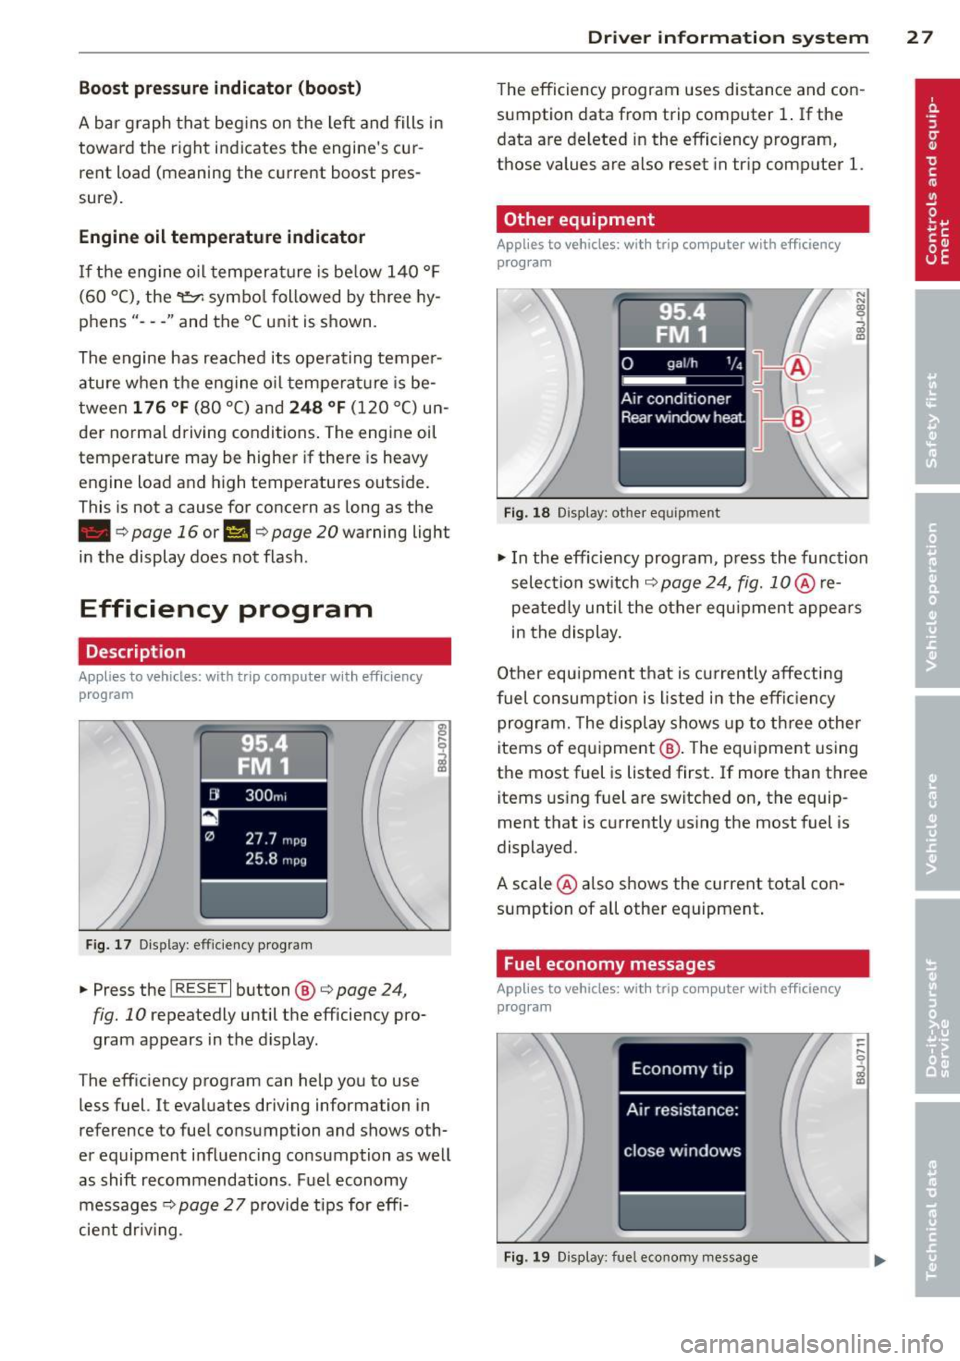
F ig. 17 Display : effic iency program
• Press the I RESE T I button @¢ page 24,
fig. 10 repeatedly until the efficiency pro
gram appears in the display.
The eff iciency program can help you to use
less fuel. It evaluates driving information in
reference to fuel consumption and shows oth
er equipment influenc ing co nsumption as well
as shift recommendations . Fuel economy
messages ¢
page 2 7 provide tips for effi
cient dr iv ing .
Dr iver in formation system 2 7
The efficiency program uses distance and con
sumption data from trip computer
1. If the
data are deleted in the efficiency program,
those values are also reset in tr ip computer
l.
Other equipment
Appl ies to vehicles: with trip computer with efficiency
prog ram
Fi g. 18 D isplay: other equ ipment
• In the efficiency program , press the function
selectio n switch
¢ page 24, fig. 1 0 @ re
peated ly until the other equipment appea rs
in the display.
Other equipment that is currently affecti ng
fuel consump tion is listed in the effi cien cy
program. The display shows up to th ree other
items of equ ipment @. The equ ipment using
the most fuel is listed first. If more than three items using fuel are switched on, the equip
ment that is currently us ing the most fuel is
displayed .
A scale @also shows the current tota l con
sumption of all other equipment .
Fuel economy messages
Applies to vehicles: with trip computer with efficiency
program
Fig . 1 9 D isplay: fue l economy message
Page 76 of 244
74 On the road
you leave your vehicle. This makes a vehicle
theft even more difficult ¢ .&. .
Ignition key saf ety lock
Afte r swi tching off the ignition, t he ig nit ion
key can on ly be removed from the ig nition
lock when the se lector lever is in the "P"
(Park) position . After you have removed the
key, the selector lever is locked and cannot be
moved.
Ignition on @
If it is diffic ult to tu rn the key after you have
inserted it into the ignition lock, turn the
steering wheel back and forth. This will take
the load
off the steering lock mechanism and
you will be able to turn the key freely and
start the engine.
Starting the engine @
In this position the engine starts . While the
engine is starting , the power supply to the
headlights and other e lectrica l consumers is
temporari ly interrupted to conserve battery
power. After the engine has started, release
the key and it will return to posit ion
(D .
Before the starter can be operated again the
key must be turned back to position @. The
non -repeat loc k prevents you from damaging
the starter when the engine is runn ing .
A WARNING
-Never remove the key from the ign it ion
lock whi le the vehicle is moving. The
steeri ng wheel will lock causing loss of
c ontrol.
- If you have to leave your vehicle - even
for just a m inute -always remove t he ig
nition key and take it with you. This is es
pecially important if you a re going to
leave chi ldren behind in the vehicle. The
children co uld start the engine or use
other vehicle controls. Unsupervised use
of vehicle controls (for examp le, power
windows) can cause serious personal in
jur ies .
(D Tips
If the vehicle battery has been disconnect
ed and then reconnected, then you must
l eave the key in position
(D for about 5
seconds before you can start the engine.
Starting and stopping
the engine
Starting the engine
The engine can only be started with an origi
nal Audi key.
.,. Set the park ing brake.
.,. Move the selector lever in P or
N ~ &_ .
.,. Turn the ignition key to position @
¢ page 73, fig. 82 -do not depress the gas
pedal when starting the engine!
.,. Let go of the key as soon as the engine
starts .
A cold engine may at first be loud after it has
been started. This is due to the hydraulic
valves bu ild ing up the oil pressure . Th is nor
mal and no need for concern .
If the engine does not start immediate ly, stop
trying after 10 seconds and then try to restart
the engine about 30 seconds later .
A WARNING
-Never start or let the engine run in a con-
f ined or enclosed area. Exhaust fumes
from the engine conta in carbon monoxide,
a colorless and odorless gas. Carbon mon
oxide can be fatal if inhaled .
- Never leave the engi ne idling unattend
ed. An unat tended veh icle w ith a runn ing
engine poses a danger of personal injury
or theft .
(D Note
-Avo id h igh engine speeds, fast accelera
tion or heavy engine loads while the en
gine is still cold. This could damage the
engine.
- T he engine cannot be started by pushing
or towing the vehicle . ..,.
Page 147 of 244
(D Note
Never push the vehicle or apply force to
the rear spoiler -it could be damaged.
@ Tips
Clean the spoiler compartment every 2 to
3 months . The spoiler compartment must
always be free of ice, snow, leaves or other
debris.
Braking
General information
What affects braking efficiency?
Oper ating condit ions and d riving hab it s
T he brakes on today's automobi les are st ill
s ubject to wear, depending largely on opera t
ing conditions and dr iv ing habi ts
c> & . On
vehicles that are e ither driven mostly in stop
and-go city traffic or are d riven hard , the
b rake pads should be checked by you r author
i zed Audi dealer more often than specified i n
the
Warr ant y & Maint enan ce booklet . Failure
to have your brake pads inspected can res ult
in red uced brake performance.
On steep slopes, you shou ld use the brak ing
effect of the eng ine. This way, you p revent un
necessa ry wear on the brake system . If you
must use yo ur brakes, do not hold the brakes
down continuously. Pump th e brakes at inter
vals.
Noises may occur when braking d epending on
the speed, braki ng force and outside condi
tions such as temperature and humidity.
Moistu re or road salt
Unde r certain conditions, for example, w hen
driving through water or ve ry heavy rain, or
even after washing your vehicle, the braking
effect can be reduced d ue to moisture (or in
fre ezing conditions ice) on the brake pads . A
few ca utious brake applicat ions should dry off
the b rake pads or remove any ice coatings.
The effectiveness of the brakes can be reduced
when th e vehicle is driven on a salt-covered
Int ellig ent technolog y 145
road and the b rakes are no t used. Likewise ,
you clean off accumulated salt coating from brake d iscs and pads with a few cautious ap
plications of the brake
c> & .
Cor ro sion
T here may be a tendency for dir t to build up
on the brake pads and corrosion to form on
the discs if the car is not driven regu larly or
on ly fo r short trips with litt le use of the
brakes.
If the brakes are not used frequently, or if cor
rosion has formed on the discs, it is advisable
to clean off the pads and discs by braking
firmly a few times from a moderately high
speed
c> & .
Faults in the brak e syst em
If you shou ld notice a sudden increase in
brake pedal trave l, then one of the two brake
c ircuits may have fai led
c> & .
Low brake fluid lev el
Malfunctions can occur in the brake system if
the b rake fluid level is too low. The brake fluid
level is monitored electronica lly.
Brake booster
T he brake booster inc reases the pressure that
you generate with the brake peda l. It works
o nl y when the engine is running
.c> &
Brake lining wear status
Brake lining wear may be checked by visual in
spection of the condition of the brake pads
through the open ings in the wheel. If neces
sary, the wheel may be removed for t his in
spection
c> page 209, What should I be
aware of when changing a tire? .
A WARNING
--=
-You should perform braking maneuvers
for the purpose of cleaning the brake
system only if road conditions permit.
Other road users must not be put at risk -
you may cause an accident!
- Before descend ing a steep grade, reduce
speed and sh ift transmission into a lower
~
•
•
Page 158 of 244
156 Vehicle care and cleaning
_& WARNING
- Only wash the vehicle when the ignition
is off and follow the instructions from
the car wash operator to reduce the risk
of accidents.
- To reduce the risk of cuts, protect your
self from sharp metal components when
washing the underbody or the inside of
the wheel housings.
- After washing the vehicle, the braking ef
fect may be delayed due to moisture on
the brake rotors or ice in the winter. The
brakes must be dried first with a few
careful brake applications .
@ Note
- If you wash the vehicle in an automatic
car wash, you must fold the exterior mir
rors in to reduce the risk of damage to
the mirrors. Power folding exterior mir rors* must only be folded in and out us
ing the power folding function.
- To prevent paint damage, do not wash
the vehicle in direct sunlight.
- To reduce the risk of damage, do not
wash the power top with a pressure
washer. -
To reduce the risk of damage, do not
wash decorative decals* with a pressure
washer.
- To reduc e the risk of damage to the sur
face, do not use insect removing spong
es, kitchen sponges or similar items.
- Matte finish painted vehicle compo
nents:
- To reduce the risk of damage to the
surface, do not use polishing agents or
hard wax.
- Never use car wash cycles that apply
protective wax.
It can destroy the
matte finish effect.
- Do not place any stickers or magnetic
signs on vehicle parts painted with matte finish paint. The paint could be
damaged when the stickers or magnets
are removed.
@ For the sake of the environment
Only wash the vehicle in facilities specially
designed for that purpose. This will reduce
the risk of dirty water contaminated with
oil from entering the sewer system.
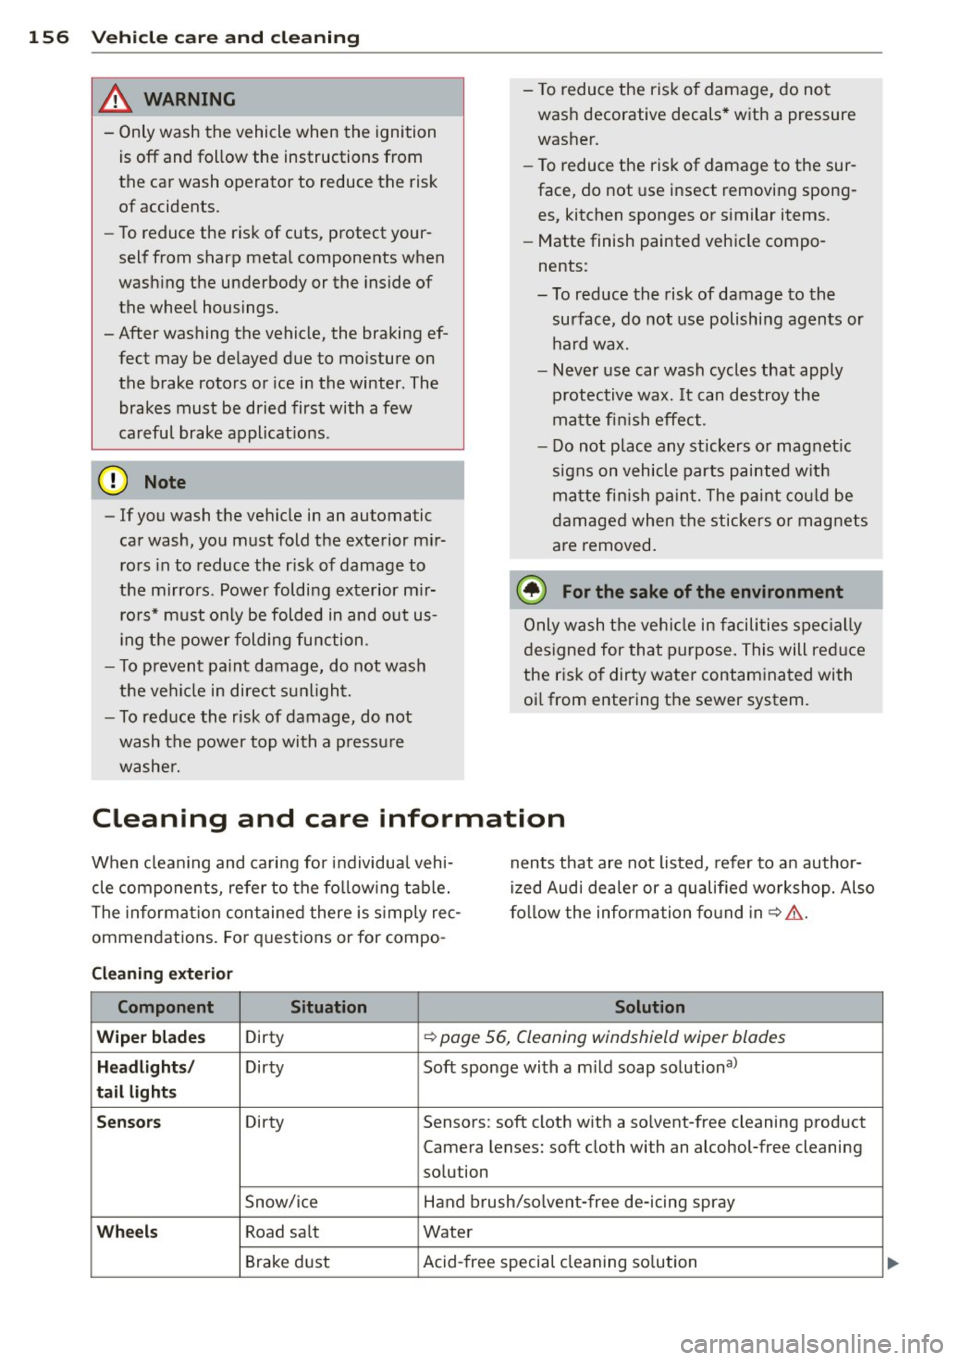
Cleaning and care information
When cleaning and caring for individual vehi
cle components, refer to the following table.
The information contained there is simply rec
ommendations. For questions or for compo- nents that are not listed,
refer to an author
ized Audi dealer or a qualified workshop. Also
follow the information found in~.&. .
Cleaning exterior Component Situation Solution
Wiper blades Dirty
~ page 56, Cleaning windshield wiper blades
Headlights/ Dirty Soft sponge with a mild soap solutional
tail lights
Sensors Dirty Sensors: soft cloth with a solvent-free cleaning product
Camera lenses: soft cloth with an alcohol-free cleaning
solution
Snow/ice Hand brush/solvent-free de-icing spray
Wheels Road salt Water
Brake dust Acid-free special
cleaning solution
Page 184 of 244
182 Tire s and wheel s
-Never mount used tires on yo ur vehicle if
yo u are not sure of their "previous histo
ry." Old used tires may have been dam
aged even though the damage cannot be
seen that can lead to sudden t ire failure
and loss of vehicle control.
- If you notice unusual vibration or if the
vehicle pulls to one side when driving, al
ways stop as soon as it is safe to do so
and check the wheels and tires for dam
age.
(D Note
Please note that summer and wi nte r tires
are designed for the cond itions that are
Glossary of tire and loading terminology
Accessory weight
means t he comb ined we ight (in excess of
those sta ndard items which may be rep laced)
of au toma tic tra nsmission, power s teer ing,
power brakes, power windows, power seats,
ra dio, and heater, to the extent that th ese
items are availab le as factory -installed equip
ment (whether installed or not) .
Aspect ratio
means t he ratio of the he ight to the w idth of
the tire in percent . Numbers of 55 or lower in
dicate a low sidewall for improve d steering re
sponse and better overall handling on dry pavement .
Bead
means the part of the ti re that is made of
steel wires, wrapped or reinforced by ply cords
and that is shaped to fit the rim.
Bead separation
means a b reakdown of the bond between
components in the bead.
Cord
means the strands forming the plies in the
tire . typ
ica l in those seasons . Aud i recommends
using winter tires during the winter
months . Low temperatures signif icant ly
decrease the e lasticity of summer tires,
which affects tract ion a nd brak ing ability.
If summer tires are used in very co ld tem
peratures, cracks ca n form on the tread
bars, res ulting in permanent tire damage
that can cause loud driving no ise and un
balan ced t ires. Audi i s not responsible for
th is type of damage .
Cold tire inflation pressure
means the tire p ress ure recommended by t he
vehicle manufacture r fo r a tire of a des igna ted
s iz e t hat has not bee n driven for more than a
coup le of miles (k ilometers) at low speeds in
t h e three hour period before the tire pressure
is measured or adjusted.
Curb weight
mea ns the we ight of a motor ve hicle with
standard equipment in clu din g the max imum
capacity of fuel, oil, and coolant, air condi
tioning and additional weight of optiona l
equipment.
Extra load tire
me ans a tire designed to ope rate a t higher
loads and at highe r inflation p ress ures than
the corresponding standard tire. Extra load
tires my be identified as "XL", "xl", "EXTRA
LOAD", or "RF" on the sidewall.
Gross Axle Weight Rating ("GAWR ")
me ans the lo ad -c a rry ing c apac ity of a s ingle
axle system , measured a t the tire-ground in
terfaces.
Gross Vehicle Weight Rating ("GVWR ")
mea ns the max imum total loaded we ight of
t h e ve hicl e. .,.
Page 191 of 244
-If the tire pressure is too low or too high,
the tires w ill wear prematurely and the
vehicle will not handle we ll.
- If the tire is not flat and you do not have
to change a wheel immed iate ly, drive at
reduced speed to the nearest service sta
t ion to check the tire pressure and add
air as required.
([) Note
Driving without va lve stem caps ca n cause
damage to the tire va lves . To prevent this ,
always make su re that facto ry installed
valve stem caps on all wheels a re secure ly
mounted on the va lve.
@ For the sake of the environment
Underinflated tires will a lso increase the
fue l consumption .
Tires and vehicle load limits
There are limits to t he amount of load or
weight that any veh icle and any t ire can carry.
A veh icle that is overloaded w ill no t handle
well and is more diff icult to stop. Overloading
can not on ly lead to loss of veh icle contro l,
but can a lso damage important parts of the
ve hicle and can lead to sudden tire failure, in
cluding a blowout and sudden deflation that
can cause the veh icle to crash .
Your safety and that of yo ur passengers a lso
depends on making sure that load limits are
no t exceeded. Vehicle load includes everybody
and everyth ing in and on the vehicle . These
load limits a re techn ica lly refer red to as the
ve hicle's
Gro ss Vehicl e W eight Rat ing
(" GVWR ").
T he "GVWR " includes the we ight of the basic
vehicle, all factory installed accesso ries , a full
tank of fue l, oil, coo lant and other fluids pl us
maximum load. The maximum load includes
the number of passengers th at the ve hicl e is
i ntended to carry ("seating capacity") with an
assumed weight of 150 lbs (68 kg) for eac h
passenger at a designated seating position
Tire s an d wheel s 189
and the total weight of any luggage i n the ve
hicle .
T he
Gro ss Ax le Weight Rating ( " G AWR ") is
the max imum load th at can be applied at each
of the vehicle's two axles .
T he Gross Vehicle Weight Rat ing and the
G ross Ax le Weig ht Ra ting are l iste d on the
s af ety comp liance s ticke r label lo cated on the
driver's side 8-pillar . Your Audi has 2 seating
positions. Each seating position has a safety
belt ~
page 101, Safety belts.
The fac t that there is an upper limit to yo ur
vehicle's G ross Vehicle Weight Rating means
that the total weight of whatever is being car ried in the vehicle is lim ited . The more passen
gers in the vehicle or passengers who are
heavier than the standard we ights assumed
mea n that less we ight can be carried as lug
gage .
The tire pressure label on your Audi also lists
the maximum combined weight of a ll of the
occupants and luggage or other cargo that
t h e ve hicle can ca rry . Fo r th e locat ion of the
label
~ page 185, fig . 138 .
_&. WARNING
Overloading a veh icle can cause loss of ve
h icl e co ntro l, a crash or o ther accide nt, se
rio us pe rsonal inj ury, and even dea th.
- Ca rrying more we igh t tha n your ve hicle
was des igned to carry wi ll prevent the
veh icle from handling properly an d in
crease the risk of the loss of vehicle con
trol.
- T he b rakes on a vehicle that has been
overloaded may not be able to stop the
veh icle w ith in a safe distance .
- Tires on a vehicle that has been over load
ed can fail suddenly, incl uding a blowo ut
and sudden deflation, causing loss of
control and a crash.
•
•