turn signal AUDI TT ROADSTER 2014 Owners Manual
[x] Cancel search | Manufacturer: AUDI, Model Year: 2014, Model line: TT ROADSTER, Model: AUDI TT ROADSTER 2014Pages: 244, PDF Size: 60.87 MB
Page 16 of 244
14 Instruments and warning/indicator lights
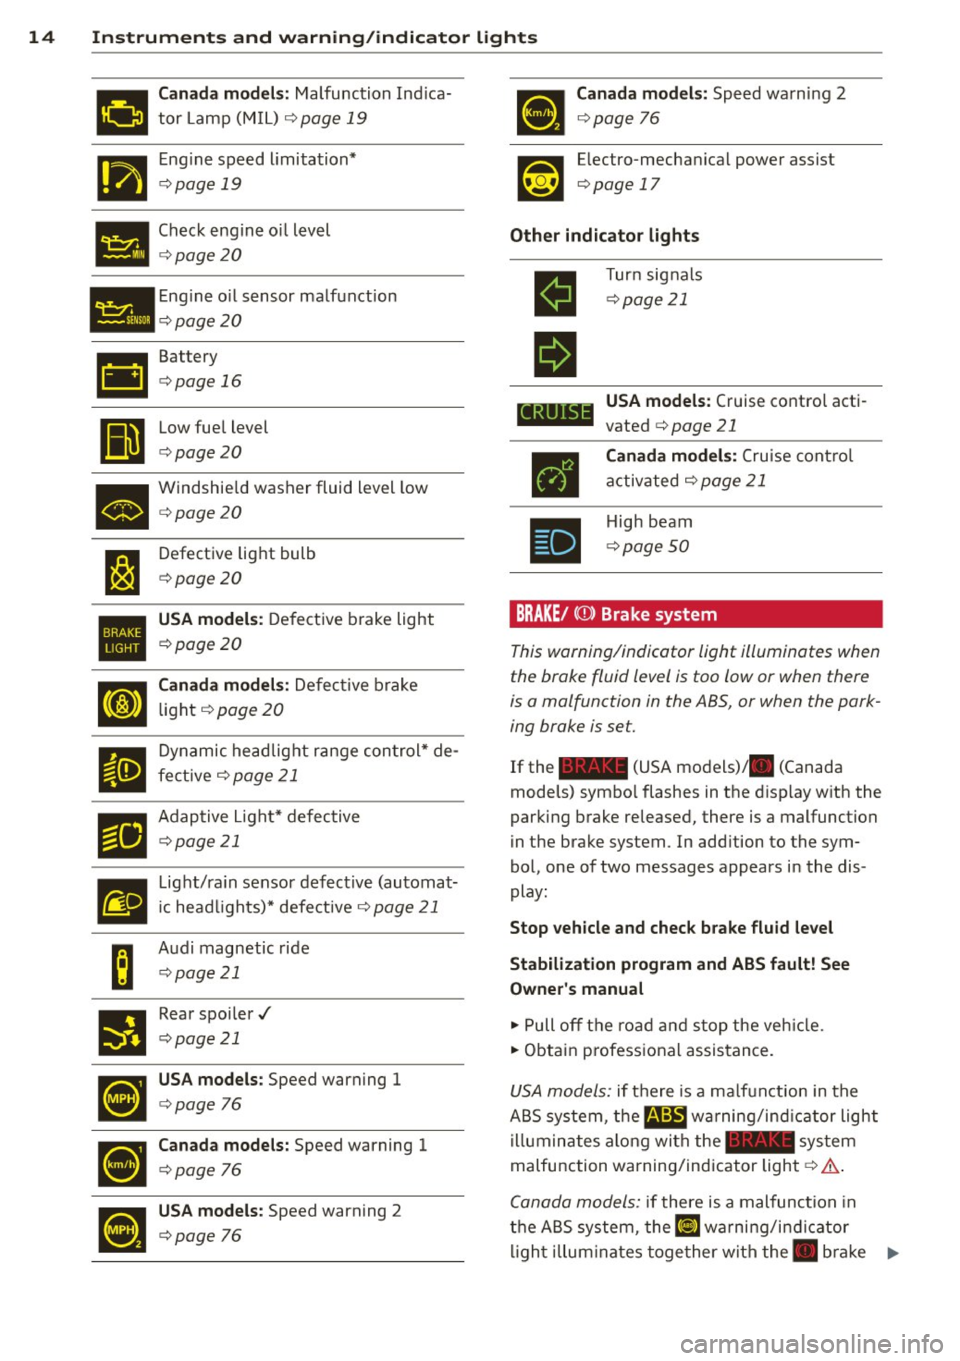
111'!!1 Canada models: Malfunction Indica
mil tor Lamp (M IL) ¢ page 19
I'm Engine speed limitation*
1111111 ¢ page 19
• Check engine o
il level ¢ page20
• Engine
oil sensor malfunction ¢ page20
•
II
Battery
¢page 16
Low fuel level
¢page20
• Windshie
ld washer fluid level low ¢ page20
l:J
Defective light bulb
¢page20
•
USA models : Defective brake light
¢page 20
Cl
Canada models: Defective brake
light
¢ page 20
II
Dynamic headlight range control* de-
fective ¢
page 21
El
Adaptive L ight* defective
¢page 21
m
Light/rain sensor defective (automat-
ic head lights)* defective ¢
page 21
B
Audi magnetic ride
¢page 21
•
Rear spoiler../
¢page 21
~
USA models : Speed warning 1
¢page 76
•
Canada models: Speed warning 1
¢page 76
•
USA models : Speed warning 2
¢page 76
Canada models: Speed warning 2
¢page 76
Electro-mechanical power assist
¢ page 17
Other indicator lights
II
II
CRUIS
•
Turn signals
¢page 21
USA models: Cruise control acti
vated ¢
page 21
Canada models: Cruise control
activated ¢
page 21
High beam
¢page 50
BRAKE/ (CD) Brake system
This warning/indicator light illuminates when
the brake fluid level is too low or when there
is a malfunction in the ABS, or when the park
ing brake is set.
If the - (USA models)/ . (Canada
models) symbo l flashes in the disp lay with the
parking brake released, there is a malfunction
in the brake system. In addition to the sym
bol, one of two messages appears in the dis
play:
Stop vehicle and check brake fluid level
Stabilization program and ABS fault! See
Owner's manual
.,. Pull off the road and stop the vehicle.
.,. Obtain p rofessional assistance.
USA models: if there is a ma lfunction in the
ABS system, the
m;B warning/ind icator light
illuminates along with the - system
malfunction warning/indicator light¢
A.
Canada models: if there is a malfunction in
the ABS system, the~ warning/i ndicator
lig ht i llum inates together with the. bra ke ..,_
Page 22 of 244
20 Instruments and warning /indicator lights
speed displayed in the driver information sys
tem . Keep in mind that the engine speed will
not exceed the va lue disp layed in the driver in
formation system, for example when down
shifting.
Please go to an authorized Audi dea ler or oth
er qualified workshop to have the ma lfunction
repaired.
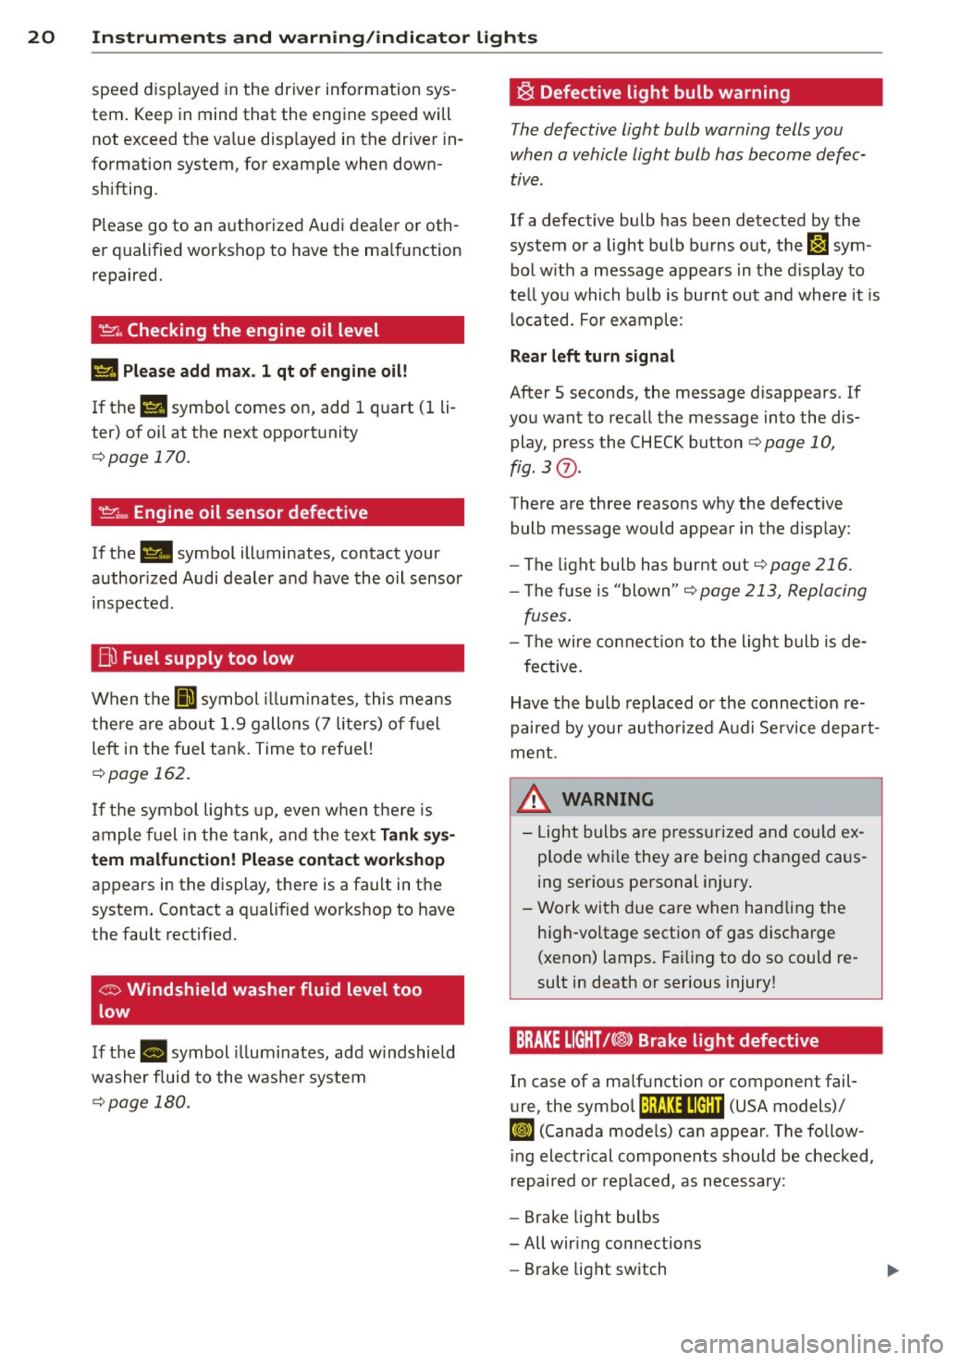
~ . Checking the engine oil level
II Please add max . 1 qt of engine oil!
If the II symbol comes on, add 1 quart (1 li
ter) of oil at the next opportunity
¢page 170.
~ ... Engine oil sensor defective
If the II symbol illuminates, contact your
author ized Audi dealer and have the oil sensor
inspected .
Bi) Fuel supply too low
When the 001 symbol illuminates, this means
there are about 1.9 gallons (7 liters) of fuel
left in the fuel tank. Time to refuel!
¢ page 162.
If the symbol lights up, even when there is
ample fuel in the tank, and the text
Tank sys
tem malfunction! Please contact workshop
appears in the display, there is a fault in the
system. Contact a qualified workshop to have
the fault rectified.
If the -symbol illum inates, add w indshield
washer f luid to the washer system
¢page 180.
~ Defective light bulb warning
The defective light bulb warning tells you
when a vehicle light bulb has become defec
tive.
If a defective bulb has been detected by the
system or a light bulb burns out,
the m sym
bol w ith a message appears in the display to
te ll you which bulb is burnt out and where it is
located. For example :
Rear left turn signal
After 5 seconds, the message disappears. If
you want to recall the message into the dis play, press the CHECK button
¢ page 10,
fig. 3
(J) .
There are three reasons why the defective
bulb message would appear in the display:
- The light bu lb has burnt out
¢page 216.
-The f use is "blown" ¢ page 213, Replacing
fuses .
-The wire connection to the light bulb is de-
fective.
Have the bulb replaced or the connect ion re
paired by your authorized Aud i Service depart
ment .
A WARNING
-
-Light bulbs are pressurized and could ex
p lode while they are being changed caus
ing serious personal injury.
- Work with due care when handling the
high-vo ltage section of gas discharge
(xenon) lamps. Failing to do so could re
sult in death or serious injury!
BRAKE LIGHT!<®> Brake light defective
In case of a malfunction or component fail-
ure, the symbol (USA models)/
It:$
repaired or replaced, as necessary:
- Brake light bulbs
- All wiring connections
- Brake light switch
Page 23 of 244
Instrument s and warnin g/indic ator ligh ts 21
Contact your authorized Audi dealer for assis
tance if necessary.
@ Tips
The brake light switch is only inspected as
pa rt of the functional check after the en
gine is started.
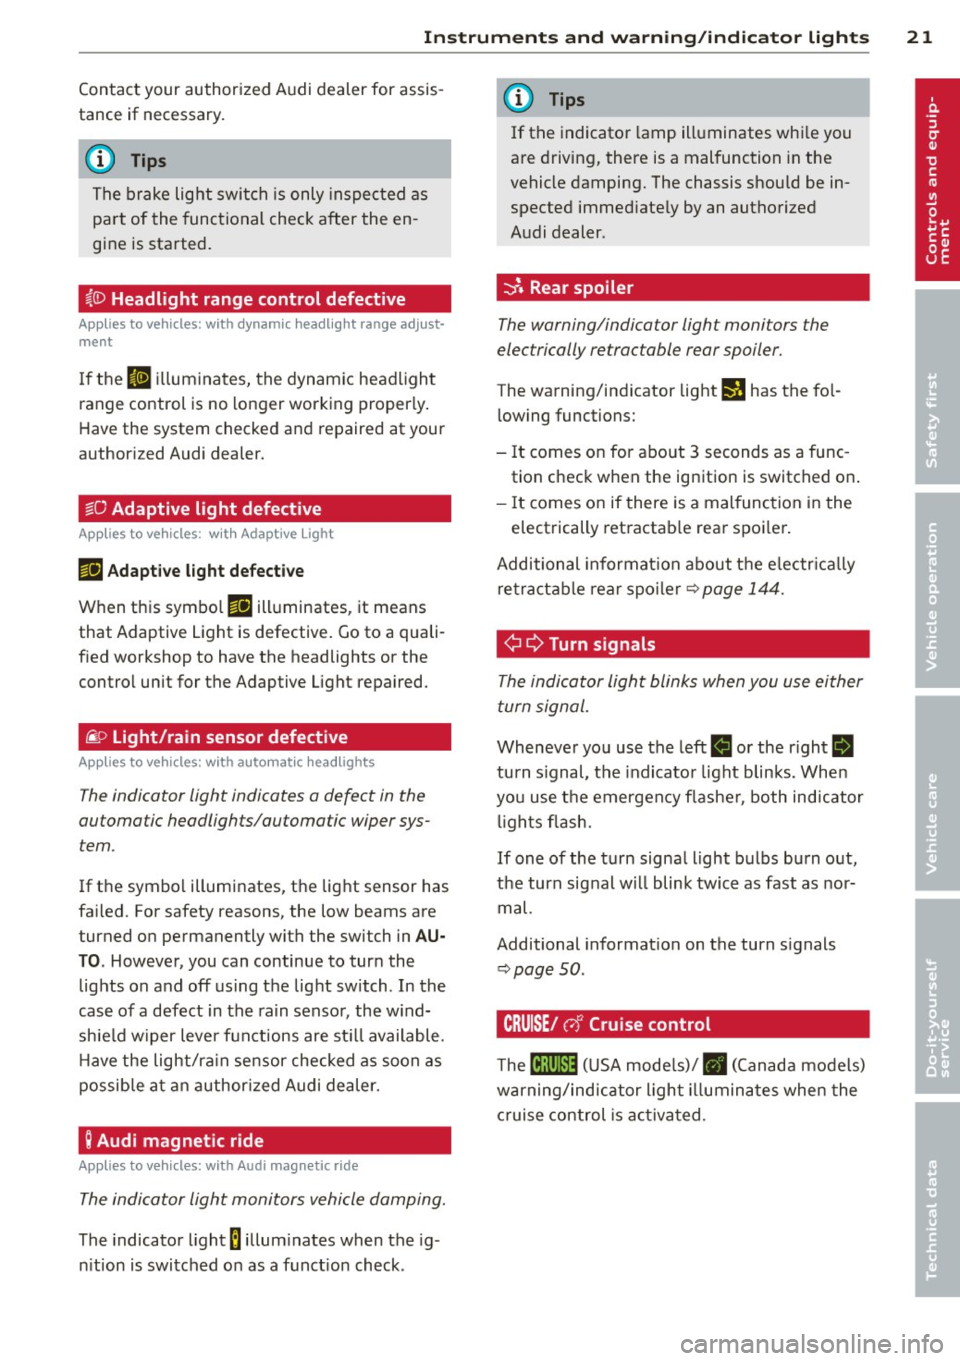
~(D Headlight range control defective
Applies to vehicles: with dynamic headlig ht range adjust·
ment
I f the II ill uminates, the dynamic headlight
range control is no longer working properly .
Have the system checked and repaired at your
authorized Audi dealer.
sD Adaptive light defective
App lies to vehicles: w it h Adaptive Light
rlJ Ad apt ive l ight de fe cti ve
When this symbo l rlJ illuminates, it means
that Adaptive Light is defective. Go to a quali
f ied workshop to have the headlights or the
control unit for the Adaptive Light repaired.
(j_ o Light/rain sensor defective
Applies to vehicles: with automat ic headlights
The indicator light indicates a defect in the
automatic headlights/automatic wiper sys
tem.
If the symbol illuminates, the light sensor has
failed. For safety reasons, the low beams are
turned on permanently with the switch in
AU
TO. However, you can continue to turn the
lights on and off using the light switch . In the
case of a defect in the ra in sensor, the w ind
sh ie ld wiper lever functions are st ill available .
H ave the light/ra in sensor checked as soon as
possib le at an author ized Audi dealer.
; Audi magnetic ride
Applies to vehicles: with Audi magnetic ride
The indicator light monitors vehicle damping.
The indicator light 8 illum inates when the ig
n ition is switched on as a funct ion check .
(D Tips
If the indicator la mp illuminates whi le you
are driving, there is a malfunction in the
vehicle damping. The chassis should be in
spected immed iate ly by an authorized
Audi dealer.
-::}. Rear spoiler
The warning/indicator light monitors the
electrically retractable rear spoiler.
The warning/indicator light I) has the fo l
l owing functions:
- It comes on for about 3 seconds as a func
tion check when the ignition is switched on .
- It comes on if there is a mal function in the
electrically retractab le rear spoi ler.
Additional informat ion about t he e lectr ica lly
retractab le rear spoi ler¢
page 144.
¢ ¢Turn signals
The indicator light blinks when you use either
turn signal.
Whenever you use the left II or the r ight II
turn s ignal, the indicator light blinks. When
you use the emergency flashe r, both indicator
li ghts fl ash.
If one of the turn signal light bulbs burn out,
the turn signal w ill blink twice as fast as nor
mal.
Additional informat ion on the turn s ignals
~ page SO.
CRUISE/ r,f Cruise control
The lB;\l )~i4 ( U SA mode ls)/ . (Canada models)
warning/indicator light illuminates when the
c ruise control is ac tiva ted.
Page 36 of 244
34 Opening and closing
Power locking system
General description
The power locking system locks or unlocks all
doors simultaneously.
The power lock ing system in your ve hicle in
corporates the fo llow ing funct ions:
- Central locking function
- Remote con tro l feature q page 33 .
- Anti -Theft Alarm Sys tem q page 38.
A ll the doors and the rear lid are locked by the
centra l locking system when you lock the vehi
cle.
The unlocking a nd lock ing mode * can be
changed in t he d river i nfo rmation system
qpage24.
Unlocking the vehicle
You can un lock the vehicle from outs ide e ither
by using the remote control
or by insert ing
a nd turning the key in t he driver's door lock.
When you
unlock your veh icle:
- The anti-theft alarm system is deactivated br iefly.
- The veh icle inter ior lights ill uminate for ap
proximate ly 30 seconds.
- All turn signa l lights will f lash twice w hen
the car is unlocked.
- After unlock ing the vehicle, yo u have 30 sec
onds to open a door or the rear lid. After 30
seconds, the vehicle automatically locks and
the ant i-theft a larm system activates again.
The rear lid can be locked or un locked either
by using the remote control
or by insert ing
a nd turning the key in the driver's door lock.
Unlock ing the ve hicle w ith the remote co ntrol
c::::5 will only unlock the rear lid, to open it, the
lid handle needs to be p ressed .
Locking the vehicle
You can lock the vehicle from o utside e ither by
using the remote control
or by insert ing and
turning the key in the drivers's door lock.
When you
lo ck the vehicle:
- All doors and the rear lid are locked. -
All turn signal lights wi ll flash once when
the car is loc ked .
- The ant i-theft a larm system is ac tiva ted.
The ho rn of the anti -theft alarm system wi ll
sound and t he anti-theft a la rm system read
iness light, located in the center of the in
strument panel be low the w indshield on the
r ight side of the air vent, will start to blink.
- The vehicle interior lights turn off.
Automat ic lock ing*
T he au tom atic locking fea ture locks a ll the ve
hicle doors an d the rear lid when you drive
faster than 9 m ph (15 km/h).
You can unlock t he vehi cle from the i nside by:
- remov ing the key from the igni tion swi tc h
(the vehi cle w ill automatically u nlock itself)
or
- pressi ng the un loc k pa rt of the power lock
sw itch
ll:D or
pull ing the door ha ndle (to open the doo r).
If you wish, yo u can have an a utho rized Aud i
dealer convert your power doo r lock system to
automat ic locking.
Unintentionally locking yourself out
T he veh icle does not lock with t he centra l
l ocking switch
¢ page 3 6 if the driver's door
is open .
D o no t lock your ve hicle w ith the
remote mas
ter key
un til a ll doo rs and t he rea r lid are
cl osed. In this way yo u avoid locking yourse lf
o ut accidentally .
_& WARNING
- When you loc k yo ur vehicle from o utside,
nobody- espec ia lly children -shou ld re
main inside the vehicle. Remember,
when yo u lock the vehicle from the out
side th e wi ndows cannot be o pened from
the inside.
- Wh en you leav e th e ve hicle, always re
move the ign ition key and take it w ith
you. This will preven t passe ngers (chil
d ren, f or example) from acci denta lly be
i n g loc ke d in the vehicle s hould they
Page 37 of 244
accidentally press the power locking
switch.
- Do not leave children inside the vehicle
unsupervised. In an emergency it would
be impossible to open the doors from
the outside without the key.
@ Tips
- In the event of a crash with airbag de
ployment a ll locked doors will be auto
matically unlocked to g ive access to the
vehicle occupants from the outside.
- If the power locking system should mal
function, you can lock each door individ
ually using the vehicle key .
- If the power locking system should fail,
you can still open the fue l tank flap in an
emergency
c> page 164.
- You are well advised not to keep valua
bles inside an unattended vehicle, visible
or not . Even a properly locked vehicle
cannot provide the security of a safe!
Unlocking and locking the vehicle w ith
the remote control
How the remote control works.
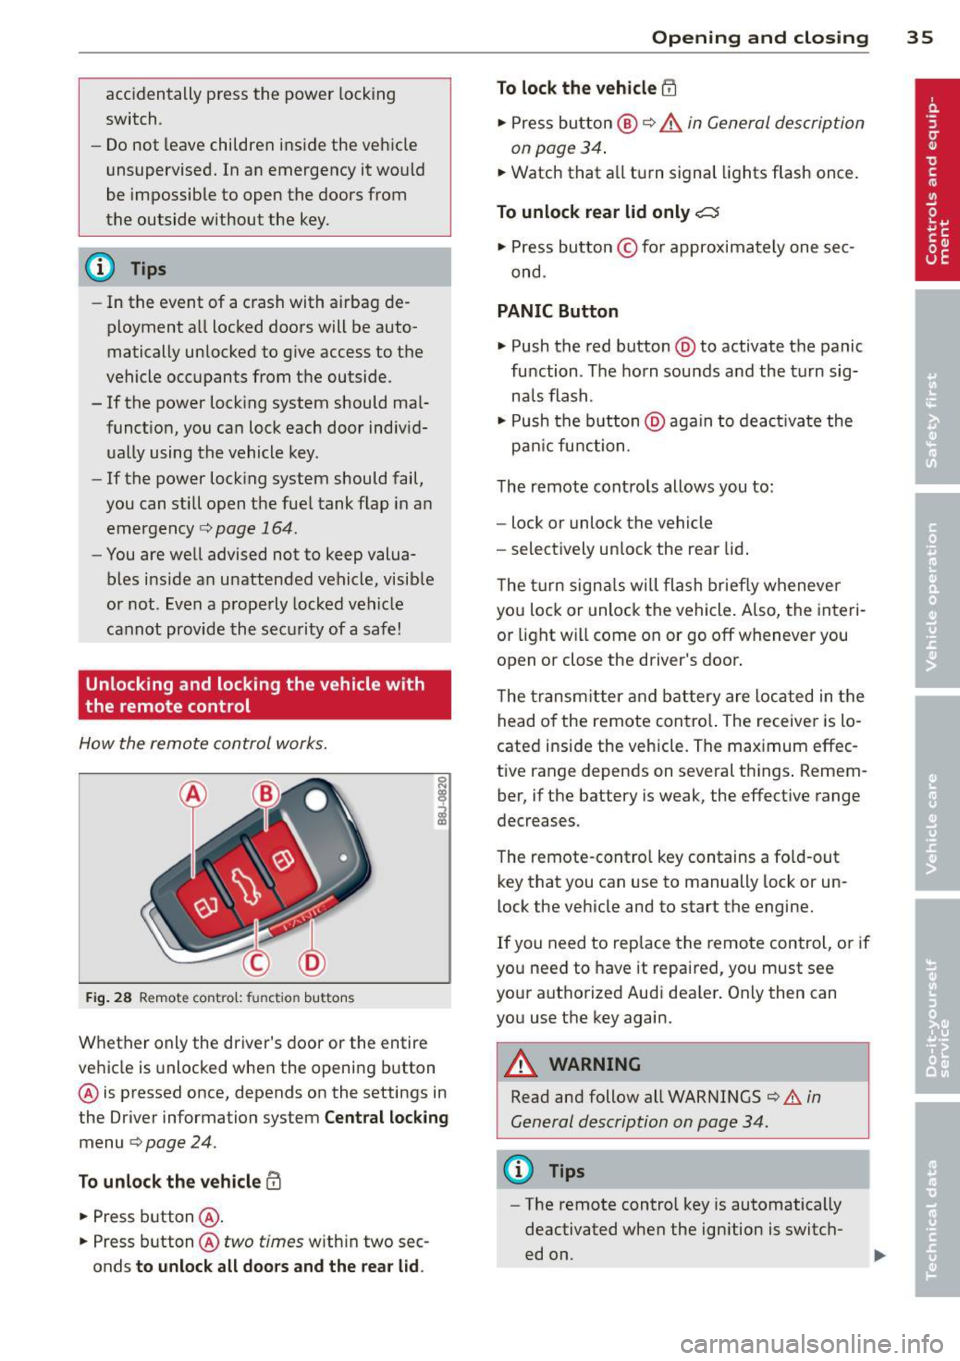
Fig . 28 Remote contro l: fu nctio n buttons
0
I
Whether only the driver's door or the entire
vehicle is unlocked when the opening b utton
@ is pressed once, depends on the settings in
the Driver information system
Central locking
menu c> page 24.
To unlock the vehicle !Ii
.,. Press button @.
.,. Press button @
two times with in two sec
onds
to unlock all doors and the rear lid.
Opening and closing 35
To lock the vehicle efl
.,. Press button @ c> &. in General description
on page 34 .
.,. Watch that a ll turn signal lights flash once.
To unlock rear lid only~
.,. Press button © for approximately one sec
ond .
PANIC Button
.,. Push the red button @to activate the panic
function . The horn sounds and the turn sig
na ls flash .
.,. Push the button @aga in to deact ivate the
pan ic function .
The remote controls allows you to:
- lock or unlock the vehicle
- select ively unlock the rear lid.
The turn signals will flash briefly whenever
you lock or unlock the vehicle. Also, the interi
or light will come on or go off whenever you
open or close the driver's door .
The transm itter and battery are located in the
head o f the remote contro l. The receiver is lo
cated ins ide the vehicle. The max imum effec
tive range depends on several th ings . Remem
ber, if the battery is weak, the effective range
decreases.
The remote-control key contains a fo ld-out
key that you can use to manually lock or un
lock the vehicle and to start the engine.
If you need to replace the remote control, or if
you need to have it repaired, you must see
your authorized Aud i dealer. Only then can
you use the key again.
A WARNING
Read and follow all WARNINGS <=>.&. in
General description on page 34.
(0 Tips
- The remote contro l key is automatically
deactivated when the ignition is switch
ed on.
-
Page 40 of 244
38 Openin g and clo sing
well as the vehicle doors closed when not
in use.
@ Tips
- If the rear lid is ope n or not properly
locked when the ignition is turned on,
the door and rear lid warning appears in
the instrument cluster disp lay.
- If the rear lid on a locked vehicle is un
locked with the middle button
c;j on the
remote key, the rear lid is automatically
l ocked again immediately after clos ing .
This is indicated by the turn signals blinking .
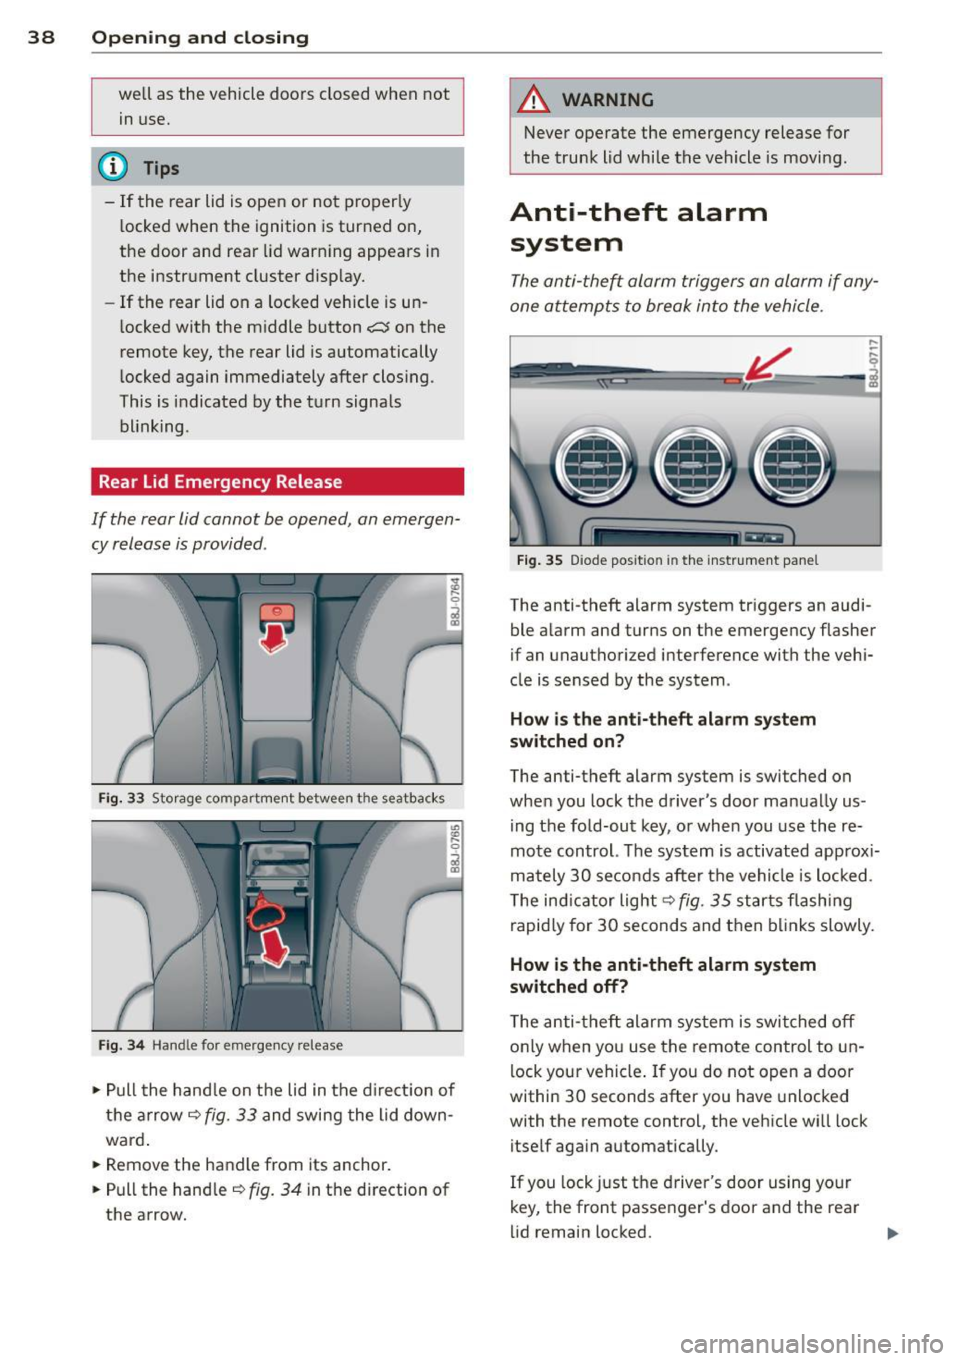
Rear Lid Emergency Release
If the rear lid cannot be opened , an emergen
cy release is provided .
Fig. 33 Storage compartment between t he seatbacks
Fig. 3 4 Handle for emergency re lease
., Pull the hand le on the lid in the d irect ion of
the arrow
i=;, fig. 33 and swing the lid down
ward .
.. Remove the handle from its anchor.
.. Pull the hand le
r::;, fig. 34 in the direction of
the arrow.
A WARNING
-Never operate the emergency release for
the trunk lid while the vehicle is moving .
Anti-theft alarm
system
The anti -the~ alarm triggers an alarm if any
one attempts to break into the vehicle.
F ig . 35 D iode positio n in th e instr ument pane l
,..
-q
i
The anti-theft alarm system triggers an audi
ble a larm and turns on the emergency flasher
if an unauthorized interference with the vehi
cle is sensed by the system .
How is the anti- theft ala rm sy ste m
sw itched on ?
The anti-theft alarm system is switched on
when you lock t he driver's door manually us
ing the fold-out key, or when you use the re
mote control. The system is activated approx i
mately 30 seconds after the vehicle is locked.
T he ind icator light
r::;,fig. 35 starts flashing
rapid ly for 30 seconds and then bl inks slowly .
How is th e anti-theft alarm sy stem
sw itched off?
T he anti-theft alarm system is switched off
o nly when you use the remote control to un
lock your vehicle . If you do not open a door
within 30 seconds after you have unlocked
with the remote control, the vehicle wi ll lock
itself aga in automatically .
If you lock just the driver's door using your
key, the front passenger's door and the rear
lid remain locked. ..,.
Page 51 of 244
light sensor checked as soon as possible at a
dealership.
Adaptive light *
The benefit of adaptive l ight is that the curve
and the edge of the road are better i llum inat
ed . The adaptive light is contro lled automati
cally, depending on vehicle speed and steering
wheel angle.
When driving a round bends, the head lights
are contro lled according to steering wheel an
g le . So that there is no black area ahead of the
ve hic le, the two main beams pivot at different
angles. The system works above a speed of
about 6 mph (10 km/h).
Com ing home /le avi ng home function *
The function is swit ched on when the switch is
in the AUTO* position and the function is
shown as active in the driver information sys
tem.
The
coming hom e function illuminates the
area around the vehicle when the ign ition is
switched off and the driver's door is ope ned.
The length of time the lights remain on can be
set in the menu display
( Illumination > Exte
rior lights > coming home ).
The leavi ng home function i lluminates the
area around the vehicle when unlocking it.
A WARNING
- Never use dayt ime running l ights to see
where you are going. They are not bright
enough and w ill not let you see far
enough ahead for safety, especially at
dusk or when it is dar k. Always switch on
the low beams at dusk or when i t is dar k.
- Automatic headlights a re only intended
to assist the dr iver. They do not re lieve
t he driver of his responsibi lity to check
t he headlights and to turn them on man
ually according to the current light and
visibility conditions. For example, fog
and rain cannot be detected by the light
sensors. So a lways switch on the head
lights under these weather cond itions
and when driving in the dark
jO .
Clear vis ion 49
- Crashes can happen when you cannot see
the road ahead and when you cannot be
seen by other motorists.
- Always turn on the headlights so that
youcanseeahe adandsothatothe ~
can see your car from the back .
- Please observe legal regulat ions w hen
using the ligh ting systems des cribed.
(D Tips
- T he light sensor for head light control is
located in the rear view mirror mount.
Do not apply any stickers to t he wind
shield in th is area to preven t malfunc
tions or fa ilures.
- Some exter io r l ighting funct ions can be
adjusted in t he driver i nformat ion sys
t em
~page 24.
- I f you remove the igni tion from t he igni
t ion lock while the headligh ts are s till
on, a buzzer wi ll sound as long as the
driver's door is o pen to remind yo u to
t u rn off the lights.
- Always observe the specific local regula
tions for your area as to when to use your
lights.
- With automatic headlights, the high
beam f unction is also available, but w ith
one restrict ion: If you have not sw itched
the high beams back to low beams dur
ing automatic headlight operation (for
example, after d riving throug h a tunnel),
only the low beams come on the next
t ime au tomati c headlights a re swi tched
on. To use the high beams , you firs t have
t o pull the hig h beam lever back and
then push the lever fo rward again .
- In coo l or damp weather, the inside of
the headlights, turn signals an d tail
lights can fog over due to the tempera
t u re difference between the inside and
outside. They w ill clear shortly after
switching them on. This does not affect
the se rv ice life of the lighting.
Page 52 of 244
50 Clear vis ion
Front fog lights
F ig. 55 Fog light act ivation: light switch pos itio n on
veh icles WITHOUT sensor light
Switching on the front fog lights iO
.,. Do no t turn the light switch ·'t/- · ¢ fig. 55 to-
ward the fog light symbol
}D.
.,. Turn the light switch to :o o: or to io .
.,. Pull the ligh t switch to the first stop @.
When the front fog lights are on, the symbol
}D next to the light switch will i llum ina te.
@ Tips
With the switch in AUTO front fog lights
cannot be turned on in addit ion.
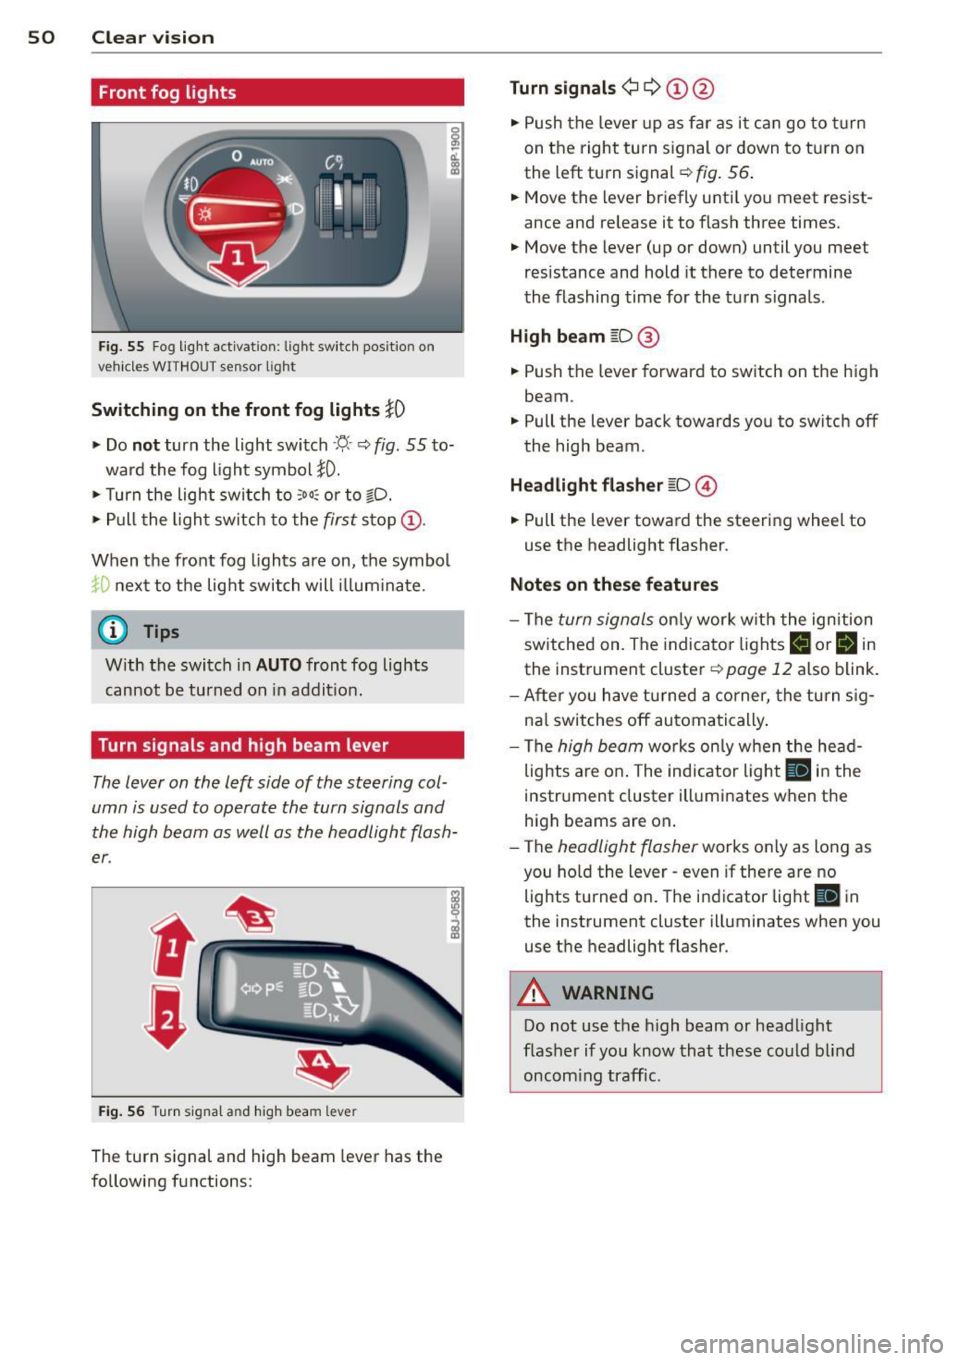
Turn signals and high beam lever
The lever on the left side of the steering col
umn is used to operate the turn signals and
the high beam as well as the headlight flash
er .
Fig. 56 Tu rn signa l and hig h beam lever
The turn signal and high beam lever has the
following functions:
Turn signals ¢ Q ©@
.,. Push the lever up as fa r as it ca n go to t urn
on the right turn s ignal or down to tu rn on
the left turn signal ¢
fig. 56 .
.,. Move the lever briefly unti l you meet res ist
ance and release it to flash three times .
.,. Move the lever (up or down) until you meet
resistance and hold it there to determine
the flashing time for the turn signals .
High be am gD @
.,. Push the lever forward to switch on the high
beam.
.,. Pull the lever back towards you to switch off
the high beam.
Headlight fla sh er gD @
.,. Pull the lever toward the steering whee l to
use the headlight flasher.
Not es on thes e features
- The turn signals on ly work wi th the ignition
sw itched on. The indicator lights
F-1 or rl in
the instrument cluster¢
page 12 also blink.
- After you have turned a co rner, the turn s ig-
na l switches off automa tically .
- The
high beam works on ly w hen the he ad
lights a re on . The indicator light
II in t he
instrument cluster illuminates when the
high beams are on.
- The
headlight flasher works only as long as
you ho ld the lever - even if there a re no
lights turned on. The indicator light
II in
the instrument cluster illuminates when you
use the headlight flasher.
A WARNING
-
Do not use the h igh beam or head light
flasher if yo u know that these could b lind
oncom ing traffic.
-
Page 53 of 244
Emergency flasher
The emergency flasher makes other motorists
a w are that you or your vehicle are in an emer
gency situation.
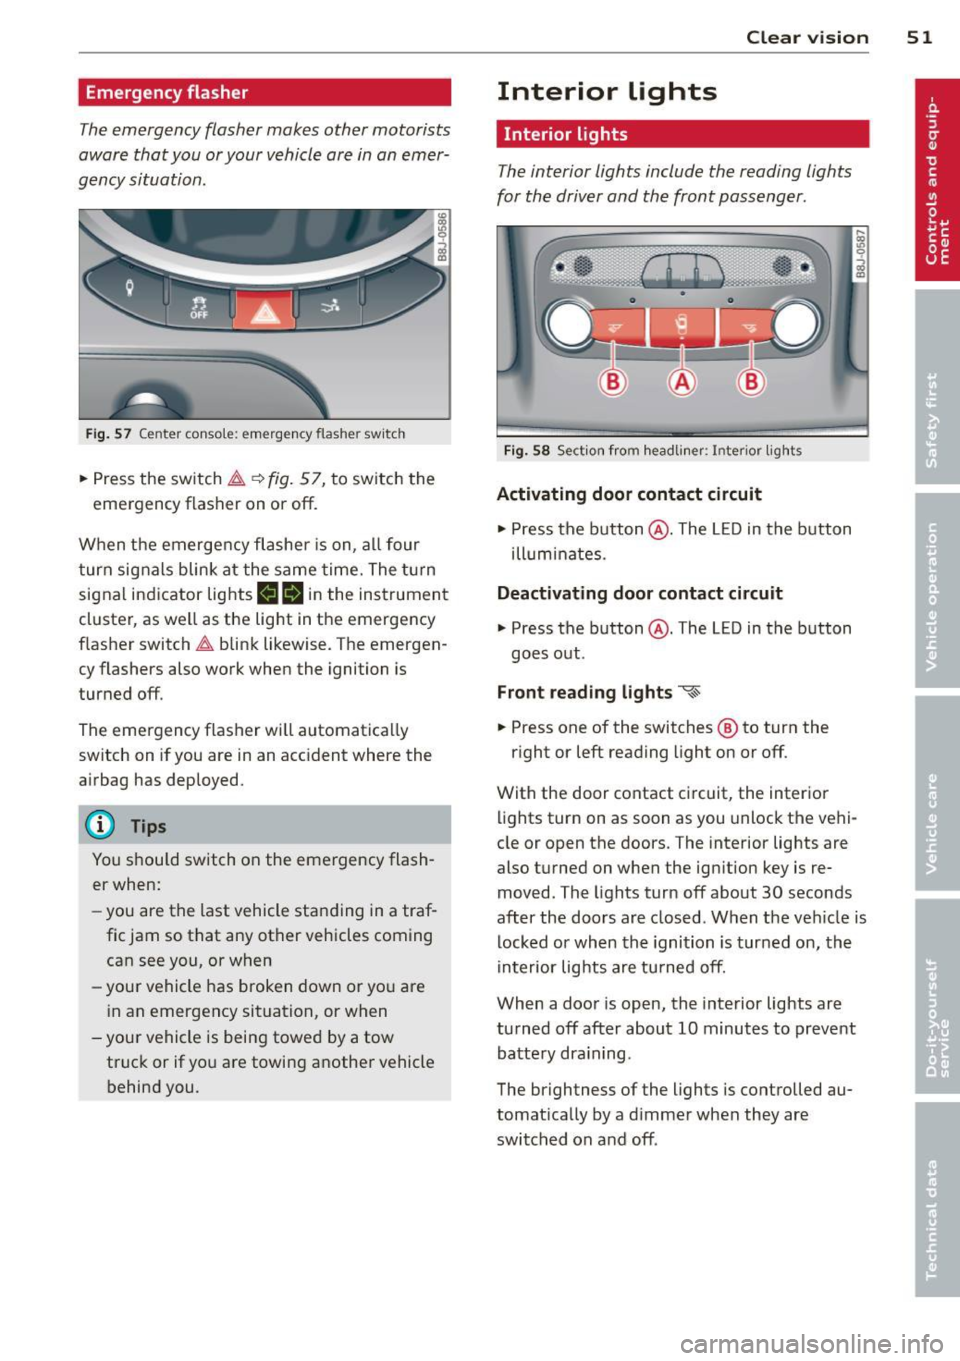
Fi g. 57 Center conso le: emergency flasher sw itch
.. Press the switch ~~ fig. 57, to switch the
emergency flasher on or off.
When the emerge ncy flashe r is on, al l four
turn signals blink at the same time. The t urn
signal indicator lights
II Hin the instrument
cluster, as we ll as the light in the emergency
flasher switch~ blink likewise. The emergen
cy flashers also work when the ignition is
turned off.
The emergency flasher will automatica lly
switch on if you are in an acc ident where the
airbag has deployed.
@ Tips
You should switch on the emergency flash
er when:
- you are the last vehicle sta nding in a traf
fic jam so that any other vehicles coming can see you, or when
- your vehicle has broken down or yo u are
i n an emergency situation, or when
-you r vehicle is being towed by a tow
truck or if yo u are towing a nothe r vehicle
behind you. Clear vi
sion 51
Interior lights
Interior lights
The interior lights include the reading lights
for the driver and the front passenger.
Fig. 58 Section from headli ner: Interior lights
Activating door contact circuit
.. Press the button @. The L ED in the button
ill um inates.
Deactivating door contact circuit
.. Press the button @. The LED in the button
goes out .
Front read ing lights ~
.. Press one of the switches ® to turn the
r ight or left reading light on or off.
With the door contact ci rcuit, the inter ior
lights turn on as soon as you unlock the vehi
cle or open the doors. The interior lights are
also turned on when the ignition key is re
moved. The lights turn off about 30 seconds
after the doors are closed . When the veh icle is
locked or when the ignition is turned on, the
in terior lig hts are tu rned off.
When a door is open, the inte rior lights are
tu rned off after about 10 minutes to preve nt
batte ry dra in ing.
The brightness of the lights is controlled au
tomat ica lly by a d immer when they are
switched on and off.
Page 134 of 244
132 Child Saf ety
typical 1 year -old chi ld, the Advanced Airbag
Syst em compares the weight meas ured by the
weight sensing mat with the in format ion stor
ed in the electron ic contro l unit.
The electron ic contro l unit a lso registers the
tension on the front passenge r safety belt.
The tens ion on the safety be lt fo r the front
passenger seat will be d ifferent for an adult
who is properly using the safety belt as com pared to the tension on t he be lt whe n it is
used to attach a child restraint to the seat .
The senso r below the latch fo r the safety be lt
fo r the front seat passenger measu res the
tension on the be lt. T he inp ut from this sen
sor is then used with the we igh t to "decide",
whether there is a chi ld restraint with a typica l
1 year-o ld child o n the front passenger seat
and whether or not the airbag must be turned
off.
Child restraints and Advanced Airbags
Regardless of the ch ild restraint that you use,
make sure tha t it has been ce rtified to meet
Un ited States Fede ral Motor Vehicle Safety
S tanda rds a nd has been cer tified by its manu
facture r fo r u se wit h an air bag. If i n excep
tional circumstances yo u m ust use it on the
front passenge r seat, caref ully read all of the
info rmation on c hild safety an d Advanced Air
bags and heed a ll of the app licable WARN
INGS. Make certai n that t he child restraint is
correctly recogni zed by the weig ht-sensing
mat i nside the front passenger seat, that the
fro nt passenge r airbag is tur ned off and that
the airbag status is a lways correctly signaled
by the
PASSENGER AIR BAG OFF light .
Many types and models of child restra ints
have been ava ilable over the years, new mod
e ls ar e introduced regularly incorporat ing new
a nd improved designs a nd older models are
taken out of p ro du ction. Child res traints are
not stan dardized . Ch ild restra ints o f the same
type typically have different weights and s izes
a nd d ifferent 'footprints,' the s ize and s hape
of the bottom o f the child restraint that sits
on the seat, when they are installed on a veh i
cle seat. These differences make it virtually impossible to certify compliance wi
th t he re
quirements for a dvanced airbags with eac h
and every ch ild restra int that has ever been
sold in the past or wi ll be sold over the course
of the useful life of your veh icle.
For t his reason, the United States National
Hig hway Traffic Safety Adm inistrat ion has
published a list of spec ific type, ma kes and
m odels of child restraints that must be used
to certify comp liance of the Advanced Airbag
System i n your veh icle w ith the su ppr ession
r equirem ents of Federal Motor Vehicle Safety
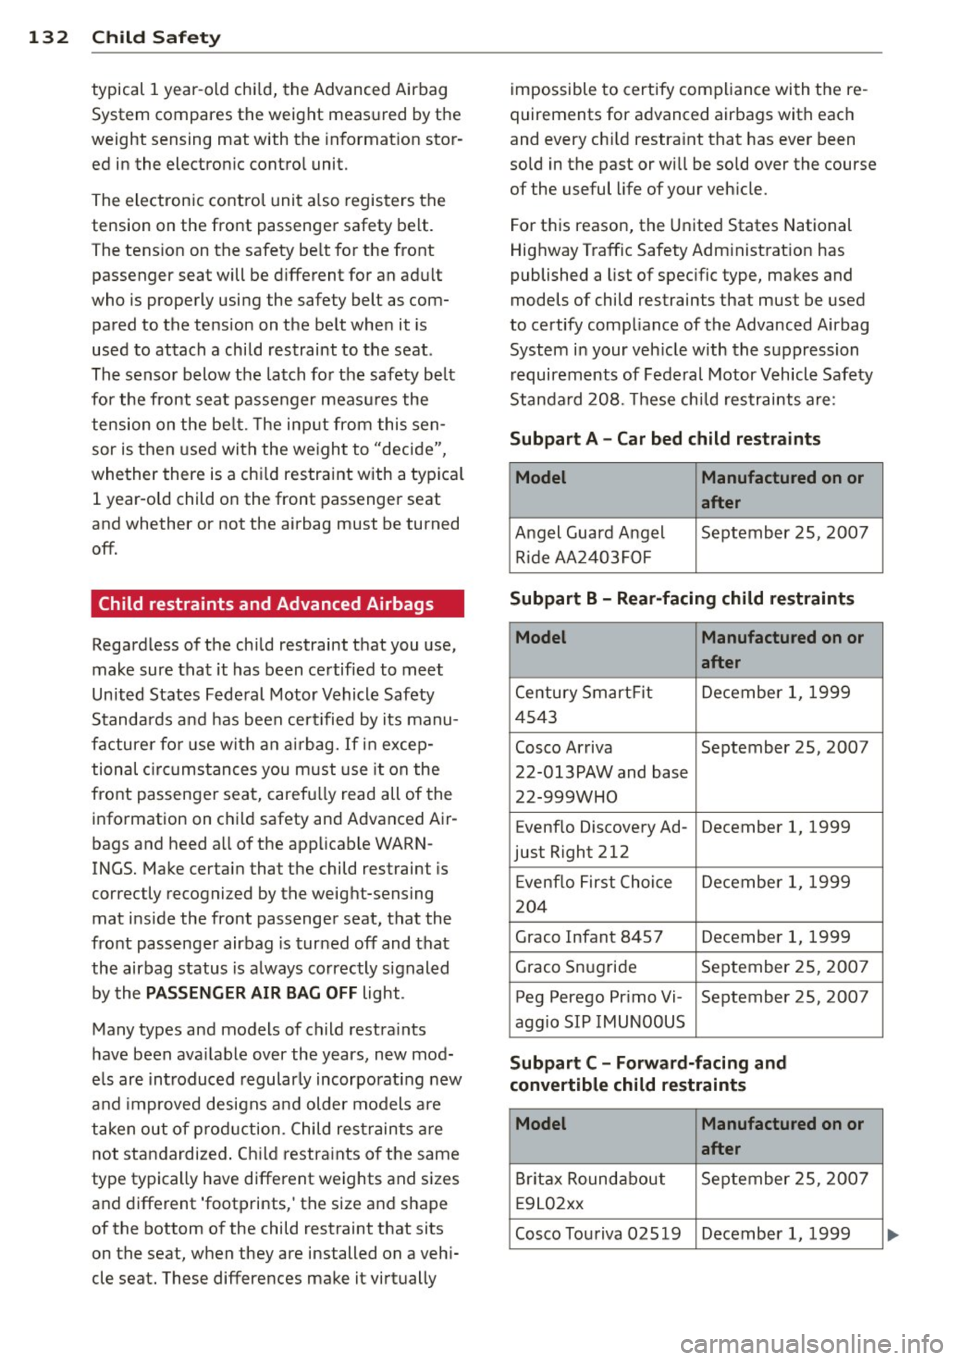
Standa rd 208. These chi ld restraints a re :
Subpart A -Car bed child restraints
Model Manufactured on or
after
A ngel Guard A ngel September 25, 2007
Ri de AA 2403FOF
Subpart B - Rear-facing child restraints
Model Manufactured on or
after
Ce ntury Smart Fit December 1, 1999
454 3
Cosco Ar riva September 2S, 2007
22-013PAW and base
22-999WHO
E venflo Discove ry Ad -December 1, 1999
just Right 212
E ven flo First Ch oic e De ce m be r 1, 1999
2 04
Graco Infant 8457 December 1, 1999
G raco Sn ug ride September 25
, 2007
Peg Perego Pr imo Vi -September 25, 2007
aggio SIP IMU NOOUS
Subpart C -Forward-facing and
convertible child restraints
Model Manufactured on or
after
B rit a x Round about S
eptember 2 5, 2007
E 9 L02xx
Cosco To uriva 02519 December 1, 1999