ECU AUDI TT ROADSTER 2015 Owners Manual
[x] Cancel search | Manufacturer: AUDI, Model Year: 2015, Model line: TT ROADSTER, Model: AUDI TT ROADSTER 2015Pages: 244, PDF Size: 60.74 MB
Page 34 of 244
32 Opening and clo sing
Opening and closing
Keys
Key set
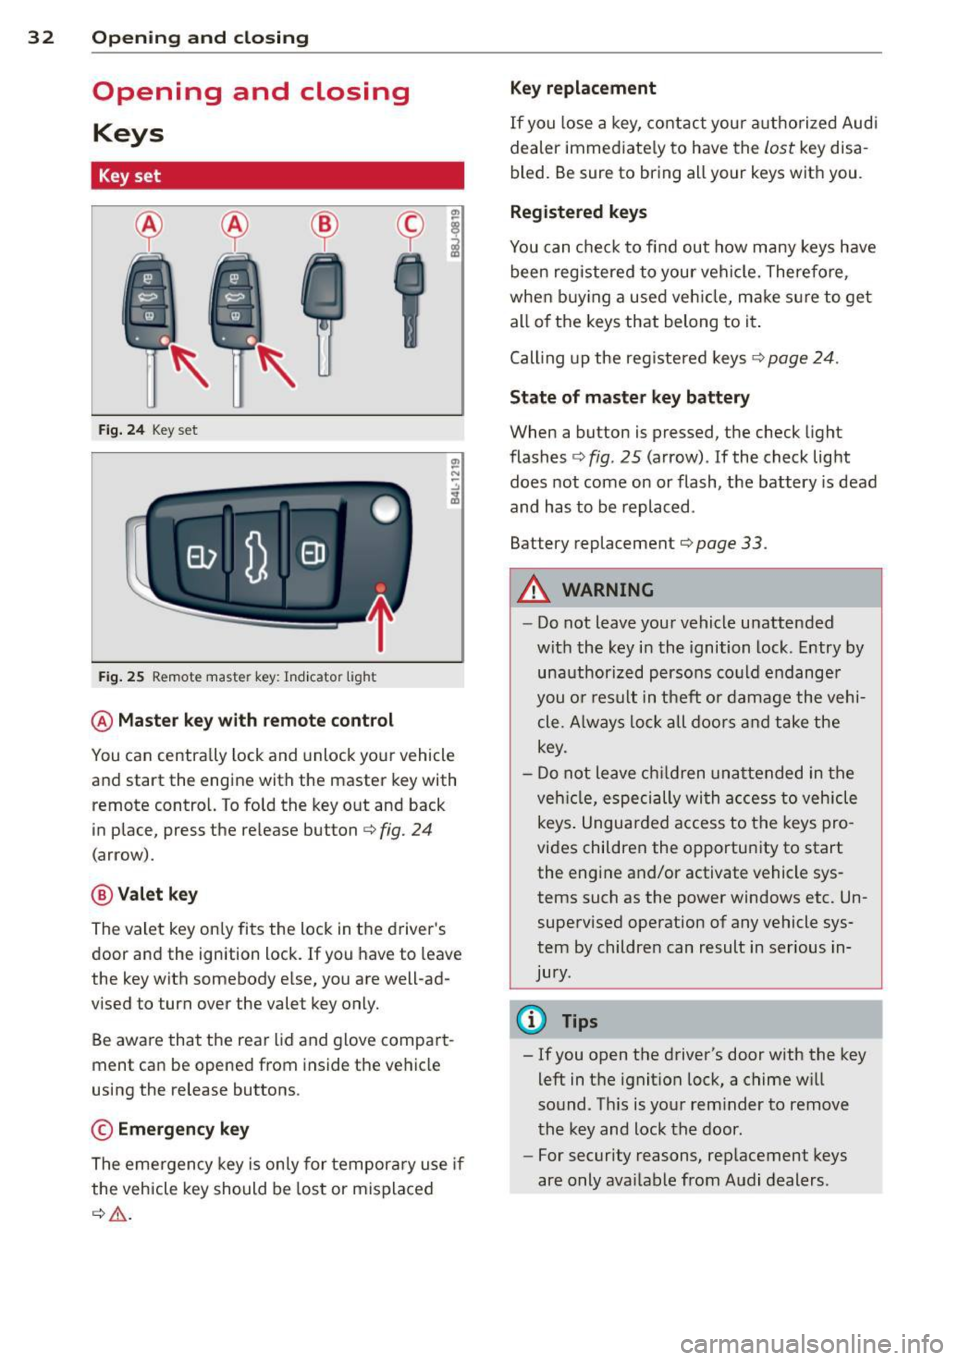
Fig . 2 4 Key set
Fig . 25 Remote master key : Indicator light
@ Ma ster key w ith remote control
You can centrally lock and unlock your vehicle
and start the engine with the master key with
remote control. To fold the key out and back
in place, press the re lease button
c:> fig. 24
(arrow).
@ Valet ke y
The valet key on ly fits the lock in the driver's
door and the ignition lock. If you have to leave
the key with somebody e lse, you are well-ad
vised to turn over the valet key only.
Be aware that the rear lid and glove compart
ment can be opened from inside the vehicle
using the release buttons .
© Emergency k ey
The eme rgency key is only for temporary use if
the vehicle key should be lost or misplaced
c:> & .
Ke y replac ement
If you lose a key, contact you r a uthorized Audi
dealer immed iate ly to have the
Lost key disa
bled. Be sure to bring all your keys with you .
Registered ke ys
You can check to find out how many keys have
been reg istered to your vehicle. Therefore,
when buy ing a used veh icle, make sure to get
all of the keys that belong to it.
Call ing up the reg istered keys
c:> page 24.
St ate of mas ter key b atter y
When a button is pressed, the check light
flashes
c:> fig . 25 (arrow) . If the check light
does not come on or flash, the battery is dead
and has to be replaced .
Battery replacement
c:> page 33.
_& WARNING ........... -
- Do not leave your vehicle unattended
wit h the key in the ignition lock. Entry by
unauthorized persons could endange r
you o r result in theft or damage the vehi
cle. A lways loc k all doors a nd take the
key.
- D o not leave ch ildren unattended in the
veh icle, especially wi th access to vehicle
keys . Unguarded access to the keys pro
vides children the opportunity to start
the engine and/or activate vehicle sys
tems such as the power windows etc. Un supervised operation of any vehicle sys
tem by children can result in ser ious in
jury.
{!) Tips
- If you open the driver's door with the key
left in the ignit ion lock, a chime will
sound . Th is is your rem inder to remove
the key and lock the door.
- For security reasons, rep lacement keys
are only ava ilable from Audi dealers .
Page 37 of 244
accidentally press the power locking
switch.
- Do not leave children inside the vehicle
unsupervised. In an emergency it would
be impossible to open the doors from
the outside without the key.
@ Tips
- In the event of a crash with airbag de
ployment a ll locked doors will be auto
matically unlocked to g ive access to the
vehicle occupants from the outside.
- If the power locking system should mal
function, you can lock each door individ
ually using the vehicle key .
- If the power locking system should fail,
you can still open the fue l tank flap in an
emergency
c>page 163.
- You are well advised not to keep valua
bles inside an unattended vehicle, visible
or not . Even a properly locked vehicle
cannot provide the security of a safe!
Unlocking and locking the vehicle w ith
the remote control
How the remote control works.
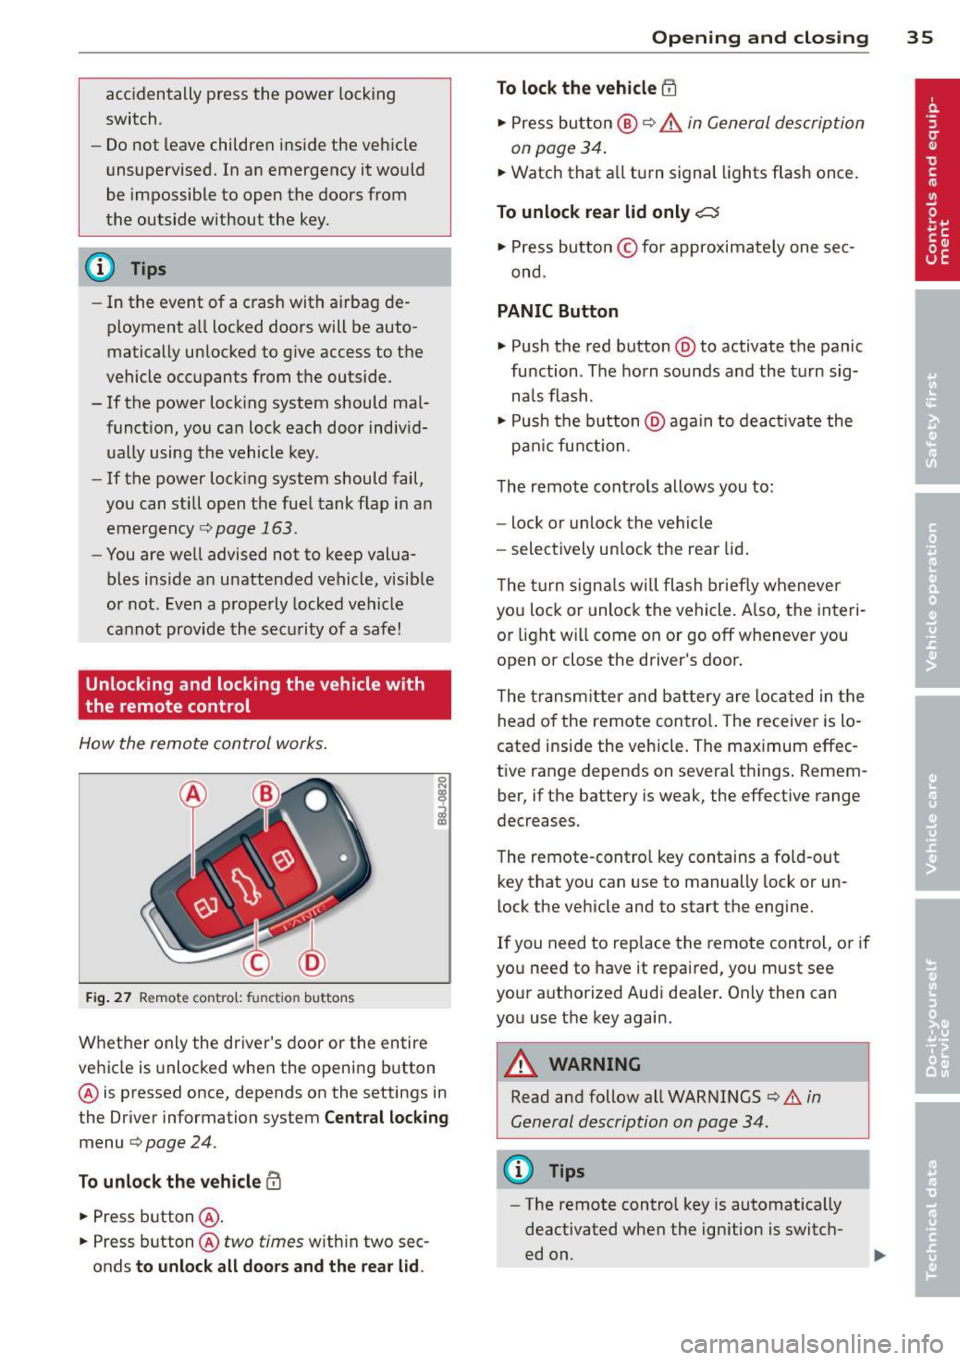
Fig . 27 Remote contro l: fu nctio n buttons
0
I
Whether only the driver's door or the entire
vehicle is unlocked when the opening b utton
@ is pressed once, depends on the settings in
the Driver information system
Central locking
menu c> page 24.
To unlock the vehicle !Ii
.,. Press button @.
.,. Press button @
two times with in two sec
onds
to unlock all doors and the rear lid.
Opening and closing 35
To lock the vehicle efl
.,. Press button @ c> &. in General description
on page 34 .
.,. Watch that a ll turn signal lights flash once.
To unlock rear lid only~
.,. Press button © for approximately one sec
ond .
PANIC Button
.,. Push the red button @to activate the panic
function . The horn sounds and the turn sig
na ls flash .
.,. Push the button @aga in to deact ivate the
pan ic function .
The remote controls allows you to:
- lock or unlock the vehicle
- select ively unlock the rear lid.
The turn signals will flash briefly whenever
you lock or unlock the vehicle. Also, the interi
or light will come on or go off whenever you
open or close the driver's door .
The transm itter and battery are located in the
head o f the remote contro l. The receiver is lo
cated ins ide the vehicle. The max imum effec
tive range depends on several th ings . Remem
ber, if the battery is weak, the effective range
decreases.
The remote-control key contains a fo ld-out
key that you can use to manually lock or un
lock the vehicle and to start the engine.
If you need to replace the remote control, or if
you need to have it repaired, you must see
your authorized Aud i dealer. Only then can
you use the key again.
A WARNING
Read and follow all WARNINGS c> .&. in
General description on page 34.
(0 Tips
- The remote contro l key is automatically
deactivated when the ignition is switch
ed on.
-
Page 38 of 244
36 Opening and closing
-The operation of the remote control key
can be temporarily disrupted by interfer
ence from transmitters in the vicinity of
the vehicle working in the same frequen
cy range (e.g. a cell phone, radio equip
ment) .
- In order to make sure the locking func
tion is working, you should always keep
your eye on the vehicle to make sure it is
properly locked .
- Do not use the remote control if you are
inside the car, otherwise you may unin
tentionally lock the vehicle, and then you
would set off the anti-theft alarm when
you try to start the engine or open a
door. In case this happens anyhow, push
the unlock button
CD .
- Use the panic function only if you are in
an emergency situation.
Resetting the remote control
The remote control must be reset if the vehi
cle does not unlock .
.,,. Press the unlock button CD on the remote
control.
.,,. Manually unlock the driver's door lock with
the mechanical key within 30 seconds.
.,,. Press either the lock-1'.D or the unlock
CD but
ton to complete th e reset sequence.
Operating locks with the key
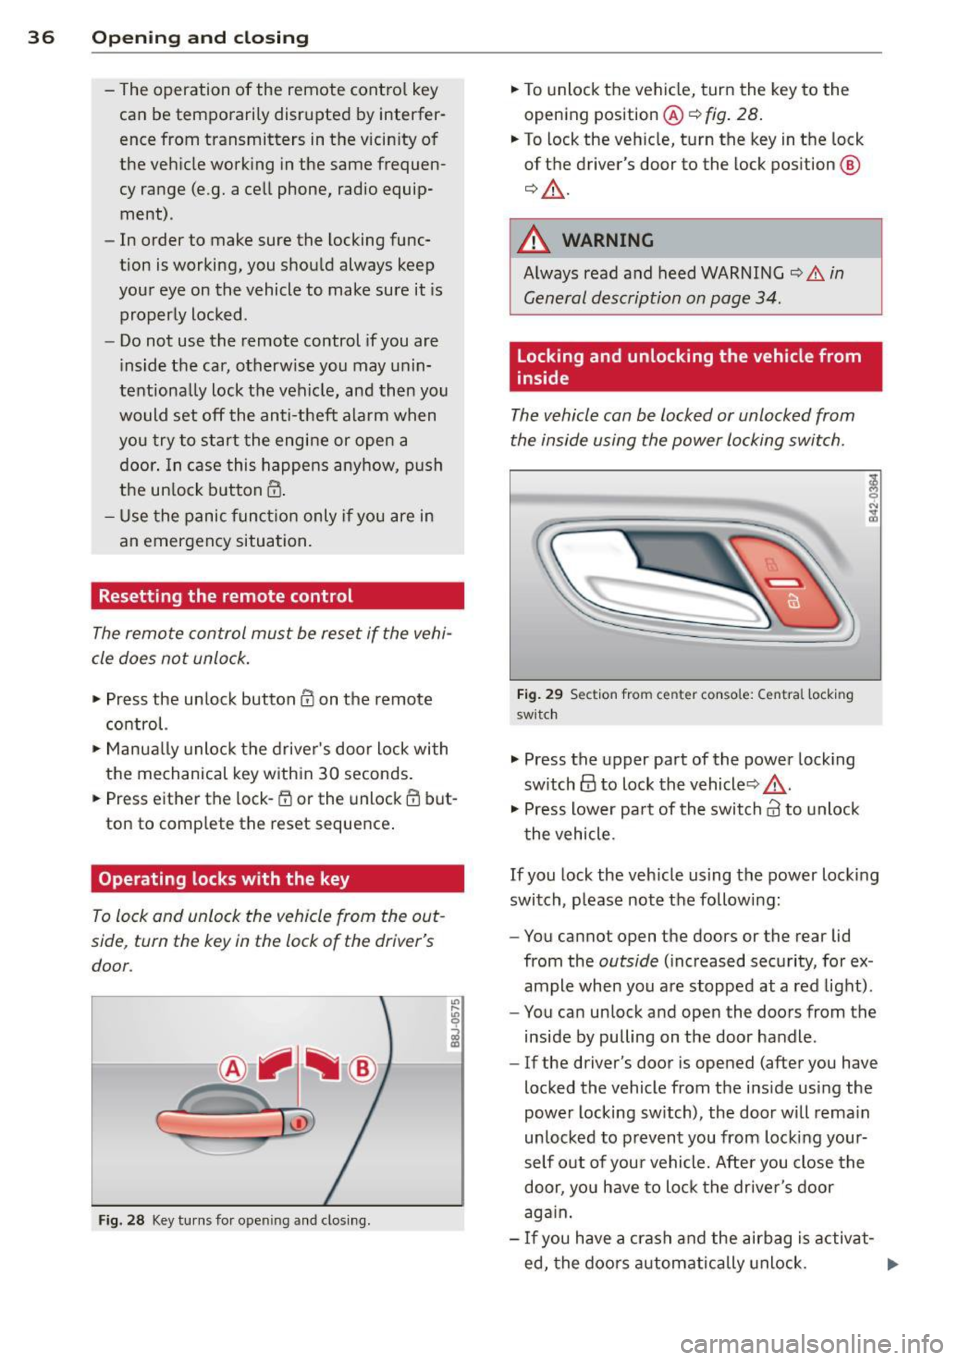
To lock and unlock the vehicle from the out
side , turn the key in the lock of the driver's
door .
Fig. 28 Key turns for ope ning and clo sing.
.,,. To unlock the vehicle, turn the key to the
opening position@¢
fig. 28.
.,,. To lock the vehicle, turn the key in the lock
of the driver's door to the lock position
@
¢ &_ .
A WARNING
Always read and heed WARNING¢.&. in
General description on page 34.
Locking and unlocking the vehicle from
inside
The vehicle can be locked or unlocked from
the inside using the power locking switch .
Fig. 29 Sec tion from center conso le: Ce ntra l locking
switch
.,,. Press the upper part of the power locking
switch
@ to lock the vehicle ¢&_ .
.,,. Press lower pa rt of the switch
crl to unlock
the vehicle .
If you lock the vehicle using the power locking
switch , please note the following:
- You cannot open the doors or the rear lid
from the
outside (increased security, for ex
ample when you are stopped at a red light).
- You can unlock and open the doors from the
inside by pulling on the door handle .
-If the driver's door is opened (after you have
locked the vehicle from the inside using the
power locking switch), the door will remain
unlocked to prevent you from locking your
self out of your vehicle. After you close the
door, you have to lock the driver 's door
again.
- If you have a crash and the airbag is activat-
ed, the doors automatically unlock. ..,.
Page 43 of 244
Convertible top
Convertible top
General information
The comprehensively engin eered design of the
f abric convertib le top a llows it to be operated
qu ickly and simply. When open, the convert i
b le top is stowed completely in a tonneau pro
vided spec ifically for this purpose.
I n normal operating conditions, the converti
b le top is wind -and waterp roof. Under certa in
circumstances, a small quantity o f droplets
might form, but on ly in extremely inclement
weather, e.g . torrentia l or contin uous heavy
rain. This is normal and not a cause for con
cern.
F ollow the care instructions
Q page 154 to
maintain the convertible top's attractive ap
pearance and to keep it wind- and waterproof.
Please follow these instructions as well:
- Stow and open the convertib le top only
when it is clean. When the top is folded
away, sharp-edged contaminants can build
up as silt and cause wear spots o n the rear
window, which may damage the convertible
top over time. Of course, ice and snow should also be removed before open ing the
convertible top.
- Under no c ircumstances should you use
sharp-edged or abrasive objects to remove
ice and snow . Use a commerc ial ice scraper
to remove ice from o f the rear window.
- T he convert ible top should be opened only if
it is complete ly d ry. If the convertib le top is
opened and then stored wet, unattractive
indentations may develop . In addition, over
time, mold and mildew stains can develop.
- Do no t leave the convertible top open for
several weeks at a time; instead, open and
close it from time to time so that the fabric
does not disco lor where it folds, and to pre
vent creases from forming. This is espec ially
important if it happens to be stowed wh ile
still damp on occasion.
- Because the fabric becomes less flexible
when temperatures drops below zero, we
Convertible top 41
recommend not operating the convertible
top below O°C.
A WARNING -
- When operat ing the convertible top,
make sure that any external factors (e.g.
the wind) do not impair its funct ion or
e ndanger other drivers.
- Never drive wh ile the convertib le top is
not properly secured. Otherwise , it may
be pulled open by the wind. This can
cause injur ies and damage to the vehicle
- danger of an accident!
- When opening and closing the converti-
ble top make sure to keep yourself and
o thers clear of a ll movi ng pa rts. Risk of
in jur y!
d) Note
-Always make su re that there is enough
clearance above the veh icle so that the
c onvertib le top is not damaged when
opening and clos ing.
- Do not place any objects in the tonneau
t o avoid damage when open ing the con
ver tible top.
(D Tips
- Th e convert ible top should be operated
only wi th the ign ition sw itched on.
- When pa rking the ca r with the convert i
ble top open, bear in mind t hat the vehi
cle's in terior is not p rotec ted fro m dam
age due to unexpec ted weather condi
tions, o r unauthorized access . It is there
fore advisab le to close the convertib le
top before leaving the veh icle. If objects
are left inside the vehicle, they should be
locked in the luggage compartment.
Page 46 of 244
44 Convertible top
Convenience opening
.,. Press the unlock but ton m on the remote
control key to unlock the vehicle.
.,. Turn the key in the driver door
once to posi
tion @~
fig. 42.
.,. Within two seconds turn the key a second
t ime and hold it in t his position until the
power top has completely retracted.
Convenience clos ing
.,. Turn the key in the dr iver door once to posi
tion @
~fig. 42.
.,. Within two seconds turn the key a second
time and hold it in this position until the
power top has completely closed .
Opening or clos ing motion stops
immediately
as soon as you re lease the key. For safety rea
sons, it is not possible to activate the
conven
ience feature with the remote control.
A WARNING
When opening and closing the powe r top
make sure to keep yourself a nd others
clear of all moving parts. Risk of injury!
Wind Deflector
The wind deflector reduces turbulence in the
passenger compartment and makes driving
more comfortable.
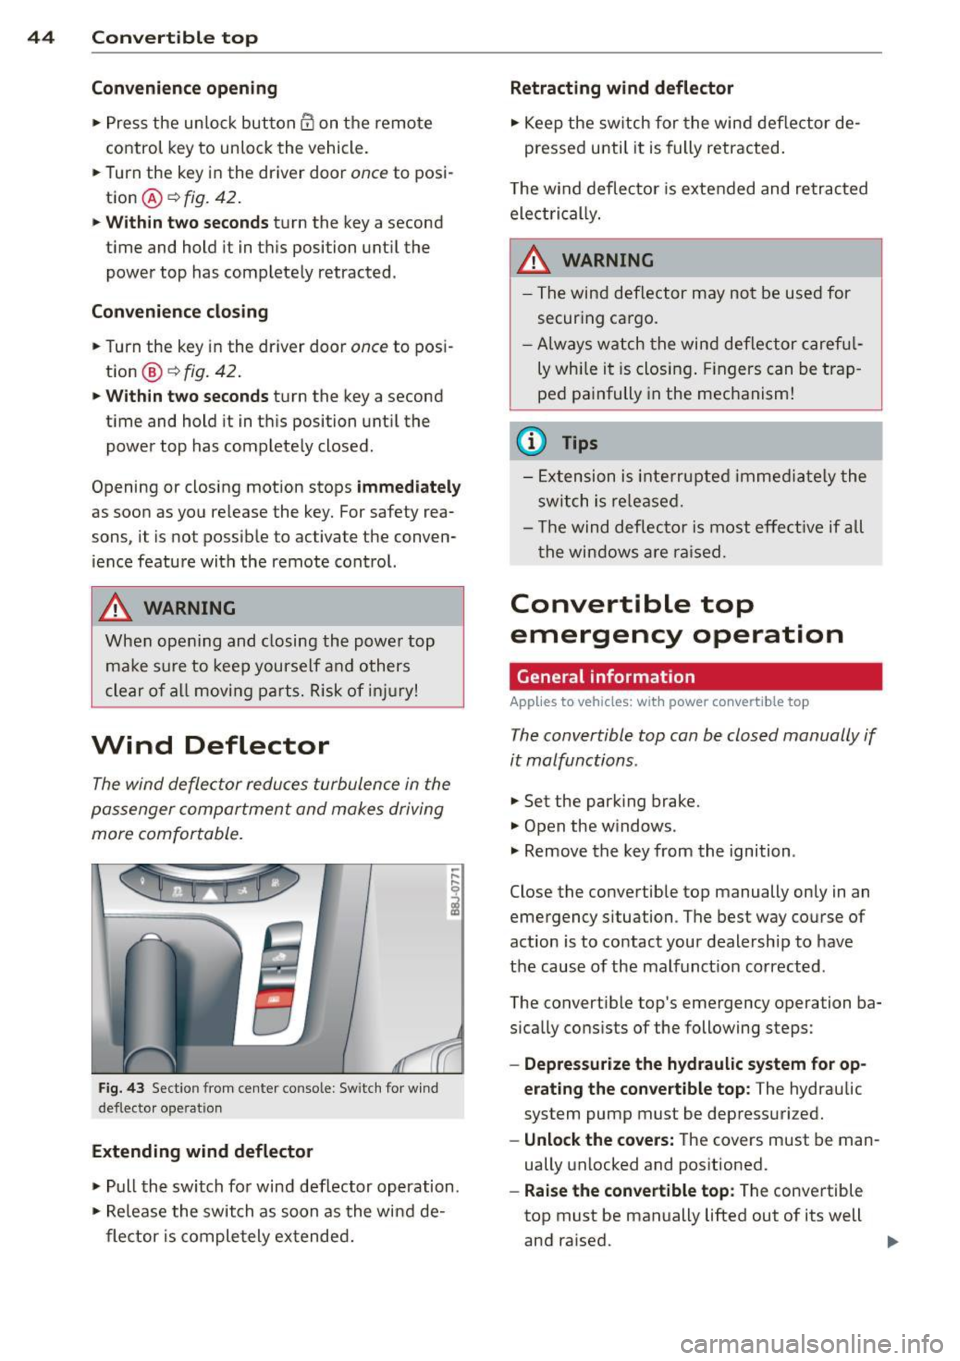
F ig. 43 Section from center console: Sw itch for w ind
deflecto r operation
Extending wind deflector
.. ,... ,... 0
i
.,. Pull the switch for wind deflector operation.
.,. Re lease the switch as soon as the wind de-
flector is completely extended.
Retracting wind deflector
.,. Keep the switch for the wind deflector de
pressed unti l it is fully retracted .
T he w ind deflector is extended and retracted
electrical ly .
A WARNING
- The wind deflector may not be used for
secur ing ca rgo.
-Al ways watch the wind deflector careful
ly while it is closing. Fingers can be trap
ped painfully in the mechanism!
(D Tips
-Extension is interrupted immediately the
switch is released.
- Th e wind deflector is most effective if all
th e windows are raised.
Convertible top
emergency operation
General information
Applies to vehicles: with power convertible top
-
The convertible top con be closed manually if
it malfunctions.
.,. Set the park ing brake.
.,. Open the w indows.
.,. Remove the key from the ignition .
Close the convertible top manually only in an
emergency situation. The best way course of
action is to contact your dealership to have
the cause of the malfunct ion corrected.
The convert ible top's emergency operation ba
s ically consists of the following steps:
- Oepressurize the hydraulic system for op
erating the convertible top :
The hydraulic
system pump must be depressurized.
- Unlock the covers: The covers must be man
ually unlocked and positioned .
-Raise the convertible top: The convertible
top must be manually lifted out of its well
and ra ised. ..,.
Page 47 of 244
-Lock the convertible top: The latches for
the convertible top must be locked with the
emergency lock key.
-Close the hydraulic system's emergency
operation bolt:
T urn the emergency opera
tion bolt¢
page 45, fig. 45 to the right to
close the hydraulic system that operates the
convertible top .
&_ WARNING
-When raising the convert ible top, take
ca re not to reach into the linkage that
operates the convertible top or any of its
other moving parts. Otherwise, your
hands may be trapped in the mechanism
- risk of injury!
- Never drive while the convertible top is
not properly secu red. Otherwise, it may
be pulled open by the wind. This can
cause injuries and damage to the vehicle
- danger of an accident!
@ Tips
Get a second person help you to close the
convertible top. It is much easier to raise
the convertib le top with the help of a sec
ond person.
Step 1: Depressurizing the hydraulic
system
Applies to vehicles: with power convertible top
Fig . 44 Luggage compartmen t: C ra nk for e mergency
ope rat ion
-
Convertible top 45
-
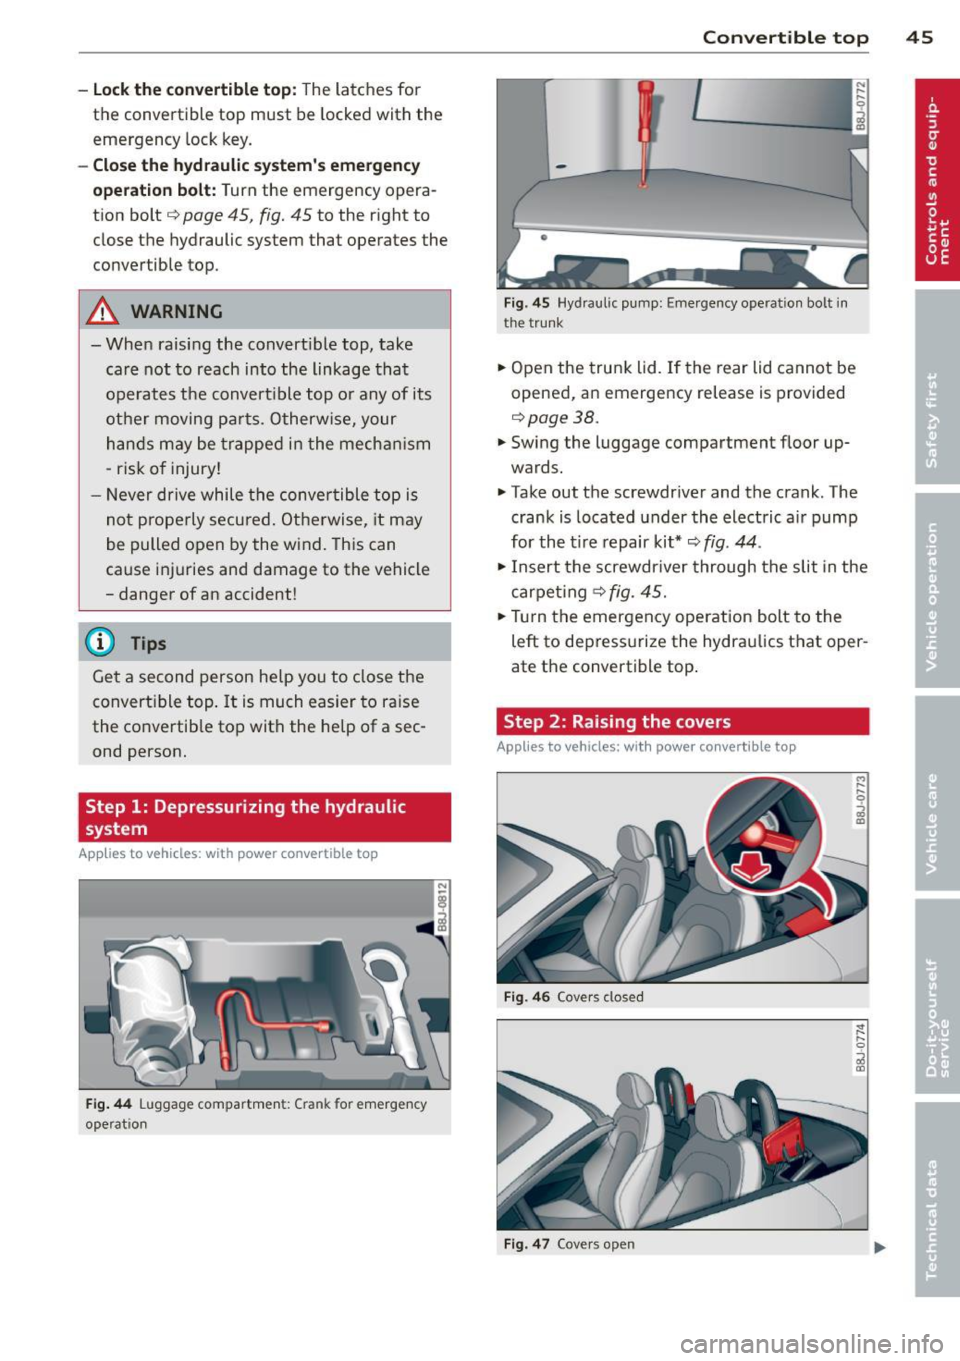
Fig . 45 H yd raul ic pump: Emergency opera ti on bo lt i n
t h e t runk
.,. Open the trunk lid. If the rear lid cannot be
opened, an emergency release is provided
r=>page38.
.,. Swing the luggage compartment floor up
wards .
.,. Take out the screwdr iver and the crank . The
crank is located under the electric air pump
for the t ire repair kit*¢
fig. 44 .
.,. Insert the screwdr iver through the slit in the
carpeting ¢
fig. 45.
.,. Tur n the emergency operation bolt to the
left to depressurize the hydraulics that oper
ate the convertible top .
Step 2: Raising the covers
Applies to vehicles: with power convertible top
Fig. 46 Covers cl osed
Fig . 47 Cover s op en
Page 64 of 244
62 Seats and storage
-To reduce the risk of injury in the case of
sudden braking or accident, front pas
sengers must never ride in a moving ve
hicle with the seatback reclined. Safety
belts and the airbag system offer maxi
mum protection only when the seatback
is upright and the safety belts are prop
erly posit ioned on the body. The more
the seatback is reclined, the greater the
risk of personal injury from an incorrect
seating position and improperly posi
tioned safety belts!
- Always make sure the front seatbacks are
in the upright position and securely
locked in place when driving.
Head restraints
Adjusting head restraints, front seats
The head restraints must be adjusted proper
ly to provide protection .
Fig. 69 Dr iver's seat head rest rain t: adjusting the
heigh t
The head restraints on the front seats can be
adjusted to provide safe support to head and
neck at the optimum he ight . When optimally
adjusted, the top of the restra int should be
leve l with the top of the head
q page 94,
Proper adjustment of head restraints.
.,. Grasp the sides of the head restra int with
both hands and slide it upward/downward
until you feel it click into place
c> fig. 69 .
_&, WARNING
-Driving without head restraints or with
head restraints that are not properly ad-
-
justed increases the risk of serious or fa
tal neck injury dramatically.
- Read and heed all WARNINGS
q page 94, Proper adjustment of head
restraints.
t@ Tips
Correctly adjusted head restraints and
safety belts are an extreme ly effective
combination of safety features.
Luggage compartment
Pass-through with Ski Bag
Using the pass-through and the removable
ski bag, you can transport long objects (e .g.
skis) neatly and without damaging the interi
or.
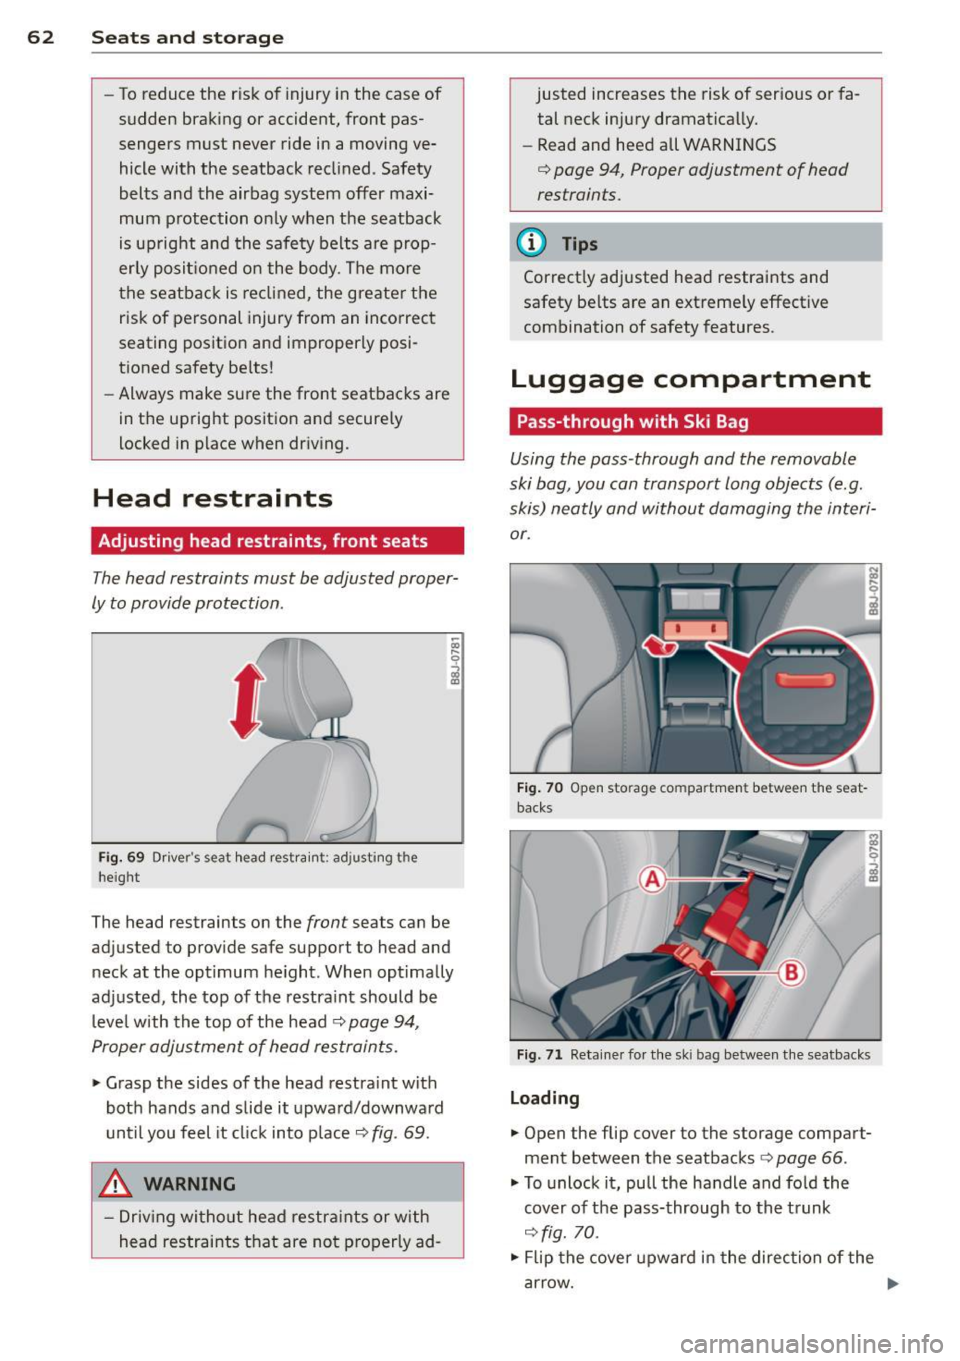
Fig. 70 Open storage compartme nt between the seat
backs
Fig. 71 Retainer fo r the ski bag between the seatbacks
Loading
.,. Open the flip cover to the storage compart
ment between the seatbacks
c> page 66.
.,. To unlock it, pull the handle and fold the
cover of the pass-through to the trunk
c> fig. 70.
.,. Flip the cover upward in the direction of the
arrow.
Page 65 of 244
.. Open the trunk lid.
.. Push the ski bag from the trunk through the
opening in the rear wall
c!;> _& .
.. Load up the ski bag.
Securing
.. Hook the sk i bag's safety strap @ ¢ fig. 71.
.. Adjust the reta ining strap @ to the desired
length.
.. Clip the retaining st rap .
Storage
.,. Unhook the ski bag's safety strap @
¢fig. 71.
.. Fold the cover ¢ fig. 70 downward in the op
posite direction of the arrow.
.. Loosen the reta ining strap @ .
.. Pull the ski bag backw ard through the rear
wall.
.. Close the cover of the pass -through to the
trunk .
.. Close the flip cover to the storage compart
ment between the seatbacks ¢
page 66.
.,. If necessary, collapse the ski bag.
& WARNING ,-
After loading, the ski bag must be secured
with the safety strap.
@ Tips
Make sure that the ski bag is not folded up
while still damp.
Cup holder
Fig. 72 Cup holder
Seats and storage 63
A WARNING
Spilled hot liquid can cause an accident
and personal injury .
- Never carry any beverage containers with
hot liquids, such as hot coffee or hot tea,
in the vehicle while it is moving. In case
of an acc ident, sudden braking or other
veh icle movement , hot liquid could spill,
causing scalding burns. Spilled hot liquid
can also cause an accident and personal
injury .
- Use only soft cups in the cupholder. Hard
cups and glasses can cause injury in an
accident .
- Never use the cupholder or adapter as an
ashtray - risk of fire .
(D Note
Only drink containers with lids should be
carried in the cupholder. Liquid could spill
out and damage you r vehicles electronic
equipment or stain the upholstery, etc.
Ashtray
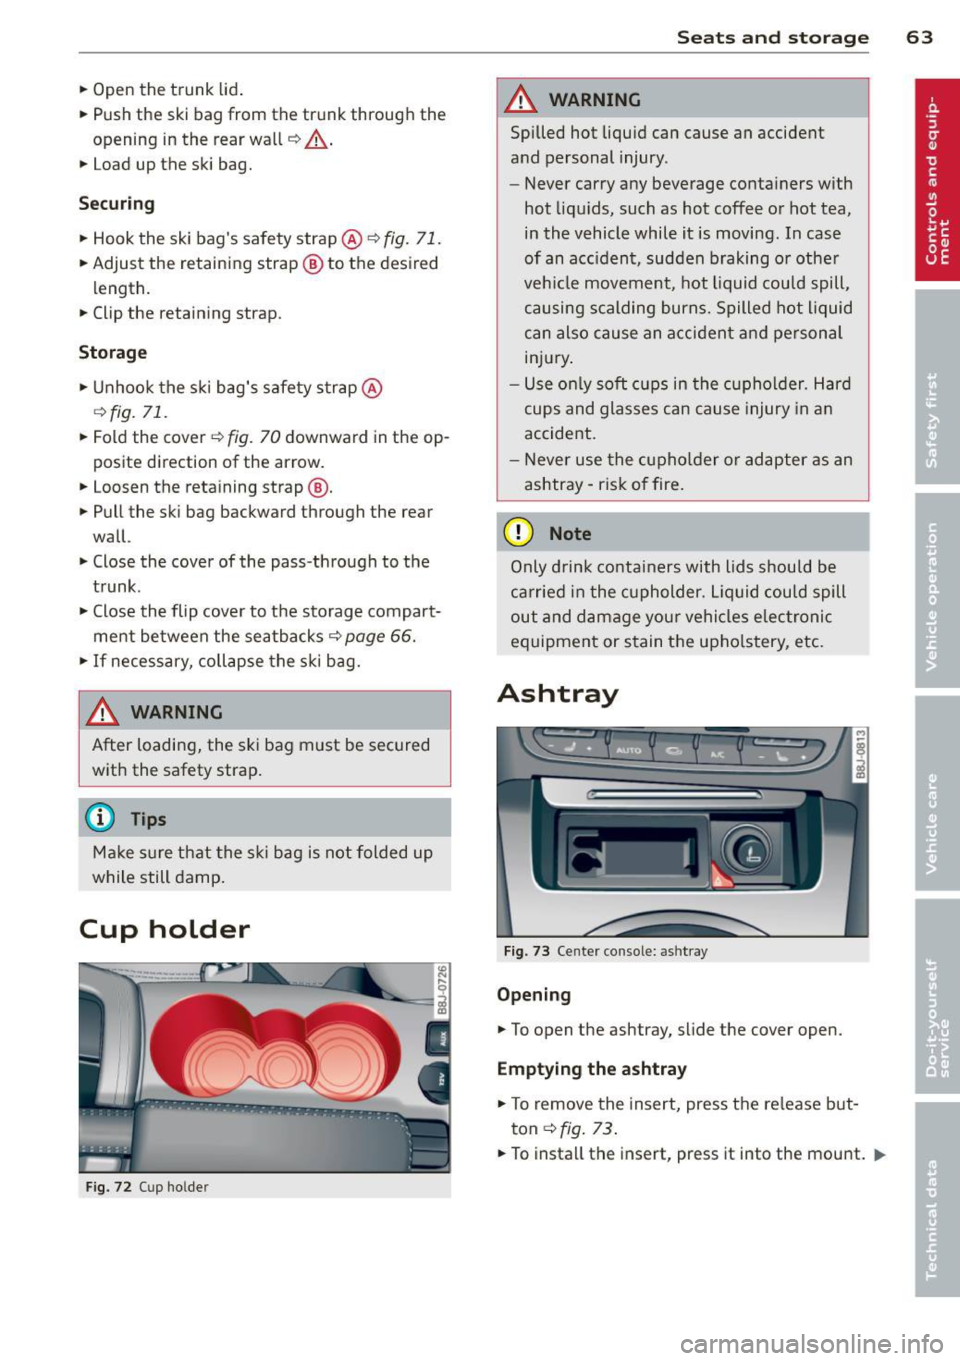
Fig. 73 Center co n sole: ashtr ay
Opening
.. To open the ashtray, slide the cover open.
Emptying the ashtray
.. To remove the insert, press the release but
ton
c:> fig. 13 .
.. To install the insert, press it into the mount . .,.
Page 93 of 244
Driving Safely
General notes
Safe driving habits
Please remember -safety first!
This chapter contains important information,
tips, instructions and warnings that you need
to read and observe for your own safety, the
safety of your passengers and others . We have
summarized here what you need to know
about safety belts, airbags, child restraints as
well as child safety. Your safety is for us
priori
ty number 1.
Always observe the information
and warnings in this section - for your own
safety as well as for that of your passengers.
The information in this section applies to all
model versions of your vehicle . Some of the
features described in this sections may be
standard equipment on some models, or may
be optional equipment on others. If you are
not sure, ask your authorized Audi dealer.
A WARNING
- Make certain that you follow the instruc
tions and heed the WARNINGS in this
Manual. It is in your interest and in the
interest of your passengers.
- Always keep the complete Owner's Liter
ature in your Audi when you lend or sell
your vehicle so that this important infor
mation will always be available to the
driver and passengers.
- Always keep the Owner's literature handy
so that you can find it easily if you have
questions.
Safety equipment
The safety features are part of the occupant
restraint system and work together to help
reduce the risk of injury in a wide variety of
accident situations .
Your safety and the safety of your passengers
should not be left to chance. Advances in
technology have made a variety of features
available to help reduce the risk of injury in an
Driving Safely 91
accident. The following is a listing of just a
few of the safety features in your Audi:
- sophisticated safety belts for driver and all
passenger seating positions,
- safety belt pre-tensioners,
- front airbags,
- knee airbags for the front seats,
- side airbags in the front seats,
- LATCH anchorages for child restraints,
- adjustable steering column.
These individual safety features can work to
gether as a system to help protect you and
your passengers in a wide range of accidents.
These features cannot work as a system if
they are not always properly adjusted and
properly used!
Safety is everybody's responsibility!
Important things to do before driving
Safety is everybody's job! Vehicle and occu
pant safety always depends on the informed and careful driver.
For your safety and the safety of your passen
gers,
before driving always:
~ Make sure that all lights and signals are op
erating correctly .
~ Make sure that the tire pressure is correct.
~ Make sure that all windows are clean and af
ford good visibility to the outside.
~ Secure all luggage and other items carefully
c::> page 65.
~ Make sure that nothing can interfere with
the pedals.
~ Adjust front seat, head restraint and mirrors
correctly for your height .
~ Instruct passengers to adjust the head re
straints according to their height .
~ Make sure to use the right child restraint
correctly to protect children¢
page 129,
Child Safety.
~ Sit properly in your seat and make sure that
your passengers do the same¢
page 59,
General recommendations. .,..
•
•
Page 98 of 244
96 Driving Safel y
Pedal area
Pedals
The pedals must al ways be free to move and
must n ever be interfered with by a floor mat
or any other object.
Make sure that all pedals move freely without
interference and that nothing prevents them
from returning to the ir original positions .
Only use floor mats that leave the peda l area
free and can be secured with floor mat fasten
ers .
If a brake circuit fails, increased brake peda l
travel is required to bring the vehicle to a full
stop.
A WARNING
Pedals that cannot move freely ca n cause
loss of vehicle control and increase the r isk
of serious injury.
- Never place any objects in the driver 's
footwell. An object could get into the
peda l area and interfere w it h pedal func
ti on. In case of s udden braki ng or an ac
cident, you would not be ab le to bra ke or
accelera te!
- Alw ays make su re th at noth ing c an f all
or move into the dr iver's footwe ll.
Floor mats on the driver side
Always use floor mats that can be securely
at tached to the floor mat fasteners and do
no t interfere with the free movement of the
pedals.
.,. Make su re tha t the floor mats are properly
sec ured and cannot move and inte rfere w ith
the pedals ~.&_ .
Use only floor mats that leave t he pedal a rea
unobstr ucted and that a re firmly secured so
that they cannot s lip out of posi tion. Yo u can
obtain suitable floor mats from your author
ized A udi Dealer.
Fl oor mat f asteners a re i nstalled in you r A udi . Floor mats used in yo
ur vehicle must be at
tached to these fasteners . Properly securing
t h e floor mats will prevent them from sliding
into positions that could interfere with the
pedals or impair safe operat ion of your vehicle
i n other ways.
A WARNING ,-
Pedals tha t ca nnot move free ly can result
i n a loss of vehicle control and inc rease the
r isk of ser ious perso na l inju ry.
- Always make sure that floor mats are
p roperly secu red.
- Never p lace or install floor mats o r other
f loor cove rings in th e vehicle that cannot
be pro pe rly secured in p la ce to prevent
them from slipping and interfer ing wi th
the peda ls o r th e ab ility to cont ro l t he
vehi cle.
- Never p lace or ins tall floor mats or othe r
floor coverings on top o f al ready instal
led floo r mats . Additiona l floor mats and
other coverings will red uce the size of
the peda l area and interfere w ith the
pedals.
- Always properly reinsta ll and secure floor
mats that have been taken out for clean
ing.
- Always make sure that objects cannot
fall into the dr iver footwell while the ve
h icle is moving . Objects can become
trapped under the brake pedal and acce l
erator pedal causing a loss of vehicle
control.
Stowing luggage
Loading the luggage compartment
All luggage and o ther objects mus t be prop
erly stowed and secured in the luggage com
partment.
L oose items in the lugg age compa rtment c an
shift s udden ly, changing vehicle handling
characteristics. Loose items can a lso increase
the risk of serious persona l injury in a sudden
vehicle maneuver or in a co llision.