center console AUDI TT ROADSTER 2017 Owners Manual
[x] Cancel search | Manufacturer: AUDI, Model Year: 2017, Model line: TT ROADSTER, Model: AUDI TT ROADSTER 2017Pages: 314, PDF Size: 76.54 MB
Page 44 of 314
Lights and Vision
Instrument illumination
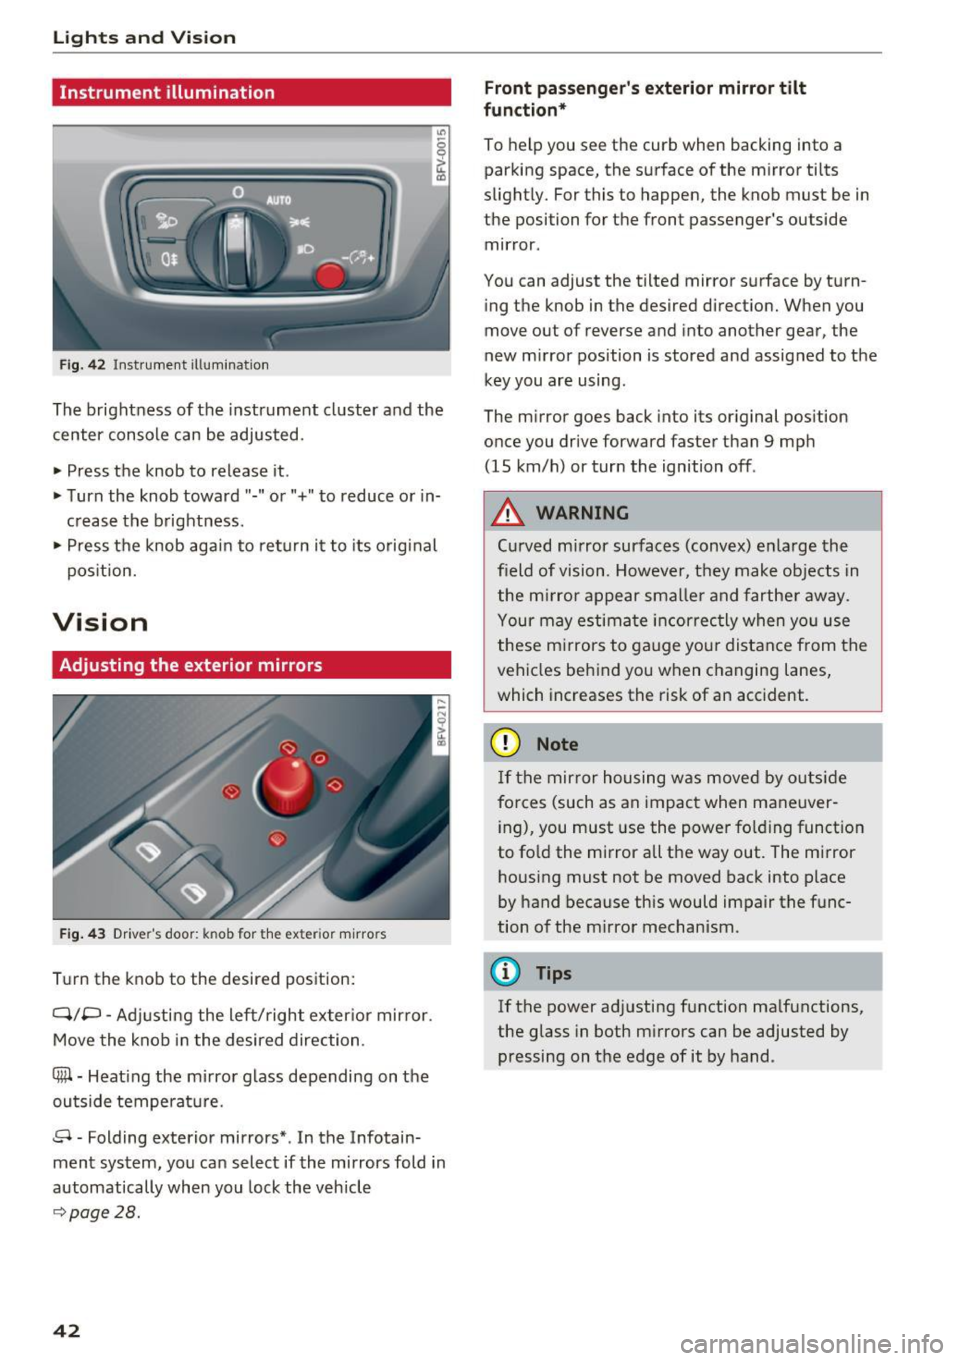
Fig . 42 Inst ru m ent illuminat io n
"' ~ 0 0
~ (0
The brightness of the instrument cluster and the
center console can be adjusted.
• Press the knob to release it .
• Turn the knob toward"-" or"+" to reduce or in
c rease the b rightness .
• Press the knob again to ret urn it to its original
pos ition.
Vision
Adjusting the exterior mirrors
F ig. 4 3 Driver's door: knob for the exter ior m irrors
T u rn the knob to the desired pos ition:
Q/P -Adjusti ng the left/right exter ior mir ror.
Move the knob in the desired direction.
®-Heat ing the mi rror g lass depending on the
outside temperat ure.
8 -Folding exterior mirrors *. In the Infotain
ment system, you can select if the mirrors fold in
automatically when you lock the vehicle
9 page28.
42
Front passenge r's exterior mirror tilt
function *
To help you see the cur b when backing into a
parking space, the surface of the m irror tilts
slight ly. For this to happen, the knob must be in
the position for the front passenger's outside
mir ror .
You can adjust the tilted mirror s urface by turn
i ng the knob in the desired direct ion. When you
move out of reverse and into another gear, the
new m irror position is stored and assigned to the
key you are using.
The m irror goes back into its or ig inal pos ition
once you drive forward faster than 9 mp h
(15 km/h) or turn the ignition off .
,&. WARNING
Curved mirror surfaces (convex) e nla rge the
field of vision. Howeve r, they make objec ts in
the m irror appear s maller and fart he r aw ay.
Your may estima te inc orrec tly when yo u use
these m irrors to ga uge you r distan ce from the
vehicles behind you w hen changing la nes ,
which increases the risk of an accident.
(D Note
If th e mir ror h ousing w as move d by o utsid e
forces (such as an imp act when ma neuver
i ng), you must use the power fo lding funct ion
to fo ld the m irror all the way out. The m irror
h ousing must not be moved back into place
by hand because this would impair the func
tion o f the m irro r mechan ism.
(D Tips
If the power ad justing function ma lfunctions ,
the glass in both m irrors can be adjusted by
pressing on t he edge of it by hand.
-
Page 50 of 314
Seats and storage
Center armrest
Applies to: vehicles with center armrest
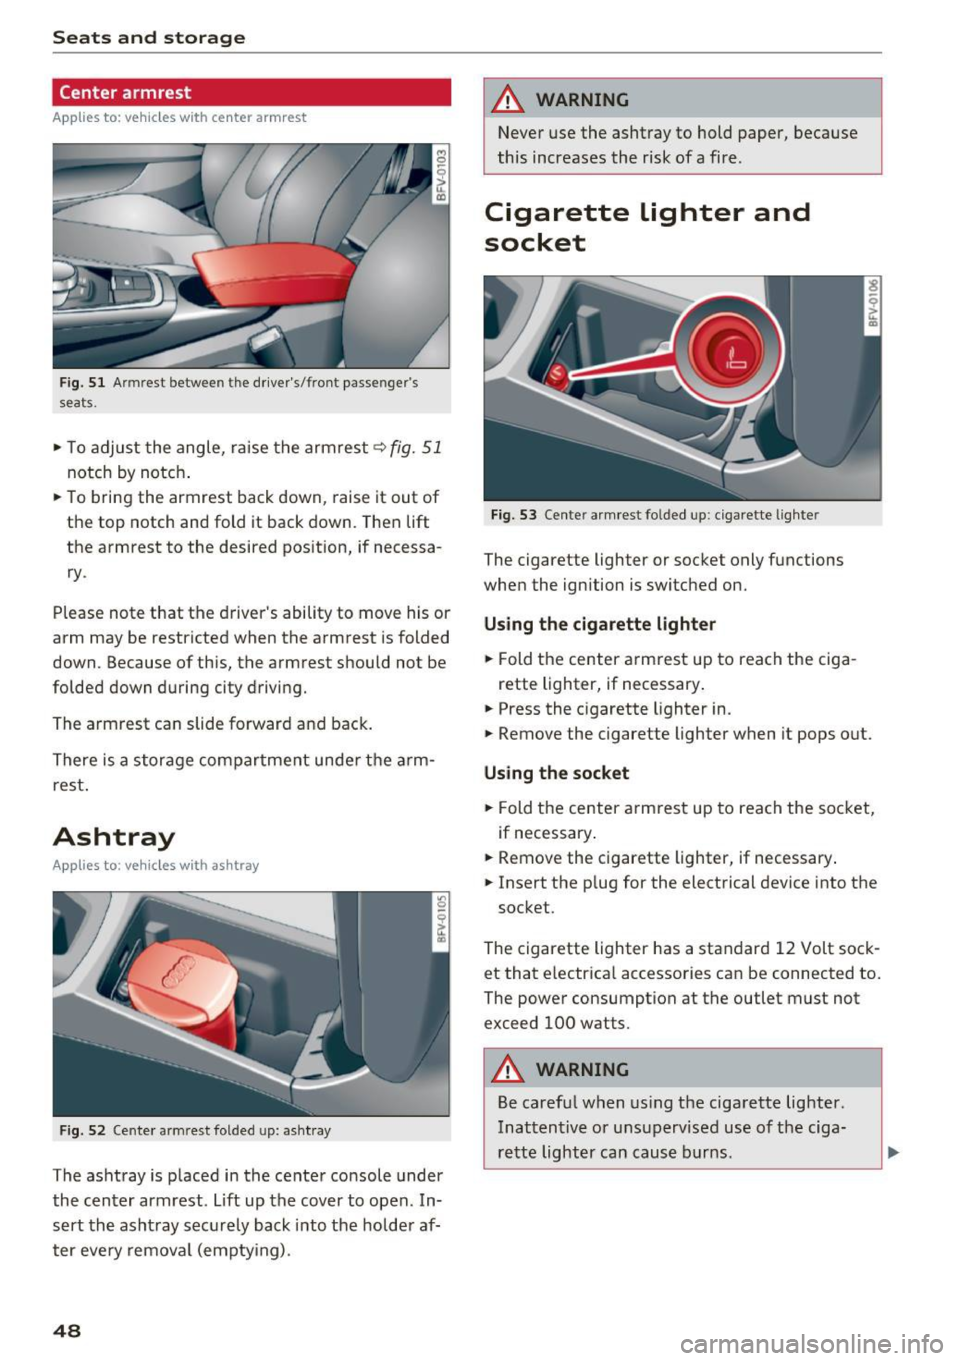
Fig. 51 Armrest between the driver's/front passenger's
seats.
,.. To adjust the angle, raise the armrest q fig. 51
notch by notch .
,.. To bring the armrest back down, raise it out of
the top notch and fold it back down. Then lift
the armrest to the desired pos ition, if necessa
ry .
Please note that the d river 's ability to move his or
arm may be restricted when the armrest is folded
down. Because of this, the armrest should not be
folded down during city driving.
The armrest can slide forward and back.
There is a storage compartment under the arm
rest .
Ashtray
Applies to : vehicles with ashtray
Fig . 52 Cente r armrest folded up: asht ray
The ashtray is p laced in the center console under
the center armrest. Lift up the cover to open . In
sert the asht ray securely back into the hold er af
ter eve ry removal (emptying) .
48
A WARNING
Never use the ashtray to hold paper, because
this increases the risk of a fire .
Cigarette lighter and
socket
Fig. 53 Center armrest folded up: cigarette lighter
The cigarette lighter or socket only functions
when the ignition is switched on.
Using the cigarette lighter
,.. Fold the center armrest up to reach the ciga-
rette lighter, if necessary .
,.. Press the cigarette lighter in.
,.. Remove the cigarette lighter when it pops out.
Using the socket
,.. Fold the center armrest up to reach the socket,
if necessary .
,.. Remove the c igarette lighter, if necessary .
,.. Insert the p lug for the electrical device into the
socket.
The cigarette lighter has a standard 12 Volt sock et that electrica l accessories can be connected to.
The power consumption at the outlet must not
exceed 100 watts.
A WARNING
Be careful when using the cigarette lighter.
Inattentive or unsupervised use of the ciga
rette lighter can cause burns .
-
Page 61 of 314
CD
CD
.... N
" N ...... 0 r--. V, co
Steering
Adjusting the steering wheel position
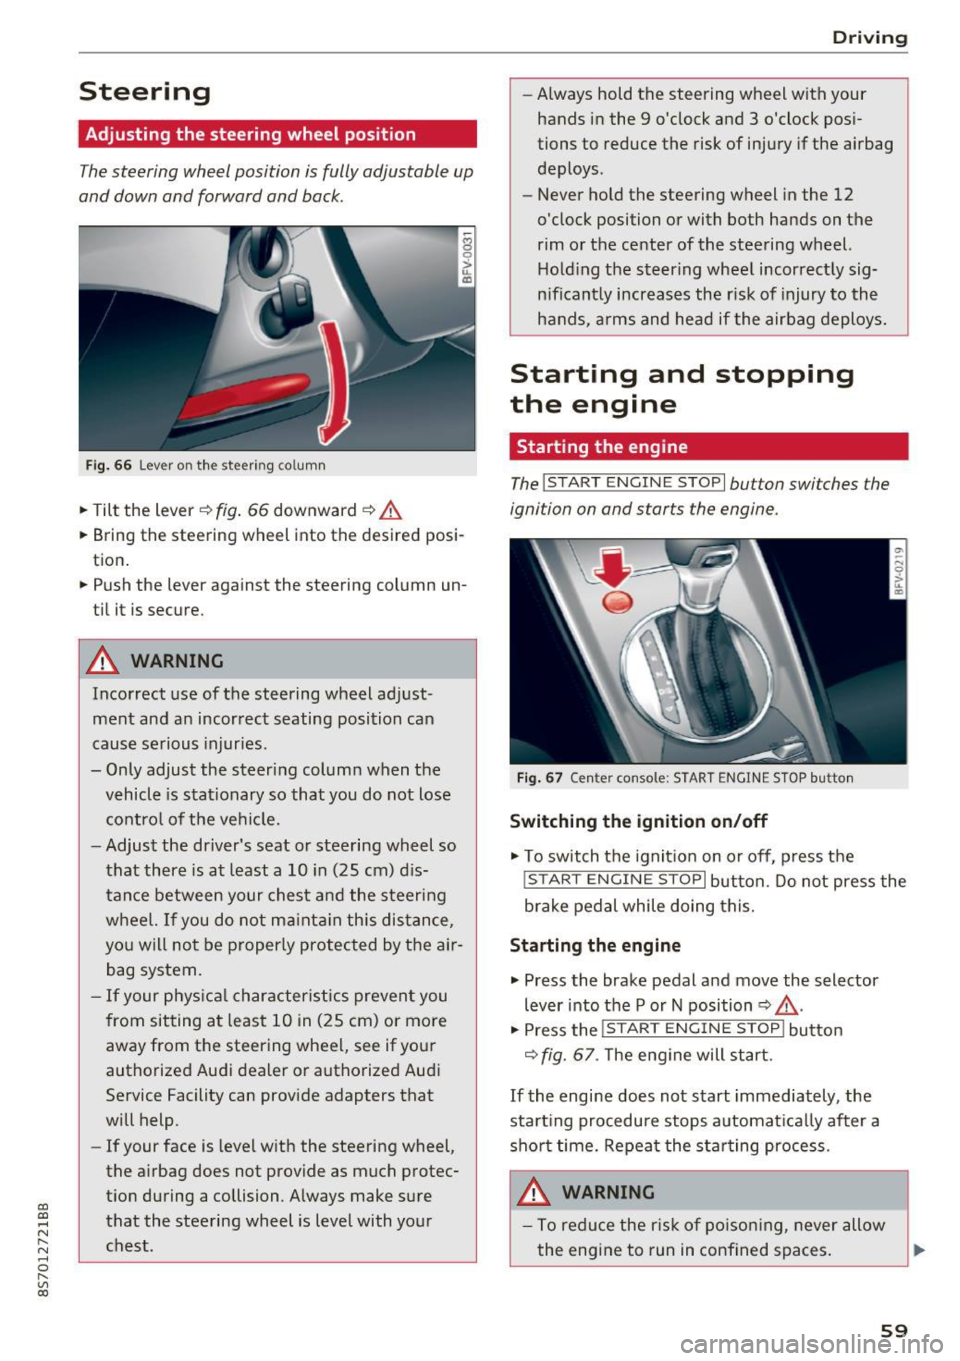
The steering wheel position is fully adjustable up
and down and forward and back.
Fig . 6 6 Lever on th e steering column
... Tilt the lever c:::> fig . 66 downward c:::> A
... Bring the steering wheel into the desired posi
tion .
... Push the lever against the steering column un
t il it is secure.
A WARNING
Incorrect use of the steering wheel adj ust
ment and an incorrect seating posi tion can
cause se rious injuries.
- Only adjust the steering column when the vehicle is stat ionary so that you do not lose
cont ro l of the ve hicl e.
- Adjust the dr iver's seat or steering wheel so
that there is at least a 10 in (25 cm) d is
t an ce betwee n your chest a nd the s teering
w heel. If you d o not m aint ain this dis tance,
yo u will no t be proper ly protected by the a ir
bag system.
- If your phys ic al characteris tic s preven t you
from sit ting at least 10 in ( 25 cm) or mo re
away from the steering wheel, see if yo ur
authorized Audi dealer or autho rized Audi
Service Facility can prov ide adapters that
will help.
- If your face is level with the steering wheel,
the a irbag does not provide as much protec
t io n during a collision. A lways make s ure
that the steering wheel is level with you r
chest.
D rivi ng
-Always hold the steering wheel with your
hands in the 9 o'clock and 3 o'clock pos i
tions to reduce the risk of injury if the airbag
deploys.
- Never hold the steering wheel in the 12
o'clock position or with both hands on the
rim or the center of the stee ring wheel.
H old ing the steer ing whee l incorrect ly sig
n ificant ly increases the r isk of injury to the
hands, a rms and head if the airbag deploys.
Starting and stopping
the engine
Starting the engine
The ! S TART ENGINE STOPI button switches the
ignition on and starts the engine .
Fig . 67 Center console: START ENGINE STOP b utto n
Switching the ignition on /off
... To switch t he ignit io n on or off, press t he
!START ENGINE STOPI but ton. Do not press the
brake pedal while doing this.
Starting the engine
... Press the brake pedal a nd move the selector
lever into the P or N position
c:::> ,&. .
... Press the !START ENGINE STOP I butto n
<=:> fig. 67 . The eng ine will start.
If the engine does not start immediately, the
sta rt ing procedure stops automa tica lly after a
sho rt time. Repea t the s ta rt ing process .
A WARNING
-To redu ce the r is k of poiso ning, never allow
the eng ine to run in confined spaces.
59
Page 81 of 314
co
co
.... N
" N .... 0
" "' c:o
Switching on and off
Applies to: vehicles with Audi side assist
The system ca n be switched on/off in the Info
t a in men t system.
"' Select in the Info tainment sys tem:
iM ENUI but
ton
> Vehicle > left contro l butto n >Driver as
sistan ce > Audi side assist
If the system is activated, the displays in the ex
ter io r mir rors wi ll turn o n briefly when the ig ni
tion is sw itched on.
Adjusting the display brightness
Applies to: vehicles with Audi side assist
The display brightness can be adjusted in the In
fotainm ent system.
"' Se lect in the Infotainment system: i MENU I but
ton
> Vehicle > left contro l butto n >Driver as
sistance > Audi side assist
The display b rightness ad justs automat ica lly to
the br ightness of the s urrou ndings, both in the
in fo rmat ion and in the warning stage . In very
da rk or ve ry br igh t sur ro u ndings, the a utomat ic
ad ju st men t will se t th e d isp lay to the mini mum
or maxim um level. In s uch cases , you m ay no tice
no change w hen adjus ting t he br ightness, o r th e
change may on ly be no tic eable o nce the su r
ro undings change .
A dju st the br ightn ess to a level where the d isp lay
i n the inform ation stage wi ll no t di srupt your
v iew ahead. If you change the brightness, the dis
p lay in the exter ior mir ror will briefly show the
b rightness level i n the information stage . The
b rightness of the warning stage is linked to the
b rightness in t he info rmat ion stage and is ad just
ed along w ith the information stage .
- Side assist is not active wh ile you are ma k
i ng the ad justment.
- Your settings are automatically stored and ass igned to the remote cont rol key being
used.
Assist
Messages
Applies to: vehicles with Audi side assist
I f the s ide ass is t swi tches off automat ically, a
mess age app ear s in t he In fota in men t sys tem dis
play.
@j Audi side assist: currently unavailable.
Sensor vision restricted due to surroundings.
See owner 's manual
The radar sensors ' v is ion is affected. Do not cover
the a rea in front of the sensors with bike whee ls,
stickers, dirt or other objects. Clean the area in
front of the sensors, if necessary
q page 77,
fig. 84.
@j Audi side a ssist: currently unavailable.
See owner's manual
S ide assist cannot be switched on at this time be
ca use there is a ma lfu nction ( for example, the
battery c harge leve l may be too low) .
@j Audi side assist: malfunction! Please
contact Service
The system cannot guarantee that it will detect
vehicles cor rect ly and it has switc hed off. The
senso rs have been move d or are fa ulty. Have the
syste m chec ked by an au tho riz ed Au di deale r or
a uthor iz e d Au di S ervice Faci lity s oon.
Audi drive select (drive
settings)
Introduction
Applies to: vehicles with Audi drive select
Dr ive select ma kes it possib le to e xper ience dif
fere nt types of ve hicl e sett ings in one ve hicle.
T he driver can sele ct from th ree mo des,
Comfort ,
Auto
and Dynamic , using the r.~;\,1 bu tton in the
center console o r by using the Infotainment sys
tem. This allows you to switch between a sporty
and a comfo rtable driv ing mode, fo r example. In
t h e
Individual mode, the sett ings can be ad just
ed to yo ur persona l pre ferences . This makes it
poss ible to com bine settings such as a sporty en-
gine sett ing wi th light s teer ing. .,._
79
Page 86 of 314
Parking systems
Switching on /off
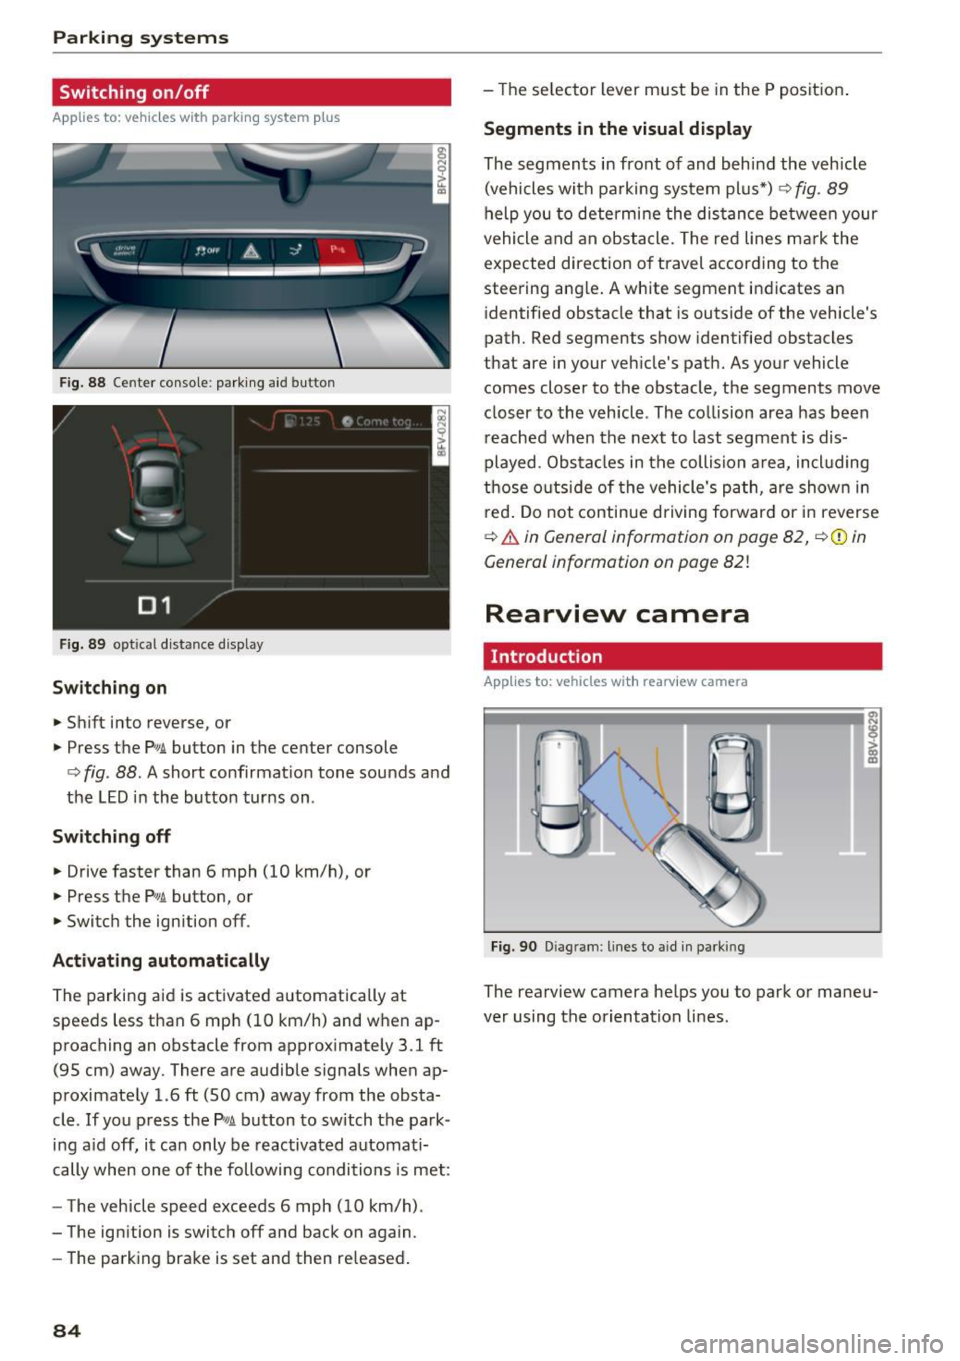
Applies to: ve hicles w ith park ing system p lus
F ig. 88 Center console : park ing aid button
Fig . 89 optical d istance display
Switching on
.,. Shift into reverse, or
.,. Press the
Pw.A. button in the center console
c:> fig. 88. A short confirmat ion tone sounds and
the LED in the button turns on.
Switch ing off
.,. Drive faster than 6 mph (10 km/h), or
.,. Press the
p,,,A button, or
.,. Switch the ignition off .
Activating automatically
The parking aid is activated automatically at
speeds less than 6 mph (10 km/h) and when ap
proaching an obstacle from approximately 3.1 ft
(95 cm) away. There are audible signals when ap
proximately 1.6
ft (SO cm) away from the obsta
cle .
If you press the p,,1~ button to sw itch the park
ing a id off, it can only be reactivated automati
cally when one of the following conditions is met :
- The vehicle speed exceeds 6 mph (10 km/h).
- The ignition is switch off and back on again .
- The parking brake is set and then re leased .
84
-Th e selector lever must be in the P position .
Segments in the visual display
The segments in front of and behind the vehicle
(vehicles with parking system plus*)
9 fig. 89
help you to determine the distance between your
vehicle and an obstacle. The red lines mark the
expected direction of travel according to the
steering ang le. A white segment indicates an
identified obstacle that is outside of the vehicle's
path. Red segments show identified obstacles
that are in your veh icle's path. As your vehicle
comes closer to the obstacle, the segments
move
closer to the vehicle . The collision area has been
reached when the next to last segment is dis
played . Obstacles in the collision a rea, incl uding
those outside of the vehicle 's path, are show n in
r ed . Do not continue driving forward or in reverse
c:> & in General information on page 82, ¢(D in
General information on page
82!
Rearview camera
Introduct ion
App lies to: vehicles wit h rearv iew camera
Fig. 90 Diag ram : lines to aid in park ing
The rearview camera helps you to park or maneu
ver using the orientation lines .
Page 87 of 314
CD
CD
.... N
" N .... 0 r--. V, co
General information
Applies to: vehicles with rearview camera
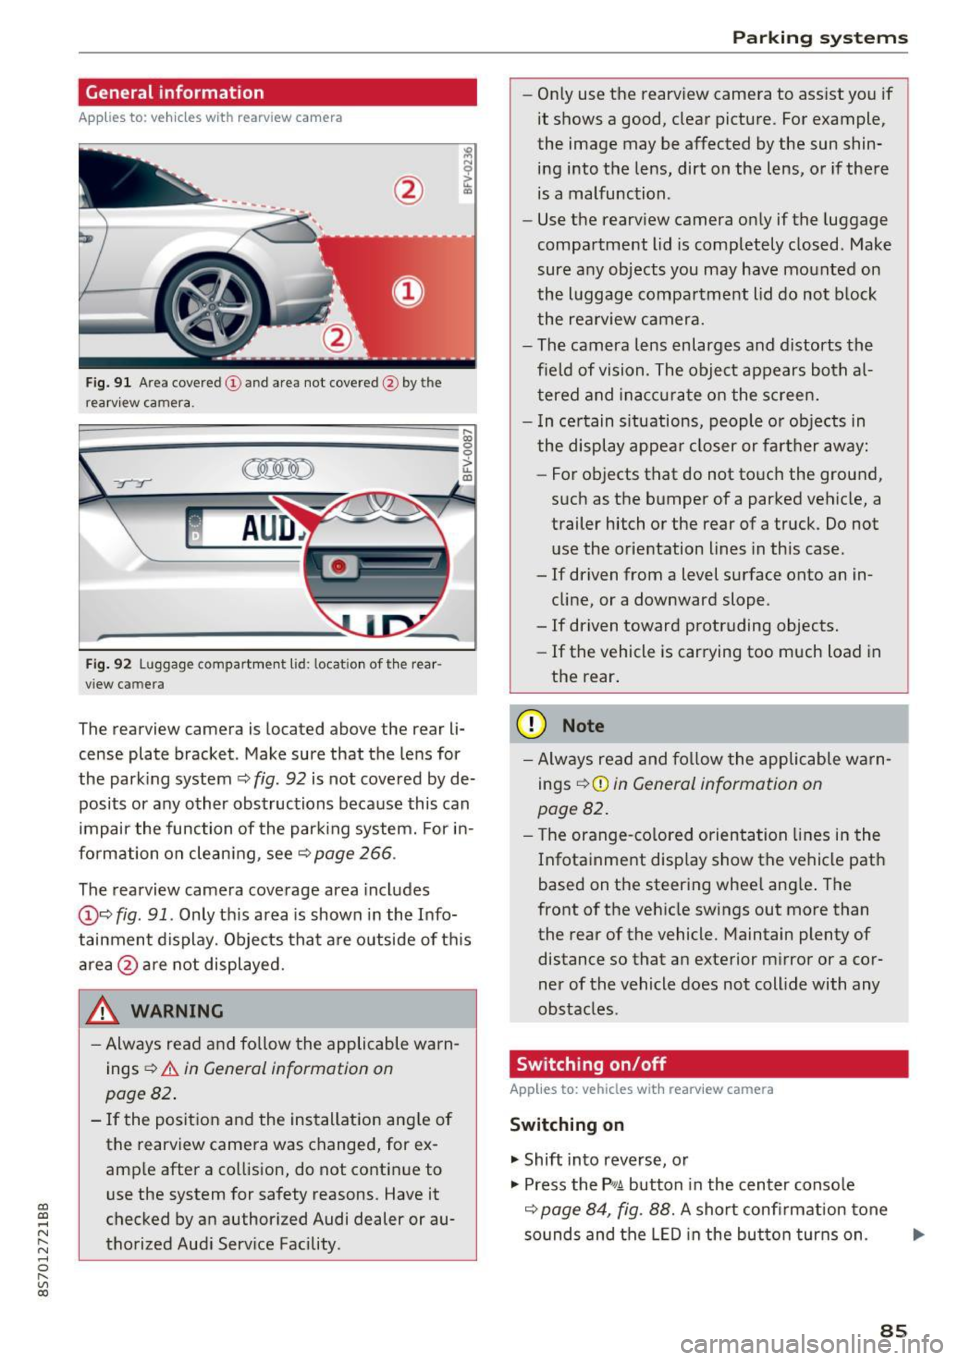
Fig. 9 1 Are a co vered (!) and a rea not cove red @ bythe
r earv iew ca mera.
~
~ ;..------ ::.·~- ,.,.~ _.,- ,,,_-------- g
(Jo00oD ~
Fig. 92 Luggage compartme nt lid: locat io n of t he rear
view c amera
The rearview camera is located above the rear li
cense plate bracket. Make sure that the lens for
the park ing system ~
fig. 92 is not covered by de
posits or any other obstructions because this can
i mpair the function of the par king system. For in
formation on clean ing, see ~
page 266 .
The rearview camera coverage area includes
@ ~ fig . 91 . Only th is area is shown in the Info
tainment display. Objects tha t are outside of th is
area @are no t displayed.
A WARNING
- Always read and fo llow the applicable warn
ings
~ A in General information on
page 82 .
- If the position and the installation ang le of
the rearview camera was changed, for ex
amp le after a collision , do not continue to
use the system for safety reasons. Have it
checked by an authorized Audi dealer or au
thorized Aud i Serv ice Facility .
Parking systems
-On ly use the rearv iew camera to ass ist you if
it shows a good, clear pictu re. For example,
the image may be affected by the sun shin
ing i nto the lens, dirt on the lens, or if there
is a malfunction .
- Use the rearv iew camera on ly if the luggage
compa rtment lid is completely closed . Make
sure any objects you may have mounted on
the l uggage compa rtment lid do not b lock
the rea rview camera.
- The camera lens enlarges and d istorts the
field of vision. The object appears both a l
t ered and ina ccur ate on the s creen.
- I n ce rtain s itu ations, people or objects in
the display appea r closer or fa rther away:
- For objects t hat do not touc h the grou nd,
such as the bumper of a parked vehicle, a
trailer hitch or the rear of a truck . Do not
u se the orie ntation lines in this case .
- If driven from a level s urface onto an in
cline, or a downward slope .
- If driven toward protruding objects.
- If the vehicle is carrying too much load in
the rear.
(D Note
-Alw ays read and fo llow the applicable w arn
ings
¢ (D in General information on
page 82 .
- The orange-co lored orientation lines in the
Infotainment display show the vehicle path
based on the steering wheel ang le . The
front o f the vehicle swings out more than
the rear of the vehicle. Maintain plenty of distance so that a n exterior m irror or a cor
ner of the vehicle does not coll ide with any
obstacles.
Switching on/off
Applies to: vehicles with rearview camera
Switching on
.. Shift into reverse, or
.. Press the
P,qA button in the center console
~ page 84, fig. 88. A short confi rmation tone
so unds and the LED in the bu tton tur ns on . ...
85
Page 91 of 314
CD
CD
.... N
" N ...... 0 r--. V, co
Intelligent Technology
Switching on and off
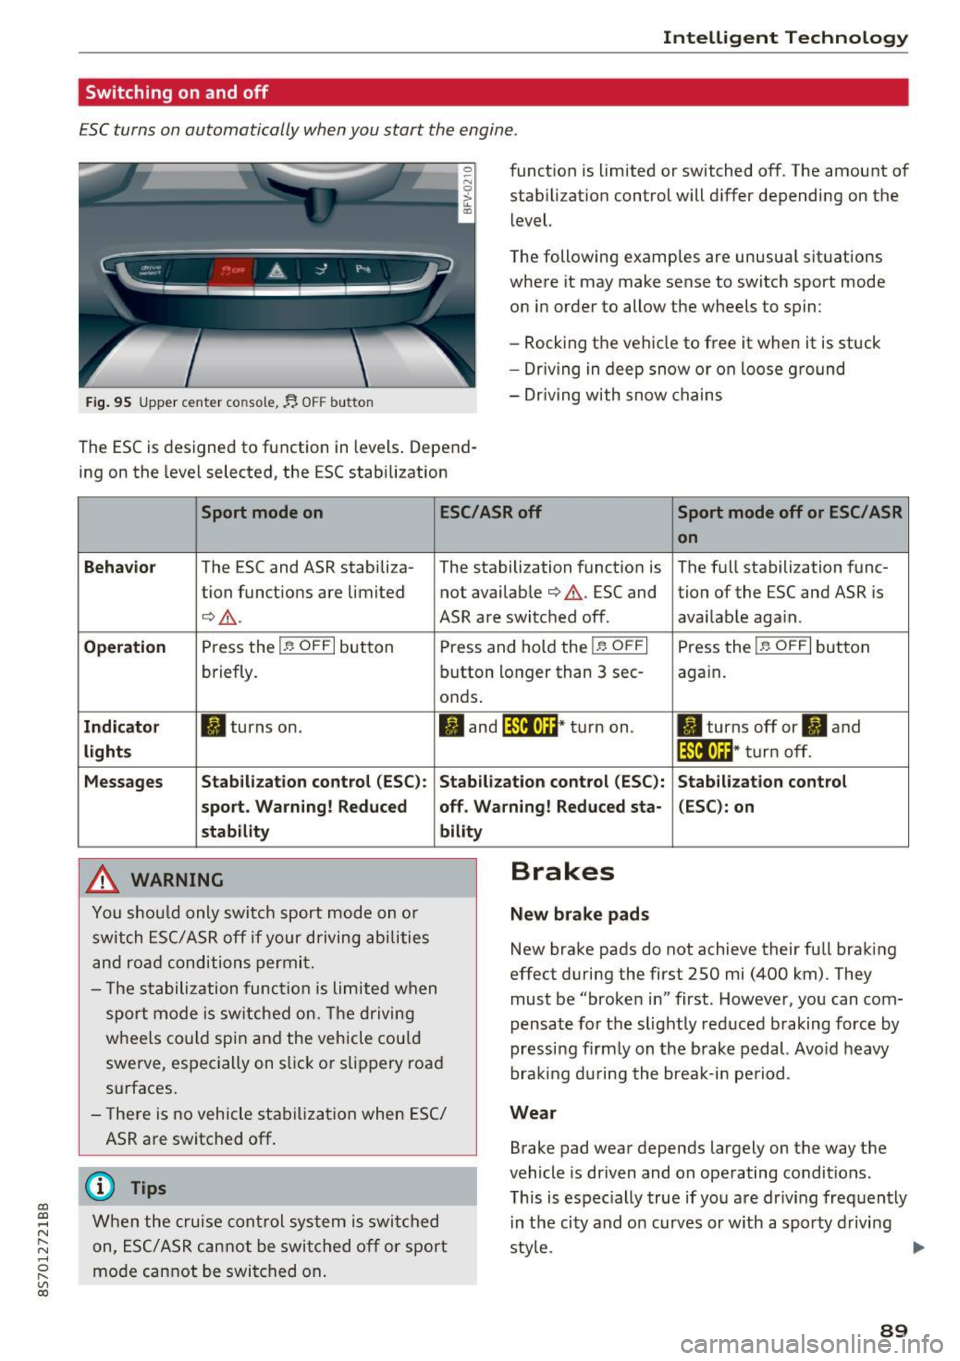
ESC turns on automatically when you start the engine.
Fig. 95 Upper center console, fj. OFF b utton
The ESC is designed to function in levels . Depend
ing on the level selected, the ESC stabilization funct
ion is limited or switched off. The amount of
stab ilizat ion control will d iffer depending on the
level.
T he following examples are unusua l situat ions
where it may make sense to switch sport mode
o n in order to allow the wheels to spin:
- Rocking the vehicle to free it when it is stuck
- Dr iving in deep snow or on loose g round
- Dr iving with snow chains
Sport mode on ESC/ASR off Sport mode off or ESC/ ASR
on
Behavio r
The ESC and ASR stabiliza- The stabilization funct ion is The f ull stabilization func-
tion funct ions are limited not availab le
¢ .&. . ESC and tion of the ESC and ASR is
¢ .&.. ASR are switched off. availab le aga in.
Operation Press the l.e OFFI but ton Press and hold the l.e OFFI Press the l .e OFFI but ton
briefly. button longer than 3 sec- aga in .
onds .
Indicator II turns on. II and l*JJ•U~* tu rn on. II turns off or II and
liil•IH * tu rn off. light s
Messages Stab
ilization control (ESC ): Stab ilization con trol (ESC ): Stab ilization cont rol
sport . Warning! Reduced off. Wa rning! Reduced sta -(ESC): on
stability
A WARNING
Y ou shou ld only swit ch spo rt m ode on or
switch ESC/ ASR off if your driving ab ilities
a n d roa d conditions permi t.
bility
- T he s tabiliz ation func tion is li mite d when
s por t mode is sw itched on. The driving
whee ls co uld spi n and the vehicle cou ld
swerve, espec ially on s lick or s lippery roa d
surfaces.
- There is no vehicle stabi lization when ESC/
ASR are switched off.
(D Tips
Wh en the cruise cont rol sys tem is swi tched
on, ESC/ ASR can not be swi tched o ff or sport
mo de can not be swit ched on .
Brakes
New brake pads
New brake pads do not achieve their fu ll braking
effect duri ng the first 250 mi (400 km) . They
must be "broke n in" first. Howeve r, you can com
pensate fo r th e slightly reduced braking force by
pressing f irm ly on the b rake pedal. Avo id heavy
bra king d urin g the brea k-in pe riod .
Wear
Brake pad wear depends largely on the way the
vehicle is driven and on operating conditions.
T his is espec ially true if yo u are dr iv ing freq uently
in t he ci ty and o n curves or w ith a spo rty d rivi ng
sty le.
IJI,,
89
Page 164 of 314
Media
@ Tips
-Depending on the Internet connection and
network traffic, a connection loss can occur
during p layback of on line media serv ices.
- Online media and Internet radio usage de·
pends on the service avai lability of the third
party provider.
- Audi AG simply makes the access to online
media serv ices possible th rough the MMI
and does not take any respons ibility for the
contents of the online med ia services.
- Always read the chapter <=>page 133, About
Audi connect.
- Depending on the mobile device used, the re
may be interrupt ions during media playback
and when using the
Audi MMI connect app .
To avoid interruptions when usi ng a mob ile
d evice, do not loc k the sc reen on yo ur mo
bile devi ce and keep the
Audi MMI connect
a pp in the foreground.
- Contact you r authorized Audi dea ler or au
thorized Audi Se rvice F acili ty for a ddi tional
i n format io n a bout o n line medi a.
Multimedia connections
USB adapter for Audi music interface or
USB charging port
Depending on the vehicle equipment , you can
connect your mobile devices (such as a smart
phone or MP3 player) to the Audi music interface
or a USB charging port using a special USB
adapter.
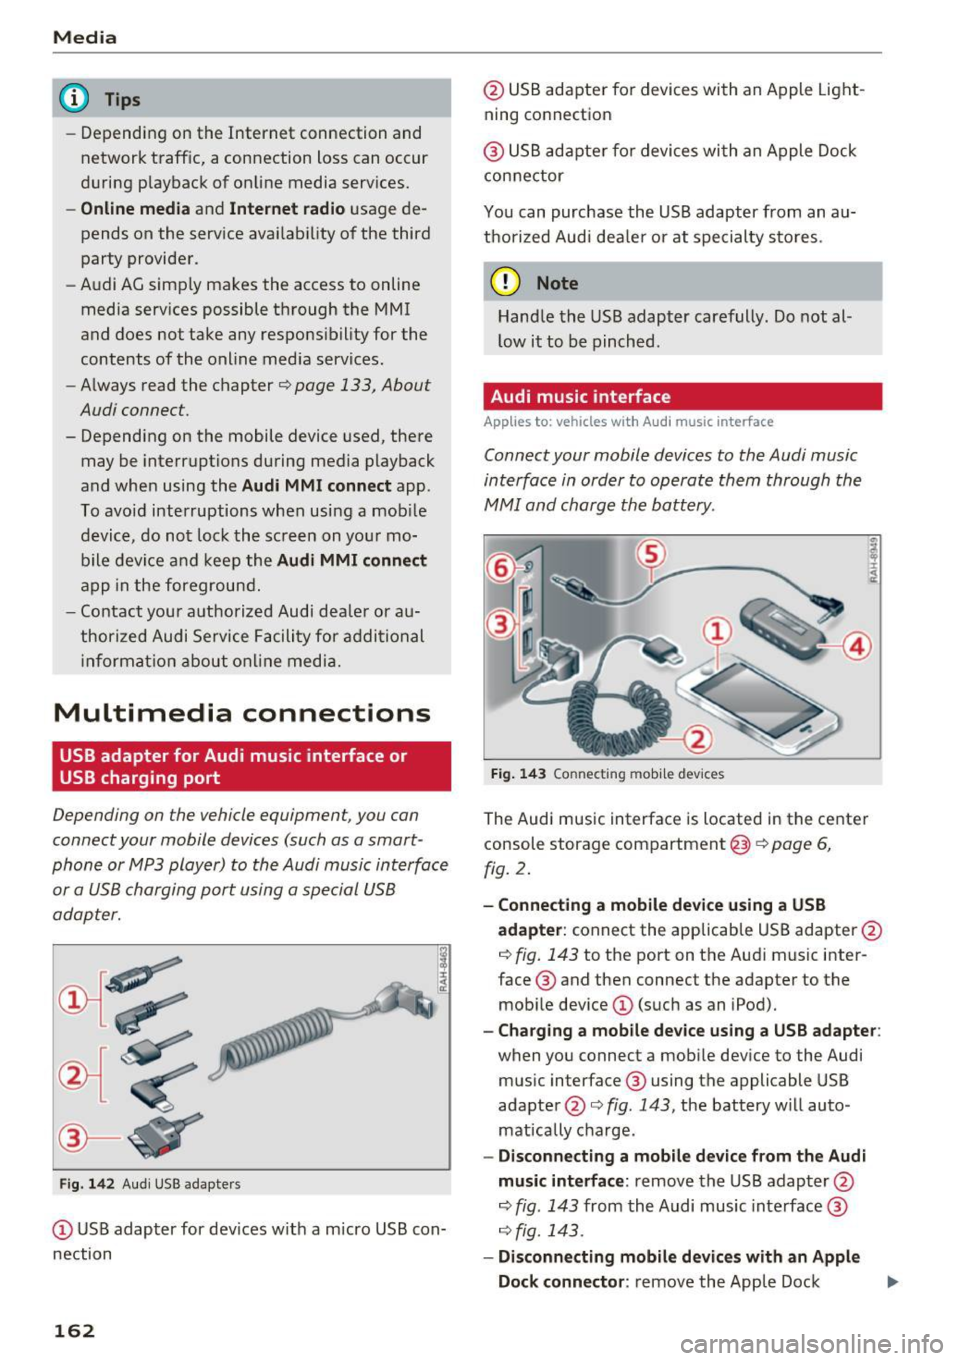
Fig . 14 2 Aud i USS ada pte rs
CD US B adapter for dev ices w it h a m icro USB con
nection
162
@ USB adapte r fo r devi ces wi th an Apple Light
ning connection
@ USB ad ap ter fo r devices wi th an Apple Dock
con nector
You can purchase the USB adapter from an au
tho rized Audi dea ler or at specialty s to res.
(D Note
Hand le the USB adapter carefully. Do not al
l ow it to be pinched .
Audi music interface
Applies to: vehicles with Aud i music interface
Connect your mobile devices to the Audi music
interface in order to operate them through the
MMI and charge the battery.
Fi g. 14 3 Connect ing mob ile devic es
The Audi music interface is located in the center
console storage compartment @
~ page 6,
fig. 2.
- Connecting a mobile device using a USB
adapter :
connect the applicab le USB adapter @
c:!) fig. 143 to the port on the Audi music inter
face ® and then connect the adapter to the
mob ile dev ice
CD (suc h as an iPod).
- Charging a mobile device using a USB adapter :
when you connect a mobile device to the Audi
mus ic interface ® using the applicable USB
adapter @<=> fig . 143 , the battery w ill auto
mat ically cha rge.
- Disconnecting a mobile d evice from the Audi
music interface :
remove the USB adapter @
<=> fig . 143 from the Audi music interface ®
r=;, fig. 143.
-Disconn ecting mobile devices with an Apple
Dock connecto r:
remove the Apple Dock .,..
Page 299 of 314
co
co
.... N
" N .... 0
" "' c:o
A
A/C (climate control system) . . . . . . . . . . . . . 53
Accessories . . . . . . . . . . . . . . . . . . . . . . . . . . 295
Active lane assist . . . . . . . . . . . . . . . . . . . . . . 7 4
Activating vibration warning . . . . . . . . . . . .
76
Adjusting steering time . . . . . . . . . . . . . . . . 76
Cleaning the camera area . . . . . . . . . . . . . 267
Indicator light . . . . . . . . . . . . . . . . . . . . . . . 75
Messages . . . . . . . . . . . . . . . . . . . . . . . . . . . 75
Switching on/off . . . . . . . . . . . . . . . . . . . . . 75
Adaptive dampers . . . . . . . . . . . . . . . . . . . . . . 80
Adaptive light . . . . . . . . . . . . . . . . . . . . . . . . . 80
Adapt ive light (indicator light) . . . . . . . . . . . 16
Additional phone ............ .. .. . 115, 176
Adjusting a ir distribution (Cl imate control sys-
tem) . . . . . . . . . . . . . . . . . . . . . . . . . . . . . . . .
53
Adjusting the air vents . . . . . . . . . . . . . . . . . . 54
Adjusting the center console lighting . . . . . . 42
Adjusting the sound . . . . . . . . . . . . . . . . . . . 179
Adjusting the temperature (climate control
system) . . . . . . . . . . . . . . . . . . . . . . . . . . . . . .
53
Advanced Airbag System
Children . . . . . . . . . . . . . . . . . . . . . . . . . . . 220
Componen ts . . . . . . . . . . . . . . . . . . . . . . . .
203
Front airbags . . . . . . . . . . . . . . . . . . . . . . . 201
How the components work together . . . . 204
Airbag . . . . . . . . . . . . . . . . . . . . . . . . . . . . . . 196
Indicator light . . . . . . . . . . . . . . . . . . . . . . . 14
Airbag system . . . . . . . . . . . . . . . . . . . . . . . . 215
Advanced Airbag-System . . . . . . . . . . . . . . 200
Care . . . . . . . . . . . . . . . . . . . . . . . . . . . . . . 210
Child restraints . . . . . . . . . . . . . . . . . . . . . 220
Components (front airbags) . . . . . . . . . . . 203
Danger of fitting a child safety seat on the
front passenger seat . . . . . . . . . . . . . . . . .
197
Disposal . . . . . . . . . . . . . . . . . . . . . . . . . . . 210
Front airbags . . . . . . . . . . . . . . . . . . . . . . . 200
H ow do the front airbags work? . . . . . . . . 205
H ow many airbags does my vehicle have? 203
Important information . . . . . . . . . . . . . . . 196
Important safety instructions on the knee
airbag system ................. ..... .
213
Knee airbags. ....................... 212
Monitoring . . . . . . . . . . . . . . . . . . . . . . . . . 207
PASSENGER AIR BAG light . . . . . . . . . . . . 208
Repairs ... . .. .. ............. .. .. .. . 210
Safety instructions . . . . . . . . . . . . . . . . . . . 209
Index
Side airbags . . . . . . . . . . . . . . . . . . . . . . . . 214
Warning/Indicator lights . . . . . . . . . . . . . 207
When must the system be inspected? . . . 207
Alarm system
refer to Anti-theft alarm system . . . . . . 24, 29
Alignment pin (changing the wheel) . . . . . . 272
All season tires . . . . . . . . . . . . . . . . . . . . . . . 260
All weather lights . . . . . . . . . . . . . . . . . . . . . . 39
All wheel drive . . . . . . . . . . . . . . . . . . . . . . . . 91
Alternative routes .. .. ................. 143
Ambient lighting . . . . . . . . . . . . . . . . . . . . . . 41
AMI
refer to Audi music interface . . . . . . . . . . . 162
Android Auto
refer to Audi smartphone interface
Announcements (settings)
refer to Voice guidance ........... .. . .
Anti-freeze
173
143
Windshield washer system . . . . . . . . . . . . 244
Anti-lock braking system (ABS) . . . . . . . . . . . 88
Anti-s lip regulat ion . . . . . . . . . . . . . . . . . . . . 88
Anti-theft alarm system . . . . . . . . . . . . . . . . . 29
Apple CarPlay
refer to Audi smartphone interface . . . . . 173
Armrest .......... .. .................. 48
Ashtray . . . . . . . . . . . . . . . . . . . . . . . . . . . . . . 48
Aspect rat io (video) . . . . . . . . . . . . . . . . . . .
167
Audi connect . . . . . . . . . . . . . . . . . . . . . . . . . 127
Data connection . . . . . . . . . . . . . . . . . . . . . 132
Data protection . . . . . . . . . . . . . . . . . . . . . 134
Services (overview) . . . . . . . . . . . . . . . . . . 129
Setup . . . . . . . . . . . . . . . . . . . . . . . . . . . . . 127
Audi magnetic ride
refer to Adaptive dampers . . . . . . . . . . . . . 80
Audi music interface . . . . . . . . . . . . . . . . . . . 162
Audi music stream
refer to W i- Fi . . . . . . . . . . . . . . . . . . . . . . . 160
Audio files . . . . . . . . . . . . . . . . . . . . . . . . . . . 164
Audio player
Bluetooth audio player . . . . . . . . . . . . . . .
159
Wi-Fi aud io player . . . . . . . . . . . . . . . . . . . 160
Audio track . . . . . . . . . . . . . . . . . . . . . . . . . . 167
Audi Service Repair Manuals and Literature 293
Audi smartphone interface ......... 173, 177
Audi virtual cockpit (instrument cluster) . . . . 8
297