alarm AUDI TT ROADSTER 2018 Owners Manual
[x] Cancel search | Manufacturer: AUDI, Model Year: 2018, Model line: TT ROADSTER, Model: AUDI TT ROADSTER 2018Pages: 310, PDF Size: 46.95 MB
Page 26 of 310
Opening and closing
LED and batteries in the remote control key
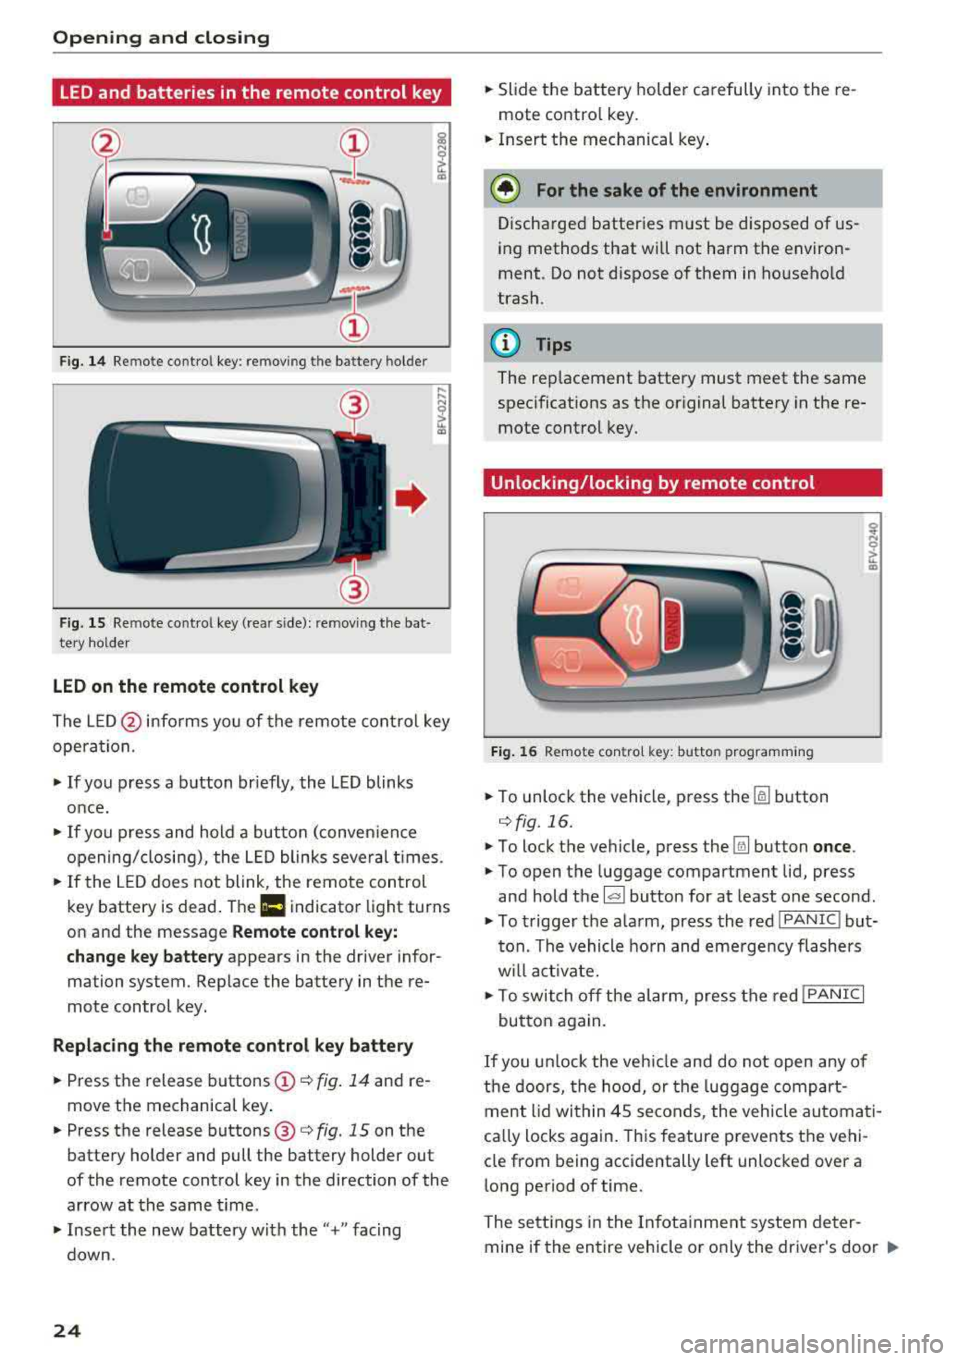
Fig. 14 Remote control key: removing the battery holder
Fig. 15 Re mote control key (rear side): removing the bat·
tery holder
LED on the remote control key
The L E D @ informs you of the remote control key
opera tion.
~ If you press a button briefly, the LED blinks
once.
~ If you press and hold a button (conven ience
opening/closing), the LED blinks several times.
~ If the LED does not blink, the remote control
key battery is dead . The
Ill indicator light turns
on and the message
Remote control key:
change key battery
appears in the driver infor·
mation system. Replace the battery in the re
mote control key.
Replacing the remote control key battery
~ Press the release buttons (!)¢ fig. 14 and re
move the mechanical key .
~ Press the release buttons@¢ fig. 15 on the
battery holder and pull the battery holder out
of the remote control key in the direction of the
arrow at the same time.
~ Insert the new battery w ith the"+" facing
down.
24
~ Slide the battery holder carefully into the re
mote contro l key.
~ Insert the mechanical key .
@ For the sake of the environment
Discharged batteries must be disposed of us
ing methods that will not harm the environ
ment. Do not dispose of them in household
trash.
@ Tips
The rep lacement battery must meet the same
specifications as the original battery in the re
mote control key.
Unlocking/locking by remote control
Fig. 16 Remote contro l key: butto n programm ing
~ To unlock the vehicle, press the [§] button
c:> fig. 16.
~ To lock the vehicle, press the Ifill button once .
~ To open the luggage compartment lid, press
and hold the
l al button for at least one second.
~ To trigger the alarm, press the red IPANIC I but
ton. The vehicle horn and emergency flashers
w ill activate.
~ To switch off the alarm, press the red !PANIC I
button again.
If you unlock the vehicle and do not open any of
the doors, the hood, or the luggage compart
ment lid within 45 seconds, the vehicle automati
ca lly locks again. This feature prevents the vehi
cle from being accidentally left unlocked over a
long period of time.
The settings in the Infotainment system deter
mine if the entire vehicle or o nly the driver's door
..,_
Page 27 of 310
Cl 00 .-< N r-N .-< 0 r-Vl 00
is unlocked when unlocking the vehicle
<=> page 26.
A WARNING
No one, especially children, should stay in the
vehicle when it is locked from the outside, be
cause the windows can no longer be opened
from the inside <=> page
2 7. Locked doors
make it more difficult for emergency workers
to get into the vehicle, which puts lives at
risk.
(D Tips
- Only use the remote control key when you
are within view of the vehicle .
- Do not use the remote control when you are
inside the vehicle. Otherwise, you could un
intentionally lock the vehicle. If you then
tried to start the engine or open a door, the
alarm would be triggered. If this happens,
press the unlock
button @.
-The selector lever must be in the P position
on vehicles with a convenience key*; other
wise the vehicle will not lock.
- Only use the panic function in an emergen
cy.
Unlocking/locking with the convenience
key
Applies to: vehicles with convenience key
The doors and luggage compartment lid can be
unlocked/locked without using the remote con
trol key.
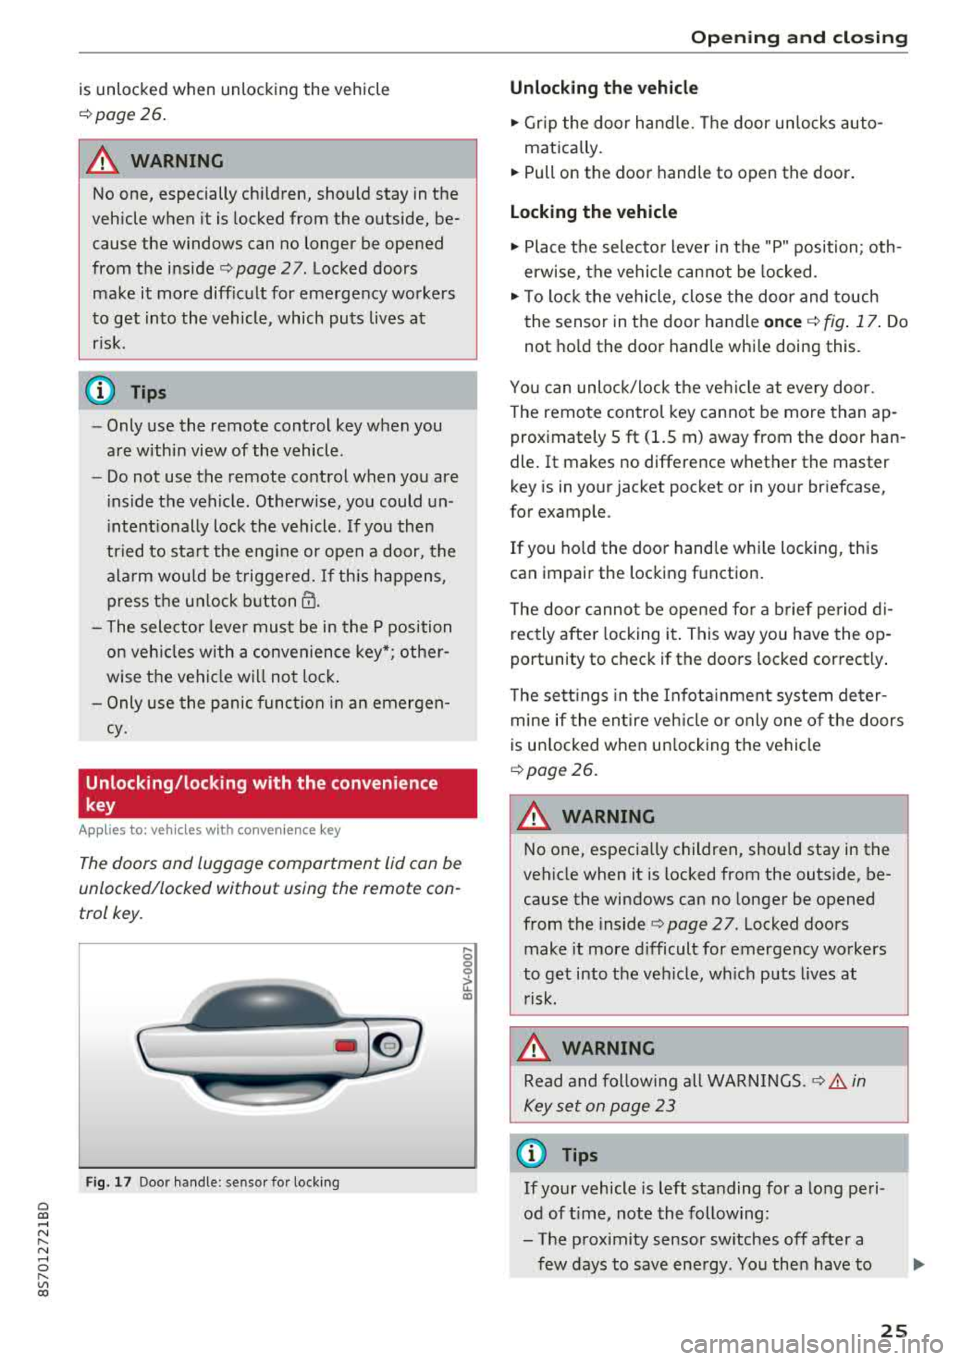
Fig. 17 Door handle : senso r for locking
,... 0
0
~ a:,
Opening and closing
Unlocking the vehicle
.,. Grip the door handle. The door unlocks auto-
matically.
.,. Pull on the door handle to open the door.
Locking the vehicle
.,. Place the selector lever in the "P" position; oth
erwise, the vehicle cannot be locked.
.,. To lock the vehicle, close the door and touch
the sensor in the door handle
once <=> fig. 17. Do
not hold the door handle while doing this.
You can unlock/lock the vehicle at every door.
Th e remote control key cannot be more than ap
proximately S ft
(1.5 m) away from the door han
dle. It makes no difference whether the master
key is in your jacket pocket or in your briefcase,
for example .
If you hold the door handle while locking, this
can impair the locking func tion .
The door cannot be opened for a brief period di
r ectly after locking i t. This way you have the op
portunity to check if the doors locked correctly.
The settings in the Infotainment system deter
mine if the entire vehicle or only one of the doors
is unlocked when unlocking the vehicle
¢page 26.
A WARNING ,..___ -
No one, especially children, should stay in the
vehicle when it is locked from the outside, be
cause the windows can no longer be opened
from the inside
¢page 27 . Locked doors
make it more difficult for emergency workers
to get into the vehicle, which puts lives at risk.
A WARNING
Read and following all WARNINGS .<=>.& in
Key set on page 23
(D Tips
If your vehicle is left standing for a long peri
od of time, note the following:
- The proximity sensor switches off after a
few days to save energy. You then have to
-
25
Page 29 of 310
Cl co ..... N ,....
N ...... 0
Fold mirrors* -if yo u se lec t On , the exterior rear
view mirrors fold in automatically when you press
the
[ml button on the remote cont rol key o r touch
the sensor* in the hand le.
Lo ck when driving1> -if you select On , the vehicle
l oc ks automatically when driving . A ll of the doors
and the luggage compa rtment lid lock.
Mechanically unlocking and locking the
doors
If the central locking fails , you mus t unlock/lock
t he doors separa tely.
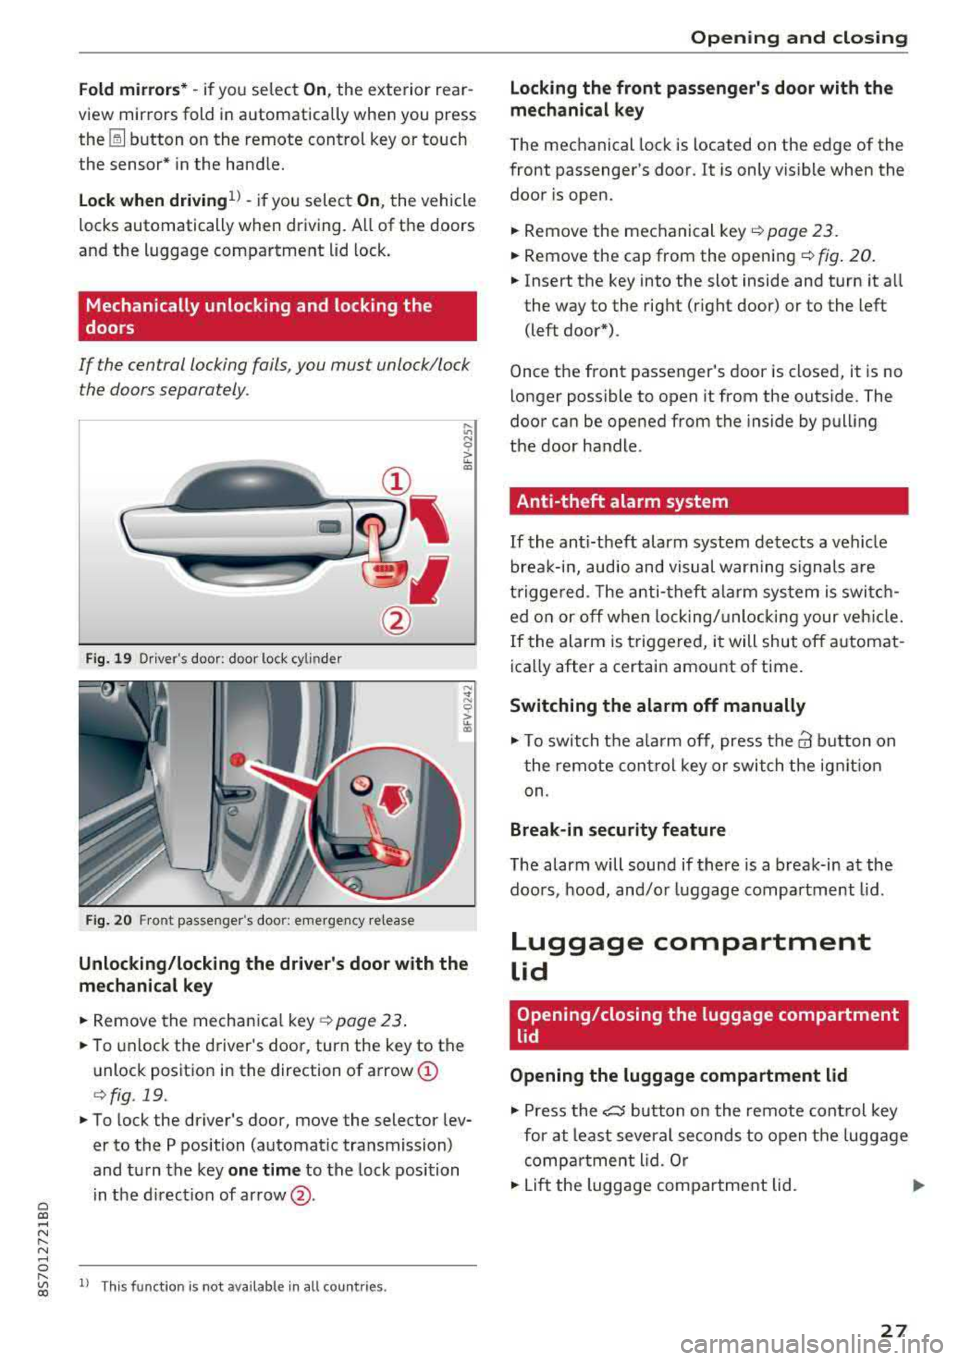
F ig. 19 Dr iver 's door: doo r loc k cy lin der
F ig. 20 Fro nt passenger 's doo r: e merge ncy re lease
Unlocking/locking the driver's door with the
mechanical key
.. Remove the mechan ica l key o:!> page 23 .
.. To unlock the driver's doo r, turn the key to the
unlock positio n in the direction of arrow
(I)
r=> fig . 19.
.. To lock the driver's door, move the selector lev
er to the P position (automat ic tra nsmission)
and tu rn the key
one t ime to the lock position
in the d irect ion of ar row @.
,....
"' l) Thi s fun ctio n is not avail able in al l coun tries. co
Opening and closing
Locking the front passenger's door with the
mechanical key
The mechanical lock is located on the edge of the
front passenger's door . It is only vis ible when the
door is open.
.. Remove the mechanical key .:!> page 23.
.. Remove the cap from the openi ng ¢ fig . 20 .
.. Insert the key into the slot inside and turn it a ll
the way to the right (r ight door) or to the left
(left door*).
Once the front passenger 's door is closed, it is no
longer possible to open it from the outs ide . The
door can be opened from the inside by pull ing
t h e door handle.
Anti-theft alarm system
If the anti-theft alarm system detects a vehicle
brea k-in, audio and visual warn ing signals are
t rigge red. The anti -theft a la rm sys tem is swi tc h
ed o n or off when lock ing/ unlo cki ng your ve hicle.
If the alarm is triggered, i t will shut off a utomat
ica lly after a certain amount of time.
Switching the alarm off manually
.,. To swit ch t he a la rm off, press t he@ b utton on
t he remote cont rol key o r switch the ig nit io n
on.
Break-in security feature
T he alarm will sound if there is a break-in at the
doo rs , hood, and/o r luggage compa rtment lid.
Luggage compartment
lid
Opening/closing the luggage compartment
lid
Opening the luggage compartment lid
.,. Press the e5 button on the remote con trol key
for at least severa l seconds to open the luggage
comp artment lid. Or
.. Lift the luggage compa rtment lid . ..,_.
27
Page 283 of 310
Cl co .... N ,....
N ...... 0 ,....
Vl co
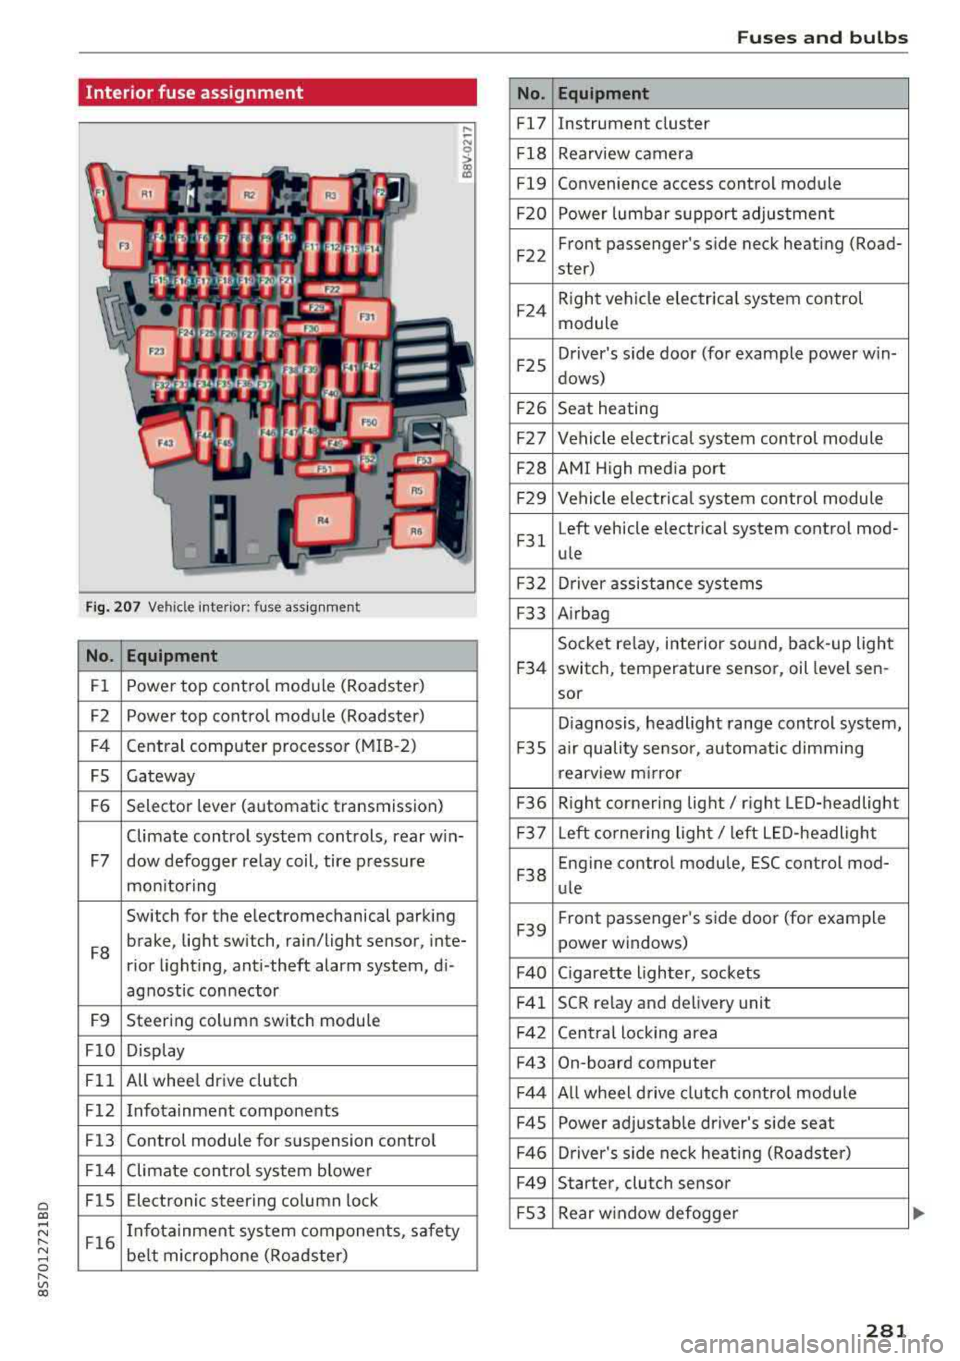
Interior fuse assignment
Fig. 207 Vehicle interior: fuse assignmen t
No. Equipment
Fl Power top cont
rol module (Roadster)
F2 Power top control module (Roadster)
F4 Central computer processor (MIB
-2)
FS Gateway
F6 Selector lever (automatic transmission)
Climate control system controls, rear w in-
F7 dow defogger relay coil, tire pressure
mon itoring
Switch for the electromechanical parking
F8 brake, light switch, rain/light sensor, inte-
rior lighting, anti -theft alarm system, di -
agnostic connector
F9 Steering column switch module
FlO Display
Fll All whee
l drive clutch
F12 Infotainment components
F13 Control module for suspension control
F14 Climate control system blowe r
FlS Electronic steering column
lock
F16 I
nfotainment system components, safety
be lt microphone (Roadster)
No.
Fl7
F1 8
Fl9
F20
F 22
F24
F 25
F 26
F 27
F28
F2 9
F 31
F3 2
F33
F 34
F 35
F36
F37
F3 8
F39
F40
F41
F 42
F43
F44
F45
F46
F49
F S3
Fuses and bulbs
Equipment
Instrument cluster
Rearview camera
Convenience access control module
Power lumbar support adjustment
Front passenger's side neck heating (Road-
ster)
R ight vehicle electrica l system control
module
Driver's s ide door (for example power w in-
dows)
Seat heating
Vehicle electrical system control module
AMI High media port
Vehicle e lectr ical system control module
Left vehicle electrical system contro l mod-
ule
Driver assistance systems
Airbag
Socket relay, inte rior sound , back-up light
switch, temperature sensor, oil leve l sen -
sor
Diagnosis, headlight range control system,
a ir quality sensor, automatic dimming
rearview mirror
R ight cornering light/ right LED-headlight
L eft cornering light/ left LED-headlight
Engine control module, ESC control mod-
ule
Front passenger's side door (for example
power windows)
C igarette lighter, sockets
SCR relay and delivery unit
Central locking area
On-board computer
A ll wheel d rive clutch control module
Power adjustable driver's side seat
Driver's side neck heating (Roadster)
Starter, clutch sensor
Rear window defogger
281
Page 296 of 310
Index
A
A/C (climate control system) . . . . . . . . . . . . . 52
Accessories . . . . . . . . . . . . . . . . . . . . . . . . . . 292
Active lane assist . . . . . . . . . . . . . . . . . . . . . . 72
Activating vibration warning . . . . . . . . . . . . 75
Adjusting steering time . . . . . . . . . . . . . . . . 75
Cleaning the camera area . . . . . . . . . . . . . 267
Indicator l ight . . . . . . . . . . . . . . . . . . . . . . . 73
Messages . . . . . . . . . . . . . . . . . . . . . . . . . . . 74
Switching on/off . . . . . . . . . . . . . . . . . . . . . 73
Adaptive light . . . . . . . . . . . . . . . . . . . . . . . . . 78
Adaptive light (indicator light) . . . . . . . . . . . 16
Adjusting the air d istr ibut ion (climate control
system) . . . . . . . . . . . . . . . . . . . . . . . . . . . . . . 52
Adjusting the air vents . . . . . . . . . . . . . . . . . . 53
Adjusting the center console lighting . . . . . . 41
Adjusting the sound . . . . . . . . . . . . . . . . . . . 177
Adjusting the temperature (climate contro l
system) . . . . . . . . . . . . . . . . . . . . . . . . . . . . . . 52
Advanced Airbag System Children
....... .. .............. ....
Components ...... .............. ... .
Front airbags ..... .............. ... .
How the components work together ... .
Ai rba g .. .. .. .. .. ............. .. .. .. .
I ndicator light .... .............. .... .
Airbag system .. .. .. .............. ... .
Advanced Airbag System ....... .. .. .. .
Care
. . .. .. .. .. ............. .. .. .. .
Ch ild rest raints .............. .... .. .
Components (front airbags) .......... .
Danger of fitting a child safety seat on the
front passenger seat ................ .
Disposal ... .. .. ............. .... .. .
Front airbags ... ............. .... .. .
H ow do the front airbags work? . .. .. .. .
H ow many airbags does my vehicle have?
Important information .............. .
I mportant safety instructions on the knee
airbag system . .. ............. .. .. .. .
Knee airbags .. .. ............. .... .. .
Monitoring ....... .............. ... .
PASSENGER AIR BAG light ........... .
Repairs
Safety instructions ................ .. .
Side airbags .. .. ............. .... .. .
294
218
201
199
202
194 14
213 198
208
218
201
195
208 198
203 201
194
211
210
205
206 208
207
212 Warning/Indicator
lights . . . . . . . . . . . . . 205
When must the system be inspected? . . . 205
Ala rm system
refer to Anti-theft ala rm system . . . . . . 22, 27
Alignment pin (tire change) . . . . . . . . . . . . . 272
All-weather lights . . . . . . . . . . . . . . . . . . . . . . 38
All season tires . . . . . . . . . . . . . . . . . . . . . . . 259
All wheel drive . . . . . . . . . . . . . . . . . . . . . . . . 89
Alte rnative routes . . . . . . . . . . . . . . . . . . . . . 141
Ambient lighting . . . . . . . . . . . . . . . . . . . . . . 40
AMI
refer to Audi music interface . . . . . . . 160, 161
Android Auto
refer to Audi smartphone interface . . . . . 171
Announcements (sett ings)
refer to Voice guidance . . . . . . . . . . . . . . . 141
Anti-freeze Windshield washer system . . . . . . . . . . . . 243
Anti- lock braking system (ABS) . . . . . . . . . . . 86
Ant i-slip regulat ion . . . . . . . . . . . . . . . . . . . . 86
Anti-theft alarm system . . . . . . . . . . . . . . . . . 27
Apple CarPlay
refer to Audi smartphone interface . . . . . 171
Armrest . . . . . . . . . . . . . . . . . . . . . . . . . . . . . . 47
Ashtray . . . . . . . . . . . . . . . . . . . . . . . . . . . . . . 47
Aspect ratio (video) . . . . . . . . . . . . . . . . . . . 165
Audi connect . . . . . . . . . . . . . . . . . . . . . . . . . 124
Data connection . . . . . . . . . . . . . . . . . . . . . 130
Data protection . . . . . . . . . . . . . . . . . . . . . 132
Services (overview) . . . . . . . . . . . . . . . . . . 126
Setup . . . . . . . . . . . . . . . . . . . . . . . . . . . . . 124
Audi magnetic ride
refer to Suspension control . . . . . . . . . . . . . 78
Audi music interface . . . . . . . . . . . . . . . . . . . 160
Audi music stream
refer to Wi-Fi . . . . . . . . . . . . . . . . . . . . . . . 158
Audio files . . . . . . . . . . . . . . . . . . . . . . . . . . . 162
Audio player
B luetooth audio player . . . . . . . . . . . . . . . 157
Wi-Fi audio player . . . . . . . . . . . . . . . . . . . 158
Audio track . . . . . . . . . . . . . . . . . . . . . . . . . . 165
Audi Service Repair Manuals and Literature 290
Audi smartphone interface ......... 171,175
Audi virtual cockpit (instrument cluster) . . . . 8