stop start AUDI TT ROADSTER 2019 User Guide
[x] Cancel search | Manufacturer: AUDI, Model Year: 2019, Model line: TT ROADSTER, Model: AUDI TT ROADSTER 2019Pages: 304, PDF Size: 80.77 MB
Page 64 of 304
Driving
changes in speed, and traveling at the maximum
speed.
If desired, the driver can also select the gears
manually (tiptronic mode).
RY ta cela (Oa eid
7
BFV-0245
a
Lee
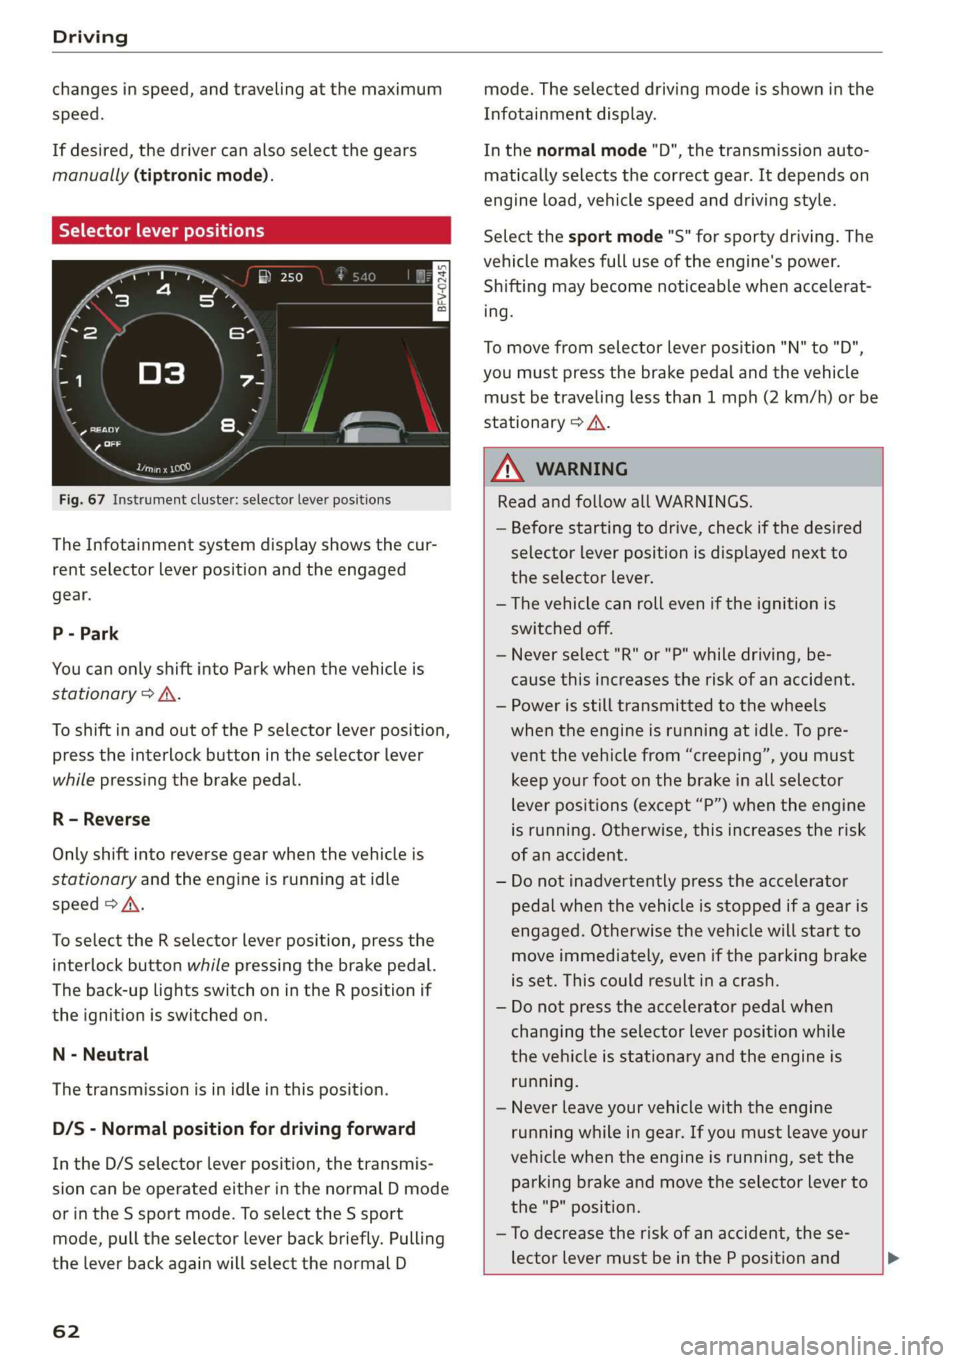
Fig. 67 Instrument cluster: selector lever positions
The Infotainment system display shows the cur-
rent selector lever position and the engaged
gear.
P - Park
You can only shift into Park when the vehicle is
stationary > A.
To shift in and out of the P selector lever position,
press the interlock button in the selector lever
while pressing the brake pedal.
R - Reverse
Only shift into reverse gear when the vehicle is
stationary and the engine is running at idle
speed > A\.
To select the R selector lever position, press the
interlock button while pressing the brake pedal.
The back-up lights switch on in the R position if
the ignition is switched on.
N - Neutral
The transmission is in idle in this position.
D/S - Normal position for driving forward
In the D/S selector lever position, the transmis-
sion can be operated either in the normal D mode
or in the S sport mode. To select the S sport
mode, pull the selector lever back briefly. Pulling
the lever back again will select the normal D
62
mode. The selected driving mode is shown in the
Infotainment display.
In the normal mode "D", the transmission auto-
matically selects the correct gear. It depends on
engine load, vehicle speed and driving style.
Select the sport mode "S" for sporty driving. The
vehicle makes full use of the engine's power.
Shifting may become noticeable when accelerat-
ing.
To move from selector lever position "N" to "D",
you must press the brake pedal and the vehicle
must be traveling less than 1 mph (2 km/h) or be
stationary > A.
Z\ WARNING
Read and follow all WARNINGS.
— Before starting to drive, check if the desired
selector lever position is displayed next to
the selector lever.
— The vehicle can roll even if the ignition is
switched off.
— Never select "R" or "P" while driving, be-
cause this increases the risk of an accident.
— Power is still transmitted to the wheels
when the engine is running at idle. To pre-
vent the vehicle from “creeping”, you must
keep your foot on the brake in all selector
lever positions (except “P”) when the engine
is running. Otherwise, this increases the risk
of an accident.
— Do not inadvertently press the accelerator
pedal when the vehicle is stopped if a gear is
engaged. Otherwise the vehicle will start to
move immediately, even if the parking brake
is set. This could result in a crash.
— Do not press the accelerator pedal when
changing the selector lever position while
the vehicle is stationary and the engine is
running.
— Never leave your vehicle with the engine
running while in gear. If you must leave your
vehicle when the engine is running, set the
parking brake and move the selector lever to
the "P" position.
—To decrease the risk of an accident, the se-
lector lever must be in the P position and
Page 66 of 304
Driving
— If the vehicle does not move in the desired
direction, the system may not have engaged
the drive position correctly. Press the brake
pedal and select the drive position again.
— If the vehicle still does not move in the de-
sired direction, there is a system malfunc-
tion. See an authorized Audi dealer or au-
thorized Audi Service Facility for assistance
to have the system checked.
The transmission shifts up and down automati-
cally when in the driving gears.
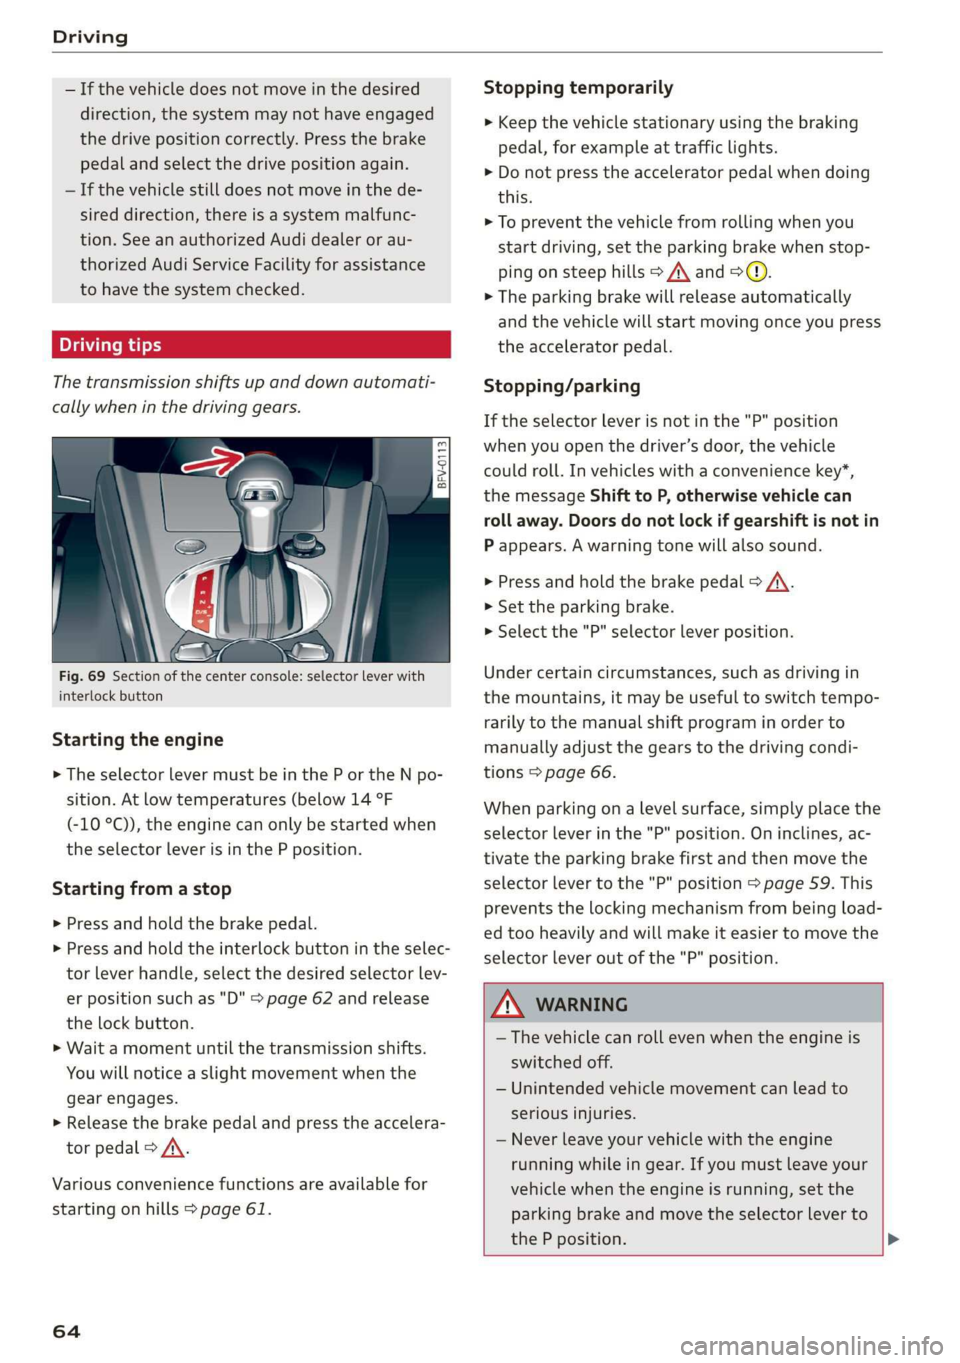
Fig. 69 Section of the center console: selector lever with
interlock button
Starting the engine
> The selector lever must be in the P or the N po-
sition. At low temperatures (below 14 °F
(-10 °C)), the engine can only be started when
the selector lever is in the P position.
Starting from a stop
> Press and hold the brake pedal.
> Press and hold the interlock button in the selec-
tor lever handle, select the desired selector lev-
er position such as "D" > page 62 and release
the lock button.
> Wait a moment until the transmission shifts.
You will notice a slight movement when the
gear engages.
> Release the brake pedal and press the accelera-
tor pedal > A\.
Various convenience functions are available for
starting on hills > page 61.
64
Stopping temporarily
> Keep the vehicle stationary using the braking
pedal, for example at traffic lights.
> Do not press the accelerator pedal when doing
this.
> To prevent the vehicle from rolling when you
start driving, set the parking brake when stop-
ping on steep hills > A\ and >@.
> The parking brake will release automatically
and the vehicle will start moving once you press
the accelerator pedal.
Stopping/parking
If the selector lever is not in the "P" position
when you open the driver’s door, the vehicle
could roll. In vehicles with a convenience key*,
the message Shift to P, otherwise vehicle can
roll away. Doors do not lock if gearshift is not in
P appears. A warning tone will also sound.
> Press and hold the brake pedal > A\.
>» Set the parking brake.
> Select the "P" selector lever position.
Under certain circumstances, such as driving in
the mountains, it may be useful to switch tempo-
rarily to the manual shift program in order to
manually adjust the gears to the driving condi-
tions > page 66.
When parking ona level surface, simply place the
selector lever in the "P" position. On inclines, ac-
tivate the parking brake first and then move the
selector lever to the "P" position > page 59. This
prevents the locking mechanism from being load-
ed too heavily and will make it easier to move the
selector lever out of the "P" position.
ZA WARNING
— The vehicle can roll even when the engine is
switched off.
— Unintended vehicle movement can lead to
serious injuries.
— Never leave your vehicle with the engine
running while in gear. If you must leave your
vehicle when the engine is running, set the
parking brake and move the selector lever to
the P position. >
Page 67 of 304
8S8012721BA
Driving
— Power is still transferred to the wheels when
the engine is running at idle. To prevent the
vehicle from “creeping”, you must keep your
foot on the brake when the engine is run-
ning and the selector lever is in the "D", "S"
or "R" position or “tiptronic” mode is select-
ed.
— Do not inadvertently press the accelerator
pedal when the vehicle is stationary. Other-
wise the vehicle will start to move immedi-
ately, even if the parking brake is set. This
could result in a crash.
— Do not press the accelerator pedal when
changing the selector lever position while
the vehicle is stationary and the engine is
running.
— Never engage the R or P selector level posi-
tions while driving. It could cause a crash.
— Before driving down a steep slope, reduce
your speed and shift into a lower gear with
“tiptronic”.
— Do not ride the brakes or press the brake
pedal
too often or too long when driving
downhill. Constant braking causes the
brakes to overheat and can substantially re-
duce braking performance, increase braking
distance, or cause complete failure of the
brake system.
— If you must stop on an incline, always hold
the vehicle in place with the foot brake or
parking brake to prevent it from rolling
back.
— Never hold the vehicle on an incline with a
slipping clutch. The clutch opens automati-
cally when it becomes too hot from the over-
load. The | indicator light turns on and a
message appears > page 67 when the
clutch is overloaded.
— If the engine must run while you are work-
ing in the engine compartment with the
hood open, make sure a gear is not engaged.
The selector lever must be firmly in the
P position and locked in place and the park-
ing brake must be set > page 227. Other-
wise, the vehicle could begin moving when
increasing the engine speed, even with the
parking brake set.
CG) Note
— When stopping on an incline, do not try to
hold the vehicle in place by pressing the ac-
celerator pedal while a driving gear is se-
lected. This can cause the automatic trans-
mission to overheat and can damage it. Set
the parking brake or press the brake pedal
to prevent the vehicle from rolling.
— Allowing the vehicle to roll when the engine
is stopped and the selector lever is in the N
position will damage the automatic trans-
mission because it is not lubricated under
those circumstances.
— The transmission can overheat and be dam-
aged under certain driving and traffic condi-
tions such as frequent starts, creeping for a
long time, or stop-and-go traffic. When the
fs} or & indicator light turns on, stop the
vehicle at the next opportunity and let the
transmission cool > page 67.
— Allowing the vehicle to roll when the engine
is stopped will damage the S tronic trans-
mission because it is not lubricated
=> page 274, Towing.
@) Tips
For safety reasons, the parking brake is re-
leased automatically only when the driver's
safety belt is fastened.
Hill descent control
The hill descent control system assists the driver
when driving down hills.
Hill descent control is activated when the selec-
tor lever is in the "D" or "S" position and you
press the brake pedal. The transmission automat-
ically selects a gear that is suitable for the hill.
Hill descent control tries to maintain the speed
that was selected at the time of braking, within
physical and technical limitations. If may still be
necessary to adjust the speed with the brakes.
Because hill descent control cannot shift down
farther than 3rd gear, it may be necessary to shift
into tiptronic mode in very steep areas. In this
65
>
Page 69 of 304
8S8012721BA
Driving
ZA\ WARNING
Please note that the wheels could spin on
slick or slippery roads when kick-down is ac-
tive.
Launch Control
The Launch Control Program enables maximum
acceleration.
Requirement: the engine must be at operating
temperature and the steering wheel must not be
turned.
> With the engine running, press the |[2OFF] but-
ton briefly one time )) .
> Pull the selector lever back out of the "D/S" po-
sition briefly to select the "S" position, or press
it toward the right into the tiptronic position or
select the Dynamic driving mode in drive se-
lect* > page 77.
> Press the brake pedal firmly with your left foot
and hold it all the way down for at least 1 sec-
ond.
> At the same time, press the gas pedal all the
way down with your right foot until the engine
reaches and stays at a high RPM level.
> Remove your left foot from the brake.
Z\ WARNING
— Always adapt your driving to the traffic flow.
— Only use Launch Control when road and traf-
fic conditions allow it and other drivers will
not be endangered or impacted by your driv-
ing and the vehicle's acceleration.
— Please note that the drive wheels can spin
and the vehicle can break away when sport
mode is switched on, especially when the
road is slippery.
— Once the vehicle has started moving, press
the |& OFF] button briefly to turn the sport
mode off.
D_ The ESC light turns on and stays on, and the message Sta-
bilization control (ESC): sport. Warning! Limited stabili-
ty appears temporarily in the Infotainment system to indi-
cate that the system was deactivated.
CG) Note
When accelerating using Launch Control, all
vehicle components are subject to heavy
loads. This can result in increased wear.
G@) Tips
After accelerating using the Launch Control,
the temperature of some vehicle components
may increase greatly. If that happens, the
function will not be available for a few mi-
nutes to reduce the risk of damage. After a
cool-down period, Launch Control will be
available again.
MeRoeumurlu adel)
& Transmission: malfunction! Safely stop vehi-
cle
Do not continue driving. Stop the vehicle as soon
as possible in a safe location and secure it so it
does not roll. See an authorized Audi dealer or
authorized Audi Service Facility for assistance.
& Transmission: too hot. Please stop vehicle
The transmission is too hot and can become dam-
aged. Stop and let the transmission cool with the
engine running (at idle) in the "P" selector lever
position. Then the indicator light and the mes-
sage turn off, drive to an authorized Audi dealer
or authorized Audi Service Facility immediately to
have the malfunction corrected. If the indicator
light and the driver message do not turn off, do
not continue driving. See an authorized Audi
dealer or authorized Audi Service Facility for as-
sistance.
[&] Transmission: malfunction! You can contin-
ue driving. See owner's manual
Drive to an authorized Audi dealer or authorized
Audi Service Facility immediately to have the
malfunction corrected.
67
Page 91 of 304
8S8012721BA
Intelligent Technology
@) Note
— Never let the brakes “rub” by pressing the
pedal lightly when braking is not actually
necessary. This can cause the brakes to over-
heat and increases braking distance and
causes wear.
— Before driving on long stretches with steep
hills, reduce the vehicle speed and shift to a
lower gear to use the engine braking effect.
This reduces the load on the brakes. If you
need to brake additionally, brake in intervals
and not continuously.
@) Tips
— If you retrofit your vehicle with a front spoil-
er, wheel covers or similar items, make sure
that the air flow to the brakes is not ob-
structed. Otherwise the brake system can
overheat.
— Also refer to the information about brake
fluid > page 235.
Steering
Electromechanical steering supports the driver's
steering movements by electronically adapting
the power steering depending on the vehicle
speed. The settings depend on the selected Audi
drive select* mode.
a Steering: malfunction! Please stop vehicle
The power steering may have failed. Adapt your
driving style immediately to compensate for the
fact that it may be more difficult to turn the
steering wheel, and stop your vehicle in a safe lo-
cation as soon as possible. Do not continue driv-
ing. See an authorized Audi dealer or authorized
Audi Service Facility for assistance.
a Steering: malfunction! You can continue
driving
There is a malfunction. Steering may be more dif-
ficult or more sensitive. Adapt your driving style.
Have the steering system checked immediately
by an authorized Audi dealer or authorized Audi
Service Facility. Please note that the red indicator
light may turn on after restarting the engine. Do
not continue driving if it does.
G@) Tips
If the 12 or al indicator light only stays on
for a short time, you may continue driving.
ALL wheel drive (quattro)
Applies to: vehicles with all wheel drive
In all wheel drive, all four wheels are powered.
General information
In all wheel drive, the driving power is divided be-
tween all four wheels. This happens automatical-
ly depending on your driving behavior as well as
the current road conditions. Also see > page 86,
Electronic stabilization control (ESC).
The all wheel drive concept is designed for high
engine power. Your vehicle is exceptionally pow-
erful and has excellent driving characteristics
both under normal driving conditions and on
snow and ice. Always read and follow safety pre-
cautions > A\.
Winter tires
By using all wheel drive, your vehicle has good
forward motion with standard tires in winter con-
ditions. However, in winter we recommend using
winter or all season tires on all four wheels, be-
cause this will improve the braking effect.
Snow chains
If there are snow chain laws, snow chains must
also be used on vehicles with all wheel drive
=> page 255, Snow chains.
Replacing tires
For vehicles with all wheel drive, only wheels with
the same rolling circumference should be used.
Avoid using tires with different tread depths
=> page 247, New tires or wheels.
89
Page 109 of 304
8S58012721BA
Voice recognition system
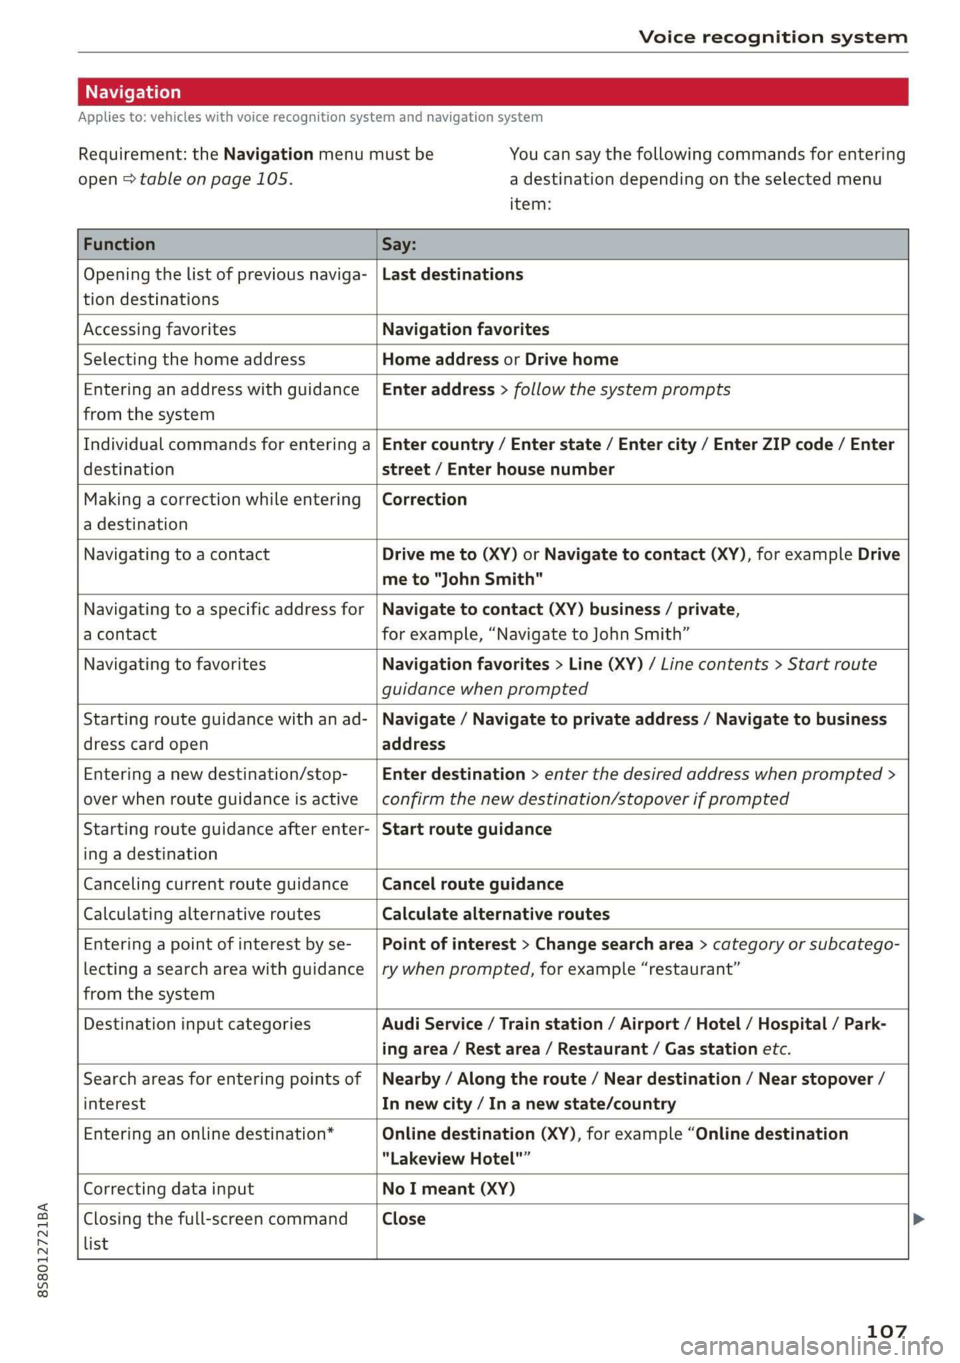
Applies to: vehicles with voice recognition system and navigation system
Requirement: the Navigation menu must be
open > table on page 105.
You can say the following commands for entering
a destination depending on the selected menu
item:
Function Say:
Opening the list of previous naviga-
tion destinations
Last destinations
Accessing favorites Navigation favorites
Selecting the home address Home address or Drive home
Entering an address with guidance
from the system
Enter address > follow the system prompts
Individual commands for entering a
destination
Enter country / Enter state / Enter city / Enter ZIP code / Enter
street / Enter house number
Making a correction while entering
a destination
Correction
Navigating to a contact Drive me to (XY) or Navigate to contact (XY), for example Drive
me to "John Smith"
Navigating to a specific address for
a contact
Navigate to contact (XY) business / private,
for example, “Navigate to John Smith”
Navigating to favorites Navigation favorites > Line (XY) / Line contents > Start route
guidance when prompted
Starting route guidance with an ad-
dress card open
Navigate / Navigate to private address / Navigate to business
address
Entering a new destination/stop-
over when route guidance is active
Enter destination > enter the desired address when prompted >
confirm the new destination/stopover if prompted
Starting route guidance after enter-
ing a destination
Start route guidance
Canceling current route guidance Cancel route guidance
Calculating alternative routes Calculate alternative routes
Entering a point of interest by se-
lecting a search area with guidance
from the system
Point of interest > Change search area > category or subcatego-
ry when prompted, for example “restaurant”
Destination input categories Audi Service / Train station / Airport / Hotel / Hospital / Park-
ing area / Rest area / Restaurant / Gas station etc.
Search areas for entering points of
interest
Nearby / Along the route / Near destination / Near stopover /
In new city / In a new state/country
Entering an online destination* Online destination (XY), for example “Online destination
"Lakeview Hotel"”
Correcting data input No I meant (XY)
Closing the full-screen command
list
Close
107
Page 137 of 304
8S8012721BA
Navigation
Transferring a destination from the
directory
Applies to: vehicles with navigation system
You can navigate directly to destinations in the
directory.
Options — Show contact details
Bayelsa)
PAN RTO a aL
Hawthorn Ave, Los Angeles, CA
® Wilshire Blvd, Beverly Hills, CA
34°03°12.7°°N, 118°14°43.2°°W
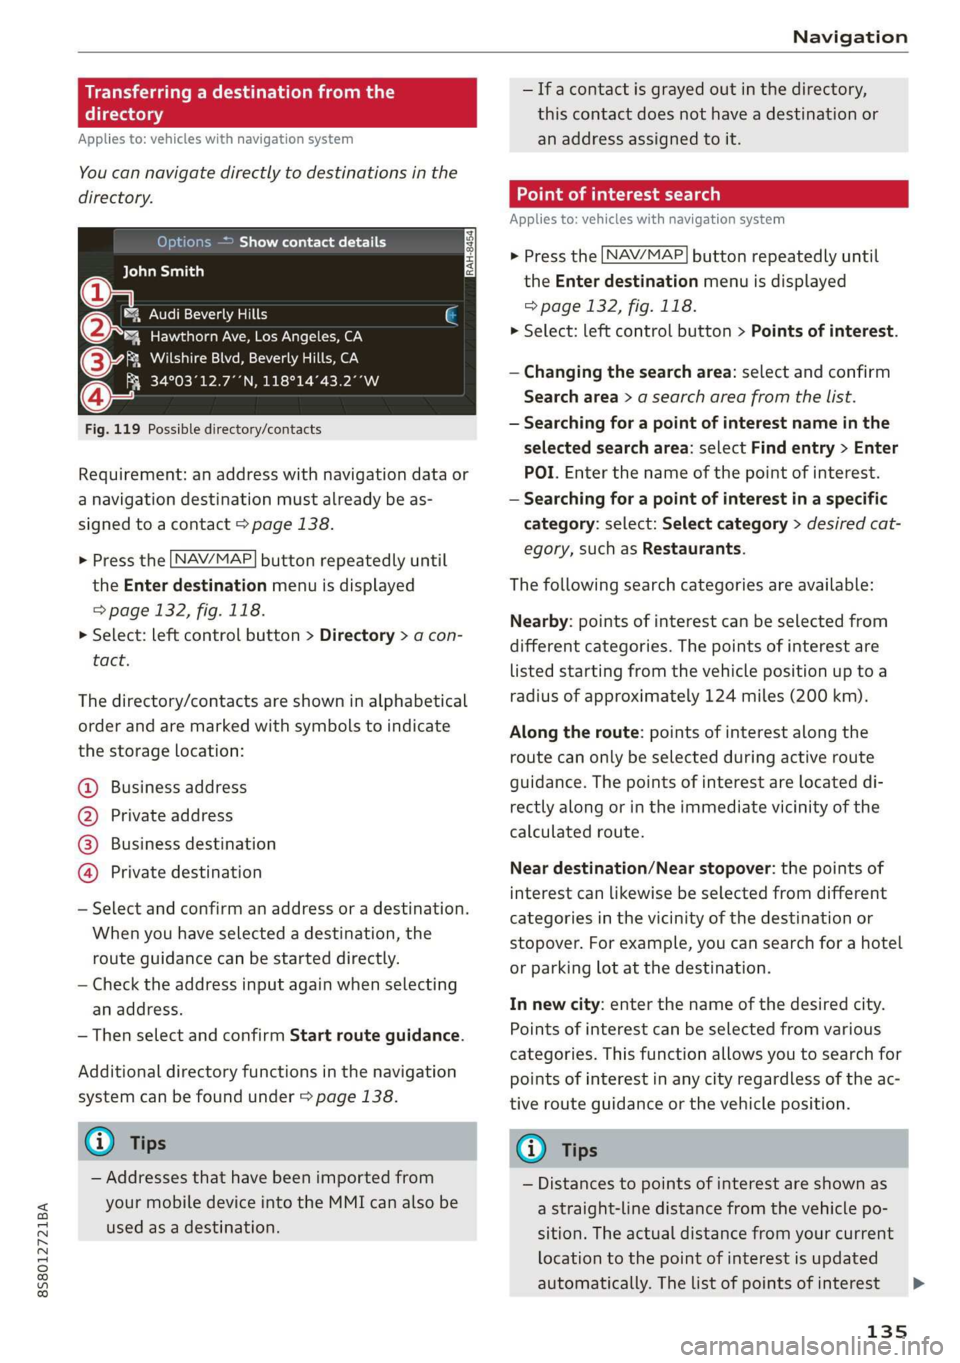
Fig. 119 Possible directory/contacts
Requirement: an address with navigation data or
a navigation destination must already be as-
signed to a contact > page 138.
> Press the LNAV/MAP] button repeatedly until
the Enter destination menu is displayed
=> page 132, fig. 118.
> Select: left control button > Directory > a con-
tact.
The directory/contacts are shown in alphabetical
order and are marked with symbols to indicate
the storage location:
@ Business address
@ Private address
@® Business destination
@ Private destination
— Select and confirm an address or a destination.
When you have selected a destination, the
route guidance can be started directly.
— Check the address input again when selecting
an address.
— Then select and confirm Start route guidance.
Additional directory functions in the navigation
system can be found under > page 138.
@ Tips
— Addresses that have been imported from
your mobile device into the MMI can also be
used as a destination.
— Ifa contact is grayed out in the directory,
this contact does not have a destination or
an address assigned to it.
meats)
Applies to: vehicles with navigation system
> Press the [NAV/MAP] button repeatedly until
the Enter destination menu is displayed
=> page 132, fig. 118.
> Select: left control button > Points of interest.
— Changing the search area: select and confirm
Search area > a search area from the list.
— Searching for a point of interest name in the
selected search area: select Find entry > Enter
POI. Enter the name of the point of interest.
— Searching for a point of interest in a specific
category: select: Select category > desired cat-
egory, such as Restaurants.
The following search categories are available:
Nearby: points of interest can be selected from
different categories. The points of interest are
listed starting from the vehicle position up toa
radius of approximately 124 miles (200 km).
Along the route: points of interest along the
route can only be selected during active route
guidance. The points of interest are located di-
rectly along or in the immediate vicinity of the
calculated route.
Near destination/Near stopover: the points of
interest can likewise be selected from different
categories in the vicinity of the destination or
stopover. For example, you can search for a hotel
or parking lot at the destination.
In new city: enter the name of the desired city.
Points of interest can be selected from various
categories. This function allows you to search for
points of interest in any city regardless of the ac-
tive route guidance or the vehicle position.
@) Tips
— Distances to points of interest are shown as
a straight-line distance from the vehicle po-
sition. The actual distance from your current
location to the point of interest is updated
automatically. The list of points of interest
135
>
Page 143 of 304
8S58012721BA
Navigation
— Switching the crosshairs on: press the control
knob in the map view.
— Switching the crosshairs off: press the [BACK
button.
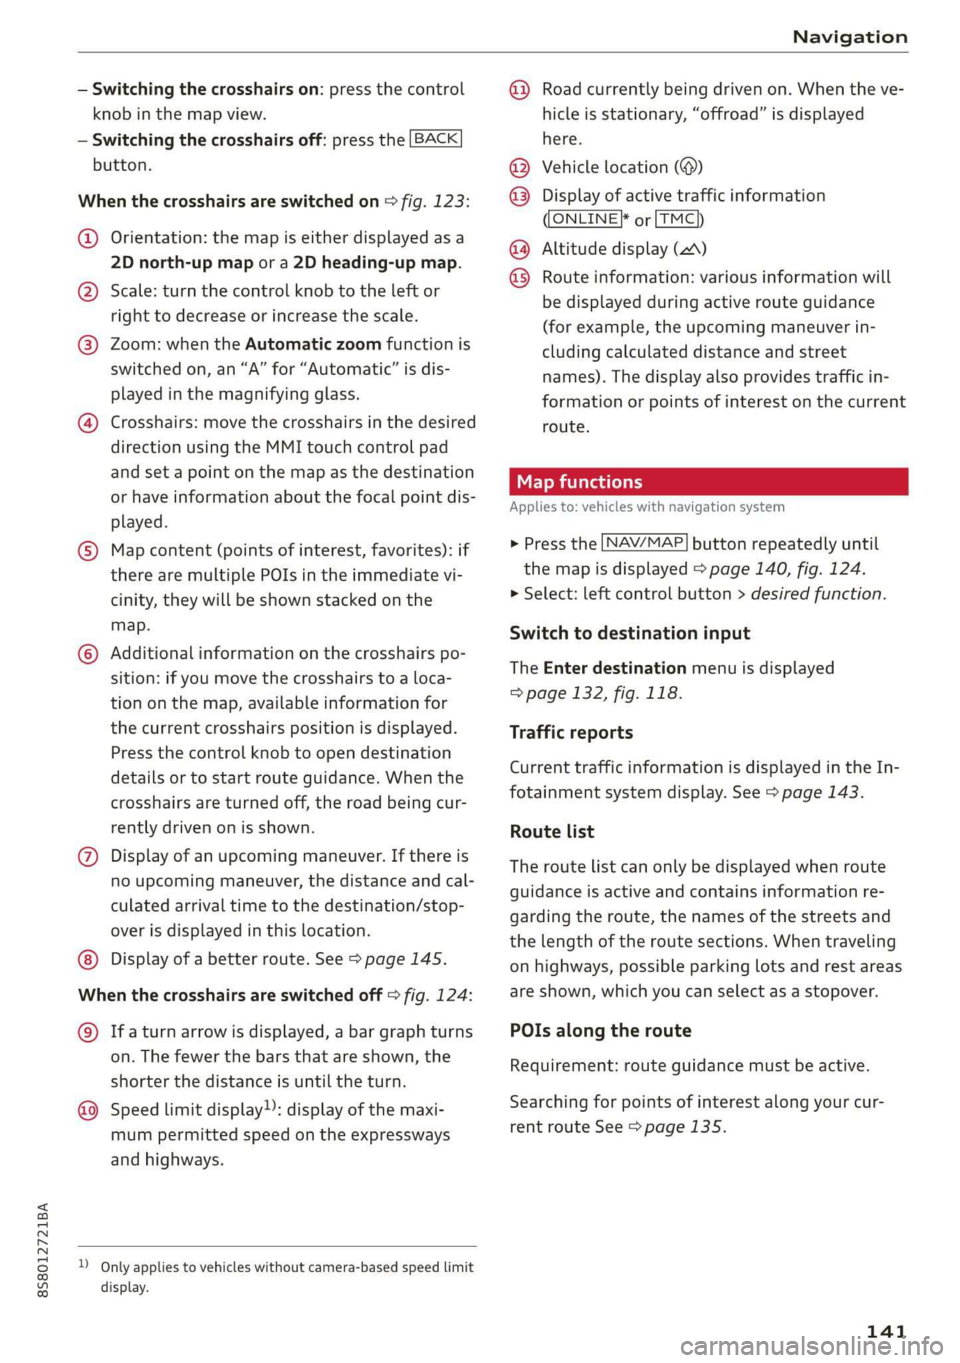
When the crosshairs are switched on > fig. 123:
@ Orientation: the map is either displayed as a
2D north-up map or a 2D heading-up map.
@) Scale: turn the control knob to the left or
right to decrease or increase the scale.
@ Zoom: when the Automatic zoom function is
switched on, an “A” for “Automatic” is dis-
played in the magnifying glass.
@ Crosshairs: move the crosshairs in the desired
direction using the MMI touch control pad
and set a point on the map as the destination
or have information about the focal point dis-
played.
© Map content (points of interest, favorites): if
there are multiple POIs in the immediate vi-
cinity, they will be shown stacked on the
map.
© Additional information on the crosshairs po-
sition: if you move the crosshairs to a loca-
tion on the map, available information for
the current crosshairs position is displayed.
Press the control knob to open destination
details or to start route guidance. When the
crosshairs are turned off, the road being cur-
rently driven on is shown.
@ Display of an upcoming maneuver. If there is
no upcoming maneuver, the distance and cal-
culated arrival time to the destination/stop-
over is displayed in this location.
Display of a better route. See > page 145.
When the crosshairs are switched off > fig. 124:
@) Ifa turn arrow is displayed, a bar graph turns
on. The fewer the bars that are shown, the
shorter the distance is until the turn.
Speed limit display): display of the maxi-
mum permitted speed on the expressways
and highways.
D_ Only applies to vehicles without camera-based speed limit
display.
@ Road currently being driven on. When the ve-
hicle is stationary, “offroad” is displayed
here.
Vehicle location (@)
Display of active traffic information
ONLINE} or [TMC
Altitude display (2)
Route information: various information will
be displayed during active route guidance
(for example, the upcoming maneuver in-
cluding calculated distance and street
names). The display also provides traffic in-
formation or points of interest on the current
route.
Applies to: vehicles with navigation system
®® O®
> Press the [NAV/MAP] button repeatedly until
the map is displayed > page 140, fig. 124.
> Select: left control button > desired function.
Switch to destination input
The Enter destination menu is displayed
=> page 132, fig. 118.
Traffic reports
Current traffic information is displayed in the In-
fotainment system display. See > page 143.
Route list
The route list can only be displayed when route
guidance is active and contains information re-
garding the route, the names of the streets and
the length of the route sections. When traveling
on highways, possible parking lots and rest areas
are shown, which you can select as a stopover.
POIs along the route
Requirement: route guidance must be active.
Searching for points of interest along your cur-
rent route See > page 135.
141
Page 157 of 304
8S8012721BA
Media
When importing, the audio files are automatical-
ly sorted into the media center categories based
on the stored additional information > page 161.
The copied video files are stored in the media
center under the Videos category.
Playing the Jukebox
Requirement: the Jukebox must contain audio/
video files > page 154, Adding files to the Juke-
box.
The Jukebox is accessed and operated through
the MMI @) & page 160, fig. 137.
Displaying Jukebox memory capacity
Select: right control button > Jukebox memory
capacity. Information about the Jukebox memory
capacity and the number of stored tracks is dis-
played.
Deleting tracks from the Jukebox!)
Requirement: the Jukebox must contain audio/
video files.
— Deleting an entry: select an entry from the
Jukebox media center. Select: right control but-
ton > Delete from jukebox > This entry or En-
tire list.
— The status of the deleting process is shown in
the MMI. Jukebox playback stops during the de-
leting process and starts again automatically
once the deletion is complete.
©) Note
Do not import audio/video files when the en-
gine is turned off because this will drain the
vehicle battery.
G) Tips
— Tracks from audio CDs cannot be imported
to the Jukebox for legal reasons.
— Files that have already been imported are
automatically recognized and cannot be
copied to the Jukebox again.
— It is not possible to play audio/video* files
in the CD/DVD* drive while importing them.
)) Not in the Playback view.
— The Jukebox does not provide an export
function due to legal reasons.
— Files or tracks without additional stored in-
formation are listed as Unknown. Audi rec-
ommends adding additional information
(such as ID3 tags) to audio files.
— Reset the Jukebox to the factory default set-
tings when selling your vehicle > page 172.
Bluetooth audio player
Applies to: vehicles with Bluetooth audio player
With the Bluetooth audio player, you can play
music wirelessly from your Bluetooth-capable
device (such as a cell phone) through the MMI.
Requirement: the vehicle must be stationary and
the ignition must be switched on. The Bluetooth
settings will open on your mobile device during
the connection setup. The Bluetooth function and
visibility of the MMI > page 174 and mobile de-
vice must be switched on. The Bluetooth audio
player > page 174 must be switched on in the
MMI.
— Connecting a Bluetooth device: press the
MEDIA] button. Press the left control button
until the sources overview is displayed. Select
and confirm Bluetooth audio player ©)
=> page 160, fig. 138.
—If necessary, select and confirm, Not connected
> Connect Bluetooth audio player. The Blue-
tooth device search starts. Follow the instruc-
tions in the MMI.
— Select and confirm the desired Bluetooth device
from the list. The MMI generates a PIN for the
connection.
— Select and confirm Yes.
— Enter the PIN for connecting on your Bluetooth
device. Or: if the PIN is already displayed on
your Bluetooth device, confirm it in the Blue-
tooth device and in the MMI. The time allowed
for entering the PIN is limited to approximately
30 seconds.
The media is started and operated through the
mobile device or the MMI, depending on the de-
vice being used.
155
>
Page 177 of 304
8S8012721BA
System settings
Start update. The length of the process de-
pends on the size of the update.
— Reset driver installation: the selected media
driver package is reset to the settings at the
time of delivery.
— Version information: information on the MMI
software version and the navigation database*
software version is displayed. The Software in-
formation function also provides information
on the software contained in the MMI and the
licensing agreement.
Sound settings
The sound distribution and volume of the MMI
can be adjusted individually. The settings depend
on the vehicle equipment.
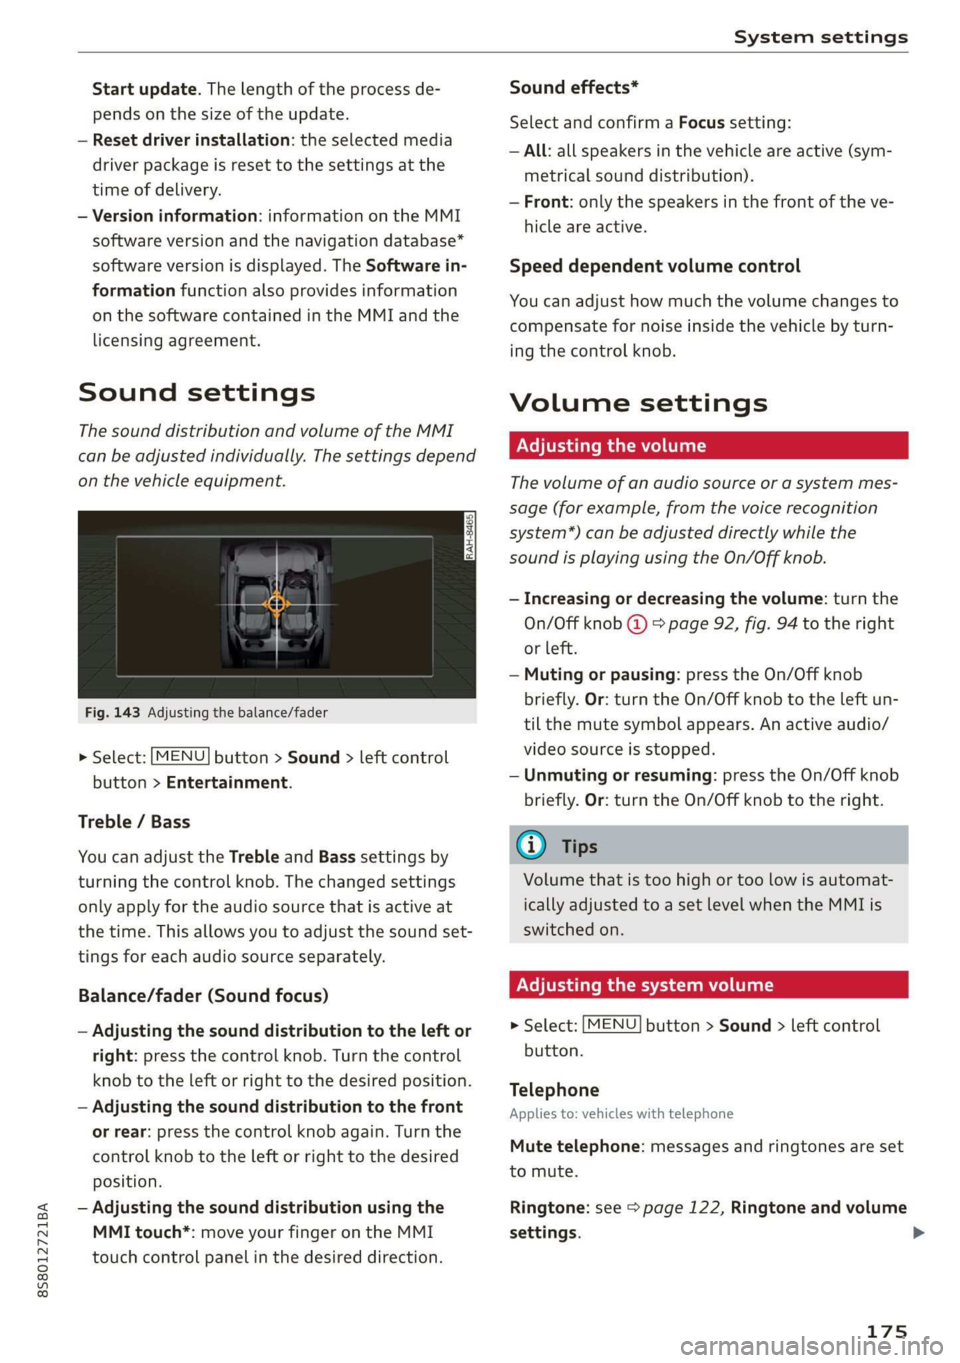
Fig. 143 Adjusting the balance/fader
> Select: [MENU] button > Sound > left control
button > Entertainment.
Treble / Bass
You can adjust the Treble and Bass settings by
turning the control knob. The changed settings
only apply for the audio source that is active at
the time. This allows you to adjust the sound set-
tings for each audio source separately.
Balance/fader (Sound focus)
— Adjusting the sound distribution to the left or
right: press the control knob. Turn the control
knob to the left or right to the desired position.
— Adjusting the sound distribution to the front
or rear: press the control knob again. Turn the
control knob to the left or right to the desired
position.
— Adjusting the sound distribution using the
MMI touch*: move your finger on the MMI
touch control panel in the desired direction.
Sound effects*
Select and confirm a Focus setting:
— All: all speakers in the vehicle are active (sym-
metrical sound distribution).
— Front: only the speakers in the front of the ve-
hicle are active.
Speed dependent volume control
You can adjust how much the volume changes to
compensate for noise inside the vehicle by turn-
ing the control knob.
Volume settings
Adjusting the volume
The volume of an audio source or a system mes-
sage (for example, from the voice recognition
system*) can be adjusted directly while the
sound is playing using the On/Off knob.
— Increasing or decreasing the volume: turn the
On/Off knob @) 9 page 92, fig. 94 to the right
or left.
—Muting or pausing: press the On/Off knob
briefly. Or: turn the On/Off knob to the left un-
til the mute symbol appears. An active audio/
video source is stopped.
—Unmuting or resuming: press the On/Off knob
briefly. Or: turn the On/Off knob to the right.
G@) Tips
Volume that is too high or too low is automat-
ically adjusted to a set level when the MMI is
switched on.
Adjusting the system volume
> Select: [MENU] button > Sound > left control
button.
Telephone
Applies to: vehicles with telephone
Mute telephone: messages and ringtones are set
to mute.
Ringtone: see => page 122, Ringtone and volume
settings.
175