change wheel AUDI TT ROADSTER 2019 Owners Manual
[x] Cancel search | Manufacturer: AUDI, Model Year: 2019, Model line: TT ROADSTER, Model: AUDI TT ROADSTER 2019Pages: 304, PDF Size: 80.77 MB
Page 6 of 304
Table of contents
Kiteerairbagsicc 2 secs ee esac a w anaes ¥ vo 204
Side airbags. ........... eee eee eee 206
SRC SARSEY ois i ese se ween 4 & ese a 210
Important information............... 210
Child 'safety S@atSiivec 2s gcan
Additional information............... 222
Maintenance and Care........... 223
Checking and Filling............. 223
Fuel... 2. cece eee eee eee eee 223
Refuelingjecs ss sees se ane + eeee § s peme 224
Emissions control system...........4. 227
Engine compartment................. 227
ERGINGOtls seus 2 x seme « ¥ neue =e oRBER Fae 230
Cooling:system . « sscses v < ssesens vo eevee so ave 234
Brake fluid... 2... eee eee eee 235
Electrical SySteMi wis ¢ scm ae mews eg ey 236
Battery: « & cess 6 6 ceva © 5 mews « wenn ¥ © oi 236
Windshield washer system...........- 238
Service interval display............... 239
Wheels ........ 0... eee 240
Wheels and Tires . . 240
Tire pressure monitoring system....... 256
Tire pressure monitoring system....... 258
Care and cleaning................ 262
General information wo. ceo saeco es 262
Car washes...............2..20.00005 262
Cleaning and care information......... 263
Taking your vehicle out of service....... 267
Do-It YOUrSEUT v5 ¢ «gee8 & peas es eee 268
Emergency assistance........... 268
General
information................. 268
EQUIPITICNE sass ¢ ¢ eens + eeen a 3 ces 3s He 268
Tire mobility kit ose: <2 cere ae eee se ees 268
Replacing wheels..............000005 270
Sparetire........... 0.00.0 20.000000. 274
TOWING scsvss = ¢ wesos « § eeons & 2 Keres 4 = HES 274
Fuses and bulbs.................. 277
FUSES an + x css 5 © ames + © eRe = Beem He 277
BULDSisi0e svowave 4 6 oniuen a a stants a Hanon w 8 ave 279
Customer information........... 280
Accessories and technical
CHANGES: « s seve + a wees ¢ s eee oe ee Ze 280
Warratttys: < s wexsas os menus vo oncans © 0 sence 280
Audi Literature Shop.............005- 280
Driving in other countries............. 280
Maintenance, repairs, and technical
modifications...............02.-00 280
Accessories and parts..............-. 282
Reporting Safety Defects.............. 282
Declaration
of compliance for
telecommunications equipment and
electroniesystemss: + - seca ss sec oo waren 283
Technical data.................... 285
Identification data................0.. 285
Ne@hicle’datiabaccic = 2 cms » @ canseae » 1 sumone a oo 285
TWAS Rey + xaos 5c owe co UE a eee se 287
Page 15 of 304

8S8012721BA
Instrument cluster
RAH-8025)
[oz
ee
Pea
Cre T a
EIN?
Fig. 7 Opening the selection and options menu
Left control button
— Opening and closing the selection menu: press
the respective left control button on the steer-
ing wheel > fig. 7. You can now select and con-
firm a function in the selection menu using the
left thumbwheel (for example, selecting a fre-
quency band).
Right control button
— Opening and closing the options menu: press
the respective right control button on the steer-
ing wheel > fig. 7. You can now adjust any con-
text-dependent functions and settings using
the left thumbwheel (for example, sound set-
tings).
Fig. 8 Standard view: classic/sport*
Fig. 9 Enhanced view
Change view
> Press the [VIEW] button (@) > page 12, fig. 6 to
switch from the default view > fig. 8 to the en-
hanced view > fig. 9.
> To return to the default view, press the [VIEW
button again.
Setting the default view
Applies to: vehicles with sport view
Depending on the vehicle equipment, you can
choose between the classic and the sport view.
> Open the first vehicle functions tab using the
<>] button on the multifunction steering
wheel.
13
Page 40 of 304
Lights and Vision
Lights and Vision
Exterior lighting
Sitar MeL Lats eal
B8V-0430
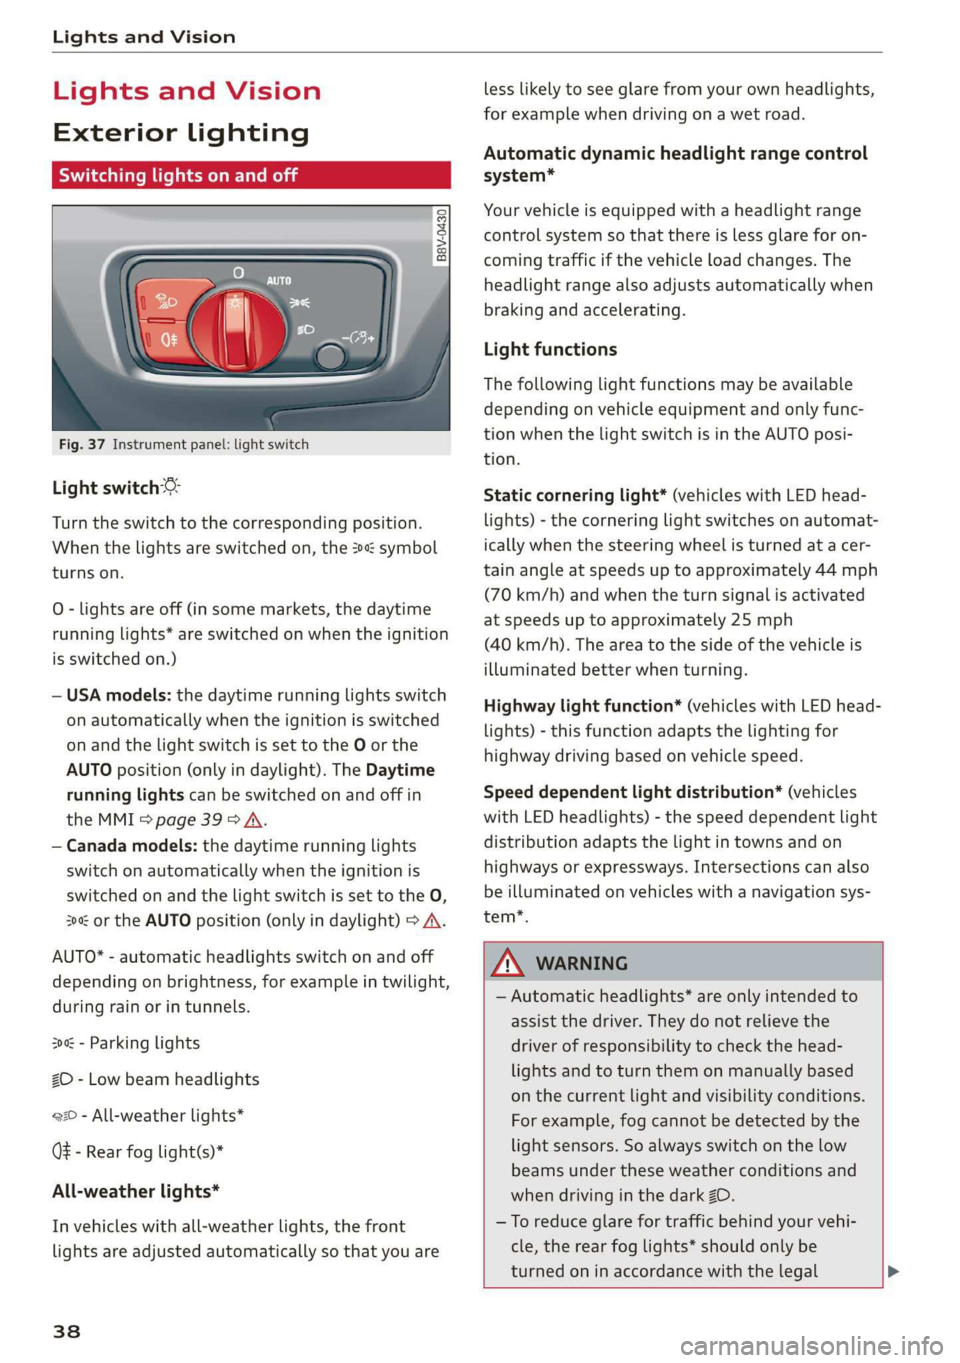
Fig. 37 Instrument panel: light switch
Light switch ©:
Turn the switch to the corresponding position.
When the lights are switched on, the 2»: symbol
turns on.
0 - lights are off (in some markets, the daytime
running lights* are switched on when the ignition
is switched on.)
— USA models: the daytime running lights switch
on automatically when the ignition is switched
on and the light switch is set to the O or the
AUTO position (only in daylight). The Daytime
running lights can be switched on and off in
the MMI > page 39 > A.
— Canada models: the daytime running lights
switch on automatically when the ignition is
switched on and the light switch is set to the O,
300 or the AUTO position (only in daylight) > A\.
AUTO* - automatic headlights switch on and off
depending on brightness, for example in twilight,
during rain or in tunnels.
300: - Parking lights
ZO - Low beam headlights
220 - All-weather lights*
QE - Rear fog light(s)*
All-weather lights*
In vehicles with all-weather lights, the front
lights are adjusted automatically so that you are
38
less likely to see glare from your own headlights,
for example when driving on a wet road.
Automatic dynamic headlight range control
system*
Your vehicle is equipped with a headlight range
control system so that there is less glare for on-
coming traffic if the vehicle load changes. The
headlight range also adjusts automatically when
braking and accelerating.
Light functions
The following light functions may be available
depending on vehicle equipment and only func-
tion when the light switch is in the AUTO posi-
tion.
Static cornering light* (vehicles with LED head-
lights) - the cornering light switches on automat-
ically when the steering wheel is turned at a cer-
tain angle at speeds up to approximately 44 mph
(70 km/h) and when the turn signal is activated
at speeds up to approximately 25 mph
(40 km/h). The area to the side of the vehicle is
illuminated better when turning.
Highway light function* (vehicles with LED head-
lights) - this function adapts the lighting for
highway driving based on vehicle speed.
Speed dependent light distribution* (vehicles
with
LED headlights) - the speed dependent light
distribution adapts the light in towns and on
highways or expressways. Intersections can also
be illuminated on vehicles with a navigation sys-
tem*.
ZA\ WARNING
— Automatic headlights* are only intended to
assist the driver. They do not relieve the
driver of responsibility to check the head-
lights and to turn them on manually based
on the current light and visibility conditions.
For example, fog cannot be detected by the
light sensors. So always switch on the low
beams under these weather conditions and
when driving in the dark ZO.
—To reduce glare for traffic behind your vehi-
cle, the rear fog lights* should only be
turned on in accordance with the legal >
Page 64 of 304
Driving
changes in speed, and traveling at the maximum
speed.
If desired, the driver can also select the gears
manually (tiptronic mode).
RY ta cela (Oa eid
7
BFV-0245
a
Lee
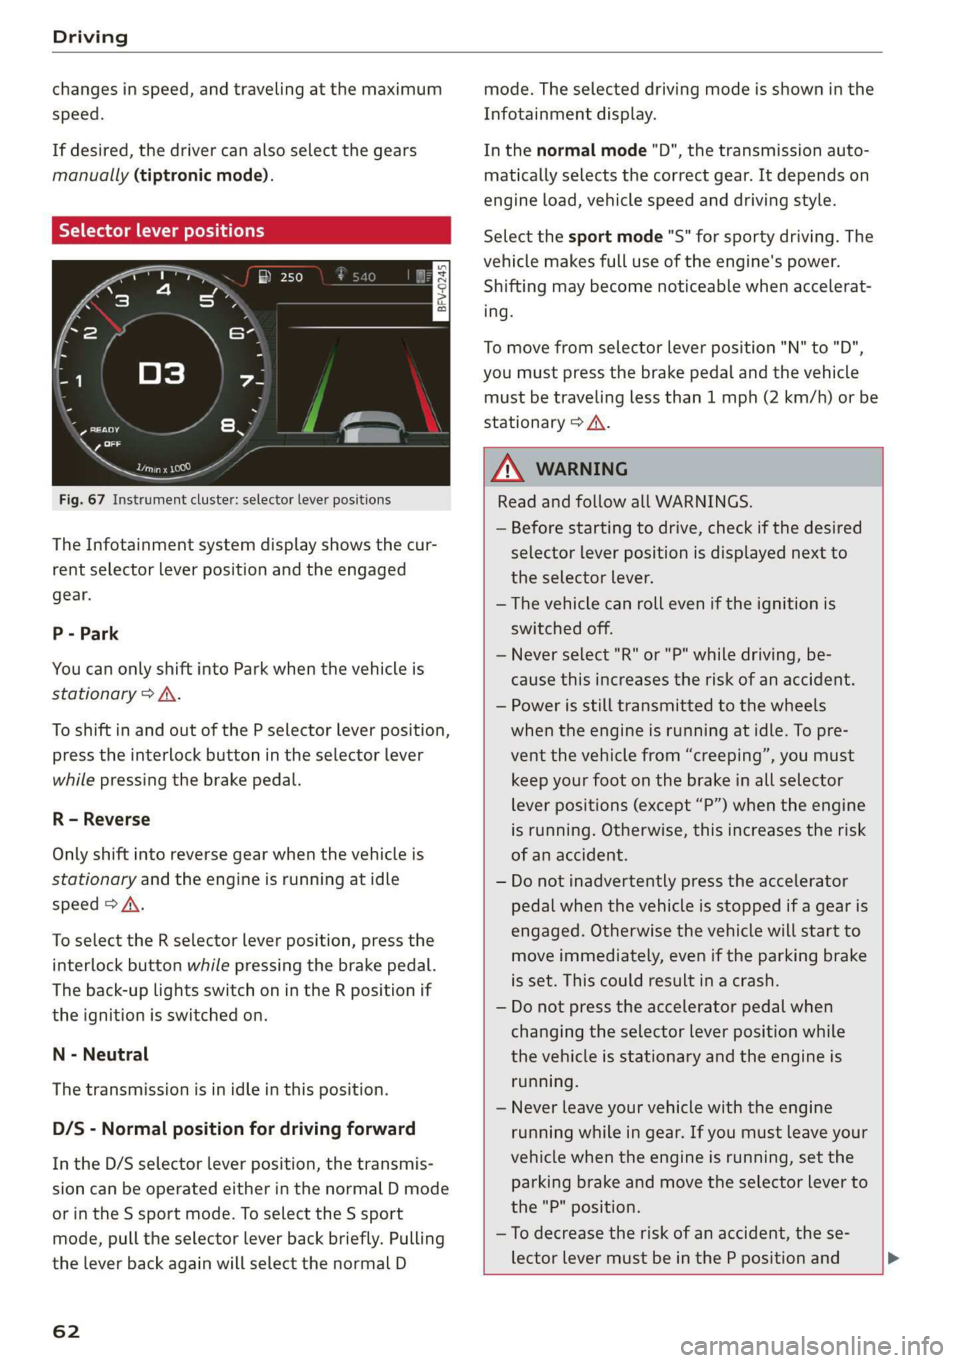
Fig. 67 Instrument cluster: selector lever positions
The Infotainment system display shows the cur-
rent selector lever position and the engaged
gear.
P - Park
You can only shift into Park when the vehicle is
stationary > A.
To shift in and out of the P selector lever position,
press the interlock button in the selector lever
while pressing the brake pedal.
R - Reverse
Only shift into reverse gear when the vehicle is
stationary and the engine is running at idle
speed > A\.
To select the R selector lever position, press the
interlock button while pressing the brake pedal.
The back-up lights switch on in the R position if
the ignition is switched on.
N - Neutral
The transmission is in idle in this position.
D/S - Normal position for driving forward
In the D/S selector lever position, the transmis-
sion can be operated either in the normal D mode
or in the S sport mode. To select the S sport
mode, pull the selector lever back briefly. Pulling
the lever back again will select the normal D
62
mode. The selected driving mode is shown in the
Infotainment display.
In the normal mode "D", the transmission auto-
matically selects the correct gear. It depends on
engine load, vehicle speed and driving style.
Select the sport mode "S" for sporty driving. The
vehicle makes full use of the engine's power.
Shifting may become noticeable when accelerat-
ing.
To move from selector lever position "N" to "D",
you must press the brake pedal and the vehicle
must be traveling less than 1 mph (2 km/h) or be
stationary > A.
Z\ WARNING
Read and follow all WARNINGS.
— Before starting to drive, check if the desired
selector lever position is displayed next to
the selector lever.
— The vehicle can roll even if the ignition is
switched off.
— Never select "R" or "P" while driving, be-
cause this increases the risk of an accident.
— Power is still transmitted to the wheels
when the engine is running at idle. To pre-
vent the vehicle from “creeping”, you must
keep your foot on the brake in all selector
lever positions (except “P”) when the engine
is running. Otherwise, this increases the risk
of an accident.
— Do not inadvertently press the accelerator
pedal when the vehicle is stopped if a gear is
engaged. Otherwise the vehicle will start to
move immediately, even if the parking brake
is set. This could result in a crash.
— Do not press the accelerator pedal when
changing the selector lever position while
the vehicle is stationary and the engine is
running.
— Never leave your vehicle with the engine
running while in gear. If you must leave your
vehicle when the engine is running, set the
parking brake and move the selector lever to
the "P" position.
—To decrease the risk of an accident, the se-
lector lever must be in the P position and
Page 74 of 304
Assist systems
Applies to: vehicles with cruise control system
ICRUISE| / §) Speed control system: currently un-
available. See owner's manual
If the indicator light turns on and this message
appears, the cruise control system has been deac-
tivated. There is a temporary malfunction, for ex-
ample the brakes are overheating. Switch the
cruise control system on again later.
Audi active lane assist
Applies to: vehicles with Audi active lane assist
Active lane assist detects lane marker lines with-
in the limits of the system using a camera in the
windshield. If you are approaching a detected
lane marker line and it appears likely that you
will leave the lane, the system will warn you with
corrective steering. You can override this steering
at any time. If you pass over a line, the steering
wheel will vibrate lightly. In order for this warn-
ing vibration to occur, it must first be switched
on in the Infotainment system. Active lane assist
is ready for operation when the lane marker line
is detected on at least one side of the vehicle.
The system is designed for driving on express-
ways and highways and so it only activates at
speeds above approximately 40 mph (65 km/h)
(depending on the market).
Applies to vehicles with side assist*: If you acti-
vate a turn signal when active lane assist is ready
and it classifies a lane change as critical because
of vehicles traveling alongside you or approach-
ing you, there will be noticeable corrective steer-
ing shortly before you leave the lane. This will at-
tempt to keep your vehicle in the lane.
Applies to vehicles without side assist*: When
the system is ready, it will not warn you if you ac-
tivate the turn signal before crossing the lane
marker line. In this case, it assumes that you are
changing lanes intentionally.
)) The corrective steering function is not available in all mar-
kets.
72
Z\ WARNING
— The system warns the driver that the vehicle
is leaving the lane using corrective steering.
The
driver is always responsible for keeping
the vehicle within the lane.
— The system can assist the driver in keeping
the vehicle in the lane, but it does not drive
by itself. Always keep your hands on the
steering wheel.
— Corrective steering may not occur in certain
situations, such as during heavy braking.
— There may be cases where the camera does
not recognize all lane marker lines. Correc-
tive steering can only take place on the side
of the vehicle where lane marker lines are
detected.
— Other road structures or objects could possi-
bly be identified unintentionally as lane
marker lines. As a result, corrective steering
may be unexpected or may not occur.
— The camera view can be restricted, for exam-
ple by vehicles driving ahead or by rain,
snow, heavy spray light shining into the
camera or by dirt on the window. This can
result in active lane assist not detecting the
lane marker lines or detecting them incor-
rectly.
— Incertain situations where visibility is low,
the vehicle may switch internally from “ear-
ly” to “late” steering correction )).
— Under certain conditions such as ruts in the
road, an inclined roadway or crosswinds, the
corrective steering alone may not be enough
to keep the vehicle in the middle of the lane.
— For safety reasons, active lane assist must
not be used when there are poor road and/or
weather conditions such as slippery roads,
fog, gravel, heavy rain, snow and the poten-
tial for hydroplaning. Using active lane as-
sist under these conditions may increase the
risk of a crash.
Page 78 of 304

Assist systems
Side assist functions at speeds above approxi-
mately 19 mph (30 km/h).
@ Approaching vehicles
In certain cases, a vehicle will be classified as
critical for a lane change even if it is still some-
what far away. The faster a vehicle approaches,
the sooner the display in the outside mirror will
turn on.
@ Vehicles traveling with you
Vehicles traveling with you are indicated in the
exterior mirror if they are classified as critical for
a lane change. All vehicles detected by side assist
are indicated by the time they enter your “blind
spot”, at the latest.
@ Vehicles you are passing
If you slowly pass a vehicle that side assist has
detected (the difference in speed between the ve-
hicle and your vehicle is less than 9 mph (15 km/
h)), the display in the exterior mirror turns on as
soon as the vehicle enters your blind spot.
The display will not turn on if you quickly pass a
vehicle that side assist has detected (the differ-
ence in speed is greater than 9 mph (15 km/h)).
Functional limitations
The radar sensors are designed to detect the left
and right adjacent lanes when the road lanes are
the normal width. In some situations, the display
in the exterior mirror may turn on even though
there is no vehicle located in the area that is criti-
cal for a lane change. For example:
— If the lanes are narrow or if you are driving on
the edge of your lane. If this is the case, the
system may have detected a vehicle in another
lane that is not adjacent to your current lane.
— If you are driving through a curve. Side assist
may react to a vehicle that is one lane over from
the adjacent lane.
—If side assist reacts to other objects (such as
high or displaced guard rails).
— In poor weather conditions. The side assist
functions are limited.
Do not cover the radar sensors > fig. 81 with
stickers, deposits, bicycle wheels or other ob-
76
jects, because they will impair the function. For
information on cleaning, see > page 262.
ZA\ WARNING
— Always pay attention to traffic and to the
area around your vehicle. Side assist cannot
replace a driver's attention. The driver alone
is always responsible for lane changes and
similar driving maneuvers.
—Insome situations, the system may not
function or its function may be limited. For
example:
—If vehicles are approaching or being left
behind very quickly. The display may not
turn on in time.
— In poor weather conditions such as heavy
rain, snow or heavy mist.
— On very wide lanes, in tight curves, or if
there is a rise in the road surface. Vehicles
in the adjacent lane may not be detected
because they are outside of the sensor
range.
@) Note
The sensors can be displaced by impacts or
damage to the bumper, wheel housing and
underbody. This can impair the system. Have
an authorized Audi dealer or authorized Audi
Service Facility check their function.
@) Tips
— If the window glass in the driver's door or
front passenger's door has been tinted, the
display in the exterior mirror may be incor-
rect.
— For an explanation on conformity with the
FCC regulations in the United States and the
Industry Canada regulations, see
> page 283.
Sie moi lie mela
Applies to: vehicles with Audi side assist
> Select in the Infotainment system: [MENU] but-
ton > Vehicle > left control button >Driver as-
sistance > Audi side assist
Page 79 of 304

8S8012721BA
Assist systems
If the system is activated, the displays in the ex-
terior mirrors will turn on briefly when the igni-
tion is switched on.
Adjusting the display brightness
Applies to: vehicles with Audi side assist
The display brightness can be adjusted in the In-
fotainment system.
> Select in the Infotainment system: [MENU] but-
ton > Vehicle > left control button >Driver as-
sistance > Audi side assist
The display brightness adjusts automatically to
the brightness of the surroundings, both in the
information and in the warning stage. In very
dark or very bright surroundings, the automatic
adjustment will set the display to the minimum
or maximum level. In such cases, you may notice
no change when adjusting the brightness, or the
change may only be noticeable once the sur-
roundings change.
Adjust the brightness to a level where the display
in the information stage will not disrupt your
view ahead. If you change the brightness, the dis-
play in the exterior mirror will briefly show the
brightness level in the information stage. The
brightness of the warning stage is linked to the
brightness in the information stage and is adjust-
ed along with the information stage.
G@) Tips
— Side assist is not active while you are mak-
ing the adjustment.
— Your settings are automatically stored and
assigned to the remote control key being
used.
Messages
Applies to: vehicles with Audi side assist
If the side assist switches off automatically, a
message appears in the Infotainment system dis-
play.
Audi side assist: currently unavailable.
Sensor vision restricted due to surroundings.
See owner's manual
The radar sensor vision is impaired. Do not cover
the area in front of the sensors with bike wheels,
stickers, dirt or other objects. Clean the area cov-
ering the sensors, if necessary > page 75, fig. 81.
Audi side assist: currently unavailable.
See owner's manual
Side assist cannot be switched on at this time be-
cause there is a malfunction (for example, the
battery charge level may be too low).
Audi side assist: malfunction! Please
contact Service
The system cannot guarantee that it will detect
vehicles correctly and it has switched off. The
sensors have been moved or are faulty. Have the
system checked by an authorized Audi dealer or
authorized Audi Service Facility soon.
Audi drive select (drive
settings)
Introduction
Applies to: vehicles with Audi drive select
Drive select makes it possible to experience dif-
ferent types of vehicle characteristics in one vehi-
cle. The driver can select from three modes,
Comfort,
Auto, and Dynamic, using the sist but-
ton in the center console or by using the Infotain-
ment system. This allows you to switch between
a sporty and a comfortable driving mode, for ex-
ample. In the Individual mode, the settings can
be adjusted to your personal preferences. This
makes it possible to combine settings such as a
sporty engine setting with light steering.
Z\ WARNING
Using Audi drive select incorrectly can lead to
collisions, other accidents and serious inju-
ries.
77
Page 82 of 304
Parking aid
Parking aid
Introduction
Applies to: vehicles with rear parking system/parking system
plus
Depending on the vehicle equipment, various
parking aids will help you when parking and ma-
neuvering.
The rear parking system is an audible parking aid
that warns you of obstacles behind the vehicle
=> page 81.
The parking system plus assists you while park-
ing by audibly and visually warning you of objects
detected in front of and behind the vehicle
=> page 81.
The rearview camera shows the area behind the
vehicle in the Infotainment system display. The
lines in the rearview camera image help you to
park or maneuver > page 82.
ZA WARNING
— Always look for traffic and check the area
around your vehicle by looking at it directly
as well. The parking system cannot replace
the driver's attention. The driver is always
responsible when entering or exiting a park-
ing space and during similar maneuvers.
— Please note that some surfaces, such as
clothing, are not detected by the system.
— Sensors and cameras have blind spots in
which people and objects cannot be detect-
ed. Be especially cautious of small children
and animals.
— The sensors can be displaced by impacts or
damage to the radiator grille, bumper,
wheel housing and the underbody. The park-
ing system may be impaired as a result.
Have an authorized Audi dealer or author-
ized Audi Service Facility check their func-
tion.
— Make sure the sensors are not obstructed by
stickers, deposits or other materials. If they
are, the sensor function could be impaired.
For additional information on cleaning, see
=> page 262.
80
@) Note
— Some objects are not detected or displayed
by the system under certain circumstances:
— objects such as barrier chains, trailer draw
bars, vertical poles or fences
— objects above the sensors such as wall ex-
tensions
— objects with certain surfaces or structures
such as chain link fences or powder snow
— If you continue driving closer to a low ob-
ject, it may disappear from the sensor
range. Note that you will no Longer be
warned about this obstacle.
— Maintain enough distance from the curb to
reduce the risk of damage to the rims.
@) Tips
— The system may provide a warning even
though there are no obstacles in the cover-
age area in some situations, such as:
— certain road surfaces or when there is tall
grass
— external ultrasonic sources such as from
cleaning vehicles
—in heavy rain, snow, or thick vehicle ex-
haust
— We recommend that you practice parking in
a traffic-free location or parking lot to be-
come familiar with the system. Practice
parking in good light and weather condi-
tions.
— You can change the volume of the signals.
— What appears in the display is slightly de-
layed.
— The sensors must be kept clean and free of
snow and ice for the parking aid to operate.
Page 85 of 304
8S8012721BA
Parking aid
General information
Applies to: vehicles with rearview camera
oO m q
2 > z
oO
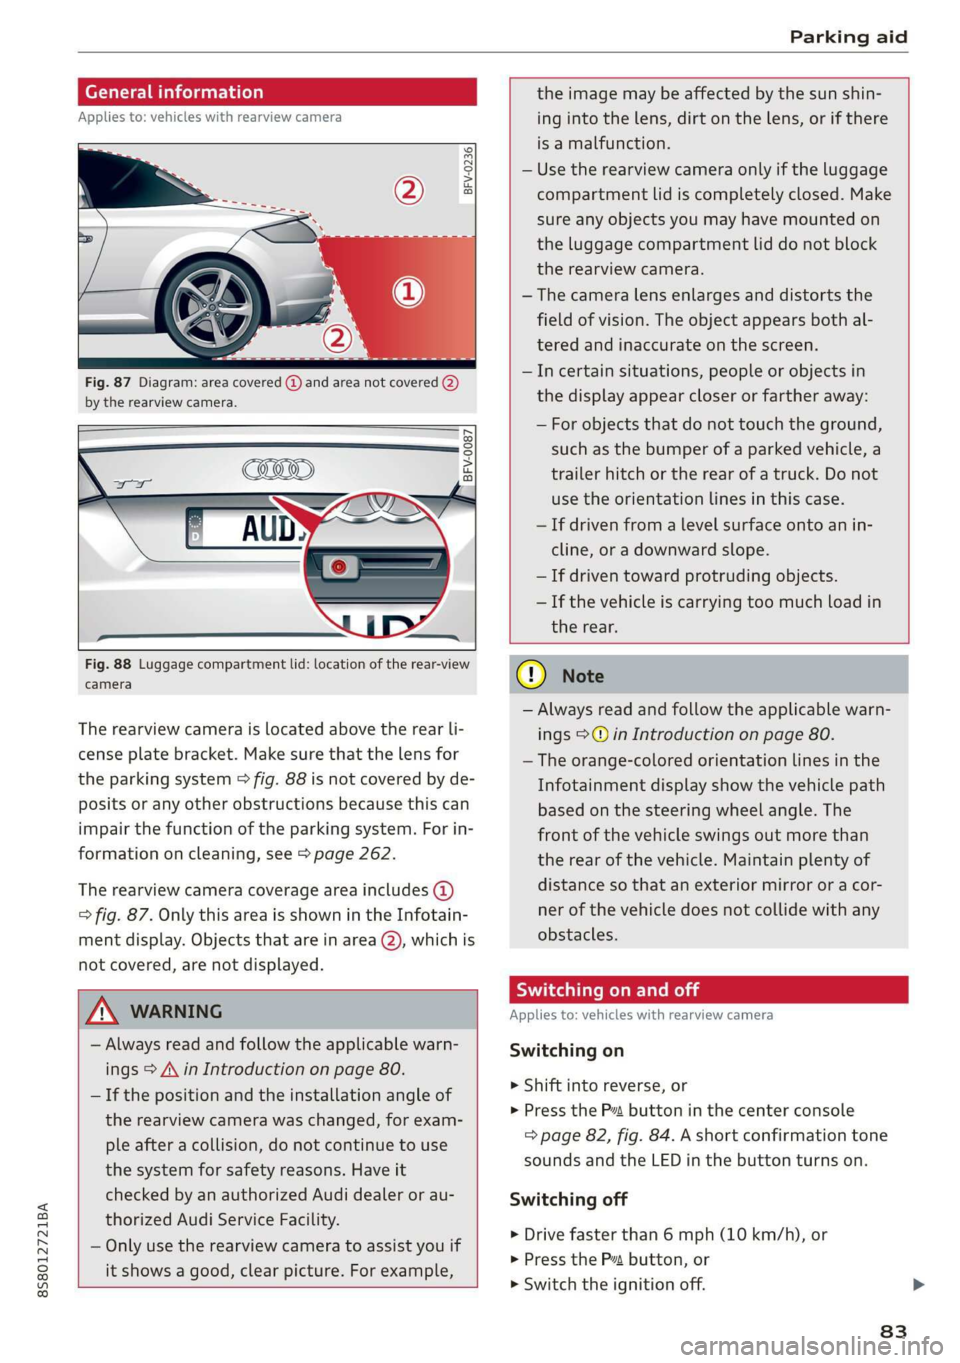
Fig. 87 Diagram: area covered @) and area not covered (2)
by the rearview camera.
BFV-0087
the image may be affected by the sun shin-
ing into the lens, dirt on the lens, or if there
is a malfunction.
— Use the rearview camera only if the luggage
compartment lid is completely closed. Make
sure any objects you may have mounted on
the luggage compartment lid do not block
the rearview camera.
— The camera lens enlarges and distorts the
field of vision. The object appears both al-
tered and inaccurate on the screen.
—Incertain situations, people or objects in
the display appear closer or farther away:
— For objects that do not touch the ground,
such as the bumper of a parked vehicle, a
trailer hitch or the rear of a truck. Do not
use the
orientation lines in this case.
—If driven from a level surface onto an in-
cline, or a downward slope.
— If driven toward protruding objects.
— If the vehicle is carrying too much load in
Fig. 88 Luggage compartment lid: location of the rear-view
camera
The rearview camera is located above the rear li-
cense plate bracket. Make sure that the lens for
the parking system > fig. 88 is not covered by de-
posits or any other obstructions because this can
impair the function of the parking system. For in-
formation on cleaning, see > page 262.
The rearview camera coverage area includes (4)
=> fig. 87. Only this area is shown in the Infotain-
ment display. Objects that are in area (2), which is
not covered, are not displayed.
ZA\ WARNING
— Always read and follow the applicable warn-
ings > A\ in Introduction on page 80.
— If the position and the installation angle of
the rearview camera was changed, for exam-
ple after a collision, do not continue to use
the system for safety reasons. Have it
checked by an authorized Audi dealer or au-
thorized Audi Service Facility.
— Only use the rearview camera to assist you if
it shows a good, clear picture. For example,
the rear.
CG) Note
— Always read and follow the applicable warn-
ings >@ in Introduction on page 80.
— The orange-colored orientation lines in the
Infotainment display show the vehicle path
based on the steering wheel angle. The
front
of the vehicle swings out more than
the rear of the vehicle. Maintain plenty of
distance so that an exterior mirror or a cor-
ner of the vehicle does not collide with any
obstacles.
Scale Le molal
Applies to: vehicles with rearview camera
Switching on
> Shift into reverse, or
> Press the P™ button in the center console
=> page 82, fig. 84. A short confirmation tone
sounds and the LED in the button turns on.
Switching off
>» Drive faster than 6 mph (10 km/h), or
> Press the Pv button, or
>» Switch the ignition off.
83
Page 86 of 304
Parking aid
® Tips
— The visual display in the left part of the dis-
play should help you detect the critical vehi-
cle areas.
— You can change the volume of the signals
and the display > page 84.
Perpendicular parking
Applies to: vehicles with rearview camera
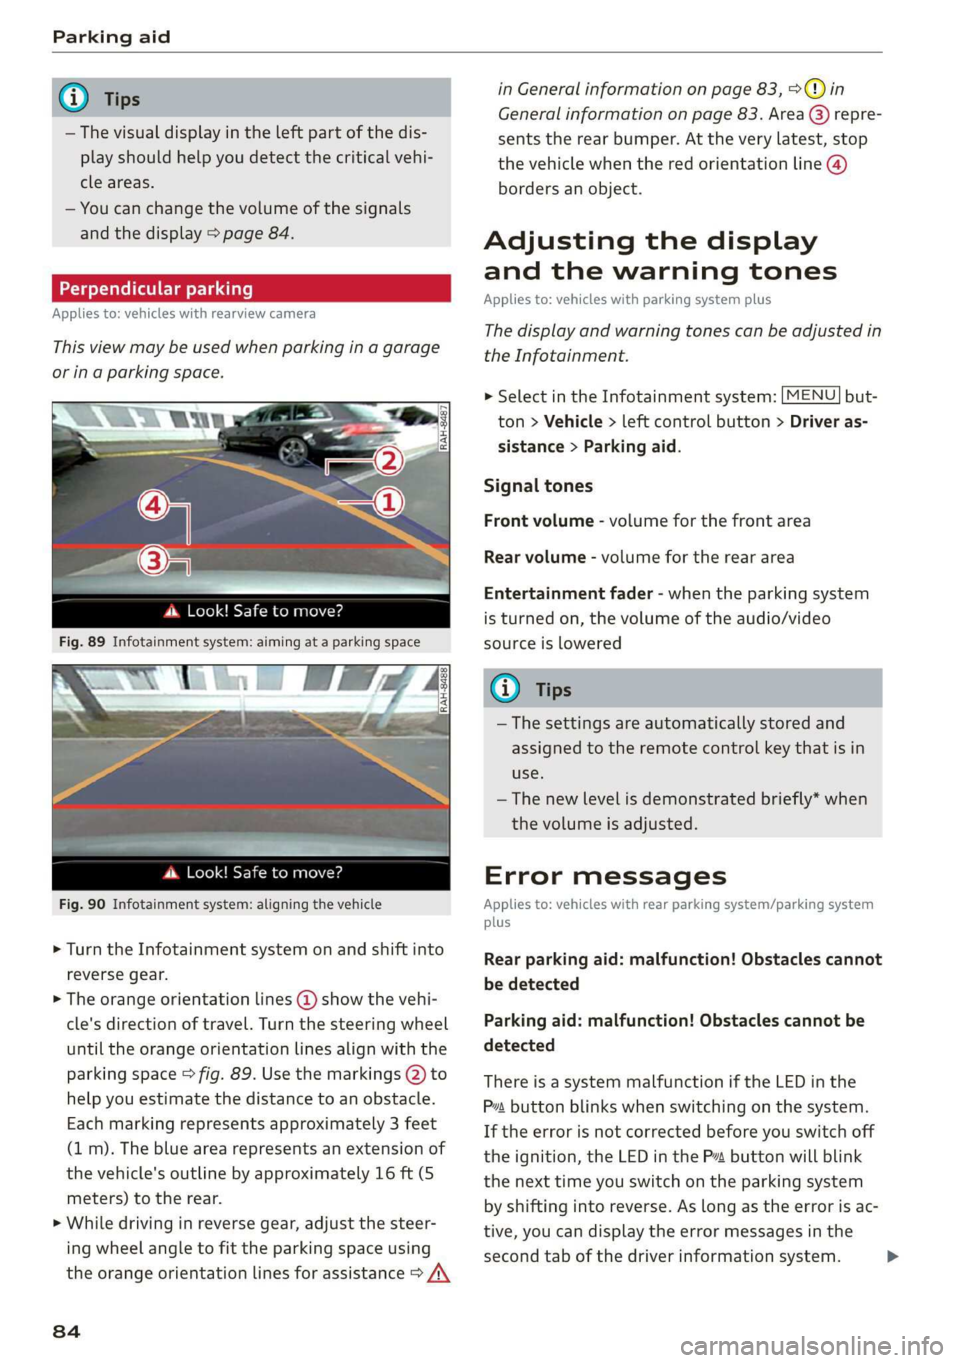
This view may be used when parking in a garage
or ina parking space.
4d. Look! Safe to move?
Fig. 90 Infotainment system: aligning the vehicle
> Turn the Infotainment system on and shift into
reverse gear.
> The orange orientation lines @ show the vehi-
cle's direction of travel. Turn the steering wheel
until the orange orientation lines align with the
parking space > fig. 89. Use the markings @) to
help you estimate the distance to an obstacle.
Each marking represents approximately 3 feet
(1 m). The blue area represents an extension of
the vehicle's outline by approximately 16 ft (5
meters) to the rear.
> While driving in reverse gear, adjust the steer-
ing wheel angle to fit the parking space using
the orange orientation lines for assistance > /\
84
in General information on page 83, >@) in
General information on page 83. Area @) repre-
sents the rear bumper. At the very latest, stop
the vehicle when the red orientation line @)
borders an object.
Adjusting the display
and the warning tones
Applies to: vehicles with parking system plus
The display and warning tones can be adjusted in
the Infotainment.
MENU > Select in the Infotainment system: but-
ton > Vehicle > left control button > Driver as-
sistance > Parking aid.
Signal tones
Front volume - volume for the front area
Rear volume - volume for the rear area
Entertainment fader - when the parking system
is turned on, the volume of the audio/video
source is lowered
G) Tips
— The settings are automatically stored and
assigned to the remote control key that is in
use.
— The new level is demonstrated briefly* when
the volume is adjusted.
Error messages
Applies to: vehicles with rear parking system/parking system
plus
Rear parking aid: malfunction! Obstacles cannot
be detected
Parking aid: malfunction! Obstacles cannot be
detected
There is a system malfunction if the LED in the
Pva button blinks when switching on the system.
If the error is not corrected before you switch off
the ignition, the LED in the P button will blink
the next time you switch on the parking system
by shifting into reverse. As long as the error is ac-
tive, you can display the error messages in the
second tab of the driver information system. >