BMW 135I 2009 E81 Owner's Manual
Manufacturer: BMW, Model Year: 2009, Model line: 135I, Model: BMW 135I 2009 E81Pages: 166, PDF Size: 5.01 MB
Page 101 of 166
Reference
At a glance
Controls
Driving tips
Mobility
99
With convenient access and automatic
transmission
Insert the remote control into the ignition
switch.
The engine can be switched off when the selec-
tor lever is in position N. Refer also to page27.
Cargo loading
To avoid loading the tires beyond their
approved carrying capacity, never over-
load the vehicle. Overloading can lead to over-
heating and increases the rate at which damage
develops inside the tires. This can ultimately
result in a sudden blow-out.<
Make sure that no liquids are spilled or
leak from their containers in the cargo
bay, as this could result in damage to the vehi-
cle.<
Determining loading limit
1.Locate the following statement on your
vehicle's placard
*:
The combined weight of occupants
and cargo should never exceed
XXX kg or YYY lbs. Otherwise, overloading
can result in damage to the vehicle and
unstable driving conditions.<
2.Determine the combined weight of the
driver and passengers that will be riding in
your vehicle.
3.Subtract the combined weight of the driver
and passengers from XXX kilograms or YYY
pounds.
4.The resulting figure equals the available
amount of cargo and luggage load capacity. For example, if the YYY amount equals
1,400 lbs. and there will be five 150-lb. pas-
sengers in your vehicle, the amount of avail-
able cargo and luggage load capacity is
650 lbs:
1,400 lbs. minus 750 lbs. = 650 lbs.
5.Determine the combined weight of luggage
and cargo being loaded on the vehicle. That
weight may not safely exceed the available
cargo and luggage load capacity calculated
in step 4.
6.If your vehicle will be towing a trailer, part of
the load from your trailer will be transferred
to your vehicle. Consult the manual for
transporting a trailer to determine how this
may reduce the available cargo and luggage
load capacity of your vehicle.
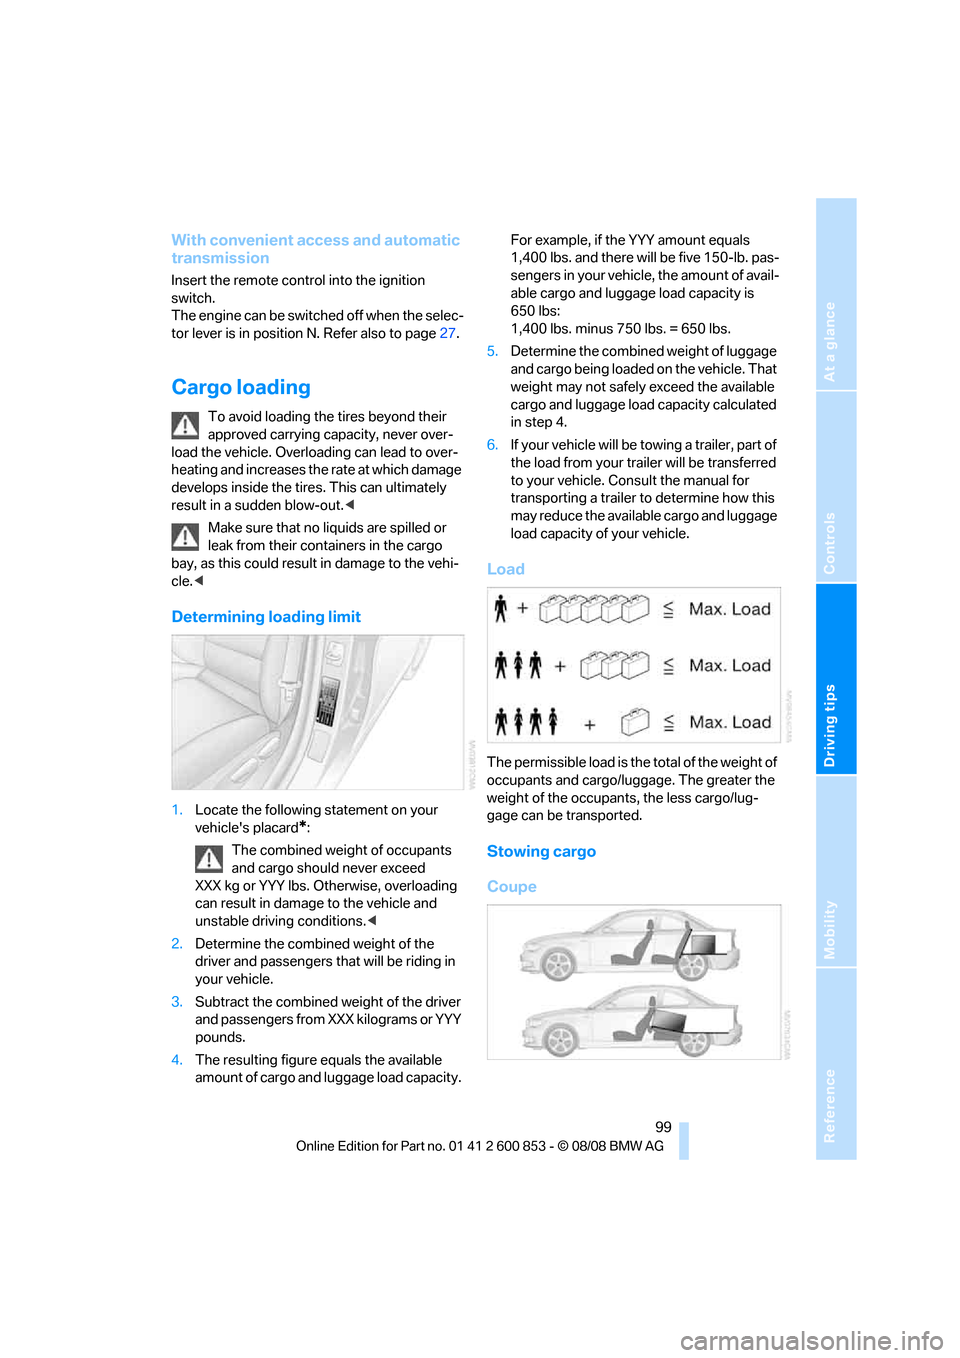
Load
The permissible load is the total of the weight of
occupants and cargo/luggage. The greater the
weight of the occupants, the less cargo/lug-
gage can be transported.
Stowing cargo
Coupe
Page 102 of 166
Things to remember when driving
100
Convertible
>Position heavy objects as low and as far for-
ward as possible, ideally directly behind the
respective seat backrests.
>Cover sharp edges and corners.
>For very heavy cargo when the rear seat is
not occupied, secure each safety belt in the
opposite buckle.
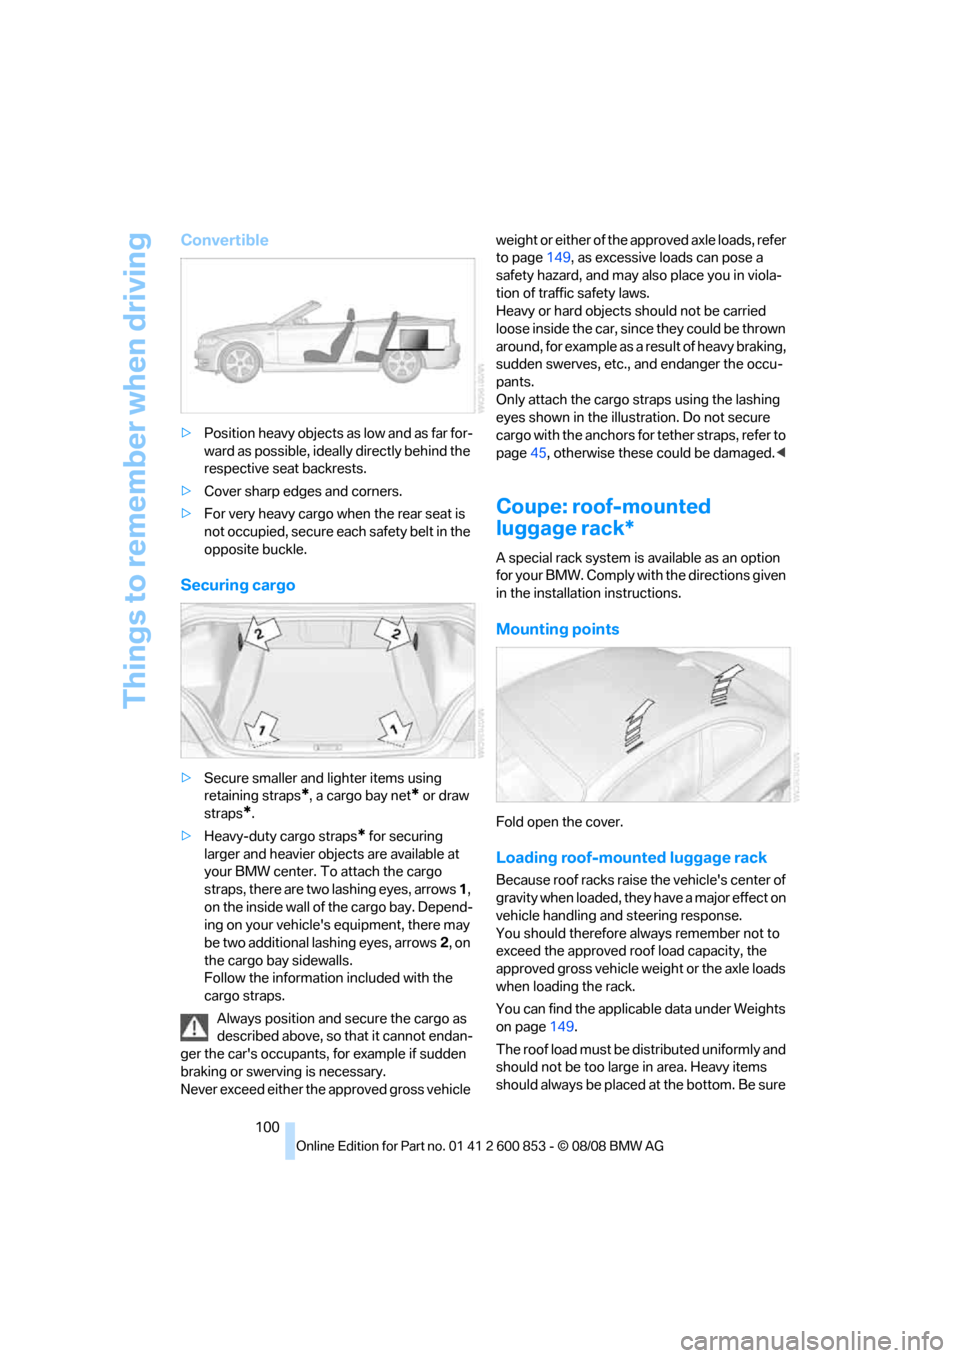
Securing cargo
>Secure smaller and lighter items using
retaining straps
*, a cargo bay net* or draw
straps
*.
>Heavy-duty cargo straps
* for securing
larger and heavier objects are available at
your BMW center. To attach the cargo
straps, there are two lashing eyes, arrows 1,
on the inside wall of the cargo bay. Depend-
ing on your vehicle's equipment, there may
be two additional lashing eyes, arrows2, on
the cargo bay sidewalls.
Follow the information included with the
cargo straps.
Always position and secure the cargo as
described above, so that it cannot endan-
ger the car's occupants, for example if sudden
braking or swerving is necessary.
Never exceed either the approved gross vehicle weight or either of the approved axle loads, refer
to page149, as excessive loads can pose a
safety hazard, and may also place you in viola-
tion of traffic safety laws.
Heavy or hard objects should not be carried
loose inside the car, since they could be thrown
around, for example as a result of heavy braking,
sudden swerves, etc., and endanger the occu-
pants.
Only attach the cargo straps using the lashing
eyes shown in the illustration. Do not secure
cargo with the anchors for tether straps, refer to
page45, otherwise these could be damaged.<
Coupe: roof-mounted
luggage rack*
A special rack system is available as an option
for your BMW. Comply with the directions given
in the installation instructions.
Mounting points
Fold open the cover.
Loading roof-mounted luggage rack
Because roof racks raise the vehicle's center of
gravity when loaded, they have a major effect on
vehicle handling and steering response.
You should therefore always remember not to
exceed the approved roof load capacity, the
approved gross vehicle weight or the axle loads
when loading the rack.
You can find the applicable data under Weights
on page149.
The roof load must be distributed uniformly and
should not be too large in area. Heavy items
should always be placed at the bottom. Be sure
Page 103 of 166
Reference
At a glance
Controls
Driving tips
Mobility
101
that adequate clearance is maintained for rais-
ing the glass roof, and that objects do not
project into the opening path of the luggage
compartment lid.
Fasten roof-mounted cargo correctly and
securely to prevent it from shifting or falling off
during the trip.
Drive smoothly. Avoid sudden acceleration and
braking maneuvers. Take corners gently.
Rear-mounted luggage rack*
A rear-mounted luggage rack is available as a
special accessory for your BMW. Comply with
the directions given in the installation instruc-
tions.
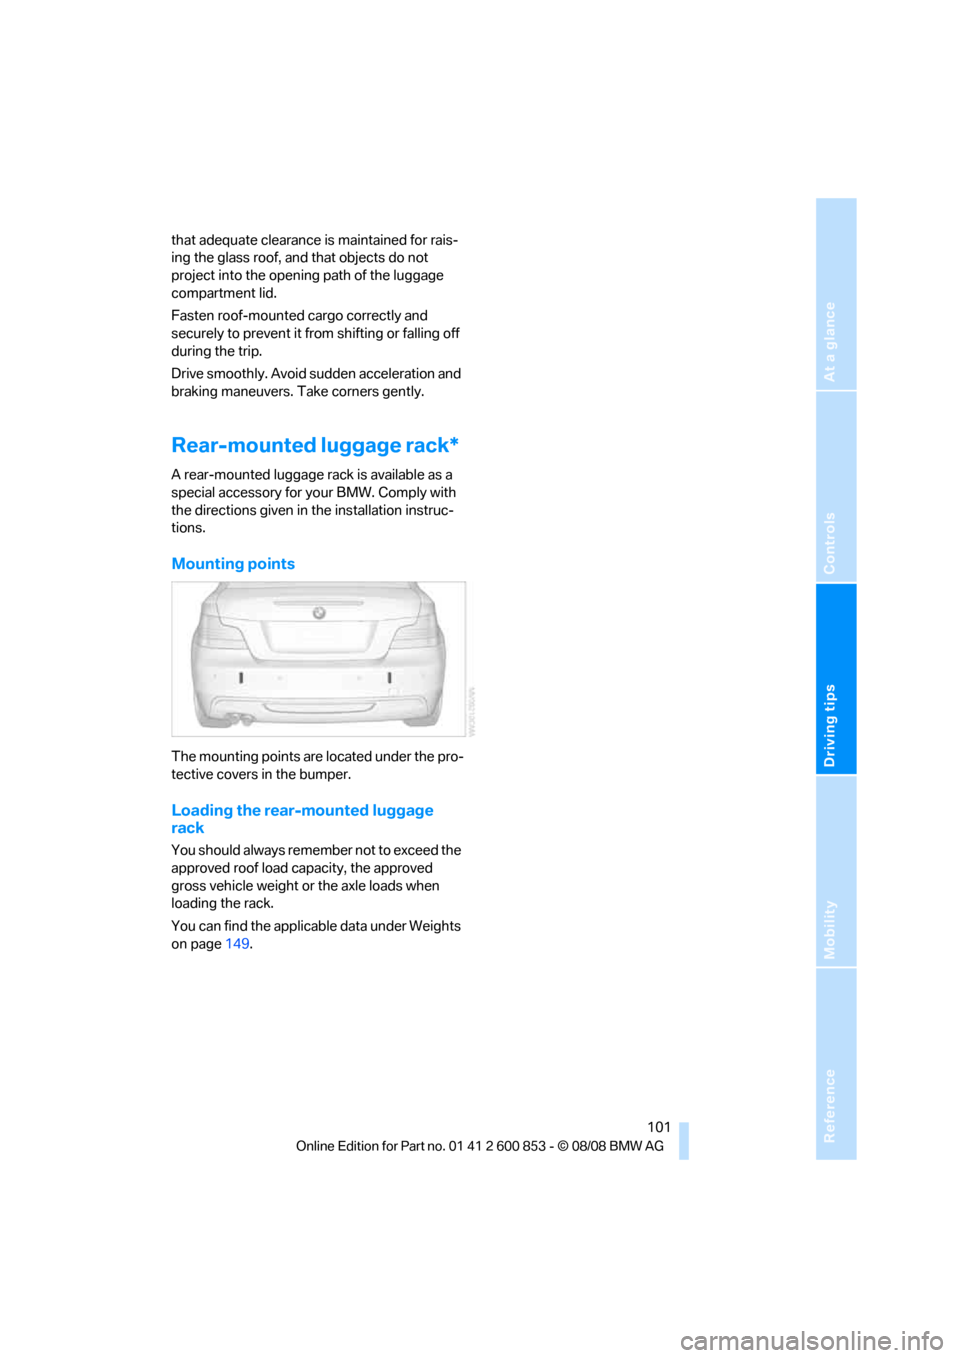
Mounting points
The mounting points are located under the pro-
tective covers in the bumper.
Loading the rear-mounted luggage
rack
You should always remember not to exceed the
approved roof load capacity, the approved
gross vehicle weight or the axle loads when
loading the rack.
You can find the applicable data under Weights
on page149.
Page 104 of 166
Page 105 of 166
Mobility
This section helps you maintain your car's
mobility by supplying important information
on vital topics including fuels and lubricants,
wheels and tires, service, maintenance and
roadside assistance.
Mobility
Page 106 of 166
Refueling
104
Refueling
Always switch off the engine before refu-
eling, otherwise, fuel cannot be added to
the tank and a message will be displayed.<
Take all precautionary measures and
observe all applicable regulations when
handling fuel. Do not carry any spare fuel con-
tainers in your vehicle. They can develop a leak
and cause an explosion or cause a fire in the
event of an accident.<
Fuel filler door
Opening
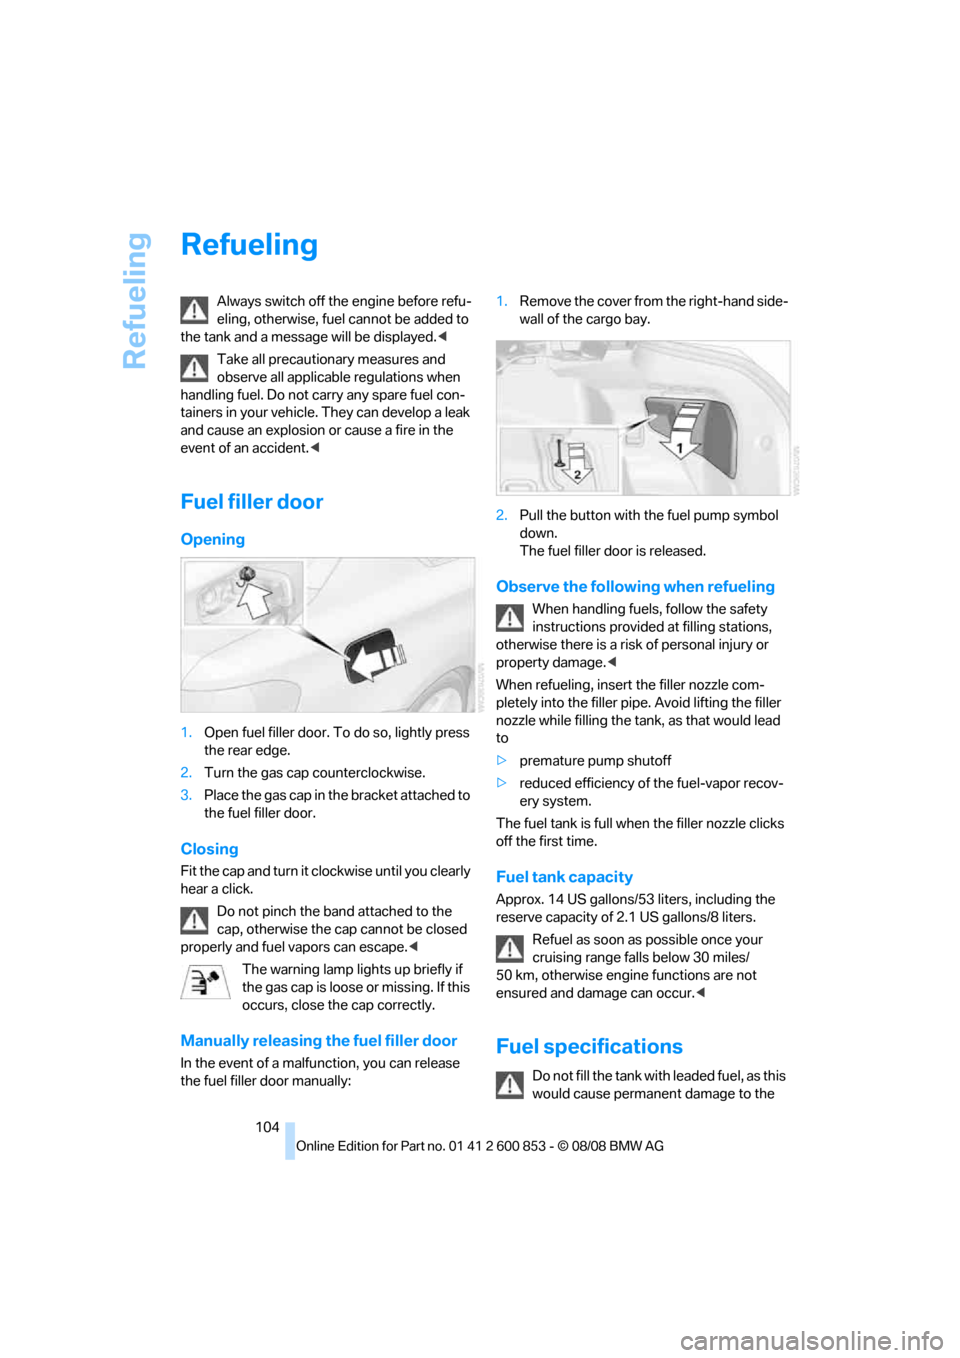
1.Open fuel filler door. To do so, lightly press
the rear edge.
2.Turn the gas cap counterclockwise.
3.Place the gas cap in the bracket attached to
the fuel filler door.
Closing
Fit the cap and turn it clockwise until you clearly
hear a click.
Do not pinch the band attached to the
cap, otherwise the cap cannot be closed
properly and fuel vapors can escape.<
The warning lamp lights up briefly if
the gas cap is loose or missing. If this
occurs, close the cap correctly.
Manually releasing the fuel filler door
In the event of a malfunction, you can release
the fuel filler door manually:1.Remove the cover from the right-hand side-
wall of the cargo bay.
2.Pull the button with the fuel pump symbol
down.
The fuel filler door is released.
Observe the following when refueling
When handling fuels, follow the safety
instructions provided at filling stations,
otherwise there is a risk of personal injury or
property damage.<
When refueling, insert the filler nozzle com-
pletely into the filler pipe. Avoid lifting the filler
nozzle while filling the tank, as that would lead
to
>premature pump shutoff
>reduced efficiency of the fuel-vapor recov-
ery system.
The fuel tank is full when the filler nozzle clicks
off the first time.
Fuel tank capacity
Approx. 14 US gallons/53 liters, including the
reserve capacity of 2.1 US gallons/8 liters.
Refuel as soon as possible once your
cruising range falls below 30 miles/
50 km, otherwise engine functions are not
ensured and damage can occur.<
Fuel specifications
Do not fill the tank with leaded fuel, as this
would cause permanent damage to the
Page 107 of 166
Reference
At a glance
Controls
Driving tips
Mobility
105
catalytic converter.
Do not fill the tank with E85, i.e. fuel containing
85 % ethanol, nor with FlexFuel. Otherwise the
engine and fuel supply system will be dam-
aged.<
Required fuel
Super Premium Gasoline/AKI 91
This gasoline is highly recommended.
However, you may also use gasoline with less
AKI. The minimum AKI Rating is:
>128i: 87
>135i: 89
If you use gasoline with this minimum AKI Rat-
ing, the engine may produce knocking sounds
when starting at high outside temperatures.
This has no effect on the engine life.
Do not use any gasoline below the speci-
fied minimum fuel grade. Otherwise the
engine could be damaged.<
Use high-quality brands
Field experience has indicated significant dif-
ferences in fuel quality: volatility, composition,
additives, etc., among gasolines offered for sale
in the United States and Canada. Fuels contain-
ing up to and including 10Ξ ethanol or other
oxygenates with up to 2.8Ξ oxygen by weight,
that is, 15Ξ MTBE or 3Ξ methanol plus an
equivalent amount of co-solvent, will not void
the applicable warranties with respect to
defects in materials or workmanship.
The use of poor-quality fuels may result in
driveability, starting and stalling problems
especially under certain environmental condi-
tions such as high ambient temperature and
high altitude.
Should you encounter driveability problems
which you suspect could be related to the fuel
you are using, we recommend that you respond
by switching to a recognized high-quality brand
such as gasoline that is advertised as Top Tier
Detergent Gasoline.
Failure to comply with these recommendations
may also result in unscheduled maintenance.
Page 108 of 166
Wheels and tires
106
Wheels and tires
Tire inflation pressures
Information for your safety
It is not merely the tires' service life, but also
driving comfort and, to a great extent, driving
safety that depend on the condition of the tires
and the maintenance of the specified tire pres-
sure.
Check the tire inflation pressure regularly
and correct it, if necessary: at least twice a
month and before starting long trips. If you fail
to observe this precaution you may be driving
on tires with incorrect tire pressures, a condi-
tion that can not only compromise your vehi-
cle's driving stability, but also lead to tire dam-
age and the risk of an accident. Do not drive
with deflated, i.e. flat tires, except when using
Run-Flat Tires. A flat tire will seriously impair
your vehicle's handling and braking response.
Attempts to drive on a flat tire can lead to loss of
control over the vehicle.<
Checking pressure
Only check tire inflation pressure when the
tires are cold. This means after a maximum of
1.25 miles/2 km driving or when the vehicle has
been parked for at least 2 hours. When tires are
warm, the tire inflation pressure is higher.
After correcting the tire inflation pressure,
reinitialize the Tire Pressure Monitor,
refer to page68, or the Flat Tire Monitor, refer
to page66.<
Inflation pressure specifications
The tables below provide all the correct inflation
pressures for the specified tire sizes at ambient
temperature.
The inflation pressures apply to the tire
sizes approved and tire brands recom-
mended by BMW; a list of these is available
from your BMW center.<
For correct identification of the right tire infla-
tion pressures, observe the following:>Tire sizes for your vehicle
>Load conditions
>Maximum allowable driving speed
Tire inflation pressures for driving up to
100 mph or 160 km/h
For normal driving up to 100 mph or 160 km/h
and to achieve optimum driving comfort, adjust
pressures to the respective tire inflation pres-
sures listed on the following pages in the col-
umns for traveling speeds up to a maximum of
100 mph or 160 km/h.
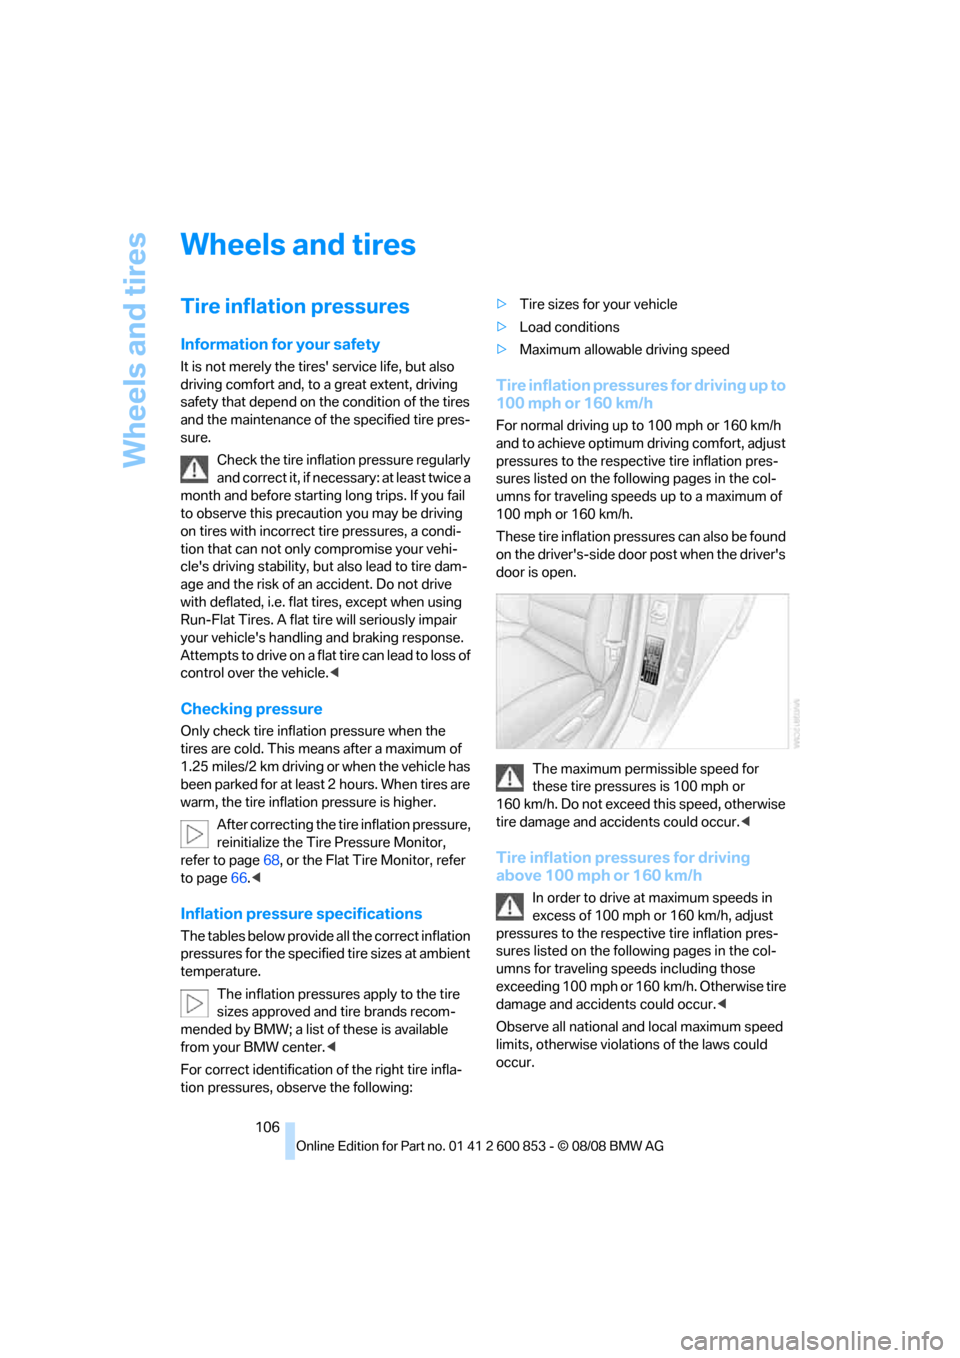
These tire inflation pressures can also be found
on the driver's-side door post when the driver's
door is open.
The maximum permissible speed for
these tire pressures is 100 mph or
160 km/h. Do not exceed this speed, otherwise
tire damage and accidents could occur.<
Tire inflation pressures for driving
above 100 mph or 160 km/h
In order to drive at maximum speeds in
excess of 100 mph or 160 km/h, adjust
pressures to the respective tire inflation pres-
sures listed on the following pages in the col-
umns for traveling speeds including those
exceeding 100 mph or 160 km/h. Otherwise tire
damage and accidents could occur.<
Observe all national and local maximum speed
limits, otherwise violations of the laws could
occur.
Page 109 of 166
Reference
At a glance
Controls
Driving tips
Mobility
107
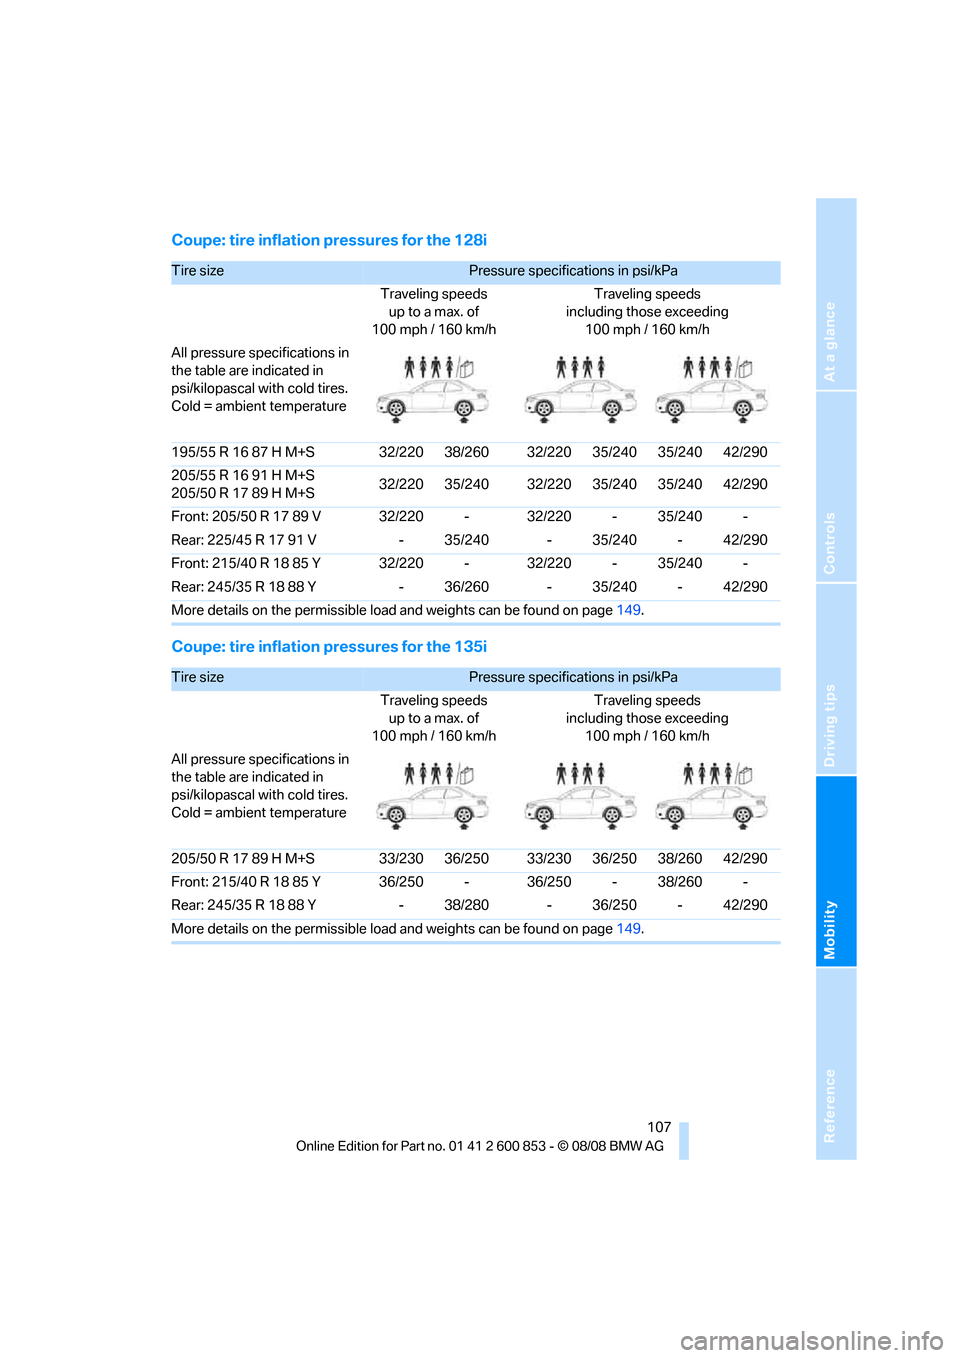
Coupe: tire inflation pressures for the 128i
Coupe: tire inflation pressures for the 135i
Tire size Pressure specifications in psi/kPa
Traveling speeds
up to a max. of
100 mph / 160 km/hTraveling speeds
including those exceeding
100 mph / 160 km/h
All pressure specifications in
the table are indicated in
psi/kilopascal with cold tires.
Cold = ambient temperature
195/55 R 16 87 H M+S 32/220 38/260 32/220 35/240 35/240 42/290
205/55 R 16 91 H M+S
205/50 R 17 89 H M+S32/220 35/240 32/220 35/240 35/240 42/290
Front: 205/50 R 17 89 V 32/220 - 32/220 - 35/240 -
Rear: 225/45 R 17 91 V - 35/240 - 35/240 - 42/290
Front: 215/40 R 18 85 Y 32/220 - 32/220 - 35/240 -
Rear: 245/35 R 18 88 Y - 36/260 - 35/240 - 42/290
More details on the permissible load and weights can be found on page149.
Tire size Pressure specifications in psi/kPa
Traveling speeds
up to a max. of
100 mph / 160 km/hTraveling speeds
including those exceeding
100 mph / 160 km/h
All pressure specifications in
the table are indicated in
psi/kilopascal with cold tires.
Cold = ambient temperature
205/50 R 17 89 H M+S 33/230 36/250 33/230 36/250 38/260 42/290
Front: 215/40 R 18 85 Y 36/250 - 36/250 - 38/260 -
Rear: 245/35 R 18 88 Y - 38/280 - 36/250 - 42/290
More details on the permissible load and weights can be found on page149.
Page 110 of 166
Wheels and tires
108
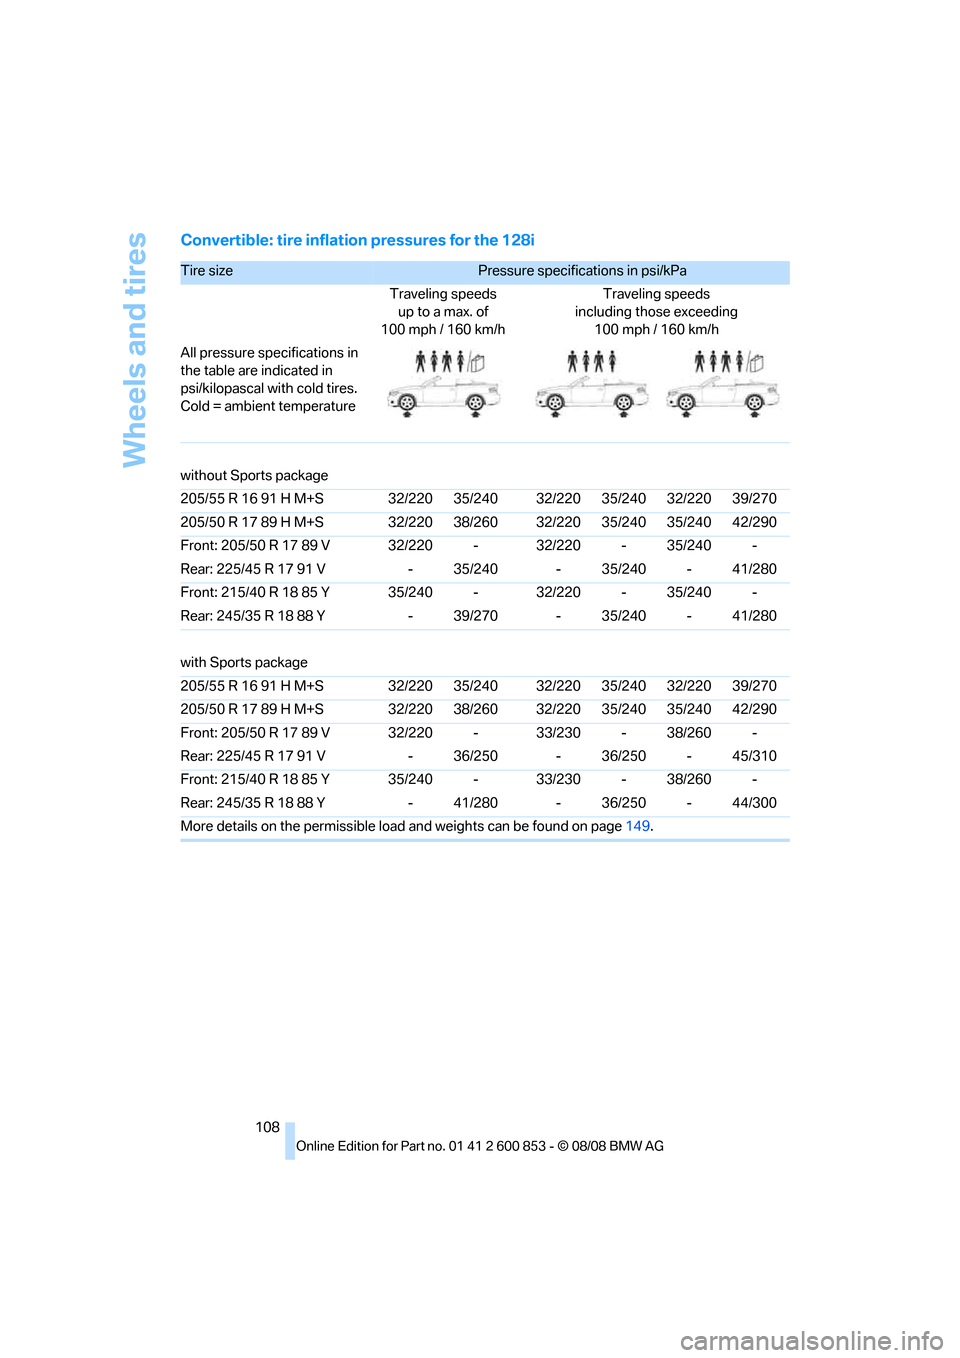
Convertible: tire inflation pressures for the 128i
Tire size Pressure specifications in psi/kPa
Traveling speeds
up to a max. of
100 mph / 160 km/hTraveling speeds
including those exceeding
100 mph / 160 km/h
All pressure specifications in
the table are indicated in
psi/kilopascal with cold tires.
Cold = ambient temperature
without Sports package
205/55 R 16 91 H M+S 32/220 35/240 32/220 35/240 32/220 39/270
205/50 R 17 89 H M+S 32/220 38/260 32/220 35/240 35/240 42/290
Front: 205/50 R 17 89 V 32/220 - 32/220 - 35/240 -
Rear: 225/45 R 17 91 V - 35/240 - 35/240 - 41/280
Front: 215/40 R 18 85 Y 35/240 - 32/220 - 35/240 -
Rear: 245/35 R 18 88 Y - 39/270 - 35/240 - 41/280
with Sports package
205/55 R 16 91 H M+S 32/220 35/240 32/220 35/240 32/220 39/270
205/50 R 17 89 H M+S 32/220 38/260 32/220 35/240 35/240 42/290
Front: 205/50 R 17 89 V 32/220 - 33/230 - 38/260 -
Rear: 225/45 R 17 91 V - 36/250 - 36/250 - 45/310
Front: 215/40 R 18 85 Y 35/240 - 33/230 - 38/260 -
Rear: 245/35 R 18 88 Y - 41/280 - 36/250 - 44/300
More details on the permissible load and weights can be found on page149.