flash BMW 135I COUPE 2008 E82 Owner's Manual
[x] Cancel search | Manufacturer: BMW, Model Year: 2008, Model line: 135I COUPE, Model: BMW 135I COUPE 2008 E82Pages: 260, PDF Size: 8.61 MB
Page 13 of 260
At a glance
11Reference
Controls
Driving tips
Communications
Navigation
Entertainment
Mobility
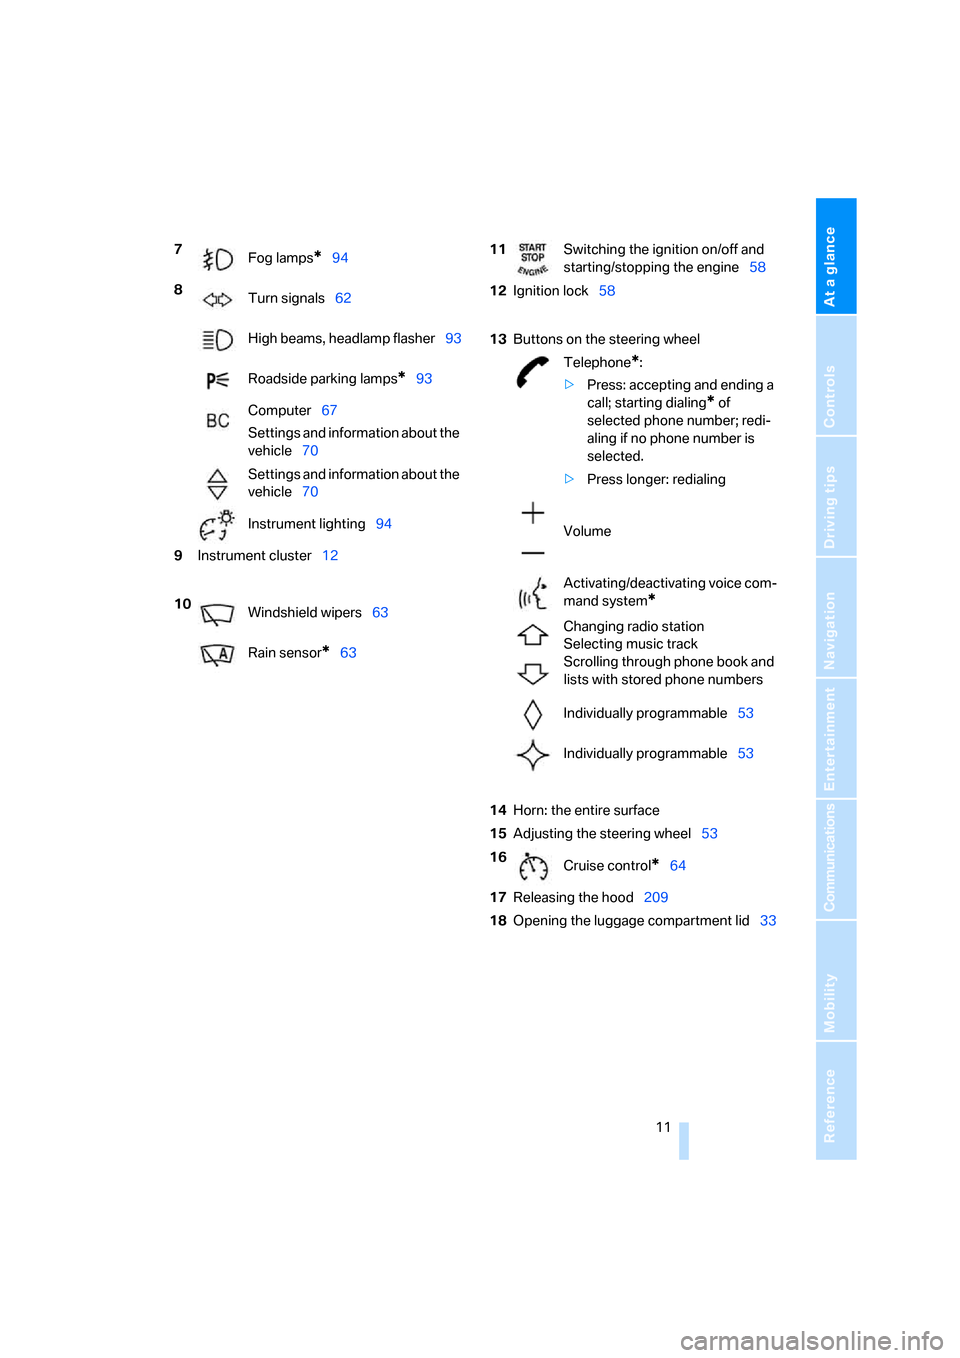
7
Fog lamps*94
8
Turn signals62
High beams, headlamp flasher93
Roadside parking lamps
*93
Computer67
Settings and information about the
vehicle70
Settings and information about the
vehicle70
Instrument lighting94
9Instrument cluster12
10
Windshield wipers63
Rain sensor
*63
11Switching the ignition on/off and
starting/stopping the engine58
12Ignition lock58
13Buttons on the steering wheel
Telephone
*:
>Press: accepting and ending a
call; starting dialing
* of
selected phone number; redi-
aling if no phone number is
selected.
>Press longer: redialing
Volume
Activating/deactivating voice com-
mand system
*
Changing radio station
Selecting music track
Scrolling through phone book and
lists with stored phone numbers
Individually programmable53
Individually programmable53
14Horn: the entire surface
15Adjusting the steering wheel53
16
Cruise control
*64
17Releasing the hood209
18Opening the luggage compartment lid33
Page 15 of 260
At a glance
13Reference
Controls
Driving tips
Communications
Navigation
Entertainment
Mobility
Indicator and warning lamps
The concept
Indicator and warning lamps in the display area
can light up in a variety of combinations and col-
ors.
Some lamps are checked for proper functioning
and thus come on briefly when the engine is
started or the ignition is switched on.
Explanatory text messages
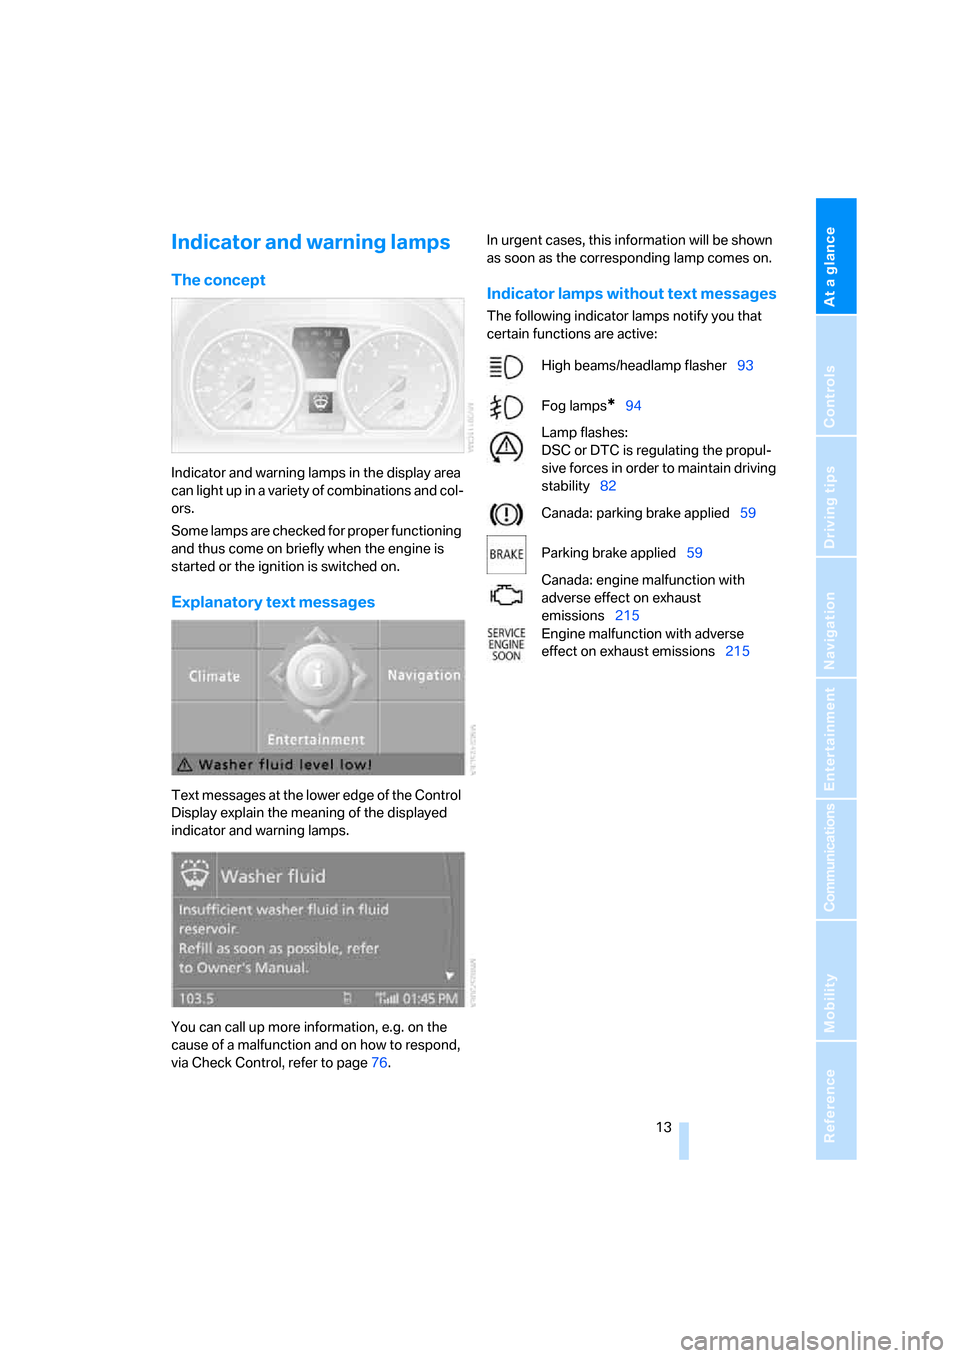
Text messages at the lower edge of the Control
Display explain the meaning of the displayed
indicator and warning lamps.
You can call up more information, e.g. on the
cause of a malfunction and on how to respond,
via Check Control, refer to page76.In urgent cases, this information will be shown
as soon as the corresponding lamp comes on.
Indicator lamps without text messages
The following indicator lamps notify you that
certain functions are active:
High beams/headlamp flasher93
Fog lamps
*94
Lamp flashes:
DSC or DTC is regulating the propul-
sive forces in order to maintain driving
stability82
Canada: parking brake applied59
Parking brake applied59
Canada: engine malfunction with
adverse effect on exhaust
emissions215
Engine malfunction with adverse
effect on exhaust emissions215
Page 17 of 260
At a glance
15Reference
Controls
Driving tips
Communications
Navigation
Entertainment
Mobility
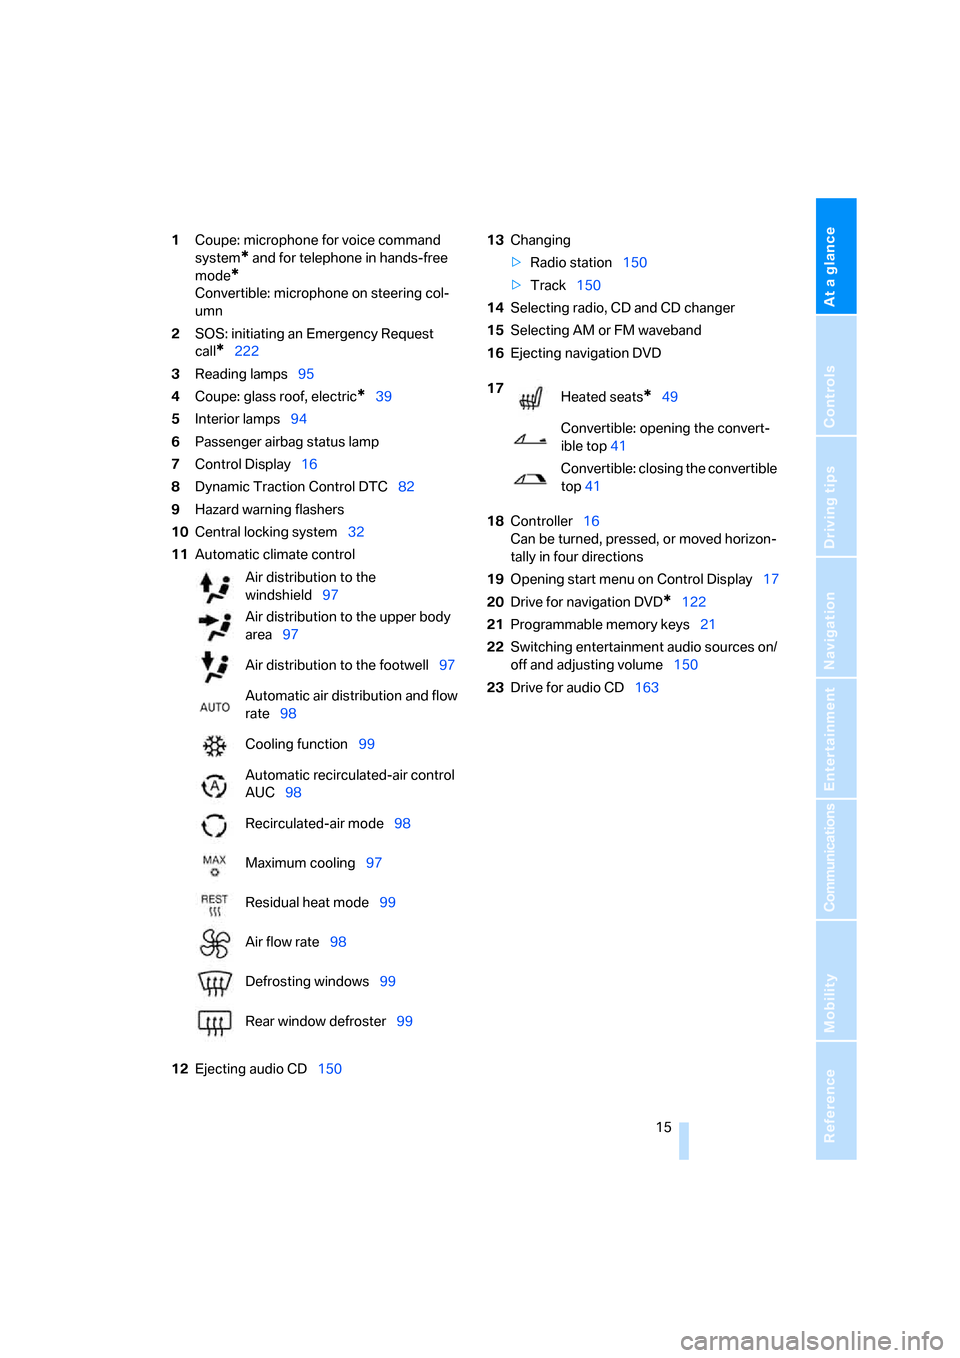
1Coupe: microphone for voice command
system
* and for telephone in hands-free
mode
*
Convertible: microphone on steering col-
umn
2SOS: initiating an Emergency Request
call
*222
3Reading lamps95
4Coupe: glass roof, electric
*39
5Interior lamps94
6Passenger airbag status lamp
7Control Display16
8Dynamic Traction Control DTC82
9Hazard warning flashers
10Central locking system32
11Automatic climate control
12Ejecting audio CD15013Changing
>Radio station150
>Track150
14Selecting radio, CD and CD changer
15Selecting AM or FM waveband
16Ejecting navigation DVD
18Controller16
Can be turned, pressed, or moved horizon-
tally in four directions
19Opening start menu on Control Display17
20Drive for navigation DVD
*122
21Programmable memory keys21
22Switching entertainment audio sources on/
off and adjusting volume150
23Drive for audio CD163 Air distribution to the
windshield97
Air distribution to the upper body
area97
Air distribution to the footwell97
Automatic air distribution and flow
rate98
Cooling function99
Automatic recirculated-air control
AUC98
Recirculated-air mode98
Maximum cooling97
Residual heat mode99
Air flow rate98
Defrosting windows99
Rear window defroster99
17
Heated seats*49
Convertible: opening the convert-
ible top41
Convertible: closing the convertible
top41
Page 31 of 260
Controls
29Reference
At a glance
Driving tips
Communications
Navigation
Entertainment
Mobility
>Settings for the display on the Control Dis-
play and in the instrument cluster:
>12h/24h format of the clock, refer to
page75
>Date format, refer to page76
>Brightness of Control Display, refer to
page79
>Language of Control Display, refer to
page79
>Units of measure for fuel consumption,
distance covered/remaining distances,
and temperature, refer to page70
>Show visual warning for Park Distance Con-
trol PDC, refer to page80
>Light settings:
>Welcome lamps, refer to page91
>Pathway lighting, refer to page92
>Daytime running lamps, refer to page92
>Automatic climate control: AUTO program,
cooling function and automatic recircu-
lated-air control activation/deactivation,
temperature, air flow rate and distribution,
refer to page97
>Entertainment:
>Audio volume, refer to page151
>Tone control, refer to page151
>Speed-dependent volume control, refer
to page151
Central locking system
The concept
The central locking system is ready for opera-
tion whenever the driver's door is closed.
The system simultaneously engages and
releases the locks on the following:
>Doors
>Luggage compartment lid
>Fuel filler door
Operating from outside
>Via the remote control>Via the door lock
>In cars with convenient access
*, via the
handles on the driver's and front passen-
ger's doors
The anti-theft system is also operated at the
same time. It prevents the doors from being
unlocked using the lock buttons or door han-
dles. In addition, if the remote control is used,
the welcome lamps
*, interior lamps and the
door's courtesy lamps
* are switched on or off.
The alarm system
* is also armed or disarmed.
For further details on the alarm system
*, refer
to page34.
Operating from inside
By means of the button for central locking, refer
to page32.
In the event of a sufficiently severe accident, the
central locking system unlocks automatically. In
addition, the hazard warning flashers and inte-
rior lamps come on.
Opening and closing:
Using the remote control
Persons or animals in a parked vehicle
could lock the doors from the inside. You
should therefore take the remote control with
you when you leave the vehicle so that the latter
can be opened from outside.<
Unlocking
Press the button.
The interior lamps, the courtesy lamps
* and the
welcome lamps come on.
You can set how the vehicle is to be unlocked.
The setting is stored for the remote control cur-
rently in use.
iDrive, for operating principle refer to page16.
1.Press the button.
This opens the start menu.
2.Press the controller to open the menu.
3.Select "Settings" and press the controller.
4.Select "Vehicle / Tires" and press the con-
troller.
Page 37 of 260
Controls
35Reference
At a glance
Driving tips
Communications
Navigation
Entertainment
Mobility
>When there is an interruption in the power
supply from the battery.
Depending on the national-market version, the
alarm system briefly signals unauthorized entry
attempts by:
>An acoustic alarm
>Switching on
* the hazard warning flashers
Arming and disarming
When you lock or unlock the vehicle, either with
the remote control or at the door lock, the alarm
system is armed or disarmed at the same time.
You can open the luggage compartment lid
using the button of the remote control even
if the alarm system is armed, refer to page30.
The lid is locked and monitored again as soon
as it is closed.
Panic mode
You can trigger the alarm system if you find
yourself in a dangerous situation.
Press the button for at least three seconds.
To switch off the alarm: press any button.
Switching off an alarm
>Unlock the car with the remote control, refer
to page29, or
>insert the remote control all the way into the
ignition lock.
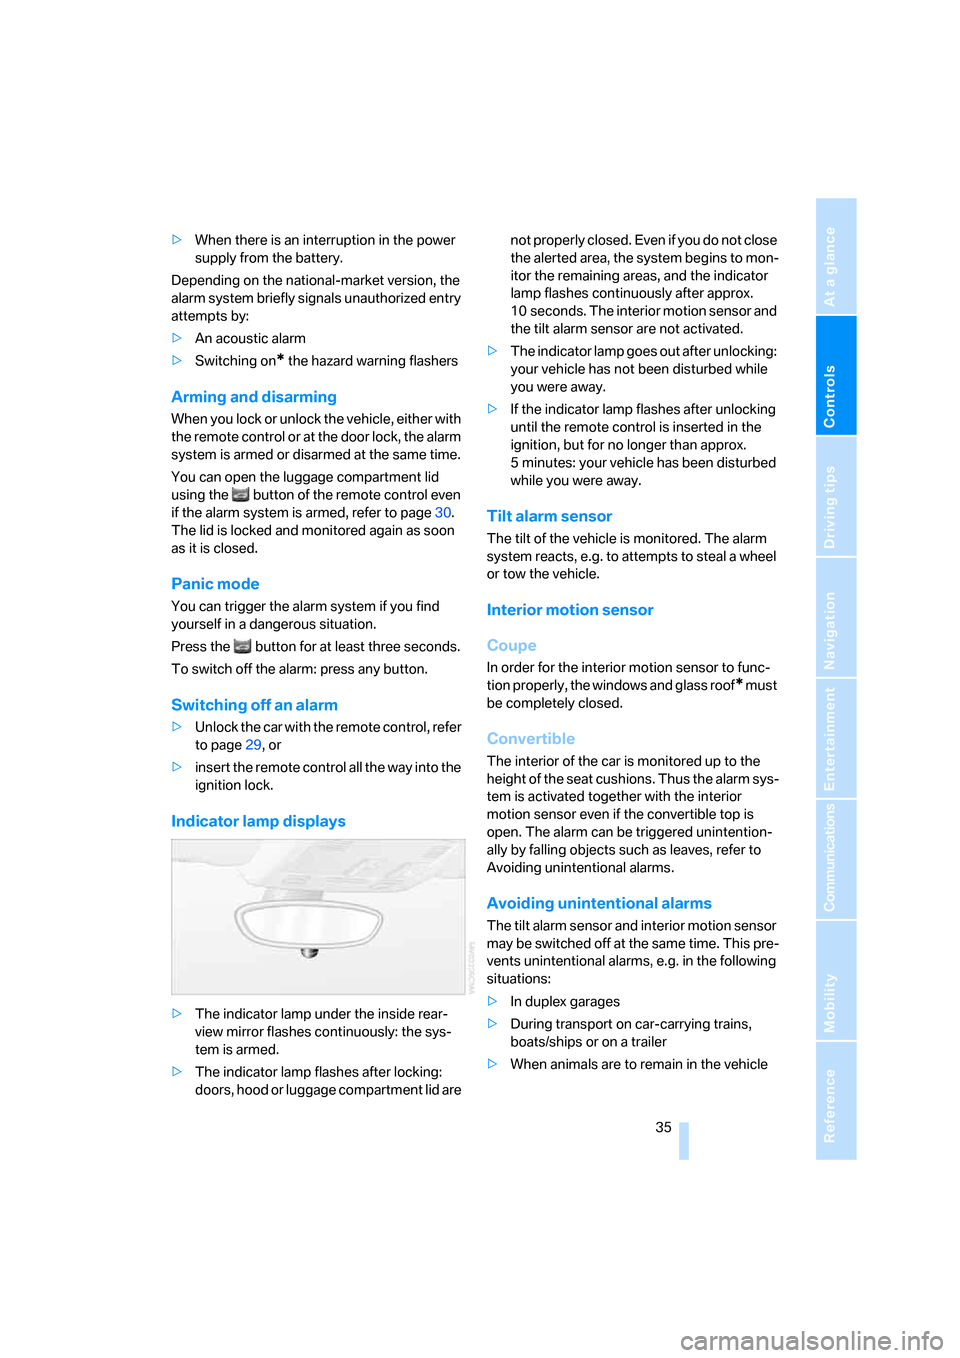
Indicator lamp displays
>The indicator lamp under the inside rear-
view mirror flashes continuously: the sys-
tem is armed.
>The indicator lamp flashes after locking:
doors, hood or luggage compartment lid are not properly closed. Even if you do not close
the alerted area, the system begins to mon-
itor the remaining areas, and the indicator
lamp flashes continuously after approx.
10 seconds. The interior motion sensor and
the tilt alarm sensor are not activated.
>The indicator lamp goes out after unlocking:
your vehicle has not been disturbed while
you were away.
>If the indicator lamp flashes after unlocking
until the remote control is inserted in the
ignition, but for no longer than approx.
5 minutes: your vehicle has been disturbed
while you were away.
Tilt alarm sensor
The tilt of the vehicle is monitored. The alarm
system reacts, e.g. to attempts to steal a wheel
or tow the vehicle.
Interior motion sensor
Coupe
In order for the interior motion sensor to func-
tion properly, the windows and glass roof
* must
be completely closed.
Convertible
The interior of the car is monitored up to the
height of the seat cushions. Thus the alarm sys-
tem is activated together with the interior
motion sensor even if the convertible top is
open. The alarm can be triggered unintention-
ally by falling objects such as leaves, refer to
Avoiding unintentional alarms.
Avoiding unintentional alarms
The tilt alarm sensor and interior motion sensor
may be switched off at the same time. This pre-
vents unintentional alarms, e.g. in the following
situations:
>In duplex garages
>During transport on car-carrying trains,
boats/ships or on a trailer
>When animals are to remain in the vehicle
Page 38 of 260
Opening and closing
36
Switching off tilt alarm sensor and
interior motion sensor
Press the button on the remote control
again as soon as the vehicle is locked.
The indicator lamp lights up briefly and then
flashes continuously. The tilt alarm sensor and
the interior motion sensor are switched off until
the next time the vehicle is unlocked and subse-
quently locked again.
Convenient access*
Convenient access enables you to enter your
vehicle without needing to hold the remote con-
trol in your hand. All you need to do is wear the
remote control close to your body, e.g. in your
jacket pocket. The vehicle detects the corre-
sponding remote control within the immediate
vicinity or in the passenger compartment.
Convenient access supports the following
functions:
>Unlocking/locking the vehicle
>Unlocking the luggage compartment lid
separately
>Engine starting
>Convenient closure
Functional requirement
>The vehicle or the luggage compartment lid
can only be locked when the vehicle detects
that the remote control currently in use is
outside of the vehicle.
>The vehicle cannot be locked or unlocked
again until after approx. 2 seconds.
>The engine can only be started when the
vehicle detects that the remote control cur-
rently in use is inside the vehicle.
Comparison to the standard remote
control
In general, there is no difference between using
convenient access or pressing the buttons on
the remote control to carry out the functions
mentioned above. You should therefore first familiarize yourself with the instructions on
opening and closing starting on page28.
Special features regarding the use of conve-
nient access are described below.
If you notice a brief delay while opening or
closing windows, the glass roof or the
convertible top, the system is checking whether
a remote control is inside the vehicle. Please
repeat the opening or closing procedure, if nec-
essary.<
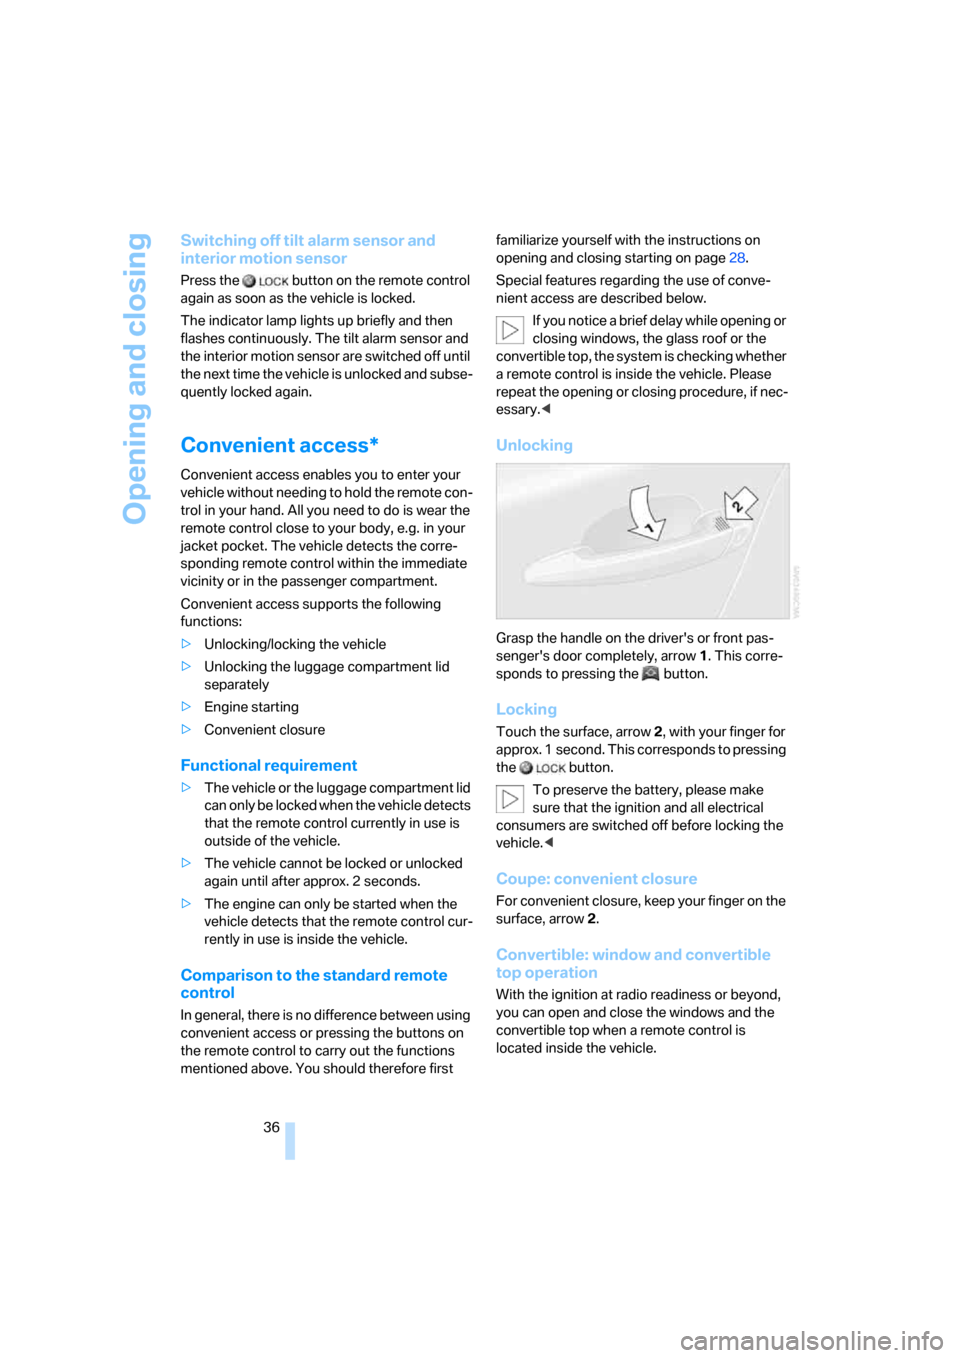
Unlocking
Grasp the handle on the driver's or front pas-
senger's door completely, arrow 1. This corre-
sponds to pressing the button.
Locking
Touch the surface, arrow 2, with your finger for
approx. 1 second. This corresponds to pressing
the button.
To preserve the battery, please make
sure that the ignition and all electrical
consumers are switched off before locking the
vehicle.<
Coupe: convenient closure
For convenient closure, keep your finger on the
surface, arrow 2.
Convertible: window and convertible
top operation
With the ignition at radio readiness or beyond,
you can open and close the windows and the
convertible top when a remote control is
located inside the vehicle.
Page 39 of 260
Controls
37Reference
At a glance
Driving tips
Communications
Navigation
Entertainment
Mobility
Unlocking the luggage compartment
lid separately
Press the button on the outside of the luggage
compartment lid. This corresponds to pressing
the button.
If the vehicle detects that a remote con-
trol has been accidentally left inside the
locked vehicle's interior after the luggage com-
partment lid is closed, the lid will reopen. The
hazard warning flashers flash and a signal
*
sounds.<
Switching on radio readiness
Radio readiness is switched on by pressing the
start/stop button, refer to page58.
Do not depress the brake or the clutch,
otherwise the engine will start immedi-
ately.<
Starting the engine
You can start the engine or switch on the igni-
tion when a remote control is inside the vehicle.
It is not necessary to insert a remote control into
the ignition switch, refer to page58.
Switching off the engine in cars with
automatic transmission
The engine can only be switched off when the
selector lever is in position P, refer to page59.
T o s w i t c h t h e e n g i n e o f f w h e n t h e s e l e c t o r l e v e r
is in position N, the remote control must be in
the ignition switch.
Before driving a vehicle with automatic
transmission into a car wash
1.Insert remote control into ignition switch.
2.Depress the brake.
3.Move the selector lever to position N.
4.Switch off the engine.
The vehicle can roll.
Malfunctions
Convenient access may malfunction due to
local radio waves. If this happens, open and
close the vehicle via the buttons on the remote control or using the integrated key. To start the
engine afterward, insert the remote control into
the ignition switch.
Warning lamps
The warning lamp in the instrument
cluster lights up when you attempt to
start the engine: the engine cannot
be started. The remote control is not inside the
vehicle or is malfunctioning. Take the remote
control with you inside the vehicle or have it
checked. If necessary, insert another remote
control into the ignition switch.
The warning lamp in the instrument
cluster lights up while the engine is
running: the remote control is no
longer inside the vehicle. After the engine is
switched off, the engine can only be restarted
within approx. 10 seconds.
The indicator lamp in the instrument
cluster comes on and a message
appears on the Control Display:
replace the battery in the remote control.
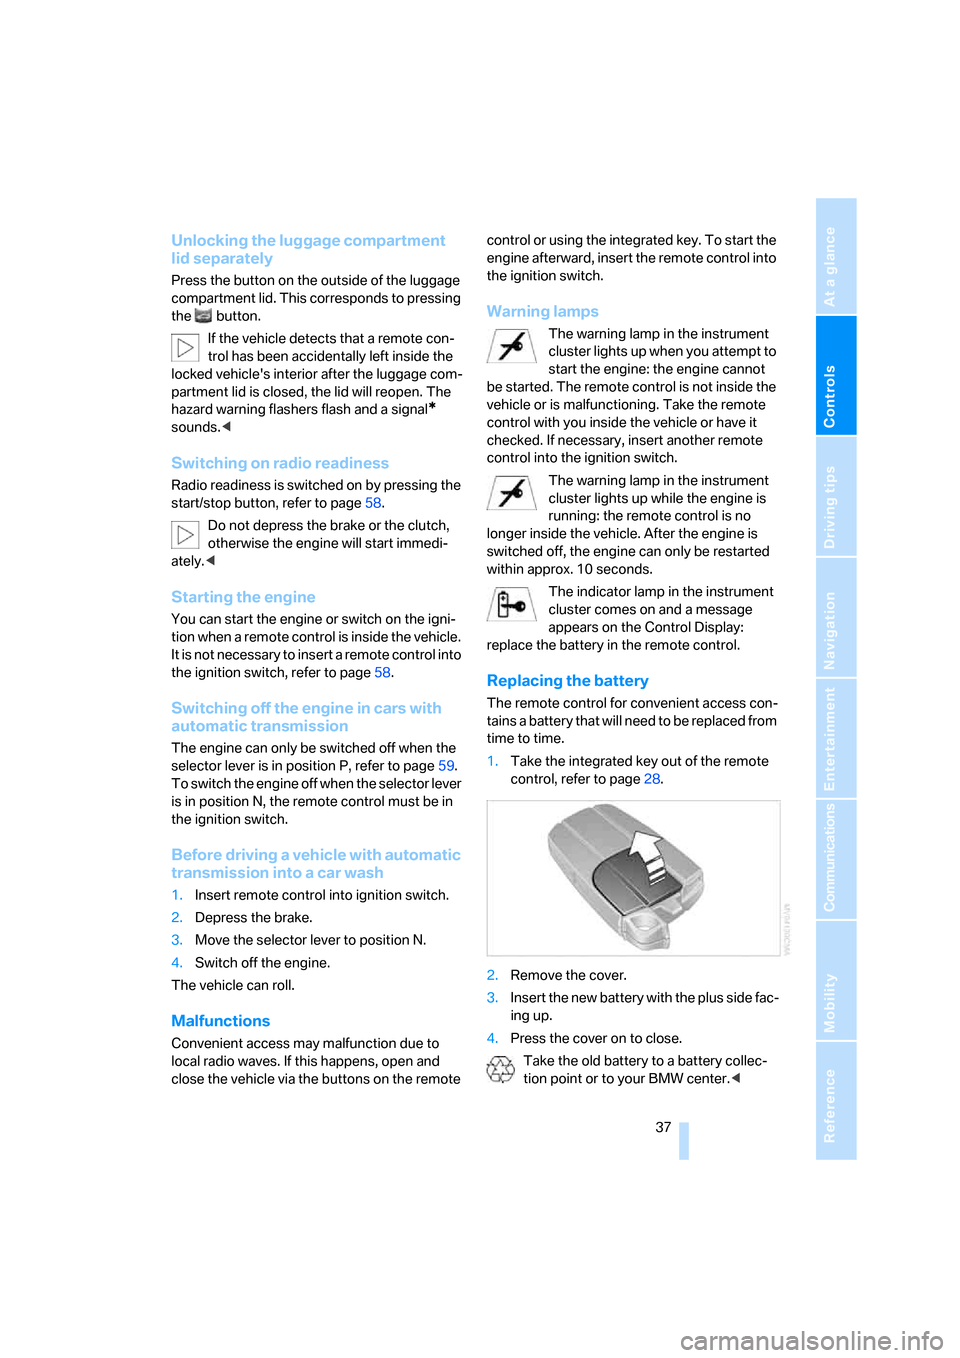
Replacing the battery
The remote control for convenient access con-
tains a battery that will need to be replaced from
time to time.
1.Take the integrated key out of the remote
control, refer to page28.
2.Remove the cover.
3.Insert the new battery with the plus side fac-
ing up.
4.Press the cover on to close.
Take the old battery to a battery collec-
tion point or to your BMW center.<
Page 44 of 260
Opening and closing
42 If you accelerate to over 30 mph/50 km/h while
the convertible top is moving, the procedure is
interrupted.
When operating the convertible top while
driving, pay extra attention to the traffic to
avoid an accident. If possible, do not move the
convertible top while driving in reverse gear,
because your view to the rear is severely limited
during the procedure. Do not operate the con-
vertible top while driving in windy conditions.
Do not drive faster than 30 mph/50 km/h, other-
wise damage to the vehicle can occur.<
LEDs
>While the convertible top is being operated,
the left LED lights up green. It goes out as
soon as the top is fully opened or closed.
In the following situations, a message appears
on the Control Display or an acoustic signal
sounds in addition to the LED lighting up:
>If the right-hand LED flashes red when you
release the button, the opening or closing
action has not yet finished.
>If the right-hand LED lights up red when the
button is pressed, the cargo bay partition is
raised, the luggage compartment lid is not
closed or there is a malfunction. The con-
vertible top cannot be moved.
Interruption
The automatic sequence of movements is
interrupted if the button for the convertible top
operation is released. The sequence can be
continued in the desired direction by pushing or
pulling the buttons.
If the opening or closing procedure is inter-
rupted for an extended period, the convertible
top remains in the raised position for approx.
10 minutes and then slowly moves to a stable
position.
A convertible top that is not fully opened
or closed is a safety hazard.<
If the convertible top is not fully opened or
closed, the luggage compartment lid can-
not be opened and the windows cannot be
moved.<
Convenient operation with remote
control or via door lock
Refer to pages30 and32.
Closing manually
Only close the convertible top manually if
it is absolutely necessary, and never open
it manually. The convertible top box cover can-
not be locked if there is an electrical defect and
would then open while the vehicle is in motion.
Incorrect handling can result in damage.<
Closing the convertible top manually should be
performed by two people. The rear seats must
not be occupied.
Before closing
1.If possible, close all windows and then lower
the rear windows by approx. 3/4 in/2 cm.
After you manually unlock the convertible
top box cover, the windows can no longer
be operated.
2.Open the luggage compartment lid. If there
is an electrical fault, unlock the lid using the
integrated key, refer to page33.
3.Take the Allen wrench and screwdriver out
of the onboard tool kit, refer to page216.
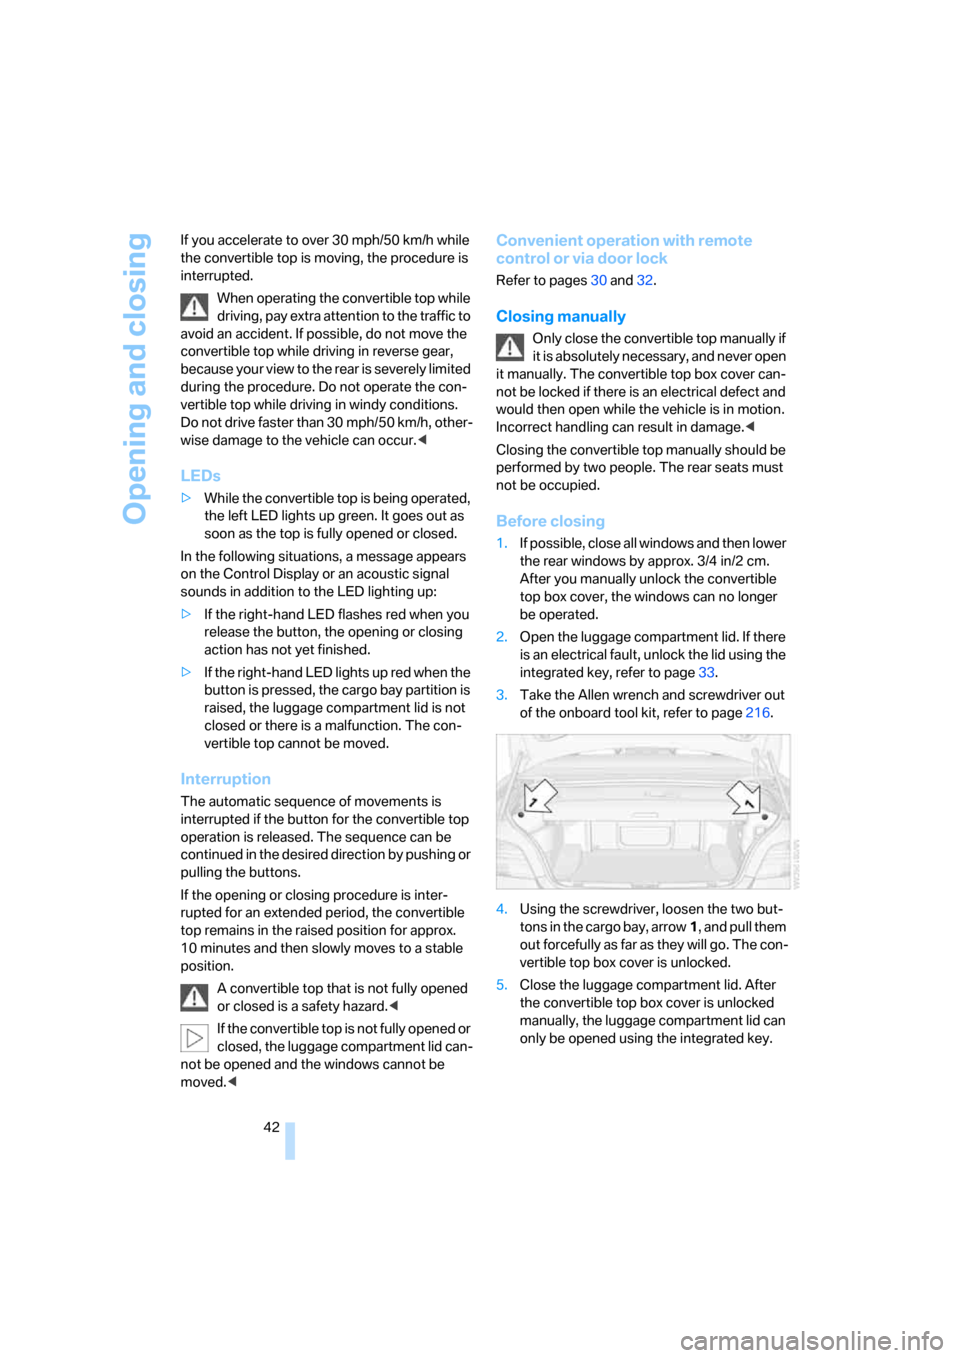
4.Using the screwdriver, loosen the two but-
tons in the cargo bay, arrow1, and pull them
out forcefully as far as they will go. The con-
vertible top box cover is unlocked.
5.Close the luggage compartment lid. After
the convertible top box cover is unlocked
manually, the luggage compartment lid can
only be opened using the integrated key.
Page 64 of 260
Driving
62 >When you use the shift paddles on the
steering wheel to shift gears in automatic
mode, the transmission switches to manual
mode.
>If you do not accelerate or shift gears using
the shift paddles for a certain amount of
time, the transmission switches back to
automatic mode.
If the selector lever is in the M/S gear
plane, manual mode remains active.<
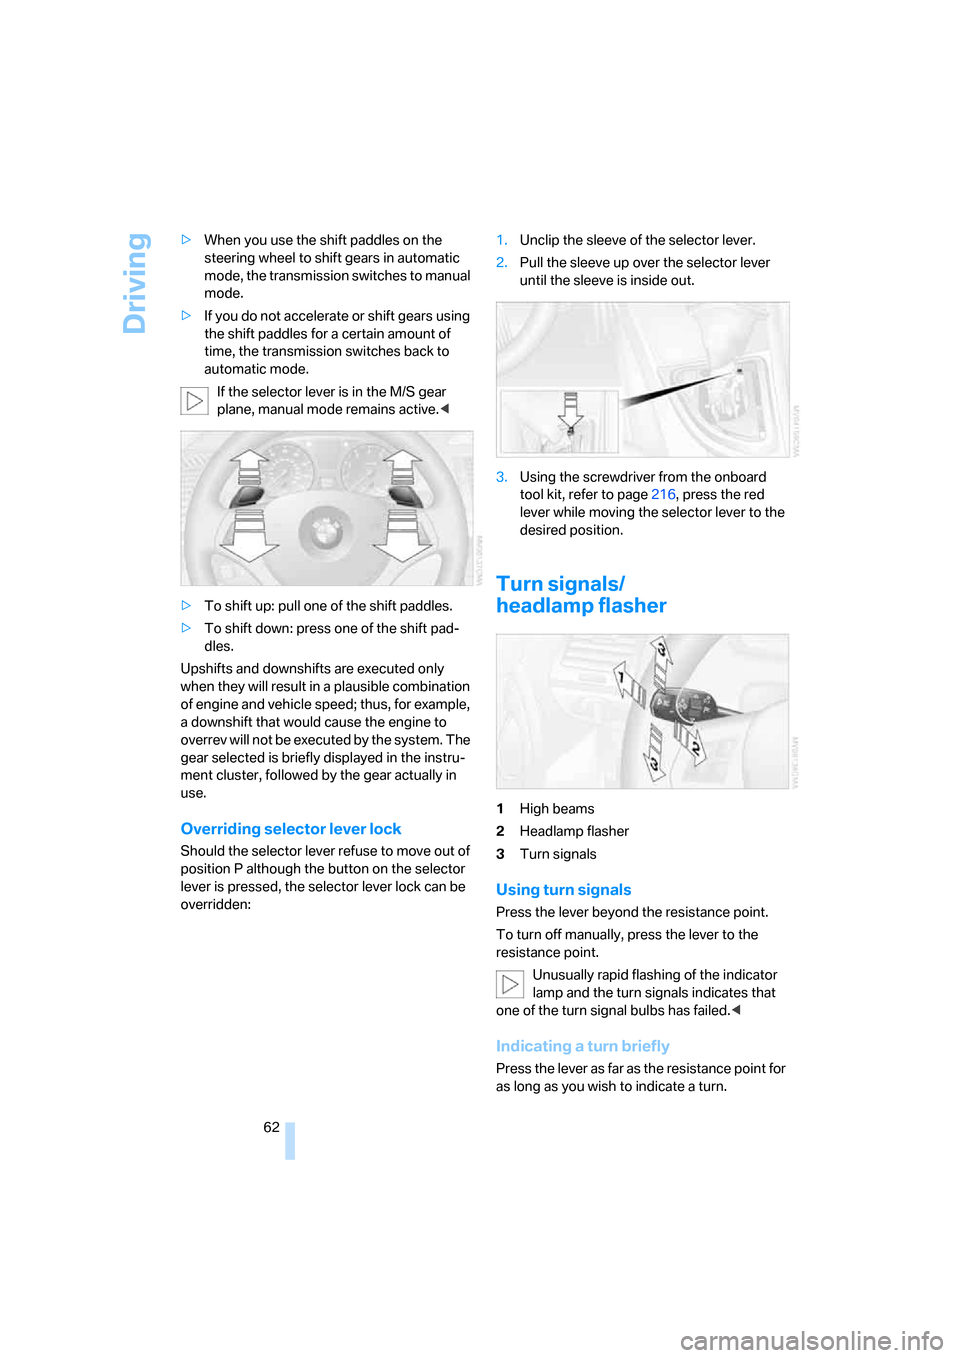
>To shift up: pull one of the shift paddles.
>To shift down: press one of the shift pad-
dles.
Upshifts and downshifts are executed only
when they will result in a plausible combination
of engine and vehicle speed; thus, for example,
a downshift that would cause the engine to
overrev will not be executed by the system. The
gear selected is briefly displayed in the instru-
ment cluster, followed by the gear actually in
use.
Overriding selector lever lock
Should the selector lever refuse to move out of
position P although the button on the selector
lever is pressed, the selector lever lock can be
overridden:1.Unclip the sleeve of the selector lever.
2.Pull the sleeve up over the selector lever
until the sleeve is inside out.
3.Using the screwdriver from the onboard
tool kit, refer to page216, press the red
lever while moving the selector lever to the
desired position.
Turn signals/
headlamp flasher
1High beams
2Headlamp flasher
3Turn signals
Using turn signals
Press the lever beyond the resistance point.
To turn off manually, press the lever to the
resistance point.
Unusually rapid flashing of the indicator
lamp and the turn signals indicates that
one of the turn signal bulbs has failed.<
Indicating a turn briefly
Press the lever as far as the resistance point for
as long as you wish to indicate a turn.
Page 65 of 260
Controls
63Reference
At a glance
Driving tips
Communications
Navigation
Entertainment
Mobility
Triple turn signal activation
Press the lever as far as the resistance point.
The turn signals flash three times.
You can activate or deactivate this function.
iDrive, for operating principle refer to page16.
1.Press the button.
This opens the start menu.
2.Press the controller to open the menu.
3.Select "Settings" and press the controller.
4.Select "Vehicle / Tires" and press the con-
troller.
5.If necessary, move the highlight marker to
the uppermost field. Turn the controller
until "Lighting" is selected and press the
controller.
6.Select "Triple turn signal" and press the
controller.
Triple turn signaling is activated.
The setting is stored for the remote control cur-
rently in use.
Wiper system
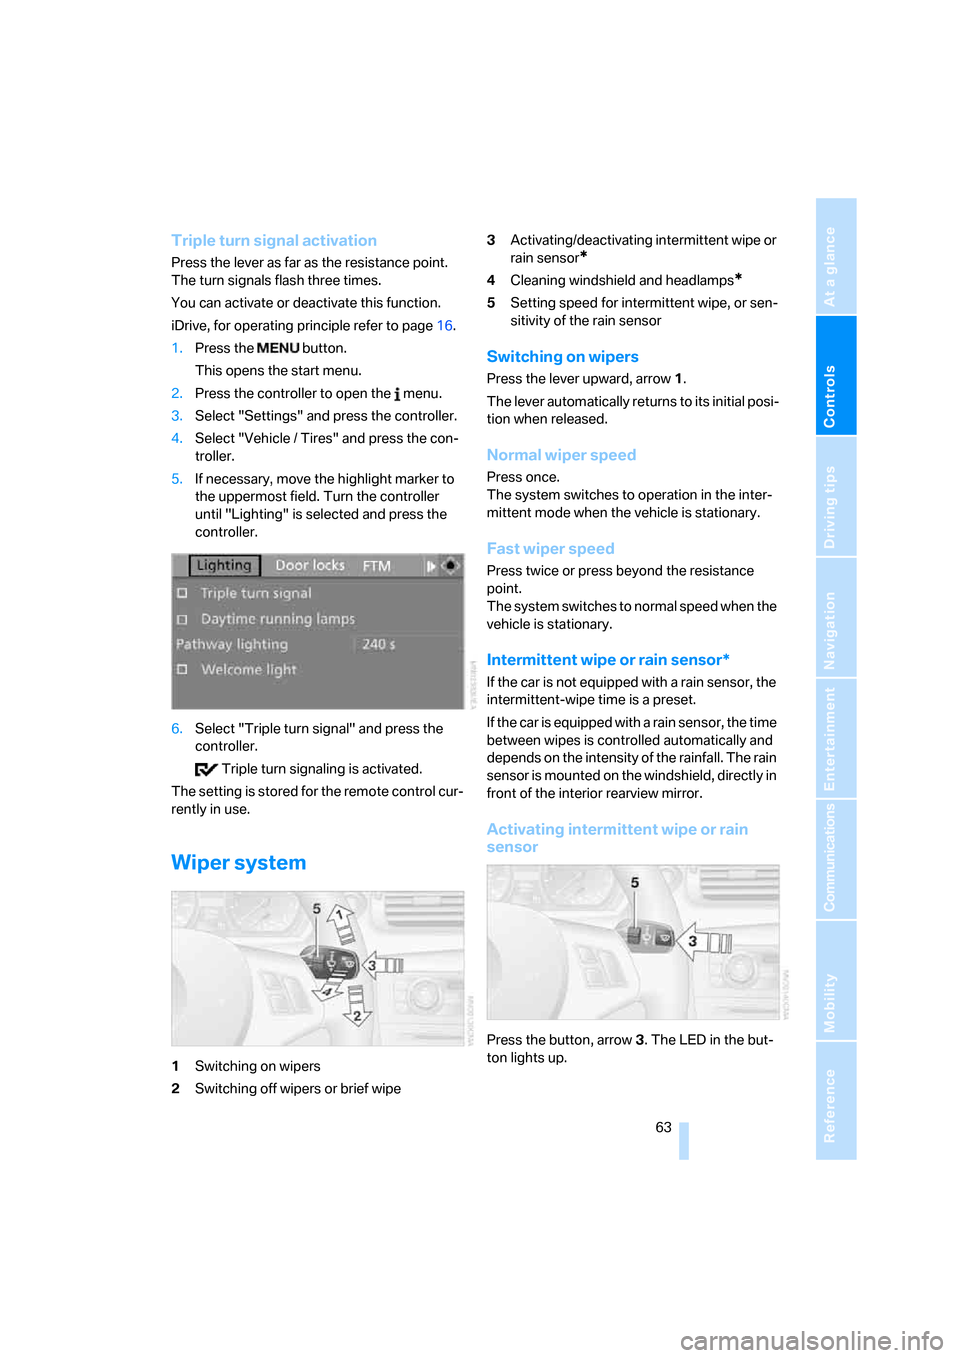
1Switching on wipers
2Switching off wipers or brief wipe3Activating/deactivating intermittent wipe or
rain sensor
*
4Cleaning windshield and headlamps*
5Setting speed for intermittent wipe, or sen-
sitivity of the rain sensor
Switching on wipers
Press the lever upward, arrow 1.
The lever automatically returns to its initial posi-
tion when released.
Normal wiper speed
Press once.
The system switches to operation in the inter-
mittent mode when the vehicle is stationary.
Fast wiper speed
Press twice or press beyond the resistance
point.
The system switches to normal speed when the
vehicle is stationary.
Intermittent wipe or rain sensor*
If the car is not equipped with a rain sensor, the
intermittent-wipe time is a preset.
If the car is equipped with a rain sensor, the time
between wipes is controlled automatically and
depends on the intensity of the rainfall. The rain
sensor is mounted on the windshield, directly in
front of the interior rearview mirror.
Activating intermittent wipe or rain
sensor
Press the button, arrow3. The LED in the but-
ton lights up.