automatic transmission BMW 3 SERIES 1983 E30 Owner's Manual
[x] Cancel search | Manufacturer: BMW, Model Year: 1983, Model line: 3 SERIES, Model: BMW 3 SERIES 1983 E30Pages: 228, PDF Size: 7.04 MB
Page 98 of 228
Caution: If the radio in your
vehicle is equipped with an anti-
theft system, make sure you
have the correct activation code before
disconnecting the battery. Refer to the
information on page 0-7 at the front of this
manual before detaching the cable.
Note: If, after connecting the battery, the
wrong language appears on the instrument
panel display, refer to page 0-7 for the
language resetting procedure.
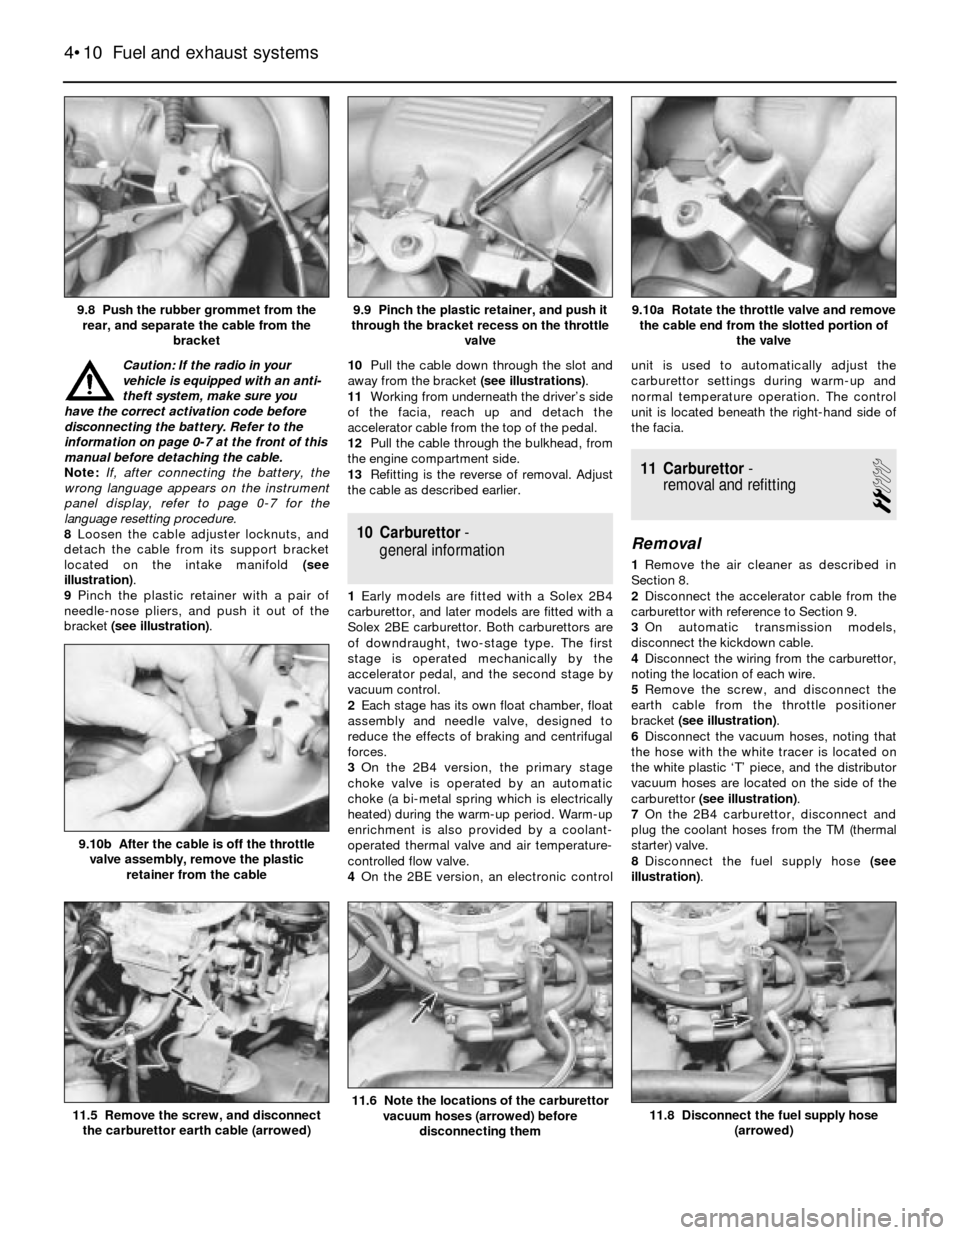
8Loosen the cable adjuster locknuts, and
detach the cable from its support bracket
located on the intake manifold (see
illustration).
9Pinch the plastic retainer with a pair of
needle-nose pliers, and push it out of the
bracket (see illustration).10Pull the cable down through the slot and
away from the bracket (see illustrations).
11Working from underneath the driver’s side
of the facia, reach up and detach the
accelerator cable from the top of the pedal.
12Pull the cable through the bulkhead, from
the engine compartment side.
13Refitting is the reverse of removal. Adjust
the cable as described earlier.
10 Carburettor-
general information
1Early models are fitted with a Solex 2B4
carburettor, and later models are fitted with a
Solex 2BE carburettor. Both carburettors are
of downdraught, two-stage type. The first
stage is operated mechanically by the
accelerator pedal, and the second stage by
vacuum control.
2Each stage has its own float chamber, float
assembly and needle valve, designed to
reduce the effects of braking and centrifugal
forces.
3On the 2B4 version, the primary stage
choke valve is operated by an automatic
choke (a bi-metal spring which is electrically
heated) during the warm-up period. Warm-up
enrichment is also provided by a coolant-
operated thermal valve and air temperature-
controlled flow valve.
4On the 2BE version, an electronic controlunit is used to automatically adjust the
carburettor settings during warm-up and
normal temperature operation. The control
unit is located beneath the right-hand side of
the facia.
11 Carburettor-
removal and refitting
2
Removal
1Remove the air cleaner as described in
Section 8.
2Disconnect the accelerator cable from the
carburettor with reference to Section 9.
3On automatic transmission models,
disconnect the kickdown cable.
4Disconnect the wiring from the carburettor,
noting the location of each wire.
5Remove the screw, and disconnect the
earth cable from the throttle positioner
bracket (see illustration).
6Disconnect the vacuum hoses, noting that
the hose with the white tracer is located on
the white plastic ‘T’ piece, and the distributor
vacuum hoses are located on the side of the
carburettor (see illustration).
7On the 2B4 carburettor, disconnect and
plug the coolant hoses from the TM (thermal
starter) valve.
8Disconnect the fuel supply hose (see
illustration).
4•10 Fuel and exhaust systems
11.8 Disconnect the fuel supply hose
(arrowed)11.6 Note the locations of the carburettor
vacuum hoses (arrowed) before
disconnecting them11.5 Remove the screw, and disconnect
the carburettor earth cable (arrowed)
9.10b After the cable is off the throttle
valve assembly, remove the plastic
retainer from the cable
9.10a Rotate the throttle valve and remove
the cable end from the slotted portion of
the valve9.9 Pinch the plastic retainer, and push it
through the bracket recess on the throttle
valve9.8 Push the rubber grommet from the
rear, and separate the cable from the
bracket
Page 107 of 228
2L-Jetronic systems are equipped with a
separate idle speed control unit (computer)
located under the facia. The idle air stabiliser
valve has an adjusting screw. Early models
are equipped with plastic valves, but they still
can be adjusted by removing the hose and
inserting a very thin screwdriver inside.
3Early Motronic systems are also equipped
with a separate idle speed control unit
(computer) located under the facia. The idle
air stabiliser valve has an adjusting screw.
4On later Motronic systems, the idle air
stabiliser valve is ECU-controlled, and no
provision is made for adjustment.
Preliminary check
5Before performing any checks on the idle
air stabiliser valve, make sure these criteria
are met:
a) The engine must be at operating
temperature (60ºC)
b) Turn off all electrical accessories (air
conditioning, heater controls, headlights,
auxiliary cooling fan, etc)
c) The throttle position sensor must be
operating correctly (see Chapter 6)
d) There must not be any exhaust leaks
e) There must not be any vacuum leaks
f) Where fitted, the oxygen sensor must be
operating properly (see Chapter 6)
6Connect a tachometer in accordance with
the manufacturer’s instructions.
Caution: The ignition must be
switched off before making any
electrical connections.
7The idle air stabiliser valve operates
continuously when the ignition is on. Start the
engine and make sure the valve is vibrating
and humming slightly.
L-Jetronic system
Check
8With the engine running, disconnect the
electrical connector from the valve. The idle
speed should increase to about 2,000 rpm.
9If the idle speed does not increase, turn the
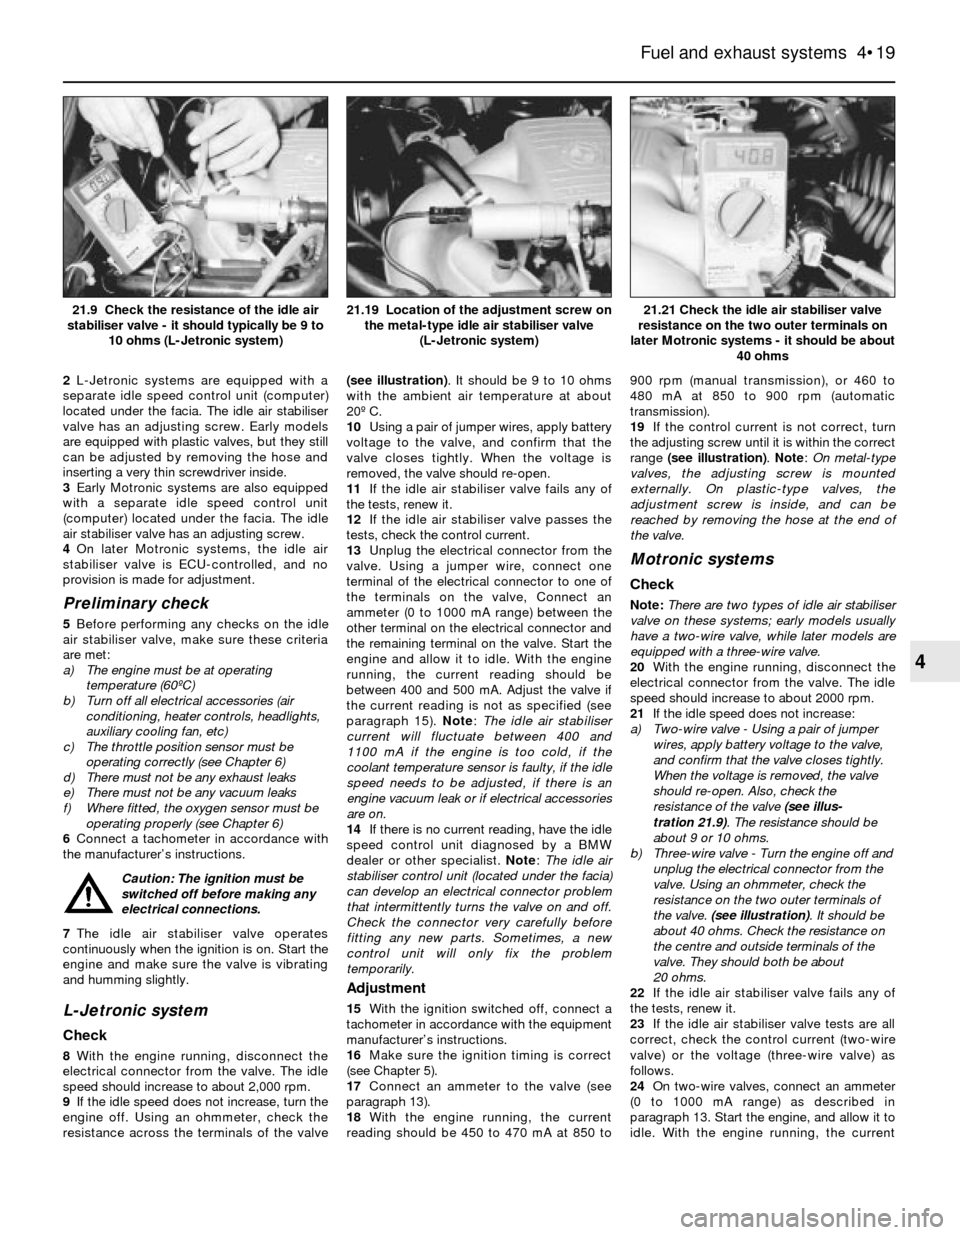
engine off. Using an ohmmeter, check the
resistance across the terminals of the valve(see illustration). It should be 9 to 10 ohms
with the ambient air temperature at about
20º C.
10Using a pair of jumper wires, apply battery
voltage to the valve, and confirm that the
valve closes tightly. When the voltage is
removed, the valve should re-open.
11If the idle air stabiliser valve fails any of
the tests, renew it.
12If the idle air stabiliser valve passes the
tests, check the control current.
13Unplug the electrical connector from the
valve. Using a jumper wire, connect one
terminal of the electrical connector to one of
the terminals on the valve, Connect an
ammeter (0 to 1000 mA range) between the
other terminal on the electrical connector and
the remaining terminal on the valve. Start the
engine and allow it to idle. With the engine
running, the current reading should be
between 400 and 500 mA. Adjust the valve if
the current reading is not as specified (see
paragraph 15). Note: The idle air stabiliser
current will fluctuate between 400 and
1100 mA if the engine is too cold, if the
coolant temperature sensor is faulty, if the idle
speed needs to be adjusted, if there is an
engine vacuum leak or if electrical accessories
are on.
14If there is no current reading, have the idle
speed control unit diagnosed by a BMW
dealer or other specialist. Note: The idle air
stabiliser control unit (located under the facia)
can develop an electrical connector problem
that intermittently turns the valve on and off.
Check the connector very carefully before
fitting any new parts. Sometimes, a new
control unit will only fix the problem
temporarily.
Adjustment
15With the ignition switched off, connect a
tachometer in accordance with the equipment
manufacturer’s instructions.
16Make sure the ignition timing is correct
(see Chapter 5).
17Connect an ammeter to the valve (see
paragraph 13).
18With the engine running, the current
reading should be 450 to 470 mA at 850 to900 rpm (manual transmission), or 460 to
480 mA at 850 to 900 rpm (automatic
transmission).
19If the control current is not correct, turn
the adjusting screw until it is within the correct
range (see illustration). Note: On metal-type
valves, the adjusting screw is mounted
externally. On plastic-type valves, the
adjustment screw is inside, and can be
reached by removing the hose at the end of
the valve.
Motronic systems
Check
Note:There are two types of idle air stabiliser
valve on these systems; early models usually
have a two-wire valve, while later models are
equipped with a three-wire valve.
20With the engine running, disconnect the
electrical connector from the valve. The idle
speed should increase to about 2000 rpm.
21If the idle speed does not increase:
a) Two-wire valve - Using a pair of jumper
wires, apply battery voltage to the valve,
and confirm that the valve closes tightly.
When the voltage is removed, the valve
should re-open. Also, check the
resistance of the valve (see illus-
tration 21.9). The resistance should be
about 9 or 10 ohms.
b) Three-wire valve - Turn the engine off and
unplug the electrical connector from the
valve. Using an ohmmeter, check the
resistance on the two outer terminals of
the valve. (see illustration). It should be
about 40 ohms. Check the resistance on
the centre and outside terminals of the
valve. They should both be about
20 ohms.
22If the idle air stabiliser valve fails any of
the tests, renew it.
23If the idle air stabiliser valve tests are all
correct, check the control current (two-wire
valve) or the voltage (three-wire valve) as
follows.
24On two-wire valves, connect an ammeter
(0 to 1000 mA range) as described in
paragraph 13. Start the engine, and allow it to
idle. With the engine running, the current
Fuel and exhaust systems 4•19
21.21 Check the idle air stabiliser valve
resistance on the two outer terminals on
later Motronic systems - it should be about
40 ohms21.19 Location of the adjustment screw on
the metal-type idle air stabiliser valve
(L-Jetronic system)21.9 Check the resistance of the idle air
stabiliser valve - it should typically be 9 to
10 ohms (L-Jetronic system)
4
Page 114 of 228
7 Ignition timing (TCI system)-
check and adjustment
4
Warning: Keep hands, equipment
and wires well clear of the
viscous cooling fan during
adjustment of the ignition timing.
Note:This Section describes the procedure
for checking and adjusting the ignition timing
on engines fitted with the TCI system. On
engines fitted with the Motronic engine
management system, the ignition timing is
controlled by the electronic control unit, and
no adjustment is possible. The timing can be
checked using the following procedure, but no
ignition timing values were available at the
time of writing. If the timing is thought to be
incorrect, refer to a BMW dealer.
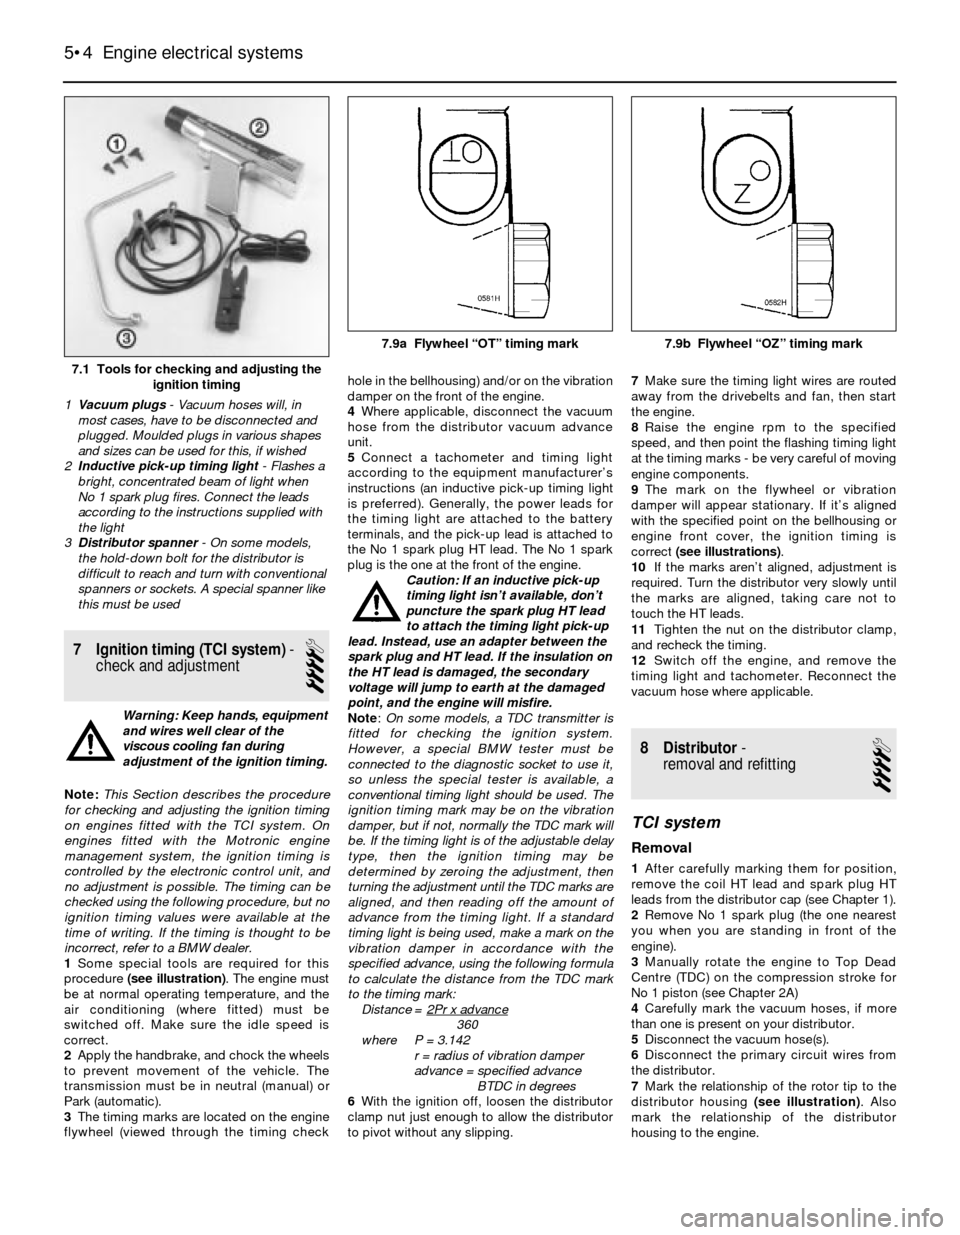
1Some special tools are required for this
procedure (see illustration). The engine must
be at normal operating temperature, and the
air conditioning (where fitted) must be
switched off. Make sure the idle speed is
correct.
2Apply the handbrake, and chock the wheels
to prevent movement of the vehicle. The
transmission must be in neutral (manual) or
Park (automatic).
3The timing marks are located on the engine
flywheel (viewed through the timing checkhole in the bellhousing) and/or on the vibration
damper on the front of the engine.
4Where applicable, disconnect the vacuum
hose from the distributor vacuum advance
unit.
5Connect a tachometer and timing light
according to the equipment manufacturer’s
instructions (an inductive pick-up timing light
is preferred). Generally, the power leads for
the timing light are attached to the battery
terminals, and the pick-up lead is attached to
the No 1 spark plug HT lead. The No 1 spark
plug is the one at the front of the engine.
Caution: If an inductive pick-up
timing light isn’t available, don’t
puncture the spark plug HT lead
to attach the timing light pick-up
lead. Instead, use an adapter between the
spark plug and HT lead. If the insulation on
the HT lead is damaged, the secondary
voltage will jump to earth at the damaged
point, and the engine will misfire.
Note:On some models, a TDC transmitter is
fitted for checking the ignition system.
However, a special BMW tester must be
connected to the diagnostic socket to use it,
so unless the special tester is available, a
conventional timing light should be used. The
ignition timing mark may be on the vibration
damper, but if not, normally the TDC mark will
be. If the timing light is of the adjustable delay
type, then the ignition timing may be
determined by zeroing the adjustment, then
turning the adjustment until the TDC marks are
aligned, and then reading off the amount of
advance from the timing light. If a standard
timing light is being used, make a mark on the
vibration damper in accordance with the
specified advance, using the following formula
to calculate the distance from the TDC mark
to the timing mark:
Distance = 2Pr x advance
360
where P = 3.142
r = radius of vibration damper
advance = specified advance
BTDC in degrees
6With the ignition off, loosen the distributor
clamp nut just enough to allow the distributor
to pivot without any slipping.7Make sure the timing light wires are routed
away from the drivebelts and fan, then start
the engine.
8Raise the engine rpm to the specified
speed, and then point the flashing timing light
at the timing marks - be very careful of moving
engine components.
9The mark on the flywheel or vibration
damper will appear stationary. If it’s aligned
with the specified point on the bellhousing or
engine front cover, the ignition timing is
correct (see illustrations).
10If the marks aren’t aligned, adjustment is
required. Turn the distributor very slowly until
the marks are aligned, taking care not to
touch the HT leads.
11Tighten the nut on the distributor clamp,
and recheck the timing.
12Switch off the engine, and remove the
timing light and tachometer. Reconnect the
vacuum hose where applicable.
8 Distributor-
removal and refitting
4
TCI system
Removal
1After carefully marking them for position,
remove the coil HT lead and spark plug HT
leads from the distributor cap (see Chapter 1).
2Remove No 1 spark plug (the one nearest
you when you are standing in front of the
engine).
3Manually rotate the engine to Top Dead
Centre (TDC) on the compression stroke for
No 1 piston (see Chapter 2A)
4Carefully mark the vacuum hoses, if more
than one is present on your distributor.
5Disconnect the vacuum hose(s).
6Disconnect the primary circuit wires from
the distributor.
7Mark the relationship of the rotor tip to the
distributor housing (see illustration). Also
mark the relationship of the distributor
housing to the engine.
5•4 Engine electrical systems
7.1 Tools for checking and adjusting the
ignition timing
1Vacuum plugs- Vacuum hoses will, in
most cases, have to be disconnected and
plugged. Moulded plugs in various shapes
and sizes can be used for this, if wished
2Inductive pick-up timing light- Flashes a
bright, concentrated beam of light when
No 1 spark plug fires. Connect the leads
according to the instructions supplied with
the light
3Distributor spanner - On some models,
the hold-down bolt for the distributor is
difficult to reach and turn with conventional
spanners or sockets. A special spanner like
this must be used
7.9a Flywheel “OT” timing mark 7.9b Flywheel “OZ” timing mark
Page 121 of 228
Refer to the information on page 0-7 at the
front of this manual before detaching the
cable.
Note: If, after connecting the battery, the
wrong language appears on the instrument
panel display, refer to page 0-7 for the
language resetting procedure.
1Disconnect the battery negative cable.
Bosch alternator
2Remove the voltage regulator from the back
of the alternator (see Section 16).
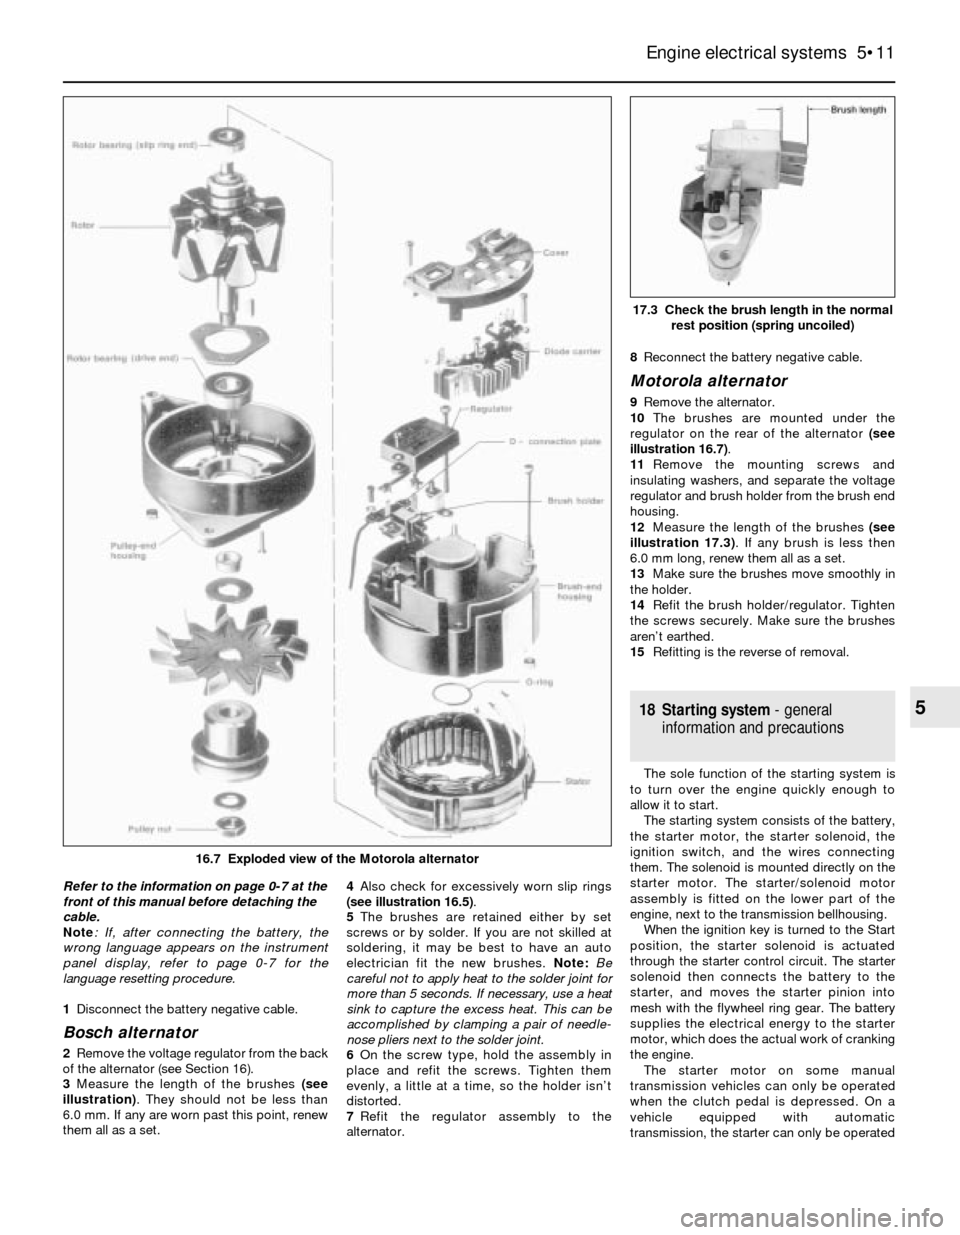
3Measure the length of the brushes (see
illustration). They should not be less than
6.0 mm. If any are worn past this point, renew
them all as a set. 4Also check for excessively worn slip rings
(see illustration 16.5).
5The brushes are retained either by set
screws or by solder. If you are not skilled at
soldering, it may be best to have an auto
electrician fit the new brushes. Note: Be
careful not to apply heat to the solder joint for
more than 5 seconds. If necessary, use a heat
sink to capture the excess heat. This can be
accomplished by clamping a pair of needle-
nose pliers next to the solder joint.
6On the screw type, hold the assembly in
place and refit the screws. Tighten them
evenly, a little at a time, so the holder isn’t
distorted.
7Refit the regulator assembly to the
alternator.8Reconnect the battery negative cable.
Motorola alternator
9Remove the alternator.
10The brushes are mounted under the
regulator on the rear of the alternator (see
illustration 16.7).
11Remove the mounting screws and
insulating washers, and separate the voltage
regulator and brush holder from the brush end
housing.
12Measure the length of the brushes (see
illustration 17.3). If any brush is less then
6.0 mm long, renew them all as a set.
13Make sure the brushes move smoothly in
the holder.
14Refit the brush holder/regulator. Tighten
the screws securely. Make sure the brushes
aren’t earthed.
15Refitting is the reverse of removal.
18 Starting system- general
information and precautions
The sole function of the starting system is
to turn over the engine quickly enough to
allow it to start.
The starting system consists of the battery,
the starter motor, the starter solenoid, the
ignition switch, and the wires connecting
them. The solenoid is mounted directly on the
starter motor. The starter/solenoid motor
assembly is fitted on the lower part of the
engine, next to the transmission bellhousing.
When the ignition key is turned to the Start
position, the starter solenoid is actuated
through the starter control circuit. The starter
solenoid then connects the battery to the
starter, and moves the starter pinion into
mesh with the flywheel ring gear. The battery
supplies the electrical energy to the starter
motor, which does the actual work of cranking
the engine.
The starter motor on some manual
transmission vehicles can only be operated
when the clutch pedal is depressed. On a
vehicle equipped with automatic
transmission, the starter can only be operated
Engine electrical systems 5•11
17.3 Check the brush length in the normal
rest position (spring uncoiled)
5
16.7 Exploded view of the Motorola alternator
Page 122 of 228
when the transmission selector lever is in Park
or Neutral.
Always detach the battery negative cable
before working on the starting system.
19 Starter motor-
in-vehicle check
2
Note:Before diagnosing starter problems,
make sure the battery is fully charged.
1If the starter motor does not turn at all when
the switch is operated, make sure that the
gear lever is in Neutral or Park (automatic
transmission) or, where applicable, that the
clutch pedal is depressed (manual
transmission).
2Make sure that the battery is charged, and
that all cables, both at the battery and starter
solenoid terminals, are clean and secure.
3If the starter motor spins but the engine is
not cranking, the overrun clutch in the starter
motor is slipping, and the starter motor must
be renewed.
4If, when the switch is actuated, the starter
motor does not operate at all but the solenoid
clicks, then the problem lies either in the
battery, the main solenoid contacts, or the
starter motor itself (or the engine is seized).
5If the solenoid plunger cannot be heard
when the switch is actuated, the battery is
faulty, the switch is defective, the fusible link
is burned-out (the circuit is open), or the
solenoid itself is defective.
6To check the solenoid, connect a jumper
lead between the battery (+) and the ignition
switch wire terminal (the small terminal) on the
solenoid. If the starter motor now operates,
the solenoid is OK and the problem is in the
ignition switch, starter inhibitor switch
(automatic transmission models), clutch
switch (some manual transmission models), or
the wiring.
7If the starter motor still does not operate,
remove the starter/solenoid assembly for
dismantling, testing and repair.
8If the starter motor cranks the engine at an
abnormally-slow speed, first make sure that
the battery is charged, and that all terminal
connections are tight. If the engine is partially-
seized, or has the wrong viscosity oil in it, it
will crank slowly.
9Run the engine until normal operating
temperature is reached, then disconnect the
coil HT lead from the distributor cap and earth
it on the engine.
10Connect a voltmeter positive lead to the
battery positive post, and connect the
negative lead to the negative post.11Crank the engine, and take the voltmeter
readings as soon as a steady figure is
indicated. Do not allow the starter motor to
turn for more than 10 seconds at a time. A
reading of 9 volts or more, with the starter
motor turning at normal cranking speed, is
normal. If the reading is 9 volts or more but
the cranking speed is slow, the solenoid
contacts are burned, there is a bad
connection, or the starter motor itself is faulty.
If the reading is less than 9 volts and the
cranking speed is slow, the starter motor is
faulty or the battery is responsible (defective
or discharged).
20 Starter motor-
removal and refitting
1
Note:If the starter motor is defective, it should
be renewed, or taken to an auto electrical
specialist for repair. Overhaul of the starter
motor is unlikely to be a practical proposition
for the home mechanic, even if spare parts are
available. However, the solenoid can be
renewed separately (see Section 21).
Removal
Caution: If the radio in your
vehicle is equipped with an anti-
theft system, make sure you
have the correct activation code
before disconnecting the battery. Refer to
the information on page 0-7 at the front of
this manual before detaching the cable.
Note: If, after connecting the battery, the
wrong language appears on the instrument
panel display, refer to page 0-7 for the
language resetting procedure.
1Detach the battery negative cable.
2Raise the vehicle and support it securely on
axle stands.
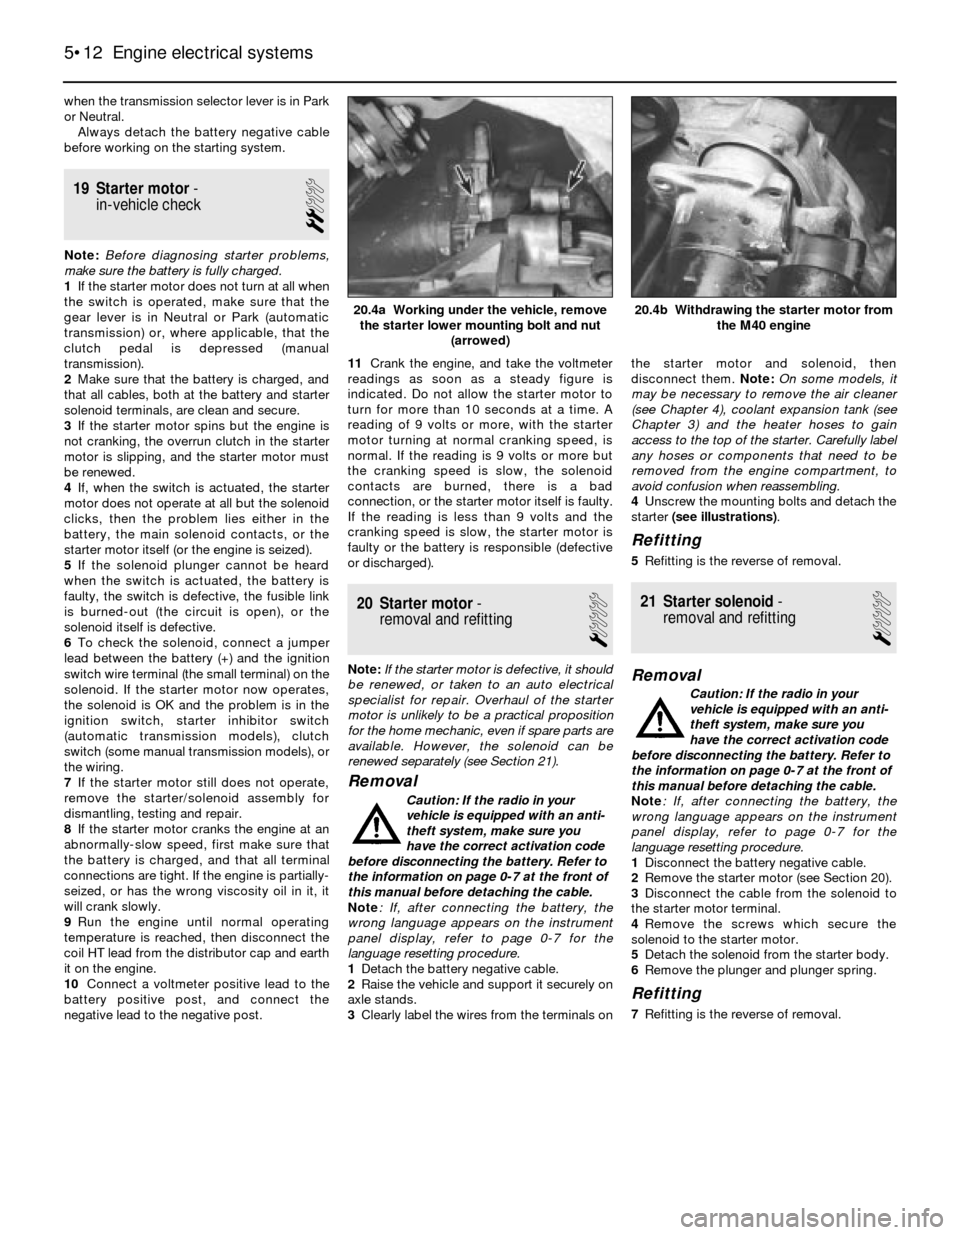
3Clearly label the wires from the terminals onthe starter motor and solenoid, then
disconnect them. Note: On some models, it
may be necessary to remove the air cleaner
(see Chapter 4), coolant expansion tank (see
Chapter 3) and the heater hoses to gain
access to the top of the starter. Carefully label
any hoses or components that need to be
removed from the engine compartment, to
avoid confusion when reassembling.
4Unscrew the mounting bolts and detach the
starter (see illustrations).
Refitting
5Refitting is the reverse of removal.
21 Starter solenoid-
removal and refitting
1
Removal
Caution: If the radio in your
vehicle is equipped with an anti-
theft system, make sure you
have the correct activation code
before disconnecting the battery. Refer to
the information on page 0-7 at the front of
this manual before detaching the cable.
Note: If, after connecting the battery, the
wrong language appears on the instrument
panel display, refer to page 0-7 for the
language resetting procedure.
1Disconnect the battery negative cable.
2Remove the starter motor (see Section 20).
3Disconnect the cable from the solenoid to
the starter motor terminal.
4Remove the screws which secure the
solenoid to the starter motor.
5Detach the solenoid from the starter body.
6Remove the plunger and plunger spring.
Refitting
7Refitting is the reverse of removal.
5•12 Engine electrical systems
20.4b Withdrawing the starter motor from
the M40 engine20.4a Working under the vehicle, remove
the starter lower mounting bolt and nut
(arrowed)
Page 125 of 228
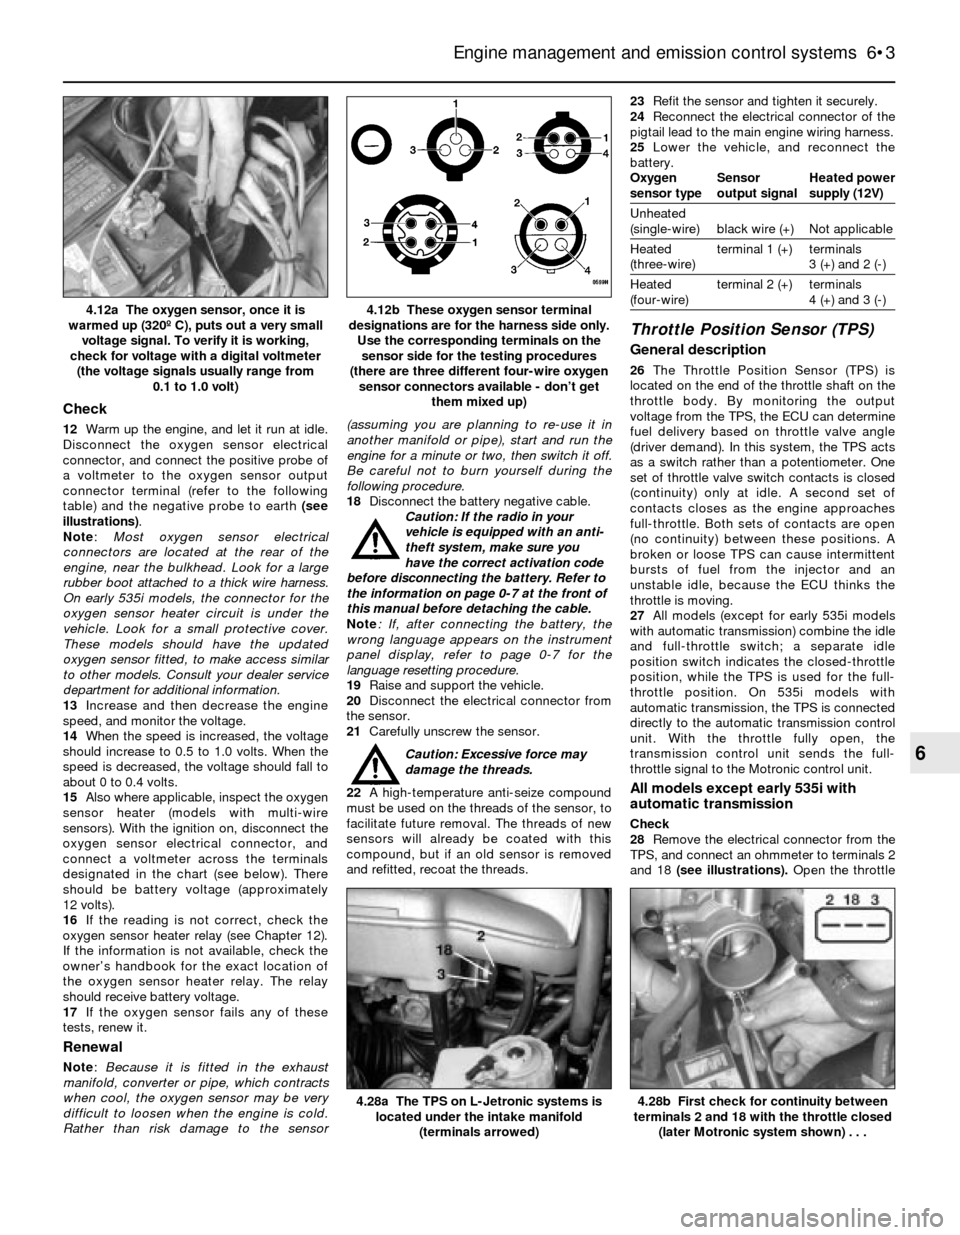
Check
12Warm up the engine, and let it run at idle.
Disconnect the oxygen sensor electrical
connector, and connect the positive probe of
a voltmeter to the oxygen sensor output
connector terminal (refer to the following
table) and the negative probe to earth (see
illustrations).
Note:Most oxygen sensor electrical
connectors are located at the rear of the
engine, near the bulkhead. Look for a large
rubber boot attached to a thick wire harness.
On early 535i models, the connector for the
oxygen sensor heater circuit is under the
vehicle. Look for a small protective cover.
These models should have the updated
oxygen sensor fitted, to make access similar
to other models. Consult your dealer service
department for additional information.
13Increase and then decrease the engine
speed, and monitor the voltage.
14When the speed is increased, the voltage
should increase to 0.5 to 1.0 volts. When the
speed is decreased, the voltage should fall to
about 0 to 0.4 volts.
15Also where applicable, inspect the oxygen
sensor heater (models with multi-wire
sensors). With the ignition on, disconnect the
oxygen sensor electrical connector, and
connect a voltmeter across the terminals
designated in the chart (see below). There
should be battery voltage (approximately
12 volts).
16If the reading is not correct, check the
oxygen sensor heater relay (see Chapter 12).
If the information is not available, check the
owner’s handbook for the exact location of
the oxygen sensor heater relay. The relay
should receive battery voltage.
17If the oxygen sensor fails any of these
tests, renew it.
Renewal
Note: Because it is fitted in the exhaust
manifold, converter or pipe, which contracts
when cool, the oxygen sensor may be very
difficult to loosen when the engine is cold.
Rather than risk damage to the sensor(assuming you are planning to re-use it in
another manifold or pipe), start and run the
engine for a minute or two, then switch it off.
Be careful not to burn yourself during the
following procedure.
18Disconnect the battery negative cable.
Caution: If the radio in your
vehicle is equipped with an anti-
theft system, make sure you
have the correct activation code
before disconnecting the battery. Refer to
the information on page 0-7 at the front of
this manual before detaching the cable.
Note: If, after connecting the battery, the
wrong language appears on the instrument
panel display, refer to page 0-7 for the
language resetting procedure.
19Raise and support the vehicle.
20Disconnect the electrical connector from
the sensor.
21Carefully unscrew the sensor.
Caution: Excessive force may
damage the threads.
22A high-temperature anti-seize compound
must be used on the threads of the sensor, to
facilitate future removal. The threads of new
sensors will already be coated with this
compound, but if an old sensor is removed
and refitted, recoat the threads.23Refit the sensor and tighten it securely.
24Reconnect the electrical connector of the
pigtail lead to the main engine wiring harness.
25Lower the vehicle, and reconnect the
battery.
Oxygen Sensor Heated power
sensor type output signal supply (12V)
Unheated
(single-wire) black wire (+) Not applicable
Heated terminal 1 (+) terminals
(three-wire) 3 (+) and 2 (-)
Heated terminal 2 (+) terminals
(four-wire) 4 (+) and 3 (-)
Throttle Position Sensor (TPS)
General description
26The Throttle Position Sensor (TPS) is
located on the end of the throttle shaft on the
throttle body. By monitoring the output
voltage from the TPS, the ECU can determine
fuel delivery based on throttle valve angle
(driver demand). In this system, the TPS acts
as a switch rather than a potentiometer. One
set of throttle valve switch contacts is closed
(continuity) only at idle. A second set of
contacts closes as the engine approaches
full-throttle. Both sets of contacts are open
(no continuity) between these positions. A
broken or loose TPS can cause intermittent
bursts of fuel from the injector and an
unstable idle, because the ECU thinks the
throttle is moving.
27All models (except for early 535i models
with automatic transmission) combine the idle
and full-throttle switch; a separate idle
position switch indicates the closed-throttle
position, while the TPS is used for the full-
throttle position. On 535i models with
automatic transmission, the TPS is connected
directly to the automatic transmission control
unit. With the throttle fully open, the
transmission control unit sends the full-
throttle signal to the Motronic control unit.
All models except early 535i with
automatic transmission
Check
28Remove the electrical connector from the
TPS, and connect an ohmmeter to terminals 2
and 18 (see illustrations). Open the throttle
Engine management and emission control systems 6•3
4.12b These oxygen sensor terminal
designations are for the harness side only.
Use the corresponding terminals on the
sensor side for the testing procedures
(there are three different four-wire oxygen
sensor connectors available - don’t get
them mixed up)4.12a The oxygen sensor, once it is
warmed up (320º C), puts out a very small
voltage signal. To verify it is working,
check for voltage with a digital voltmeter
(the voltage signals usually range from
0.1 to 1.0 volt)
4.28b First check for continuity between
terminals 2 and 18 with the throttle closed
(later Motronic system shown) . . .4.28a The TPS on L-Jetronic systems is
located under the intake manifold
(terminals arrowed)
6
Page 126 of 228
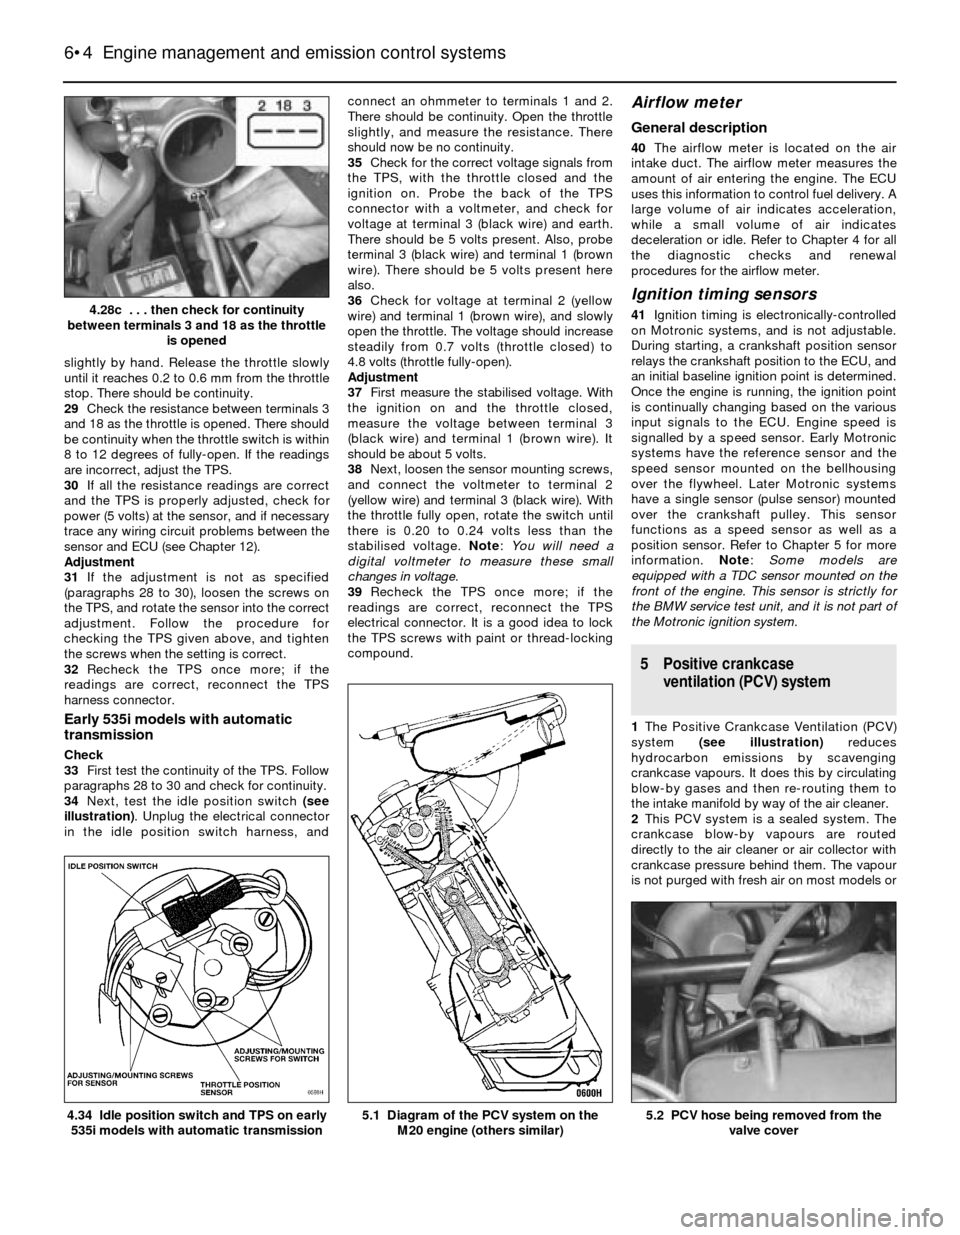
slightly by hand. Release the throttle slowly
until it reaches 0.2 to 0.6 mm from the throttle
stop. There should be continuity.
29Check the resistance between terminals 3
and 18 as the throttle is opened. There should
be continuity when the throttle switch is within
8 to 12 degrees of fully-open. If the readings
are incorrect, adjust the TPS.
30If all the resistance readings are correct
and the TPS is properly adjusted, check for
power (5 volts) at the sensor, and if necessary
trace any wiring circuit problems between the
sensor and ECU (see Chapter 12).
Adjustment
31If the adjustment is not as specified
(paragraphs 28 to 30), loosen the screws on
the TPS, and rotate the sensor into the correct
adjustment. Follow the procedure for
checking the TPS given above, and tighten
the screws when the setting is correct.
32Recheck the TPS once more; if the
readings are correct, reconnect the TPS
harness connector.
Early 535i models with automatic
transmission
Check
33First test the continuity of the TPS. Follow
paragraphs 28 to 30 and check for continuity.
34Next, test the idle position switch (see
illustration). Unplug the electrical connector
in the idle position switch harness, andconnect an ohmmeter to terminals 1 and 2.
There should be continuity. Open the throttle
slightly, and measure the resistance. There
should now be no continuity.
35Check for the correct voltage signals from
the TPS, with the throttle closed and the
ignition on. Probe the back of the TPS
connector with a voltmeter, and check for
voltage at terminal 3 (black wire) and earth.
There should be 5 volts present. Also, probe
terminal 3 (black wire) and terminal 1 (brown
wire). There should be 5 volts present here
also.
36Check for voltage at terminal 2 (yellow
wire) and terminal 1 (brown wire), and slowly
open the throttle. The voltage should increase
steadily from 0.7 volts (throttle closed) to
4.8 volts (throttle fully-open).
Adjustment
37First measure the stabilised voltage. With
the ignition on and the throttle closed,
measure the voltage between terminal 3
(black wire) and terminal 1 (brown wire). It
should be about 5 volts.
38Next, loosen the sensor mounting screws,
and connect the voltmeter to terminal 2
(yellow wire) and terminal 3 (black wire). With
the throttle fully open, rotate the switch until
there is 0.20 to 0.24 volts less than the
stabilised voltage. Note: You will need a
digital voltmeter to measure these small
changes in voltage.
39Recheck the TPS once more; if the
readings are correct, reconnect the TPS
electrical connector. It is a good idea to lock
the TPS screws with paint or thread-locking
compound.
Airflow meter
General description
40The airflow meter is located on the air
intake duct. The airflow meter measures the
amount of air entering the engine. The ECU
uses this information to control fuel delivery. A
large volume of air indicates acceleration,
while a small volume of air indicates
deceleration or idle. Refer to Chapter 4 for all
the diagnostic checks and renewal
procedures for the airflow meter.
Ignition timing sensors
41Ignition timing is electronically-controlled
on Motronic systems, and is not adjustable.
During starting, a crankshaft position sensor
relays the crankshaft position to the ECU, and
an initial baseline ignition point is determined.
Once the engine is running, the ignition point
is continually changing based on the various
input signals to the ECU. Engine speed is
signalled by a speed sensor. Early Motronic
systems have the reference sensor and the
speed sensor mounted on the bellhousing
over the flywheel. Later Motronic systems
have a single sensor (pulse sensor) mounted
over the crankshaft pulley. This sensor
functions as a speed sensor as well as a
position sensor. Refer to Chapter 5 for more
information. Note: Some models are
equipped with a TDC sensor mounted on the
front of the engine. This sensor is strictly for
the BMW service test unit, and it is not part of
the Motronic ignition system.
5 Positive crankcase
ventilation (PCV) system
1The Positive Crankcase Ventilation (PCV)
system (see illustration)reduces
hydrocarbon emissions by scavenging
crankcase vapours. It does this by circulating
blow-by gases and then re-routing them to
the intake manifold by way of the air cleaner.
2This PCV system is a sealed system. The
crankcase blow-by vapours are routed
directly to the air cleaner or air collector with
crankcase pressure behind them. The vapour
is not purged with fresh air on most models or
6•4 Engine management and emission control systems
5.2 PCV hose being removed from the
valve cover5.1 Diagram of the PCV system on the
M20 engine (others similar)4.34 Idle position switch and TPS on early
535i models with automatic transmission
4.28c . . . then check for continuity
between terminals 3 and 18 as the throttle
is opened
Page 210 of 228
REF•9
REF
Fault Finding
Engine
m mEngine will not rotate when attempting to start
m mEngine rotates, but will not start
m mEngine hard to start when cold
m mEngine hard to start when hot
m mStarter motor noisy or excessively-rough in engagement
m mEngine starts, but stops immediately
m mOil puddle under engine
m mEngine idles erratically
m mEngine misses at idle speed
m mEngine misses throughout driving speed range
m mEngine misfires on acceleration
m mEngine surges while holding accelerator steady
m mEngine stalls
m mEngine lacks power
m mEngine backfires
m mPinking or knocking engine sounds when accelerating
or driving uphill
m mEngine runs with oil pressure light on
m mEngine runs-on after switching off
Engine electrical system
m
mBattery will not hold charge
m mIgnition (no-charge) warning light fails to go out
m mIgnition (no-charge) warning light fails to come on
when key is turned
Fuel system
m mExcessive fuel consumption
m mFuel leakage and/or fuel odour
Cooling system
m
mOverheating
m mOvercooling
m mExternal coolant leakage
m mInternal coolant leakage
m mCoolant loss
m mPoor coolant circulation
Clutch
m
mPedal travels to floor - no pressure or very little resistance
m mFluid in area of master cylinder dust cover and on pedal
m mFluid on slave cylinder
m mPedal feels “spongy” when depressed
m mUnable to select gears
m mClutch slips (engine speed increases with no increase in
vehicle speed)
m mGrabbing (chattering) as clutch is engaged
m mNoise in clutch area
m mClutch pedal stays on floor
m mHigh pedal effort
Manual transmission
m
mVibration
m mNoisy in neutral with engine running
m mNoisy in one particular gear
m mNoisy in all gears
m mSlips out of gear
m mLeaks lubricant
Automatic transmission
m
mFluid leakage
m mTransmission fluid brown, or has a burned smell
m mGeneral shift mechanism problems
m mTransmission will not kickdown with accelerator pedal
pressed to the floor
m mEngine will start in gears other than Park or Neutral
m mTransmission slips, shifts roughly, is noisy, or has no drive
in forward or reverse gears
Brakes
m mVehicle pulls to one side during braking
m mNoise (high-pitched squeal) when the brakes are applied
m mBrake vibration (pedal pulsates)
m mExcessive pedal effort required to stop vehicle
m mExcessive brake pedal travel
m mDragging brakes
m mGrabbing or uneven braking action
m mBrake pedal feels “spongy” when depressed
m mBrake pedal travels to the floor with little resistance
m mHandbrake does not hold
Suspension and steering
m
mVehicle pulls to one side
m mAbnormal or excessive tyre wear
m mWheel makes a “thumping” noise
m mShimmy, shake or vibration
m mHigh steering effort
m mPoor steering self-centring
m mAbnormal noise at the front end
m mWandering or poor steering stability
m mErratic steering when braking
m mExcessive pitching and/or rolling around corners or
during braking
m mSuspension bottoms
m mUnevenly-worn tyres
m mExcessive tyre wear on outside edge
m mExcessive tyre wear on inside edge
m mTyre tread worn in one place
m mExcessive play or looseness in steering system
m mRattling or clicking noise in steering gear
Page 211 of 228

REF•10Fault Finding
Engine will not rotate when attempting to start
m mBattery terminal connections loose or corroded (Chapter 1).
m mBattery discharged or faulty (Chapter 1).
m mAutomatic transmission not completely engaged in Park (Chap-
ter 7B) or (on models with a clutch switch) clutch not completely
depressed (Chapter 8).
m mBroken, loose or disconnected wiring in the starting circuit
(Chapters 5 and 12).
m mStarter motor pinion jammed in flywheel ring gear (Chapter 5).
m mStarter solenoid faulty (Chapter 5).
m mStarter motor faulty (Chapter 5).
m mIgnition switch faulty (Chapter 12).
m mStarter pinion or flywheel teeth worn or broken (Chapter 5).
m mEngine internal problem (Chapter 2B).
Engine rotates, but will not start
m
mFuel tank empty.
m mBattery discharged (engine rotates slowly) (Chapter 5).
m mBattery terminal connections loose or corroded (Chapter 1).
m mLeaking fuel injector(s), faulty fuel pump, pressure regulator, etc
(Chapter 4).
m mFuel not reaching fuel injection system or carburettor (Chapter 4).
m mIgnition components damp or damaged (Chapter 5).
m mFuel injector stuck open (Chapter 4).
m mWorn, faulty or incorrectly-gapped spark plugs (Chapter 1).
m mBroken, loose or disconnected wiring in the starting circuit
(Chapter 5).
m mLoose distributor mounting bolts causing ignition timing to wander
(Chapters 1 and 5).
m mBroken, loose or disconnected wires at the ignition coil, or faulty
coil (Chapter 5).
Engine hard to start when cold
m mBattery discharged (Chapter 1).
m mFuel system malfunctioning (Chapter 4).
m mInjector(s) leaking or carburettor automatic choke faulty (Chap-
ter 4).
m mDistributor rotor carbon-tracked (Chapter 5).
Engine hard to start when hot
m
mAir filter element clogged (Chapter 1).
m mFuel not reaching the fuel injection system or carburettor (Chap-
ter 4).
m mCorroded battery connections, especially earth (negative)
connection (Chapter 1).
Starter motor noisy or excessively-rough in
engagement
m mPinion or flywheel gear teeth worn or broken (Chapter 5).
m mStarter motor mounting bolts loose or missing (Chapter 5).
Engine starts, but stops immediately
m
mLoose or faulty electrical connections at distributor, coil or
alternator (Chapter 5).
m mInsufficient fuel reaching the fuel injector(s) or carburettor
(Chapters 1 and 4).
m mDamaged fuel injection system speed sensors (Chapter 5).
m mFaulty fuel injection relays (Chapter 5).
Oil puddle under engine
m
mOil sump gasket and/or sump drain plug seal leaking (Chapter 2).
m mOil pressure sender unit leaking (Chapter 2).
m mValve cover gaskets leaking (Chapter 2).
m mEngine oil seals leaking (Chapter 2).
Engine idles erratically
m
mVacuum leakage (Chapter 4).
m mAir filter element clogged (Chapter 1).
m mFuel pump not delivering sufficient fuel to the fuel injection system
or carburettor (Chapter 4).
m mLeaking head gasket (Chapter 2).
m mTiming belt/chain and/or sprockets worn (Chapter 2).
m mCamshaft lobes worn (Chapter 2).
m mFaulty charcoal canister, where fitted (Chapter 6). This Section provides an easy-reference guide to the more
common problems which may occur during the operation of your
vehicle. These problems and their possible causes are grouped under
headings denoting various components or systems, such as Engine,
Cooling system, etc. They also refer you to the Chapter and/or
Section which deals with the problem.
Remember that successful fault diagnosis is not a mysterious
black art practised only by professional mechanics. It is simply the
result of the right knowledge combined with an intelligent, systematic
approach to the problem. Always work by a process of elimination,
starting with the simplest solution and working through to the mostcomplex - and never overlook the obvious. Anyone can run the fuel
tank dry or leave the lights on overnight, so don’t assume that you are
exempt from such oversights.
Finally, always establish a clear idea of why a problem has
occurred, and take steps to ensure that it doesn’t happen again. If the
electrical system fails because of a poor connection, check all other
connections in the system to make sure that they don’t fail as well. If a
particular fuse continues to blow, find out why - don’t just renew one
fuse after another. Remember, failure of a small component can often
be indicative of potential failure or incorrect functioning of a more
important component or system.
Engine
Page 212 of 228
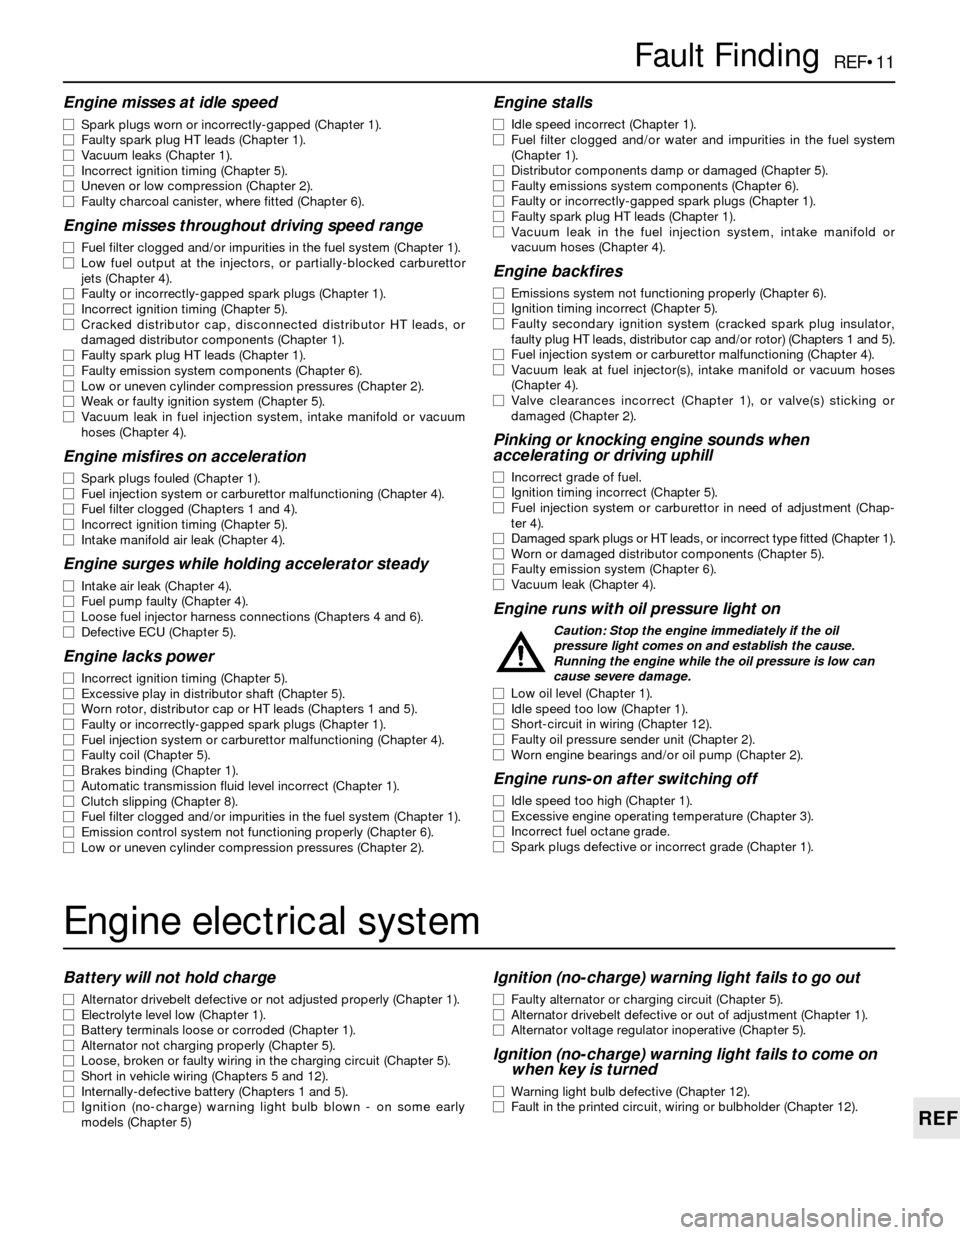
REF•11
REF
Fault Finding
Engine misses at idle speed
m mSpark plugs worn or incorrectly-gapped (Chapter 1).
m mFaulty spark plug HT leads (Chapter 1).
m mVacuum leaks (Chapter 1).
m mIncorrect ignition timing (Chapter 5).
m mUneven or low compression (Chapter 2).
m mFaulty charcoal canister, where fitted (Chapter 6).
Engine misses throughout driving speed range
m
mFuel filter clogged and/or impurities in the fuel system (Chapter 1).
m mLow fuel output at the injectors, or partially-blocked carburettor
jets (Chapter 4).
m mFaulty or incorrectly-gapped spark plugs (Chapter 1).
m mIncorrect ignition timing (Chapter 5).
m mCracked distributor cap, disconnected distributor HT leads, or
damaged distributor components (Chapter 1).
m mFaulty spark plug HT leads (Chapter 1).
m mFaulty emission system components (Chapter 6).
m mLow or uneven cylinder compression pressures (Chapter 2).
m mWeak or faulty ignition system (Chapter 5).
m mVacuum leak in fuel injection system, intake manifold or vacuum
hoses (Chapter 4).
Engine misfires on acceleration
m mSpark plugs fouled (Chapter 1).
m mFuel injection system or carburettor malfunctioning (Chapter 4).
m mFuel filter clogged (Chapters 1 and 4).
m mIncorrect ignition timing (Chapter 5).
m mIntake manifold air leak (Chapter 4).
Engine surges while holding accelerator steady
m
mIntake air leak (Chapter 4).
m mFuel pump faulty (Chapter 4).
m mLoose fuel injector harness connections (Chapters 4 and 6).
m mDefective ECU (Chapter 5).
Engine lacks power
m
mIncorrect ignition timing (Chapter 5).
m mExcessive play in distributor shaft (Chapter 5).
m mWorn rotor, distributor cap or HT leads (Chapters 1 and 5).
m mFaulty or incorrectly-gapped spark plugs (Chapter 1).
m mFuel injection system or carburettor malfunctioning (Chapter 4).
m mFaulty coil (Chapter 5).
m mBrakes binding (Chapter 1).
m mAutomatic transmission fluid level incorrect (Chapter 1).
m mClutch slipping (Chapter 8).
m mFuel filter clogged and/or impurities in the fuel system (Chapter 1).
m mEmission control system not functioning properly (Chapter 6).
m mLow or uneven cylinder compression pressures (Chapter 2).
Engine stalls
m
mIdle speed incorrect (Chapter 1).
m mFuel filter clogged and/or water and impurities in the fuel system
(Chapter 1).
m mDistributor components damp or damaged (Chapter 5).
m mFaulty emissions system components (Chapter 6).
m mFaulty or incorrectly-gapped spark plugs (Chapter 1).
m mFaulty spark plug HT leads (Chapter 1).
m mVacuum leak in the fuel injection system, intake manifold or
vacuum hoses (Chapter 4).
Engine backfires
m mEmissions system not functioning properly (Chapter 6).
m mIgnition timing incorrect (Chapter 5).
m mFaulty secondary ignition system (cracked spark plug insulator,
faulty plug HT leads, distributor cap and/or rotor) (Chapters 1 and 5).
m mFuel injection system or carburettor malfunctioning (Chapter 4).
m mVacuum leak at fuel injector(s), intake manifold or vacuum hoses
(Chapter 4).
m mValve clearances incorrect (Chapter 1), or valve(s) sticking or
damaged (Chapter 2).
Pinking or knocking engine sounds when
accelerating or driving uphill
m mIncorrect grade of fuel.
m mIgnition timing incorrect (Chapter 5).
m mFuel injection system or carburettor in need of adjustment (Chap-
ter 4).
m mDamaged spark plugs or HT leads, or incorrect type fitted (Chapter 1).
m mWorn or damaged distributor components (Chapter 5).
m mFaulty emission system (Chapter 6).
m mVacuum leak (Chapter 4).
Engine runs with oil pressure light on
Caution: Stop the engine immediately if the oil
pressure light comes on and establish the cause.
Running the engine while the oil pressure is low can
cause severe damage.
m mLow oil level (Chapter 1).
m mIdle speed too low (Chapter 1).
m mShort-circuit in wiring (Chapter 12).
m mFaulty oil pressure sender unit (Chapter 2).
m mWorn engine bearings and/or oil pump (Chapter 2).
Engine runs-on after switching off
m
mIdle speed too high (Chapter 1).
m mExcessive engine operating temperature (Chapter 3).
m mIncorrect fuel octane grade.
m mSpark plugs defective or incorrect grade (Chapter 1).
Engine electrical system
Battery will not hold charge
m
mAlternator drivebelt defective or not adjusted properly (Chapter 1).
m mElectrolyte level low (Chapter 1).
m mBattery terminals loose or corroded (Chapter 1).
m mAlternator not charging properly (Chapter 5).
m mLoose, broken or faulty wiring in the charging circuit (Chapter 5).
m mShort in vehicle wiring (Chapters 5 and 12).
m mInternally-defective battery (Chapters 1 and 5).
m mIgnition (no-charge) warning light bulb blown - on some early
models (Chapter 5)
Ignition (no-charge) warning light fails to go out
m mFaulty alternator or charging circuit (Chapter 5).
m mAlternator drivebelt defective or out of adjustment (Chapter 1).
m mAlternator voltage regulator inoperative (Chapter 5).
Ignition (no-charge) warning light fails to come on
when key is turned
m mWarning light bulb defective (Chapter 12).
m mFault in the printed circuit, wiring or bulbholder (Chapter 12).