check engine BMW 3 SERIES CONVERTIBLE 2013 E93 Owner's Manual
[x] Cancel search | Manufacturer: BMW, Model Year: 2013, Model line: 3 SERIES CONVERTIBLE, Model: BMW 3 SERIES CONVERTIBLE 2013 E93Pages: 311, PDF Size: 7.05 MB
Page 19 of 311
14
At a glanceDashboard
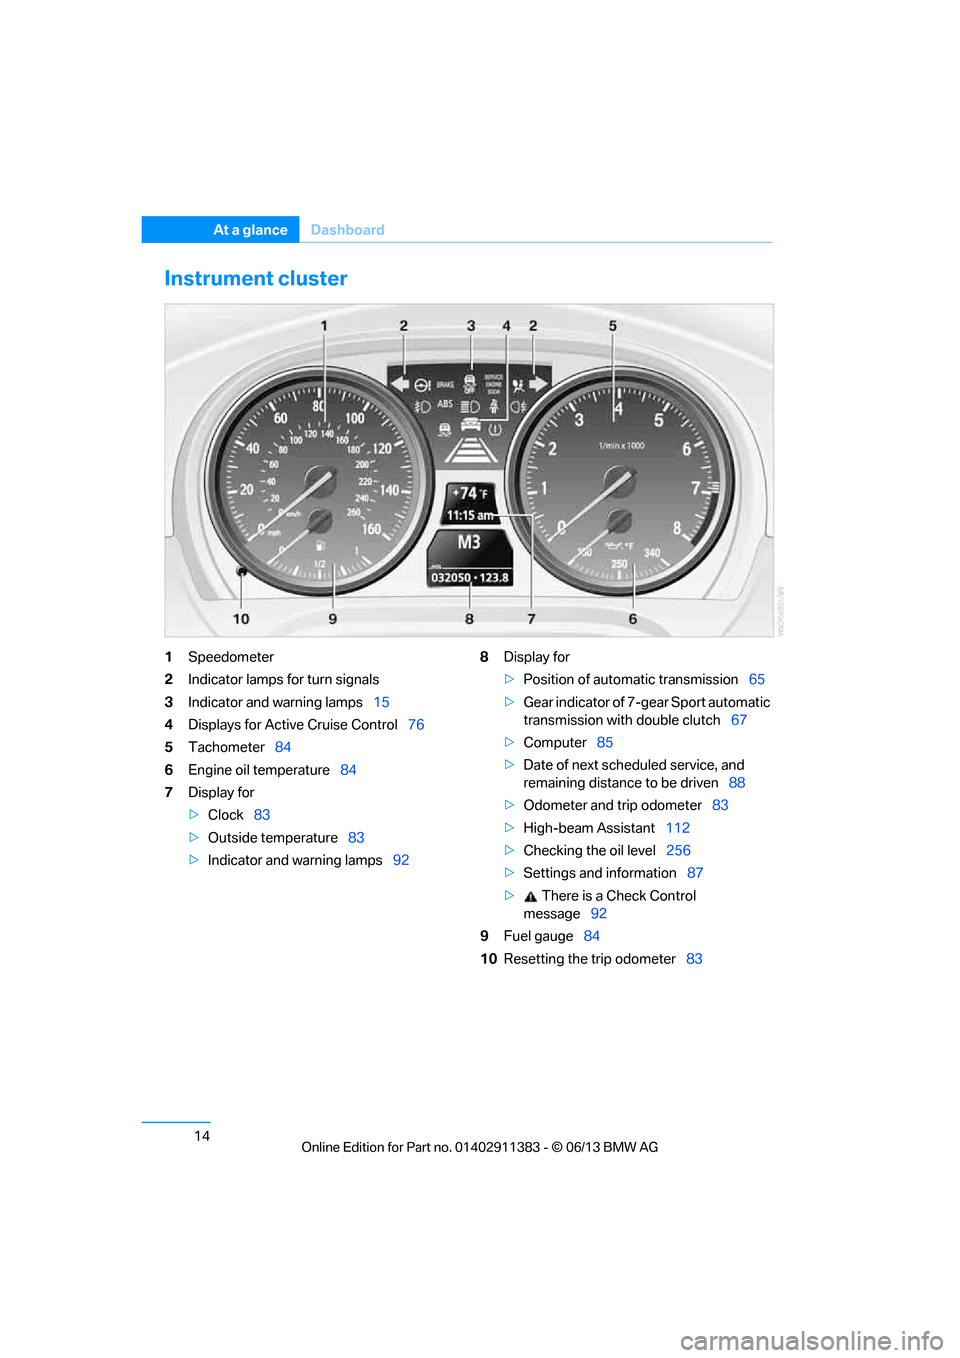
Instrument cluster
1Speedometer
2 Indicator lamps for turn signals
3 Indicator and warning lamps 15
4 Displays for Active Cruise Control 76
5 Tachometer 84
6 Engine oil temperature 84
7 Display for
>Clock 83
> Outside temperature 83
> Indicator and warning lamps 928
Display for
>Position of automatic transmission 65
> Gear indicator of 7-gear Sport automatic
transmission with double clutch 67
> Computer 85
> Date of next scheduled service, and
remaining distance to be driven 88
> Odometer and trip odometer 83
> High-beam Assistant 112
> Checking the oil level 256
> Settings and information 87
> There is a Check Control
message 92
9 Fuel gauge 84
10 Resetting the trip odometer 83
00320051004F004C00510048000300280047004C0057004C005200510003
Page 20 of 311
15
Dashboard
At a glance
Indicator and warning lamps
The concept
Indicator and warning lamps can light up in a
variety of combinations and colors.
Several of the lamps are checked for proper
functioning and light up temporarily when the
engine is started or the ignition is switched on.
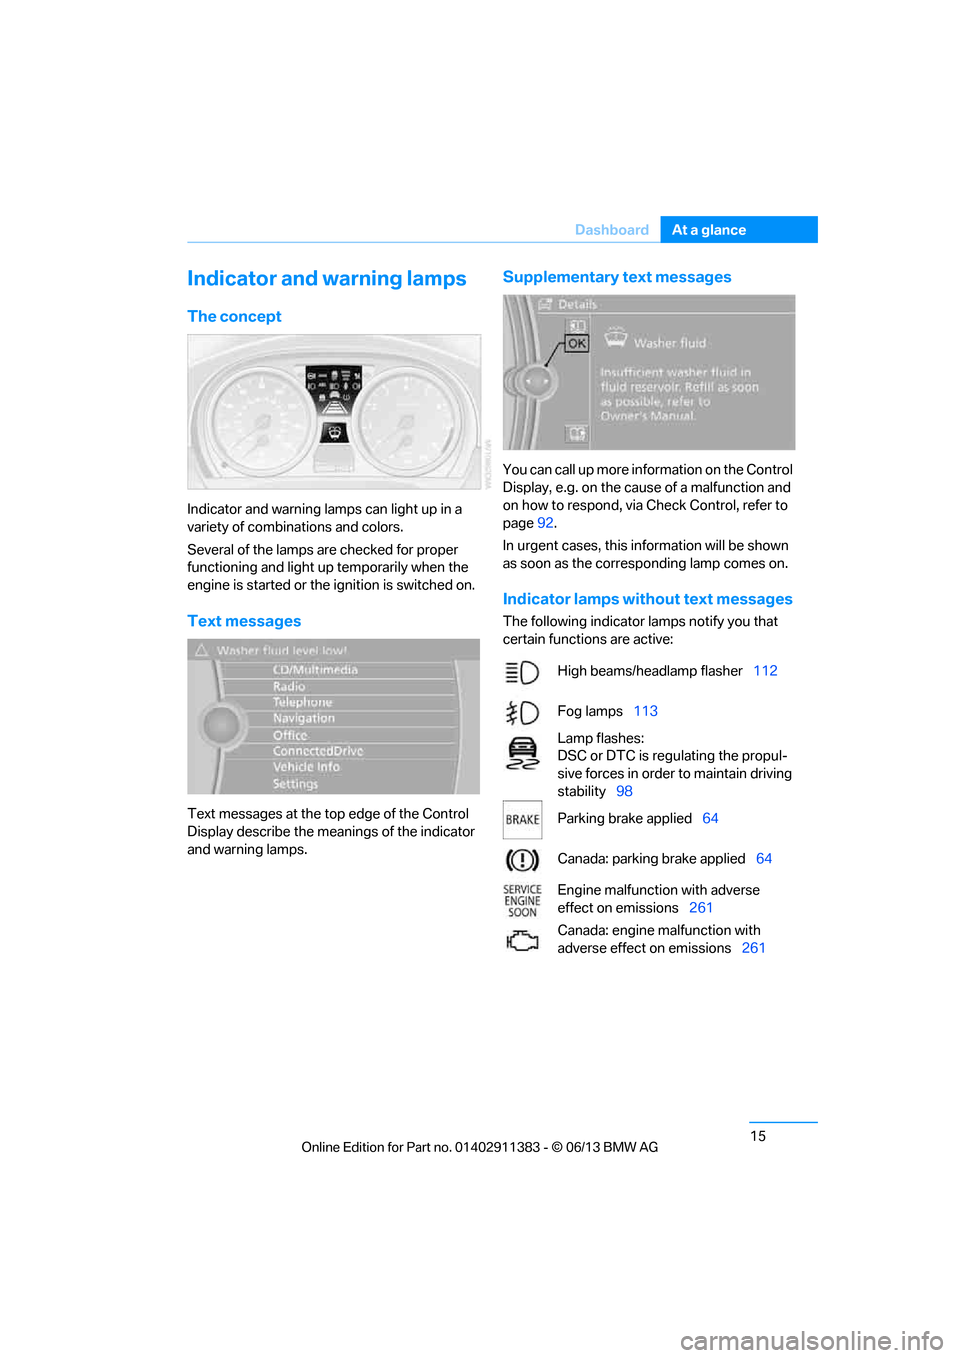
Text messages
Text messages at the to
p edge of the Control
Display describe the mean ings of the indicator
and warning lamps.
Supplementary text messages
You can call up more information on the Control
Display, e.g. on the cause of a malfunction and
on how to respond, via Check Control, refer to
page 92.
In urgent cases, this information will be shown
as soon as the corresponding lamp comes on.
Indicator lamps without text messages
The following indicator lamps notify you that
certain functions are active:
High beams/headlamp flasher 112
Fog lamps 113
Lamp flashes:
DSC or DTC is regulating the propul-
sive forces in order to maintain driving
stability 98
Parking brake applied 64
Canada: parking brake applied 64
Engine malfunction with adverse
effect on emissions 261
Canada: engine malfunction with
adverse effect on emissions 261
00320051004F004C00510048000300280047004C0057004C005200510003
Page 45 of 311
40
ControlsOpening and closing
Switching off tilt alarm sensor and
interior motion sensor
Once the vehicle is locked, press the
button on the remote control again
within approx. 10 seconds.
The indicator lamp light s up briefly and then
flashes continuously. The tilt alarm sensor and
the interior motion sensor are switched off until
the next time the vehicle is unlocked and subse-
quently locked again.
Comfort Access
The concept
It is possible to access the vehicle without actu-
ating the remote control. It is sufficient to have
the remote control with you, for example in your
jacket pocket. The vehicle automatically
detects the remote control in the vicinity or in
the passenger compartment.
Comfort Access supports the following
functions:
> Unlocking/locking the vehicle
> Convenient closing
> Unlocking the trunk lid separately
> Engine starting
Functional requirement
>There are no external sources of interfer-
ence in the vicinity.
> The remote control mu st be outside the
vehicle to lock it.
> The next unlocking and locking cycle is not
possible until after approx. 2 seconds.
> It is only possible to start the engine if the
remote control is inside the vehicle.
Comparison to the standard remote
control
The above functions can be controlled by
pressing the remote control buttons or by using
Comfort Access. If you notice a brief delay while opening or
closing windows, the glass roof or retract-
able hardtop, the system is checking whether a
remote control is inside the vehicle. Please
repeat the opening or closing procedure, if
necessary. <
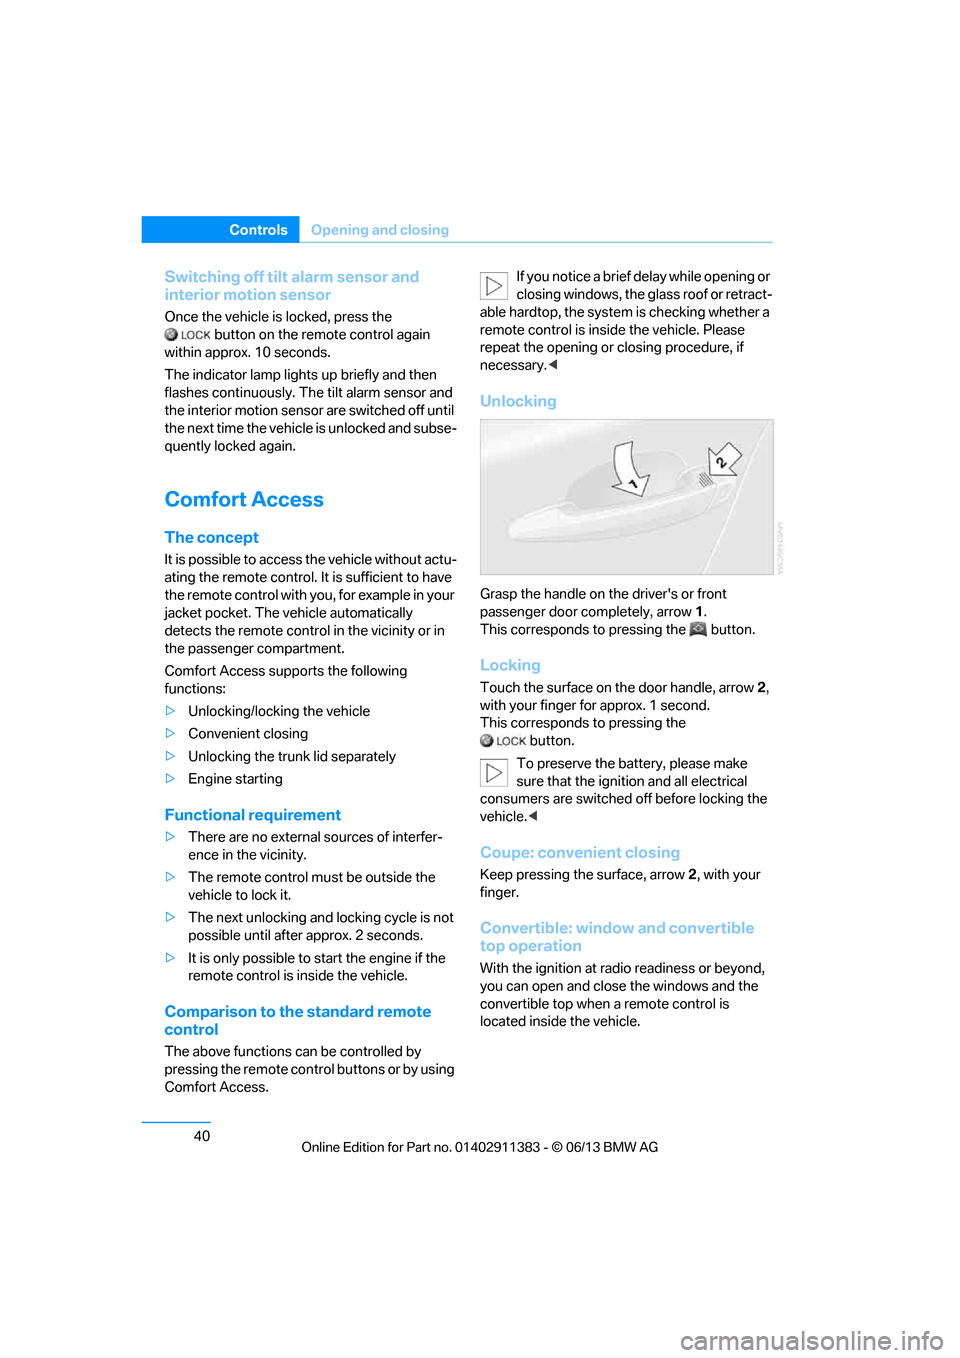
Unlocking
Grasp the handle on the driver's or front
passenger door completely, arrow 1 .
This corresponds to pressing the button.
Locking
Touch the surface on the door handle, arrow 2,
with your finger for approx. 1 second.
This corresponds to pressing the
button.
To preserve the battery, please make
sure that the ignition and all electrical
consumers are switched off before locking the
vehicle. <
Coupe: convenient closing
Keep pressing the surface, arrow 2, with your
finger.
Convertible: window and convertible
top operation
With the ignition at ra dio readiness or beyond,
you can open and close the windows and the
convertible top when a remote control is
located inside the vehicle.
00320051004F004C00510048000300280047004C0057004C005200510003
Page 46 of 311
41
Opening and closing
Controls
Unlocking the trunk lid separately
Press the button on the ou
tside of the trunk lid.
This corresponds to pressing the button.
If the vehicle detects that a remote
control has been accide ntally left inside
the locked vehicle's trunk after the trunk lid is
closed, the lid will reopen. The hazard warning
flashers flash and a signal sounds. <
Switching on radio readiness
Pressing the Start/Stop button switches on
radio readiness.
Do not depress the brake or the clutch; other-
wise, the engine will start immediately.
Starting the engine
The engine can be started or the ignition can be
switched on when a remote control is inside the
vehicle. It is not necessa ry to insert a remote
control into the ignition lock, refer to page 62.
Switching off the engine in cars with
automatic transmission
The engine can only be switched off when the
selector lever is in po sition P, refer to page 64.
To switch the engine off when the selector lever
is in position N, the remote control must be in
the ignition lock.
Malfunction
Local radio waves can in terfere with the func-
tion of Comfort Access, for example when a
mobile phone is in the immediate vicinity of the
remote control or by when a mobile phone is
being charged in the vehicle.
If this happens, open or close the vehicle via the
buttons on the remote co ntrol or using the inte-
grated key. To start the engine afterward, insert
the remote control into the ignition lock.
Warning lamps
The warning lamp in the instrument
cluster lights up when you attempt to
start the engine: the engine cannot
be started. The remote co ntrol is not inside the
vehicle or is malfunctioning. Take the remote contro
l with you inside the
vehicle or have it checked. If necessary, insert
another remote control in to the ignition lock.
The warning lamp in the instrument
cluster lights up wh ile the engine is
running: the remote control is no
longer inside the vehicle. After the engine is
switched off, the engine can only be restarted
within approx. 10 seconds.
The indicator lamp in the instrument
cluster lights up and a message
appears on the Control Display:
replace the battery in the remote control.
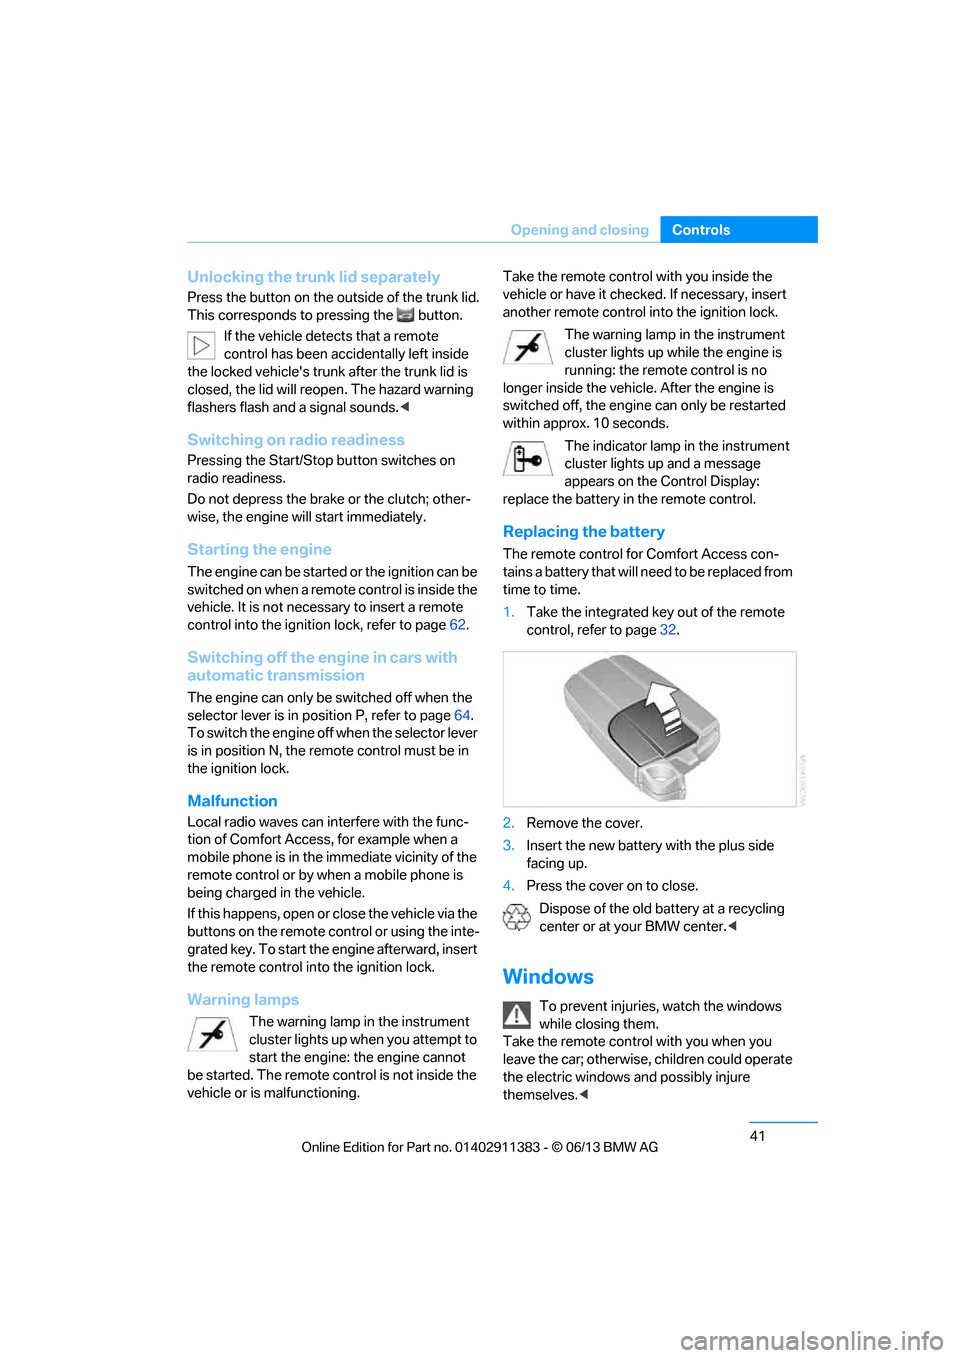
Replacing the battery
The remote control for Comfort Access con-
tains a battery that will need to be replaced from
time to time.
1. Take the integrated ke y out of the remote
control, refer to page 32.
2. Remove the cover.
3. Insert the new battery with the plus side
facing up.
4. Press the cover on to close.
Dispose of the old battery at a recycling
center or at your BMW center. <
Windows
To prevent injuries, watch the windows
while closing them.
Take the remote contro l with you when you
leave the car; otherwise, children could operate
the electric windows and possibly injure
themselves. <
00320051004F004C00510048000300280047004C0057004C005200510003
Page 60 of 311
55
Adjustments
Controls
Even if you have not yet fastened your safety
belt, the belt hand-over will retract if you:
>
Wait for more than approx. one minute
> Open the corresponding door
> Start driving.
Closing the respective do or reactivates the belt
hand-over if the ignition or radio readiness is on.
Front passenger seat
The belt hand-over will exte nd only if the seat is
occupied and after the front passenger door is
closed.
Pinch protection system
If the belt hand-over en counters resistance on
moving in or out, it moves back slightly in the
opposite direction and stops in this position. To
reactivate the belt hand -over: open and close
the door or switch the ignition off and on.
Although there is a pinch protection sys-
tem, always check that the maneuvering
area of the belt hand-ove r is clear. Otherwise it
cannot be ensured that the system will stop
moving in certain extreme situations. <
Mirrors
Exterior mirrors
The front passenger's mirror is more con-
vex than the driver's mirror. The objects
seen in the mirror are closer than they appear.
Do not gauge your distan ce from traffic behind you on the basis of what you see in the mirror;
otherwise, there is an increased risk of an
accident.
<
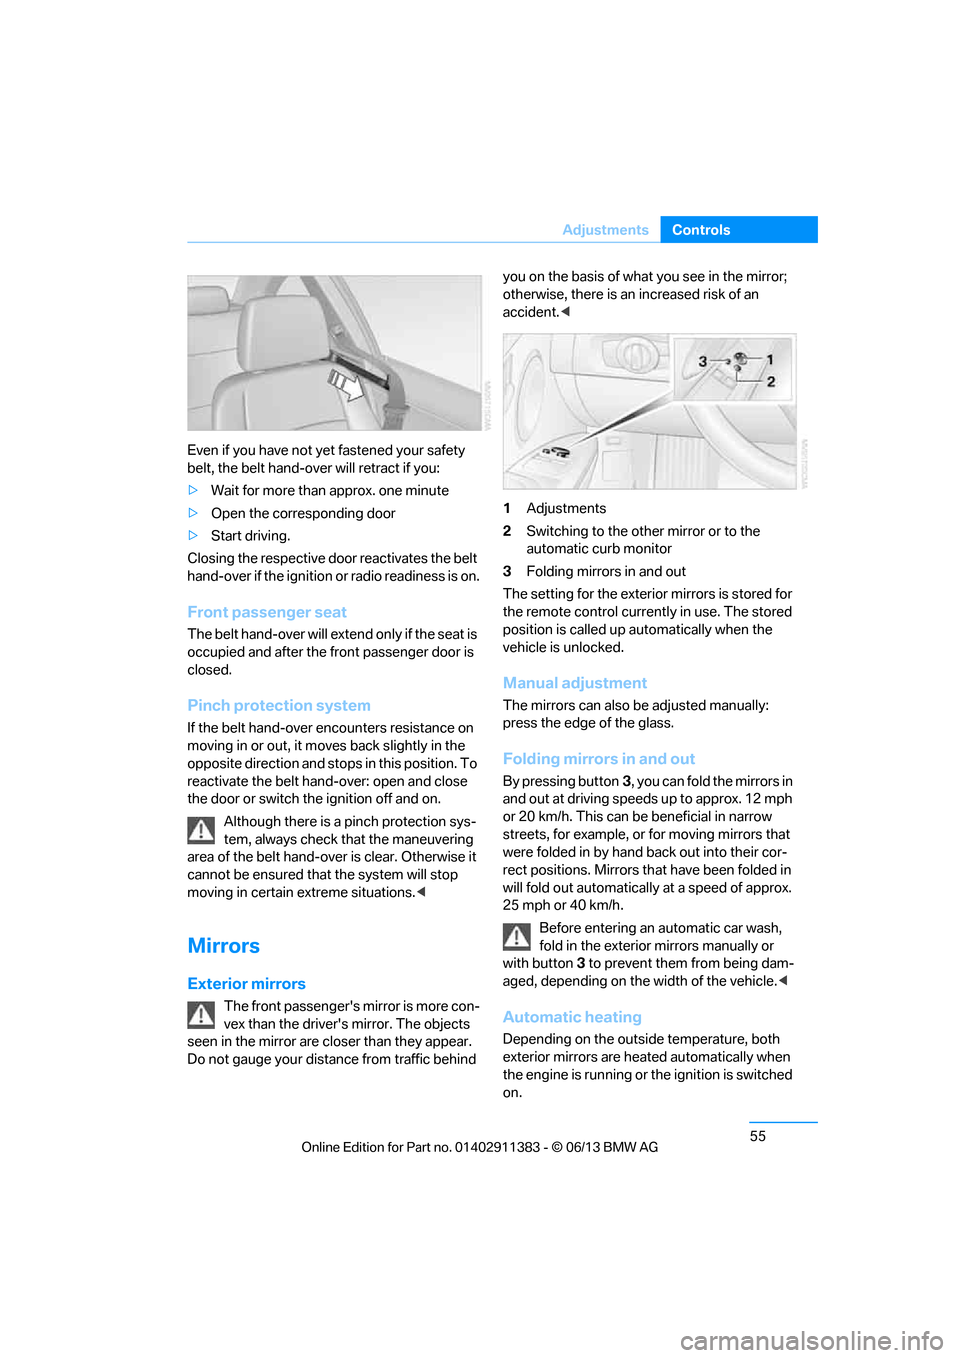
1 Adjustments
2 Switching to the other mirror or to the
automatic curb monitor
3 Folding mirrors in and out
The setting for the exterior mirrors is stored for
the remote control currently in use. The stored
position is called up automatically when the
vehicle is unlocked.
Manual adjustment
The mirrors can also be adjusted manually:
press the edge of the glass.
Folding mirrors in and out
By pressing button 3, you can fold the mirrors in
and out at driving speeds up to approx. 12 mph
or 20 km/h. This can be beneficial in narrow
streets, for example, or for moving mirrors that
were folded in by hand back out into their cor-
rect positions. Mirrors th at have been folded in
will fold out automatically at a speed of approx.
25 mph or 40 km/h.
Before entering an automatic car wash,
fold in the exterior mirrors manually or
with button 3 to prevent them from being dam-
aged, depending on the width of the vehicle. <
Automatic heating
Depending on the outside temperature, both
exterior mirrors are heated automatically when
the engine is running or the ignition is switched
on.
00320051004F004C00510048000300280047004C0057004C005200510003
Page 97 of 311
92
ControlsControls overview
Date
The settings are stored for the remote control
currently in use, refer also to Personal Profile on
page32.
Setting the date
In the instrument cluster
To set the dd/mm or mm/dd date format, refer
to Setting the date format below.
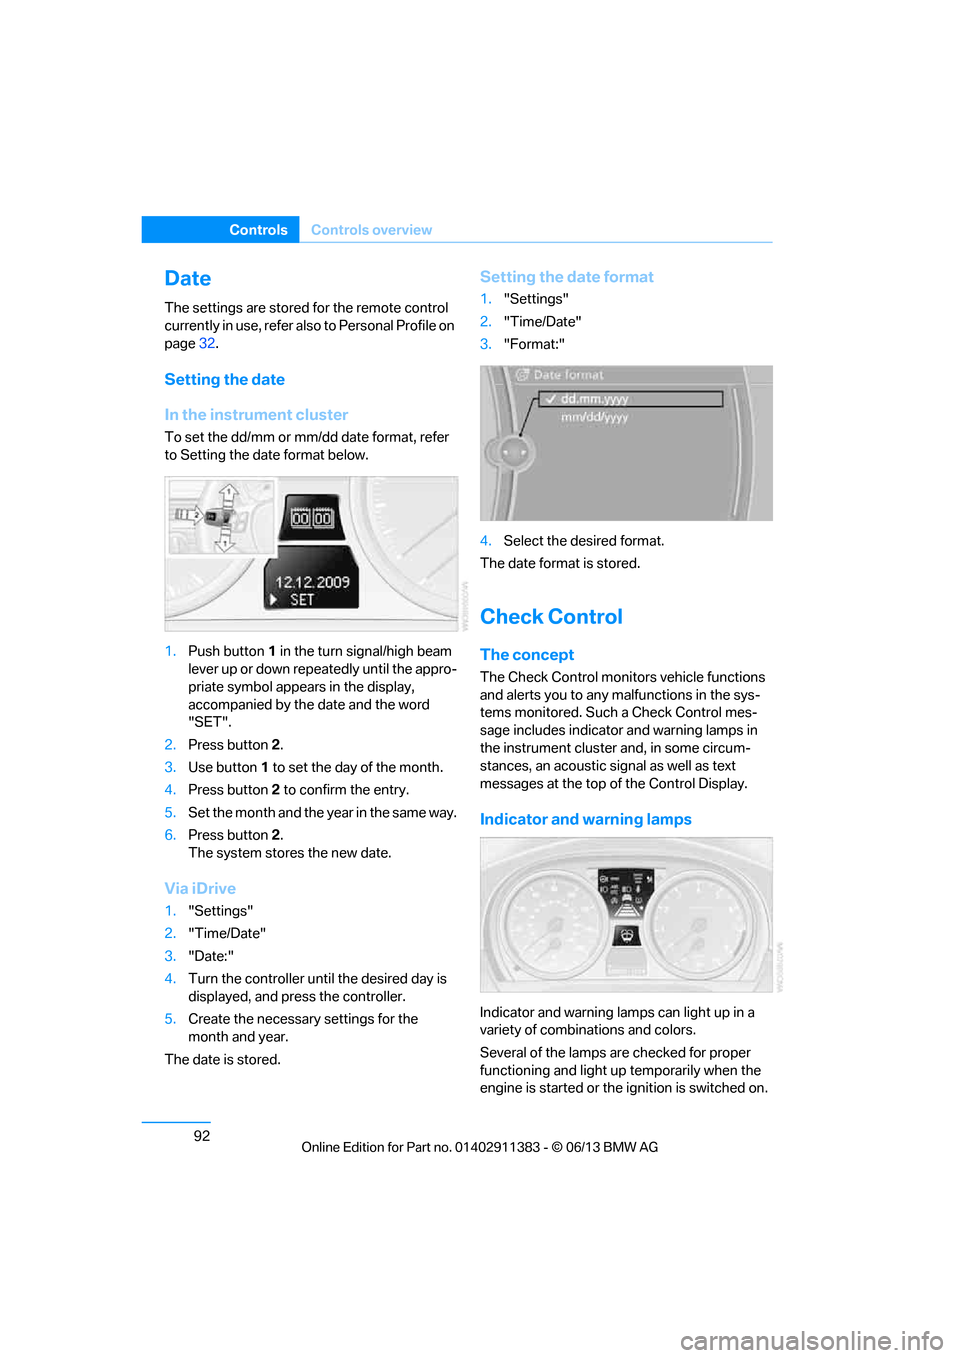
1. Push button 1 in the turn signal/high beam
lever up or down repe atedly until the appro-
priate symbol appear s in the display,
accompanied by the date and the word
"SET".
2. Press button 2.
3. Use button 1 to set the day of the month.
4. Press button 2 to confirm the entry.
5. Set the month and the ye a r i n t he s a m e w a y .
6. Press button 2.
The system stores the new date.
Via iDrive
1. "Settings"
2. "Time/Date"
3. "Date:"
4. Turn the controller until the desired day is
displayed, and press the controller.
5. Create the necessary settings for the
month and year.
The date is stored.
Setting the date format
1. "Settings"
2. "Time/Date"
3. "Format:"
4. Select the desired format.
The date format is stored.
Check Control
The concept
The Check Control monitors vehicle functions
and alerts you to any malfunctions in the sys-
tems monitored. Such a Check Control mes-
sage includes indicato r and warning lamps in
the instrument cluster and, in some circum-
stances, an acoustic signal as well as text
messages at the top of the Control Display.
Indicator and warning lamps
Indicator and warning lamps can light up in a
variety of combinations and colors.
Several of the lamps are checked for proper
functioning and light up temporarily when the
engine is started or the ignition is switched on.
00320051004F004C00510048000300280047004C0057004C005200510003
Page 102 of 311
97
Technology for driving comfort and safety
Controls
Malfunction
The warning lamp lights up. A mes-
sage appears on th
e Control Display.
PDC is malfunctioning. Have the
system checked.
To avoid this problem, keep the sensors clean
and free of ice or snow in order to ensure that
they will continue to op erate effectively. When
using a high-pressure cleaner, do not spray the
sensors for extended periods of time and only
from a distance of at least 1 ft/30 cm.
Manual operation
The LED above the button also flashes.
PDC with visual warning
The approach of the vehicle to an object is
shown on the Control Display. Objects that are
farther away are displayed on the Control Dis-
play before a signal to ne sounds. The display
appears on the Control Display as soon as PDC
is activated.
System limitations
Even with PDC, final responsibility for
estimating the distance between the
vehicle and any obstructions always remains
with the driver. Even when sensors are pro-
vided, there is a blind spot in which objects can
no longer be detected. The system is also sub-
ject to the physical limit s that apply to all forms
of ultrasonic measurement, such as those
encountered with traile r towbars and hitches,
thin or wedge-shaped objects, etc. Low objects
that have already been displayed, e.g. curbs,
can disappear again from the detection area of
the sensors before or after a continuous tone
sounds. Higher, protruding objects, e.g. ledges,
cannot be detected. Therefore, always drive
cautiously; otherwise, there is a risk of personal
injury or property damage.
Loud sound sources outside or inside the car
can drown out the PDC signal. Therefore,
always drive cautiously; otherwise, there is a
risk of personal injury or property damage. <
Driving stability control
systems
Your BMW has a number of systems that help
to maintain the vehicle's stability even in
adverse driving conditions.
ABS Antilock Brake System
ABS prevents locking of the wheels during
braking. Safe steering response is maintained
even during full braking. Active safety is thus
increased.
The ABS is operational every time you start the
engine. Braking safely, refer to page138.
Electronic brake-force distribution
EBV
The system controls the brake pressure in the
rear wheels to ensure stable braking behavior.
Dynamic Brake Control DBC
When you apply the brakes rapidly, this system
automatically produces the maximum braking
force boost and thus helps to achieve the short-
est possible braking distance during full brak-
ing. This system exploi ts all of the benefits
provided by ABS.
Do not reduce the pressu re on the brake for the
duration of the full braking application.
Dynamic Stability Control DSC
DSC prevents the driving wheels from losing
traction when you pull aw ay from rest or accel-
erate. The system also recognizes unstable
driving conditions, for example if the rear of the
car is about to swerve or if momentum is acting
at an angle past the front wheels. In these
cases, DSC helps the vehicle maintain a safe
course within physical limits by reducing engine
output and through brakin g actions at the indi-
vidual wheels.
00320051004F004C00510048000300280047004C0057004C005200510003
Page 106 of 311
101
Technology for driving comfort and safety
Controls
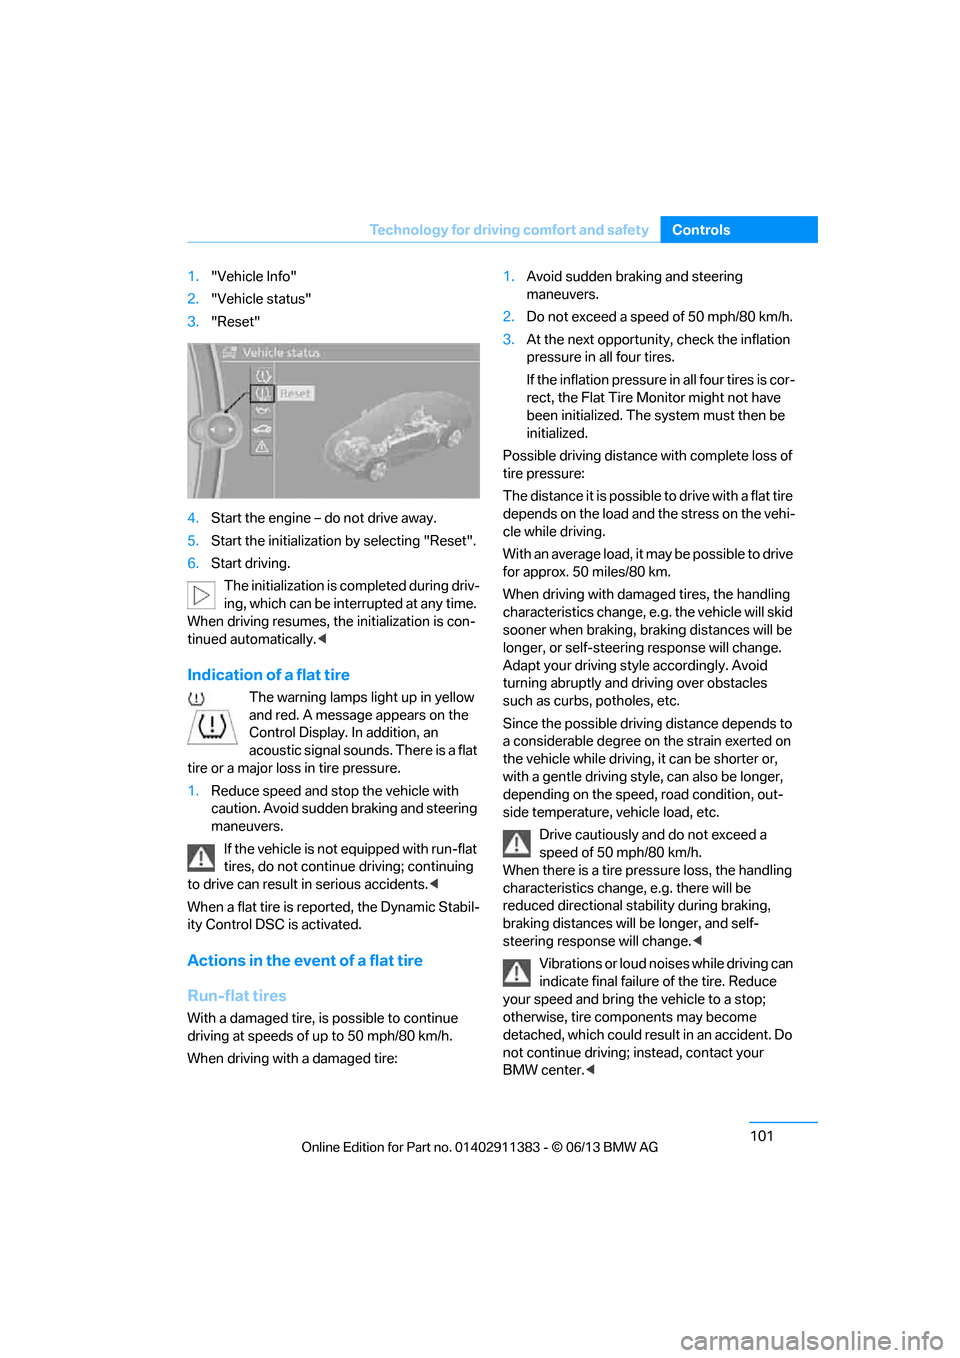
1.
"Vehicle Info"
2. "Vehicle status"
3. "Reset"
4. Start the engine – do not drive away.
5. Start the initialization by selecting "Reset".
6. Start driving.
The initialization is completed during driv-
ing, which can be interrupted at any time.
When driving resumes, the initialization is con-
tinued automatically. <
Indication of a flat tire
The warning lamps light up in yellow
and red. A message appears on the
Control Display. In addition, an
acoustic signal sounds. There is a flat
tire or a major loss in tire pressure.
1. Reduce speed and stop the vehicle with
caution. Avoid sudden braking and steering
maneuvers.
If the vehicle is not equipped with run-flat
tires, do not continue driving; continuing
to drive can result in serious accidents.<
When a flat tire is re ported, the Dynamic Stabil-
ity Control DSC is activated.
Actions in the event of a flat tire
Run-flat tires
With a damaged tire, is possible to continue
driving at speeds of up to 50 mph/80 km/h.
When driving with a damaged tire: 1.
Avoid sudden braking and steering
maneuvers.
2. Do not exceed a speed of 50 mph/80 km/h.
3. At the next opportunity, check the inflation
pressure in all four tires.
If the inflation pressure in all four tires is cor-
rect, the Flat Tire Monitor might not have
been initialized. The system must then be
initialized.
Possible driving distance with complete loss of
tire pressure:
The distance it is possible to drive with a flat tire
depends on the load and the stress on the vehi-
cle while driving.
With an average load, it may be possible to drive
for approx. 50 miles/80 km.
When driving with damaged tires, the handling
characteristics change, e. g. the vehicle will skid
sooner when braking, braking distances will be
longer, or self-steerin g response will change.
Adapt your driving style accordingly. Avoid
turning abruptly and driving over obstacles
such as curbs, potholes, etc.
Since the possible drivin g distance depends to
a considerable degree on the strain exerted on
the vehicle while driving, it can be shorter or,
with a gentle driving style, can also be longer,
depending on the speed, road condition, out-
side temperature, vehicle load, etc.
Drive cautiously and do not exceed a
speed of 50 mph/80 km/h.
When there is a tire pr essure loss, the handling
characteristics change, e.g. there will be
reduced directional stability during braking,
braking distances will be longer, and self-
steering response will change. <
Vibrations or loud noises while driving can
indicate final failure of the tire. Reduce
your speed and bring the vehicle to a stop;
otherwise, tire components may become
detached, which could result in an accident. Do
not continue driving; instead, contact your
BMW center. <
00320051004F004C00510048000300280047004C0057004C005200510003
Page 108 of 311
103
Technology for driving comfort and safety
Controls
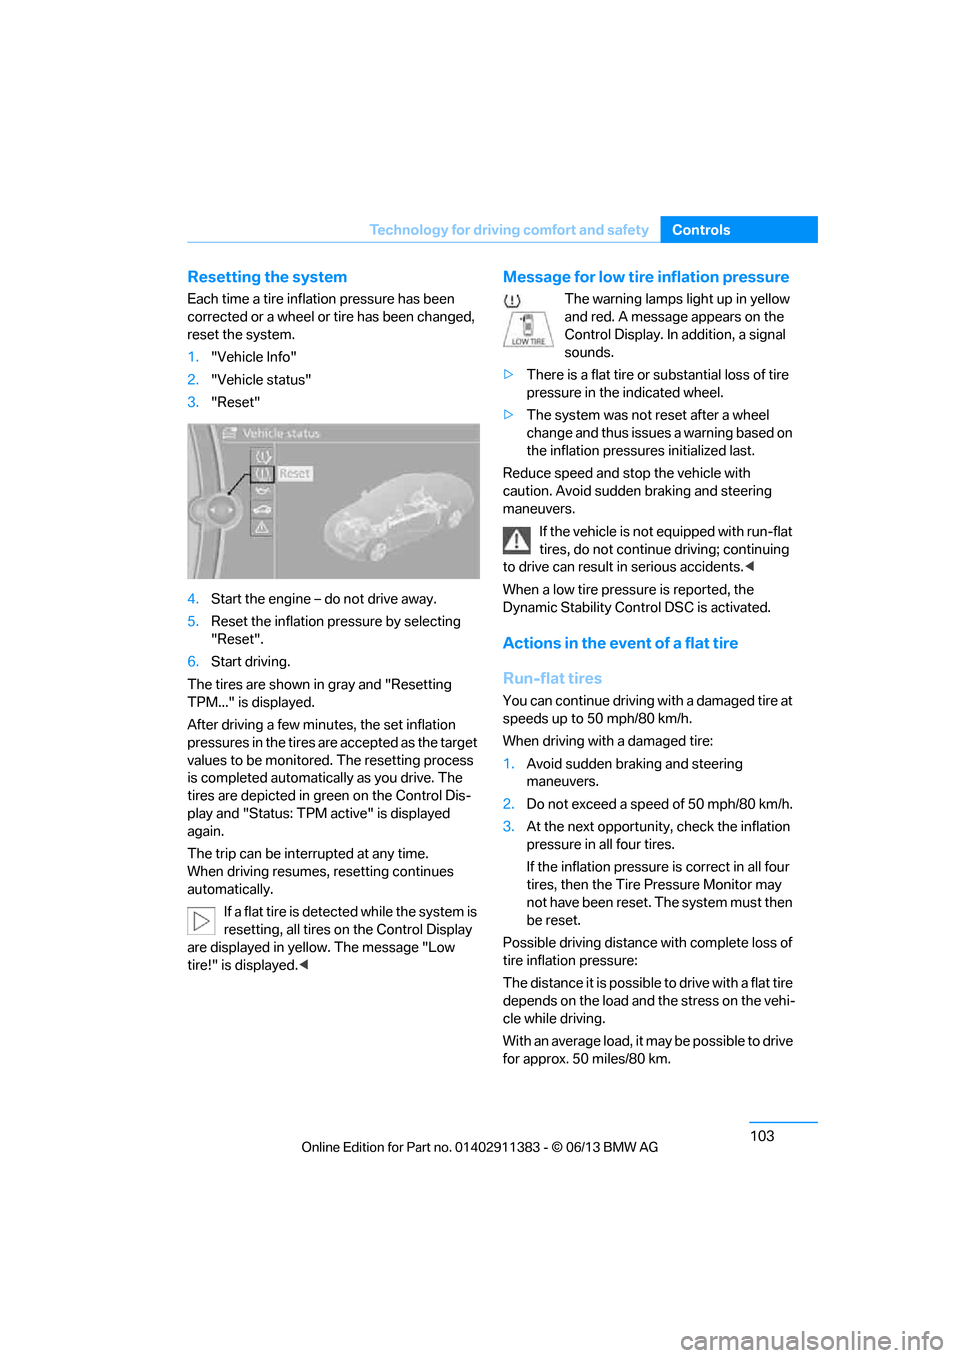
Resetting the system
Each time a tire inflation pressure has been
corrected or a wheel or tire has been changed,
reset the system.
1.
"Vehicle Info"
2. "Vehicle status"
3. "Reset"
4. Start the engine – do not drive away.
5. Reset the inflation pr essure by selecting
"Reset".
6. Start driving.
The tires are shown in gray and "Resetting
TPM..." is displayed.
After driving a few minu tes, the set inflation
pressures in the tires are accepted as the target
values to be monitored. The resetting process
is completed automatically as you drive. The
tires are depicted in green on the Control Dis-
play and "Status: TPM active" is displayed
again.
The trip can be interrupted at any time.
When driving resumes, resetting continues
automatically.
If a flat tire is detected while the system is
resetting, all tires on the Control Display
are displayed in yellow. The message "Low
tire!" is displayed. <
Message for low tire inflation pressure
The warning lamps light up in yellow
and red. A message appears on the
Control Display. In addition, a signal
sounds.
> There is a flat tire or substantial loss of tire
pressure in the indicated wheel.
> The system was not reset after a wheel
change and thus issues a warning based on
the inflation pressure s initialized last.
Reduce speed and stop the vehicle with
caution. Avoid sudden braking and steering
maneuvers. If the vehicle is not equipped with run-flat
tires, do not continue driving; continuing
to drive can result in serious accidents.<
When a low tire pressure is reported, the
Dynamic Stability Control DSC is activated.
Actions in the event of a flat tire
Run-flat tires
You can continue driving with a damaged tire at
speeds up to 50 mph/80 km/h.
When driving with a damaged tire:
1. Avoid sudden braking and steering
maneuvers.
2. Do not exceed a speed of 50 mph/80 km/h.
3. At the next opportunity, check the inflation
pressure in all four tires.
If the inflation pressure is correct in all four
tires, then the Tire Pressure Monitor may
not have been reset. The system must then
be reset.
Possible driving distance with complete loss of
tire inflation pressure:
The distance it is possible to drive with a flat tire
depends on the load and the stress on the vehi-
cle while driving.
With an average load, it may be possible to drive
for approx. 50 miles/80 km.
00320051004F004C00510048000300280047004C0057004C005200510003
Page 117 of 311
112
ControlsLamps
The corner-illuminating lamp is switched on
automatically, depending on the steering wheel
angle or turn signal indicator.
Standstill function: to avoid blinding oncoming
traffic, the Adaptive Light Control does not
direct light toward the driver's side when the
vehicle is at a standstill.
When you are reversing, only the corner-illumi-
nating lamps are switched on and active on
both sides.
Malfunction
The warning lamp lights up. A mes-
sage appears on the Control Dis-
play.The Adaptive Light Control is
malfunctioning or failed. Have the system
checked as soon as possible.
High beams/roadside parking
lamps
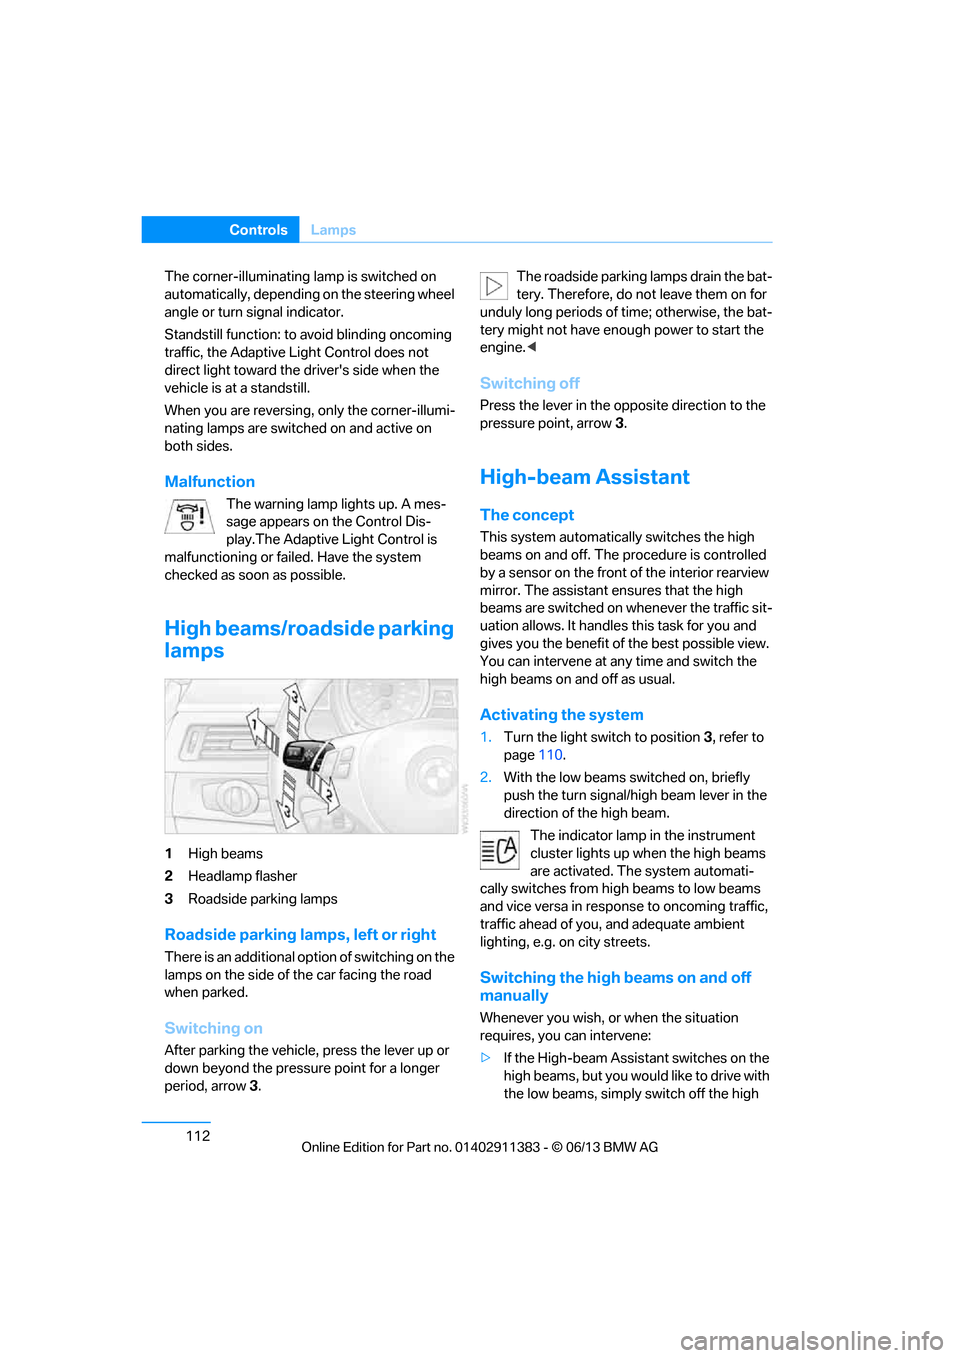
1 High beams
2 Headlamp flasher
3 Roadside parking lamps
Roadside parking lamps, left or right
There is an additional option of switching on the
lamps on the side of the car facing the road
when parked.
Switching on
After parking the vehicle, press the lever up or
down beyond the pressu re point for a longer
period, arrow 3. The roadside parking lamps drain the bat-
tery. Therefore, do not leave them on for
unduly long periods of time; otherwise, the bat-
tery might not have enou gh power to start the
engine. <
Switching off
Press the lever in the o pposite direction to the
pressure point, arrow 3.
High-beam Assistant
The concept
This system automatically switches the high
beams on and off. The procedure is controlled
by a sensor on the front of the interior rearview
mirror. The assistant ensures that the high
beams are switched on whenever the traffic sit-
uation allows. It handle s this task for you and
gives you the benefit of the best possible view.
You can intervene at any time and switch the
high beams on and off as usual.
Activating the system
1. Turn the light switch to position 3, refer to
page 110.
2. With the low beams switched on, briefly
push the turn signal/high beam lever in the
direction of the high beam.
The indicator lamp in the instrument
cluster lights up when the high beams
are activated. The system automati-
cally switches from hi gh beams to low beams
and vice versa in response to oncoming traffic,
traffic ahead of you, and adequate ambient
lighting, e.g. on city streets.
Switching the high beams on and off
manually
Whenever you wish, or when the situation
requires, you can intervene:
> If the High-beam Assistant switches on the
high beams, but you would like to drive with
the low beams, simply switch off the high
00320051004F004C00510048000300280047004C0057004C005200510003