glove BMW 3 SERIES SEDAN 2013 F30 Owner's Manual
[x] Cancel search | Manufacturer: BMW, Model Year: 2013, Model line: 3 SERIES SEDAN, Model: BMW 3 SERIES SEDAN 2013 F30Pages: 248, PDF Size: 5.21 MB
Page 18 of 248
CockpitVehicle equipment
All standard, country-specific and optional
equipment that is offered in the model series is
described in this chapter. Therefore, equip‐ment is also described that is not available in a
vehicle, e. g., because of the selected optional
equipment or country variant. This also applies
for safety-related functions and systems.
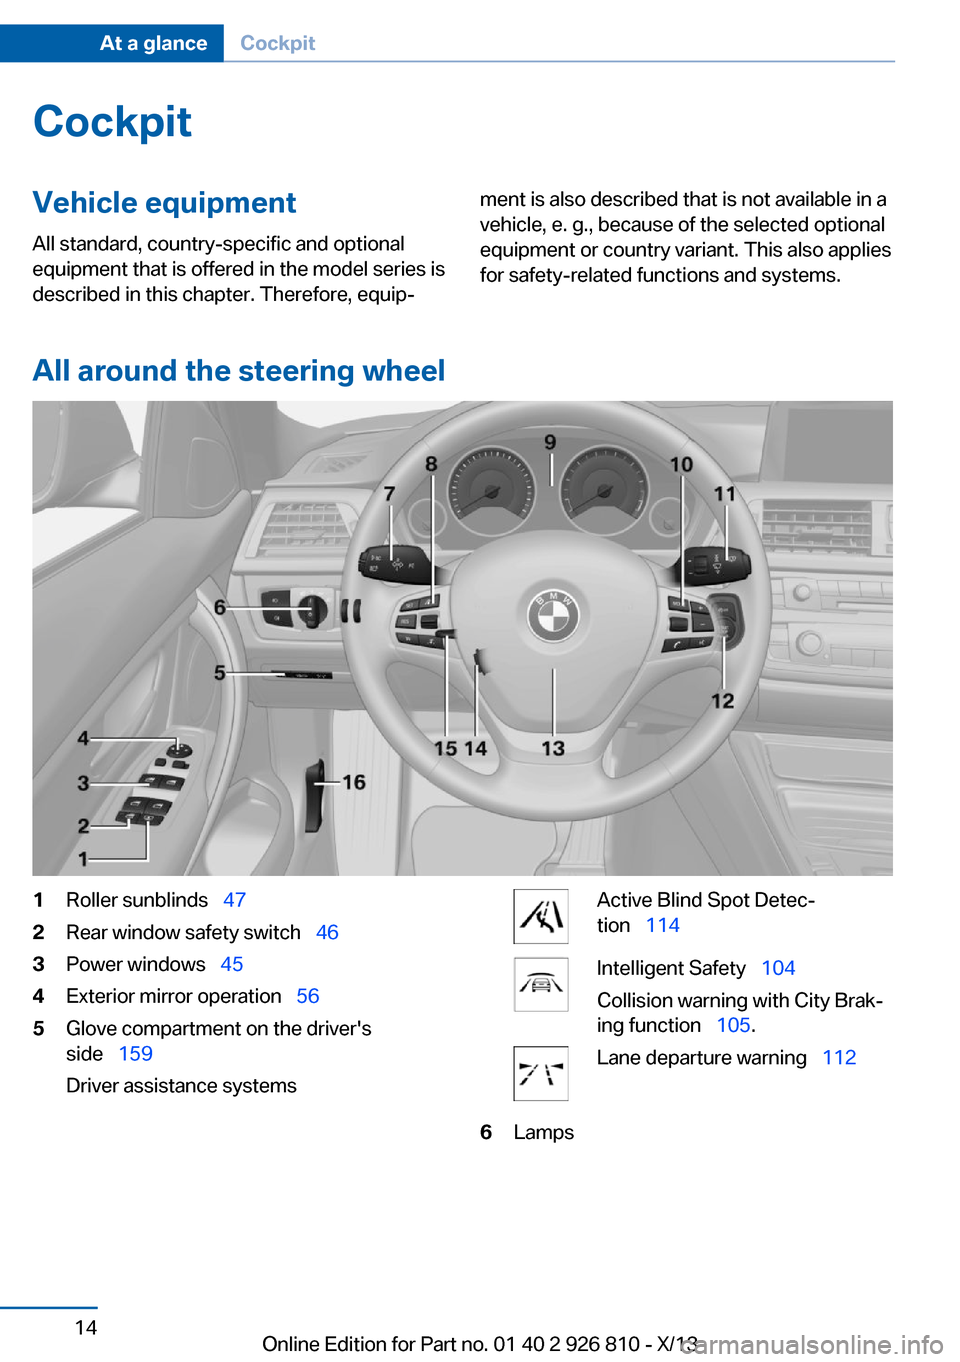
All around the steering wheel
1Roller sunblinds 472Rear window safety switch 463Power windows 454Exterior mirror operation 565Glove compartment on the driver's
side 159
Driver assistance systemsActive Blind Spot Detec‐
tion 114Intelligent Safety 104
Collision warning with City Brak‐
ing function 105.Lane departure warning 1126LampsSeite 14At a glanceCockpit14
Online Edition for Part no. 01 40 2 926 810 - X/13
Page 20 of 248
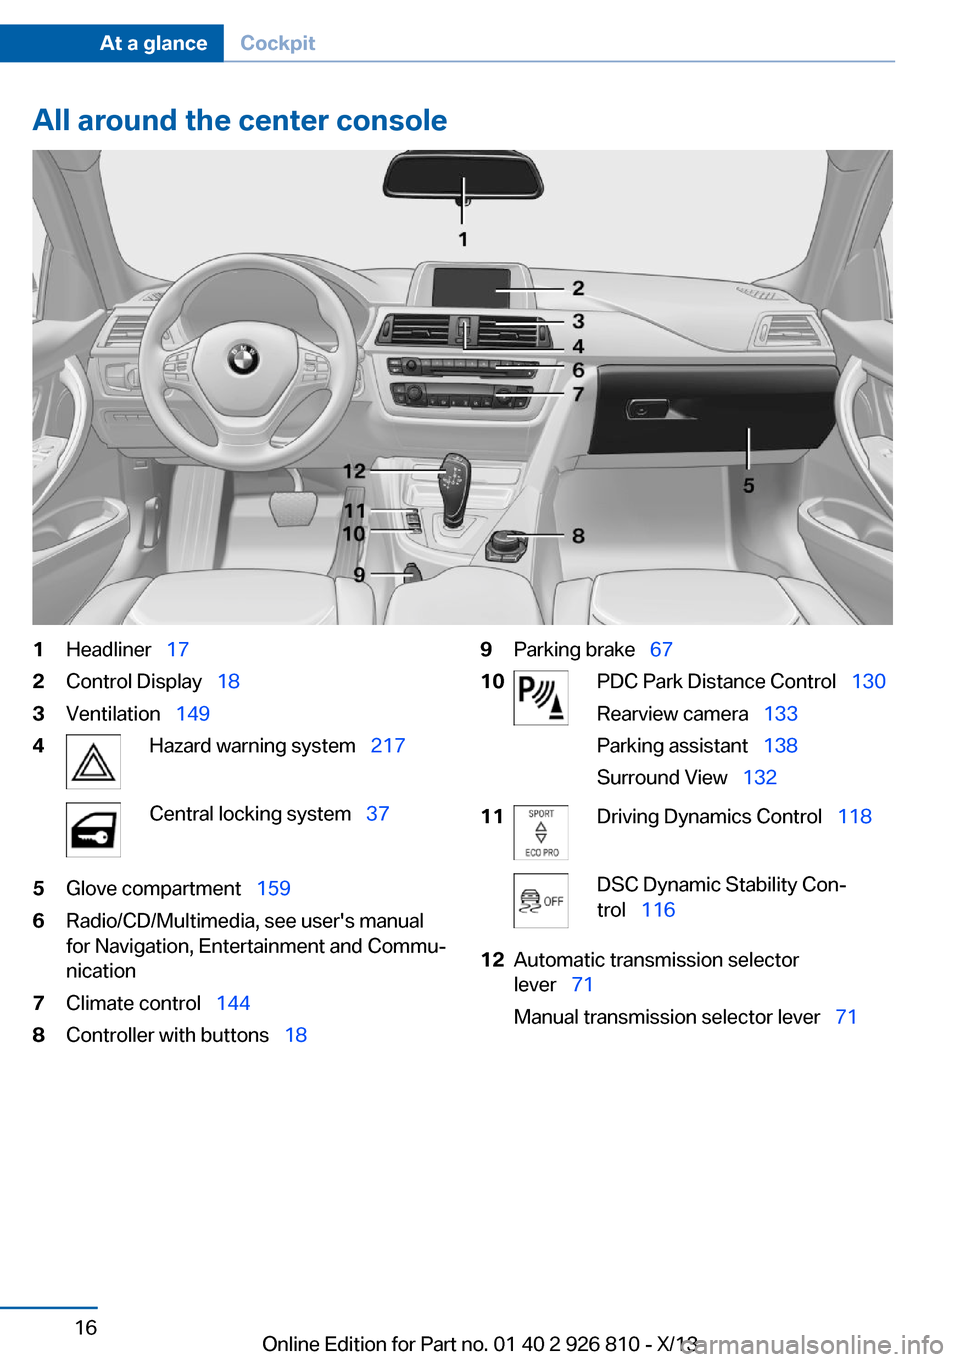
All around the center console1Headliner 172Control Display 183Ventilation 1494Hazard warning system 217Central locking system 375Glove compartment 1596Radio/CD/Multimedia, see user's manual
for Navigation, Entertainment and Commu‐
nication7Climate control 1448Controller with buttons 189Parking brake 6710PDC Park Distance Control 130
Rearview camera 133
Parking assistant 138
Surround View 13211Driving Dynamics Control 118DSC Dynamic Stability Con‐
trol 11612Automatic transmission selector
lever 71
Manual transmission selector lever 71Seite 16At a glanceCockpit16
Online Edition for Part no. 01 40 2 926 810 - X/13
Page 28 of 248
Split screen
General information Additional information can be displayed on the
right side of the split screen, e.g., information
from the onboard computer.
In the divided screen view, the so-called split
screen, this information remains visible even when you change to another menu.
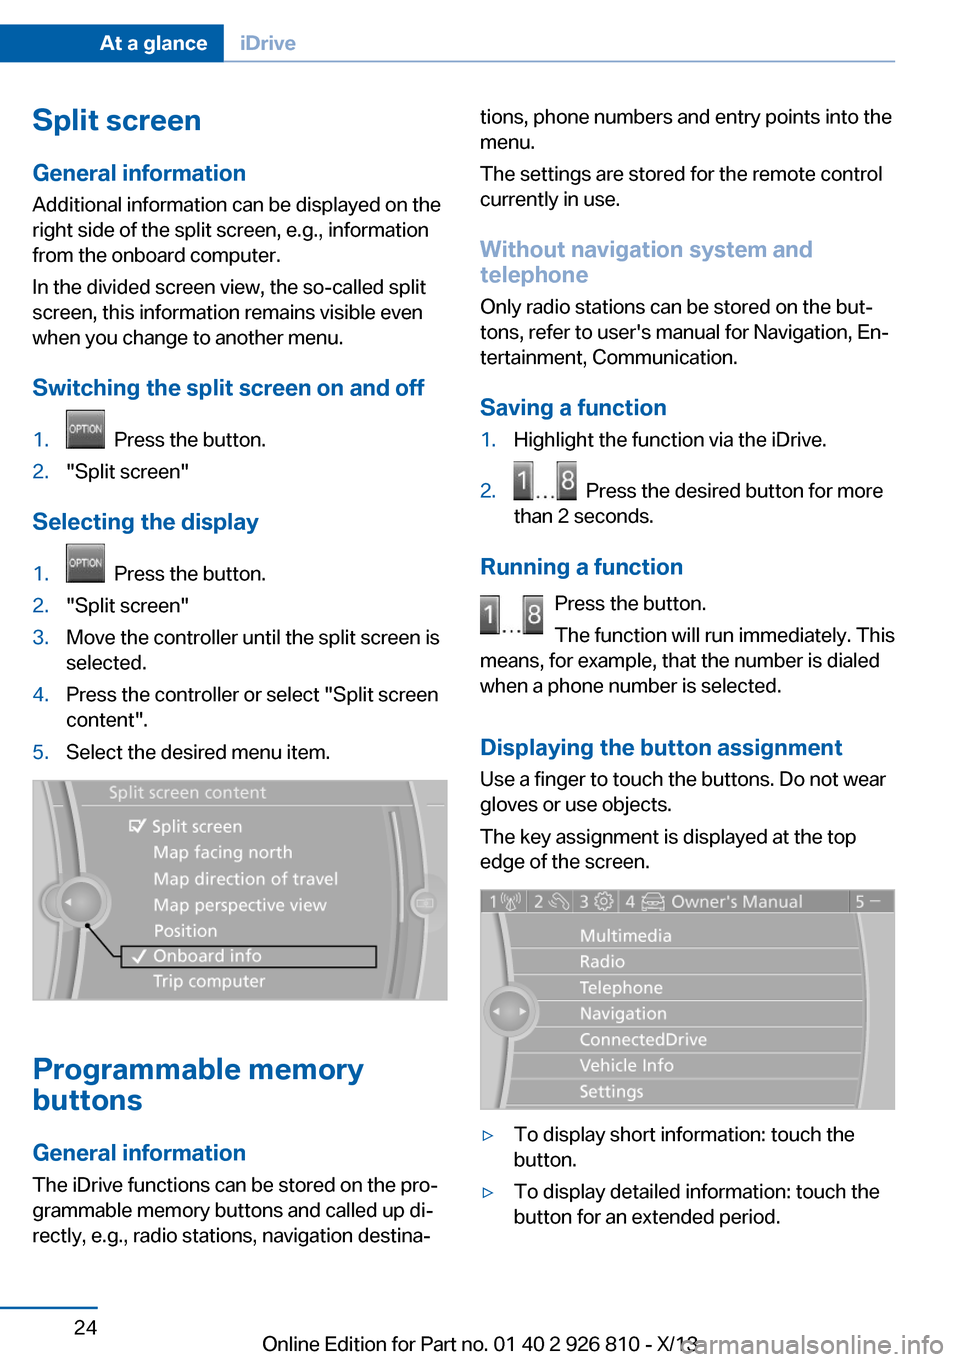
Switching the split screen on and off1. Press the button.2."Split screen"
Selecting the display
1. Press the button.2."Split screen"3.Move the controller until the split screen is
selected.4.Press the controller or select "Split screen
content".5.Select the desired menu item.
Programmable memory
buttons
General information
The iDrive functions can be stored on the pro‐
grammable memory buttons and called up di‐
rectly, e.g., radio stations, navigation destina‐
tions, phone numbers and entry points into the
menu.
The settings are stored for the remote control
currently in use.
Without navigation system and
telephone
Only radio stations can be stored on the but‐
tons, refer to user's manual for Navigation, En‐
tertainment, Communication.
Saving a function1.Highlight the function via the iDrive.2. Press the desired button for more
than 2 seconds.
Running a function
Press the button.
The function will run immediately. This
means, for example, that the number is dialed
when a phone number is selected.
Displaying the button assignment Use a finger to touch the buttons. Do not wear
gloves or use objects.
The key assignment is displayed at the top
edge of the screen.
▷To display short information: touch the
button.▷To display detailed information: touch the
button for an extended period.Seite 24At a glanceiDrive24
Online Edition for Part no. 01 40 2 926 810 - X/13
Page 38 of 248
Opening and closingVehicle equipment
All standard, country-specific and optional
equipment that is offered in the model series is
described in this chapter. Therefore, equip‐
ment is also described that is not available in a
vehicle, e. g., because of the selected optional
equipment or country variant. This also applies
for safety-related functions and systems.
Remote control/key General information The vehicle is supplied with two remote con‐
trols with keys.
Every remote control contains a replaceable
battery.
The settings called up and implemented when
the car is unlocked depend on which remote
control is used to unlock the car. Personal Pro‐
file, refer to page 35.
Information on the required maintenance is
stored in the remote control as well. Service
data in the remote control, refer to page 204
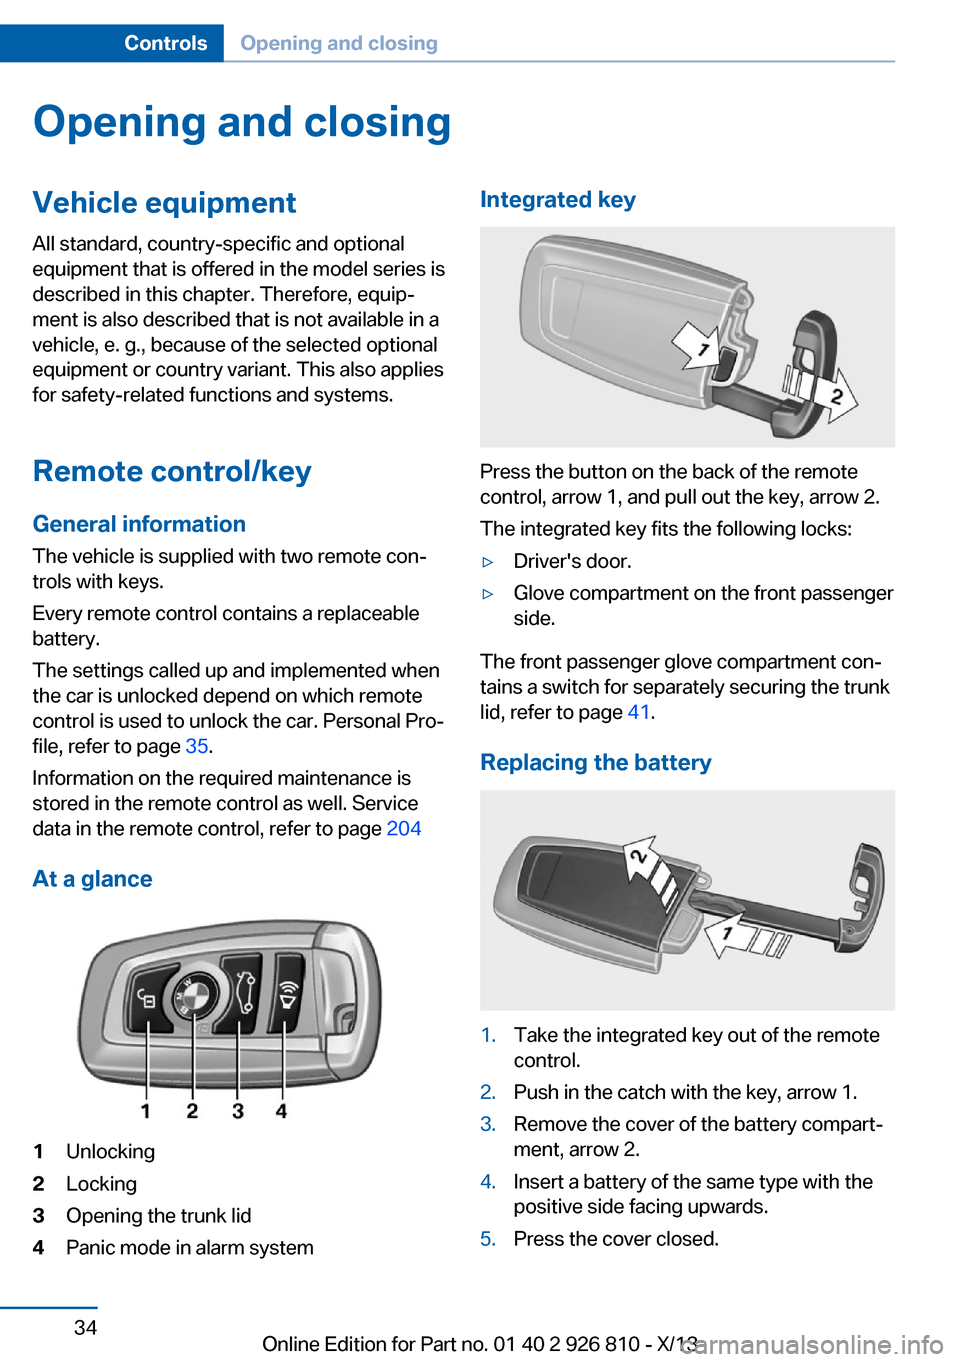
At a glance1Unlocking2Locking3Opening the trunk lid4Panic mode in alarm systemIntegrated key
Press the button on the back of the remote
control, arrow 1, and pull out the key, arrow 2.
The integrated key fits the following locks:
▷Driver's door.▷Glove compartment on the front passenger
side.
The front passenger glove compartment con‐
tains a switch for separately securing the trunk
lid, refer to page 41.
Replacing the battery
1.Take the integrated key out of the remote
control.2.Push in the catch with the key, arrow 1.3.Remove the cover of the battery compart‐
ment, arrow 2.4.Insert a battery of the same type with the
positive side facing upwards.5.Press the cover closed.Seite 34ControlsOpening and closing34
Online Edition for Part no. 01 40 2 926 810 - X/13
Page 45 of 248
Keep the closing path clear
Make sure that the closing path of the
trunk lid is clear; otherwise, injuries may re‐
sult.◀
Do not place the remote control in the
cargo area
Take the remote control with you and do not
leave it in the cargo area; otherwise, the re‐
mote control is locked inside the vehicle when
the trunk lid is closed.◀
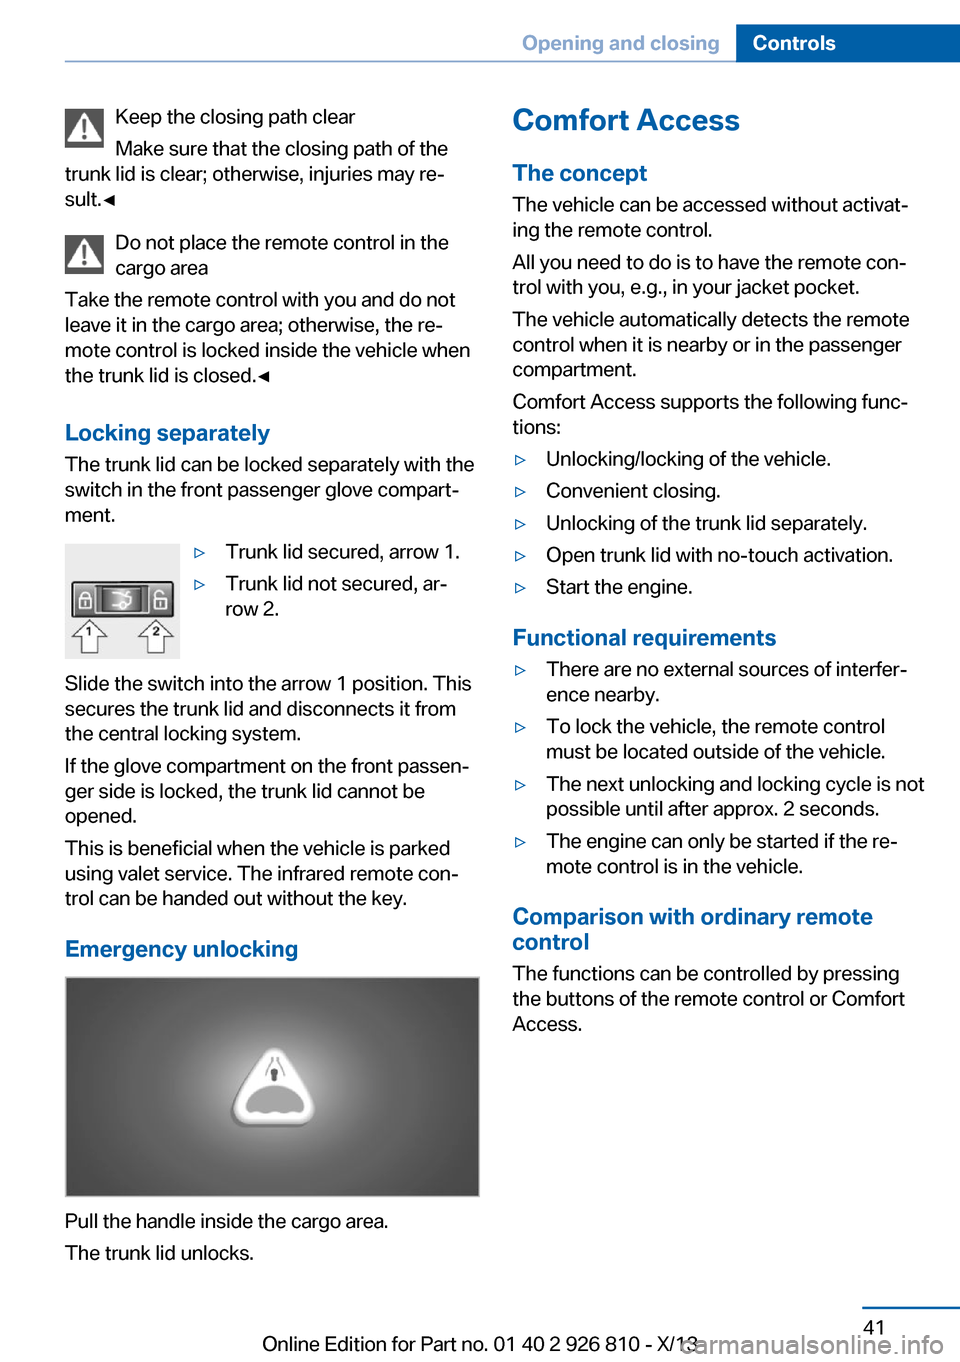
Locking separately The trunk lid can be locked separately with theswitch in the front passenger glove compart‐
ment.▷Trunk lid secured, arrow 1.▷Trunk lid not secured, ar‐
row 2.
Slide the switch into the arrow 1 position. This
secures the trunk lid and disconnects it from
the central locking system.
If the glove compartment on the front passen‐
ger side is locked, the trunk lid cannot be
opened.
This is beneficial when the vehicle is parked
using valet service. The infrared remote con‐
trol can be handed out without the key.
Emergency unlocking
Pull the handle inside the cargo area.
The trunk lid unlocks.
Comfort Access
The concept
The vehicle can be accessed without activat‐
ing the remote control.
All you need to do is to have the remote con‐
trol with you, e.g., in your jacket pocket.
The vehicle automatically detects the remote
control when it is nearby or in the passenger
compartment.
Comfort Access supports the following func‐
tions:▷Unlocking/locking of the vehicle.▷Convenient closing.▷Unlocking of the trunk lid separately.▷Open trunk lid with no-touch activation.▷Start the engine.
Functional requirements
▷There are no external sources of interfer‐
ence nearby.▷To lock the vehicle, the remote control
must be located outside of the vehicle.▷The next unlocking and locking cycle is not
possible until after approx. 2 seconds.▷The engine can only be started if the re‐
mote control is in the vehicle.
Comparison with ordinary remote
control
The functions can be controlled by pressing the buttons of the remote control or Comfort
Access.
Seite 41Opening and closingControls41
Online Edition for Part no. 01 40 2 926 810 - X/13
Page 160 of 248
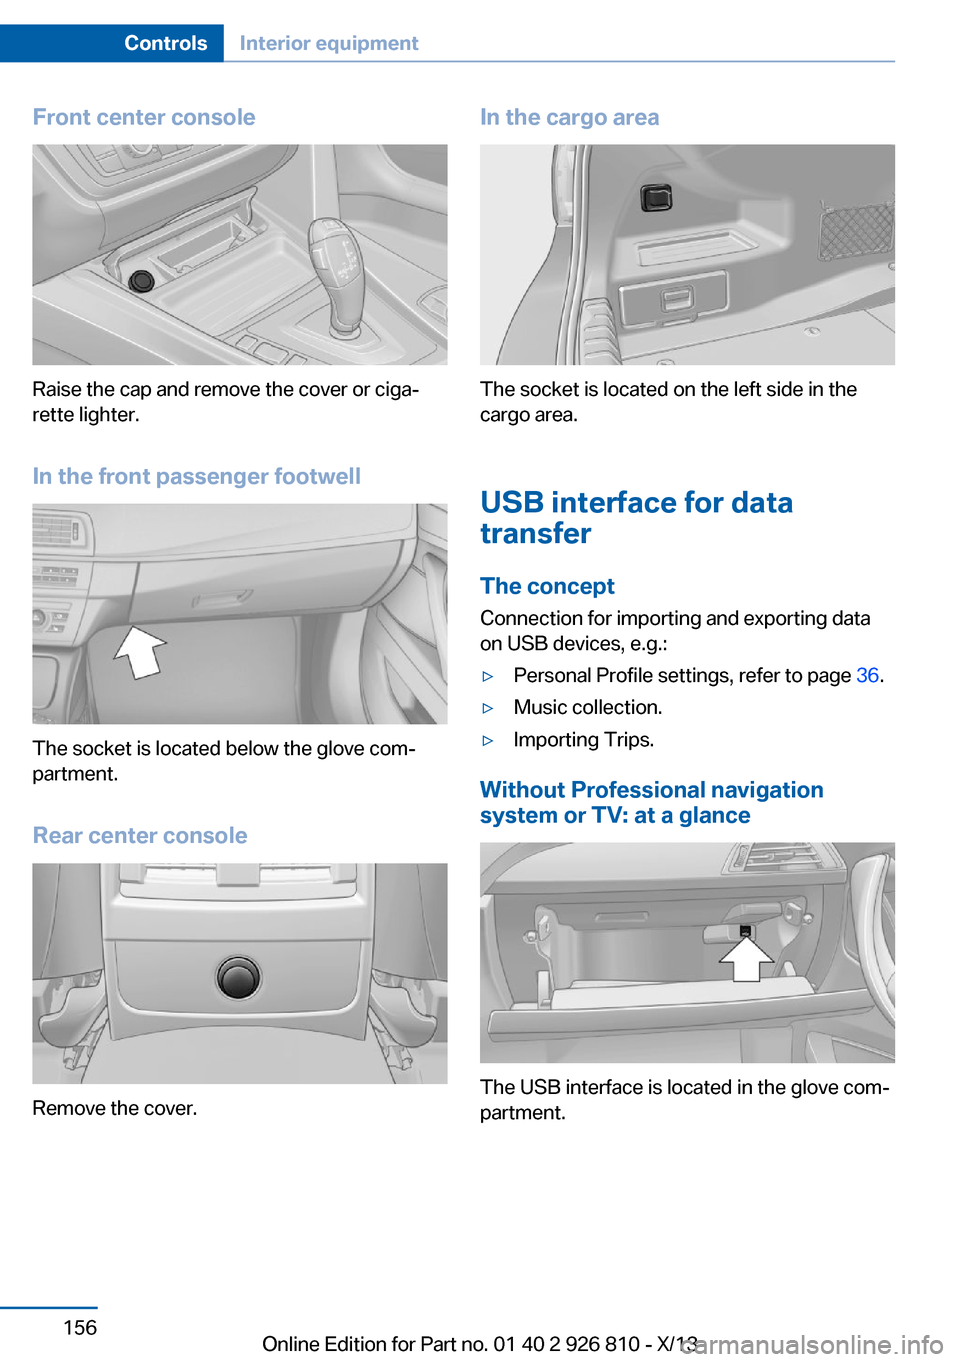
Front center console
Raise the cap and remove the cover or ciga‐
rette lighter.
In the front passenger footwell
The socket is located below the glove com‐
partment.
Rear center console
Remove the cover.
In the cargo area
The socket is located on the left side in the
cargo area.
USB interface for data
transfer
The concept Connection for importing and exporting data
on USB devices, e.g.:
▷Personal Profile settings, refer to page 36.▷Music collection.▷Importing Trips.
Without Professional navigation
system or TV: at a glance
The USB interface is located in the glove com‐
partment.
Seite 156ControlsInterior equipment156
Online Edition for Part no. 01 40 2 926 810 - X/13
Page 163 of 248
Storage compartmentsVehicle equipmentAll standard, country-specific and optional
equipment that is offered in the model series is
described in this chapter. Therefore, equip‐
ment is also described that is not available in a
vehicle, e. g., because of the selected optional
equipment or country variant. This also applies
for safety-related functions and systems.
Notes No loose objects in the passenger com‐
partment
Do not stow any objects in the passenger
compartment without securing them; other‐
wise, they may present a danger to occupants
for instance during braking and avoidance ma‐
neuvers.◀
Do not place anti-slip mats on the dash‐
board
Do not place anti-slip mats on the dashboard.
The mat materials could damage the dash‐
board.◀
Storage compartments
The following storage compartments are avail‐
able in the vehicle interior:▷Glove compartment on the driver's side,
refer to page 160.▷Glove compartment on the front passenger
side, refer to page 159.▷Without Smoker's package: Front storage
compartment, in front of the cupholders,
refer to page 160.▷Storage compartment in the front center
armrest, refer to page 160.▷Compartments in the doors, refer to
page 160.▷Nets on the backrests of the front seats.▷Storage compartment in the rear center
console, refer to page 161.
Glove compartment
Front passenger side
Note Close the glove compartment again im‐
mediately
Close the glove compartment immediately af‐
ter use while driving; otherwise, injury may oc‐
cur during accidents.◀
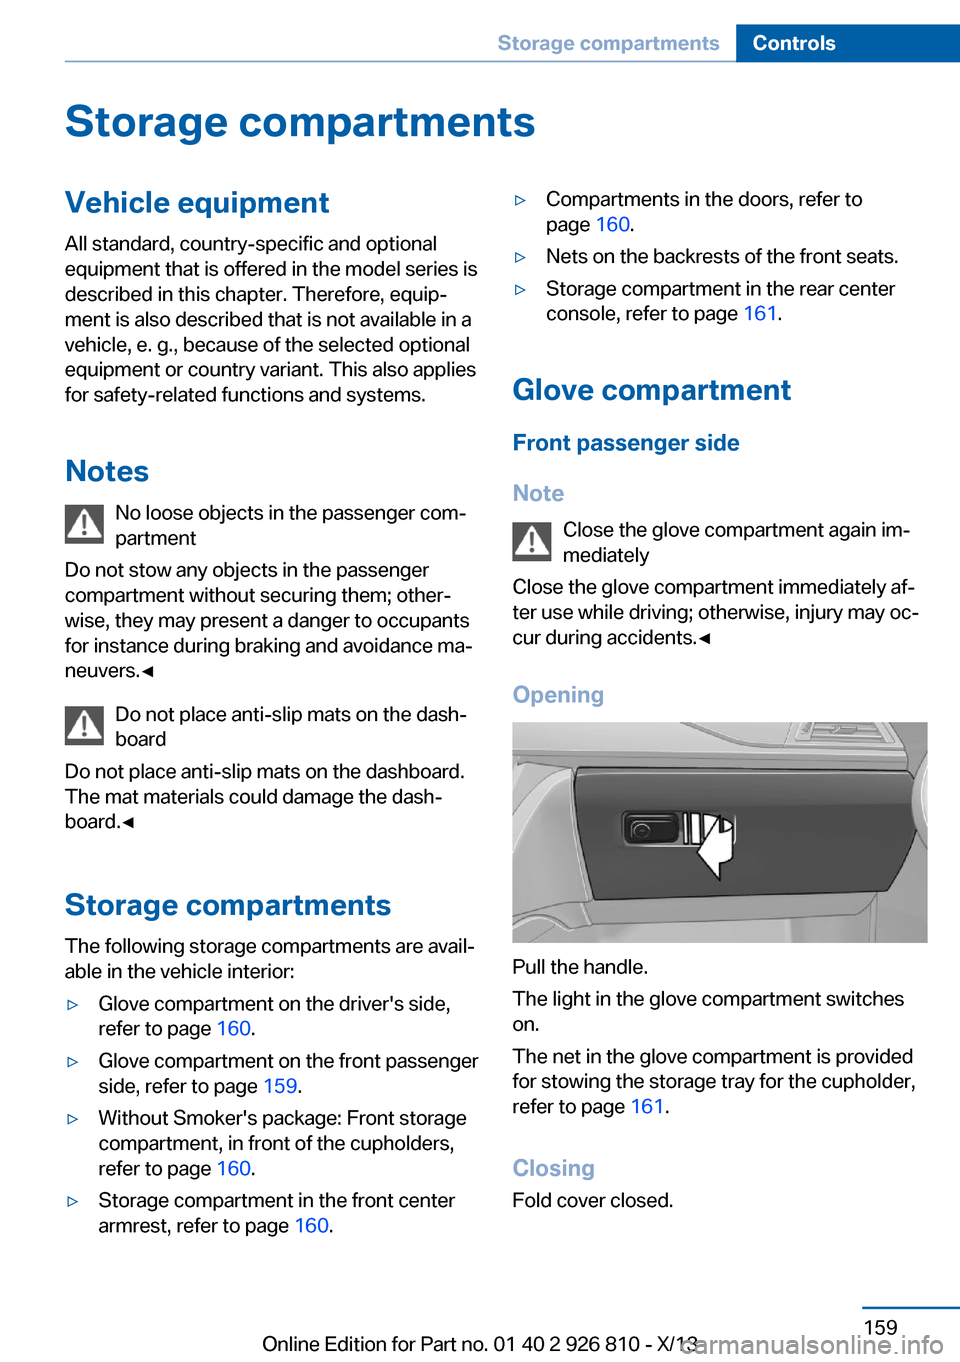
Opening
Pull the handle.
The light in the glove compartment switches
on.
The net in the glove compartment is provided
for stowing the storage tray for the cupholder,
refer to page 161.
Closing Fold cover closed.
Seite 159Storage compartmentsControls159
Online Edition for Part no. 01 40 2 926 810 - X/13
Page 164 of 248
LockingThe glove compartment can be locked with an
integrated key to separately secure the trunk
lid, refer to page 41, for example.
This prevents access to the glove compart‐
ment and to the cargo area.
After the glove compartment is locked, the re‐
mote control can be handed over, such as at a
hotel, without the integrated key.
Driver's side
Note Close the glove compartment again im‐
mediately
Close the glove compartment immediately af‐
ter use while driving; otherwise, injury may oc‐
cur during accidents.◀
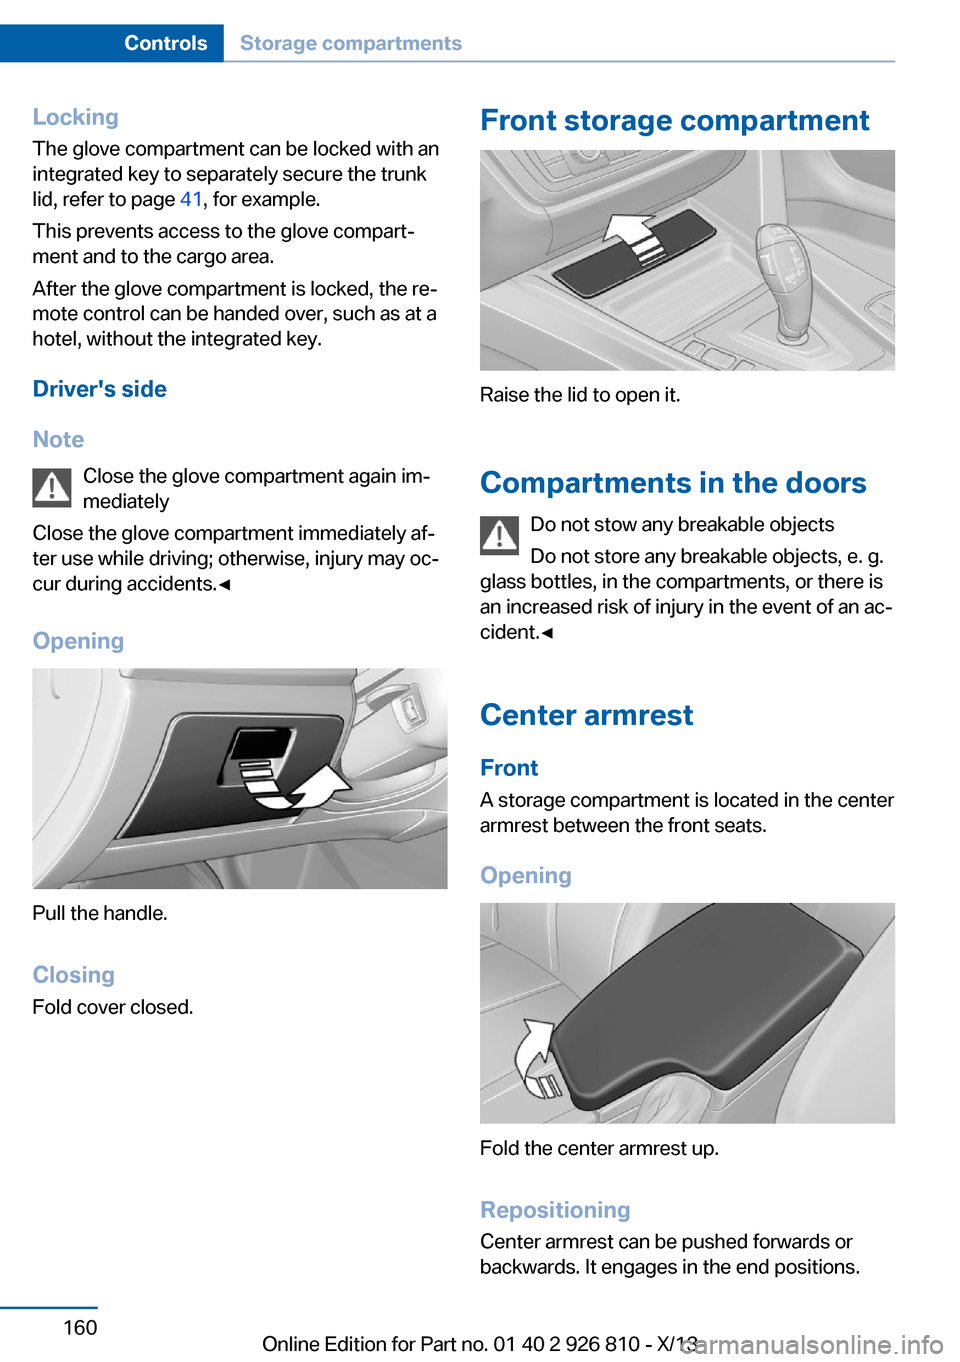
Opening
Pull the handle.
ClosingFold cover closed.
Front storage compartment
Raise the lid to open it.
Compartments in the doors Do not stow any breakable objects
Do not store any breakable objects, e. g.
glass bottles, in the compartments, or there is
an increased risk of injury in the event of an ac‐
cident.◀
Center armrest
Front A storage compartment is located in the center
armrest between the front seats.
Opening
Fold the center armrest up.
Repositioning
Center armrest can be pushed forwards or
backwards. It engages in the end positions.
Seite 160ControlsStorage compartments160
Online Edition for Part no. 01 40 2 926 810 - X/13
Page 165 of 248
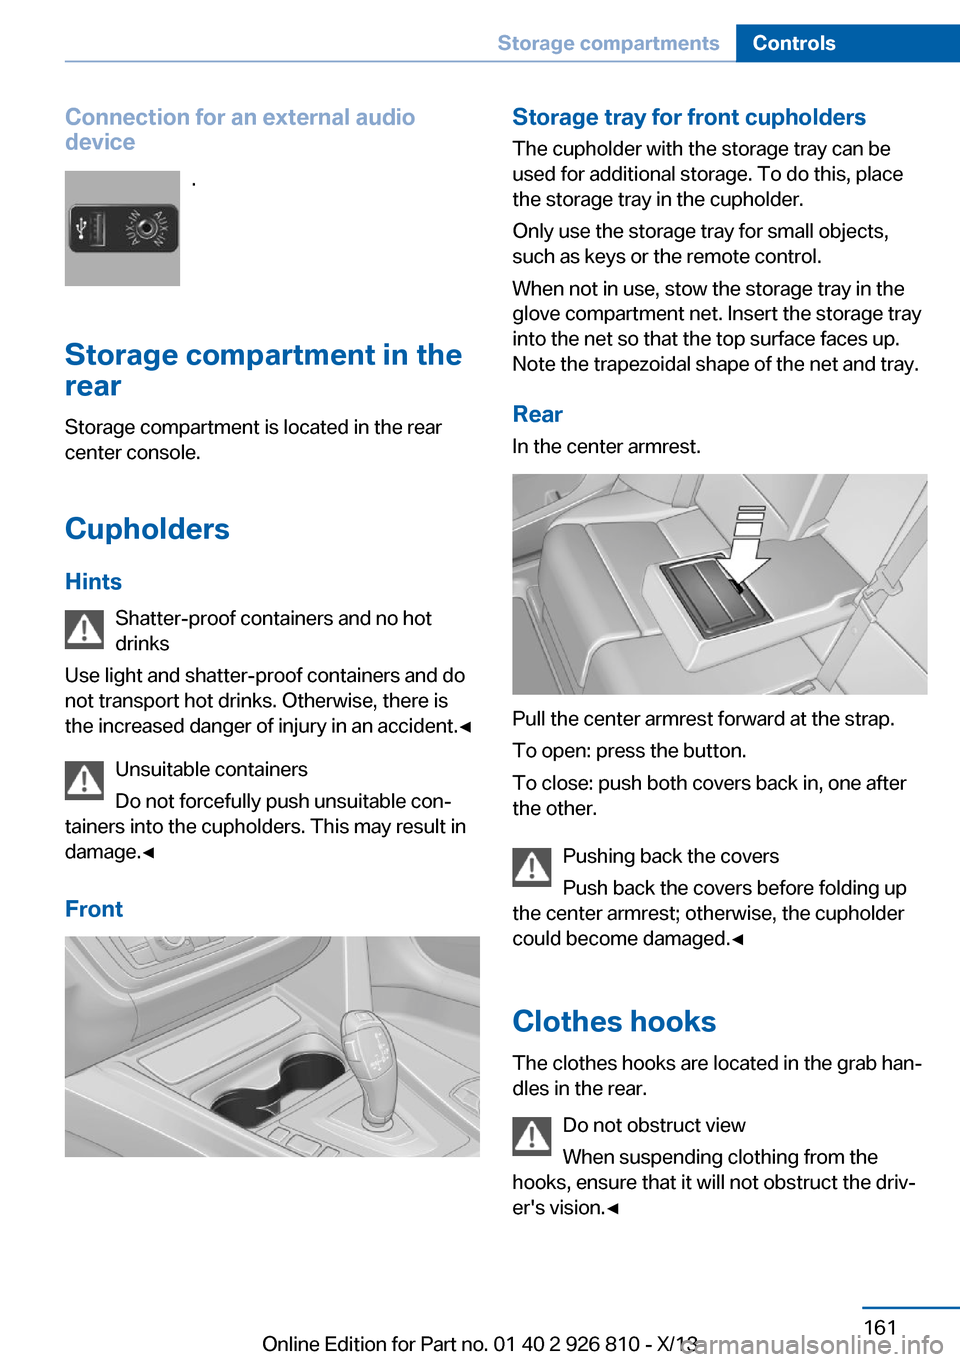
Connection for an external audio
device
.
Storage compartment in the
rear
Storage compartment is located in the rear
center console.
Cupholders
Hints Shatter-proof containers and no hot
drinks
Use light and shatter-proof containers and do
not transport hot drinks. Otherwise, there is
the increased danger of injury in an accident.◀
Unsuitable containers
Do not forcefully push unsuitable con‐
tainers into the cupholders. This may result in
damage.◀
FrontStorage tray for front cupholders
The cupholder with the storage tray can be
used for additional storage. To do this, place
the storage tray in the cupholder.
Only use the storage tray for small objects,
such as keys or the remote control.
When not in use, stow the storage tray in the
glove compartment net. Insert the storage tray
into the net so that the top surface faces up.
Note the trapezoidal shape of the net and tray.
RearIn the center armrest.
Pull the center armrest forward at the strap.
To open: press the button.
To close: push both covers back in, one after
the other.
Pushing back the covers
Push back the covers before folding up
the center armrest; otherwise, the cupholder
could become damaged.◀
Clothes hooks
The clothes hooks are located in the grab han‐
dles in the rear.
Do not obstruct view
When suspending clothing from the
hooks, ensure that it will not obstruct the driv‐
er's vision.◀
Seite 161Storage compartmentsControls161
Online Edition for Part no. 01 40 2 926 810 - X/13
Page 241 of 248
Engine oil additives 201
Engine oil change 202
Engine oil filler neck 201
Engine oil temperature 80
Engine oil types, alterna‐ tive 202
Engine oil types, ap‐ proved 202
Engine start during malfunc‐ tion 35
Engine start, jump-start‐ ing 218
Engine start, refer to Starting the engine 64
Engine stop 65
Engine temperature 80
Entering a car wash 223
Equipment, interior 151
ESP Electronic Stability Pro‐ gram, refer to DSC 116
Exchanging wheels/tires 195
Exhaust system 167
Exterior mirror, automatic dimming feature 57
Exterior mirrors 56
External start 218
External temperature dis‐ play 81
External temperature warn‐ ing 81
Eyes for securing cargo 170
F
Failure message, refer to Check Control 78
False alarm, refer to Uninten‐ tional alarm 45
Fan, refer to Air flow 145, 148
Fault displays, refer to Check Control 78
Filler neck for engine oil 201
Fine wood, care 225
First aid kit 218 Fitting for towing, refer to
Tow fitting 221
Flat tire, changing wheels 214
Flat Tire Monitor FTM 102
Flat tire, Tire Pressure Moni‐ tor TPM 99
Flat tire, warning lamp 100, 103
Flooding 167
Floor carpet, care 226
Floor mats, care 226
Fogged up windows 145
Fold down the rear seat back‐ rest, see Though-loading
system 157
Fold-out position, windshield wipers 70
Foot brake 167
Front airbags 96
Front fog lamps 94
Front fog lamps, front, bulb replacement 211
Front lamps 207
Front passenger airbags, au‐ tomatic deactivation 98
Front passenger airbags, indi‐ cator lamp 98
FTM Flat Tire Monitor 102
Fuel 182
Fuel cap 180
Fuel consumption, current 82
Fuel consumption, refer to Average fuel consump‐
tion 86
Fuel filler flap 180
Fuel gauge 80
Fuel quality 182
Fuel recommendation 182
Fuel, tank capacity 233
Fuse 215 G
Garage door opener, refer to Universal garage door
opener 151
Gasoline 182
Gasoline quality 182
Gear change, automatic transmission 72
Gear shift indicator 83
General driving notes 166
Glass sunroof, powered 47
Glove compartment 159
Gross vehicle weight, ap‐ proved 230
H
Handbrake, refer to parking brake 67
Hand-held transmitter, alter‐ nating code 152
Hazard warning flashers 217
Head airbags 96
Headlamp control, auto‐ matic 92
Headlamp courtesy delay fea‐ ture 91
Headlamp flasher 68
Headlamp glass 207
Headlamps 207
Headlamps, care 224
Headlamp washer system 68
Headliner 17
Head restraints 49
Head restraints, front 53
Head restraints, rear 54
Head-up Display 89
Head-up Display, care 226
Heavy cargo, stowing 170
High-beam Assistant 93
High beams 68
High beams/low beams, refer to High-beam Assistant 93
Hills 168 Seite 237Everything from A to ZReference237
Online Edition for Part no. 01 40 2 926 810 - X/13