cluster BMW 318i 1992 E36 User Guide
[x] Cancel search | Manufacturer: BMW, Model Year: 1992, Model line: 318i, Model: BMW 318i 1992 E36Pages: 759
Page 178 of 759
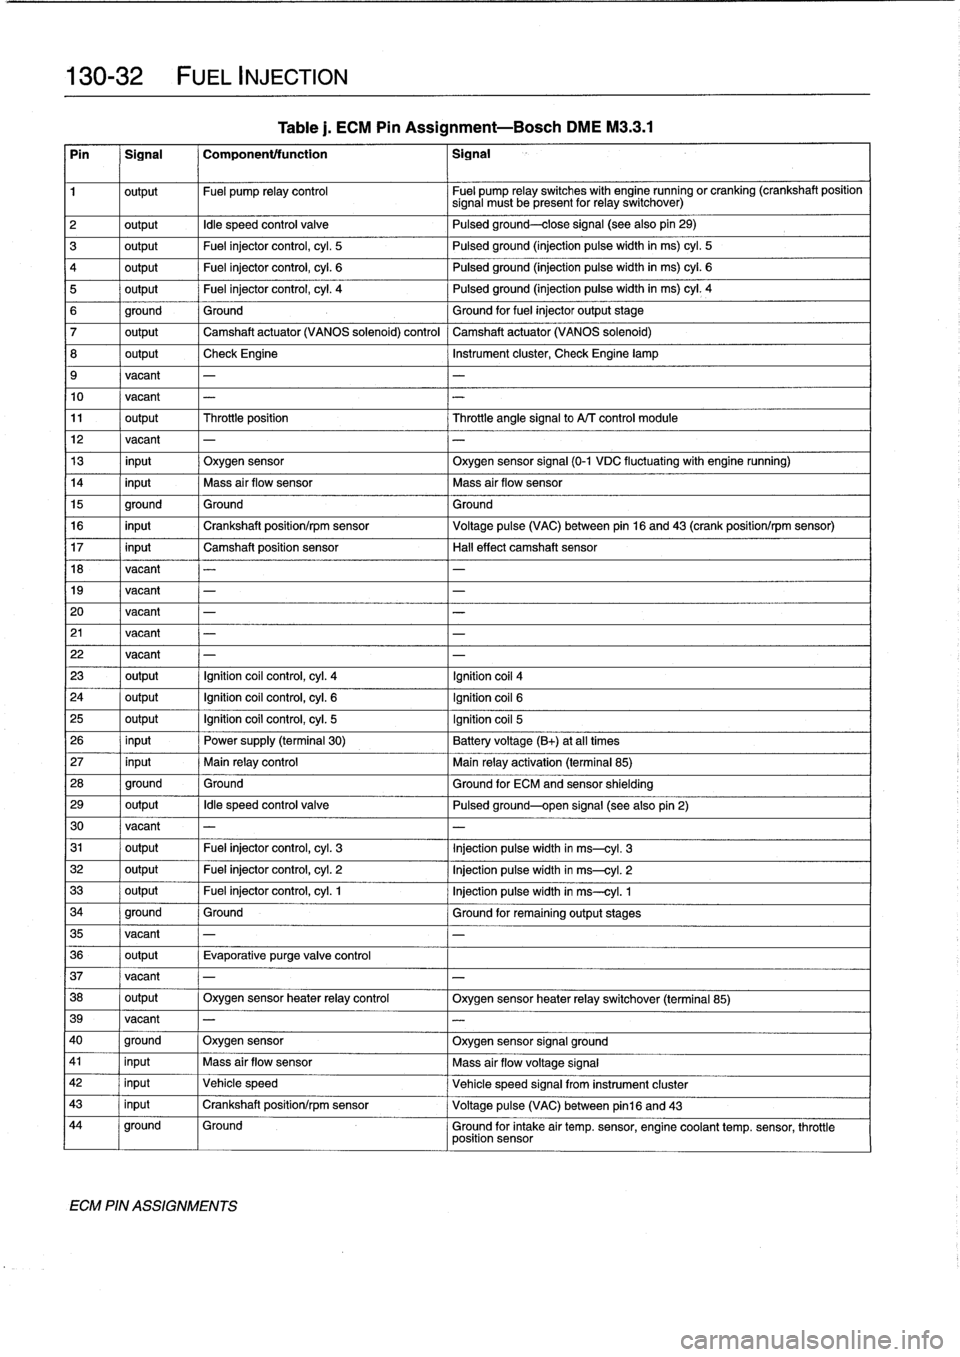
130-
3
2
FUEL
INJECTION
Pin
1
Signal
1
Component/function
1
Signal
1
output
Fuel
pump
relay
control
Fuel
pump
relay
switches
with
engine
running
or
cranking
(crankshaft
position
signal
must
be
present
for
relay
switchover)
2
output
Idle
speed
control
valve
Pulsed
ground-close
signal
(seealso
pin
29)
3
output
Fuel
ínjectorcontrol,
cyl
.
5
Pulsed
ground
(injection
pulsewidth
in
ms)
cyl
.
5
4
output
Fuel
injectorcontrol,
cyl
.
6
Pulsed
ground
(injection
pulsewidth
in
ms)
cyl
.
6
5
output
Fuel
injectorcontrol,
cyl
.
4
Pulsed
ground
(injection
pulsewidth
in
ms)
cyl
.
4
6
ground
Ground
Ground
for
fuel
injector
output
stage
7
output
Camshaft
actuator
(VANOS
solenoid)
control
Camshaft
actuator
(VANOS
solenoid)
8
output
Check
Engine
Instrument
cluster,
Check
Engine
lamp
9
vacant
-
-
10
vacant
-
-
11
output
Throttle
position
Throttle
angle
signal
to
A/T
control
module
12
vacant
-
-
13
input
Oxygen
sensor
Oxygen
sensor
signal
(0-1
VDC
fluctuating
with
engine
running)
14
input
Mass
air
flow
sensor
Mass
air
flow
sensor
15
ground
Ground
Ground
16
input
Crankshaft
position/rpm
sensor
Voltage
pulse
(VAC)
between
pin
16
and
43
(crank
position/rpm
sensor)
17
input
Camshaft
position
sensor
Halleffect
camshaft
sensor
18
vacant
-
-
19
vacant
-
-
20
vacant
-
-
21
vacant
-
-
22
vacant
-
-
23
output
Ignition
coil
control,
cyl
.
4
Ignition
coil
4
24
output
Ignition
coil
control,
cyl
.
6
Ignition
coil
6
25
output
Ignition
coil
control,
cyl
.
5
Ignition
coil
5
26
input
Power
supply
(terminal
30)
Battery
voltage(B+)
at
all
times
27
input
Main
relay
control
Main
relayactivation
(terminal
85)
28
ground
Ground
Ground
for
ECM
and
sensor
shielding
29
output
Idle
speed
control
valve
Pulsed
ground-open
signal
(seealsopin
2)
30
vacant
-
-
31
output
Fuel
injectorcontrol,
cyl
.
3
Injection
pulse
wicith
in
ms-cyl
.
3
32
output
Fuel
injectorcontrol,
cyl
.
2
Injection
pulse
wicith
in
ms-cyl
.
2
33
output
Fuel
injectorcontrol,
cyl
.
1
Injection
pulsewidth
in
ms-cyl
.
1
34
ground
Ground
Ground
for
remaining
output
stages
35
vacant
-
-
36
output
Evaporative
purge
valve
control
37
vacant
-
-
38
output
Oxygen
sensor
heater
relay
control
Oxygen
sensor
heater
relay
switchover
(terminal
85)
39
vacant
-
-
40
ground
Oxygen
sensor
Oxygen
sensor
signal
ground
41
input
Mass
air
flow
sensor
Mass
air
flow
voltage
signal
42
input
Vehicle
speed
Vehicle
speed
signal
from
instrument
cluster
43
input
Crankshaft
position/rpm
sensor
Voltage
pulse
(VAC)
between
pin16
and
43
44
ground
Ground
Ground
for
intake
air
temp
.
sensor,
engine
coolant
temp
.
sensor,
throttle
position
sensor
ECM
PIN
ASSIGNMENTS
Table
j
.
ECM
Pin
Assignment-Bosch
DME
M3
.3
.1
Page 179 of 759
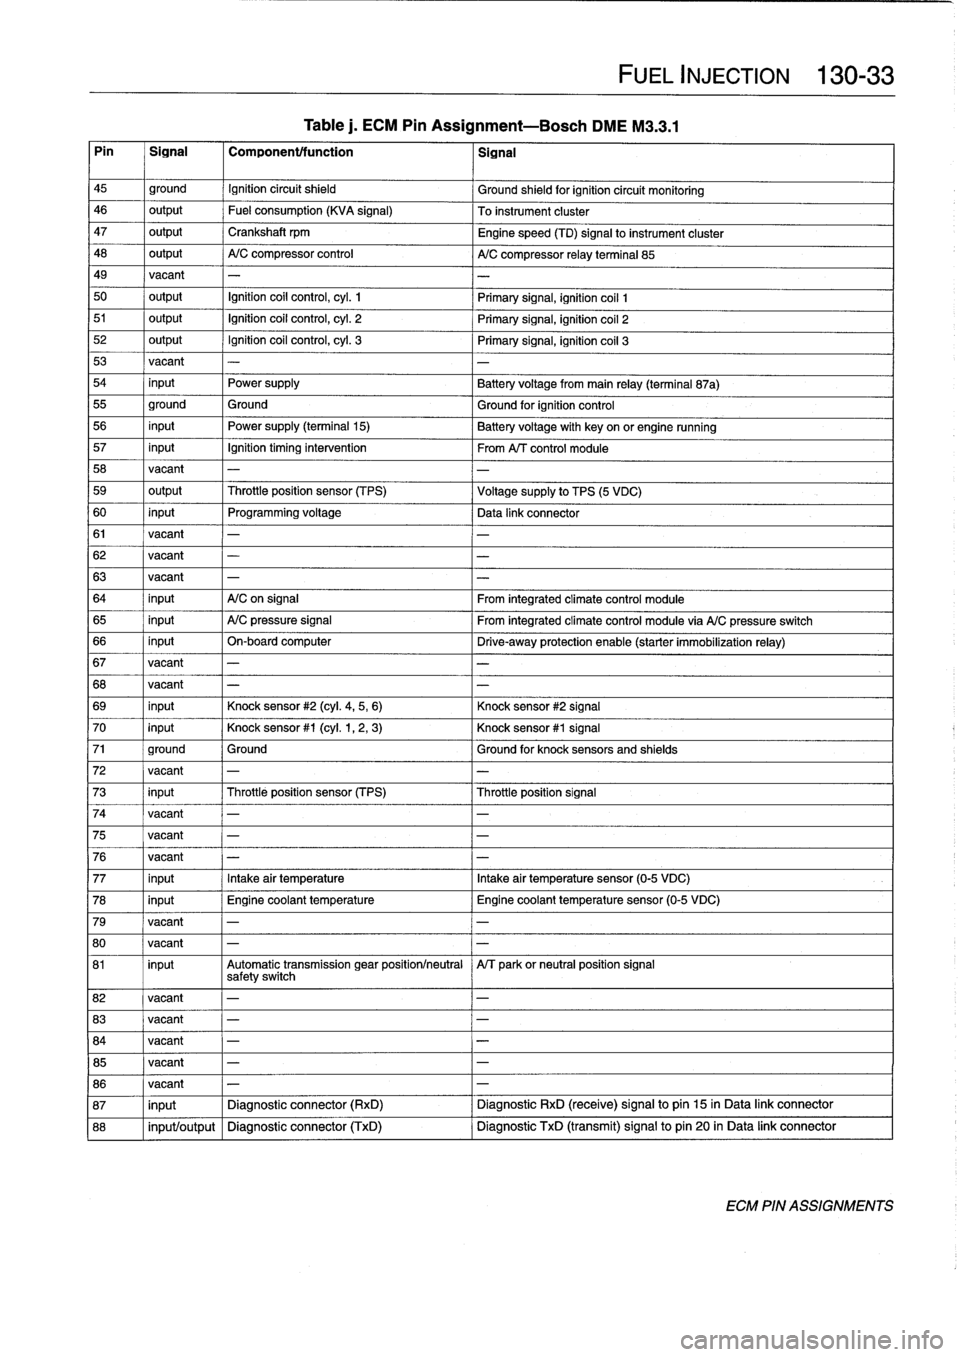
Table
j.
ECM
Pin
Assignment-Bosch
DME
M3
.3
.1
Pin
~
Signal
1
Componentffunction
1
signal
FUEL
INJECTION
130-
33
45
ground
Ignition
circuit
shield
Ground
shieldfor
ignition
circuit
monitoring
46
output
Fuel
consumption
(KVA
signal)
To
instrument
cluster
47
output
Crankshaft
rpm
Engine
speed
(TD)
signal
to
instrument
cluster
48
output
A/C
compressor
control
A/C
compressor
relay
terminal
85
49
vacant
-
-
50
output
Ignition
coil
control,
cyl
.
1
Primary
signal,
ignition
coil
1
51
output
Ignition
coil
control,
cyl
.
2
Primary
signal,
ignition
coil
2
52
output
Ignition
coil
control,
cyl
.
3
Primary
signal,
ignition
coil
3
53
vacant
-
-
54
input
Power
supply
Battery
voltagefrom
main
relay
(terminal
87a)
55
ground
Ground
Ground
for
ignition
control
56
input
Power
supply
(terminal15)
Batteryvoltage
with
key
on
or
engine
running
57
input
Ignition
timing
intervention
From
A/T
control
module
58
vacant
-
-
59
output
Throttleposition
sensor
(TPS)
Voltage
supply
to
TPS
(5
VDC)
60
input
Programming
voltage
Data
link
connector
61
vacant
-
-
62
vacant
-
-
63
vacant
-
-
64
input
A/C
on
signal
From
integrated
climate
control
module
65
input
A/C
pressure
signal
From
integrated
climate
control
module
via
A/C
pressure
switch
66
input
On-board
computer
Drive-away
protection
enable
(starter
immobilization
relay)
67
vacant
-
-
68
vacant
-
-
69
input
Knock
sensor
#2
(cyl
.
4,5,
6)
Knock
sensor
#2
signal
70
input
Knock
sensor
#1
(cyl
.
1,2,
3)
Knock
sensor
#1
signal
71
ground
Ground
Ground
for
knock
sensors
and
shields
72
vacant
-
-
73
input
Throttleposition
sensor
(TPS)
Throttleposition
signal
74
vacant
-
75
vacant
-
-
76
vacant
-
77
input
Intakeair
temperatura
Intakeair
temperatura
sensor
(0-5
VDC)
78
input
Engine
coolant
temperature
Engine
coolant
temperature
sensor
(0-5
VDC)
79
vacant
-
80
vacant
-
-
81
input
Automatic
transmission
gear
positionlneutral
A/T
parkor
neutral
position
signal
safetyswitch
82
vacant
-
-
83
vacant
-
-
84
vacant
-
-
85
vacant
-
-
86
vacant
-
-
87
input
Diagnostic
connector
(RxD)
Diagnostic
RxD
(receive)
signal
to
pin
15
in
Data
link
connector
88
input/output
Diagnostic
connector
(TxD)
Diagnostic
TxD
(transmit)
signal
to
pin
20
in
Data
link
connector
ECM
PIN
ASSIGNMENTS
Page 180 of 759
130-
34
FUEL
INJECTION
Pin
i
Signal
1
Component/function
1
Signal
1
output
Oxygen
sensor
(monitoring
sensor)heater
Oxygen
sensor
heater
control
(switched
ground)
2
output
Idle
speed
control
valve
Pulsed
ground-close
signal
(see
also
pin
29)
3
output
Fuel
injector
control,
cyl
.
1
Pulsed
ground
(injection
pulsewidth
in
ms)
cyl
.
1
4
output
Fuel
injector
control,
cyl
.
4
Pulsed
ground
(injection
pulse
width
in
ms)
cyl
.
4
5
not
used
-
-
6
ground
Ground
Ground
for
fuel
injector
output
stage
7
not
used
-
8
1
output
1
Check
Engine
1
Instrument
cluster,
Check
Engine
lamp
9
not
used
-
-
10
input
Electronic
immobilizer
control
(EWS
II)
Electronic
immobilizer
control
(EWS
II)
module
11
output
Automatic
climate
control
Automatic
climate
control,
to
evaporator
controlier
12
not
used
-
-
13
not
used
-
-
14
not
used
-
-
15
not
used
-
-
16
input
Intake
air
temperature
Intake
air
temperature
Signal
17
input
Mass
air
flow
meter
Intake
air
signal
18
not
used
-
-
19
input
Oxygen
sensor
(monitoring
sensor)
Oxygen
sensor
control
20
output
Crankshaft/rpm
sensor
Crankshaft/rpm
sensor
control
21
input
Camshaft
position
sensor
Camshaft
position
signal
22
output
Ignition
coil
control,
cyl
.
3
Primary
signal,
ignitioncoil
3
23
output
Ignition
coil
control,
cyl
.
4
Primary
signal,
ignitioncoil
4
24
not
used
-
-
25
not
used
-
-
26
input
Power
supply
(terminal
30)
Battery
voltage
(B+)
at
al¡
times
27
input
Main
relay
control
Main
relay
activation
(terminal
85)
28
ground
Ground
Ground
for
ECM
and
sensor
shielding
29
output
Idle
speed
control
valve
Pulsed
ground-open
signal
(seealsopin
2)
30
output
Oxygen
sensor
(monitoring
sensor)
heater
Oxygen
sensor
heater
control
(switched
ground)
31
output
Fuel
injectorcontrol,
cyl
.
3
Pulsed
ground
(injection
pulsewidth
in
ms)
cyl
.
3
32
output
Fuel
injector
control,
cyl
.
2
Pulsed
ground
(injection
pulsewidth
in
ms)
cyl
.
2
33
I
not
used
40
input
Knock
sensor
#2
(cyl
.
3,4)
Knock
sensor
#2
signal
41
not
used
-
-
42
input
Vehicle
speed
Vehicle
speed
signal
from
instrument
cluster
43
not
used
-
-
44
output
Throttleposition
sensor
(TPS)
Throttleposition
reference
signal
ECM
PIN
ASSIGNMENTS
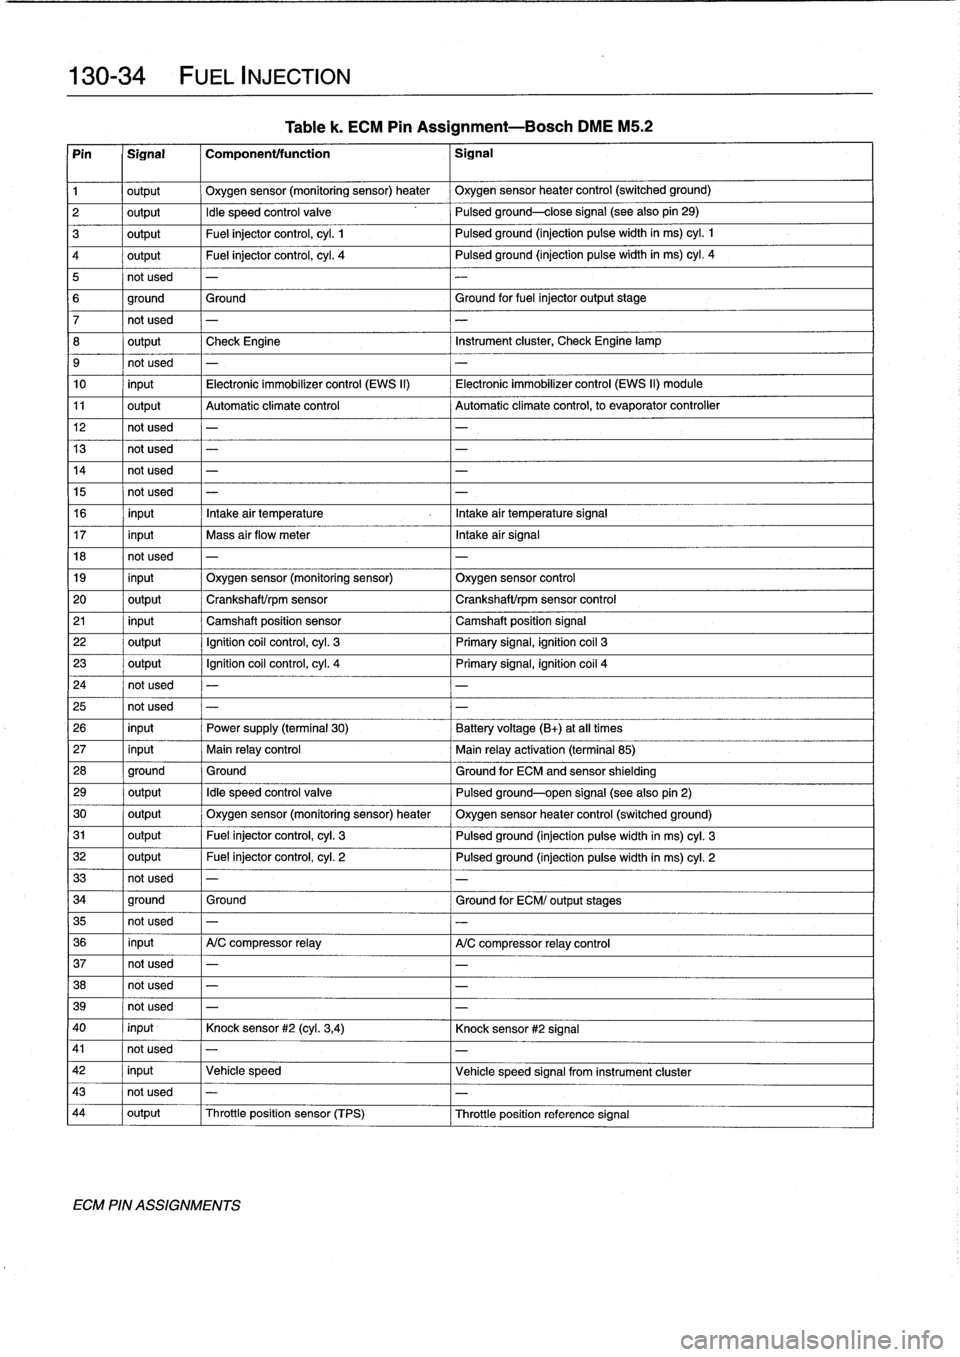
Table
k
.
ECM
Pin
Assignment-Bosch
DME
M5
.2
34
ground
Ground
Ground
for
ECM/
output
stages
35
not
used
-
-
36
input
A/C
compressor
relay
A/C
compressor
relay
control
37
not
used
-
-
38
not
used
-
-
39
not
used
-
-
Page 182 of 759
130-
3
6
FUEL
INJECTION
Pin
1
Signal
1
Componentffunction
1
Signal
1
output
Ignition
coil
control,
cyl
.
2
Primary
signal,
ignition
coil
2
2
output
Ignition
coil
control,
cyl
.
4
Primary
signal,
ignitioncoil
4
3
output
Ignition
coil
control,
cyl
.
6
Primary
signal,
ignition
coil
6
4
ground
Ground
Ground
5
output
Fuel
injectorcontrol,
cyl
.
2
Pulsed
ground
(injection
pulse
width
in
ms)
cyl
.
2
6
output
Fuel
injectorcontrol,
cyl
.
1
Pulsed
ground
(injection
pulse
width
in
ms)
cyl
.
1
7
output
Mass
air
flow
meter
Mass
air
meter
signal
8
input
Mass
air
flow
meter
Mass
air
meter
signal
9
output
Instrument
cluster
Fuel
consumption
signal
10
output
Engine
coolant
temperature
(ECT)
sensor
ECT
signal
11
output
Fueltankpressure
sensor
Fueltankpressure
sensor
control
12
input
Throttleposition
sensor
(TPS)
Throttleposition
signal
13
-
14
input
Intake
air
temperature
(IAT)
sensor
Intake
air
temperature
signal
15
Traction
control
AST
module
16
input
Automatic
climate
control
Automatic
climate
control
17
18
input
Electronic
immobilizer
control
(EWS
II)
Electronic
immobilizer
control
(EWS
II)
module
19
Automatic
climate
control
Automatic
climate
control
20
-
Instrument
cluster
Instrument
cluster
21
output
Camshaft
actuator
(VANOS
solenoid)
control
Camshaft
actuator
(VANOS
solenoid),
switched
ground
22
output
Fuel
injectorcontrol,
cyl
.
3
Pulsed
ground
(injection
pulse
width
in
ms)
cyl
.
3
23
Fuel
injectorcontrol,
cyl
.
6
Pulsed
ground
(injection
pulse
width
in
ms)
cyl
.
6
24
Fuel
injectorcontrol,
cyl
.
4
Pulsed
ground
(injection
pulse
width
in
ms)
cyl
.
4
25
output
Oxygen
sensor
heater
control
Oxygen
sensor
heater
ground
26
input
Power
supply
(terminal
30)
Battery
voltage(B+)
at
all
times
27
output
Idle
speed
control
valve
Pulsed
ground-open
signal
(see
also
pin
53)
28
ground
Ground
Ground
29
output
Ignition
coil
control,
cyl
.
1
Primary
signal,
ignition
coíl
1
30
output
Ignition
coil
control,
cyl
.
3
Primary
signal,
ignition
coil
3
31
output
Ignition
coil
control,
cyl
.
5
Primary
signal,
ignition
coil
5
32
ground
Ground
Ground
33
output
Fuel
injector
control,
cyl
.
5
Pulsedground
(injection
pulsewidth
in
ms)
cyl
.
5
34
ground
Ground
Ground
35
output
Secondary
air
injection
Secondary
air
injection
pump
relay
control
36
output
Engine
speed
output
Engine
speed
signal
37
-
38
ground
Knock
sensor
Shielding
for
knock
sensors
39
output
Intake
air
temperature
sensor
(IAT
Sensor)
Voltagesupply
to
IAT
sensor
and
ECT
sensorEngine
coolant
temperature
(ECT)
sensor
40
output
Crankshaft
position
sensor
(Hall
effect)
Crankshaft
position
sensor
control
41
ground
Camshaft
position
(CMP)
sensor
Shielding
for
CMP
sensor
42
output
Throttle
position
sensor
(TPS)
TPS
ground
43
input
Camshaft
position/rpm
sensor
Camshaft
position/rpm
sensor
control
44
output
Throttle
position
sensor
(TPS)
Voltagesupply
to
TPS
(5
VDC)
45
Traction
control
AST
module
46
-
Instrument
cluster
Instrument
cluster
ECM
PIN
ASSIGNMENTS
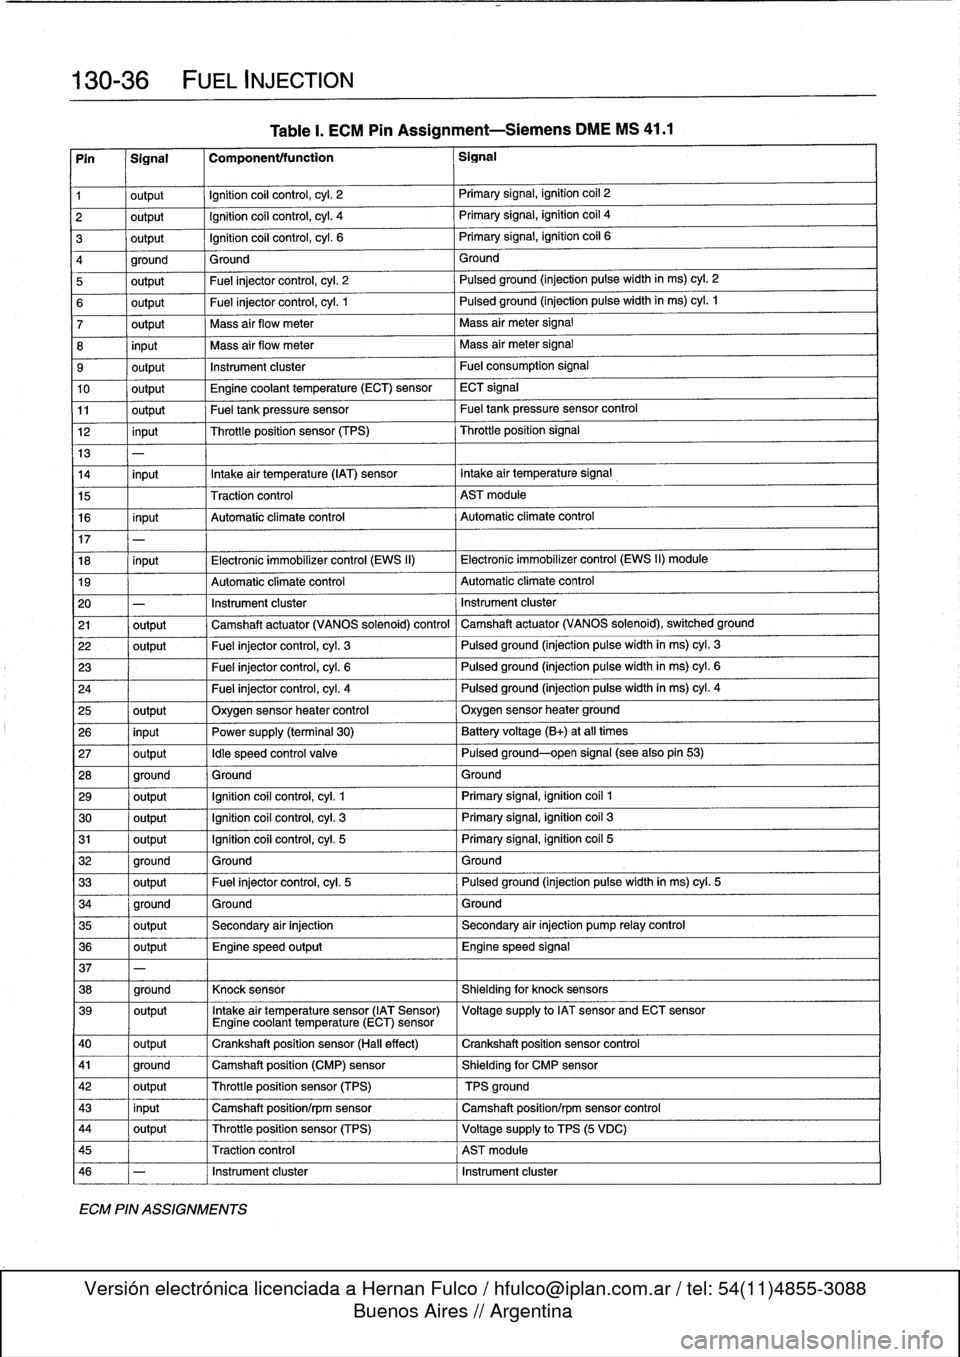
Table
I.
ECM
Pin
Assignment-Siemens
DME
MS
41
.1
Page 216 of 759
210-2
CLUTCH
Clutch
hydraulic
system,
bleeding
and
flushing
If
the
clutch/brake
fluid
is
murky
or
muddy,
or
has
not
been
changed
within
the
last
two
years,
the
system
should
be
flushed
.
Flushing
the
old
fluid
from
the
clutch
lines
is
done
us-
ing
a
brake
system
pressure
bleeder
.
1
.
Remove
brake
fluíd
reservoir
cap
.
Usinga
clean
sy-
ringe,
remove
brake
fluid
from
reservoir
.
Refill
reservoir
with
clean
fluid
.
2
.
Attach
pressure
brake
bleeder
to
fluid
reservoír
.
CA
UTION-
Do
not
exceed
2
bar
(29
psi)
pressure
at
the
fluid
reservoir
when
bleeding
or
flushing
the
hydraulic
system
.
3
.
Connect
a
length
of
hose
from
clutch
slave
cylinder
bleeder
valve
lo
a
container
.
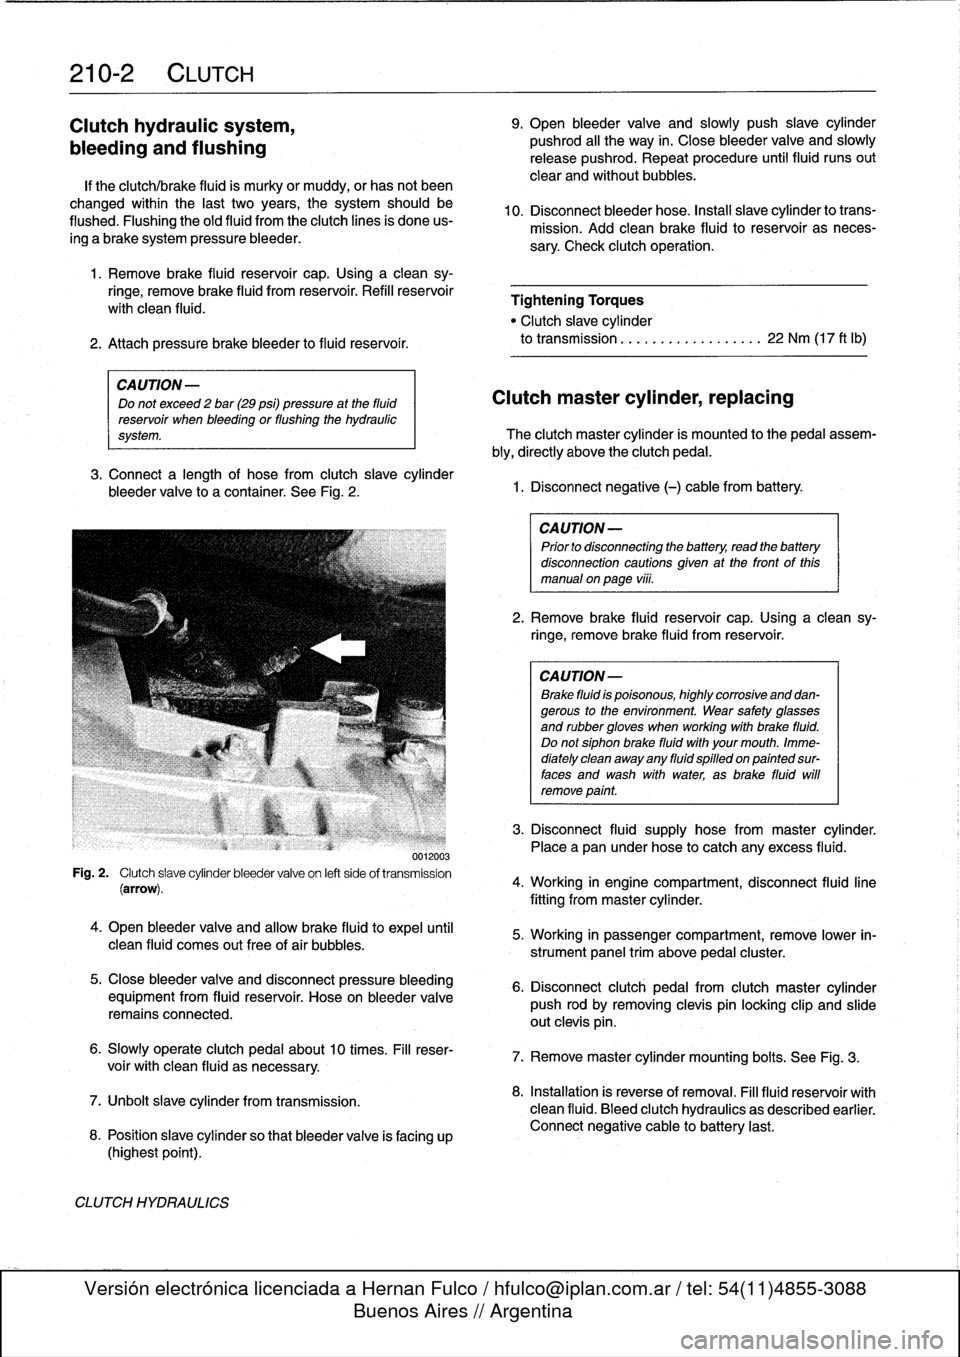
See
Fig
.
2
.
0012003
Fig
.
2
.
Clutch
slave
cylinder
bleeder
valve
on
left
side
of
transmission
(arrow)
.
4
.
Open
bleeder
valve
and
allow
brake
fluid
to
expel
until
clean
fluid
comes
out
free
of
air
bubbles
.
5
.
Close
bleeder
valve
and
disconnect
pressure
bleeding
equipment
from
fluid
reservoir
.
Hose
on
bleeder
valve
remainsconnected
.
6
.
Slowly
operate
clutch
pedal
about10
times
.
Fill
reser-
voir
with
clean
fluid
asnecessary
.
7
.
Unbolt
slavecylinder
from
transmission
.
8
.
Position
slave
cylinder
so
that
bleeder
valve
is
facing
up
(highest
point)
.
CLUTCH
HYDRAULICS
9
.
Open
bleeder
valve
and
slowly
push
slave
cylinder
pushrod
al¡
the
way
in
.
Close
bleeder
valve
and
slowly
release
pushrod
.
Repeat
procedure
until
fluid
runs
out
clear
and
without
bubbles
.
10
.
Disconnect
bleeder
hose
.
Instan
slavecylinder
lo
trans-
mission
.
Add
cleanbrake
fluid
to
reservoir
as
neces-
sary
.
Check
clutch
operation
.
Tightening
Torques
"
Clutch
slave
cylinder
to
transmission
................
..
22
Nm
(17
ft
lb)
Clutch
master
cylinder,
replacing
The
clutch
master
cylinder
is
mounted
to
the
pedal
assem-
bly,
directly
above
the
clutch
pedal
.
1
.
Disconnect
negative
(-)
cable
from
battery
.
CAUTION-
Prior
to
disconnectiog
the
battery,
read
the
battery
disconnection
cautionsgiven
at
the
front
of
this
manual
on
page
viii
.
2
.
Remove
brake
fluid
reservoir
cap
.
Usinga
clean
sy-
ringe,
remove
brake
fluid
from
reservoir
.
CA
UTION-
Brake
fluid
is
poisonous,
highly
corrosive
and
dan-gerous
to
the
environment
.
Wear
safety
glasses
and
rubbergloves
when
working
with
brake
fluid
.
Do
notsiphonbrake
fluid
with
your
mouth
.
Imme-
diately
clean
away
any
fluid
spilled
on
painted
sur-
faces
and
wash
with
water,
asbrake
fluid
will
remove
point
.
3
.
Disconnect
fluid
supply
hose
from
master
cylinder
.
Placea
pan
under
hose
to
catch
any
excess
fluid
.
4
.
Working
in
engine
compartment,
disconnect
fluid
line
fitting
frommaster
cylinder
.
5
.
Working
in
passenger
compartment,
remove
lower
in-
strument
panel
trim
above
pedal
cluster
.
6
.
Disconnect
clutch
pedal
from
clutch
master
cylinder
push
rod
by
removing
clevis
pin
locking
clip
and
slide
out
clevis
pin
.
7
.
Remove
master
cylinder
mounting
bolts
.
See
Fig
.
3
.
8
.
Installation
is
reverse
of
removal
.
Fill
fluid
reservoir
with
clean
fluid
.
Bleed
clutch
hydraulics
as
described
earlier
.
Connect
negative
cable
to
battery
last
.
Page 253 of 759
NOTE-
The
traction
control
system
referred
to
as
AST
(all
sea-
son
traction)
may
also
be
referred
to
as
ASC
(Automat-
ic
Stability
Control)
and
ASC+T
(Automatic
Stability
Control+Traction)
.
The
AST
system
improves
traction
by
electronically
apply-
ing
the
rear
brakes
when
therear
drive
wheels
are
spinning
at
a
faster
rate
than
the
front
wheels
.
The
combined
ABS/AST
control
module,
operating
through
the
ABS
hydraulic
control
unit,
modulates
braking
force
at
therear
wheels
.
In
addition,
AST
uses
retarded
ignition
timing
and
an
auxil-iary
engine
throttle
plate
to
reduceengine
torque
and
maintain
vehicle
stability
.
The
auxiliary
throttle
plate
is
held
open
by
spring
pressure
.
The
AST
system
actívates
the
auxiliary
throttie
position
motor
(ADS)
to
cose
the
AST
throttle
as
needed
.
This
reduces
the
volume
of
engine
intake
air
.
Due
to
the
throttle
closing
very
rapidly
during
AST
operationthe
driver
cannot
increase
theengine
power
output
regardless
of
how
far
theaccelerator
pedal
is
pushed
to
the
floor
.
The
auxiliary
throttle
plate
is
placed
ahead
of
the
conven-
tional
throttle
plate
in
the
throttle
body
.
Traction
control
also
comes
into
operationduringdecelera-
tion
.
Decelerating
on
snowy
or
icy
road
surfaces
can
lead
to
rear
wheel
slip
.
If
a
rear
wheel
startsto
drag
or
lock
up
when
the
throttle
is
closed
rapidly
orduringdownshifting,the
AST
system
can
limit
the
problem
by
advancing
the
ignition
timing
.
A
switch
on
the
center
console
is
used
to
togglethe
AST
on
or
off
.
The
AST
system
is
designed
to
be
maintenance
free
.
There
are
no
adjustments
that
can
be
made
.
Repair
and
trouble-
shooting
of
the
AST
system
requires
special
test
equipment
andknowledgeand
should
be
performed
only
by
an
autho-
rized
BMW
dealer
.
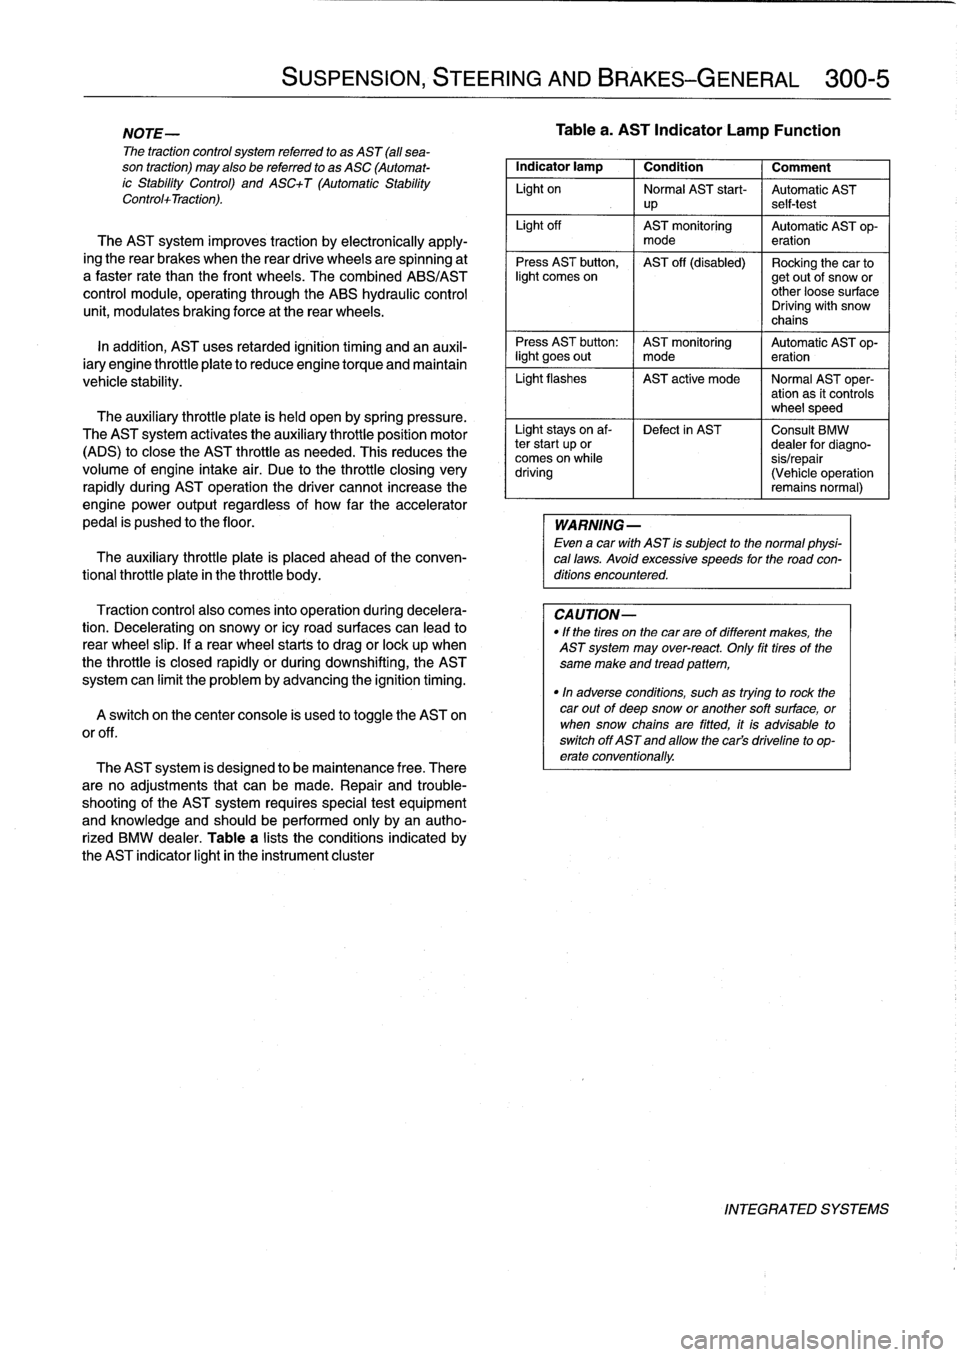
Table
a
lists
theconditions
indicated
by
the
AST
indicator
light
in
the
instrument
cluster
SUSPENSION,
STEERING
AND
BRAKES-GENERAL
300-5
Tablea
.
AST
Indicator
Lamp
Function
Indicator
lamp
1
Condition
1
Comment
Light
on
Normal
AST
start-
Automatic
AST
up
self-test
Light
off
AST
monitoring
Automatic
AST
op-
mode
eration
Press
AST
button,
AST
off
(disabled)
Rocking
the
car
tolight
comes
on
getout
of
snow
or
other
loose
surface
Driving
with
snow
chains
Press
AST
button
:
AST
monitoring
Automatic
AST
op-
light
goes
out
I
mode
eration
Light
flashes
AST
active
mode
I
Normal
AST
oper-
ation
as
it
controls
wheel
speed
Light
stays
on
af-
Defect
in
AST
Consult
BMW
ter
start
up
or
dealer
for
diagno-
comes
on
while
sis/repair
driving
(Vehicle
operation
remains
normal)
WARNING
-
Even
a
car
with
AST
is
subject
to
the
normal
physi-
cal
laws
.
Avoid
excessive
speeds
for
the
road
con-
ditions
encountered
.
CAUTION-
"
If
the
tires
on
the
carare
of
different
makes,
the
AST
system
may
over-react
.
Only
fit
tires
of
the
same
make
and
tread
pattem,
"In
adverse
conditions,
such
as
trying
to
rock
the
car
outof
deep
snow
or
another
soft
surface,
or
when
snow
chainsare
fitted,
it
is
advisable
to
switch
off
AST
and
allow
the
cars
driveline
to
op-
erate
conventionally
.
INTEGRATED
SYSTEMS
Page 306 of 759
400-
4
BODY-GENERAL
INTERIOR
EQUIPMENT
E36
interiors
have
a
unique
character,
with
a
combínation
of
sporty
features
and
innovative
design
.
Al¡
body
versions
were
made
in
a
wide
choice
of
interior
and
exterior
colors
.
New
colors
with
matching
leather
and/or
fabric
upholstery
were
in-
troduced
for
each
model
year,
including
light-alloy
wheels
in
new
designs
.
Driving
comfort
is
enhanced
by
power
steering,
tilt
steering
wheel
(optional),
height-adjustable
front
seats,
and
electrical-
ly
adjustable
and
heated
rear-view
mirrors
.
Inside
thecar
there
are
reading
lights
at
four
seating
positions
.
Seats
and
Seat
Belts
NOTE-
Theseat
base
usedon
cars
with
pyrotechnic
seatbelt
Anatom¡cal
ly-correct
seats
are
constructed
from
polyure-
tensioners
is
not
interchangeable
with
the
earlier
seat
thane
foam
containing
areas
or
"zones"
of
different
firmness
.
base
.
The
seat
bases
have
steel
springs
for
added
support
and
strength
.
The
power
seats
are
provided
with
conveniently
lo-
Instruments
and
Controls
cated
switches
along
the
outside
edge
of
the
seat
.
Heated
seats
are
an
option
in
all
models
.
See
520
Seats
for
more
de-
Everything
in
the
interior
passenger
compartment
essential
tails
.
to
the
driver
is
logically
grouped
and
easy
to
reach
.
Al¡
instru-
ments
and
controls
havebeen
arranged
ergonomically
and
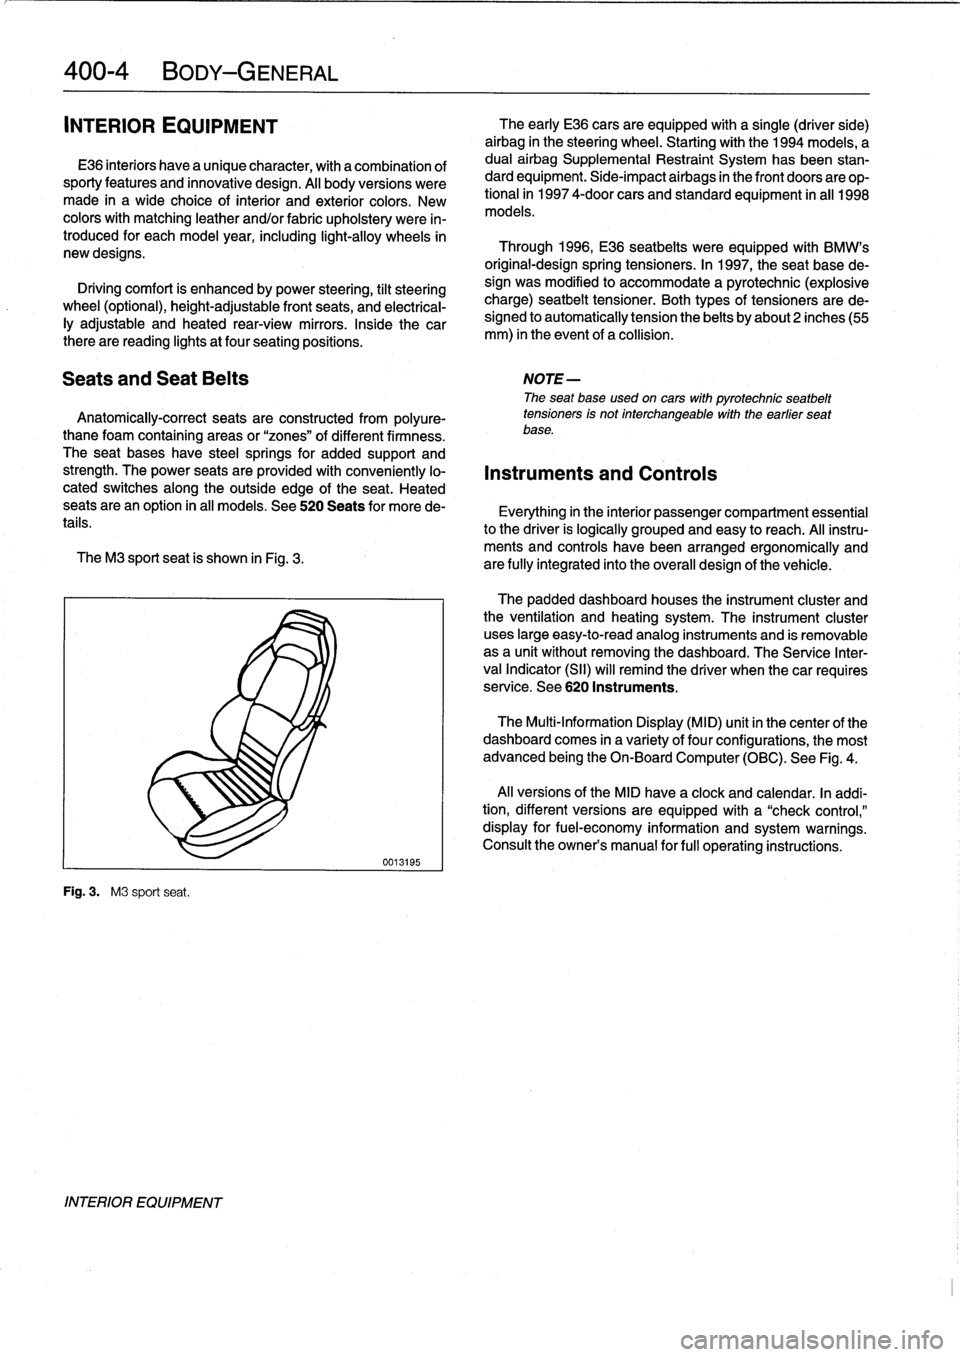
The
M3
sport
seat
is
shown
in
Fig
.
3
.
are
fully
integrated
into
the
overall
design
of
the
vehicle
.
Fig
.
3
.
M3
sport
seat
.
INTERIOR
EQUIPMENT
0013195
The
early
E36
cars
areequipped
with
a
single
(driver
side)
airbag
in
the
steering
wheel
.
Startingwith
the
1994
models,
a
dual
airbag
Supplemental
Restraint
System
has
been
stan-
dard
equipment
.
Side-impact
airbags
in
the
front
doors
are
op-
tional
in
1997
4-door
cars
and
standard
equipment
in
all
1998
models
.
Through
1996,
E36
seatbelts
were
equipped
with
BMW's
original-designspring
tensioners
.
In
1997,
the
seat
base
de-
sign
was
modified
to
accommodate
a
pyrotechnic
(explosive
charge)
seatbelt
tensioner
.
Both
types
of
tensioners
arede-
signed
to
automatically
tension
the
belts
by
about2
inches(55
mm)
in
the
event
of
a
collision
.
The
padded
dashboard
houses
the
instrument
cluster
and
the
ventilation
and
heating
system
.
The
instrument
cluster
uses
large
easy-to-read
analog
instruments
and
is
removable
as
a
unit
without
removing
the
dashboard
.
The
Service
Inter-
val
Indicator
(SII)
will
remind
the
driver
when
thecar
requires
service
.
See
620
Instruments
.
The
Multi-Information
Display
(MID)
unit
in
thecenter
of
the
dashboard
comes
in
a
variety
of
four
configurations,
the
most
advanced
being
the
On-Board
Computer
(OBC)
.
See
Fig
.
4
.
Al¡
versions
of
the
MID
have
a
clock
and
calendar
.
In
addi-
tion,
different
versions
areequipped
with
a
"check
control,"
display
for
fuel-economy
information
and
system
warnings
.
Consult
the
owner's
manual
for
fui¡
operating
instructions
.
Page 347 of 759
Dashboard,
removing
and
installing
1
.
Disconnect
negative
(-)
cable
from
battery
and
cover
terminal
with
insulating
material
.
CAUTION-
Prior
to
disconnectiog
the
battery,
read
the
battery
disconnection
cautionsgiven
at
the
front
of
this
manual
onpage
vi¡¡
.
2
.
Remove
center
console
as
described
earlier
.
3
.
Remove
glove
compartment
as
described
earlier
.
4
.
Remove
lower
left
dash
trim
piece
as
described
above
.
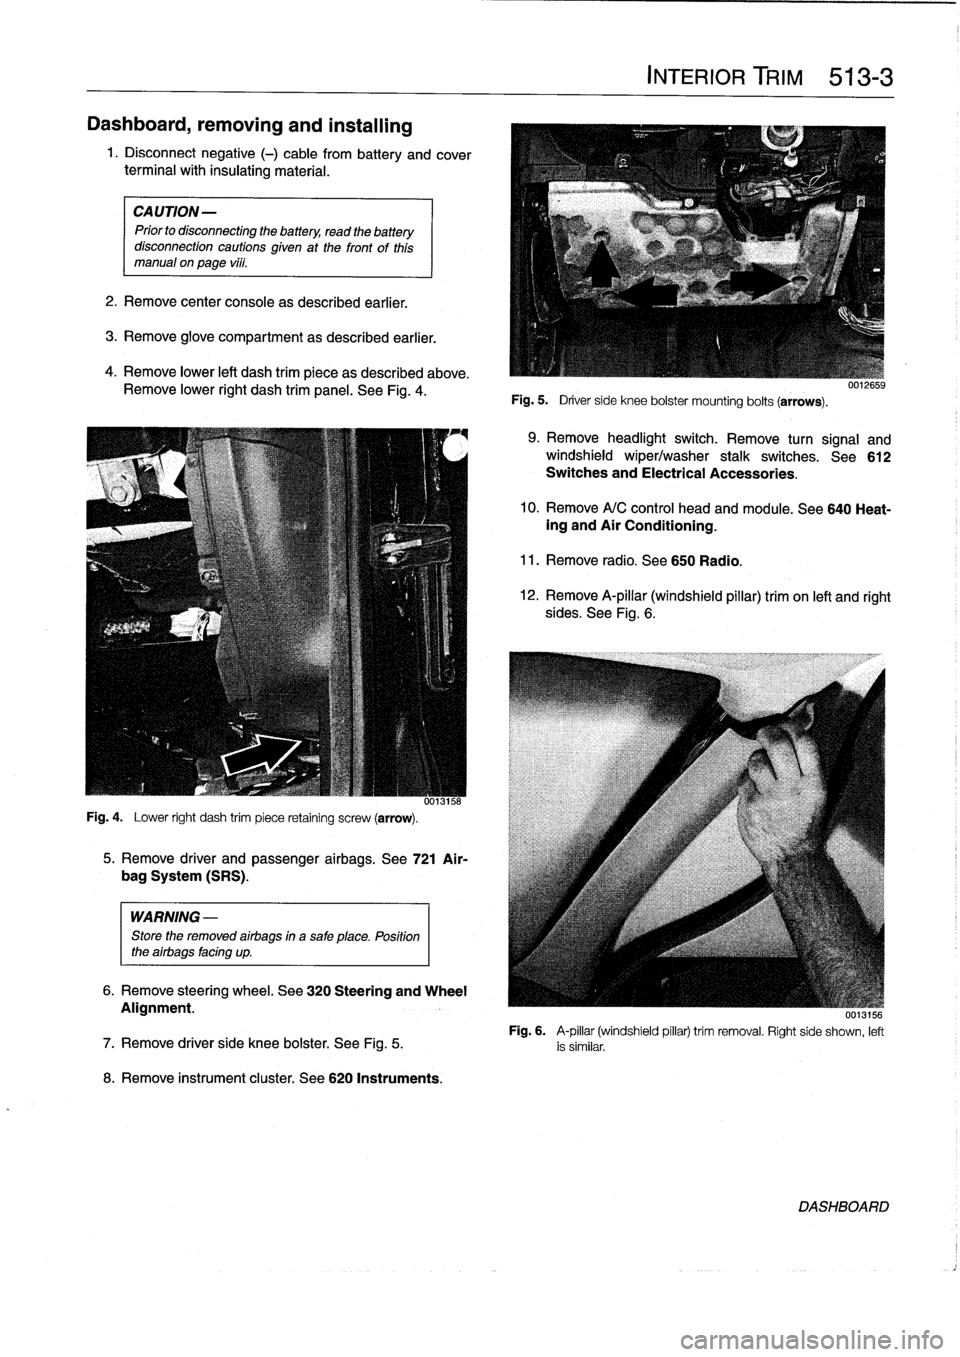
Remove
lower
right
dash
trim
panel
.
See
Fig
.
4
.
Fig
.
4
.
Lower
right
dash
trim
piece
retaining
screw
(arrow)
.
WARNING
-
Store
the
removed
airbags
in
a
safe
place
.
Position
the
airbags
facing
up
.
8
.
Remove
instrument
cluster
.
See
620
Instruments
.
5
.
Remove
driver
and
passenger
airbags
.
See
721
Air-
bag
System
(SRS)
.
6
.
Remove
steering
wheel
.
See
320
Steering
and
Wheel
Alignment
.
INTERIOR
TRIM
513-
3
Fig
.
5
.
Driver
side
knee
bolster
mounting
bolts
(arrows)
.
9
.
Remove
headlight
switch
.
Remove
turn
signal
and
windshield
wiper/washer
stalk
switches
.
See612
Switches
and
Electrical
Accessories
.
10
.
Remove
A/C
control
head
and
module
.
See
640
Heat-ing
and
Air
Conditioning
.
11
.
Remove
radio
.
See650
Radio
.
12
.
Remove
A-pillar
(windshield
pillar)
trim
on
left
and
right
sides
.
See
Fig
.
6
.
UU13156
Fig
.
6
.
A-pillar
(windshield
pillar)
trim
removal
.
Right
side
shown,
left
7
.
Remove
driver
side
knee
bolster
.
See
Fig
.
5
.
is
similar
.
DASHBOARD
Page 400 of 759
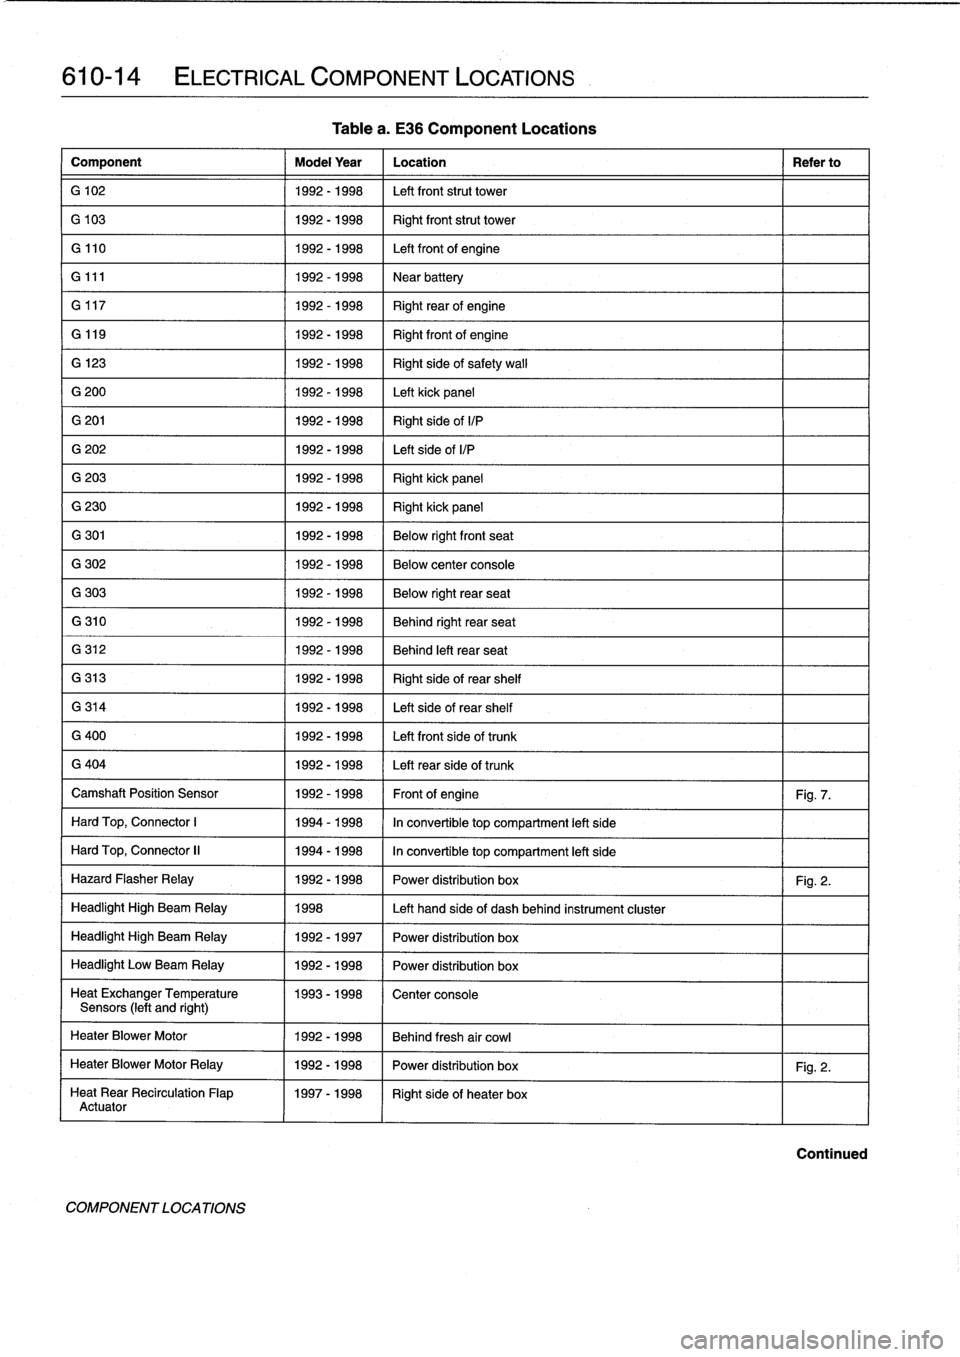
610-14
ELECTRICAL
COMPONENT
LOCATIONS
Component
Model
Year
Location
Refer
to
G
102
1992-1998
Left
front
strut
tower
G
103
1992-1998
Right
front
strut
tower
G
110
1992-1998
Left
front
of
engine
G
111
1992-1998
Near
battery
G
117
1992-1998
Right
rearof
engine
G
119
1992-
1998
Right
front
of
engine
G
123
1992-1998
Right
side
of
safety
wall
G
200
1992-1998
Left
kick
panel
G
201
1992-1998
Right
side
ofI/P
G
202
1992-1998
Left
side
ofI/P
G
203
1992-1998
Right
kick
panel
G
230
1992-1998
Right
kick
panel
G
301
1992-1998
Below
rightfront
seat
G
302
1992-1998
Below
center
console
G
303
1992-1998
Below
right
rear
seat
G
310
1992-1998
Behind
right
rear
seat
G
312
1992-1998
Behind
left
rear
seat
G
313
1992-1998
Right
side
of
rear
shelf
G
314
1992-1998
Left
side
of
rear
shelf
G
400
1992-1998
Left
front
side
of
trunk
G
404
1992-1998
Left
rearside
of
trunk
Camshaft
Position
Sensor
1992-1998
Front
of
engine
Fig
.
7
.
Hard
Top,
Connector
1
1994-1998
In
convertible
top
compartment
left
side
Hard
Top,
Connector
II
1994-1998
In
convertible
top
compartment
left
side
Hazard
Flasher
Relay
1992-1998
Power
distribution
box
Fig
.
2
.
Headlight
High
Beam
Relay
1998
Left
hand
side
of
dash
behind
instrument
cluster
Headlight
High
Beam
Relay
1992-1997
Power
distribution
box
Headlight
Low
Beam
Relay
1992-1998
Power
distribution
box
Heat
ExchangerTemperature
1993-1998
Center
console
Sensors
(left
and
right)
HeaterBlower
Motor
1992-1998
Behind
fresh
air
cowl
HeaterBlower
Motor
Relay
1992-1998
Power
distribution
box
Fig
.
2
.
Heat
Rear
Recirculation
Flap
1997-1998
Right
sideof
heater
box
Actuator
COMPONENTLOCATIONS
Tablea
.
E36
Component
Locations
Continued
Page 406 of 759
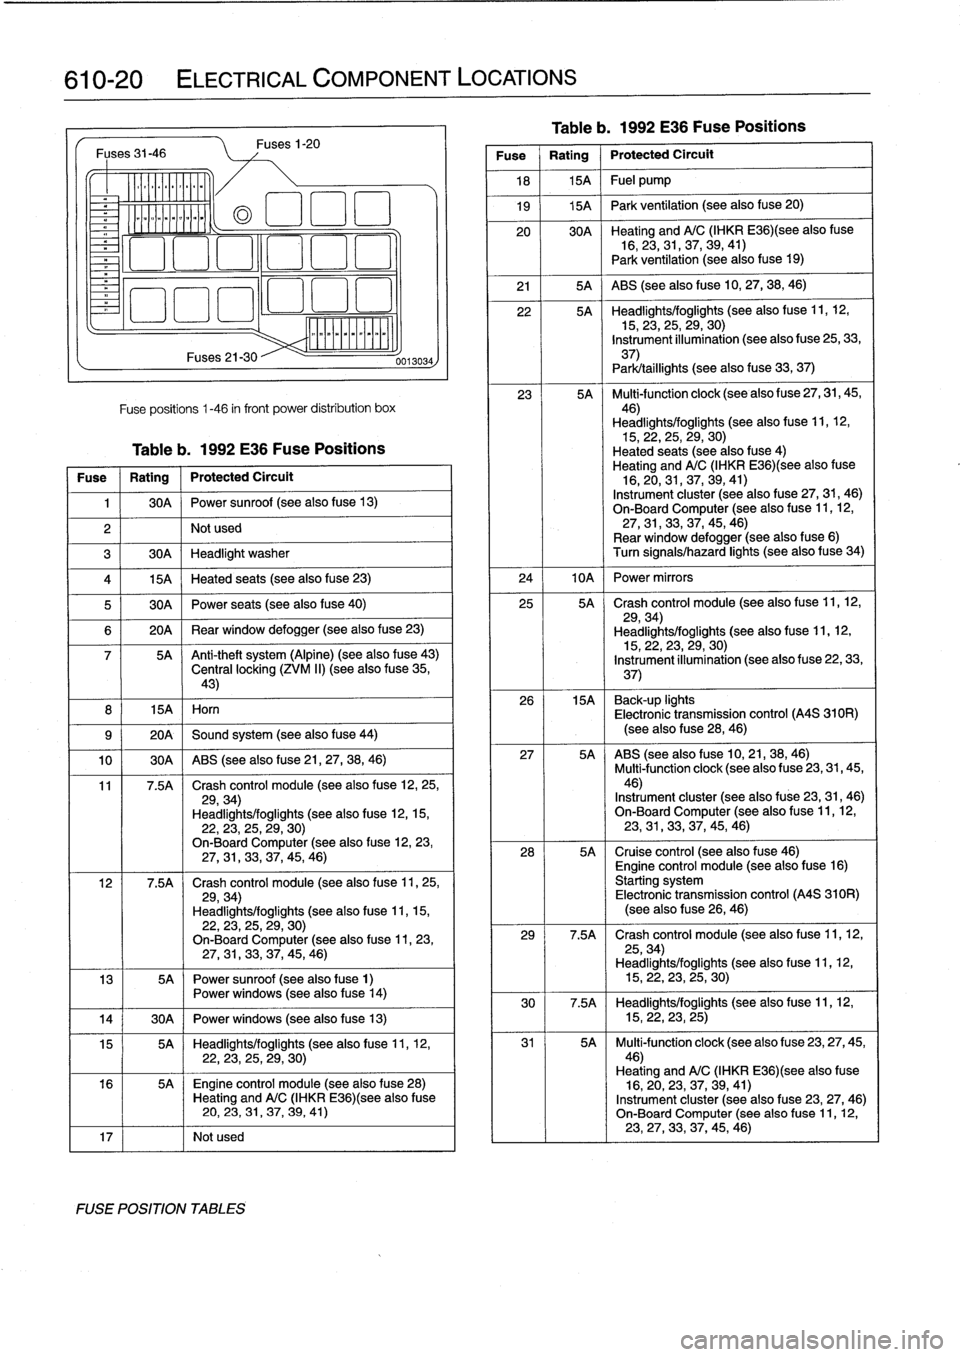
610-20
ELECTRICAL
COMPONENT
LOCATIONS
Fuses
31-46
o_
~oomoo
ommmo~
8
I
15A
I
Horn
Fuses21-30
Fuses
1-20
Fuse
positions
1-46
in
front
power
distribution
box
Table
b
.
1992
E36
Fuse
Positions
Fuse
1
Rating
1
Protected
Circuit
1
1
30A
1
Power
sunroof
(see
also
fuse
13)
2
I
I
Not
used
3
1
30A
1
Headlight
washer
(a
El
1
:1
El
4
1
15A
1
Heated
seats
(see
also
fuse
23)
5
1
30A
1
Power
seats
(see
also
fuse
40)
6
1
20A
1
Rear
window
defogger
(see
also
fuse
23)
7
5A
~
Anti-theft
system
(Alpine)
(see
also
fuse
43)
Central
locking
(ZVM
II)
(see
also
f
use
35,43)
9
(
20A
1
Sound
system
(see
also
fuse
44)
10
1
30A
1
ABS
(see
also
f
use
21,
27,
38,
46)
11
7
.5A
Crash
control
module
(seealso
fuse
12,25,
29,34)
Headlights/foglights
(see
also
fuse
12,15,22,23,
25,29,
30)
On-BoardComputer
(seealsofuse
12,
23,27,31,
33,37,
45,
46)
12
7
.5A
Crash
control
module
(see
also
f
use
11,
25,
29,34)
Headlights/foglights
(seealsofuse
11,15,
22,
23,25,
29,
30)
On-BoardComputer
(see
also
fuse
11,
23,27,
31,33,
37,45,
46)
13
5A
Power
sunroof
(see
also
fuse
1)
Power
windows
(see
also
f
use
14)
14
j
30A
1
Power
windows
(see
also
fuse
13)
15
5A
Headlights/foglights
(see
also
fuse
11,
12,22,
23,
25,29,
30)
16
5A
~
Engine
control
module
(seealsofuse
28)
Heating
andA/C
(IHKR
E36)(see
alsofuse
20,
23,
31,37,
39,
41)
17
I
I
Notused
FUSE
POSITION
TABLES
0013034
Table
b
.
1992
E36
Fuse
Positions
Fuse
Rating
Protected
Circult
18
1
15A
1
Fuel
pump
19
j
15A
1
Park
ventilation
(see
also
fuse
20)
20
30A
~
Heating
andA/C
(IHKR
E36)(see
alsofuse
16,23,31,37,39,
41)
Park
ventilation
(see
also
f
use
19)
21
1
5A
{
ABS
(see
also
fuse
10,27,
38,46)
22
5A
Headlights/foglights
(see
also
f
use
11,12,15,
23,
25,29,
30)
Instrument
illumination
(see
also
fuse
25,33,
37)
Park/taillights
(seealsofuse
33,
37)
23
5A
Multi-function
clock
(see
also
fuse
27,
31,
45,
46)
Headlights/foglights
(see
also
fuse
11,12,15,22,25,
29,30)
Heated
seats
(seealsofuse
4)
Heating
andA/C
(IHKR
E36)(see
alsofuse
16,20,31,37,39,
41)
Instrument
cluster
(see
also
fuse
27,31,
46)
On-Board
Computer
(seealso
fuse
11,
12,
27,31,
33,
37,45,
46)
Rear
window
defogger
(see
alsofuse
6)
Turn
signals/hazard
lights
(seealsofuse
34)
24
I
10A
I
Power
mirrors
25
5A
Crash
control
module
(see
also
f
use
11,12,
29,34)
Headlights/foglights
(see
also
fuse
11,12,15,22,23,29,
30)
Instrument
illumination
(see
also
fuse
22,
33,
37)
26
15A
~
Back-up
lights
Electronic
transmission
control
(A4S
310R)
(seealsofuse
28,46)
27
5A
ABS
(see
also
fuse
10,21,38,
46)
Multi-function
clock
(see
also
fuse
23,
31,
45,46)
Instrument
cluster
(see
also
fuse
23,
31,46)
On-BoardComputer
(see
also
fuse
11,12,23,
31,
33,37,45,
46)
28
5A
Cruise
control
(see
alsofuse
46)
Engine
control
module
(see
alsofuse
16)
Starting
system
Electronic
transmission
control
(A4S
310R)
(see
also
f
use
26,
46)
29
7
.5A
Crash
control
module
(see
also
fuse
11,12,
25,34)
Headlights/foglights
(see
also
fuse
11,12,15,22,23,
25,
30)
30
7
.5A
Headlights/foglights
(see
also
fuse
11,
12,
15,22,23,
25)
31
5A
Multi-function
clock
(see
alsofuse
23,27,
45,46)
Heating
andA/C
(IHKR
E36)(see
also
fuse
16,20,
23,
37,39,
41)
Instrument
cluster
(seealso
fuse
23,
27,46)
On-Board
Computer
(see
also
f
use
11,12,23,27,
33,
37,45,
46)